Enabling Intune integration
You can use Shopping 6.0 or later with Microsoft Intune in much the same way as with Configuration Manager.
Note
This page was correct at the time of publishing. Microsoft update their Azure configuration website frequently, so some screenshots and instructions on this page may not exactly match the latest version. Please contact Microsoft or your 1E Account Team if you have difficulties with any of the instructions given below.
Requirements
We assume that you have a working Intune and Azure Active Directory (AAD) environment.
Intune
To use Shopping's Intune integration, then you require the following:
A working Intune instance
Clients must be Intune enabled for them to receive Intune applications
User accounts must have email addresses
The relevant Shopping Requirements must be met.
You can then:
Define the two Azure Active Directory (AAD) authentication applications required
Configure administrator and service accounts, the UPN suffix for these two accounts should match in on-premises AD and AAD
Make appropriate settings for Intune in Shopping
Enable the Configuration Manager co-management feature.
Using the Intune integration is very similar to using Configuration Manager, with Shopping for both administrators and end-users.
Azure Active Directory Connect
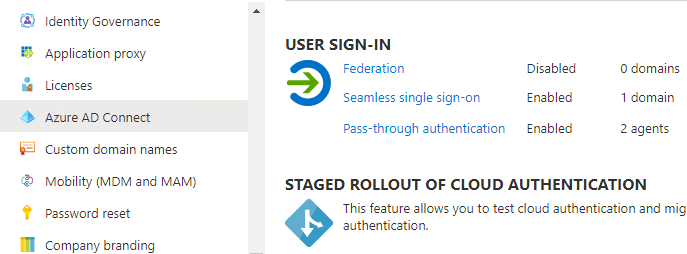
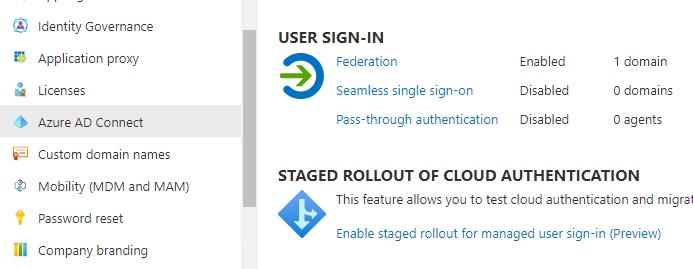
Azure AD Connect must be in hybrid mode and have either of these two options enabled:
Pass-through authentication with Seamless single sign-on (SSO)
Federation.
Both options are shown in the screenshots.
If these options are not available to you, then you must use the Client App Client Secret method of authentication.
Warning
The Client Secret method is available only if you install the latest Accumulated Hotfix for Shopping Central.
Note
You will need to configure Azure AD Connect in your on-premises environment. Doing this will add your users from the local domain into your Azure Active Directory.
Please refer to Microsoft documentation for details about installing and configuring Azure AD Connect:
Define the two AAD authentication applications required
In Intune, you'll need to set up two authentication applications for Shopping. These are also known as Authentication Client Apps.
Console authentication application – in this example named ShoppingConsoleAuthenticationClientApp
Central Service authentication application – in this example named ShoppingServiceAuthenticationClientApp
Warning
Use the following steps to create and configure each App. It is vital to get the right configuration in order for Shopping to work with Intune.
In most cases the configuration steps are the same for each App, and will tell you where they are different, be careful as it is easy to get confused between each App.
We recommended you configure one App at a time, going through the whole sequence of steps. If you want to configure both Apps at the same time, then do so using separate browser windows.
Note
Depending on the version of Microsoft Azure you use, although you may see some differences in the UI, the steps required to set up the authentication applications will be the same.
You can find related Microsoft documentation at https://docs.microsoft.com/en-us/graph/permissions-reference.
Note
Most of the steps in the sequence are required for both Console and Central Service authentication applications. Where there are exceptions and the instructions apply to one or the other, they will be explicitly called out.
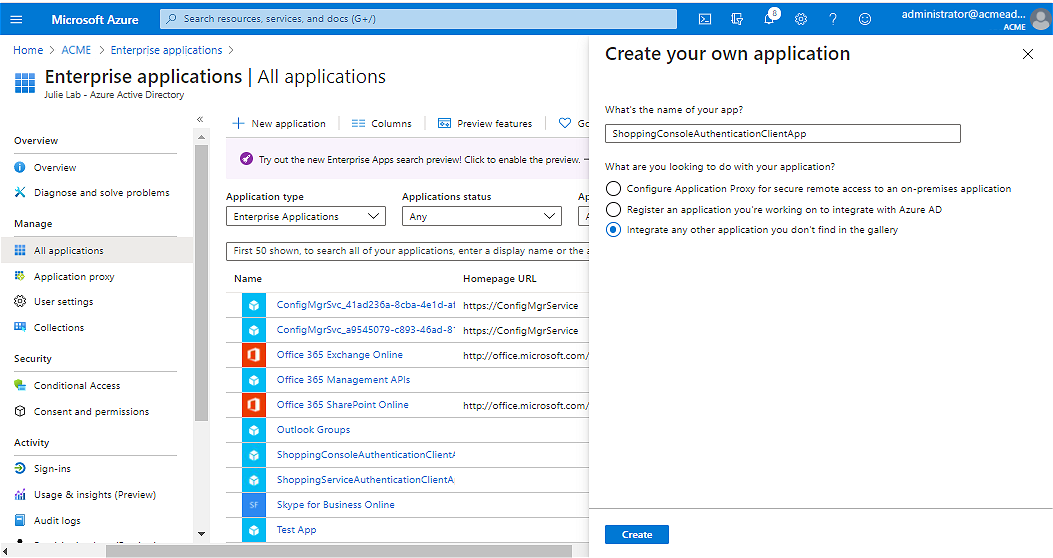
Create your own application
In your AAD console, go to the Enterprise applications node and click New application.
In the Create your own application blade:
Provide a name for the application.
Console authentication application, in this example named ShoppingConsoleAuthenticationClientApp
Central Service authentication application, in this example named ShoppingServiceAuthenticationClientApp
Select Integrate any other application you don't find in the gallery
Click on the Create button.
Tip
The application names are not important except for ease of identification. The essential distinction is that one relates to the Shopping console (as used by administrators) and the other relates to the Shopping Central service (as used by Shopping itself).
Note
At this point and similar points where objects are created or adjusted, you should see a success message in the upper right corner of the AAD console.
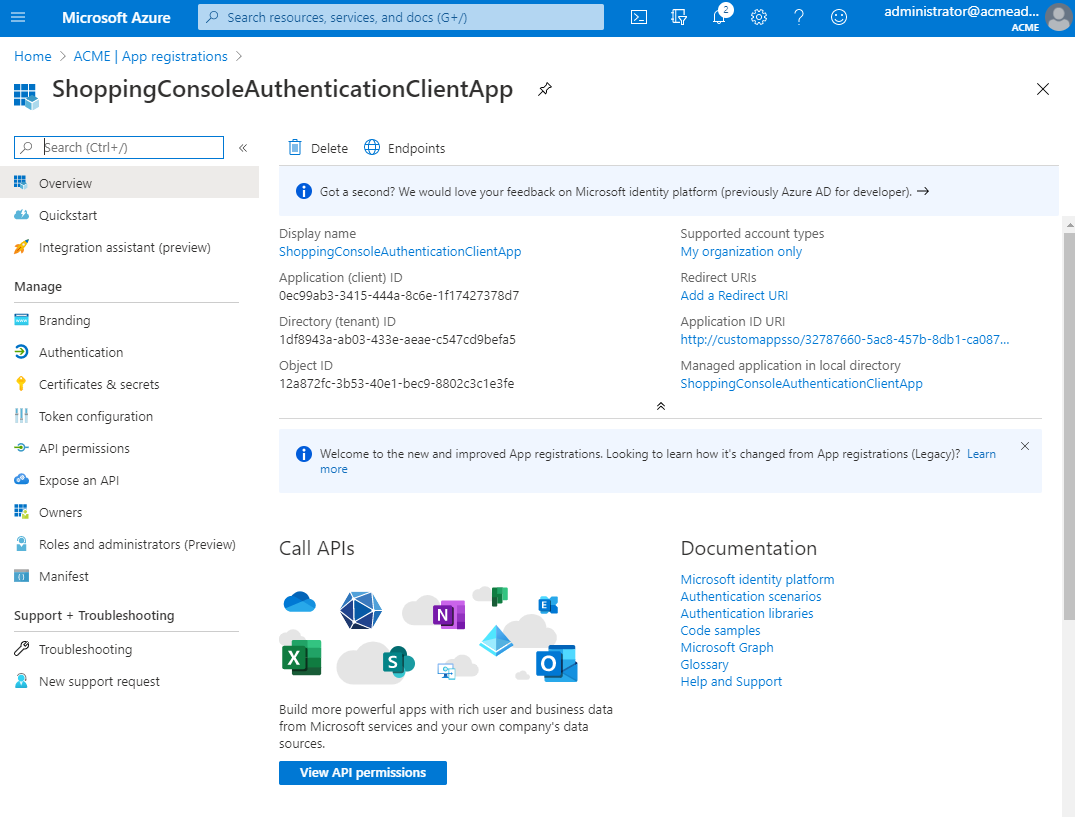
Note the Application (client) ID
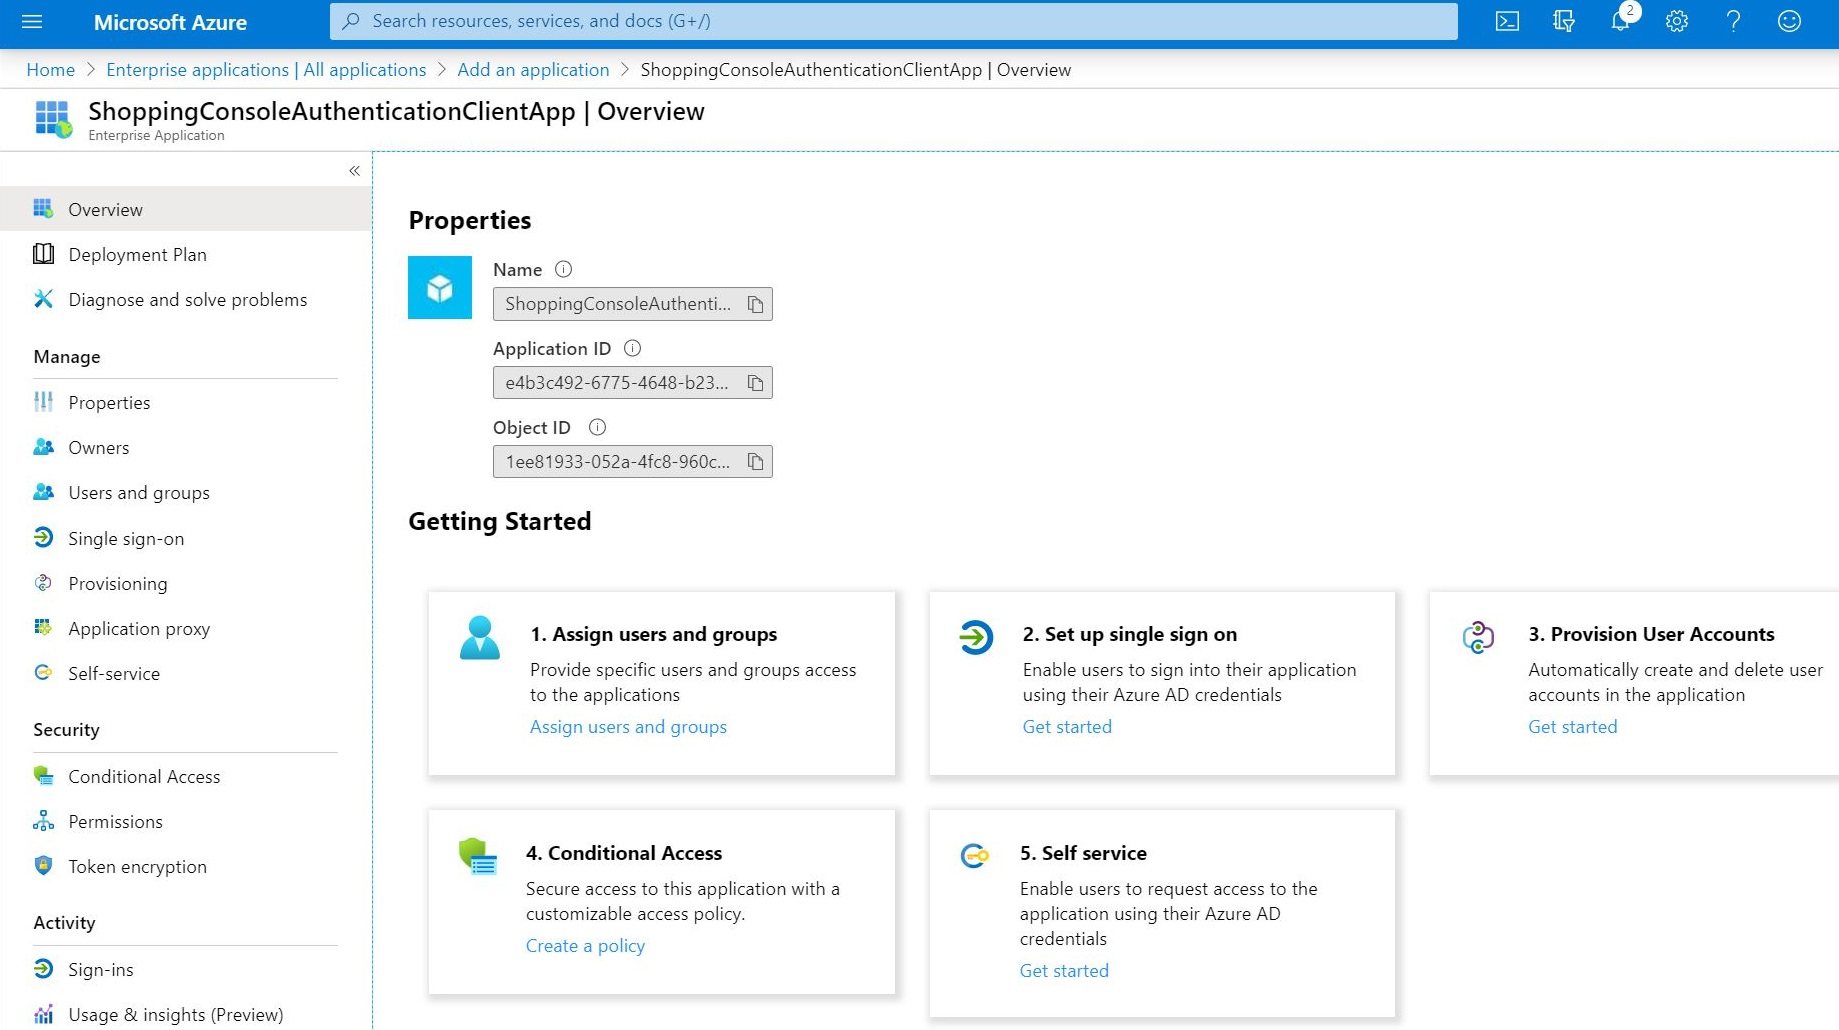
You will then see an Overview tab.
You will need the Application (client) ID when you configure Shopping (as detailed in During installation or upgrade below), so copy it to a text or document file you can reference later. While you can retrieve the Application (client) ID at any time, this is a convenient opportunity to do so.
Ensure you note which application the ID corresponds to:
Console authentication application – in this example named ShoppingConsoleAuthenticationClientApp
Central Service authentication application – in this example named ShoppingServiceAuthenticationClientApp
Add users and groups to the application
On the Overview page, click on the 1. Assign users and groups tile.
On the Users and groups page, click on Add user (which can also be used to add groups).
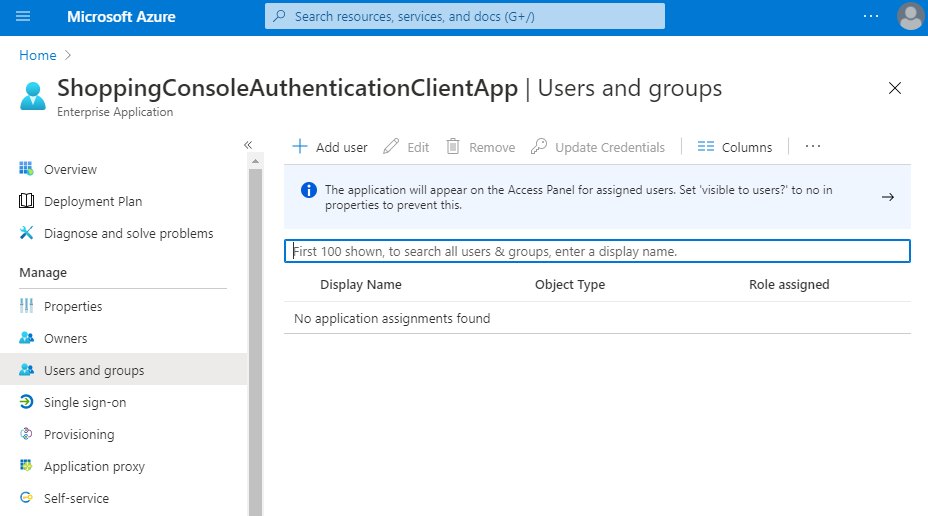
Click on the Users and groups None Selected row.
If you are using an evaluation version of AAD, a message will be displayed on this page indicating that groups are not available for assignment. AAD groups are not required for Shopping's Intune integration (though it's recommended to use them).
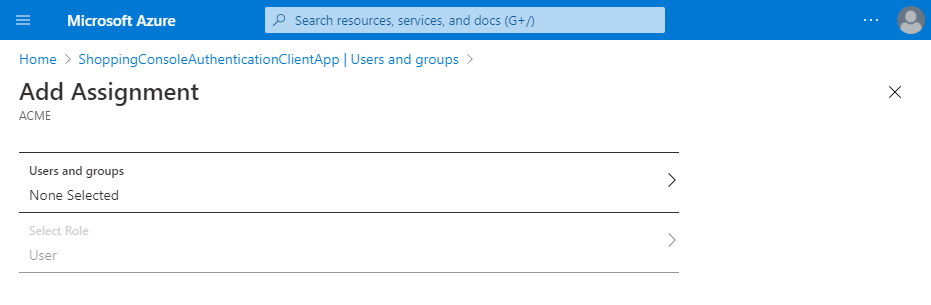
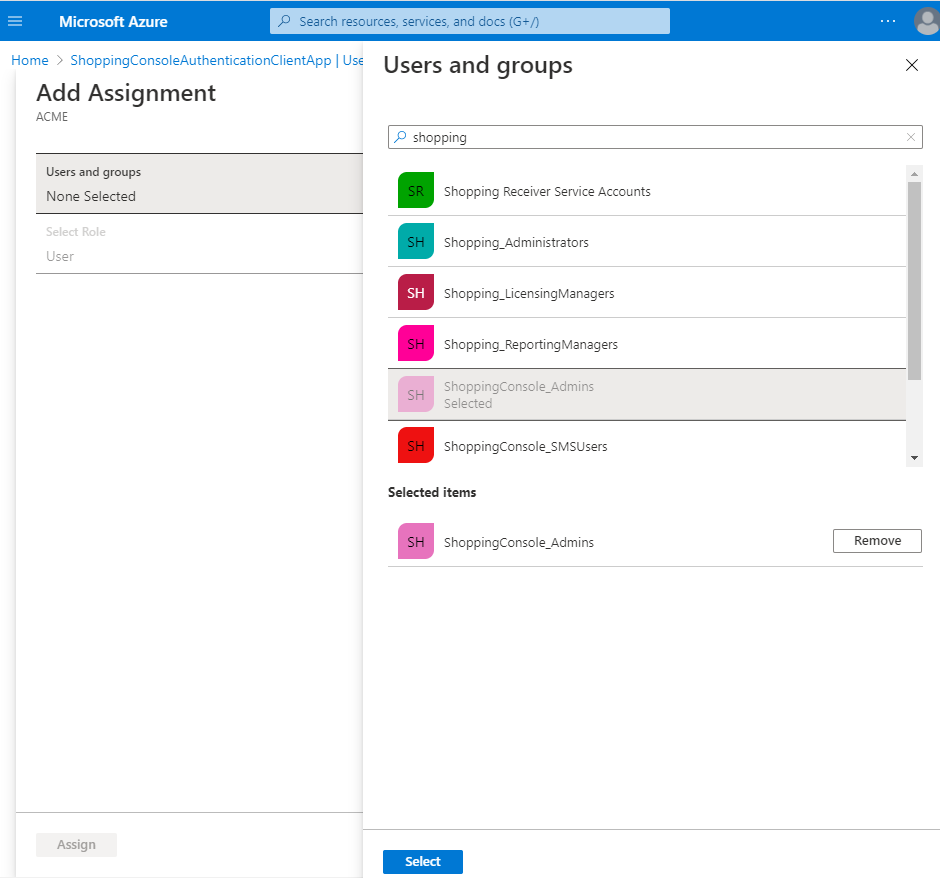
Select from the Users and groups as appropriate.
For the Console authentication application, this should be group(s) or users that you expect to use the Shopping console. In our example, for the console app we choose the group ShoppingConsole_Admins used for our Active Directory implementation.
For the Central Service authentication application, this should be the Shopping Central service account.
Tip
All the accounts or groups have to be from your Active Directory implementation (as opposed to being AAD-only accounts or groups). If you are not sure which are AD users or groups, use another AAD console and review the users and groups under the corresponding nodes. AD users and groups have a source of Windows Server AD.
Note
The users and groups you click on will be listed under Selected Items.
Click on Select to make the selections effective.
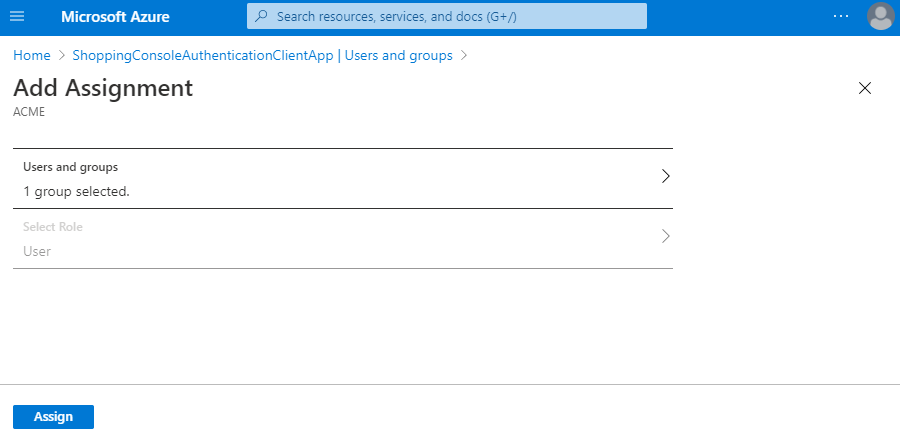
The number of users and/or groups will be displayed. If this is correct, click the Assign button.
The users and/or groups will be displayed under the Users and groups node for the application.
Configure the App registrations
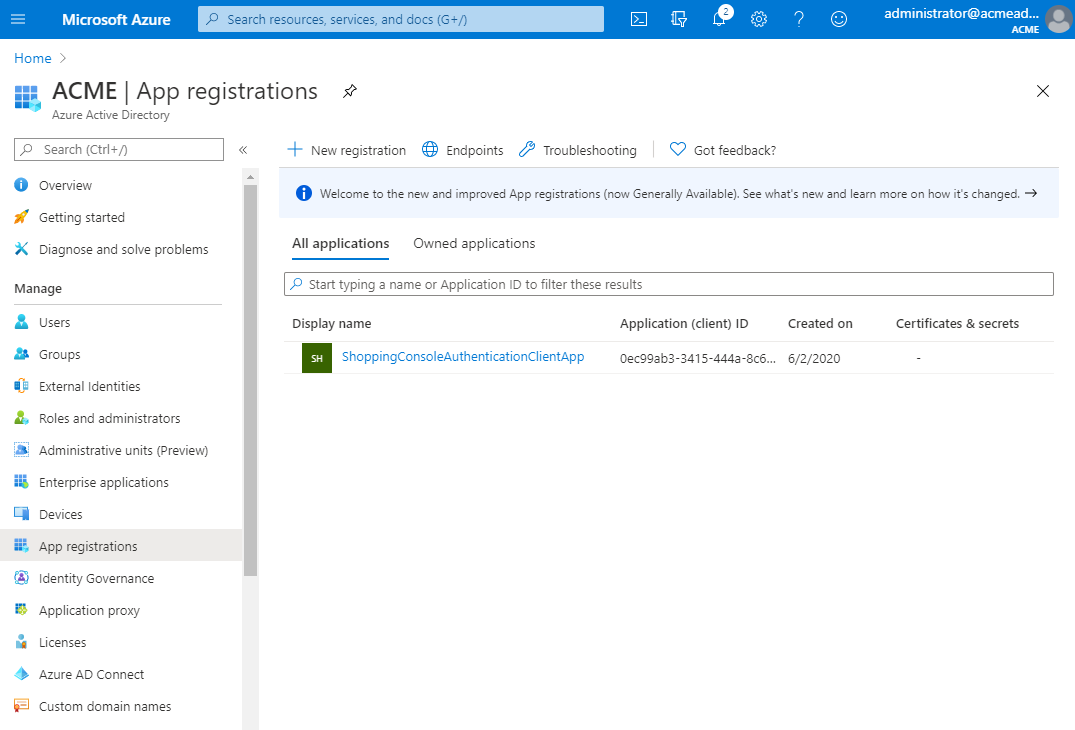
Click the App registrations node of your AAD directory. Click All applications. You will see your application (or applications) listed.
Click on the application name.
Configure API permissions for the App registration
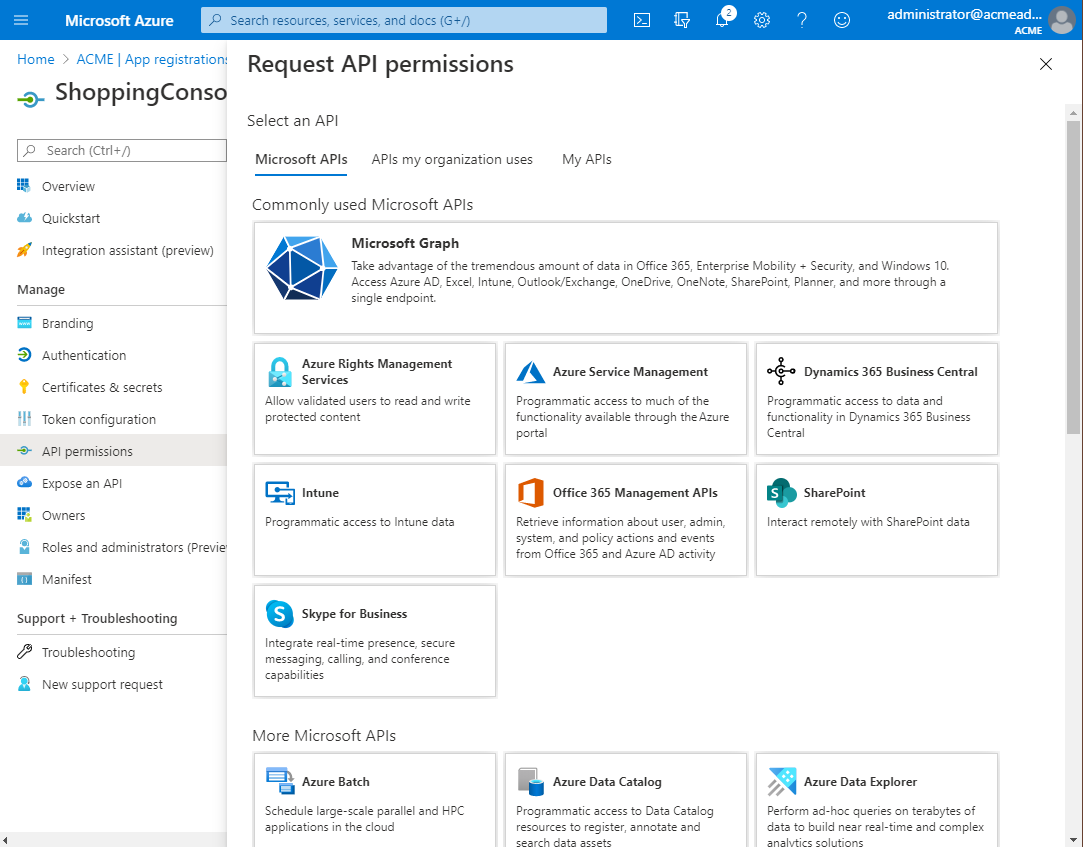
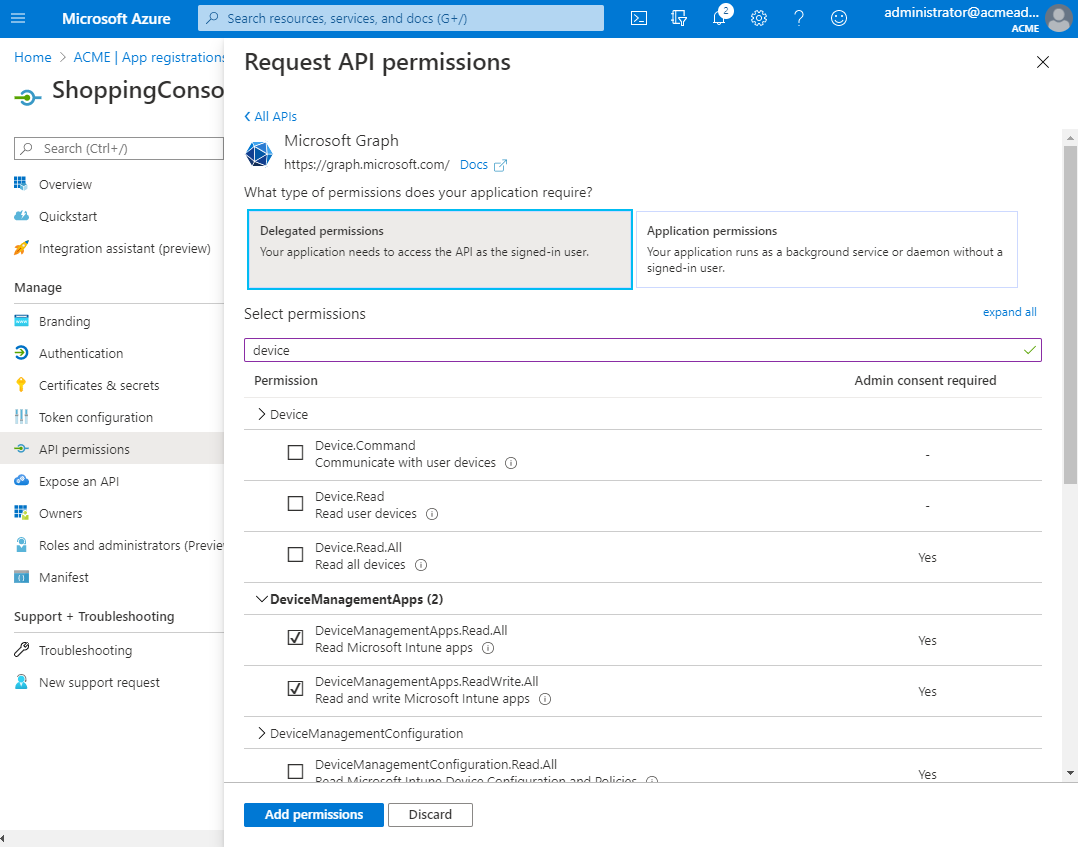
In the Overview node of the selected application, click on the API permissions node, then click Add a permission.
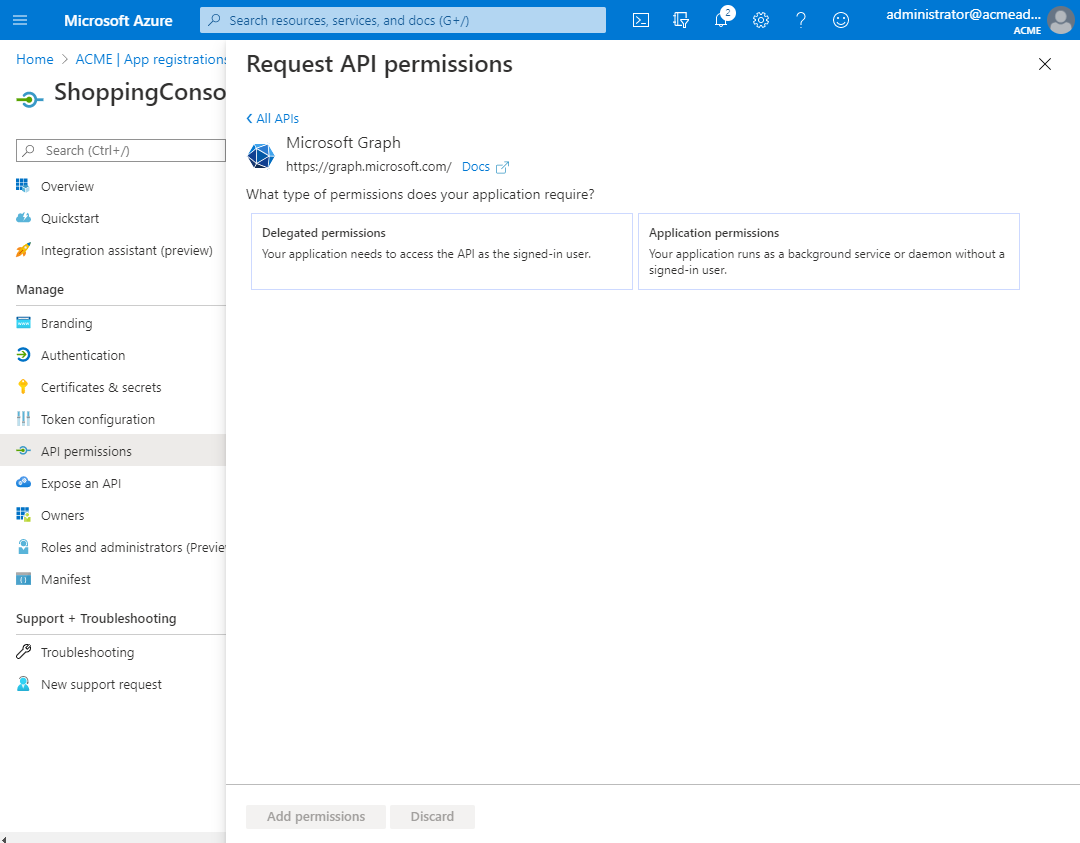
In the Request API permissions dialog, click on the Microsoft Graph tile.
Click on Delegated permissions.
Note
If you are using Client Secrets and not Seamless SSO, you will need to choose Application permissions. You will also need to create a new client secret.
To add a client secret:
Click on the Certificates & secrets node and then click on the New client secret button.
The Add a client secret form will open, add a Description and select an expiry from the Expires radio buttons and then click Add.
Copy the new client secret value and save it, as you won't be able to retrieve it after you perform another operation or leave this blade.
Warning
If you do not copy the Value at this point, when you navigate away from the Certificates & secrets screen, you will be unable to copy it again. This means that you will have to delete the Secret and recreate it.
You will see a long list of API permissions, the list will be slightly different depending on whether you are using Application or Delegated permissions.
Scroll through them and check them as appropriate, then, click Add permissions.
For the Console authentication application, check off the following:
Permission | Purpose |
|---|---|
DeviceManagementApps.Read.All | To get application status, application type, and target type. |
DeviceManagementManagedDevices.Read.All | To discover devices when Trigger User and Device Intune Sync button is clicked. |
Directory.Read.All | To discover users. Also, to verify groups have been successfully added to the directory. |
User.Read.All | To get user email address. |
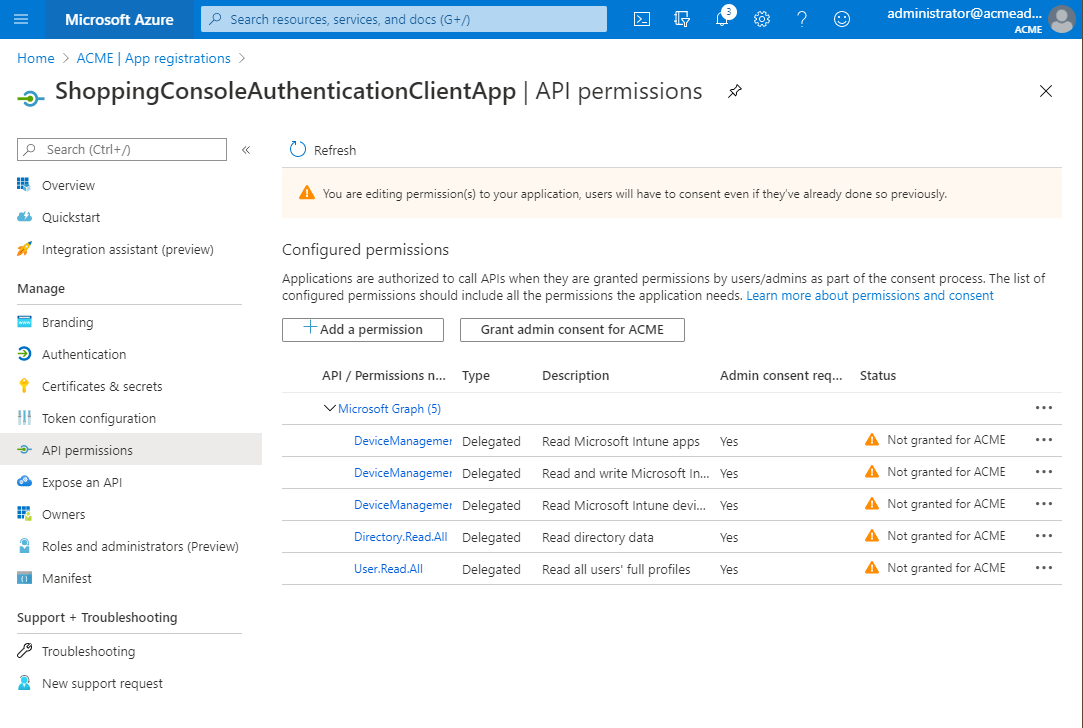
For the Central Service authentication application, check off the following:
Permission | Purpose |
|---|---|
DeviceManagementApps.Read.All | To get application status, application type, and target type. Also, to verify application assignments. |
DeviceManagementApps.ReadWrite.All | To add assignment to an Intune application. |
DeviceManagementManagedDevices.PrivilegedOperations.All | To initiate client synchronization (to expedite deployments). |
DeviceManagementManagedDevices.Read.All | To discover devices when the Shopping Central service is started and then routinely after that. |
Directory.AccessAsUser.All | To discover users and groups to whatever extent, the Shopping service account is permitted. NoteNot available for Application scope. |
Directory.Read.All | To discover users. Also, to verify groups have been successfully added to the directory. |
Directory.ReadWrite.All | So, groups are can be added to or removed from the directory. This is required when creating groups in Azure for an Intune application by the Shopping Central Service during the assignment creation process. |
Group.ReadWrite.All | To create or remove groups to assign Intune applications to that have been added to Shopping. This is required while creating or removing assignments to an Intune application on groups by the Shopping Central Service during the assignment creation process. |
GroupMember.ReadWrite.All | To add or remove users or devices from a group, and to verify they've been added or removed as intended. This is required when adding or removing users or devices to and from a group by the Shopping Central Service during order processing of an Intune application. |
User.Read.All | To get status when app is user targeted. |
User.ReadBasic.All | To get user email address. NoteNot available for Application scope. |
Click Grant admin consent for <tenant> In our example, the tenant is ACME.
Note
This means that as a tenant administrator for your organization, you're consenting that the users of the application would want to use these permissions. The users in this case would be people that would use the Shopping console and/or set up the Shopping service.
Configure Authentication for the App registration
Click on the Authentication node.
Scroll to the bottom of the page and under Advanced settings select Yes to enable the public client flows.
Click Save.
Note
For Shopping's purposes, this allows the use of Integrated Windows Authentication.

Configure Administrator and Service Accounts
Note
If you use the client secret method, you do not need to complete the Configure Administrator and Service Accounts steps.
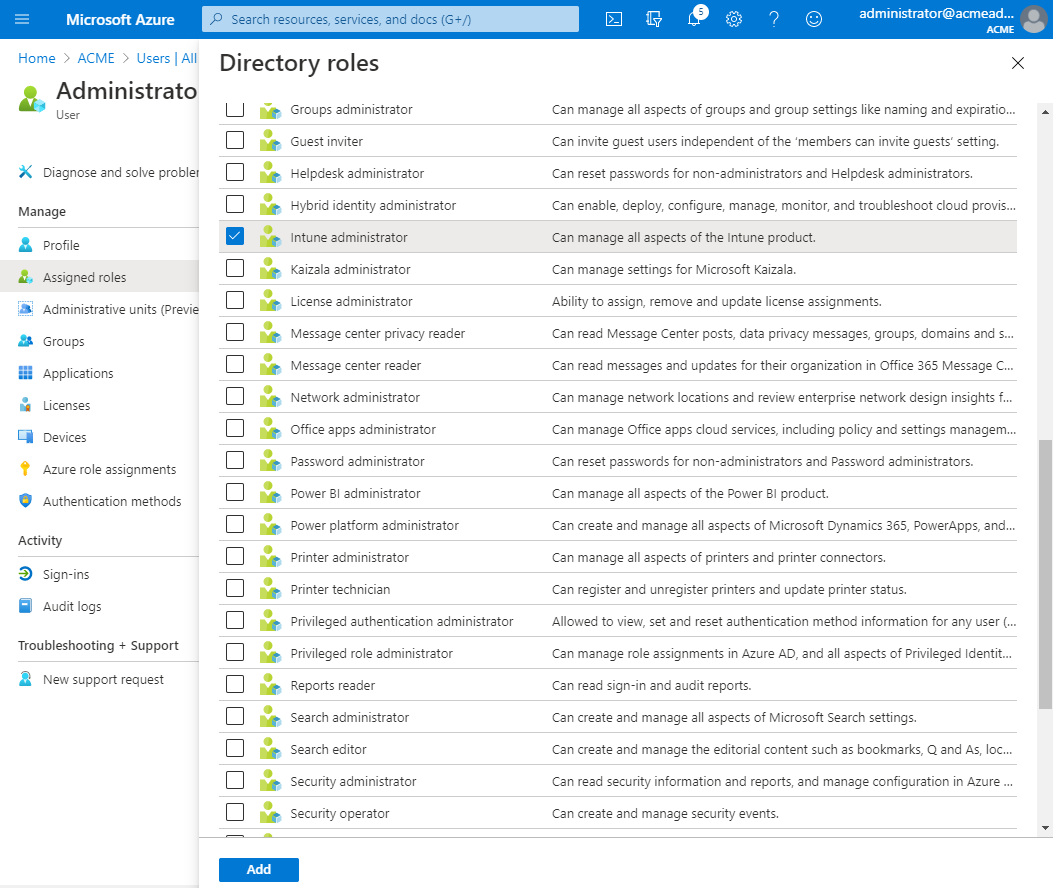
In the AAD console, click Users and select the name of a user that will be a Shopping console user and who might need to manage Intune applications or initiate AAD user and device synchronization.
Click on the Assigned roles node.
Click Add assignments.
Check the Directory role called Intune administrator and click Add.
Note
You must repeat this process for the service account used to run the Shopping Central service. Both the Shopping console user and Shopping Central service accounts must be licensed for Intune.
Note
The user account must be a hybrid account and so in the list of users the source of the account must be Windows Server AD.
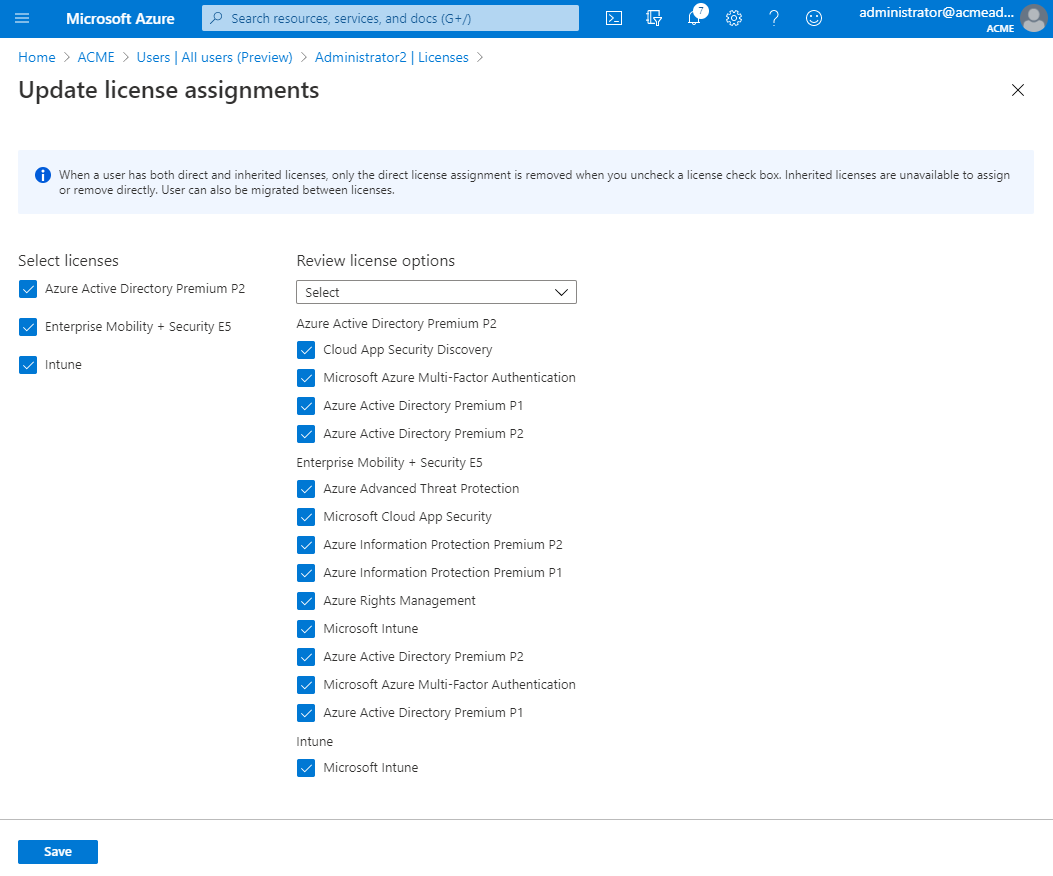
Update license assignments
In the AAD console, go to the list of users and select the name of a user that will be a Shopping console user and who might need to manage Intune applications or initiate AAD user and device synchronization. The steps below are also required for the Shopping Central service account to synchronize users and devices from Intune.
Note
The usage location for your chosen user and for the Shopping Central Service account must be defined in their User Profile in AAD, otherwise you will get a License cannot be assigned to a user without a usage location specified error.
Click on the Licenses node.
Click on Assignments.
Select an appropriate license, such as Enterprise Mobility + Security E5.
Click Save.
Make appropriate settings for Intune in Shopping
You can do this either during an installation or upgrade or from the Shopping Admin Console after an installation or upgrade.
During installation or upgrade
Early in the Shopping Central installation wizard, when you specify the installation type you can indicate whether Intune integration should be enabled by checking Enable integration with Intune.
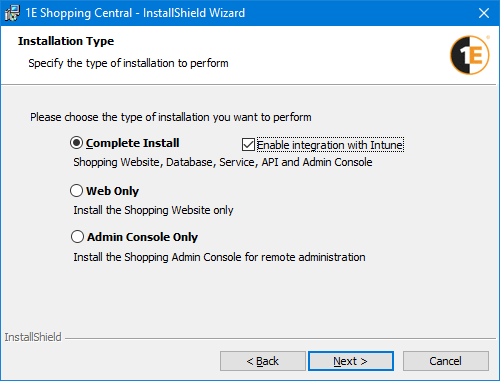
If you enabled integration with Intune, later in the installation wizard you can specify the Intune Integration details:
ID | Note |
|---|---|
Azure tenant ID | This is the same as your Azure tenant ID, available in the Overview node of your AAD console. |
Service authentication client app ID | Available in the Overview node for the app in the App Registrations or Enterprise applications nodes of your AAD console. |
Console authentication client app ID | Available in the Overview node for the app in the App Registrations or Enterprise applications nodes of your AAD console. |

After installation or upgrade
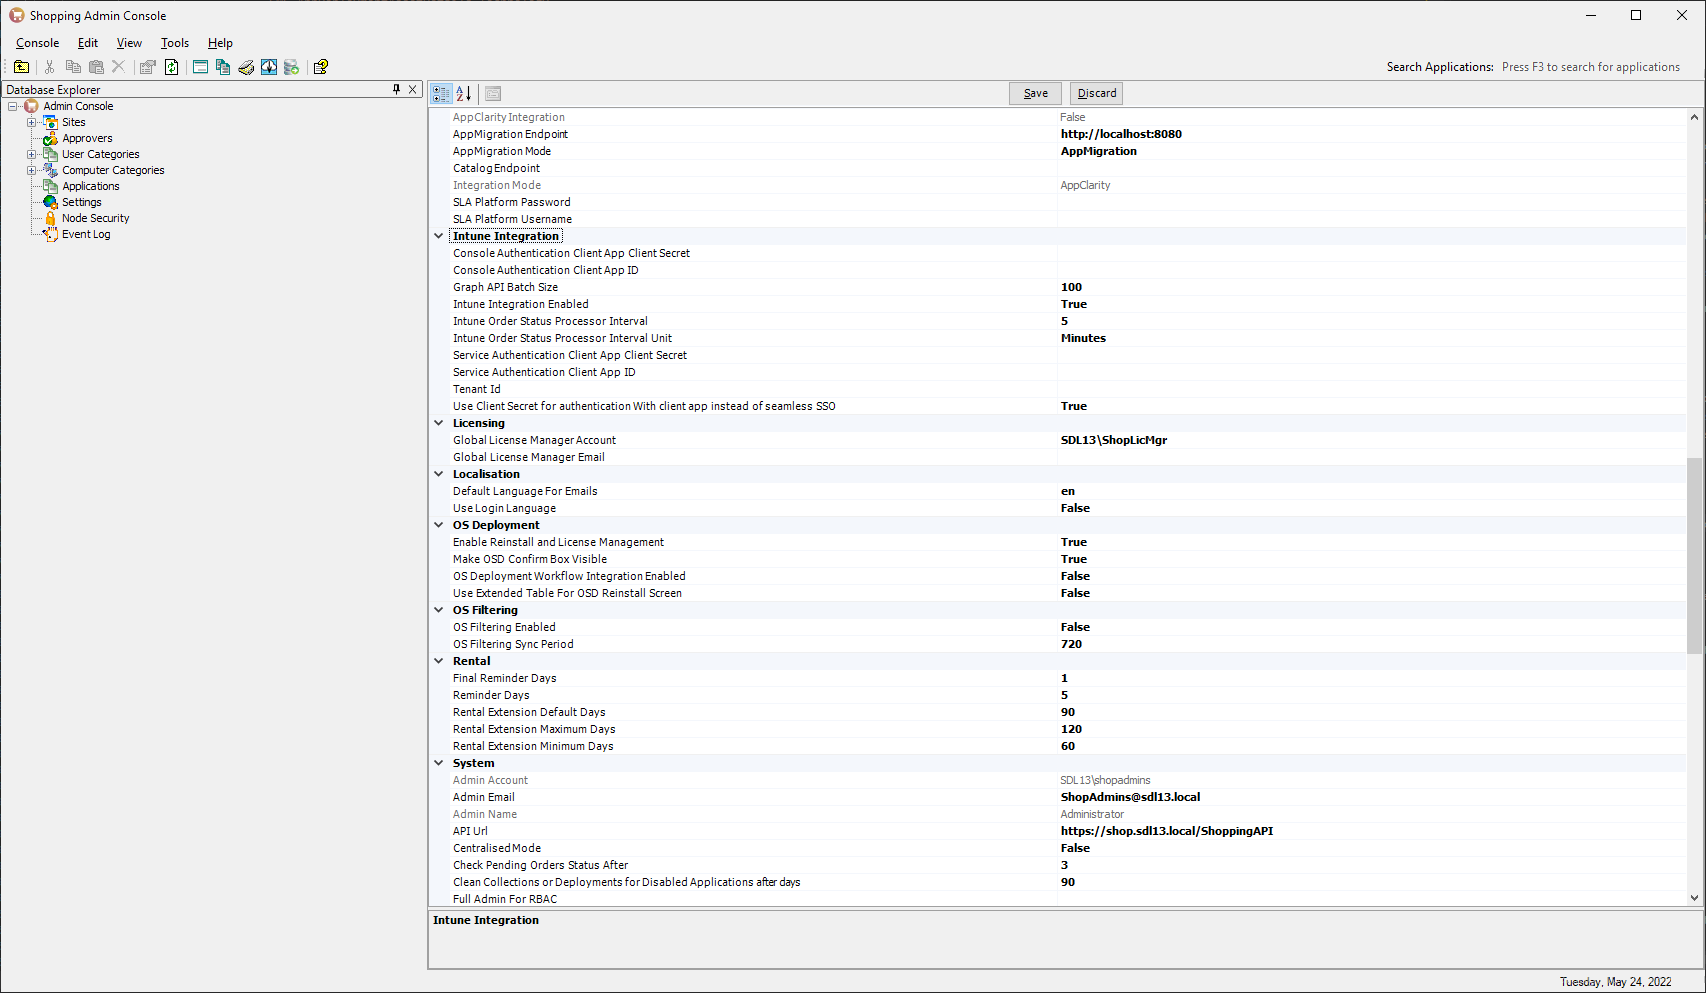
You could have enabled Intune integration while installing Shopping or upgrading to it. If you did not do so, start the Shopping Admin Console and go to the Intune Integration group of settings in the Settings node.
You will need the following details:
Intune Integration | Note |
|---|---|
Console Authentication Client App Client Secret | Client Secret of authentication client app in Azure with limited permissions used by Shopping Admin Console. NoteThis setting is available only if you have installed the latest Accumulated Hotfix. |
Console Authentication Client App ID | Available in the Overview node for the app in the App Registrations or Enterprise applications nodes of your AAD console. |
Intune Integration Enabled | True. |
Service Authentication Client App Client Secret | Client Secret of authentication client app in Azure used by Shopping Central Service. NoteThis setting is available only if you have installed the latest Accumulated Hotfix. |
Service Authentication Client App ID | Available in the Overview node for the app in the App Registrations or Enterprise applications nodes of your AAD console. |
Tenant Id | This is the same as your Azure Tenant ID, available in the Overview node of your AAD console. |
Use Client Secret for authentication with client app instead of seamless SSO | To use client secrets instead of seamless SSO to acquire authentication token of respective client app to query Intune portal using Graph API calls. NoteThis setting is available only if you have installed the latest Accumulated Hotfix. |
Click Save.
Restart the Shopping Central service and then the Shopping Admin Console.
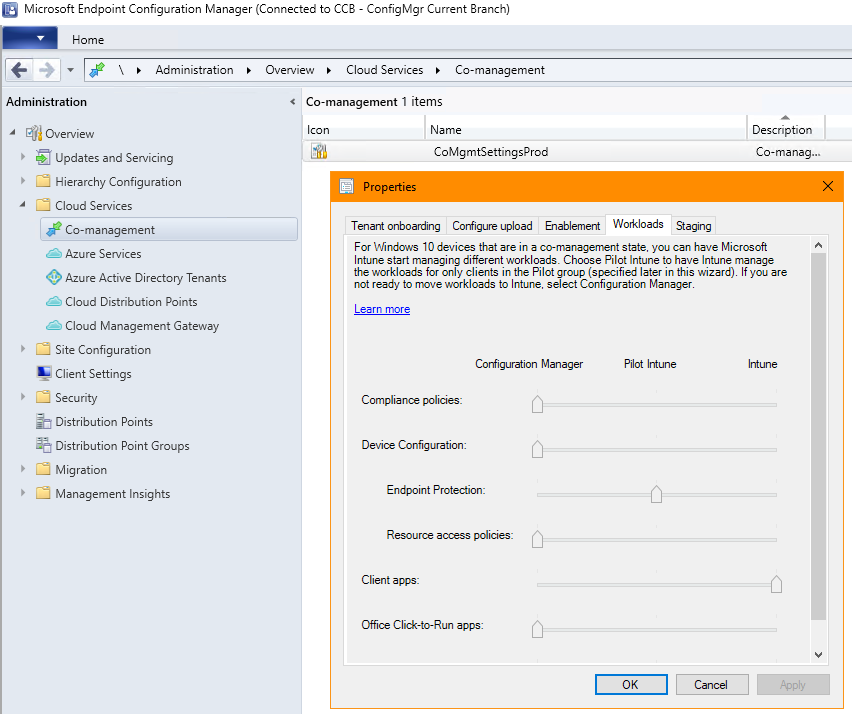
Configuration Manager Co-management
This section describes where the co-management settings would be configured by a Configuration Manager administrator. The Intune clients will not try to do software distribution if this feature is not enabled. Please refer to your Configuration Manager documentation for full instructions on how to configure co-management. No additional configuration is needed in Shopping to support this feature.
Using a ConfigMgr console, in the Administration node, under Cloud Services, Azure Services, in the ribbon click on Configure Azure Services and add Cloud Management.
Under Cloud Services, Co-management, configure the co-management.
Set Client apps to use Intune.
The ConfigMgr clients must be restarted to reflect these changes (as reflected in the client-side CoManagementHandler log).
Conclusion
You are now ready to use Shopping with Intune. If you have appropriate applications set up in Intune, you can define the applications in Shopping (refer to Managing Intune applications for details) so that they can be made available to users.
Users can then request the applications from the Shopping web interface. The applications will be delivered by Intune and their status will be returned to Shopping. The features of Shopping, such as approvals and rentals, can be used with these applications.
If you have any difficulties, refer to the Intune integration FAQs in the troubleshooting section.