Managing applications with no direct deployment mechanism
Basic Shopping applications i.e. those without a direct deployment mechanism - such as Configuration Manager, Intune, or Tachyon - are also commonly referred to as non-ConfigMgr applications. They are free-form holders that allow you to hook any type of request into the Shopping Web and approval process. For example, you can create an application that is a request for additional RAM – this hardware cannot be supplied via Configuration Manager or the other deployment options.
The application appears in the Shopping Web interface for users and when requested can use an approval process and other Shopping features. Active Directory changes might be made as part of the application and that might indirectly trigger a deployment or needed security or configuration changes. Or you might use a manual process to track such requests or integrate Shopping with ServiceNow or similar systems.
Creating non-Configuration Manager applications
To create a new non-Configuration Manager application:
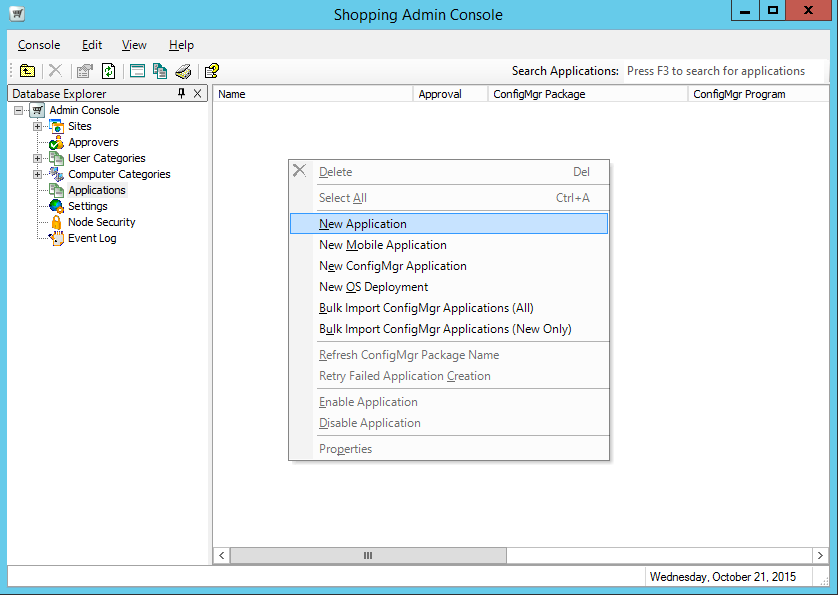
In the Shopping Admin console, click Applications.
Right-click anywhere in the right-hand pane and, from the context menu, choose New Application.
In the New Application wizard:
On the Welcome screen, click Next.
On the General Details screen, populate the attributes for the application and click Next.
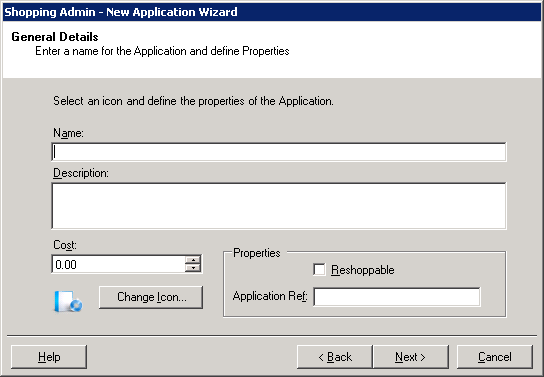
Display Name – the name of the application which is used in the Shopping Admin Console as well as in the Shopping Web portal
Comment – useful information for the application
Cost – the cost of the application (displayed in whichever currency defined in the Shopping Central server) which is used in the Shopping Web portal, the Shopping basket and email notifications
Change Icon – changes the icon used for the application. It is used in the Shopping Admin Console and the Shopping Web portal. If you change the icon, the dialog displays icons from the
SHELL32.DLLfile by default. To get the icon from a specific application, click Browse…, navigate to and select a local copy of the executable in the Browse dialog and click Open. The executable's icons are then retrieved and displayed in the Select Icon from File dialog.Properties – choose from:
Reshoppable – a reshoppable application is one that will always appear in the list of applications available to the user regardless of whether they have successfully shopped for that application on their computer previously. The default is that applications are not reshoppable. This means that they will disappear from the list of applications (on a per user, per computer basis) as soon they have been shopped, or approved or rejected.
Application Ref – the optional unique identifier for the application which is used in conjunction with the Shopping APIs.
On the User Categories screen, select the user categories the application will be available in and click Next.
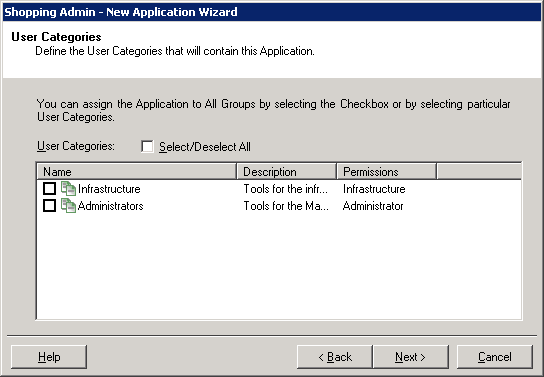
Note
If you do not choose a user category, the application is automatically associated with the Miscellaneous User Category.
On the Configuration Manager Sites screen, select the sites the application will be available in and click Next.
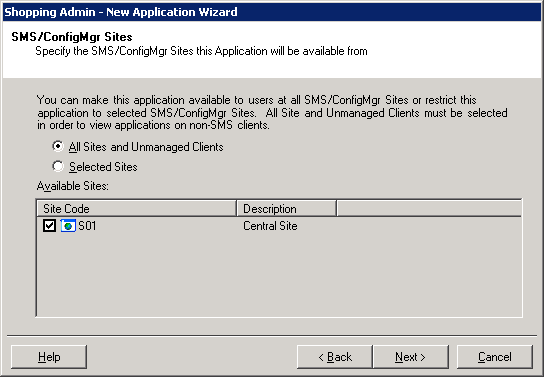
All Sites – the application is available in all Configuration Manager sites, including ones added at a later stage.
Selected Sites – the application is only available on Configuration Manager sites selected from the list. Using Selected Sites makes the application available to just those sites regardless of what is added in later – unless the application is edited to add the new sites in explicitly.
Note
The computers used by users must have the Configuration Manager client installed – this means that they belong to a particular Configuration Manager site.
Even though the application is not delivered by Configuration Manager, you must still select the sites where it is available. This provides an additional level of permissions for the application as the Configuration Manager client on the machine where the user is shopping is queried to determine its site. If this additional level of permission is not necessary, just select All Sites.
On the Central or Branch Management screen, choose how the application is managed and click Next.
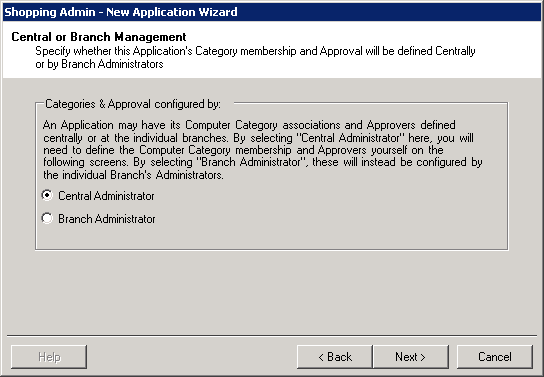
If you choose Central Administrator, the application is centrally managed and is administered from the Shopping Admin Console. The approval and publication for the application is determined in the Approvals screen.
If you choose Branch Administrator, the application is managed at a branch level. The application is initially defined in the Shopping Admin Console but its approval and publication to the computer category must be completed by the branch administrator. The next screen is the Licensing Details screen. Branch Administration is dealt with separately in Branch management.
On the Approval screen, choose the type of approval for the application. This screen is only shown if the central administration is used.
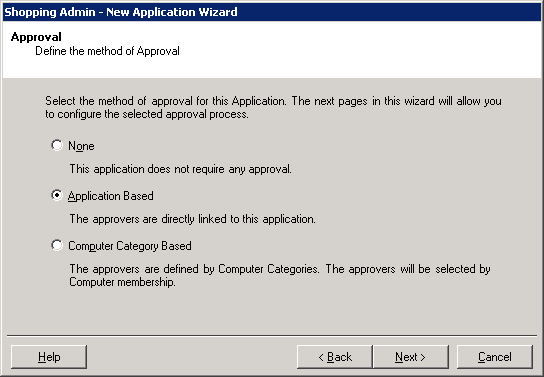
None – no approval is required and users can request it as long as they have permissions to view it
Application Based – approvers are required for the application. If you choose this option, the Application-based approval screen is displayed.
Note
Applications that require approval may need some Shopping approvers defined, for more details see Managing approvers and deputy approvers. Alternatively, you can use the pre-defined
<MANAGER>approver which will select the manager of the user, as determined by AD, as an approver.On the Application based Approval screen, choose the approval method.
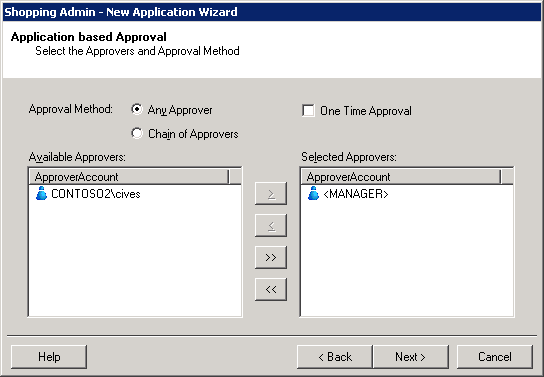
Any Approver – all approvers in the list are sent an email notification when an application request is made. The outcome of the request is determined when the first person in the list approves or rejects the application request.
One Time Approval – the outcome (approve or reject) for the application request is processed only once for a particular user. Subsequent requests by that user for the same application will always follow the original outcome.
Chain of Approvers – all approvers in the list must approve the application request for it to be successful. As long as the request is not rejected, approvers are sent email notifications sequentially to ask them to approve or reject the request. When one approver rejects the request, the process stops immediately and the application request is treated as rejected.
Computer Category Based – approvers are required for specific computers where the application is to be installed. If you choose this option, the Computer Categories screen is displayed.
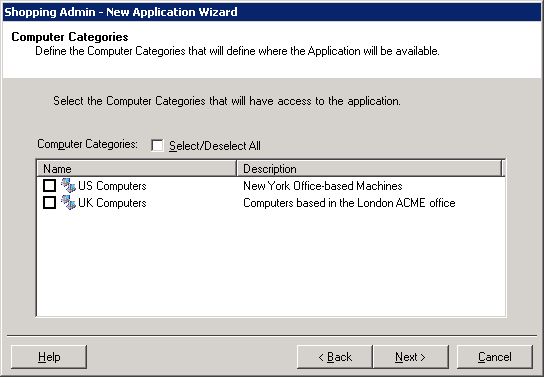
Choose the computer categories that can access the application and click Next.
Select/Deselect All – selects or deselects all the categories in the list.
Choose the computer categories from the list by ticking the check box next to it.
On the Computer Category Based Approval screen, select the approval method and approvers for the computer category and click Next.
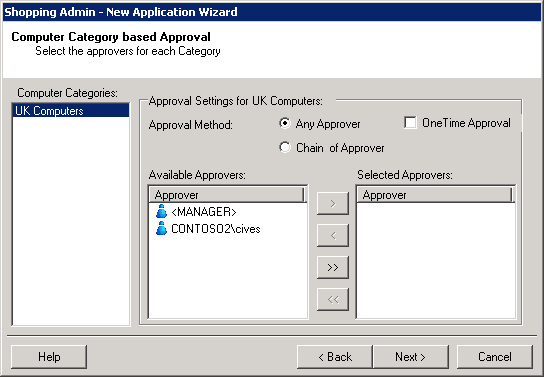
Any Approver – all approvers in the list are sent an email notification when an application request is made. The outcome of the request is determined when the first person in the list approves or rejects the application request.
One Time Approval – the outcome (approve or reject) for the application request is processed only once for a particular user. Subsequent requests by that user for the same application will always follow the original outcome.
Chain of Approvers – all approvers in the list must approve the application request for it to be successful. As long as the request is not rejected, approvers are sent email notifications sequentially to ask them to approve or reject the request. When one approver rejects the request, the process stops immediately and the application request is treated as rejected.
Click Next.
Note
If you create an application without any computer categories previously defined, a note will be displayed informing you that the Computer Category Based option will be disabled until a Computer Category has been defined. In this case you will only be able to create an application using one of the other two approval options.
On the Licensing Details screen, set application's licensing parameters for the Configuration Manager sites.
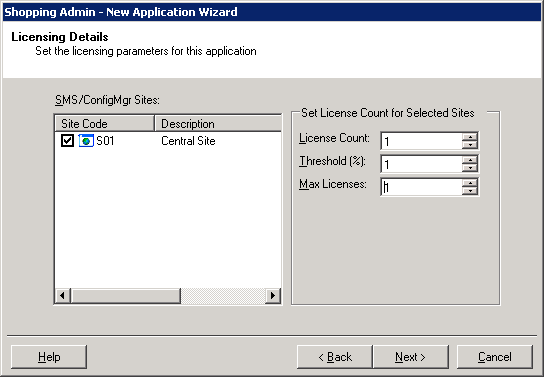
License Count – the number of licenses used for this application
Threshold (%) – the point at which an email notification is sent to the License Manager informing them that licenses are running out
Max Licenses – the maximum number of licenses available for the application
On the Completion screen, click Finish to complete the wizard or go back and review your options.