Configuring AD membership applications
Applications in Shopping can be configured to enable membership of two selected AD groups, one group for the user and the other for the user's computer. When the application is shopped for the user's user account and/or computer account get added to the group. For example, an organization may want to do this in order to provide self-service access to shares, or use domain groups to grant access to an application database.
Shopping also allows AD group membership to be revoked when the application is uninstalled and supports AD group membership rental.
An example application
To illustrate AD integration we will use an example application called ACME DataMater, this application is intended to provide data mining capabilities and so requires access to shares and databases.
The User AD Group we are going to select is one called ACME DataMater DB Access, this is configured in our example network to enable appropriate database access for users of the ACME DataMater application.
The Computer AD Group we will use is one called ACME DataMater Share Access, this is configured in our example network to enable a share on the machine where the ACME DataMater application is installed.
AD group permissions
To allow Shopping to automate the adding and removing from specific AD groups, the Shopping Central service account must have read/write permissions to any group that will be used. So in our example, the Shopping Central service account must have read/write access to both user and computer AD group.
Access rights can be achieved by granting the Shopping Central service account, or an AD group it is a member of, using either of the following methods, or a mixture.
grant AD permissions to individual AD security groups
grant AD permissions on an OU containing AD Security Groups, and enable the Shopping Admin Console setting Allow Implicit Access For AD Integration.
Setting the AD groups
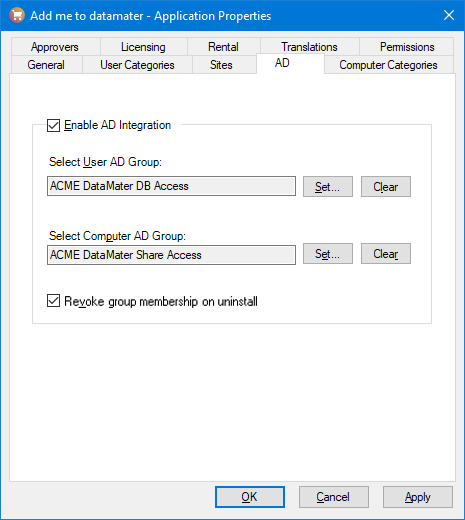
The AD integration is set up on the AD tab of the Application Properties dialog. We can now add the references to the two AD groups. We first select the application properties and in the Application Properties dialog we then click on the AD tab to display the controls for setting up the integration.
Checking the Enable AD Integration checkbox enables the other controls on the tab and turns AD integration on.
The groups are added to each field using the Set... button next to it, this brings up the usual AD selection dialog that lets you search AD for appropriate groups.
You can also clear any previously selected group from a field by clicking the Clear button next to it. The result of setting the groups is shown in the picture opposite.
Revoking group membership on uninstalling the Shopping application
Below the AD Group fields is the Revoke group membership on uninstall checkbox. When checked, this configures Shopping to remove the user and computer from the selected AD groups when the application is uninstalled from the end-user's device - for non-ConfigMgr applications, this will also cause an Uninstall button to appear next to the application's entry on the Completed Orders page in the Shopping website. Uninstallation may occur when the rental period has expired - if the application has rental configured - or by user request from the Shopping website.
Saving the changes
Having set the groups, we then click OK to store the settings with the application. At this point, Shopping will confirm that the Shopping Central service account has write access to the selected groups. If this is not the case, a warning dialog will appear and the Properties dialog will not close, preventing the selection of the groups. To resolve this issue, you should contact the AD Administrator and ensure that the Shopping Central Service Account gets the appropriate write permission to modify the membership of the selected groups.