Deploying Software Reclaimer
The Software Reclaimer is an executable that is run on Windows clients and is responsible for implementing reclaim policies provided by AppClarity. It can be distributed to devices using Configuration Manager. For more details on how to set up reclaim policies, please see Reclaiming a product based on its usage.
Software Reclaimer files
Note
Software Reclaimer is deployed and run on client devices, it is not installed. The supported deployment method is using Microsoft System Center Configuration Manager, described in Configuration Manager setup below.
Before deployment, the Software Reclaimer requires configuration, described in Configuring the Software Reclaimer below.
During installation of 1E, 1E Setup (specifically the SLA Platform installer) copies three files into C:\ProgramData\1E\SLA Platform
AppClarity.SoftwareReclaimer.exe | The Software Reclaimer executable |
AppClarity.SoftwareReclaimer.xml | Template for optional customization of the software reclaim dialog. See Customizing the dialogs. Contains the public key of the 1E web server when using HTTPS. |
logo.png | The banner logo, preferably 500x90 pixels. See Customizing the dialogs. |
If the executable is run without the customization files, it will display the default English text and 1E banner logo.
Configuring the Software Reclaimer
Overview
The Software Reclaimer is designed to run in two modes using the -mode parameter. These modes should be run at different times of the day, on all Windows workstations.
Optout mode processes optional software reclaim policies. When run, it contacts the SLA Operations Provider API to determine whether there is software to optionally uninstall from the local machine, and displays a dialog to the user only if there are polices for optional uninstallation. Optout mode does not uninstall any software. The Software Reclaimer does not need elevated rights to run in this mode, but does require a user to be logged on.
If there isn't software to optionally uninstall, the SLA API returns an empty list, and the Software Reclaimer exits without displaying anything;
If there is, the Software Reclaimer prompts the user for a response, and sends back the user's response to the SLA Operations Provider API
If the response is Remove software, then the server will convert the reclaim policy from optional to mandatory, so that the software will be uninstalled later. If the response is I still need this, then software is not uninstalled.
Tip
Optout mode is best used at a time when users are most likely at their computers so that they can respond to prompts.
Mandatory mode processes mandatory reclaim policies. In this mode, the Reclaimer runs unattended and does not display any dialog or progress bars. When run, it contacts the SLA Operations Provider API service to determine whether there is software to uninstall from the local machine. For this to work, the Software Reclaimer must be run with administrative privileges.
If there isn't software to uninstall, the server returns an empty list, and the Software Reclaimer exits
If there is, the SLA Operations Provider API returns the software it considers the highest priority to remove for the Software Reclaimer to act on immediately. The Reclaimer attempts to uninstall the software, returning the result to the SLA Operations Provider API .
Tip
Mandatory mode is best used at a time when users are not at their computers so that any software uninstall does not disrupt them during working hours.
Mandatory mode should be run at least one hour after optout in order to allow the server to process opt-out responses. Typically, you will configure deployments to run opt-out mode in the morning when the user is logged on, and mandatory mode in the afternoon when the computer is switched on.
Note
Regardless of the mode in which it is run, by default the Software Reclaimer will wait a random amount of time before it begins. The random wait is anywhere between 0 and 60 minutes and is implemented to prevent flooding the SLA Operations Provider API in larger organizations.
Mandatory reclaim process will reclaim only one software in a cycle.
Note
The supported deployment method is using Microsoft System Center Configuration Manager, described in Configuration Manager setup.
Software Reclaimer command line
AppClarity.SoftwareReclaimer.exe [-mode <mode>] [-service "<serverURL>/CoreExternal/api/ReclaimAction/Action/"]
Name | Value options | Notes |
|---|---|---|
-mode |
| This parameter determines the Software Reclaimer request mode. Although this parameter is optional, you should always use it with a value of mandatory or optout. WarningDo not use the valuebothunless testing; because it will run optout and then immediately run mandatory, without sufficient time for the server to have processed the opt-out response, especially if you have used the -nowait parameter. You would typically wait for several minutes up to an hour to allow opt-out responses to be processed. |
-service | <serverURL>/CoreExternal/api/ReclaimAction/Action/ | <serverURL> is the binding used to connect to the 1E server which hosts the SLA Operations Provider API, for example: https://tachyon.acme.local:443 If this parameter is not used, the Software Reclaimer will attempt to use the URL specified in <appClarityReclaimerServiceUrl> under the <appSettings> section of the AppClarity.SoftwareReclaimer.xml file. The URL in the template XML files uses HTTPS. You can change the URL to use HTTP, or keep HTTPS and add the public key of the 1E web server. WarningTo use HTTPS please refer to Configuring Software Reclaimer to use HTTP or HTTPS. Using HTTP does not require any additional configuration if the -service parameter is used. This parameter is not required in Demo mode, however if not provided you will see COM exception errors logged. |
-nowait | By default, the Software Reclaimer waits a random amount of time before it contacts the server, regardless of the mode in which it is run. The random wait is anywhere between 0 and 60 minutes and is implemented to prevent flooding the AppClarity service in large organizations. The -nowait parameter can be used to avoid the random wait, which is useful when testing. NoteThe -nowait parameter is for testing purposes only and must never be used in a production environment. |
Configuring Software Reclaimer to use HTTP or HTTPS
If using HTTP
Specify HTTP in the server URL used to connect to the 1E Web Server (Master Stack):
Either edit the server URL in each XML file(s)
Use the -service parameter to override XML file(s).
If using HTTPS
You can configure the Software Reclaimer to use SSL over HTTPS to connect to the 1E website. The following applies to the 1E website's SSL certificate:
It must be trusted by clients running the Software Reclaimer. This is also the same requirement for 1E clients. Please refer to Client authentication certificates
Its public key must be encoded in each of the Software Reclaimer XML file(s)
Use the attached ReclaimerPublicKey.ps1 to encode the public key and add it to the XML file.
Either run the script on the 1E Web Server (Master Stack)
Or copy the XML file from the Web Server into the same folder as the PowerShell script, and then run the script
If you have multiple XML files to support customizations then you will need to add the public key to each of them.
Using a non-standard port
A default installation of 1E uses standard ports HTTP 80 and HTTPS 443. You may wish to use a different port for Software Reclaimer, for example, if you previously used:
HTTP 8335 or HTTPS 8336 with AppClarity 5.2
HTTP 8080 or HTTPS 8443 with SLA Platform 3.3 and AppClarity 6.1
You can manually add a website binding after installation of 1E. You may already be using a non-standard port if specified in 1E Setup during installation of 1E, or you manually added a binding after installation for another application like Application Migration, or ActiveEfficiency.
Testing Software Reclaimer
If you simply want to demonstrate how the reclaimer behaves, or test customizations (refer to Customizing the dialogs), then you can use Demo mode.
If you run Software Reclaimer on a device that has a reclaim policy then it will process the reclaim in the normal way. That is, it will present the optout dialog if the policy is configured for optional uninstall, and uninstall the software in mandatory mode. You will not be able to easily repeat the test even if you re-install the software, because the policy will have been processed on the server and be subject to Site Settings affecting the Software Reclaimer, including uss_AutomaticUninstallOptOutInterval_Days (7) and uss_MinimumResendCompletedPolicy_Days (14).
Warning
Only add the -nowait parameter when testing.
AppClarity.SoftwareReclaimer.exe [-mode <mode>] [-service <serverURL>/CoreExternal/api/ReclaimAction/Action/] -nowait
You can see reclaim reports in Viewing the software reclaim reports.
Example command-line for testing mandatory mode

To view what policies affect a device, without processing a reclaim, you can test the URL in a browser:
<serverURL>/CoreExternal/api/ReclaimAction/Action/OptionalPolicy?machinegroup=<Domain Name>&machinename=<Machine Name>

<serverURL>/CoreExternal/api/ReclaimAction/Action/UninstallPolicy?machinegroup=<Domain Name>&machinename=<Machine Name>
<serverURL> is the binding used to connect to the 1E server which hosts the SLA Operations Provider API, for example: https://tachyon.acme.local:443
Below is an example XML response for a mandatory request. You would only see details for one application at any time. If you have multiple reclaims for the same device then the server will prioritize one at a time.
Example XML response for a mandatory request Expand source
<ArrayOfUninstallableProduct xmlns="http://www.1e.com/appclarity/services/softwarereclaimer/" xmlns:i="http://www.w3.org/2001/XMLSchema-instance">
 <UninstallableProduct>
   <CorrelationId>1:2345:5678</CorrelationId>
   <ProductDescription>Microsoft Visio Premium 2010</ProductDescription>
   <UninstallCommandLines xmlns:a="http://schemas.microsoft.com/2003/10/Serialization/Arrays">
      <a:string>cscript.exe ".\Resources\VisioPro2010\VisioPro_2010.vbs"</a:string>
   </UninstallCommandLines>
   <UninstallableApplications xmlns:a="http://schemas.microsoft.com/2003/10/Serialization/Arrays">
      <a:string>Microsoft Visio Premium 2010</a:string>
   </UninstallableApplications>
   <Versions xmlns:a="http://schemas.microsoft.com/2003/10/Serialization/Arrays">
      <a:string>14.0.6029.1000</a:string>
   </Versions>
 </UninstallableProduct>
</ArrayOfUninstallableProduct>
Log files
Every time the Reclaimer runs it will create a local log file of the process it is doing. The location and name of the log file depends on what task the reclaimer is doing.
Task | Logpath | Notes |
|---|---|---|
Optout | C:\Users\{USER}\AppData\Local\Temp\ AppClarity.SoftwareReclaimer.log | Optout mode is normally run under user context so that the user can interact with the dialog. This means the log file will be in the users Temp folder within the user profile. |
Mandatory | C:\windows\Temp\AppClarity.SoftwareReclaimer.log | Mandatory mode is normally set to run under system context, in order to process reclaim uninstall commands. Therefore, the log file will be under the system temp directory. |
Reclaim | C:\windows\Temp\AppClarity.SoftwareReclaimer.MSI.log | For a mandatory reclaim, if a reclaim occurs using an MSI then an MSI log file is also created. |
Configuration Manager setup
The following assumes you will create one Configuration Manager package, with two deployments. However, an additional two deployments are recommended for initial testing.
To setup the Software Reclaimer in Configuration Manager
Create a source folder in your Configuration Manager site source folder structure
Copy the AppClarity.SoftwareReclaimer.exe and optionally the two customization files into the source folder
Optionally include other customization files, if required for language support - see customizing the dialogs
Tip
During Tachyon installation, AppClarity.SoftwareReclaimer.exe and the two customization files are copied to : <installation drive>:\ProgramData\1E\SLA Platform
In Configuration Manager console, deploy a new software distribution package, with two programs
In package settings, point the source directory to the source folder where you copied all the files.
For the newly created package, distribute to relevant distribution points.
Create a new collection to be used specifically for the Software Reclaimer.
Create two new programs for the package – one for the mandatory mode and one for the opt-out mode.
Create two deployments – one for each program.
Collections
We recommend you create at least one new collection specifically for use with the Software Reclaimer. DO NOT reuse an existing collection made for another purpose in case you need to add exclusions at a later date. The collection must contain all the Windows workstations you want to run the Software Reclaimer on. There may be instances where it is advisable to create more than one collection so that you can stagger the times the Software Reclaimer is run within your organization.
Programs
You must create up two programs for the package – one for opt-out mode and one for mandatory mode.
The parameters you need to set in Configuration Manager when you run it in mandatory mode are:
Parameter | Value |
|---|---|
Command line: | AppClarity.SoftwareReclaimer.exe -mode MANDATORY -service "<serverURL>/CoreExternal/api/ReclaimAction/Action" See Software Reclaimer command-line regarding the -service parameter. |
Program can run: | Whether or not a user is logged on. |
Run mode: | Run with administrative rights. In mandatory mode, the Software Reclaimer requires administrative privileges to run without user intervention and it is advisable to run it when users are not at their computers to avoid interrupting them during working hours. When the application to be uninstalled has been installed in per user mode, i.e. the only for me option was selected during installation, the program for the Configuration Manager package must be run with user's rights. If the application has not been installed in per user mode, i.e. the for everyone option was selected during installation, the program for the Configuration Manager package must be run with administrative rights. |
In opt-out mode, the Software Reclaimer does not require elevated rights and it is advisable to run it at a time when users are most likely at their computers so that they can respond to prompts. The parameters you need to set in Configuration Manager when you run it in opt-out mode are:
Parameter | Value |
|---|---|
Command line: | AppClarity.SoftwareReclaimer.exe -mode OPTOUT -service "<serverURL>/CoreExternal/api/ReclaimAction/Action" See Software Reclaimer command-line regarding the -service parameter. |
Program can run: | Only when a user is logged on. |
Run mode: | Run with user's rights. |
When this program is assigned to a computer: | Run once for every user who logs on. |
Deployments
Each program created (one for opt-out mode and one for mandatory mode) must have its own deployment. Additionally, if you created more than one collection, you must create an advertisement for each collection. The parameters for the deployments are:
Parameter | Value |
|---|---|
Mandatory assignments: | Occurs every 1 day(s) effective <date> where <date> is when the mandatory assignment comes into effect. |
Program rerun behavior: | Always rerun program. |
Distribution points: | Download content from distribution point and run locally. |
Tip
Mandatory mode is best used at a time when users are not at their computers so that any software uninstall does not disrupt them during working hours.
Mandatory mode should be run at least one hour after optout in order to allow the server to process opt-out responses. Typically, you will configure deployments to run opt-out mode in the morning when the user is logged on, and mandatory mode in the afternoon when the computer is switched on.
Testing
Please refer to Testing Software Reclaimer above.
Opt-out dialog and reclaim override management
This dialog is displayed when the Software Reclaimer is run in opt-out mode and only if there is at least one application that is a candidate for un-installation. If there is more than one candidate for removal, it will show up to three items as prioritized by the AppClarity server.
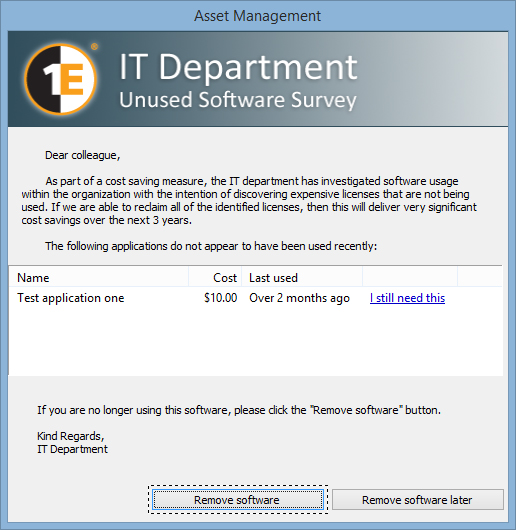 |
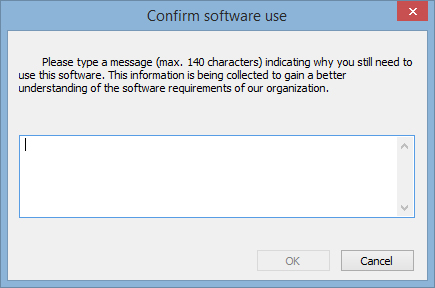
If the end-user selects an I still need this… link, a second dialog is displayed prompting them to justify their need for the corresponding application.
 |
To close the main opt-out dialog, the end-user must select either Remove Software or Remove software later.
The Software Reclaimer closes automatically after 120 minutes if the end-user does not interact with the dialog.
Action by end-user | Response sent back to the server | Action by AppClarity | Next experience for the end-user |
|---|---|---|---|
No action | None. | None, because the Reclaimer does not send anything back to the server. | The next time the Reclaimer runs in opt-out mode, the opt-out dialog is displayed. The applications listed depend on whether priorities have changed. |
Remove software | The Reclaimer sends back a response with:
| The policy for each of the displayed applications is converted from optional to mandatory, except for applications where the end-user has given a reason using I still need this.... If an administrator rejects the user's reason, then the policy for that application is converted to mandatory. | The next time the Reclaimer runs in opt-out mode, the opt-out dialog is displayed only if there are further applications with optional policies. Each time the Software Reclaimer runs in mandatory mode, the Reclaimer uninstalls the top priority application that has a mandatory policy. |
Remove software later | The Reclaimer sends back a response with:
| They defer the decision of whether or not to uninstall all the displayed applications. The opt-out dialog is not displayed on that machine for the next seven days even if the Software Reclaimer is run in opt-out mode on that machine within the seven-day window. When an end-user defers the decision for the first time, they must choose I still need this… within the next 21 days or it will be scheduled for uninstallation and not be displayed in the opt-out dialog again. If an administrator rejects the user's reason, then the policy for that application is converted to mandatory. | The next time the Reclaimer runs in opt-out mode, the opt-out dialog is displayed only if there are further applications with optional policies. The opt-out dialog is only shown again if there are further applications with optional policies. Next time the Software Reclaimer runs in mandatory mode, the Reclaimer uninstalls the top priority application. |
When a policy for an application is converted from optional to mandatory, then the application will be handled the same as any other application that has a mandatory policy. The mandatory policies for the machine are prioritized by the AppClarity server, and the next time the Software Reclaimer runs in mandatory mode, the application with the highest mandatory policy will be uninstalled. The Software Reclaimer uninstalls only one application each time it runs.
Reclaim overrides
When a user chooses to opt out of a reclaim, their reason is displayed in Reclaim override management under the Policy tab. Administrators then have an option whether to accept or reject the end-user's reason. The end-user is not informed of the administrator's decision. Please see Opt-out dialog and reclaim override management for more information.
Administrator actions
If an administrator accepts the reason, the application policy for the end-user's machine is de-activated (is neither an optional nor mandatory policy) and the application starts again with the normal usage assessment that may cause re-activation at a later date
If an administrator rejects the reason, the policy for the application is converted from optional to mandatory.
User actions
If the user selects Remove software, then all applications in the list will be scheduled for un-installation. The actual un-installation is reassessed on the next mandatory-mode software reclaim run and prioritized along any other candidates for mandatory uninstall.
If the user selects Remove software later, they defer the decision of whether to uninstall the applications. The opt-out dialog is not displayed on that machine for the next seven days even if the Software Reclaimer is run in opt-out mode on that machine within the seven-day window.
When a user defers the decision for the first time, they must choose I still need this… within the next 21 days or it will be scheduled for uninstallation and not be displayed in the opt-out dialog again.
When a policy for an application is converted from optional to mandatory, then the application will be handled the same as any other application that has a mandatory policy. The mandatory policies for the machine are prioritized by the AppClarity server, and the next time the Software Reclaimer runs in mandatory mode, the application with the highest mandatory policy will be uninstalled. The Software Reclaimer uninstalls only one application each time it runs.
Site Settings affecting the Software Reclaimer
The Sofware Reclaimer has the following settings in the SLA databases, which directly relate to the behaviour of the Reclaimer. There are other settings in the same database tables which relate to usage policies and other behaviour of the system, some are described in Usage categories
Warning
The following is for information only, to help understand how the Reclaimer process works. Do not make changes to any settings unless advised by 1E.
Setting | Default | Purpose |
|---|---|---|
uss_AutomaticUninstallRetryLimit | 5 | Number of times an uninstall is retried if a status is returned indicating that the uninstall failed but a retry is permitted. The retries must complete within the time window given by the setting uss_minimumResendCompletedPolicy_Days (by default, 14 days). After this the policy is recorded as having failed for the device in question |
uss_AutomaticUninstallMaxItemsCount | 1 | Do not change this setting. |
uss_AutomaticUninstallOptOutTimeoutMins | 120 | This is the number of minutes for which the Software Reclaimer opt-out dialog is displayed. If the user has not interacted with the dialog after this time period, it automatically closes. No default user action is associated with this closure. |
uss_AutomaticUninstallOptOutMaxLimit_Days | 28 | This defines the length of time for which a user can continually defer the decision with regard to software reclaim, when presented with the opt-out dialog. After this time period elapses, if the user has not either requested approval for the software to be retained, or acceded to its removal, then a mandatory policy to uninstall it will be activated. The time period commences when the user first defers the decision from the opt-out dialog. |
uss_AutomaticUninstallOptOutInterval_Days | 7 | The number of days before the Reclaimer opt-out dialog is redisplayed to the user, if previously the end-user responded to the dialog in any way. |
uss_AutomaticUninstallOptOutMaxItemsCount | 3 | Do not change this setting. |
uss_MinimumResendActivePolicy_Days | 2 | The number of days before an active policy is re-sent to a machine. |
uss_MinimumResendCompletedPolicy_Days | 14 | The number of days before a completed policy (either successfully completed or failed) can be re-sent to a machine. |
uss_AutomaticUninstallRemoveComponentProducts | 1 | If set, indicates that, if a software reclaim policy is associated with a product which is a suite (e.g Microsoft Office Professional Plus), then any component products associated with that suite (e.g Excel) will also be uninstalled. |
uss_AutomaticUninstallKeepInterval_Days | 60 | The number of days before an active policy is re-sent to a machine If a user has requested that a software item not be reclaimed, and the request has not already been approved or rejected, then this is the number of days that must elapse before the user will again be prompted as to what action should be taken. |
uss_ReclaimOptOutInfoDetails_MaxRows | 100 | Do not change this setting. |
Warning
Do not make changes to any settings unless advised by 1E.
The settings exist in [SLA-Shared].[dbo].[ProjectSetting] table, which gets copied to [SLA-Data].[dbo].[InstanceSetting] when a new Inventory repository is created. Each Inventory repository will have its own group of settings in the InstanceSetting table. You can edit [SLA-Data].[dbo].[InstanceSetting] to change the settings for an existing repository. If that repository contains reclaim policies, the new settings will take effect and update the policies after an action is run on the repository.
Use the following SQL script to view settings in both tables.
SELECT * for [SLA-Shared]

SELECT * FROM [SLA-Data].dbo.InstanceSetting AS ISG
JOIN [SLA-Data].dbo.InstalledProject AS IP ON IP.ProjectID=ISG.ProjectID
JOIN [SLA-Data].dbo.Instance AS I ON I.InstanceID=ISG.InstanceID
WHERE IP.Title='Compliance' AND I.IsArchived=0
Customizing the dialogs
Either or both of these dialogs can be customized:
For the main (Asset Management) dialog, all text plus the header logo can be customized
For the confirmation (Confirm software use dialog), all text can be customized
Dialogs are customized by using one or more locale specific XML files to override any or all parts of the two dialogs. Locales and XML search order, are discussed in more detail below under Per-locale customization.
Although you can have multiple XML files for different languages, you cannot use multiple files to independently configure either dialog. The first XML file which is considered applicable will always be used, to the exclusion of any other files.
The XML files
must be included in the same folder as the Reclaimer executable
can have any name but we recommend a convention such as AppClarity.SoftwareReclaimer(locale).xml
Customizing the logo in the main dialog
The built-in header logo used in the main dialog can be replaced using an image file called logo.png which must exist in the same folder as the Reclaimer executable.
For best results, this image should be 500x90 pixels.
There can be only one logo file, because the filename is hard-coded in the software reclaimer, and is not referenced in any XML files.
Sample XML customization file
A sample XML file is shown below, which includes all the element names for text strings that are configurable. Any element included in an XML file will override the default built-in both dialogs for all target locales. If the element is missing then the built-in default text will be used, as decribed below under Partial customization.
Note
The use of the CDATA sections ensures that text containing special XML characters, such as <, > and &, does not need to be specially escaped.
AppSettings
The <appSettings> section of the XML file can be ignored or removed if you are using the -service parameter on the Software Reclaimer command-line.
If you are not using the -service parameter, then you must ensure that all XML files contain the correct value for appClarityReclaimerServiceUrl.
The <activeEfficiencyUrl> section is not used, and can be deleted.
The <publicKey> section is used to support the optional SSL pinning feature. Please contact 1E for more details about this feature.
Partial customization
For a partial customization, exclude elements from the XML file. This will cause the hard-coded default values embedded in the Reclaimer executable to be used. For example, if you exclude the
<button1><![CDATA[Remove software]]></button1>
element in the <mainDialog> section, the Remove software button will take the default value. However, any other elements which override hard-coded defaults would still take effect.
If the element corresponding to the entire dialog is omitted, then that dialog reverts to its hard-coded defaults. For example, omitting the <confDialog> element and its children will result in the main dialog being customized and the confirmation dialog reverting to its hard-coded defaults.
Per-locale customization
Locales are specified by two attributes, using the Microsoft locale name format:
The first attribute is the language associated with the locale, for example, de for German
The second attribute is the geographical region associated with the locale, for example, at for Austria
In this example de-at represents German (Austria). Another example is en-us which represents English (United States).
You can specify either the first attribute, or both attributes, when creating a customization XML file. The example XML file below specifies both attributes: <configuration xml:lang="de-at">. A customization file that specifies only the first attribute, for example de, would specify the language attribute as such: <configuration xml:lang="de">.
When the Software Reclaimer runs, it reads the Windows user locale and uses the following search order to select the first applicable customization XML file:
Region - the first XML file found whose language attribute exactly matches the full locale e.g. <configuration xml:lang="de-at">
Language - the first XML file found whose language attribute matches the language of the locale e.g. <configuration xml:lang="de">
Global default - the first XML file found that does not specify a language attribute i.e. <configuration>
Built-in default - otherwise use the internal hard-coded default text
The selection is then used for both dialogs. Although you can have multiple XML files for different regions and languages, you cannot use multiple files to independently configure either dialog. The first XML file which is considered applicable will always be used, to the exclusion of any other files. If the selected XML file has partial customization, the built-in default text will be used for the omitted elements.
The example XML below is a full customization of the text in both dialogs for the locale de-at.
Demo mode
Demo mode allows you to run the Software Reclaimer dialogs without the need for a server or policies, so that you can:
simply demonstrate what it looks like out of the box
validate customizations, including logo, text and locale, as described Customizing the dialogs.
Note
Demo mode does not test connection to the server, nor does it test reclaim policies.
If not using demo mode, you would need all the following in order to demonstrate or test the Reclaimer optout dialog.
Full SLA Platform infrastructure installed and working, with a Configuration Manager connector
Applications installed on your test machine
Optional policies configured that match your test machine.
The following is a way that you can run the Reclaimer as many times as you want using optout mode without requiring policies or affecting anything already configured.
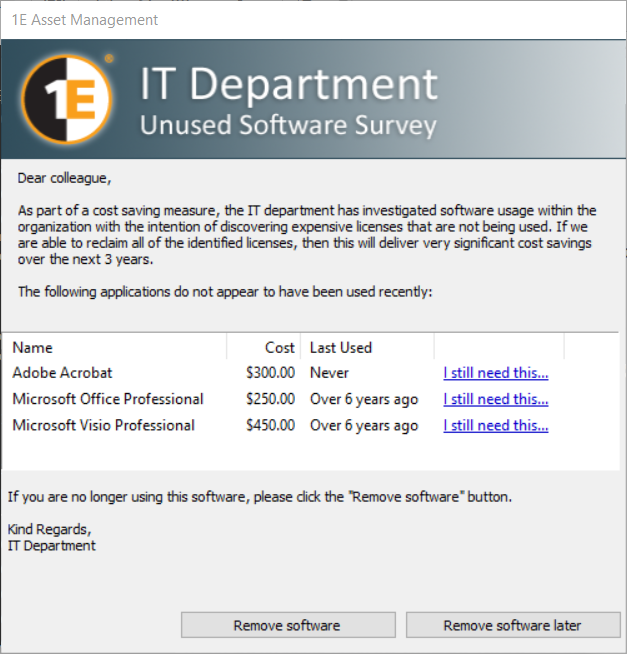
Download AppClarity.SoftwareReclaimer.Demo.xml
Make modifications to the OptionalUninstall applications
You can specify from 1 up to 3 applications.
Copy the following into a test folder on your computer
AppClarity.SoftwareReclaimer.exe
Your copy of AppClarity.SoftwareReclaimer.Demo.xml
Any custom XML files and logo.png that you wish to test.
From a command prompt run the following:
AppClarity.SoftwareReclaimer.exe -mode OPTOUT -nowait
The dialog is displayed showing the optional uninstall applications, with a new logo and customized dialog text from other custom XML files
 |
Click on I still need this... to show the second dialog with its text customization
To close the window select one of the buttons
in demo mode these buttons do not send opt-out responses back to the server
You can then make further changes to your custom XML files, and repeat testing until you are happy with the customizations
When done, copy the custom XML files to your deployment package for deployment testing (do not include the Demo XML file).
Download AppClarity.SoftwareReclaimer.Demo.xml ...
AppClarity.SoftwareReclaimer.Demo.xml Expand source
<?xml version="1.0" encoding="utf-8"?>
<OptionalUninstalls>
  <!--
    name is required
    cost is optional
    if lastUsedDate is given, it must be of the form "YYYY-MM-DDTHH:MM:SSZ" (example: 2011-03-10T10:53:12Z)
    if lastUsedDate is not given, the application will be shown as "never" used
  -->
  <OptionalUninstall name="Adobe Acrobat" cost="$300" />
  <OptionalUninstall name="Microsoft Office Professional" cost="$250" lastUsedDate="2011-03-10T10:53:12Z" />
  <OptionalUninstall name="Microsoft Visio Professional" cost="$450" lastUsedDate="2011-03-10T10:53:12Z" />
</OptionalUninstalls>
Tip
You do not need to specify -service in the command line because demo mode does not use the server. Even if specified, the parameter is ignored in demo mode.
For the same reason you do not need to configure the <appClarityReclaimerServiceUrl> setting in the <appSettings> section of any XML files, or the publicKey for HTTPS.
Digital signing certificates
Certificate limitations - signing certificates missing
On Windows computers, the installation MSI files, and binary executable and DLL files of 1E software are digitally signed. The 1E code signing certificate uses a timestamping certificate as its countersignature. 1E occasionally changes its code signing certificate, and uses it for new releases and patches for older versions, as shown in the table(s) below.
Root Certificate Authorities are implicitly trusted to validate certificates, and their certificates must be correctly installed to do this. Your computers should already have the necessary root CA certificates installed, however this may have been prevented by your organization's security policies, or inability to connect to the Internet, or they are legacy OS. In general this is not an issue because by default Windows allows software to be installed and run without validation, although you may see a warning or experience a delay. However, you must have relevant CA certificates installed if you are using 1E Client (which self-validates its own files), or your organization has applied more secure polices (for example UAC, AppLocker or SmartScreen).
Typical reasons for issues with signing certificate are:
If your organization has disabled Automatic Root Certificates Update then you must ensure the relevant root CA certificates are correctly installed on each computer
If computers do not have access to the Internet then you must ensure the relevant root and issuing CA certificates are correctly installed on each computer, numbered in the table(s) below.
The signature algorithm of the 1E code signing certificate is SHA256RSA. In most cases, the file digest algorithm of an authenticode signature is SHA256, and the countersignature is a RFC3161 compliant timestamp. The exception is on legacy OS (Windows XP, Vista, Server 2003 and Server 2008) which require the file digest algorithm of an authenticode signature to be SHA1, and a legacy countersignature.
The table below applies to software and hotfixes released in 2020.
2020 | Signing certificate | Timestamping certificates |
|---|---|---|
Certificate | 1E Limited | TIMESTAMP-SHA256-2019-10-15 and DigiCert Timestamp Responder |
Issuing CA | DigiCert EV Code Signing CA (SHA2) Thumbprint: 60ee3fc53d4bdfd1697ae5beae1cab1c0f3ad4e3 | DigiCert SHA2 Assured ID Timestamping CA Thumbprint: 3ba63a6e4841355772debef9cdcf4d5af353a297 and DigiCert Assured ID CA-1 Thumbprint: 19a09b5a36f4dd99727df783c17a51231a56c117 |
Root CA | DigiCert High Assurance EV Root CA Thumbprint: 5fb7ee0633e259dbad0c4c9ae6d38f1a61c7dc25 | DigiCert Assured ID Root CA Thumbprint: 0563b8630d62d75abbc8ab1e4bdfb5a899b24d43 |
Certificate limitations - expired root certificates
Ensure that your Root CA Certificates are up-to-date on clients and servers. The Automatic Root Certificates Update feature is enabled by default, but its configuration may have been changed or restricted by Group Policy Turn off Automatic Root Certificates Update.
If this GPO is enabled, then you will see DisableRootAutoUpdate = 1 (dword) in HKLM\Software\Policies\Microsoft\SystemCertificates\AuthRoot.