High Availability options for SQL Server
High Availability options
Overview of High Availability (HA) options for SQL Server databases used by 1E and its applications. Includes steps before upgrading 1E, and post-installation steps required when using certain HA options.
The options described here provide resilience, they are not for increasing load and performance.
1E supports the following High Availability (HA) options for SQL Server:
AlwaysOn Availability Group (AG) using an AG Listener
Failover Cluster Instance (FCI)
1E does not support the following HA options for SQL Server:
AlwaysOn Availability Group without an AG Listener
AlwaysOn Availability Group on FCI
AlwaysOn Basic Availability Group (provided by SQL Server Standard Edition)
Older HA methods such as Log Shipping and Transactional Replication
SQL Server Analysis Server (SSAS) databases.
This page does not describe HA options for application servers, that is servers with 1E Master and Response stack components, including DMZ Servers. SQL Server(s) must be remote from application servers, that is, not local. HA for Response stack components (Switches and Background Channel) is possible using multiple response servers and Network Load Balancing (NLB) as discussed in Network requirements.
Note
Please contact your 1E Account Team if you need help with HA for 1E Master stack components.
Failover Cluster Instance (FCI)
Installation, upgrade, and patching of 1E on a Failover Cluster Instance, are all supported by using 1E Server Setup.
The FCI Cluster has a Virtual Network Name (VNN). When you run 1E Server Setup, you must specify the VNN for each database in the Database servers screen.
When patching, you must use 1E Server Setup and 1E Hotfix bundles, as described in 1E Server post-installation tasks.
AlwaysOn Availability Group (AG)
Installation, upgrade, and patching of 1E servers in a AlwaysOn Availability Group, are all supported by using 1E Server Setup, provided your AG has an AG Listener.
This page does not support converting an existing installation without an AG, to one using an AG, because the re-configuration is too complex. However, you can convert as part of an upgrade, or re-installation, because 1E Server Setup will handle the configuration changes.
When installing 1E, you must specify the AG Listener name in 1E Server Setup. After installation, you can then add the databases to the AG, and manually copy SQL Logins and linked servers to secondary nodes.
When upgrading, you must temporarily remove 1E databases from the AG, and add them back after upgrading your 1E system.
Note
This page does not cover Basic Availability Groups (provided SQL Server Standard Edition). They are created and managed much like normal Availability Groups, but each AG only supports one database.
Prerequisites
In addition to all the requirements listed in SQL Server requirements, your AlwaysOn Availability Group (AG) must have an AG Listener.
Note
If the AG Listener is using a non-default port, then this must be included in the steps below. The Browser service does not help.
Note
The AG Listener name must have a Service Principle Name (SPN) registered for the SQL Server service account used by each SQL instance in the AG. Typically, all instances in an AG will use the same service account.
setspn -L domain\sqlserviceaccount

setspn -S MSSQLSvc/AGListenerName:port domain\sqlserviceaccount
setspn -S MSSQLSvc/AGListenerName.FQDN:port domain\sqlserviceaccount
The requirements include an installation account that must have a SQL Login with sysadmin or relevant rights on the primary node. If you have previously installed 1E, then you may already have this. Please refer to SQL Logins in Directory requirements.
You also require a user account that has sysadmin or relevant rights on all AG node instances, in order to manage the AG, replicate databases, create SQL Logins and linked servers. This can be the installation account.
Installing 1E
This scenario is for a new installation of 1E, and you have already prepared the Availability Group with an AG Listener.
Note
If you want to pre-create databases before a new installation, do not put them in the AG. SQL Server will find the empty databases in the primary node when you specify the AG Listener name in 1E Server Setup.
When you run 1E Server Setup to do the installation
you must specify the AG Listener name for each database in the Database servers screen
do not specify the AG Listener name in the SSAS servers screen
After installation, you can verify 1E functions
Verify the failover.
Upgrade 1E with an existing Availability Group
This scenario is for an existing installation that is already running in an AlwaysOn Availability Group.
You must use the following steps:
Remove all the 1E databases from their AG - keep the databases as full recovery model, do not change the AG, its replica(s), or the AG listener
Use 1E Server Setup to do the upgrade
you must specify the AG Listener name for each database in the Database servers screen
do not specify the AG Listener name in the SSAS servers screen
You must use these steps to temporarily remove databases from the AG, because of a known issue with installers switching databases into single-user mode, which is not supported within an AG.
Upgrade 1E with a new Availability Group
This scenario is for an existing installation that you want to add to a new AlwaysOn Availability Group. The process is similar to a new installation.
You must use the following steps:
When you create the new Availability Group, ensure its primary node is the same as the SQL instance that hosts the existing 1E databases. Do not add the databases to the Availability Group yet.
When you run 1E Server Setup to do the upgrade
you must specify the AG Listener name for each database in the Database servers screen
do not specify the AG Listener name in the SSAS servers screen
Note
The Database servers screen will show the name of the original SQL instance (the primary node) but you must change these to the name of the AG Listener.
After the upgrade, you can verify 1E functions
Verify the failover.
Patching 1E
You must use 1E Server Setup and 1E Hotfix bundles, as described in 1E Server post-installation tasks.
Manually add databases to the Availability Group
You must manually add all databases to the AG after installing or upgrading 1E.
1E databases
1E uses the following SQL Server databases:
1ECatalog
ContentDistribution (if using Content Distribution)
SLA-Data
SLA-Shared
SLA-Integrate
TachyonExperience (if using Experience Analytics)
TachyonMaster
TachyonResponses (if using a Response Stack)
Database recovery model
Before you add a 1E database to an Availability Group for the first time, you must change its recovery model from simple to full. You must do this for each 1E database.
Note
By default, 1E Server Setup installs its SQL databases with simple recovery model on the primary node of the Availability group. You must change each database to full recovery model before adding it to an Availability Group.
With full recovery model, you must ensure you have a SQL maintenance plan to truncate logs, otherwise transaction logs will grow and cause performance and other issues.
Replicating databases to secondary nodes
When you add a database to an Availability Group, the SQL Server wizard provides two options for replicating the databases to the other AG nodes. Your choice depends on how quickly you need to complete the replication. You must do this for each 1E database.
Copy - use this for new or small installations
Backup and restore - use this for existing large installations - you can use the steps below, or whatever process your organization prefers
Make a full backup of each database on the primary replica
Make a tlog backup of each database on the primary replica
Copy the database backups to the secondary replica
Restore the full backup (with no recovery) of each database on the secondary replica
Restore the tlog backup (with no recovery) of each database on the secondary replica.
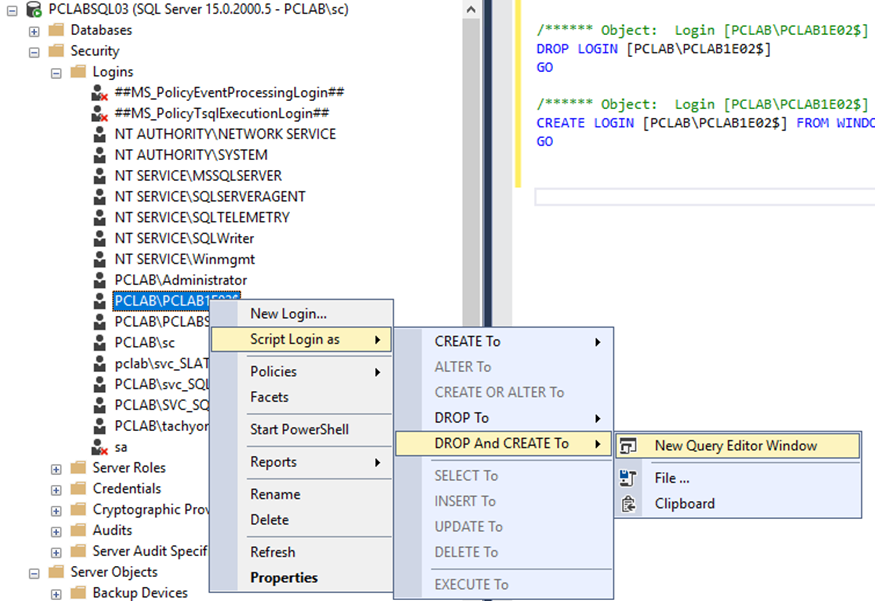
Manually copy SQL Logins to each secondary node
When you install 1E, with application and SQL server in separate servers, 1E Server Setup creates a SQL Login on the primary node for the 1E application server's computer$ account. This is the remote representation of its Network Service account. For more information about this account, please refer to Directory requirements.
If you are installing SLA Business Intelligence (required by Patch Success) then 1E Server Setup will create a SQL Login for the BI SSAS User account.
The above SQL Logins must be manually copied to each secondary node. You can use the following steps to copy each SQL Login, or use whatever process your organization prefers. In summary, you will create a script for the SQL Login, which you then run on each of the secondary nodes.
Using SQL Server Management Studio, connect to the primary node (the SQL instance where you originally installed 1E)
For each SQL Login
Right-click on SQL Login, and select Script Login as → DROP And CREATE To → New Query Editor Window
Save the new script
Connect to each secondary node, open the saved script as a new query, and execute it.
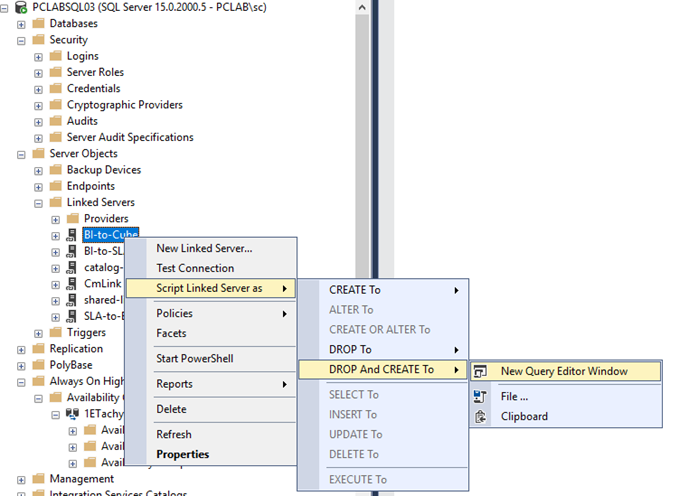
Manually copy linked servers to each secondary node
When you install 1E, it will create the following linked servers on the primary node. These must be manually copied to all the other nodes in the AG.
Linked server | Notes |
|---|---|
| These linked servers exist for all installations, and link the Catalog and SLA databases. |
| The three BI linked servers are only present if you have installed SLA Business Intelligence, which is a requirement for Patch Success. The BI-to-Cube linked server uses the BI SSAS User account, for which you will need its username and password. Please refer to Directory requirements: Service accounts for more information about this account. |
| The CmLink linked server is only used by Content Distribution 8.0 or earlier. When upgrading, 1E Server Setup will automatically remove it from the primary node, but you should manually remove it from the secondary nodes. |
You can use the following steps to manually copy each linked server, or use whatever process your organization prefers. In summary, you will create a script for each linked server, which you then run on each of the secondary nodes.
Using SQL Server Management Studio, connect to the primary node (the SQL instance where you originally installed Tachyon)
For each linked server
Right-click on the linked server, and select Script Linked Server as → DROP And CREATE To → New Query Editor Window
For the BI-to-Cube linked server script, confirm the value of @rmtuser is what you expected for the BI SSAS User account, and change the value of @rmtpassword from ##### to the actual password
Save the new script
Connect to each secondary node, and for each linked server, open the saved script as a new query, and execute it
Repeat for each linked server on each of other nodes.
Below is an extract of an example script used to create the linked server catalog-link-SLA-Data. Note its @datasrc is the AG Listener, which you do not need to edit.

Below is an extract of an example script used to create the linked server BI-to-Cube. Note its @datasrc is the SSAS instance. You need to edit value of @rmtpassword.