Self-service Operating System deployment
Enabling users to schedule or initiate their own Operating System deployments can significantly reduce the time and cost of IT staff to rebuild, replace or upgrade machines and also reduces user downtime as they have more control over when the process happens and can initiate it at a time when they do not need their computer.
Shopping uses Applications to publish items to users for self-service through the Shopping portal. Shopping 5.5 offers three methods to deliver self-service Operating System Deployment to your users, each using different Shopping Application types.
Each of these methods use Microsoft Configuration Manager Task Sequences to automate the OS deployment tasks, but differ in the user experience, the way that the Task Sequences are deployed to the device and the deployment scenarios that are supported.
ConfigMgr Applications
The simplest form of self-service OS deployment uses a standard ConfigMgr Application in Shopping that is configured to publish a Configuration Manager task sequence in the Shopping portal in the same way that Applications and Packages are published (this functionality has been in since Shopping 3.0). Users that have permission to view the Application will see it in the portal as a tile along with other Applications. ConfigMgr Applications that publish a task sequence can be organized in the portal in the same way as other Shopping Applications with User Categories.
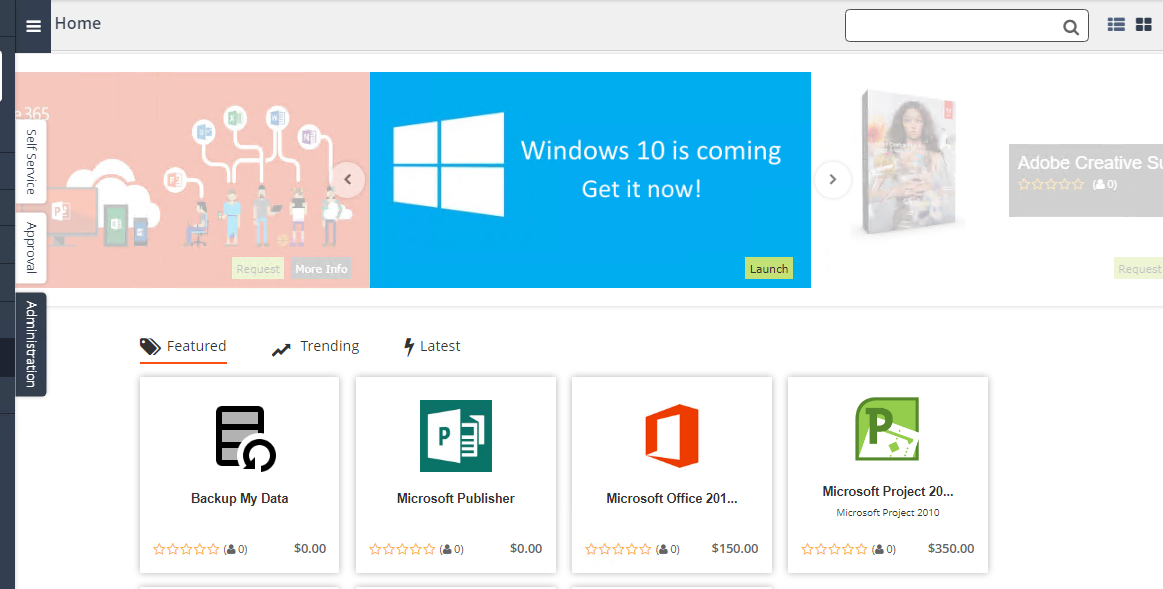
The images below illustrate an example of a ConfigMgr Application in Shopping named Backup My Data that publishes the 4a - Backup My Data task sequence to the portal and how this application is presented to the user in the Shopping portal.
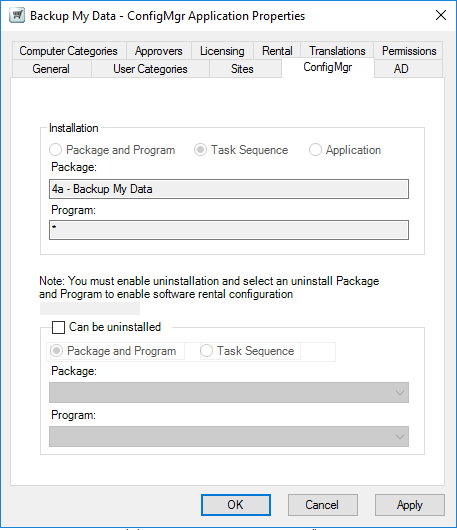
When the user requests the application, any defined approval workflow will be executed, after which Shopping adds the machine from which the request was made into a Collection that is targeted with the task sequence defined in the ConfigMgr Application properties. The task sequence must be created before the ConfigMgr Application can be defined in Shopping, but the target Collection and Deployment are created by Shopping the first time a user requests the application from the portal (as is the case with ConfigMgr Applications that publish Configuration Manager Packages). Once the machine is in the targeted Collection, on the next Configuration Manager Machine Policy refresh cycle on the machine, the task sequence will start to execute. Beyond the initial request, the user has no other control over the process.
ConfigMgr Applications in Shopping that publish task sequences can be used in the following OS deployment scenarios:
In-place Upgrade
Computer Replace. In this scenario, separate Applications are published - the first to back up the data from the old PC and the second to restore data and install applications onto the new computer. A Computer Association that associates the old computer with the new computer must be defined in Configuration Manager to enable self-service Computer Replace. The user requests the 'backup' application from the portal on the old PC, then logs into the new PC (which must already have an image installed) and requests the 'restore' application.
Computer Refresh (reinstall the current Operating System or install a new one, migrating the data and applications using automation built into the Task Sequence)
Due to the limited user interaction, they are useful in the following situations:
Where user processes are well documented, and the user does not need any on-screen guidance in the process
Where the task sequence fully automates the OS deployment process without the need for additional parameters to be defined by the user or different logic and process to be defined for users in the office compared with users working remotely
It doesn't matter when the task sequence starts - it will start when the approval workflow (if any) has been completed, Shopping has added the machine to the Collection and the CM client has retrieved the policy, all of which is fairly unpredictable.
Where the same process (e.g. computer refresh) may need to be executed multiple times on the same device over time
Where approval is required for self-service OS deployment requests
Publishing Task Sequences to the Shopping Portal
To publish an OS deployment Task Sequence in the Shopping portal using a ConfigMgr Application:
Create and test the task sequence in Configuration Manager
Create a ConfigMgr Application in Shopping following the process in Managing Configuration Manager applications, selecting the task sequence to be published in the ConfigMgr Package and Program page of the wizard.
OSD Applications
Wizard-based self-service OS Deployment was first introduced in Shopping 4.0 using OSD Applications. OSD Applications are defined in the Shopping Console along with other Application types and are presented to the user through a banner that appears at the top of the portal as shown in the screenshot below.
The banner is associated with a specific OSD Application, and the user must have permission to view that Application in order to see it. However, there may be multiple OSD Applications published in Shopping. When the user clicks the Launch button, a web-based wizard is launched that steps the user through the options available. The first page of the wizard shows all OSD Applications that the user has permission to view, and the user can select which one they want to deploy. The user is then optionally shown the applications that will be migrated during the process (if Application Migration has been implemented and the Shopping Administrator has enabled the page in the OSD Application properties) and finally invited to select a time slot to schedule the deployment (based on what restrictions the Shopping Admin defined in the OSD Application properties) or to run the deployment immediately.
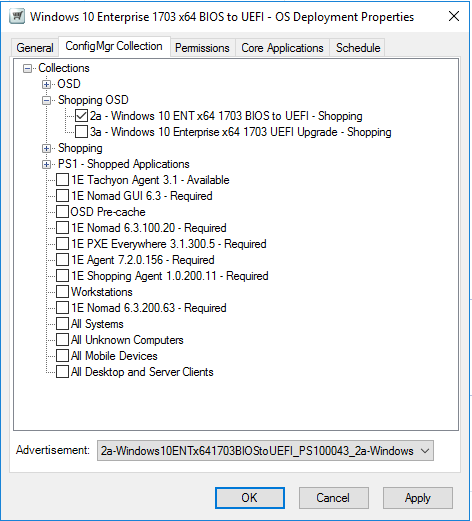
The preparation of OSD Applications differs from ConfigMgr Applications that publish Task Sequences as the administrator must create the Task Sequence, the target Collection and a Required Deployment before creating the OSD Application in Shopping. When defining the OSD Application, the administrator selects the previously created target Collection in the OSD Application properties and then selects the appropriate Deployment from the Advertisement list in the OS Deployment Properties dialog.
When the user has completed the web-based OSD wizard, if they chose to run the deployment immediately, Shopping adds the machine from which the wizard was run into the target Collection specified in the Shopping OSD Application properties. If the user selected a specific schedule, Shopping adds the machine to the target Collection at the scheduled time. The Configuration Manager client will then execute the associated task sequence when it next refreshes its machine policy (typically, Shopping will initiate a CM Policy Refresh on the target machine after it has added the machine to the target Collection, depending on the Policy Refresh option selected when Shopping was installed).
OSD Applications can be used for the following deployment scenarios:
In-place Upgrade
Computer Refresh (reinstall the current Operating System or install a new one, migrating the data and applications using automation built into the Task Sequence)
They are useful in the following situations:
Where the user requires some guidance and may want to schedule the deployment to occur at a time that is convenient to them
One-off upgrades or migrations to a new OS or new OS version (e.g. an in-place upgrade from Windows 10 1703 to 1709). Note that once an OSD Application request has completed successfully on a machine, the banner is no longer available to users viewing the Shopping portal from the same machine so the same OSD Application cannot be deployed multiple times on the same PC.
Where Shopping Administrators wish to request OSD Applications on behalf of other users (i.e. to schedule deployment of a new OS on multiple devices through the Shopping web portal)
Publishing OSD Applications to the Shopping portal
To publish an OSD Application to the Shopping portal:
Create and test the task sequence in Configuration Manager.
Create an empty Collection in Configuration Manager that will become the target of a Task Sequence Deployment. Shopping will add machines to this Collection according to the schedule options selected by the user in the OSD Wizard.
In Configuration Manager, deploy the task sequence created in step 1 to the Collection created in step 2. The Deployment should be Required with the schedule option As soon as possible selected
Create an OSD Application in Shopping following the process in Managing OS deployment applications
Windows Servicing Assistant (WSA) Deployment Applications
New to Shopping 5.5 is the Windows Servicing Assistant (WSA) Deployment Application.
Additional software required for Windows Servicing Assistant
The Shopping module of the 1E Client also provides Windows Servicing Assistant (WSA) which guides users through the preparation and execution of an OS deployment. It is a client-based wizard that enables users in the office or working remotely over VPN to initiate an OS upgrade or OS refresh (wipe-and-load) or to migrate data, settings and applications from an old PC to a replacement PC at their convenience. WSA Applications are managed through the Shopping Admin console.
WSA features have the following 1E product dependencies:
1E Client
Nomad is required to manage content and storage of user state using custom Task Sequence steps that are implemented with Nomad
Application Migration is required if you want to enable the WSA to migrate applications
AppClarity is optional
Customers that have purchased the WSA license can use Shopping, Nomad, and Application Migration, and can therefore take full advantage of the all WSA functionality.
The following lists are combinations of products compatible with Shopping 6.1:
1E Client 8.1, Nomad 8.1, Tachyon Platform 8.1, Application Migration 8.1, AppClarity 8.1
1E Client 8.0, Nomad 8.0, Tachyon Platform 8.0, Application Migration 8.0, AppClarity 8.0
1E Client 5.2, Nomad 7.1, Tachyon Platform 5.2, Application Migration 3.1, AppClarity 7.1
The following WSA features are available with the above product versions.
Support for nested Task Sequences
Autofill Wi-Fi passcode on Connection page if available
Option to disable the Location page
Applications page includes all installed, normalized applications
Allow conditional download of Windows 10 upgrade packages
Check Windows 10 version readiness checks before upgrading
Perform In-place Upgrade compatibility check in WSA readiness checks
Allow Windows Servicing Assistant to exclude user state migration
Support for environments where TLS 1.0 is disabled.
WSA Applications are similar to, but slightly different from OSD Applications in the following ways:
They are made available to users in the Shopping portal through a single banner rather than individual application tiles. However, the banner for WSA Applications is not tied to a specific WSA application - it will be displayed if the user has permissions to any WSA Application.
Administrators must create a target Collection and Deployment before creating the WSA Application in Shopping, however for WSA Applications the Deployment must be Available rather than Required, and the Deployment start time must be set to a time way in the future (e.g. 10 years). This is because the WSA will convert the schedule locally on the client immediately before the deployment is to be executed. This prevents the task sequence appearing in Software Center (thereby preventing the user from starting it independently) or executing before the machine is ready.
The key differentiator from OSD Applications is that the WSA is a client-based wizard that is implemented with the Shopping module in the Tachyon 3.2 Agent or later. Although it is invoked by the user, once launched (by clicking the Launch button on the banner in the Shopping portal) the process is managed by the Shopping module in the Tachyon Agent. This approach enables the WSA to actively prepare the machine, for example:
ensuring content is downloaded locally, using a USB drive if permitted for additional storage if necessary, enabling remote users with a VPN connection to complete OS upgrade, OS refresh and replacement scenarios
ensuring certain prerequisites are met, such as the machine is connected to a power source rather than running on battery
optionally enabling the user to select folders to be included in the user state capture (The WSA dynamically creates a USMT configuration file based on the user selections and stores this in the Shopping database. Custom steps in the task sequence then retrieve this file and add it to the USMT state capture command line).
The WSA implements a system tray tool that notifies the user of the current status of the process and allows the user to minimize the wizard while their machine is prepared. They will be notified when the machine is ready for the selected deployment and can choose to run it immediately or come back later to run it when they are ready,
WSA Applications can be used for the following deployment scenarios:
In-place Upgrade
Computer Refresh (aka Wipe-and-load). WSA Applications have the concept of 'destructive' and 'non-destructive' wipe-and-load deployments. A Non-destructive Wipe-and-load Application will execute a task sequence that does not repartition or reformat the local disk. In this scenario, user state can be preserved on the disk using USMT with hard links, speeding up the deployment time. A Destructive Wipe-and-load Application will execute a task sequence that will repartition or reformat the local disk. In this scenario, it is particularly important that all the content required to complete the deployment is available either on a local peer or on a connected USB drive. The WSA manages the acquisition of the required content and will also store the captured user data on a USB drive if no local peers are available to store the content.
Computer Replace. In this scenario, separate Applications are published - the first to back up the data from the old PC and the second to restore data and install applications onto the new computer. The WSA can manage computer replacements where no Computer Association exists in Configuration Manager. However, if a Computer Association does exist, the zero-touch option can be used, which automates the deployment of the restore application to the new computer once the capture of the old computer has completed and been acknowledged by the user.
Note
For WSA to support computer replacement, the new (replacement) computer must be provided to the user with the Operating System installed and the Nomad 6.3.200 or later and Tachyon 3.2 or later agents installed. The WSA is not currently able to build the new computer, but is instead used to transfer data and migrate applications from the old computer to the new computer.
They are particularly useful in the following situations:
Where users require on-screen guidance through the deployment process
Where users may need to deploy an OS while working remotely and connected to the corporate network via VPN
Where administrators want to ensure the best chance of the OS Deployment Task Sequence executing and completing successfully by ensuring everything is in place and ready before the task sequence is executed
Publishing Windows Servicing Assistant Deployment Applications to the Shopping portal
To publish Windows Servicing Assistant Deployment Applications to the Shopping portal:
Create and test the task sequence in Configuration Manager.
Create an empty Collection in Configuration Manager that will become the target of a Task Sequence Deployment. Shopping will add machines to this Collection as the Windows Servicing Assistant prepares the machine for the deployment.
In Configuration Manager, deploy the task sequence created in step 1 to the Collection created in step 2. The Deployment should be Available with the Available time set to 10 years in the future.
Create a Windows Servicing Assistant Deployment application Shopping
Refer to Managing Windows Servicing Assistant Deployment Applications for details on completing the above steps.
The Windows Servicing Assistant user journey
To understand the Windows Servicing Assistant user experience, see:
Reporting on Windows Servicing Assistant Deployments
The Windows Servicing Assistant sends status updates to Shopping. The status of all active Windows Servicing Assistant deployments can be viewed from the Shopping Web Administration interface by selecting the Track WSA Order option from the OS Migration menu.