Quick Start
How to quickly install, configure and run Tachyon for first use in a small-scale lab, evaluation, or pilot environment.
To simplify things, this quick start assumes a simple design in which you will install Tachyon components on a single web server, with SQL Server, installedTachyon components on a single web server, with SQL Server installed either locally or remotely (split). When implementing in a more complex environment you should instead follow the design, install and verify phases described in the Planning for Tachyon section.
This quick start is intended only for a fresh install. For upgrading or replacing an existing system, please see Upgrading Tachyon Platform.
There are four stages to the Tachyon quick start. Each of these stages touches upon the design, install, and verify phases described in the Planning for Tachyon section.
Verifying Tachyon
This quick start provides an outline for installing, configuring, and verifying a Tachyon system that is suitable for a lab-type environment. After the Prepare and Install sections, the Configure and Use sections provide steps that will verify the following aspects of Tachyon installation:
Configure quick start users - confirms integration with Active Directory and the basic RBAC capabilities of Tachyon.
The verification instructions - confirms the basic functionality for importing instruction definitions into Tachyon as well as confirming that licensing is working appropriately.
Viewing connected devices - confirms that Tachyon certificates have been correctly configured
Asking a question - confirms that Tachyon client communications are working
Performing an action - confirms that two-factor authentication, email connections, and the approval workflow are working. The stage 2 verification action also checks that the Tachyon client download mechanism is working and that the background channel has been correctly configured.
This run-through of basic Tachyon functionality works as a verification of Tachyon installation in a lab environment. If you see any issues when running through these steps please check the Troubleshooting section for a list of known issues. For production environments, a more formal verification process that uses the same 1E-TachyonPlatform.zip file as used in this quick start guide is provided on the Verifying page.
Prepare
This quick start assumes a simple design in which you will be installing Tachyon components on a single web server, with SQL Server installed either locally or remote (split).
A summary of the preparation tasks:
Get a suitable license file for Tachyon, this should cover the Tachyon applications you want to use.
Review your Quick start infrastructure.
Prepare the Quick start Tachyon servers.
Create the DNS Name.
Install IIS on the Tachyon server.
Get and install the Tachyon Server's web server certificate - Request a Web Server certificate.
Get and install a certificate on the Tachyon Server with at least Client Authentication Enhanced Key Usage. You might find that your Tachyon Server web certificate has this already, but that will not usually be the case.
Get the Tachyon files that will be used to complete the quick start.
Prepare the Quick start Tachyon client devices.
Create the Quick start user accounts.
The below process assumes your quick start environment has a Microsoft Enterprise CA and you are familiar with how to:
Configure your CA to use a CRL DP that supports HTTP or HTTPS
Publish a Web Server certificate template or issue a PFX
Use certlm.msc or the mmc certificates snap-in to request a web server certificate
Deploy computer certificates to clients, optionally using auto-enrollment.
Quick start infrastructure
A Tachyon system consists of:
Tachyon Server, which includes the Tachyon Switch component and website, hosted on an IIS web server
SQL Server instance, which hosts the Tachyon Master and Responses databases, can be local or remote (split)
Tachyon clients on supported devices
Browsers used by Tachyon users and administrators to access the Explorer and Admin portal.
Your environment also requires:
A correctly routed network environment where each device is configured with a genuine default gateway
The server where your Tachyon Web Server will be installed also needs internet access so that the licensing will work, specifically to https://license.1e.com
AD domain for the Tachyon Server and user accounts, but Tachyon client devices can be in workgroups or other domains
SMTP email server - See Email and 2FA requirements for more details
A PKI which serves the Tachyon Server and all Tachyon client devices
Your CA(s) are able to issue certificates with a CRL DP that supports HTTP or HTTPS.
Remote SQL
If using a remote SQL Server in a test environment, and you want to configure the Tachyon Server to support more than 500 devices, then you can either ignore the warning that you should have an additional network interface used for SQL traffic, or you can install and configure an additional network interface as described in Configuring a persistent route for SQL traffic.
PKI notes
If you have an existing PKI and have just added a new CDP to support HTTP/S then you will need to re-issue certificates to your servers and devices.
Tachyon deliberately does not work with self-signed certificates for security reasons. Therefore, Tachyon Server cannot be installed on the same server as a Root CA, because its certificate is self-signed. For the same reason, client cannot be installed on a DC unless the client's Switch is configured to not require client certificates.
Tachyon uses TLSv1.2. If your PKI is using SHA512, then please ensure that your environment has relevant updates applied, as described in KB2973337. See Enabling SHA-512 to work with TLSv1.2.
If you want Tachyon to manage any legacy OS that Microsoft no longer supports, there may be issues with encrypted certificates described in Constraints of Legacy OS.
Quick start Tachyon servers
These are the servers required by Tachyon in addition to Quick start infrastructure.
Server | Software | Hardware |
|---|---|---|
Tachyon Server | Windows Server 2016, 2019 or 2022 Full .NET Framework 4.8 or later | 1 CPU Core, 1GB RAM if Web Server only. 2 CPU Core, 2GB RAM if using combined Web and SQL Server. |
SQL Server | SQL Server 2017 or 2019, Standard or Enterprise | 1 CPU Core, 1GB RAM if SQL Server only. |
Server(s) can be physical or virtual, and must be domain joined.
If using any other version of Windows OS or SQL Server, or more detail is required, please refer to Windows Server requirements, and Server Provisioning.
If using a firewall on the Tachyon Server, then ensure the following incoming ports are open:
Website HTTPS 443
Switch Port 4000
If more detail is required, refer to Communication Ports in the Reference section.
DNS Name
Create the DNS Name for the Tachyon Server, for example Tachyon.acme.local
This can be a CNAME or a (A) Host record.
This DNS Name is used in the Web Server certificate (refer to Request a Web Server certificate) that needs to be installed on the TachyonServer.
Install IIS
Run the following PowerShell script on the Server. Do this even if IIS is already installed because it will ensure all the required features and roles are installed.
Note
If you intend to install Tachyon by running setup, then you may choose to let the setup program perform this operation for you instead of downloading and running the script manually. Just click on the Install missing prerequisites button after you have run the checks in the Check prerequisites page.
If more detail is required, refer to, Windows Server roles and features.
Note
View RolesInstall.ps1 ...
Click here to download - RolesInstall.ps1
RolesInstall.ps1 - Configure IIS using PowerShell
Import-Module ServerManager

Get-WindowsFeature | Out-file $PSScriptRoot\ServerManager-1.txt -Append
Install-WindowsFeature Web-Server,
Web-Http-Redirect,
Web-Dyn-Compression,
Web-Basic-Auth,
Web-IP-Security,
Web-Windows-Auth,
Web-Asp-Net45,
Web-Mgmt-Console,
Net-Framework-45-Core,
Net-Framework-45-ASPNET

Uninstall-WindowsFeature Web-DAV-Publishing

Get-WindowsFeature | Out-file $PSScriptRoot\ServerManager-2.txt -Append
Note
When running the above command, if you receive an error that contains The source files could not be downloaded you will need to supply the source path to your Windows Server OS installation media \Sources\sxs folder.
Append -source X:\Sources\sxs or -source \\Server\Path\Source\sxs to the command line, adjusted for your drive letter or UNC path.
Note
PowerShell always uses 45 in the names of .NET Framework features, irrespective of the actual version of .NET Framework 4.X installed on the server, like:
4.8 in Windows Server 2022 (note: from Tachyon 8.1 onwards, any Tachyon component that requires .NET Framework, requires version 4.8)
4.7.2 in Windows Server 2019
4.6.2 in Windows Server 2016
For details of .NET Framework versions, please refer to https://docs.microsoft.com/en-us/dotnet/framework/get-started/system-requirements#supported-server-operating-systems.
Tip
Tip
If you prefer to use the Add Roles and Features Wizard to manually enable features then you can use the Display Names listed in the table Windows Server roles and features.
Note
Web-Http-Redirect is only required to support legacy Nomad clients after an In-place upgrade of ActiveEfficiency Server for Nomad.
Web-Basic-Auth is only required if you will be installing 1E ITSM Connect or 1E Core for integrating ServiceNow and Tachyon.
Request a Web Server certificate
You will need to have requested a Web Server certificate from your Certificate Authority. To get the certificate in your organization you will have either:
Submitted a CSR and received a password protected PFX file
Used the Certificate Enrollment wizard to request a suitable Web Server certificate.
Once the Web Server certificate has been provided it must be imported into the Tachyon Server's local computer Personal Certificates store.
Each server that has Tachyon Server components installed requires its own Web Server certificate (except for a remote SQL Server). This certificate is also used by the Tachyon Switch and the Tachyon Coordinator. Therefore, a single-server installation requires only one Web Server certificate. This certificate must be provided on the server prior to installation of Tachyon.
The Web Server certificate requires the minimum of the following:
Issued by a trusted Certificate Authority (CA)
The certificate for the Root CA in the Certification Path must exist in the Trusted Root CA store of the server
If the issuing CA is not the Root CA then the certificate for the issuing CA and any intermediate CA in the Certification Path must exist in the Intermediate CA store of the server
The above CA certificates must exist on the Tachyon Web Server and Windows client devices
Most organizations have automated distribution of these CA certificates to servers and clients, using Group Policy for example.
Has at least the following Key Usage:
Digital signature
Key encipherment
Has at least the following Enhanced Key Usages:
Server Authentication
Revocation information is included
References at least one CRL Distribution point that uses HTTP - see DMZ Server note below
Must have a private key available
Tip
The default template Web Server available with a Microsoft PKI is suitable for requesting a Tachyon Web Server certificate.
DMZ Server
Please ensure you note the additional certificate requirements described below, when installing any server in a system that also contains a DMZ Server. Internal Master and Response Stack servers, and DMZ Server, each require two HTTPS bindings, as described in DNS Names. For even more detail, please refer Implementing a Tachyon DMZ Server.
Also note the requirement for server certificates to reference at least one CRL Distribution point that uses HTTP. These CRL DPs are likely to be in the internal network, and the firewall will need to allow the DMZ server to access these internal servers.
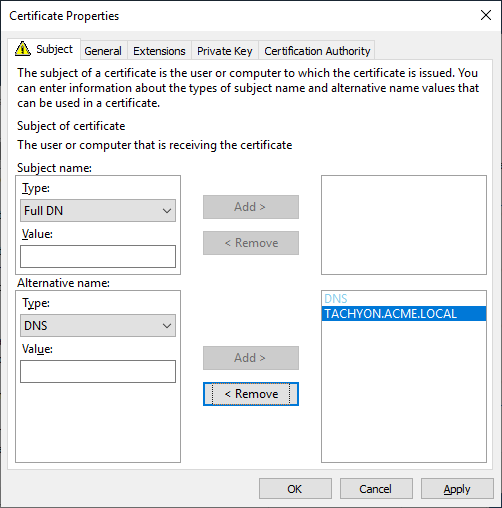
Web Server certificates used by a Tachyon Servers must be issued with their fields set as follows. Example DNS Names are discussed in DNS Names.
Fields | Example Option 3 type certificate | |
|---|---|---|
Subject Common Name Field (subject:commonName) | Subject (CN) can be any valid name, and is no longer mandatory as required by previous versions of Tachyon. | |
Subject Alternative Name Extension (extensions:subjectAltName), type dnsName | The Tachyon Server DNS Name FQDN (DNS Alias) of the server. This is mandatory, same as required by previous versions of Tachyon. On a Master Stack - example: DNS Name=Tachyon.ACME.LOCAL On a Response Stack - example: DNS Name=TachyonRS.ACME.LOCAL On a DMZ Server - example: DNS Name=TachyonEXT.ACME.COM | |
Subject Alternative Name Extension (extensions:subjectAltName), type dnsName | An Alternate DNS Name FQDN (DNS Alias) of the server. This is usually mandatory, for example if there is more than one server in your Tachyon system, as discussed in DNS Names. On a Master Stack, example: DNS Name=TachyonALT.ACME.LOCALorDNS Name=Tachyon.ACME.LOCAL On a Response Stack - example: DNS Name=TachyonALT.ACME.LOCAL On a DMZ Server - example: DNS Name=TachyonDMZ.ACME.LOCAL | |
Example |
|
Note
Earlier versions of Tachyon required the certificate to have a CN and used SAN fields differently. If you are upgrading your Tachyon server from an earlier version, it may still be using this type of certificate. When upgrading Tachyon, you can issue a replacement certificate, or continue using the old style certificate (because the new-style certificate requires only a SAN DNS Name that matches the DNS Alias, which are provided by the old style certificates).
Click here to see examples of old-style certificates...
Fields | Example old Option 2 type certificate |
|---|---|
Subject Common Name Field (subject:commonName) | The computername FQDN of the server Example: CN=ACME-TCN01.ACME.LOCAL |
Subject Alternative Name Extension (extensions:subjectAltName), type dnsName | The DNS Alias FQDN of the server Example: DNS Name=Tachyon.ACME.LOCAL TipAdd any additional DNS Names here. |
Example certificate request | 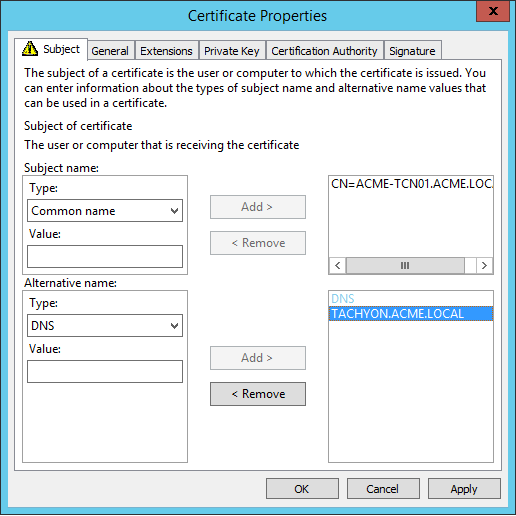 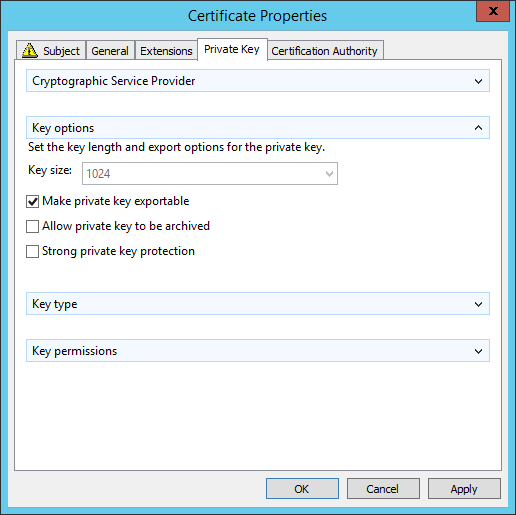 NoteOption 2 type certificates required the CN to be the computername FQDN, and the list of Subject Alternate Names (SAN) to contain the DNS Alias. Also, prior to Tachyon 5.0 the certificate required its private key to be exportable. Tachyon 5.0 and later is able to use this type of certificate when upgrading from an earlier version of Tachyon. |
Fields | Example of old Option 1 type certificate |
|---|---|
Subject Common Name Field (subject:commonName) | The DNS Alias FQDN of the server Example: CN=Tachyon.ACME.LOCAL |
Subject Alternative Name Extension (extensions:subjectAltName), type dnsName | The DNS Alias FQDN of the server Example: DNS Name=Tachyon.ACME.LOCAL The computername FQDN of the server Example: DNS Name=ACME-TCN01.ACME.LOCAL |
Example certificate request | 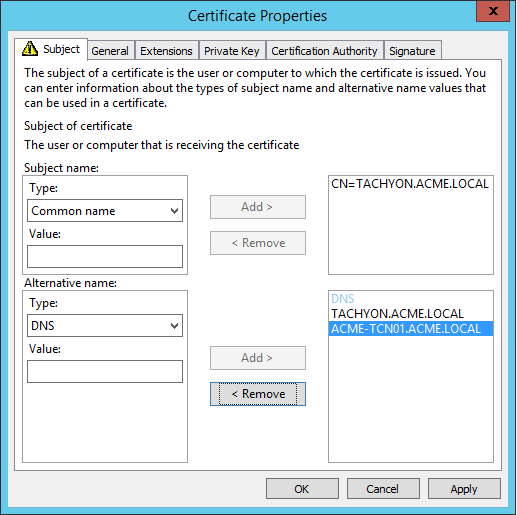 NoteOption 1 type certificates required the CN to be the DNS Alias, and the list of Subject Alternate Names (SAN) to contain the computername FQDN. Also, prior to Tachyon 5.0 the certificate required its private key to be exportable. Tachyon 5.0 and later is able to use this type of certificate when upgrading from an earlier version of Tachyon. |
Request a client certificate
You will need to have requested a client certificate from your Certificate Authority. This will be used to authenticate communications between the Background Channel and the ContentDistribution components to support Nomad features.
Get the Tachyon files
You will need to download the following to complete the quick start.
1E Client installers
The 1EClient zip file can be downloaded from the 1E Support Portal https://1e.my.site.com/. The zip includes the following files used to install the 1E Client on Windows devices:
1E.Client-x64.msi
1E.Client-x86.msi
Tachyon Server installers
The TachyonPlatform zip file can be downloaded from the 1E Support Portal (https://1e.my.site.com/). Extracting the zip will create a folder structure containing the following, where the files highlighted in bold are required by Tachyon Setup.
| Please refer to:
WarningTachyon Setup is the only supported method of installing, upgrading, and patching a Tachyon server. Installation using standalone msi or msp files is not supported unless advised by 1E, which may be necessary in complex installations, using non-interactive (quiet/silent) command-lines, and may require further post-install configuration steps. | ||||
| This folder contains msi installer files for components and applications that will be installed by Tachyon Setup if their prerequisites are met. | ||||
| This folder contains apps folders for Tachyon consumer applications that will be installed by Tachyon Setup if their prerequisites are met. If you do not want to install a consumer application, then delete the folder before running setup. Later, if you need to install the consumer application, then you can reinstate the folder and install the app using setup as described in Applications maintenance. NoteSome consumer applications are installed using their msi instead of an apps folder, for example AppClarity and Application Migration. | ||||
| These Product Pack are required to support various features, for more detail please refer to Tachyon Product Packs reference. If your license permits, you can use additional Product Pack available from 1E Exchange (https://exchange.1e.com/) to meet specific use-cases.
TipThe Tachyon Product Pack Deployment Tool can be started independently or at the end of the Tachyon Setup process via the Post-installation checks screen, where the screen contains a link that launches the tool. The Tachyon Setup method of starting the tool is recommended because Tachyon Setup ensures you have the correct permissions to upload the Product Packs. |
Quick start Tachyon client devices
The Tachyon client is supported on the following Windows OS in a quick start environment.
Windows Server 2022
Windows Server 2019
Windows Server 2016
Windows 11 CB 21H2
Windows 10 CB 21H2
Windows 10 CB 21H1
Windows 10 CB 20H2
If using any other OS then please refer to Supported Platforms and Tachyon client installation pages in the Reference section.
Tachyon users on client devices can connect to the Tachyon Explorer using any of the following browsers:
Latest version of:
Google Chrome
Microsoft Edge (Chromium)
Mozilla Firefox.
PowerShell is used by some Tachyon Product Packs. If more detail is required, refer to Tachyon scripting requirements.
If you have configured Tachyon Server to require client certificates (Client certificates) then each device requires a certificate with the following properties, so the Tachyon client can be authenticated by the Tachyon Switch.
Issued by a trusted Certificate Authority (CA)
The certificate for the Root CA in the Certification Path must exist in the Trusted Root CA store of the client
If the issuing CA is not the Root CA then the certificate for the issuing CA and any intermediate CA in the Certification Path must exist in the Intermediate CA store of the client
If either of these CA certificates are different to those used by the Tachyon Web Server, they will need to be exported and imported on the Tachyon Web Server
Most organizations have automated distribution of these CA certificates to clients and servers, using Group Policy for example.
Has at least the following Enhanced Key Usage
Client Authentication
Has at least the following Key Usage
Digital Signature
Key encipherment
Has a private key
For workgroup and non-Windows devices, the private key must be exportable
Revocation information is included.
References at least one CRL Distribution point that uses HTTP.
Has a Subject Name of type Common Name (CN=<computername>) or Subject Alternative Name (DNS Name=<computername>) where <computername> depends on the type of device:
On domain-joined Windows PCs this must be the computername FQDN of the computer, for example W701.ACME.LOCAL
On workgroup Windows PCs and non-Windows devices, this must be the computername of the computer - as returned by the hostname command, for example on Windows PC this could be W701, and on a Mac this could be MAC01.local
Note
Tachyon clients and Switches use OpenSSL and its validation process to verify certificates.
Quick start user accounts
For simplicity in the quick start guide, we use just two Tachyon user accounts, the installation account and another full administrator account.
Note
To get things up and running quickly in a lab environment, you may want to make use of the full administrator role. This will help minimize the number of users required for an evaluation and reduce the initial configuration required.
To further minimize the number of users needed, you can also enable the Windows account used to install Tachyon to assume the Tachyon full administrator role. The installation account is added as the system principal user in Tachyon by the installer, and its permissions are locked down by default. You can allow it to assume the full administrator role using the following steps:
Create a Tachyon user from an existing AD security group.
Apply the Tachyon full administrator role to the user.
Add the installation account to the AD security group.
In the short term it's fine to make use of full administrators in this way, but this practice is not really suitable for large-scale deployments and should be used with care for the following reasons:
The full administrator role has permissions to do everything in Tachyon. It has across the board permissions to all Instruction Sets and therefore can be used to run actions that can have a major impact on your network.
The full administrator accounts receive emails for all the transactions that are performed by Tachyon.
For the purposes of the quick start, which uses two-factor authentication, each account must have its AD account configured with an email address.
Note
If two-factor authentication is enabled (as it is by default) email is required for any user who intends to run an action, in this case TCNInstaller01.
Using just the following accounts we can perform all the installation, administration, verification questions, actions and approval tasks shown in this quick start guide.
Account | Description | Tachyon roles |
|---|---|---|
TCNInstaller01 | Server installation account, used to install Tachyon Server and configure initial security user and roles settings. This account requires the following rights:
This account should be a member of the TCNGAdministrators group | The roles for this account cannot be changed directly, but this account may be added to AD groups with other Tachyon permissions assigned. |
TCNAdmin01 | A user account that will be used in combination with the TCNInstaller01 user to enable the request and approval of actions. | No direct roles applied to this account. |
TCNGAdministrators | An AD Universal group with two members: TNCInstaller01 and TCNAdmin01. | Global Administrators role. |
Quick start service accounts
The table below describes all the service accounts and where they are used. Where domain accounts are required, you should create separate domain user accounts for each service.
Account | Description |
|---|---|
CATSVC | 1E Catalog Update Service account. Used by the 1E Catalog Update service to connect to the 1E Cloud service via the Internet to download catalog updates and upload anonymous details about newly detected software. Used by the Catalog web application pool to connect to the 1ECatalog database on the SQL Server database instance. |
BISSASSVC | Business Intelligence (BI) SSAS user account. Used to access the BI cube on the SSAS instance by services on the web server and the linked server on the SQL Server database instance. |
SLATACHYON | A Tachyon user account that will be used by the 1E Platform Connector, which provides the Tachyon Inventory. This account will be a member of the 1E Inventory custom role, which has questioner permissions on the 1E Inventory instructions set. The instruction set contains four instructions. You can choose different names for this role and instruction set. |
Network Service | On local servers, this is NT AUTHORITY\Network Service; on remote servers, this is: ACME\computer$ where computer is the computer name of the Tachyon Server. Used by the following for connection to databases on the SQL Server database instance:
Used by the Tachyon Coordinator service to connect to the 1E license cloud to validate and activate your license. Used by the System Center Configuration Manager (SCCM) Connector if the connector configuration has Use Windows Authentication enabled instead of a SQL Login. |
Local System | Used by the Tachyon Switch Host service. |
Install
Tachyon Server
After obtaining your Tachyon.lic file from 1E you should store it in a secure location. In our example we've placed the Tachyon.lic file in the installation directory where Tachyon.Setup.exe is located.
Logon to the server using the server installation account TCNInstaller01.
Install interactively using Tachyon.Setup.exe.
Launch the setup wizard by double-clicking on Tachyon.Setup.exe. Then fill out the screens of the wizard using the following information.
Screen | Actions | ||||||||||||
|---|---|---|---|---|---|---|---|---|---|---|---|---|---|
Welcome | Click Next to skip to the next screen. | ||||||||||||
Documentation | This page provides some links to some online information about Tachyon. Click Next to skip to the next screen. | ||||||||||||
License agreement | Accept the license agreement by checking the I accept the terms of the license agreement checkbox and click Next. | ||||||||||||
License File | Enter the location for your Server Tachyon.lic license file, or click Browse to locate the file using the system file browser. When the .lic file is selected, it will be verified with the Tachyon license server. If everything is OK, click Next. | ||||||||||||
Select configuration | This screen lets you select the configuration you want to install, which determines which components are installed on the server. The quick start example installs all the Tachyon Server components onto a single-server with the databases on a remote SQL instance, so ensure that the All components on a single server option is selected and then click Next. | ||||||||||||
Check prerequisites | This screen performs prerequisite checks on the local server and user account. Click Start checking to start the checks. If any of the checks fail, Tachyon Setup may be able to install the missing prerequisites. To install these, click the Install missing prereqs. button. Not all prerequisite checks have automated fixes. If your environment fails a check and the Install missing prereqs. button has not been enabled, you will need to fix the conditions for that check by hand. You can click Check Again to re-run the checks once any remediation steps have been made. | ||||||||||||
Server certificate | This screen displays a list of certificates from the Local Computer\Personal certificate store, and you select the certificate created earlier, as described in the Request a Web Server certificate heading. Tachyon Setup will then evaluate the suitability of the selected certificate according to how specific properties of the certificate have been configured. In this quick start example, we select the certificate with the friendly name of Tachyon Web Certificate, confirm all checks pass and click Next to continue. | ||||||||||||
Client certificates | On this screen, you can set whether client certificates are required to be presented by the Tachyon clients. If your clients do not have certificates, then uncheck the Switches require client certificates to be presented by Tachyon client features of the 1E Client checkbox. If your clients have certificates issued by different Certificate Authorities than the Tachyon Server certificate, then you must ensure clients and Switch servers each have the others CA certificates in their certificate stores. For the quick start, client certificates are required from the Tachyon clients, and as all the clients in the quick start example use the same certificate authority as the Tachyon Server, you can skip this screen by clicking Next to continue. | ||||||||||||
Database servers | Select the SQL server instance name for the Tachyon Master and Responses databases as well as the SQL server instance names for the 1E Catalog, SLA and BI databases. In the quick start example, these will all be installed on the ACME-SQL01 instance. It's also a good idea to click the Validate button to ensure that the specified instance is valid before continuing by clicking Next. | ||||||||||||
SSAS servers | Here you need to set the domain account details for the BI SSAS user. This user will be used to create a linked server for the BI database to access the BI cube and enable BI services on the server to query the cube. You also enter the SQL Server Analysis Service (SSAS) instance, where the BI cube will be created. In the quick start example, the account name and password for the domain account ACME\BISSASSVC are used. The SSAS instance for BI is set to ACME-SQL01, where an SSAS instance has been set up alongside the SQL Server instance used for the main Tachyon databases. | ||||||||||||
Number of devices | Enter the number of devices to match your license key. The quick start example is limited to 15 by the Tachyon.lic file selected on the License File screen. You can change this number from the default, but it should not be set larger than your permitted licenses. | ||||||||||||
Switch configuration | The default switch configuration displayed is determined by the number of devices set on the Number of devices page. For the quick start, we leave this as the suggested default. In the quick start example we click Validate to check that the selected configuration is appropriate, all the checks pass, so we then click Next to continue. | ||||||||||||
Website configuration | Verify the following details for Main website bindings:
For the quick start, the Alternate website bindings are not used, so you can leave these at their default settings. Verify the following service ports:
Click Next to continue. | ||||||||||||
Active Directory and email | Enter the following:
In the quick start example, we click Validate to check that the options are valid, and then click Next to continue. | ||||||||||||
SLA and 1E Catalog | On this screen, you can enable or disable the AI Powered Auto-curation feature. This is supported by SLA but also involves downloading the AI files using 1E Catalog. In the quick start example, we leave this in the default state, where the Enable AI-based auto-curation checkbox is not checked, and the feature is disabled, and then click Next. You should only enable this feature if you have appropriate hardware. You can enable this feature later. For more information, please refer to AI Powered Auto-curation. | ||||||||||||
Nomad | If you selected to install Content Distribution on the Select Configuration screen you will need to provide the server name for a Microsoft Endpoint Manager Configuration Manager (MEMCM, ConfigMgr) site server. In the quick start example, we enter ACME-CM01 as the Configuration Manager Site server and leave the Nomad sync at its default value of 30. Clicking Validate checks the connection to the CM Site Server. We then select the Client Authentication certificate, requested earlier under the Request a client certificate heading, that will be used to authenticate communications between the Background Channel and the ContentDistribution components. The clients authentication we leave at the default of Windows authentication. Clicking the Validate button verifies the selected Client Authentication certificate. Then click Next to continue. | ||||||||||||
Ready to install | Having entered all the necessary values, click the Install! button to begin the installation. | ||||||||||||
Installation results | The Installation results screen displays the log messages from the installer as they occur. Confirm that the installation has succeeded by checking that the concluding log message says: The installer exited and reported successful completion then click Next. | ||||||||||||
Post-installation checks | Run the post-installation checks by clicking the Start checking button. Confirm that all checks pass. NoteYou can click on the Open link to the right of the Tachyon Portal web application responds check to open the Tachyon Portal. If you get green ticks all the way down, then your Tachyon Server installation has been successful, and you can now close the setup wizard by clicking the Close button. If any of the checks failed, you can see more information about the check in the Info column. Which you can then use in combination with the Troubleshooting section to help track down the cause of the issue. If you have unzipped the contents of the TachyonProductPacks zip file to a ProductPacks folder in the same folder where Tachyon.Setup.exe resides, a Product Packs are available check will be displayed with a link that launches the Tachyon Product Pack Deployment Tool. In this initial quick start video, we pause the setup at this point and continue with the process under the Uploading with the Tachyon Product Pack Deployment Tool heading. | ||||||||||||
Maintenance | This section of setup is used to configure Tachyon post-installation. Here you can uninstall components, configure applications and replace certificates. |
For more detail on the setup wizard, read Tachyon Setup in Installing Tachyon.
Note
You can now choose to launch the Tachyon Portal by browsing to: https://<TachyonDNSName>/Tachyon, where <TachyonDNSName> is the DNS name you have configured for Tachyon in your environment. In our example, this is https://tachyon.acme.local/Tachyon.
Uploading with the Tachyon Product Pack Deployment Tool
Continuing from the previous section, we select to run the Tachyon Product Pack Deployment Tool using the following steps:
In setup click on the Deploy link next to the Product Packs are available check on the Post-installation checks screen.
The Tachyon Product Pack Deployment Tool appears, showing all the Available Product Packs that were found in the ProductPacks folder.
There are two types of Product Pack displayed, Classic and Integrated. Classic Product Packs contain Instruction definitions, and Integrated Product Packs also include Policies.
You can select the Product Packs you want to load by checking the box in the Selected column for each entry. In our example, we'll leave all the Product Packs selected to load them all.
To load the Product Pack, click on the Upload selected button.
When the upload has completed, the text Done will appear in the Results field.
At this point, you can click the Close button to close the Tachyon Product Pack Deployment Tool.
Then click the Close button in setup, and click OK in the confirmation dialog to exit the wizard.
Signing in to the Tachyon Portal to check the Instructions from the uploaded Product Pack:
Enter the URL for the Tachyon Portal into a suitable browser for example https:\\Tachyon portal.acme.local\Tachyon.
Sign in using your installation account credentials, for example ACME\TCNInstaller01.
When the Tachyon Portal has finished loading, click on Settings at the bottom of the list of applications.
When the Settings application has opened, click on Instructions and then Instruction sets.
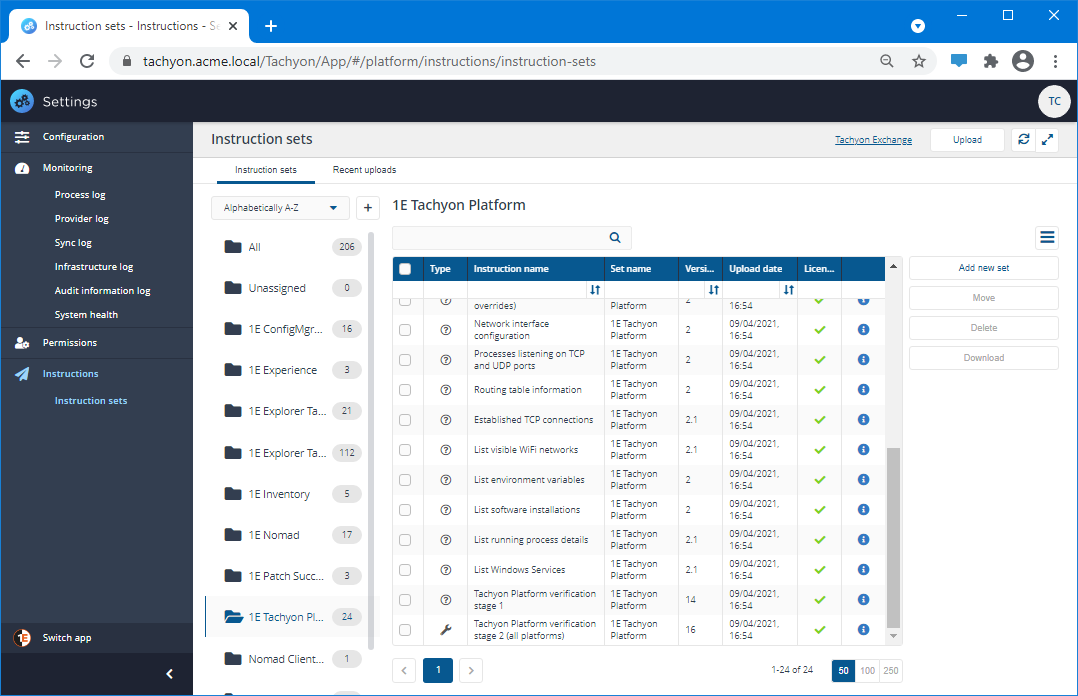
On the Instructions sets page, you will be able to see Instruction sets that have been created for each Product Pack that was in the ProductPacks folder.
The verification instructions
By following the steps provided under the Uploading with the Tachyon Product Pack Deployment Tool heading you will have loaded the 1E-Tachyon-Platform.zip Product Pack into the 1E Tachyon Platform Instruction set, containing the two verification instructions: Tachyon Platform verification stage 1 and Tachyon Platform verification stage 2 (all platforms), along with a number of other instructions that are used to populate data in the Device View. The verification instructions will be used later in the quick start guide to perform a quick verification of Tachyon and demonstrate how to ask questions and run actions.
Tachyon clients
When installing 1E Client (with Tachyon features enabled) the following installation settings are mandatory and must be supplied. Other client configuration settings are optional and have been assigned default values.
The following properties can be entered manually when installing from the Windows Installer wizard. Alternatively, the properties can be included as part of a Windows msiexec command-line launch.
Property | Mandatory | Setting |
|---|---|---|
Yes | Set to the previously configured Tachyon DNS Name FQDN. You will also need to specify the port and the rest of the background channel URL. By default, the port is set to 443. In our example, this would be set to: https://TACHYON.ACME.local:443/Background/ | |
Yes | Set to the previously configured Tachyon DNS Name FQDN. From version 3.1 onwards, you will also need to specify the port. By default, this is set to 4000. In our example, this would be set to: TACHYON.ACME.local:4000 |
Example which enables only Tachyon client
Example Windows 1E Client installer command-line with only the 1E Client features enabled, other client modules are not enabled. Tachyon uses HTTPS only.
msiexec /i 1E.Client-x64.msi SWITCH="tachyon.acme.local:4000" BACKGROUNDCHANNELURL="https://tachyon.acme.local:443/Background/" /qn /l*vx C:\Windows\temp\1EClient-install.log
Example which enables only Nomad client
Example Windows 1E Client installer command-line with only Nomad module enabled, which also requires Tachyon client features to be enabled. Tachyon uses HTTPS only.
msiexec /i 1E.Client-x64.msi SWITCH="tachyon.acme.local:4000" BACKGROUNDCHANNELURL="https://tachyon.acme.local:443/Background/" MODULE.NOMAD.ENABLED=true MODULE.NOMAD.CONTENTREGISTRATION=1 MODULE.NOMAD.SSDENABLED=1 /qn /l*vx C:\Windows\temp\1EClient-install.log
Example which enables only PXE Everywhere Agent
Example Windows 1E Client installer command-line with only PXE Everywhere Agent client module enabled, and Tachyon features disabled (by setting SWITCH and BACKGROUNDCHANNELURL to none). PXE Everywhere uses only HTTP.
msiexec /i 1E.Client-x64.msi SWITCH=none BACKGROUNDCHANNELURL=none MODULE.PXEEVERYWHERE.ENABLED=true MODULE.PXEEVERYWHERE.CONFIGSERVERURL="http://pxecentral.acme.local/PXELite/PXELiteConfiguration.asmx" /qn /l*vx C:\Windows\temp\1EClient-install.log
Example which enables only Shopping client
Example Windows 1E Client installer command-line with only Shopping client module enabled, and Tachyon features disabled (by setting SWITCH and BACKGROUNDCHANNELURL to none). Ensure you use HTTP or HTTPS as appropriate.
msiexec /i 1E.Client-x64.msi SWITCH=none BACKGROUNDCHANNELURL=none MODULE.SHOPPING.ENABLED=true MODULE.SHOPPING.SHOPPINGCENTRALURL="https://appstore.acme.local/shopping" MODULE.SHOPPING.LOOPBACKEXEMPTIONENABLED=true /qn /l*vx C:\Windows\temp\1EClient-install.log
Example which enables only WakeUp client
Example Windows 1E Client installer command-line with only WakeUp client module enabled, and Tachyon features disabled (by setting SWITCH and BACKGROUNDCHANNELURL to none).
msiexec /i 1E.Client-x64.msi SWITCH=none BACKGROUNDCHANNELURL=none MODULE.WAKEUP.ENABLED=true MODULE.WAKEUP.REPORTINGSERVER="nwmserver.acme.local" /qn /l*vx C:\Windows\temp\1EClient-install.log
Use 1E.Client-x64.msi for 64-bit Windows and 1E.Client-x86.msi for 32-bit Windows. For non-Windows platforms, platform specific packages for Linux, Solaris and Mac are available.
When installing interactively through the Windows installer wizard, logon using an account that has local administrator rights.
For details of step-by-step interactive and command-line installation, please see Deploying 1E Client on Windows.
For details of how to deploy the 1E Client to macOS platforms, see Deploying 1E Client on macOS.
For details of how to deploy the 1E Client to Linux platforms, see Deploying 1E Client on Linux.
Export all responses feature
This step is optional, only if you require this feature. Please refer to Tachyon Server post-installation tasks for details.
Configure
Set security roles
After installation you will only be able to log onto the Tachyon Explorer using the installation account. This account is purposefully restricted to just allowing the configuration of security roles. So the first step must be to add other users to access the other capabilities of Tachyon.
Users for administration
We suggest that you add a user or group to handle the administration tasks for your evaluation environment.
Users for performing actions
To perform actions you will need at least two other users. One an actioner and the other an approver, otherwise you won't be able to perform actions.
A Tachyon AD group tutorial
For this quick start guide we use two specific accounts and a security group to assign to the roles we need. You may want to use AD groups to define Tachyon access and we have provided a complete tutorial on adding users and roles via AD groups, on the Configuring Access Rights - tutorial page, which you may find useful.
Configure quick start users
At this point we will configure the user accounts, as listed in Quick start user accounts, to their different roles in Tachyon.
Using these accounts the user roles configuration is done using the following steps:
Logon to Tachyon using the installation account. The Tachyon Portal website will be available after installation using the Tachyon DNS Name FQDN, configured during the prepare phase of the quick start. In our quick start environment this is tachyon.acme.local. So the URL for the Tachyon Portal is:
Note
https://tachyon.acme.local/Tachyon
The first time you log in the Tachyon applications will be set up.
Initially the installer account has purposefully limited Tachyon permissions and the permissions for this account cannot be modified directly. This means that the account cannot access any of the applications. To resolve this for the quick start guide, we need to create a new Tachyon user account for the TCNGAdministrators group and assign global administrator permissions to that user. To do this you need to navigate to the Settings application page using one of the following methods:
If you're on the home page click on the Settings item.
If you've already navigated to another application, click on the Settings item on the Switch app menu.
Once you're in the Settings application, to add the TCNGAdministrators group Tachyon user:
Expand the Permissions node.
Click on Users to display the Users page.
Click the Add button to display the Add user popup.
Enter some text in the Select AD user or security group field (for example, TCNG) that matches the required user or group name. In our example we know we will be adding a security group, so we can uncheck the User option so that the search only returns security groups.
After clicking the search icon, a list of matching users and groups from AD will be displayed. Select TCNGAdministrators and click Add.
To set the full administrator role for the new ACME\TCNGAdministrators Tachyon user:
Click on the new ACME\TCNGAdministrators username link to display its details.
On the Roles tab click the Edit button to display the Edit roles assigned to user popup.
Select Full Administrator from the list of available roles.
Click the Save button to assign the selected roles to the user.
You can check which users belong to the group by clicking on the Group members tab. In our example, you can see that there are two users in the group: TCNAdmin01 and TCNInstaller01. Both of these accounts should now have the Full Administrator role applied.
In our example, to demonstrate this for the logged on TCNInstaller01 account all they need to do is refresh the page in the browser. They now have all the permissions related to the Full Administrator role and will therefore be able to see all the configuration items in the Settings application, and they can also now browse to Tachyon Explorer.
Use
Using Tachyon
Having configured the users who will access Tachyon we can now go on to demonstrate the basic functionality of Tachyon including: viewing connected devices, asking a question and seeing the responses, requesting to perform an action and the associated approval process.
Viewing connected devices
Perhaps one of the first things you should do after installing and configuring role-based access to Tachyon is to check what devices are connected. This gives you instant feedback on whether the Tachyon client devices have been installed correctly and are able to communicate back to Tachyon.
In our quick start example we were previously logged on to Tachyon as TCNInstaller01, and have already navigated to Explorer. In order to view the Devices->Table page expand the Devices node and select Table.
The quick start example
To illustrate the workflow for asking questions, filtering responses and performing follow-up actions we will use a simple example where we ask the Tachyon Platform verification stage 1 question. We'll then run the Tachyon Platform verification stage 2 action to complete the verification.
Asking a question
The first step in the example is to ask the question and view the responses in Tachyon Explorer. The question we want to ask is Tachyon Platform verification stage 1. The following steps show how to select and ask the question then view the responses. Still logged on as the TCNInstaller01 account, the steps are:
The usual way to run instructions is from the ExplorerHome page, click on Home to view the Home page.
Type some letters from the name of the stage 1 question into the Explorer field, in our example we type the text verif. This will display a list of questions that match the text. You will see the two instructions; the stage 1 question and the stage 2 action.
Select the Tachyon Platform verification stage 1 question from the list of matches.
The question is added to the Explorer window. Depending on the question you may need to set some attributes and for all questions you can set parameters, such as the duration, coverage and question filters. In our example this simple question has no attributes and will be asked of all the devices with no filtering, so we click on the Ask this question button directly.
The question gets asked of all Tachyon client devices. If they are currently connected they will respond immediately. If they are offline they will respond if they connect within the duration of the question.
Performing an action
From Tachyon v4.0 you no longer need to ask a question before you can run an action from the ExplorerHome page.
To do this:
In the edit field of the Home page type verif and select the Tachyon Platform verification stage 2 action from the list displayed.
Run this action with default parameters by clicking the Perform this action button. Doing this triggers the action approval workflow.
Tachyon will ask you to confirm your user name and password credentials. This is a safeguard to prevent actions from being run on unlocked devices where you are temporarily absent.
By default, if email has been configured, Tachyon provides two-factor authentication - so after the credentials have been set and the Confirm and send button is clicked, you will see that the instruction requires authentication. You will then need to check your email for the authentication code.
After retrieving the authentication code, return to Tachyon and enter it into the prompt. The instruction will then go into a pending approval state and a notification will be sent to the approver. As a further safeguard, Tachyon actions cannot be approved by the person requesting the action. In our example this means that TCNInstaller01 cannot approve their own action, approval must be done by the other user TCNAdmin01.
The approver will receive an email saying that the action is pending their approval. If the approver logs on to Tachyon using the link provided in the email, they will be directed to their Notifications page.
Scrolling to the bottom of the Notifications page the approver gets an opportunity to provide a comment for their approval or rejection decision. If they want to approve the action they must first check the I understand approving my request impacts my IT environment checkbox and then click the Approve button. In our example TCNAdmin01 enters a suitable comment, checks the box and clicks Approve to approve the service start action.
The approver is then immediately notified that their decision has been implemented.
At the same time, Tachyon also enables the action to go ahead. In our example, the results of running the action are displayed, showing that all twelve connected devices responded and were able to run the verification of the background channel.
In conclusion
In this quick start guide we've shown how to configure an example environment, how to implement the Tachyon Server and Tachyon clients onto the environment, how to configure the Tachyon users and import Product Packs. Finally we've shown those users accessing the Explorer to investigate the devices that are currently connected and then asking a question and performing and approving an action.
Next Steps
Using applications that are installed by default
The following applications are always installed by Tachyon Setup, although you may have limited access to features depending on your license.
Settings - please refer to Using Settings
Inventory - please refer to Introducing Inventory
Explorer - please refer to Using Tachyon Explorer
Guaranteed State - please refer to Using Guaranteed State
Experience - please refer Using Tachyon Experience.
Please refer to Using consumer applications for a summary of these and other optional applications.
Use the Connectors page in the Inventory application to configure connectors and populate the inventory repository. Introducing Inventory describes how to view the normalized inventory data, which can then be used by the following applications that depend on inventory.
AppClarity
Application Migration
Patch Success.
Installing and Using AppClarity
You can use Tachyon Setup to install AppClarity during or after you install or upgrade Tachyon using setup. Please refer to Implementing AppClarity.
Installing and Using Application Migration
You can install Application Migration during or after you install or upgrade Tachyon using setup. Please refer to Introducing Application Migration.
Installing and Using Patch Success
Use must use Tachyon Setup to install and configure Patch Success when you install or upgrade Tachyon. Further configuration is then required as described in Implementing Patch Success.
Installing and Using Nomad
You can install Nomad during or after you install or upgrade Tachyon using setup. Please refer to Implementing Nomad.
Using Configuration Manager Console Extensions
If you have Microsoft System Center Configuration Manager (SCCM, ConfigMgr) then you can install the 1E Tachyon Toolkit on each computer that has Configuration Manager Console installed, in order to add right-click tools. Please refer to The 1E Tachyon Toolkit.
Creating your own instructions
You will need your own code signing certificate, and have it registered in your Tachyon license, if you want to develop your own custom Tachyon instructions, or modify those of other authors. Instructions that are provided in the Tachyon Platform zip or downloaded from the 1E Exchange have already been code signed using the Platform and Exchange certificates from 1E. Your license controls whether you can use these instructions.
Ideally, all of your Tachyon instruction developers should share a single code signing certificate between them. Each code signing certificate must be registered in your license and associated with your organization's instruction name prefix. When you have chosen your prefix and have your code signing certificate(s) you then need to send details of these to 1E, who will update your license. This will then automatically activate on your Tachyon Server (assuming it has a connection to the Internet).
For a getting-started guide to configuring and verifying your Tachyon system so that you can run customized Instructions, refer to Running instructions for the first time.
The Tachyon SDK (refer to Writing instructions) is where you can find comprehensive resources for using Tachyon Instruction Management Studio (TIMS) and authoring your instructions.