Repositories page
How to configure repositories for use with AppClarity.
Managing your repositories
Go toSettings → Configuration → Repositories
Adding a new repository
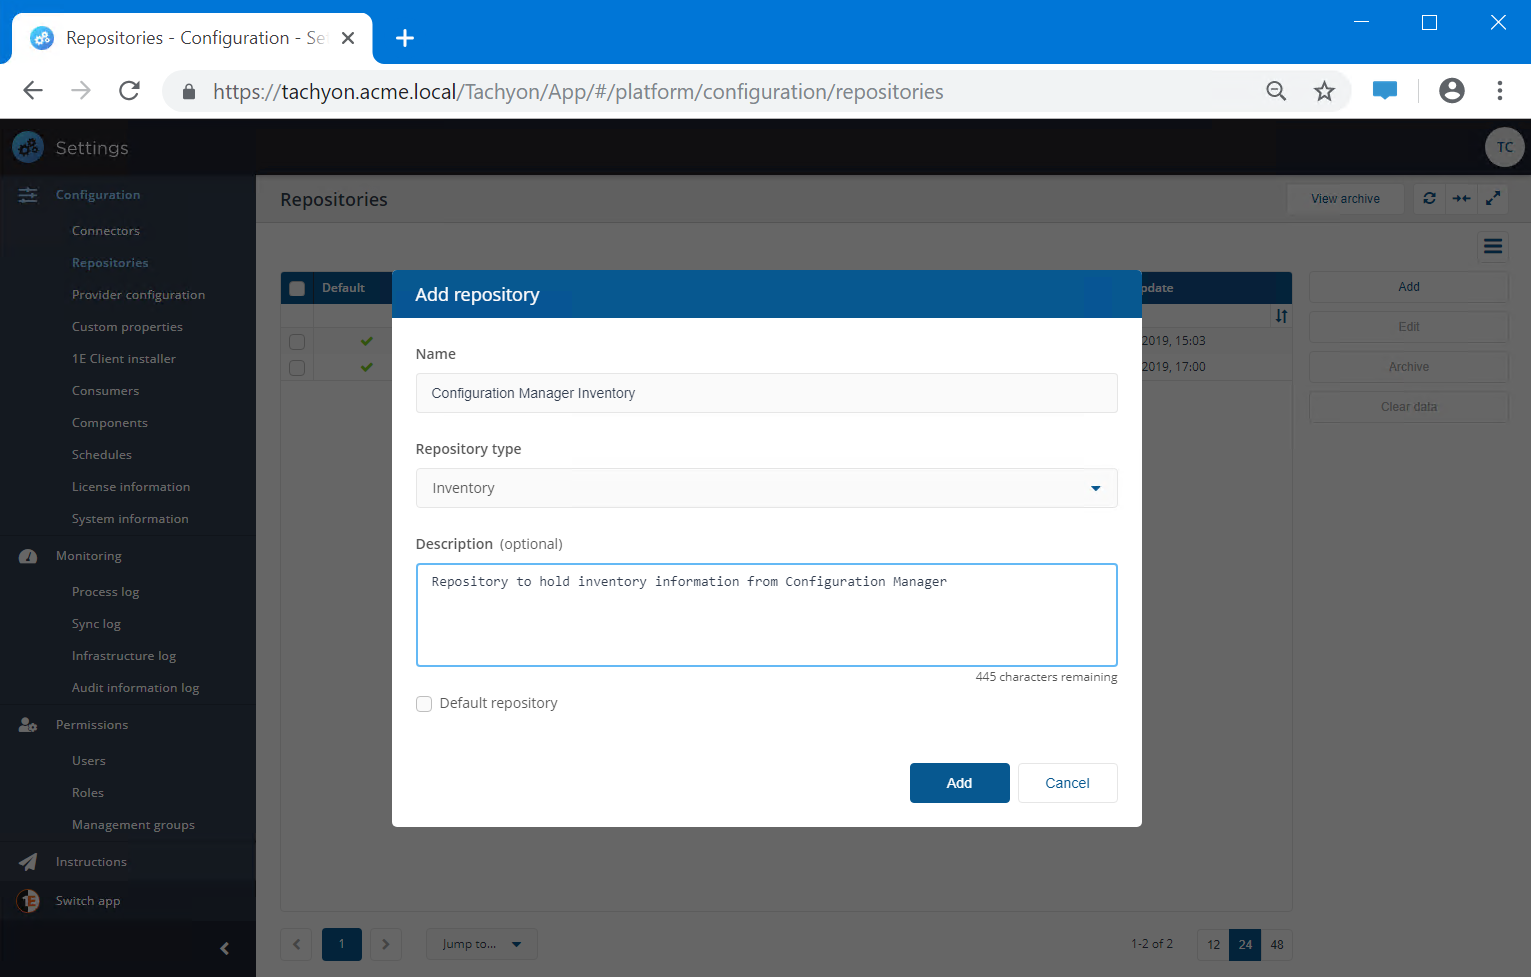
Click on the Add button.
In the Add repository popup enter the details for the new repository.
Enter a suitable Name for the repository this must not match any existing repository.
Select the Repository type.
Enter a suitable description for the new repository.
If you want the new repository to be the default for the selected Repository type then check the Default repository checkbox, otherwise leave this unchecked.
When all the settings have been made click Add to create the repository.
Tip
You should use a naming convention for repository names:
<scope> <repository type>
Naming with scope first makes it easier to know which repository you are using. The name of the repository you are currently using is visible in a drop-down list at the top of pages in the user interface.
Including the repository type in the name helps when creating an action or schedule.
Changing the name of a repository
Select a repository and click Edit
In the Edit repository popup change the Name
Change the description if required.
If you want the repository to be the default for the selected Repository type then check the Default repository checkbox, otherwise leave this unchecked.
Click Save.
Setting the default repository
Select a repository, for example Configuration Manager Inventory and click Edit.
In the Edit repository popup check the Default repository checkbox and click Save.
Confirm the repository is listed as Default for its repository Type.
From this point on all pages that show information from an inventory repository would show the Configuration Manager Inventory by default. You can still change the repository for a particular page by clicking on the repository selector at the top-right of the page.
If you no longer wish a repository to be the default, then you must choose another repository instead.
Tip
Repositories are useful when you want to segregate different types of data. For example, you could have one inventory repository for Configuration Manager inventory data, and another one for BigFix data. Alternatively, you can have connectors to different inventory sources pushing data into one repository. Any Management Groups that you create will span all the repositories you have.
Note
Once you've created a new repository you cannot delete it. You can only change its details, clear its data or archive it.
The name of a repository must be unique, but can be changed.
Setting a repository as the default repository means it is used as the default on certain screens.
Creating a new compliance or entitlement repository
The process is similar to creating a new inventory repository with the additional step of Configuring associations for a new compliance repository. Each compliance repository must be associated with one entitlement repository and one inventory repository.
When you first installed AppClarity, two repositories were created called Default compliance and Default Entitlement to add to the existing Default Inventory. You can associate using the steps described in Running your first Compliance License Summary.
When creating new repositories, please refer to Naming conventions.
Guidance for using multiple repositories
In general, you will not need additional repositories. Once a compliance repository has been used you should not change its associated entitlement or inventory repositories because that will produce inconsistent compliance results, you should keep all your:
Entitlements in a single entitlements repository, for example Default Entitlements, you can use additional entitlements repositories for testing entitlement imports
Reclaim policies in a single compliance repository, for example Default compliance, the reclaim system uses all compliance repositories, so if you create reclaim policies in multiple compliance repositories they will all be used and troubleshooting may be difficult, but you can use management groups to manage reclaim policies.
You can use a single compliance repository for compliance reporting. If you want you can create a new compliance repository for a specific compliance audit project, for example, every quarter or annually, so that you can compare one period with another. You would associate each compliance repository with your default entitlement repository, but maybe associate an additional inventory repository for each snapshot inventory.
Configuring associations for a new compliance repository
To create a new compliance repository and associate it with one entitlement repository and one inventory repository, you'll need to:
Under the Settings→Configuration→Repositories click Add.
In the Add repository screen for:
Name - enter a logical name for the new repository.
Repository type - select Compliance from the drop-down menu.
Inventory repository - select which Inventory repository is used by Compliance.
Entitlement repository - select which Entitlement repository is used by Compliance
Description (optional) - enter a description for the new repository.
Default repository - check if you want this to be a default repository.
When you first run AppClarity the Entitlement repository dropdown in the Add repository screen will only contain the Default Entitlement repository, you can select the default or other entitlement repository if you have created one.
You're now ready to start populating the compliance repository.