Using the WakeUp console
Configuration is managed from the WakeUp Console (started from the WakeUp program group on the Start menu). Configuration options vary depending on whether you are using Configuration Manager or NightWatchman Management Center.
Configuration consists of:
Setting the communication protocols between the Agents and the WakeUp server
Setting an exclusion (only available in Configuration Manager mode)
Viewing Advertisement Statistics (only available in Configuration Manager mode)
Viewing Software Updates Statistics (only available in Configuration Manager mode)
Viewing Application Statistics (only available in Configuration Manager mode).
Connecting to the WakeUp server
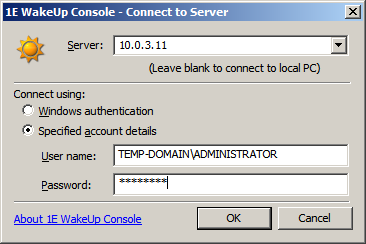
The first step is to connect to the required WakeUp Server.
Note
You need full permissions on the WakeUp server root\N1E\WakeUp WMI namespace in order to run the WakeUp console; alternatively connect as a local administrator.
The parameters to connect to the server are:
Parameter | Notes |
|---|---|
Server | The name or IP address of the WakeUP Server you are connecting to. Leave blank if you are connecting to the local computer. |
Windows authentication | Uses credentials for the currently logged on user to connect to the WakeUp Server. |
Specified account details | Requires a user name and password for authentication; useful if connecting to a remote server. |
The General screen
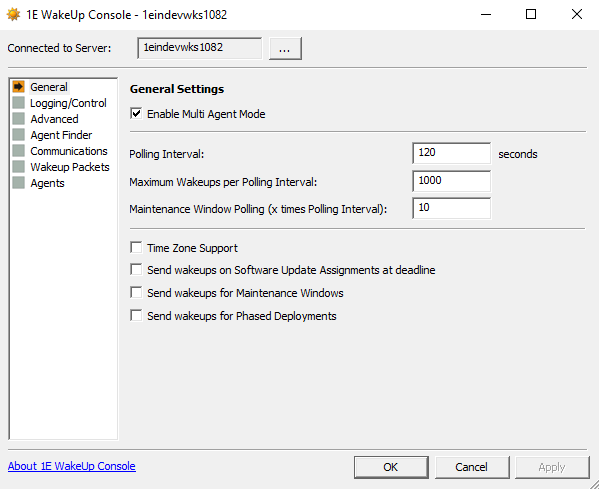
The options for General settings are:
Options | NightWatchman Management Center | Configuration Manager | Notes | ||||||||||||
|---|---|---|---|---|---|---|---|---|---|---|---|---|---|---|---|
Enable Multi-Agent Mode |  | | Multi-Agent mode is the recommended mode of operation for WakeUp. Ensure this is enabled to support functionality such as Last Man Standing and WakeUp Success Reporting. NoteIf you modify this parameter, you must restart the WakeUp server. | ||||||||||||
Polling Interval | | | The time in seconds between database scans. This parameter is also used to define the period between wake ups (default is 30 seconds). WakeUp looks for new advertisements or jobs added since the last scan and actions them according to other service settings. | ||||||||||||
Maximum Wakeups per polling interval | | | Sets the maximum number of magic packets to be sent per poll interval (default is 1000 wake ups per polling interval). This should be set based on the maximum number of systems likely to require waking in one hour of advertisement processing. This figure also depends on the poll interval itself and should be set in order to make it possible to process all outstanding wake up requests within one hour. For example:
| ||||||||||||
Maintenance Window Polling (x times Polling Interval) |  |
| This parameter sets the time interval between Maintenance Window check cycles. Value of this parameter times value in Polling Interval seconds will be the time interval for Maintenance Window check cycles. | ||||||||||||
Time Zone Support | | | If checked, all wake ups occur in the correct time for the local client system. If disabled, all wake ups occur in local time on the Configuration Manager server. This parameter is unchecked by default NoteIf you modify this parameter, you must restart the WakeUp server. | ||||||||||||
Send wakeups on Software Updates Assignments at deadline | | | If checked, sets the use of WakeUp Server for software updates assignments. Only computers that are non-compliant (those needing the patch) are woken. The wake ups occur when the deployment deadline (when the Software Updates must be installed by) is reached. | ||||||||||||
Send wakeups for Maintenance Windows | | | If checked, sets the WakeUp Server for Maintenance Windows. Only computers inside collections on which Maintenance Window will be applied will be woken up. | ||||||||||||
Send wakeups for Phased Deployments | | | If checked, sets the WakeUp Server for Phased Deployments. Computers for respective phases will be woken up the specified time as per deployment. |

The Logging/Control screen

The options for Logging/Control are:
Options | NightWatchman Management Center | Configuration Manager | Notes |
|---|---|---|---|
Logfile Name: | | | Specifies the name of the log file. Defaults is: |
Maximum Logfile Size: | | | Sets the maximum size for the log file in bytes (default is 524288 bytes). When the file reaches this size, a copy is made with a |
Logging Levels: | | | Determines the level of detail recorded in log file. Under normal circumstances, the default settings should be enough; however more detailed logging can be enabled by increasing the logging levels and events to watch. Logging levels
Event log levelsAdds the category of WakeUp logging information to be put into the Windows Event log by the WakeUp Server. NoteThis only restricts the events that are logged during the wake up process, events such as service start and stop events and major communications failures and exceptions will always be logged.
Other controls
|
The Advanced screen
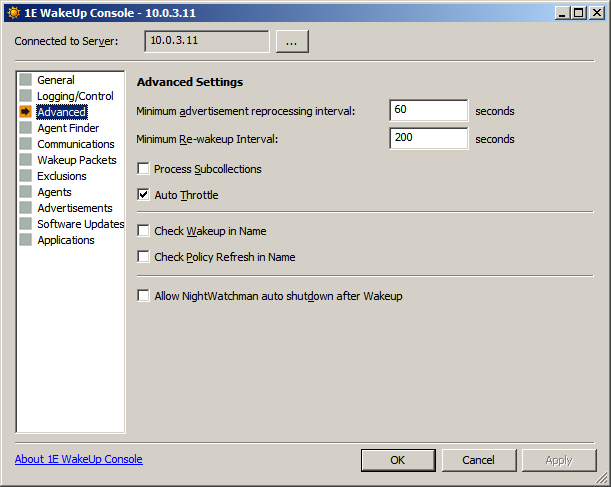
Advanced Settings control how WakeUp deals with specific timing or operational requirements. These parameters are typically left at their default values.
Options | NightWatchman Management Center | Configuration Manager | Notes |
|---|---|---|---|
Minimum advertisement reprocessing interval | | | The minimum time in seconds before the same advertisement is reprocessed default is 60 seconds). This timer is only relevant if short poll intervals are required. |
Minimum Re-wakeup Interval | | | Minimum time in seconds between wake ups for the same machine (default is 200 seconds). The minimum re-wakeup interval is designed to prevent a system from receiving multiple magic packets when it has already been woken up. |
Process Subcollections | | | Determines if sub-collections are included when processing advertisements (disabled by default). |
Auto Throttle | | | If enabled, WakeUp automatically increases the number of wake ups per polling cycle to ensure that all systems can be processed within one hour (enabled by default). |
Check Wakeup in Name | | | Determines whether wakeups are sent depending on specific text included in the Configuration Manager deployment name and/or comment (unchecked by default). When unchecked, wakeups are sent unless the text 'NoWakeUps' is used. When checked, wakeups are sent only when the text 'WakeUpsEnabled' is used. NoteIf checked, any Software Updates Assignment in Configuration Manager that you want to associate with WakeUp must have the text 'WakeUpsEnabled' in the name or comment. |
Check Policy Refresh in Name | | | Determines whether policy refreshes are sent depending on specific text included in the Configuration Manager deployment name and/or comment (unchecked by default). When unchecked, Policy Refreshes are sent unless the text 'NoPolicyRefresh' is used. When checked, Policy Refreshes are sent only when the text 'PolicyRefreshEnabled' is used. |
Allow NightWatchman auto shutdown after Wakeup | | | Enables interaction between WakeUp and NightWatchman. Computers woken by WakeUp are shut down providing there are no pending Configuration Manager jobs. Autoshutdown does not occur for manually requested wake ups, i.e. those from a right-click option from the Configuration Manager console, from the WMI interface or on the WakeUp command-line NoteIn NightWatchman, You can override the general auto shutdown option and prevent shutdown on a per Configuration Manager Advertisement basis by including the text 'NoAutoShutdown' in the advertisement name or comment. |
The Agent Finder screen
The Agent Finder screen controls how 1E Agents are discovered (using ping packets) when using Multi-Agent mode. You can set the number and frequency of pings sent, the timeout for receiving a response and how often the subnet is rescanned. This lets you set a balance between successfully finding all the Agents against the amount of network traffic generated.
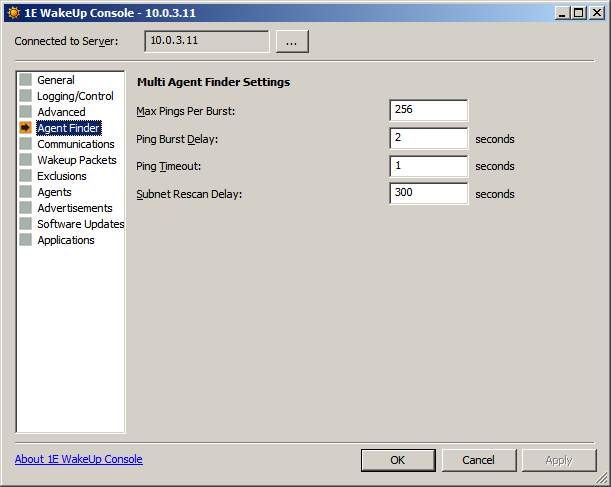
The following options are only available if Enable Multi-Agent is enabled in the General screen.
Settings | Notes |
|---|---|
Max Pings Per Burst: | The number of ping packets to generate in a single burst (default is 256 packets). |
Ping Burst Delay: | The delay in seconds between successive ping bursts (defaults is 2 seconds). |
Ping Timeout: | The time in seconds to wait for a response from the 1E Agents (default is 1 second). |
Subnet Rescan Delay: | The time in seconds to wait before rescanning the subnet to detect 1E Agents (default is 300 seconds). |
The Communications screen
The Communications parameters are:
Settings | Notes |
|---|---|
Agent TCP Port: | The 1E Agent listening port (default is 1776). Used for WakeUp Server to talk to 1E Agent services. This must be the same for WakeUp Server and all its 1E Agents. NoteIf TCP is not supported in your environment, contact 1E Support for further information. |
Server TCP Port: | WakeUp Server listening port (default is 1777). Used to communicate with the WakeUp Server. This must be different to Agent TCP Port and must be the same for the WakeUp Server and all its 1E Agents. |
Maximum Connections: | The maximum number of connections that WakeUp Server opens at any given time (default is 16). Only relevant if NoteThere is an in-built maximum limit of 64. |
Maximum Burst Size: | Sets the maximum numbers of wake up requests forwarded to a 1E Agent in a single burst (default is 100). |
Burst Delay: | Sets the number of seconds between each batch of wake up requests being transmitted to a 1E Agent (default is 5 seconds). |
Enable Agent Reporting: | Enables or disables 1E Agent reporting Advertisement status (on by default). NoteIf 1E Agent reporting is disabled, WakeUp reports are unavailable. |
Enable FIPS Compliance Encryption | Enables or disables the use of FIPS for NightWatchman Management Center communications. Enabling this sets the NightWatchman Management Center to use FIPS encrypted communications. NoteWhen setting this option, ensure that the same setting is made for all NightWatchman Management Center, WakeUp Server and 1E Agent components. |
Encryption Level: | Controls the level of encryption used for communications between WakeUp Server and 1E Agents during operations. Encryption prevents packet sniffers from examining the contents of the WakeUp packet and discovering information about your network. Options are:
|
The WakeUp Packets screen
WakeUp Packets enables 1E Agent configuration (regardless whether the system is in Multi-Agent or dedicated Agent mode). When a wake up request is sent, agent configuration parameters is also broadcast to the 1E Agents ensuring that they function according to WakeUp Server and not by settings made during the 1E Agent installation.
Settings | Notes |
|---|---|
Magic Packet Sending Port: | The UDP port used to send wake up broadcasts. |
Magic Packet Delay: | Delay in milliseconds between sending magic packets. |
Repeat Count: | Number of times to repeat sending magic packets. The maximum repeat count allowed is 3. NoteIf you suspect your network is prone to dropping datagram packets, try setting different values for Repeat Count and Repeat Delay. |
Repeat Delay: | Delay in seconds before resending a repeated magic packet. NoteIf you suspect your network is prone to dropping datagram packets, try setting different values for Repeat Count and Repeat Delay. |
Wakeup Result Delay: | Configures the time, in seconds, for the Primary Agent to wait and see if it has woken a machine. It waits for the WakeUp Agent to announce it has just woke, or tries an ICMP ping. The delay should be set to how long it normally takes for computers to start up. You can override this setting on the WakeUp Agent using its installer property |
Enable Wake-on-LAN (Magic) Packets | Sets the use of a standard Wake-On-LAN packet to power on a system from sleep state (selected by default). You should test your systems to determine which packet type is needed. |
Enable Unsuspend Packets | Sets the use of a directed packet (required by some newer systems) to wake those systems from standby or suspend state (selected by default). You should test your systems to determine which packet type is needed. |
The Exclusions screen
This is a Configuration Manager only screen and is used to prevent wake ups for taking place during certain times of the day. Check the Enable WakeUp Exclusions box and define the time periods for the exclusion. For example:
To define an All Hours exclusion, click the shaded cell next to All Hours.
To define an exclusion for a particular day, click the shaded cell next to the day.
To define an exclusion for a particular hour for all days, click the shaded cell below the hour of the day.
Choose Prevent Wake Ups or Allow Wake Ups to define the behavior of the exclusion. An example below illustrates an exclusion that disables wake ups between 8AM to 8PM, Monday to Friday
Click Apply to enforce the WakeUp exception.
The Agents screen
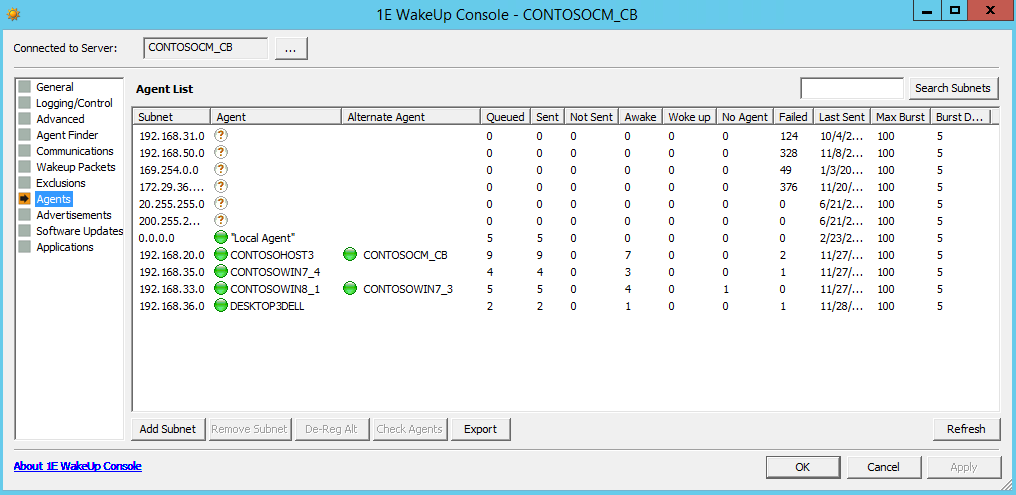
The Agent screen displays a list of all discovered 1E Agent systems and enables centralized control over their settings. When a subnet is discovered, the Primary and Alternative Agents are displayed under Agent List.
In Dedicated Agent mode the 1E Agent systems populate the list box by registering with the WakeUp Server at service start-up. In multi-agent mode the 1E Agents are listed after they have been found. In the Agent screen, you can:
Controls | Notes |
|---|---|
Add Subnet | Adds a specific subnet to the Agent List. Once the subnet is added, you can check for 1E Agents on it. Subnets are added automatically as these are checked when a scheduled wakeup is performed. |
Remove Subnet | Removes a subnet from the Agent List. Only enabled when the selected subnet has no registered Agents. |
De-Reg Agent | Only enabled when a subnet is selected from the Agent List. De-registers the primary agent for the selected subnet from use by WakeUp Server. If a previously discovered alternate agent exists it will become the new primary agent. Note1E Agents re-register at start-up so the de-registered 1E Agent may re-appear. If you do not want that machine to be used as an 1E Agent, remove the 1E Agent from the machine. |
De-Reg Alt | De-registers the alternative 1E Agent for the selected Subnet. |
Check Agents | Checks the primary agent and alternative agent on the selected subnet. The check pings selected 1E Agents. If the scan fails for the primary and alternative agents, a complete scan for the subnet is done. NoteThe process is completely automatic as the Primary and Alternative Agents are also checked when a scheduled wakeup is performed. |
Export | Export the subnets to a CSV file. In Microsoft Excel or a similar program you can then analyze the subnets to identify problems, review results, etc. |
Refresh | Refreshes the details for selected 1E Agent system. |
Search Subnets | Enter the first part of a subnet or subnets you're interested in to and then click Search Subnets to have only subnets starting with that part. For example, "192.168" will return all subnets start with 192.168. Start with a percentage sign if you want any subnets including the part. For example, "%168" will return all subnets that include "168" anywhere in them. |
Explaining the Agent List box
The following describes the columns for the Agent List box:
Agent | Explanation |
|---|---|
Subnet | Lists the subnets managed by the WakeUp server. |
Agent | Lists the name for the Primary Agent. It is the computer on each subnet that manages wakeup requests for the subnet. |
Agent state | This is a column in the export file and the icon next to the Agent name in the console. See the next table (below) for the significance of the status icons. |
Alternate Agent | Lists the name for the Alternate Agent. The computer will serve as the purpose of the primary agent if the primary agent is not available. |
Alternate state | This is a column in the export file and the icon next to the Alternate Agent name in the console. The icons are the same as the Agent State icons. |
Queued | Lists the number of wake ups that have been received from the WakeUp server and sent on the subnet. |
Sent | Lists the number of computers sent a wake up signal |
Not Sent | Lists the number of computers not sent a wake up signal. |
Awake | Lists the number of target computers which were already on when the primary or alternate sent out the magic packet. Only available in Multi-Agent mode. |
Woke Up | Lists the number of target computers waking up in response to the magic packet. Only available in Multi-Agent mode. |
No Agent | Lists the number of computers already awake but without a 1E Agent installed (and therefore could not respond to wakeup requests). |
Failed | After sending magic packets, the primary or alternate waits for a pre-determined time for replies. Any computers which have not responded are sent an ICMP ping. Computers responding to this are classified as No Agent (they are awake, but WakeUp cannot be certain if this is due to a magic packet or if the machine was awake already). Computers not responding to the ping are classified as Failed. |
Last Sent | Lists the last time a wake up signal was sent. |
Max Burst | Lists the MAXBURST value set for the primary and alternate agents. |
Burst Delay | Lists the BURSTDELAY value set for the primary and alternate agents. |
In Site | This is a column in the export file that doesn't have an equivalent in the WakeUp Console. Its value is always 1, indicating that the subnet belongs to the WakeUp server you connected the console to. |
See the Understanding WakeUp Status page for more details.
The significance of the status icons are:
Icon | Export file value | Status | Notes |
|---|---|---|---|
 | 0 | Unknown | 1E Agent has an unknown status. When a new subnet is added the primary and alternative agents have not yet been discovered thus having unknown status. |
 | 3 | OK | 1E Agent has been discovered and is working as expected. |
 | 1 | Unavailable | The 1E Agent has de-registered itself. |
 | 2 | Connection failed | Connectivity to the 1E Agent is severed. The machine may have been powered down or a network cable removed so that it could not de-register. |
Clicking on a column a column header will cause the list to be sorted in ascending order of that column. Clicking the column header again will cause the list to be sorted in descending order.
Manually adding a new subnet
The Agent Discovery Process is a background task that automatically locates and processes new subnets. It is also possible to manually add a new subnet – most useful in lab environments or during a roll-out when performing targeting testing.
You can manually add a new subnet to the WakeUp discovery by clicking on the Add Subnet button to open the Add Subnet dialog.
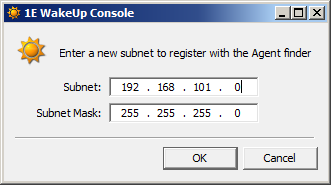
Once a new subnet has been added, it is displayed in the console. Adding the subnet also triggers a discovery, though you may have to wait for the WakeUp Console to refresh before the 1E Agents are listed. You can always force a discovery by selecting the subnet and clicking the Check Agents button.
Modifying the discovered agents
Agent discovery is largely automatic, but from the console you do have the ability to de-register both the primary and alternate agents and trigger a discovery for a particular subnet. You can modify the primary and alternate agents for a subnet by selecting a subnet in the Agent List. If the subnet has already been discovered, the De-Reg Agent, De-Reg Alt and Check Agents buttons are enabled.
Clicking the De-Reg Agent button de-registers the primary agent for the selected subnet. If an alternate agent has been previously discovered, it will become the new primary agent.
Clicking the De-Reg Alt button de-registers the alternate agent for the selected subnet.
Clicking the Check Agents button forces a rediscovery of the selected subnet. This may rediscover previously de-registered 1E Agents.
The Advertisements screen
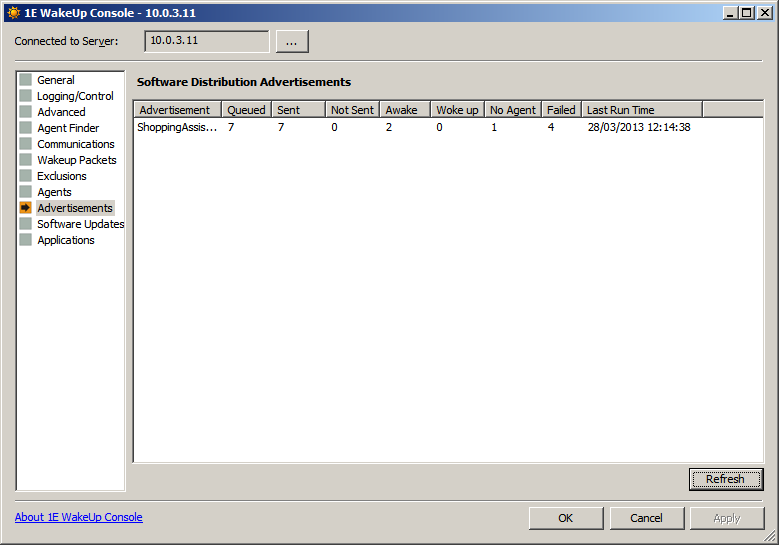
Only applicable to Configuration Manager, displays the statistics of WakeUp behavior in relation to Configuration Manager advertisements that have been sent. The Software Distribution Advertisements table lists the successful wake ups for each Advertisement sent to clients of this particular Configuration Manager site.
The Software Updates screen
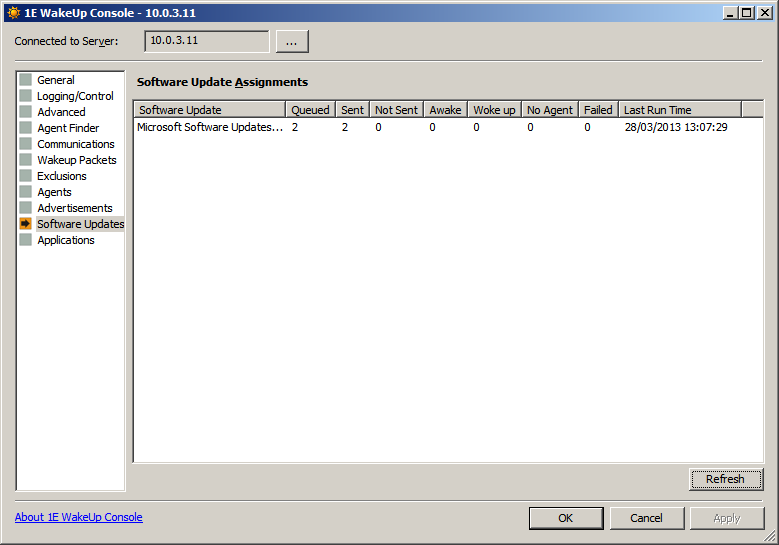
Only applicable to Configuration Manager, displays the statistics of WakeUp behavior in relation to Configuration Manager Software Update Assignments that have been sent. The Software Update Assignments table displays the successful wake ups for each Software Update Assignment sent to clients of this particular Configuration Manager site.
The Applications screen
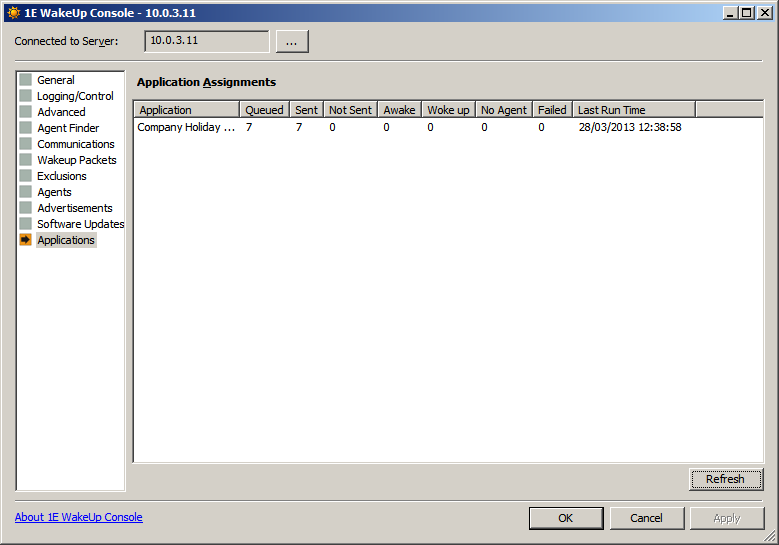
Only applicable to Configuration Manager, displays the statistics of WakeUp behavior in relation to Configuration Manager Application Assignments that have been sent. The Application Assignments table displays the successful wake ups for each Application Assignment sent to clients of this particular Configuration Manager site.
Explaining the Software Distribution Advertisements, Software Update Assignments and Application Assignments table columns
Table column | Explanation |
|---|---|
Advertisement | Lists the name of the Configuration Manager Advertisement, Software Update Assignment or Application Assignment. |
Queued | The queued wake ups for the Advertisement, Software Update Assignment or Application Assignment. |
Sent | Lists the total number of wakeups sent. |
Not Sent | Indicates an error; i.e. no TCP route to the computer was found |
Awake | Lists the number of target computers which were already on when the active 1E Agent sent out magic packets. Only available in Multi-Agent mode |
Woke Up | Lists the number of target computers woken up in response to magic packets. Only available in Multi-Agent mode |
No Agent | Lists the number of computers which were awake already but without a 1E Agent installed |
Failed | After sending magic packets, the 1E Agent waits for a pre-determined time for replies. Any computers which have not responded are sent an ICMP ping. computers responding to this are classified as No Agent (they are awake, but WakeUp cannot be certain if this is due to a magic packet or if the computer was awake already. Also, the 1E Agent may not have been installed). computers not responding to the ping are classified as Failed. |
Last Run Time | Lists the last time the recurring Advertisement, Software Update Assignment or Application Assignment ran. |
Refresh | Updates the Advertisement, Software Update Assignment or Application Assignment table. |
The console reporting can be enabled or disabled by checking the Enable Agent Reporting checkbox in the Communications screen.
Note
If 1E Agent reporting is disabled, WakeUp reports are unavailable.
Configuring 1E Agents
In general, 1E Agents are configured at install time (see installing the 1E Agent. You can, additionally, set wake up parameters for 1E Agents at runtime using the WakeUp Server console.
WakeUp in conjunction with Configuration Manager
We describe two typical situations that WakeUp is used and show how the individual WakeUp components are configured.
Out-of-hours software distribution
Starting systems at predetermined times
Typically, WakeUp is configured once and subsequent usage is done without the need for further intervention – providing a 'set and forget' function. The default WakeUp configuration is valid for 90% of scenarios encountered, thus making the 'set and forget' functionality possible.
Using WakeUp for out-of-hours software distribution
WakeUp can be used to increase the success rate of out-of-hours software distribution. It does this by making sure that systems are powered on when an advertisement becomes available. As many users power down their systems in the evening before leaving, this is an essential to ensure software installs successfully. WakeUp can also be used to spread the load on the network by gradually waking batches of systems during the out-of-hours period.
Scenario
An Office 2012 upgrade needs to go out to 1,000 systems overnight. Because of the size of the install and disruption to business users, it cannot be installed during the day.
Configuring WakeUp for optimum performance
The Configuration Manager administrator determines that 1,000 systems must be upgraded between the hours of 01:00 am and 08:00am. It is common that around 20% (200) of users leave their systems switched on. The rest are powered off but can be booted using Wake-On-LAN. The Office software was sent to distribution points the previous evening so a mandatory assignment schedule is created for the Office 2000 advertisement starting at 01:00 am.
The Configuration Manager administrator also calculates that the 200 systems that are already on will receive the advertisement first. The administrator sets the WakeUp hours of operation to between 01:00 and 07:00. This allows 1 hour after the last wake up for the install to complete.
The administrator must now calculate the number of wake ups and the frequency of polling intervals to spread the load of the installations over the hours of operation (01:00 to 07:00).
Note
The advertisement must arrive within the hours of operation in order for WakeUp to process it. If you have a critical patch that you want to deliver to all machines outside the hours of operation you should use an explicit immediate wake up.
To do this, right-click the context menu in Configuration Manager to invoke WakeUp directly on a collection before sending the critical advertisement. See sending an immediate wake up for more details.
The administrator uses the following calculation:
(Number of systems/Available Hours) /Polling cycles per hour= Maximum required wake ups per polling cycle
Assuming that the polling cycle is every 300 seconds (5 minutes) this works out as follows.
(800 / 6) / 12 = 11.111111…
So the administrator needs to set the Maximum Wakeups per polling interval parameter to 12 (rounding the value up) to ensure all the machines are covered.
At 01:00 the advertisement becomes available and the systems that were left switched on install the software immediately. At the same time WakeUp starts to wake up systems at a rate of 12 every five minutes until 07:00. The last systems to be awakened have the remaining hour to complete the installation, ensuring that all updates are completed by 08:00.
In addition, WakeUp can be configured to shut down systems that it has awoken so the out-of-office wake ups are accompanied by shutdowns after the critical updates have taken place, thereby minimizing power consumption and cost.
Conclusion
Using WakeUp to stage the software installs over the entire out-of-hours period means minimum network load, minimum load on the Configuration Manager distribution points and ensures that all of the targeted systems are available for the upgrade.
Using WakeUp to start systems at a set time
WakeUp allows an enterprise's systems to be powered off at night and ensures that they are up and running by the time the workers are due to arrive in the morning. This saves time, energy and money.
Scenario
A large bank has 500 branches, each containing 10 systems which are Configuration Manager 2012 clients and are Wake-On-LAN compliant. It is company policy to power off these systems every evening in order to save power consumption. The brief is to power on all of the bank's workstations before their employees arrive at 8:00am. This will mean that they do not have to wait around for system start-up and their workstations will be ready to use.
Configuring WakeUp for mass system start-up
The Configuration Manager hierarchy at the bank consists of a central site, 5 primary sites, each of which has 100 secondary sites reporting to it (1 per branch). Because the forwarding of directed subnet broadcasts across the bank routers is disabled, the WakeUp Server is installed in multi-agent mode on the single server in each branch. It is also installed in Stand-alone Server mode on each of the 5 primary site systems.
Because of this highly distributed environment, WakeUp is configured to wake as many systems as possible as quickly as possible with no restrictions. Each primary site is responsible for 1,000 branch workstations, so at each primary site Maximum Wake ups per polling interval is set to 1,000 and the polling interval is set to every 5 minutes. This means that WakeUp can add all 1,000 systems to the wake up list in one polling interval if required. WakeUp is also configured to connect to a maximum of 50 agent systems concurrently, and can send 10 wake ups every 10 seconds to each agent system in the branches. This is set using Burst Delay and Maximum Burst.
Within the Configuration Manager central site, the administrator has defined a collection named All Branch Workstations containing all of the 5,000 systems. In order to wake all 5,000 of these systems each morning at 7:00 - to make sure they are up and running by 8:00, all the administrator has to do is to create an Advertisement which runs the following command on each workstation:
cmd.exe /c
This is in effect a dummy Advertisement, its only purpose being to invoke WakeUp to wake the machines.
Advertisement or assignment wake ups and auto shutdown
Using the WMI interface or the WakeUp Send WakeUp... menu options in the Configuration Manager Admin Console you can wake machines immediately, the Advertisement or Assignment option will wake up the machines at a time appropriate to their local time zone and will automatically be aligned with the receipt of the Advertisement or Assignment. For waking machines in general we recommend that you use the Alarm Clock feature, which is part of the Power Policy capability, in the NightWatchman Management Console to establish wakeup times for your PCs local to their time zone.
Autoshutdown does not occur for manually requested wake ups (these include: the right-click option from the Configuration Manager console, via the WMI interface or on the WakeUp command-line).
So for the Advertisement wake ups, you will need to override the WakeUp auto shutdown option and prevent shutdown by including the text 'NoAutoShutdown' in the Advertisement name or Advertisement comment. A suitable name for the Advertisement would be: Wake all machines at 7 NoAutoShutdown
Sequence of events
07:00 - The advertisement becomes available and each primary site server enumerates the systems that are to receive the advertisement. Because there are no restrictions to the WakeUp service, each site can add all 1,000 systems to the wake up list for forwarding to the 1E Agent systems.
The WakeUp Server connects to 50 1E Agent systems and sends 10 wake up requests to each one. As Agent connections are dropped, new ones are created until the second 50 agent systems are processed.
The whole process takes less than 10 minutes.
Conclusion
WakeUp is ideal for this type of housekeeping task that improves user productivity. Once configured correctly for the environment, no further intervention is required. WakeUp simply integrates with existing Configuration Manager working practices.
Using WakeUp in multi-tier Configuration Manager environments
When creating Adverts in a multi-tier environment where you want to use WakeUp to process the Adverts and send wake ups with policy refresh you must bear in mind the following factors:
How long will it take the Advert to be passed down the Configuration Manager hierarchy to the desired sub-primary where the machines to be woken are located?
What is the desired intention for the Advert? To wake up machines at a specific time or run as soon as possible?
WakeUp advert processing
To achieve the desired behavior when processing Adverts with WakeUp it is important to understand the following concepts/terms:
Advert polling is the process by which WakeUp checks current advertisements in Configuration Manager and checks their schedules and mandatory assignments for due dates.
Advert processing is the act of investigating the Advert and queuing wake ups for the appropriate machines.
WakeUp will process all Adverts that have been scheduled in the last poll interval. This is configurable (please refer to the admin guide).
When an Advert is polled, if the scheduled time is in the past and prior to the last poll time this advert will not be processed.
Advert processing in a multi-tier environment
In a multi-tier environment when an Advert is created it will take a variable amount of time to ripple down the tiers. If by the time the Advert is polled at a lower tier the advertisement's scheduled time has passed, WakeUp will not action any wake ups for that advertisement.
If you create a mandatory assignment with the current time (this also occurs when doing a re-run) this is not guaranteed to be processed at the lower tiers.
Note
It is also possible to increase the poll interval on the WakeUp Server to handle this lag. This does however have the negative effect of increasing the time it takes WakeUp to detect and process all scheduled Adverts.
What this means in practice is that if you want to use WakeUp to wake up machines for an Advert, you need to create the Advert in the right way. Depending on the purpose of the Advert you should create it in one of the following two ways:
If you create an Advert with an "as soon as possible" mandatory assignment this will be processed by WakeUp the first time it detects the Advert during the next poll.
If you want a controlled synchronized update then create an Advert scheduled further in the future than the lag time it takes for an Advert to reach the bottom tiers of the hierarchy.
Configuring the WakeUp Server
We show how the WakeUp Server can be configured to support the specific Configuration Manager site configuration and guide you through configuring and optimizing WakeUp on both the Server and remote listening systems in your hierarchy.
When first installed, the service should be configured according to your Configuration Manager hierarchy, the number of clients and the preferred hours of operation.
All configuration of the service is performed from the WakeUp Console which is started from the the 1E WakeUp program group on the Start menu. If you start the console from the Configuration Manager Administrator Console, you will not be shown the Connect to Server dialog.
Note
WakeUp configuration should only be performed by experienced Configuration Manager administrators, who have a thorough knowledge of the entire Configuration Manager hierarchy.
The console must be run with a local administrator account.
WakeUp Console reporting
In multi-agent mode, as target machines wake, each primary agent reports successful wake-ups as quickly as possible back to its WakeUp server, but has to wait before trying to ping machines that have not reported and then report the remaining successes and failures.
If a target machine is already on and has a 1E Agent installed, it will broadcast: Was Awake
Machines with 1E Agents that have just woken will broadcast: Just Woke
For remaining machines, the primary agent waits WakeUp Result Delay and then pings. Successful ping responses are reported as No Agent and failed responses are reported as Failed
The WakeUp Result Delay (WUResultDelay) is configurable in the Agent registry and is in seconds. By default it is 0 which means the WakeUp Server will tell the Primary Agent how long to wait – configure the delay to be slightly longer than the time it takes for machines to boot up and start their 1E Agent.
The WakeUp server combines all information it receives. Status is reported in the Advertisements node of the WakeUp server console. If it is integrated with Configuration Manager, statuses for software updates and applications are reported.
Note
As some adverts are repeating, statistics are gathered on a daily basis. Historical data can be found in
\Application Data\1E\WakeUpSvr*.csvfiles.Advertisement Wakeup Success information is sent asynchronously by the 1E Agent and does not affect WakeUp performance.
Wakeup Success figures per subnet can be retrieved from the WakeUp Server using WMI. Example web pages exist in the WakeUp Server installation directory.
Causes of incorrect reporting
Statistics will be skewed if client machines are multi-homed i.e. have more than one network card. A wake up request is sent for each network card, but only one reply is returned.
Data will be lost if the WakeUp Server or the active 1E Agent is stopped and restarted. This can occur if the Configuration Manager Advertisement asks for a machine reboot before the WUResultsDelay time has elapsed.
Only machines running the 1E Agent can report back as Woke Up or Awake. An incomplete roll-out of the multi-agent service will cause machines to be registered as No Agent rather than Woke Up.
Sending an immediate wake up request
WakeUp can be used to wake up machines immediately and explicitly from the Configuration Manager Admin Console or automatically, without user intervention to ensure machines are woken up prior to a Configuration Manager Advertisement.
When installed, WakeUp extends the Configuration Manager administrator console menus. The menu extensions permit the explicit immediate waking up of single machines or entire collections.
Note
Policy refresh requires multi-agent mode.
There are three options:
Send WakeUp – sends a wake up request.
Send WakeUp with Policy Refresh – sends a wake up and additionally requests that the computer will check Configuration Manager for new policy.
Collection wake up
To perform an immediate wake up to a Configuration Manager collection, right-click on the collection in the left hand pane of the Configuration Manager administrator console and from the WakeUp sub-menu select Send WakeUp.
Single resource wakeup
Sending a wake up packet to a single resource is similar to sending a wake up to a Configuration Manager Collection. Simply select the required resource in the right hand pane of the Configuration Manager administrator console, right click and from the WakeUp sub-menu select Send WakeUp.
Wake up prior to advertisements
A key feature of WakeUp is that it can be configured to run automatically without impacting on the workflow of the Configuration Manager administrator.
All the administrator needs to do is create the advertisements and WakeUp works out which machines need waking and when and performs the task in time for the advertisement to be processed.
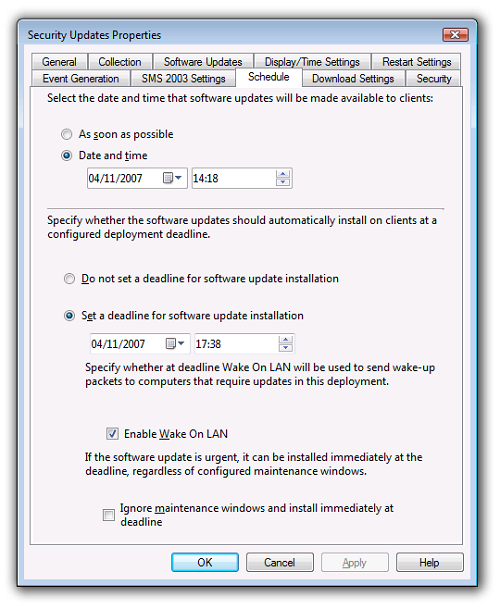
Note
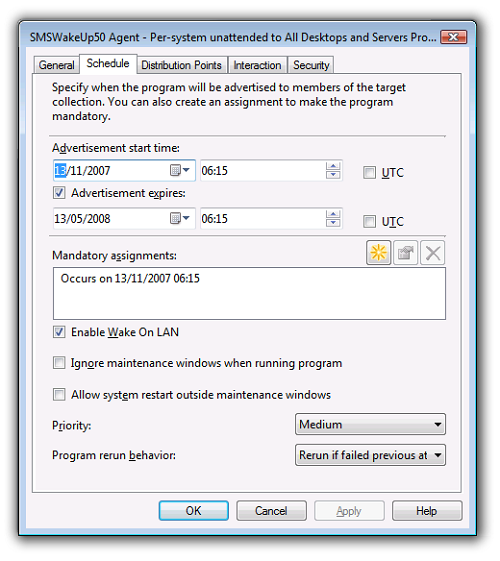
When using WakeUp with Configuration Manager, you must tick the Enable Wake-on-LAN checkbox on the Schedule tab on the Advertisement Properties dialog for each Advertisement you want to use WakeUp with.
To do this the WakeUp service performs the following steps:
It scans all assigned (mandatory) advertisements which are yet to run.
It keeps a list of all processed advertisements – an advertisement will only be reprocessed when its next valid time is greater than the Minimum advertisement re-processing interval.
All valid systems within the advertised collection will then be enumerated and all machines added to a list of requested wake ups. A wake up list is generated in this way for each subnet.
The wake up lists are enumerated in stages. At each polling interval a batch of machines will be woken up and removed from the wake up list. As this wake up list is enumerated, only entries which have not been woken up recently will be processed. Others will be silently discarded.
The wake up list is enumerated in different ways depending upon your installation scenario.
Scenario A: Stand-Alone server only – wake up requests are sent out directly to the machines.
Scenario B: Dedicated agent – the wake up list is sent to the dedicated or alternate 1E Agent for that subnet. This 1E Agent then enumerates the wake up list in stages and wake up requests are sent out to machines for that subnet.
Scenario C: multi-agents – a live 1E Agent is discovered for each subnet. This becomes the active 1E Agent. The wake up list is sent to this 1E Agent. The active 1E Agent then enumerates the wake up list in stages and wakeup requests are sent out to machines for that subnet.
You will have noticed that there are many different configuration options available for WakeUp. This ensures that performance can be controlled to fit in with any network infrastructure.
Policy Refresh
Policy Refresh is only operational in multi-agent mode. This is because a client component is required to initiate the Policy Refresh action.
By default, WakeUp will send a Policy Refresh prompt to ensure that newly awoken machines get any pending advertisements as soon as possible. You can turn the Policy Refresh behavior off globally by checking the Check Policy Refresh in Name option in the Configuration tab of the WakeUp console, or you can turn it off for a particular advertisement by putting the text NoPolicyRefresh into the name of the advertisement.
When you turn Policy Refresh off globally, it can still be explicitly requested for specific advertisements by including the text PolicyRefreshEnabled in the advertisement name.
Supported advertisement schedules
In order for the WakeUp service to process an advertisement, the schedule for that advertisement must be assigned (mandatory). The following types of advertisement schedules are all valid for processing by WakeUp.
Single Schedule
Multiple Schedules
Repeating Schedules
'Soon as Possible' Schedules
Unsupported advertisement schedules
The following advertisement schedules are not supported when used with WakeUp:
Next Logon and Next Logoff – If the package cannot run until next user logon or logoff, there is no point in waking the system, as this will be done by the user.
Advertisements to collections containing Users or User groups.
Note
Collections containing a mixture of systems and users will be processed but the 'user' type resources will be discarded.
Software updates assignments, WakeUp and Configuration Manager
When configuring the use of WakeUp with Software Updates Assignments in Configuration Manager you need to ensure the following items are done:
You need to check the Send wake ups on Software Updates Assignments at deadline checkbox on the General tab of the WakeUp console
You will also need to check the Enable Wake On LAN option in the Properties dialog for the Software Updates, Advertisement or Deployments you want to associate with WakeUp.
Note
If you have set the Check Wakeup in Name option on the Advanced Settings section of the WakeUp console you will also need to add the text WakeUpsEnabled to the Software Updates Assignment name or comments field.
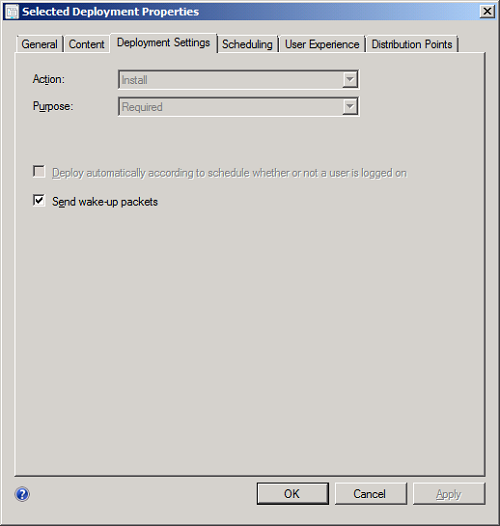
The Software Updates Properties dialog in Configuration Manager 2012 lets you configure wake-up on the Deployment Settings tab. Ensure that the Use Wake-on-LAN to wake up clients for required deployments checkbox is checked.
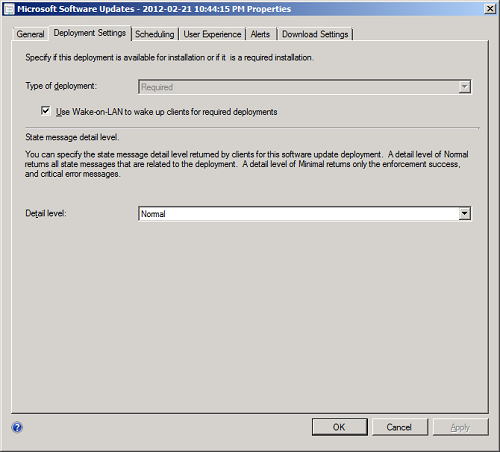
In Configuration Manager 2012 software distribution is performed using Deployments. Select the Send wake-up packets option.
Note
By default the built-in Configuration Manager WOL feature is disabled for the site. If you intend to use WakeUp as the wake up mechanism, ensure that the Configuration Manager WOL feature remains disabled otherwise both systems will be used simultaneously, leading to unnecessary network traffic.
WakeUp and the software updates process
Once all the settings have been configured as described above WakeUp will then wake up machines that are found to be non-compliant with the Software Updates Assignment (i.e. they require the software updates to be applied) when the deployment deadline for the Software Update is reached.
WakeUp Intel® AMT component
The WakeUp Intel® AMT component consists of a single service that runs on the same server as WakeUp and registers with the service. Intel® AMT systems should be enabled and set up so that the WakeUp Intel® AMT component service can perform management functions on them.
Intel® AMT must be enabled in the system's BIOS. Bare Intel® AMT systems contain the technology but it is not supported until they are configured. See refer to the OEM's BIOS documentation for details on how to enable this technology.
Enterprise and small business modes
The WakeUp Intel® AMT component supports two modes of operation:
Enterprise mode – In enterprise mode, an Intel® AMT platform uses secure communications via transport layer security (TLS) communication protocols. It also provides a standard and single-sign-on style of authentication by integrating its authentication framework with Microsoft Active Directory Server which manages domain authentication based on the Kerberos protocol. Intel® AMT maintains an access control list (ACL) of users that can access realms within the device.
Small business mode – In small business mode, when digest authentication (user id and password) is used, the ACL contains an entry per user. When using Active Directory and Kerberos in enterprise mode, an ACL contains a SID, a list of realms and access permissions.
Although the device can be configured to operate in both modes, the WakeUp Intel® AMT component can only be configured to work in a single mode. Please refer to the Intel® AMT Small Business and Enterprise Configuration User Guides for details on how to set up the preferred authentication mode and realms.
Configuring WakeUp to use AMT instead of Last Man Standing
In order to wake machines up, WakeUp in multi-agent mode requires a single machine on the subnet to be always awake to receive messages from the WakeUp service on Primary Configuration Manager Server. There are two alternative methods that WakeUp can use to achieve this.
The administrator can enable Last Man Standing (LMS) in the 1E Agents to allow the agents to constantly monitor shutdowns to keep a single machine up in the subnet.
With the WakeUp Intel® AMT component, if an Intel® AMT machine is available in the subnet; WakeUp LMS can be disabled allowing all machines to be shut down in the subnet. The Intel® AMT machine on the subnet can then be awoken remotely to act as an agent for waking up targeted machines on the subnet.
Last Man Standing is disabled on the 1E Agent with LASTMANENABLED=0. This can be set during an installer repair, if the 1E Agent has already been installed to use LMS.
WakeUp Intel® AMT component and Configuration Manager
The WakeUp Intel® AMT component installs an additional service on the Configuration Manager Server that communicates with WakeUp. This service queries Configuration Manager for discovered Intel® AMT machines and dispatches SOAP messages to wake up them.
Intel® AMT machines discovery
The 1E Agent service installed on every machine attempts to communicate with Intel® AMT Board Management Controller via the Management Engine (ME) interface driver or Host Embedded Controller Interface (HECI) driver. The state set by the 1E Agent is sent to Configuration Manager as an extension to hardware inventory. A hardware inventory WMI class, called SMS_G_SYSTEM_WAKEUP_1E_IAMT, is created in Configuration Manager that contains a list of all machine resources known to Configuration Manager that are Intel® AMT machines with 1E Agent installed.
Waking up an Intel® AMT machine
WakeUp only requires a single machine in a remote subnet to wake up targeted machines on the subnet. If the existing agent finder in WakeUp fails to find any currently awake machines in the subnet, it dispatches a request to the WakeUp Intel® AMT Service to find a suitable agent in the subnet and wake it using an Intel® AMT SOAP message and the pre-configured authentication mechanism. WakeUp subsequently uses the 1E Agent on that machine to wake up other targeted machines on the subnet using magic packet technology.
Configuration Manager Integration
The WakeUp Intel® AMT component needs to be installed on all Configuration Manager Primary Site Servers where WakeUp is installed. It uses system inventory information to send out SOAP messages on requests from the WakeUp service in time for any advertisement schedules.
WakeUp Intel® AMT feature pack components
The main feature pack consists of:
WakeUp Intel® AMT service
1E Agent and extensions to Configuration Manager hardware inventory
WakeUp Intel® AMT service
The WakeUp Intel® AMT service is responsible for communicating with the WakeUp service and sending SOAP messages to Intel® AMT machines via the preconfigured authentication mechanism.
When running with Configuration Manager this service should be installed in each Configuration Manager Site server in the hierarchy that has WakeUp installed – providing the site has Intel® AMT Configuration Manager clients and those clients have been provisioned.
When running solely with NightWatchman Management Center, this service only needs to be installed on the WakeUp Server set as the NightWatchman Management Center wake up provider.
If Intel® AMT is configured in enterprise mode using Active Directory for authentication with Kerberos, the service will run using an account that is a member of the Intel® AMT Collections Managers group. The WakeUp Intel® AMT service will attempt to use WinHTTP to impersonate the account and connect to the targeted machine.
If Intel® AMT is configured in small business mode; the WakeUp Intel® AMT service will use a username and password for digest authentication. Once installed, WakeUp will detect the WakeUp Intel® AMT service and dispatch requests when agents are not found on a targeted subnet.
1E Agent
The WakeUp Intel® AMT component provides an alternative to the Last Man Standing mechanism. The alternative still relies on the 1E Agent being installed on every machine. The 1E Agent is responsible for discovering the Intel® AMT Board Management Controller and building up a database of Intel® AMT machines in Configuration Manager or NightWatchman Management Center. Once discovered, the WakeUp Intel® AMT Service will wake up the machine. The 1E Agent on the machine will receive instructions from WakeUp Server to send out magic packets to any systems that need waking.
Intel® AMT support for Last Man Standing
Computers that have Intel® AMT hardware and are configured to support remote wake ups circumvent the WakeUp requirement that there is at least one 1E Agent on the subnet running to handle wake up signals from WakeUp Server. This is because WakeUp is able to use the Intel® AMT capabilities to wake the machine remotely without using magic packet broadcasts, which are liable to be disabled in secure networks.
To use Intel® AMT for a subnet where such hardware exists instead of Last Man Standing, you need to enable the Intel® AMT option during WakeUp Server installation and, except for the 1E Agent on the Intel® AMT computer, install all the other 1E Agents on the subnet with LASTMANENABLED=0.
Configuration Manager Hardware Inventory
A hardware inventory WMI class is created by extending the Configuration Manager Hardware Inventory MOF compiled. Hardware inventory information sent by every Configuration Manager client will contain extended data identifying whether the machine resource is an Intel® AMT machine.
This information is used to enhance the existing hardware inventory information in Configuration Manager providing the WakeUp Intel® AMT service with a means of identifying Intel® AMT machines for a specific subnet.
NightWatchman Management Center Inventory
When running solely with the NightWatchman Management Center, the 1E Agent sends information about the computers running Intel® AMT to be stored in the NightWatchman Management Center database.
Configuring the WakeUp Intel® AMT feature pack
This section describes the two different authentication modes for Intel® AMT and then shows how the individual components of the WakeUp Intel® AMT component are configured. Typically, WakeUp Intel® AMT is configured once and subsequently works without the need for further intervention – thereby providing set and forget functionality.
The WakeUp Intel® AMT component is designed to self-register with an existing WakeUp Server ensuring zero configuration for WakeUp itself. During installation, the WakeUp Intel® AMT service registers a free TCP/IP port on the server with WakeUp Server. Thereafter, WakeUp Server automatically detects the service whenever it needs to dispatch requests to wake up remote Intel® AMT machines.
When starting up, the 1E Agent runs an inexpensive test to check whether its local machine is an Intel® AMT machine. A local registry key is updated which is in turn picked up by the ConfigMgr client and sent up to the ConfigMgr Server on each Hardware Inventory cycle.
Configuring the WakeUp Intel® AMT Service
The WakeUp Intel® AMT service must be configured to use one of the pre-configured authentication modes for managing the power state of the Intel® AMT machine. This section describes the setup in two modes: small business mode (SMB) using digest authentication and enterprise mode using Kerberos.
Small business mode (SBM)
The WakeUp Intel® AMT service runs as LOCAL SYSTEM and uses a username and password specified at install time to connect to Intel® AMT machines. The administrator can modify this username and password from the command-line.
Note
Setting the user name and password for HTTP digest authentication overrides the settings for enterprise mode.
The following parameters are supported by the command-line:
Parameter | Notes |
|---|---|
UserName | The HTTP digest account name that is registered with the Intel® AMT Power Control realm on the machine. |
Password | The HTTP digest password for the account name specified above. |
In order to set the authentication to the default Intel® AMT username and password:
C:\Program Files\1E\WakeUp\Server>WakeUpAMT.exe –username=admin –password=admin
Enterprise mode
The WakeUp Intel® AMT service runs as a domain account that is a member of the Intel® AMT Collections Manager Active Directory group.The administrator can configure the service to run in this mode by manually configuring the service via the Service Control Manager MMC snap-in and forcing Kerberos authentication mode from the command line:
Property | Notes |
|---|---|
UseKerberos | Specifies whether to use Kerberos with
|
After modifying the properties of the service, run:
C:\Program Files\1E\WakeUp\Server>WakeUpAMT.exe –useKereberos=1
Configuring network access control security
Port-based Network Access Control (NAC) uses the 802.1x standard. It provides increased network security by requiring authentication for computers before they access a network. Typically, this relies on dividing the network into two sets of VLANs:
authenticated VLANs (also known as the main, live or corporate network).
corresponding unauthenticated VLANs, that act as a holding ground for computers that have not yet been authenticated (also known as guest network).
In this model, the division into authenticated and unauthenticated VLANs is handled by the network switches. The unauthenticated network ports are in a blocking state and do not allow traffic to or from a computer unless part of the authentication process. In practice, this means that computers move off of the authenticated network and onto the unauthenticated network as soon as they are turned off. Depending on the authentication mechanism, this move can also occur when the computer goes to sleep. When off or asleep, the computer does not respond to ARP queries and will respond only to broadcasts.
WakeUp does not know if a powered down computer is on an authenticated or unauthenticated network, and the normal methods used by WakeUp will not work. Normally, to wake a computer from off or from sleep, the WakeUp system only needs to send a Wake-On-LAN (WOL) magic packet as a directed broadcast to the last-known subnet of the target computer, which is the authenticated subnet. When NAC is implemented, WakeUp must send an additional broadcast to the unauthenticated subnet. When the computer wakes, it uses its normal authentication method to get back onto the authenticated network.
The problem of sending wakeups to unauthenticated subnets has two parts:
WakeUp configuration - determines how WakeUp identifies the corresponding unauthenticated subnet where the computer has moved
Network configuration - determines how the network allows a subnet directed broadcast to reach the computer on the unauthenticated subnet
Configuring SubnetOverride on a WakeUp Agent
This registry value should be populated in the WakeUp Agent registry with a comma separated list of values each of which defines a subnet. Duplicate subnets are ignored. The subnet on which the Agent resides is also ignored because it has already been sent a broadcast. The WakeUp Server first instructs the relevant WakeUp Agent to broadcast to the Authenticated subnet on which it resides, before processing the SubnetOverride list.
The Server method requires the registry for the WakeUp Agent on the WakeUp Server(s) to be configured. The Agent method requires the registry for the WakeUp Agent on the 1E Agents to be configured.
HKLM\Software\1E\WakeUpAgt\SubnetOverride (REG_SZ)
The format for each value can be one of the following:
Notation | Format | Example |
|---|---|---|
Classless Inter-Domain Routing (CIDR) | Base address/bit length | 192.168.13.0/24 |
Subnet mask | Base address/subnet mask | 192.168.13.0/255.255.255.0 |
Subnet broadcast address | Broadcast address | 192.168.13.255 |
You can mix different format values in the same string as long as each value is consistent with one of the above formats. For example:
192.168.13.0/24,192.168.34.0/255.255.255.0,192.168.10.255
Configuring AdditionalSubnets on a WakeUp Agent
This registry value is not always necessary, but may be required when using the Agent method in Multi-agent or Dedicated agent scenarios. If the WakeUp Agent starts up before the computer has authenticated, it will attempt to report the unauthenticated subnet as the last known subnet. The information is not reported back until the computer switches to the authenticated network, but it means the WakeUp Server will attempt to use its normal process to discover an Agent on both subnets on the next wakeup attempt. The discovery process will fail for the unauthenticated subnet and delay the wakeup.
If this problem should occur, this registry value allows the WakeUp Agent to inform the WakeUp Server that it will also act as the Agent for the additional subnets, and should be populated with the same list of subnets as specified in the SubnetOverride list.
HKLM\Software\1E\WakeUpAgt\AdditionalSubnets (REG_SZ)
Each subnet must be in the following format (which is different to the formats available for SubnetOverride).
Notation | Format | Example |
|---|---|---|
Subnet mask | Base address,subnet mask | 192.168.13.0,255.255.255.0 |
Multiple subnets would be represented as follows, for example:
192.168.13.0,255.255.255.0,192.168.34.0,255.255.255.0,192.168.10.0,255.255.255.0
Configuring AlwaysQueueToLocalAgent on a WakeUp Server
This registry value must be set to ON when using WakeUp Server in Multi-agent and Dedicated agent scenarios, so that the WakeUp Server will instruct its local WakeUp Agent to send the additional WOL broadcasts.
This registry value is either not used, or set to OFF, when using WakeUp Server in Standalone Server scenario, because the WakeUp Server will always use its local WakeUp Agent to send WOL broadcasts, and setting this value to ON would cause these broadcasts to be duplicated.
HKLM\Software\1E\WakeUpSrv\AlwaysQueueToLocalAgent (REG_SZ)
Configuring Configuration Manager to work with WakeUp
Setting up Configuration Manager to work with WakeUp
To integrate WakeUp seamlessly with Configuration Manager, you need to enable Hardware Inventory. We assume that the primary Configuration Manager site has already been installed.
To enable the client agents:
Open the Configuration Manager Console.
Expand the Overview tree under Administration.
Select Client Agents.
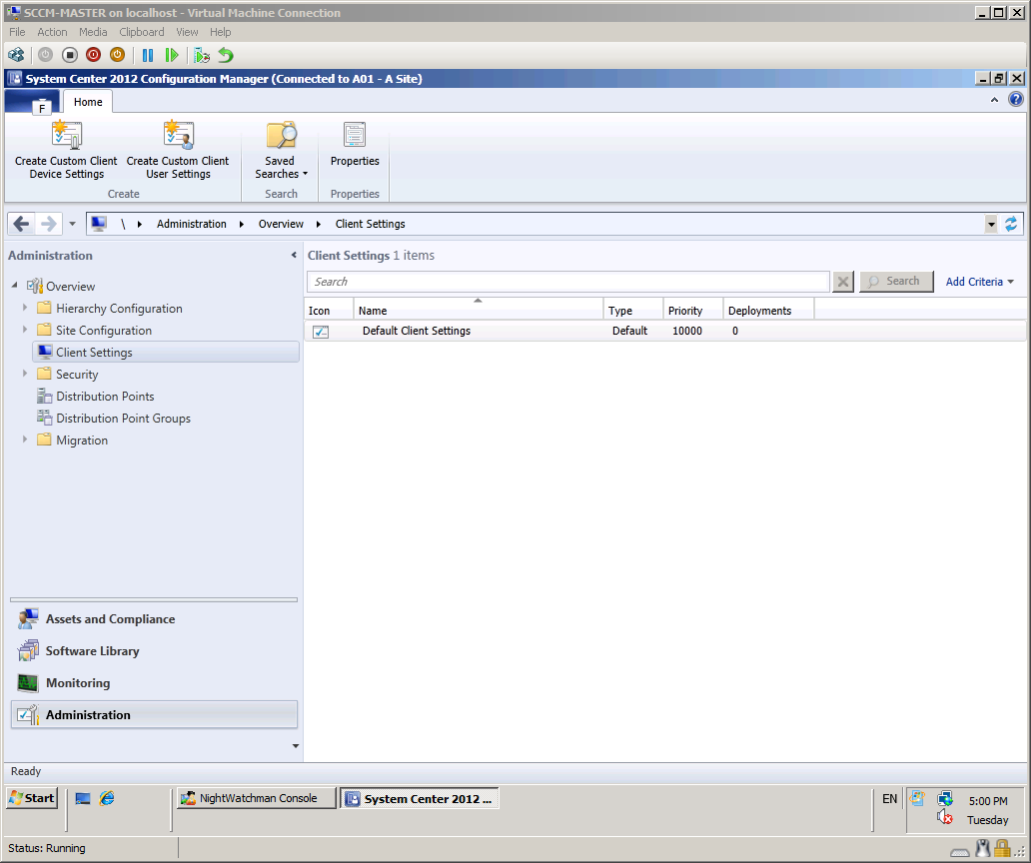
For WakeUp, you need to enable the Hardware Inventory Client Agent:
Double-click Default Client Settings in the Client Settings list.
Select Hardware Inventory and select the Yes option for the Enable hardware inventory on clients field.
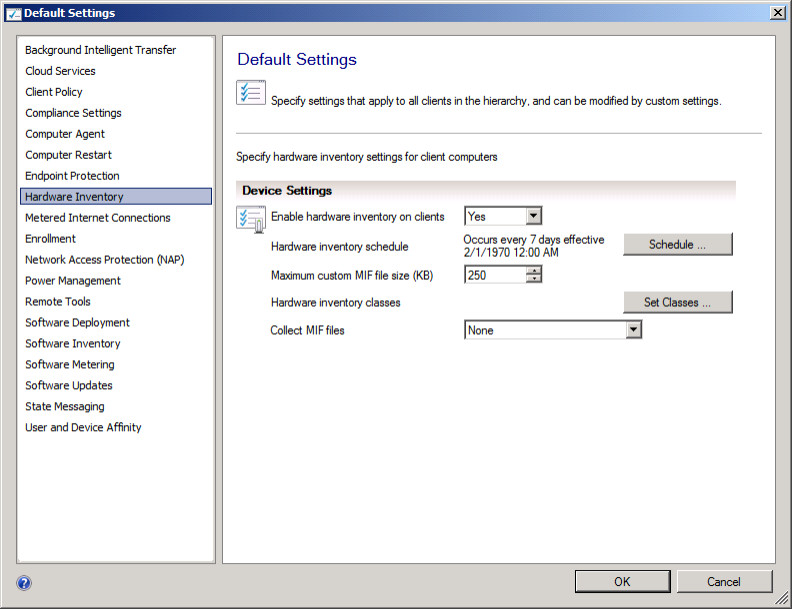
Click OK.
Complete client hardware inventory
This is an important step, as WakeUp uses the network adapter hardware inventory data to determine the correct IP subnet mask for a system.
To force Hardware Inventory to run on a client in Configuration Manager,
Open Configuration Manager from the Control Panel.
Go to the Actions tab.
Select Hardware Inventory Cycle.
Click Initiate Action.
Wait 5-10 minutes for the inventory data to update the Configuration Manager database. To check that the hardware inventory is complete, open the Configuration Manager Resource Explorer for a client and expand the Hardware node.