Web WakeUp server configuration
Web WakeUp supports a small number of administrator configurable options. To perform wake-ups, it integrates with the NightWatchman Console Service so some of the options are set in the NWM.ServiceHost.exe.config file located in the 1E NightWatchman Console service installation directory and others in Web.config found in the Web WakeUp Website installation directory, which may be on different servers. The configuration files use XML format and strict observance of the existing syntax must be followed.
Systems | NWM.ServiceHost.exe.config | Web.config |
|---|---|---|
32-bit systems | C:\Program Files\1E\NightWatchmanManagementCenter\ConsoleService | C:\Program Files\1E\WebWakeUp\Website |
64-bit systems | C:\Program Files (x86)\1E\NightWatchmanManagementCenter\ConsoleService | C:\Program Files (x86)\1E\WebWakeUp\Website |
Changes to the service configuration options should be as follows:
For options that require changes to
NWM.ServiceHost.exe.config, edit the file and restartNWM.ServiceHost.exeFor options that require changes to
Web.config, edit the filePerform an IIS reset on the Web WakeUp server if either file is changed
Most of the configuration file provides internal settings that should not be changed from the default. The following NWM.ServiceHost.exe.config options may be changed under specific circumstances to modify the behavior of Web WakeUp.You will need to restart the NightWatchman Console Service for the changes to take effect.
NightWatchman console service options
Administrator configurable options for the NWM.ServiceHost.exe.config file are detailed below. After changing these settings, you will need to restart the NightWatchman Console Service and perform an IIS reset, for them to take effect.
Configuration | Notes |
|---|---|
Setting the maximum number of computers returned | Results are not paged when searching for computers in the Web WakeUp website so the only way to allow users to see more results is to change the number of computers returned. The default is 30. Values range from 20 - 500 inclusive. To increase the results returned, update the value for ...
<appSettings>
...
<add key="MaxMachines" value="100"/>
...
</appSettings>
... |
Enabling authorization | Web WakeUp supports setting the use of authorization which can be selected during a NightWatchman Management Center Console Service installation. To modify authorization after an installation, edit the For example, to enable authorization ...
<appSettings>
...
<add key="AuthorisedMachineModule"
value="N1E.WakeUp.Web.AuthorisedMachineModule.dll"/>
...
</appSettings>
...and to disable authorization ...
<appSettings>
...
<add key="AuthorisedMachineModule"
value=""/>
...
</appSettings>
...Once you enable authorization, Web WakeUp users can only search for computers that they have permissions for. If they do not have an entry in the Web WakeUp authorization database, they will not be able to search for, or wake any computers. |
Website control | You control which pages get displayed when a user visits the Web WakeUp website with
For example, you could maintain strict control over computers that their users can wake-up remotely by setting the website to display only the My Computers tab and then pre-registering all the user's registered computers by modifying the Web WakeUp database directly or by using the API. NoteWhen all pages are removed from the |
Web options
Administrator configurable options for the Web.config file are detailed as follows. After changing these settings, you will need to perform an IIS reset, for them to take effect.
Configuration | Notes | |||||||||
|---|---|---|---|---|---|---|---|---|---|---|
ActiveX usage | Web WakeUp provides an ActiveX control used to retrieve local computer names for the purposes of registration. When this ActiveX control is not used Web WakeUp uses a reverse DNS lookup that relies on a correctly configured and up-to-date DNS environment. The ActiveX alternative is more reliable, accurate and efficient. In certain circumstances, you may not want to install the ActiveX control for example, 64-bit browsers are not supported by the ActiveX control or you may have pre-determined all the users' registered computers and not want the ActiveX control installed. In these cases you can turn off the installation and use of the ActiveX control To do this, update the value ... <appSettings> ... <add key="UseActiveX" value="False"/> ... </appSettings> ... | |||||||||
Remote desktop access | Web WakeUp supports the use of remote desktop access for connecting to a computer once it has been awoken. You can turn this functionality on or off by updating the value ... <appSettings> ... <add key="EnableRDP" value="False"/> ... </appSettings> ... | |||||||||
Automatic status checking | When a user has some registered computers, the default behavior for the My Computers page on the Web WakeUp website is to automatically check the status for those computers. Given large numbers of users with large numbers of registered computers you may want to disable this feature to minimize the impact on your network. To do this, update the value ... <appSettings> ... <add key="EnableStatus" value="False"/> ... </appSettings> ... | |||||||||
Setting the size of the computer search buffers | The WakeMachines method takes an input argument that contains a comma separated list of computers. This limits the number of computers that can be awoken in a single call to the maximum length of the input argument string. There is an absolute upper limit of 10,000 computers that can be awoken by WakeUp in a single operation but given the default value of 65536 characters for the WakeMachines input argument string length and an average domain\computer name length of approximately 26 characters, the limit for WakeMachines is approximately 2500 computers. To raise the limit, make a change to both config files. Change the These bindings contain a number of properties, two of which are NoteWhen changing values you need to set both these properties to the same value otherwise the service will raise an error on startup.
NoteChanges to these properties must be made in both the Web.config and NWM.ServiceHost.exe.config files. For example, to increase the buffer size to 131072 in ...
<bindings>
...
<netTcpBinding>
...
<binding name="NetTcpBinding_MachineSearchService"
...
maxBufferSize="131072"
maxReceivedMessageSize="131072"
...
/>
...
</netTcpBinding>
...
</bindings>
...and similarly, to increase the buffer size to 131072 in ...
<bindings>
...
<netTcpBinding>
...
<binding name="NetTcpBinding_MachineSearchServiceBindingConfiguration"
...
maxBufferSize="131072"
maxReceivedMessageSize="131072"
...
/>
...
</netTcpBinding>
...
</bindings>
... |
Configuring Web WakeUp mobile devices
This section describes how to configure Web WakeUp to allow mobile devices to wake computers, the security considerations that should be taken into account and gives examples of the mobile interface.
Website configuration
There are three scenarios that allow mobile devices to use Web WakeUp. In all three cases the Web Wakeup website is hosted in the company's network:
The Web WakeUp website is published on a publicly available server.
The mobile user connects to the company network using VPN then there should be VPN client installed on the mobile phones.
The mobile user located in the office is able to connect to the office network using a wireless connection.
Security considerations
Due to the nature of the mobile devices it is not possible to check the credentials of the mobile user logged on to the Web WakeUp website. This has two direct consequences:
It is not possible to verify the mobile user when they connect to the Web WakeUp website.
It is not possible to constrain the computers that a mobile user can awaken.
For these reasons we only recommend that you avoid using configuration scenario 1 above and only use configuration scenarios 2 and 3. This allows security to be managed via VPN or wireless connection to ensure that only mobile users with company network access are able to browse to the Web WakeUp website.
The mobile interface
The Web WakeUp website has a mobile interface designed to fit onto the smaller screens on mobile devices. This interface only supports the Wake Up Computer page.
Supported devices
The interface on mobile devices differs slightly depending on whether it is on the web.config list of supported devices.
On supported devices, after attempting to wake a computer, the wake by name screen will provide feedback on whether the named computer has been awoken.
On non-supported devices to check whether a computer has been awoken you need to hit the wake up button again after a suitable time.
To add a device to the list of supported devices the browser on the device must be Javascript enabled and support DHTML. You then edit the web.config file located in:
C:\Program Files\1E\WebWakeUp\Website
This XML file configures various aspects of the way that Web WakeUp runs.
To add a mobile device, edit the comma-delimited ValidMobileOSVersions key in the <appsettings> section to include one or more of the following text strings:
blackberry#4.7
blackberry#4.6
iPhone
iPad
windows phone os 7.0
The # in blackberry indicates specific support for versions 4.7 and 4.6, while Windows phone OS is version 7.0 and the for the iPhone and iPad – any version.
<appSettings>
  <add key="CustomErrorPage" value="GenericErrorPage.aspx" />
  <add key="PingTimeoutPeriod" value="20000" />
  <add key="MaxPingRetry" value="10" />
  <add key="UseActiveX" value="False"/>
  <add key="EnableRDP" value="False"/>
  <add key="RDPTempDir" value="C:\ProgramData\1E\Web.WakeUp\RDP\"/>
  <add key="ActiveXVersion" value="1.7.0.96"/>
  <add key="AuthenticationModule" value=""/>
  <add key="EnableStatus" value="true" />
  <add key="ValidMobileOSVersions" value="blackberry#4.7, blackberry#4.6, iphone, ipad, windows phone os 7.0"/>
</appSettings>
Unlike other settings in the web.settings file, after changing the ValidMobileOSVersions parameter there is no need to perform an IIS reset before the changes take effect.
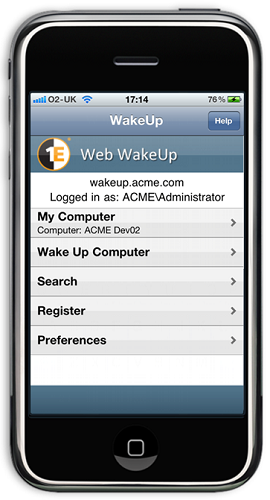
The iPhone app
1E also provide an interface to Web WakeUp as an iPhone or iPad application, available separately from the Apple Store. This application provides access to all the pages of the Web WakeUp website. An example of the main Web WakeUp screen on the iPhone .
If you are an administrator and have defined a publicly available website for Web WakeUp you may be contacted by iPhone application users requesting the name of the server hosting the Web WakeUp website, the account and password to be used to access the server and the protocol being used for the site.
These details are likely to vary depending on how you have configured the site, but the name of the server hosting the Web WakeUp website must be entered into the iPhone application without using http:\\ or https:\\ prefixes.
Configuring RDP settings
During installation, a file called rdp.template is created in the rdp subfolder of the Web WakeUp installation folder. This file is used to control the RDP settings such as the screen resolution etc.
To view the default contents of rdp.template, expand the link:
Most of these correspond to the standard parameters for controlling RDP and may be changed by the administrator. The exceptions are <ADDRESS>, <USERNAME> and <DOMAIN>. These should not be changed as they are update by Web Wakeup.
Re-branding Web WakeUp
It is possible to modify the images for the Web WakeUp website to your corporation's branding requirements.
Currently, branding is done is through modifying the images that form the backgrounds to various parts of the Web WakeUp website. Modifications to the structure of the pages is not supported. Replacement images must have exactly the same dimensions as the originals.
The following Jpeg images are found in the%installdir%\Website\Imagesdirectory:
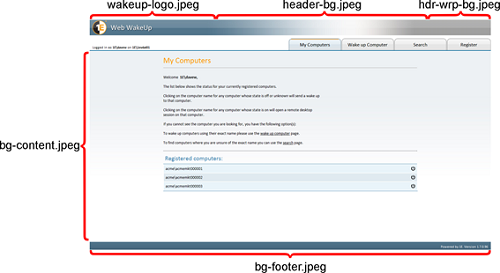 |
Image | Description |
|---|---|
bg-content.jpeg | Sets the background behind the main contents for the site |
bg-footer.jpeg | Sets the background for the footer of the page |
hdr-wrp-bg.jpeg | Sets the repeater image used on the right-hand side of the banner |
header-bg.jpeg | Sets the right-hand side of the banner |
wakeup-logo.jpeg | Sets the left-hand side of the banner |
Once the images have been replaced, browsing the website or refreshing the browser displays the new images.
 |
Web WakeUp authorization table
The Web WakeUp tables added to the Agility Framework database are also supplied with an SQL Server Agent job that can be used to populate the tbWWU_Authorised_UserMachines table from a .csv file.
The SQL Server Agent job is called 1E Web WakeUp, Import Authorisation. Before running it, you must first create the source authorization input file and set the SQL Server Agent job to use the file.
Note
Running the SQL Server Agent job will clear any existing data from the authorization table, except for "power user" type entries where the computer name is set to "".*
The authorization input file format
The input file for the 1E Web WakeUp, Import Authorisation SQL Server Agent job is a .csv format file where each line in the file contains the following information in the following format:
<
User ID> is the user whose authorization is being set. When using Windows authentication<UserID>should be in the formatDomainName\UserName.<
Computer Name> is the netBIOS name of the computer the<UserID>is allowed to wake.<
Domain Name> is the domain the computer is running on.
The example below is an authorization input file with three entries:
Revised 9/4/2009 ESA for WWU implementation,,
ACME\rachel,devwks1,ACME
ACME\rachel,devwks2,ACME
ACME\joey,saleswks2,ACME
Although the first line must also have three comma separated elements, it is treated as a header line and ignored. Notice how the first line, as it is ignored by the import process, can be used as a place to store notes on the file.
Setting the authorization input file
To set the SQL Server Agent job to reference a specific authorization file you need to modify the SQL Server Agent job's Import CSV step in SQL. The command-line for this step is:
EXEC [dbo].[spWWU_Import_Authorised_UserMachines] 'C:\CN-DN-PU.csv'
Change the default file referenced at the end of the command-line to point to your .csv file. For example, to set the SQL Server Agent job 1E Web WakeUp, Import Authorisation to use C:\1EWWU\ACME\acme.csv:
EXEC [dbo].[spWWU_Import_Authorised_UserMachines] 'C:\1EWWU\ACME\acme.csv'
To edit this job in SQL Server Management Studio:
Navigate to SQL Server Agent/Jobs.
Right-click 1E Web WakeUp, Import Authorisation and choose Properties from the context menu to open the Job Properties - 1E Web WakeUp, Import Authorisation dialog.
In the Select a page column on the left, choose Steps to display the Job Step List in the right pane.
Select the only job step Import CSV and click the Edit button to display the Job Setp Properties - Import CSV dialog.
In the Command: field, edit the currently displayed SQL command from:
EXEC [dbo].[spWWU_Import_Authorised_UserMachines] 'C:\CN-DN-PU.csv'
to (in order to point to your particular authorization file):
EXEC [dbo].[spWWU_Import_Authorised_UserMachines] 'C:\1EWWU\ACME\acme.csv'
Click OK to save your changes and close the Job Step Properties - Import CSV dialog.
Click OK to close the Job Properties - 1E Web WakeUp, Import Authorisation dialog.
You can then execute the modified job to import the specified data:
Right-click the SQL Server Agent/Jobs/1E Web WakeUp, Import Authorisation node and select Start Job at Step... item from the context menu.
The job will start running. In the Start Jobs - <ServerName> dialog confirm that the Status returned at the end is Success.
Click Close to complete the job execution.
After execution open the table tbWWU_Authorised_UserMachines to confirm the results are as expected.
When the SQL Server Agent job is run
The following steps shows what happens when the SQL Server Agent job is run:
Existing entries in the authorization table are removed, except for 'power user' type entries where the computer name is set to "*".
The new entries from the input file are added to the authorization table.
Note
One consequence of this sequence is that 'power user' type entries where the computer name is set to "" should only ever be added to the database by hand and not added to the input .csv file as this may result in the import failing due to primary key violations in the database.
Integrating the Web WakeUp portal
You can invoke Web WakeUp to wake-up specific computers from your company portal site using the Web WakeUp site URL.
Wake-up mode | Notes |
|---|---|
Wake-up with status checking | To open the Web WakeUp page and check the current wake status of a specified computer before sending a wake up, then use the WakeUpByName URL: <SiteHost>/WebWakeUp/WakeUpByName.aspx?Machine=<Domain\ComputerName> Where |
Wake-up without status checking | To immediately request a WakeUp for a specified computername without checking its status first, then use the MobileWakeUp URL: <SiteHost>/WebWakeUp/MobileWakeUp.aspx?Machine=<Domain\ComputerName> Where |