Preparation
Information that will help you design and plan implementing NightWatchman Enterprise in your organization. This includes preparation tasks that may take some time to organize, depending on how your organization works.
Integration features
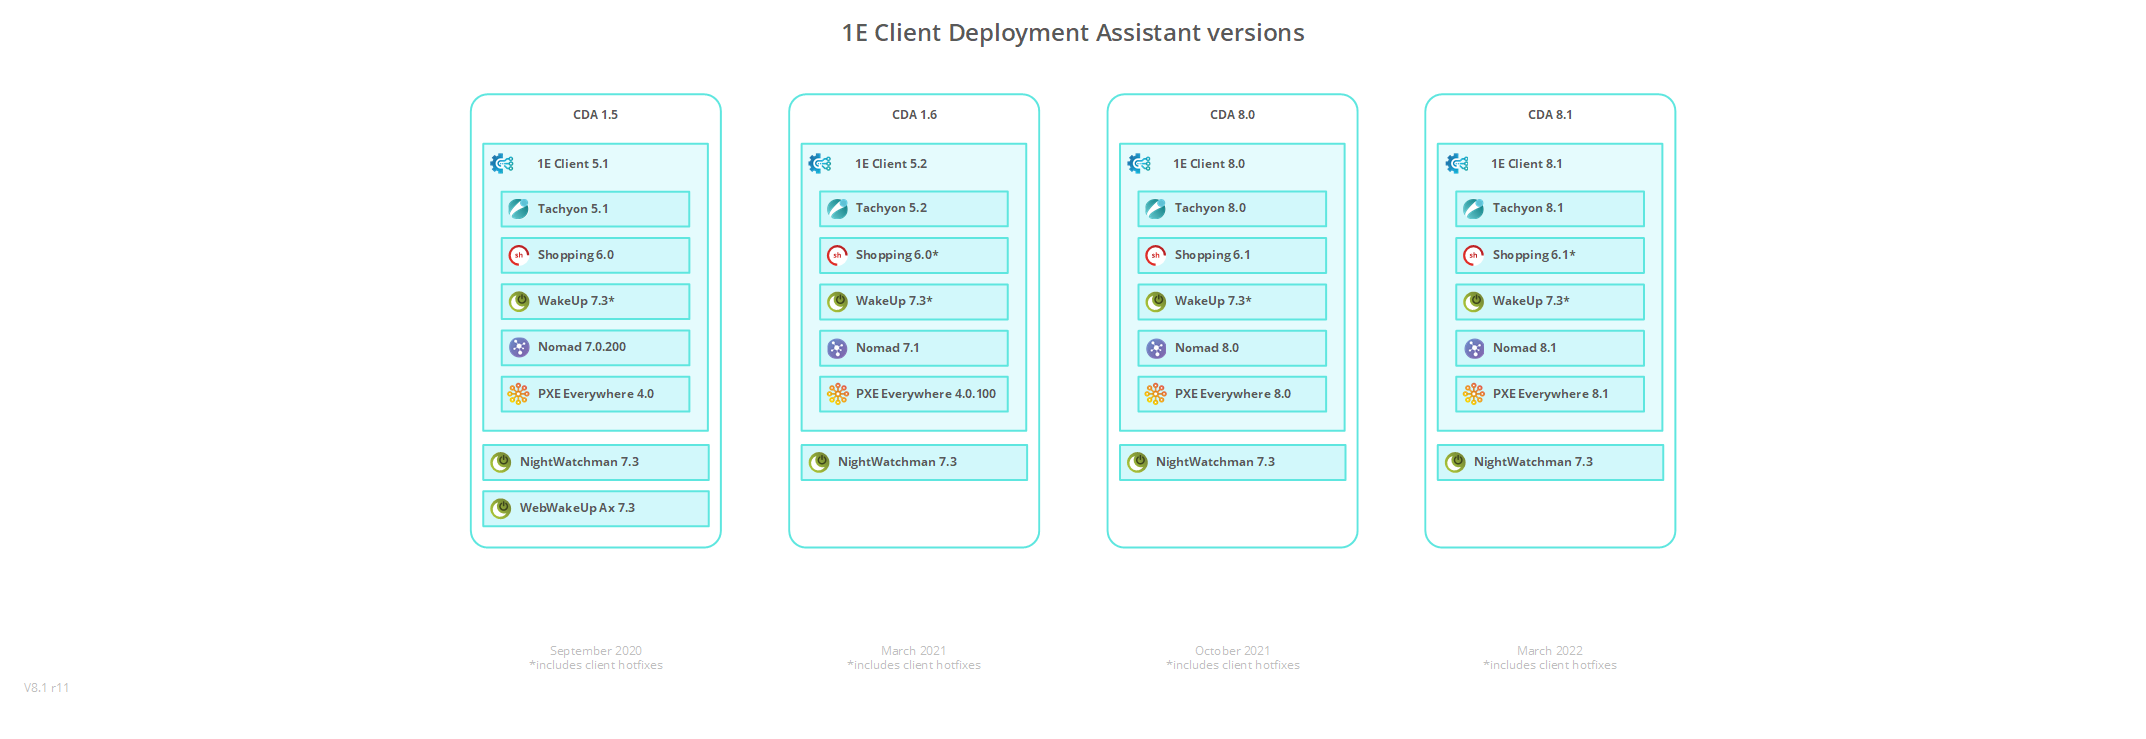
Your choice of 1E Client version, and therefore the version of 1E Client Deployment Assistant (CDA), depends on which integration features you need, and if you need any other features of Tachyon Platform.
WakeUp 7.3 client is included in each of the supported versions of 1E Client, with later versions containing hotfixes. You can deploy hotfixes separately. You only need to enable WakeUp client if you are using WakeUp features with NightWatchman.
NightWatchman Agent 7.3 is available as a separate installer. Please refer to Installing the 1E NightWatchman Agent for Windows.
1E Client and NightWatchman Agent 7.3 can be deployed on their own, or with the aid of any supported version of CDA.
1E Client | Integration features | Client Deployment Assistant (CDA) |
|---|---|---|
1E Client 24.3 - WakeUp client requirements 1E Client 24.3 - Deploying 1E Client on Windows | NightWatchman Online Status (Tachyon Platform) Nomad integration with WakeUp (Tachyon Platform) | 1E Client Deployment Assistant This version of CDA can be used independently of Microsoft Endpoint Configuration Manager. |
1E Client 8.0 - WakeUp client requirements 1E Client 8.0 - Deploying 1E Client on Windows | NightWatchman Online Status (Tachyon Platform 8.0) Nomad integration with WakeUp(Tachyon Platform 8.0) | 1E Client Deployment Assistant 8.0 This version of CDA can be used independently of Microsoft Endpoint Configuration Manager. |
1E Client 5.2 - WakeUp client requirements 1E Client 5.2 - Deploying 1E Client on Windows Do not use 1E Client 5.2 if you require Nomad integration with WakeUp. | NightWatchman Online Status (Tachyon Platform 5.2) Do not use Tachyon Platform 5.2 if you require Nomad integration with WakeUp. | 1E Client Deployment Assistant 1.6 |
NightWatchman Online Status
The NightWatchman Online Status feature is described in Enabling Online Status using Tachyon integration. In addition to having a NightWatchman and WakeUp infrastructure, you must have:
Tachyon Platform 5.1 or later - the latest version is 24.3
1E Client 5.1 or later, with Tachyon client enabled - the latest version is 24.3
Please refer to Tachyon - Implementing Tachyon Platform for how to install Tachyon Server, and 1E Client - Implementing 1E Client for how to install the 1E Client with Tachyon and other client features enabled.
Nomad integration with WakeUp
The feature Integrating Nomad with WakeUp is available with the following versions of Nomad:
Nomad 8.0 or later, with Tachyon Platform
Nomad 7.0.200 or earlier, with ActiveEfficiency Server (no longer supported after July 2022).
Note
This feature is not available with Nomad 7.1 because 7.1 relies on Tachyon Platform 5.2, which has replaced ActiveEfficiency with a version of Content Distribution that does not support this feature. The feature was re-instated in 8.0.
Integration with Tachyon to support Nomad integration with WakeUp
In addition to having a NightWatchman and WakeUp infrastructure, you must have:
Tachyon Platform 8.x with the Nomad app and Content Distribution installed
1E Client 8.x with Nomad client enabled
Nomad 8.x tools
Integration with ActiveEfficiency to support Nomad integration with WakeUp
In addition to having a NightWatchman and WakeUp infrastructure, you must have:
ActiveEfficiency Server 1.10 - this can be installed separately or on a Tachyon 5.1 server.
1E Client 5.1 with its Nomad and WakeUp clients enabled
Nomad 7.0.200 tools
Note
ActiveEfficiency Server 1.10 is available as:
a separate installer, that can be downloaded from the 1E Support Portal - you may already have this if you are suing older versions of Shopping or Nomad
included with Tachyon Platform 5.1 (if you have a license) and installed using Tachyon Setup
You must enable the following:
Microsoft Message Queuing (MSMQ) must be enabled on the ActiveEfficiency Server and the server where NightWatchman Management Center will be installed.
Enable firewall ports on the server.
ActiveEfficiency Server is only required for the following:
Shopping 6.0 - also requires ActiveEfficiency Scout (it is not required for Shopping 6.1)
Nomad 7.0 features:
Single-site download
Single-site peer backup assistant
WakeUp integration
Nomad Pre-caching
Nomad Download Pause
Nomad Dashboard
Nomad Pre-caching and Nomad Dashboard require ActiveEfficiency Server's Nomad Sync feature to be enabled.
Please refer to ActiveEfficiency Server 1.10 documentation.
Accounts needed to install NightWatchman Management Center
To install NightWatchman Management Center, you need the following accounts and groups.
Installation account
Must be domain user account
Must have local admin rights on the server where NightWatchman Management Center is being installed
Must have sysadmin rights on the SQL Server instance, unless the AgilityFrameworkReporting database and SQL Server Agent jobs are pre-created by a DB administrator. This right can be temporary.
Will be set as the primary NightWatchman Console administrator
Console service account
Must be a domain account configured where the password does not expire, and the user can never change the password
Must have local admin rights on the server where NightWatchman Management Center is being installed
Will be granted the following during installation:
Log on as service and Access the computer from the network privileges on the local machine
Added to the public role on the AgilityFrameworkReporting database
If using WakeUp, the service account will require rights on WakeUp Server WMI namespaces on each WakeUp Server, as described below.
User accounts or AD Groups
User account or AD Security Groups are required for use as administrators in the NightWatchman Management Center Console.
Note
If you are using the import Wizard to populate hierarchies, check that:
You are typically the person who installed the NightWatchman Management Center components
You will already have db owner rights on the AgilityFrameworkReporting database
You are :
Either sysadmin on the SQL Server instance
or have been added to the
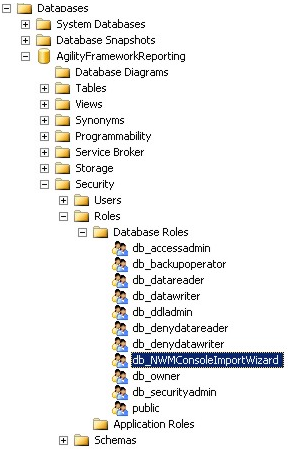
db_NWMConsoleImportWizarddatabase role on the AgilityFrameworkReporting database, that is created when the Import Wizard is installed.
Any user or group that needs to use the Import Wizard must:
Be a member of the
db_NWMConsoleImportWizarddatabase roleHave a login on the SQL Server instance that must be added to the Users of the AgilityFrameworkReporting database
Have NTFS permissions to modify the directory for the Import Wizard log file.
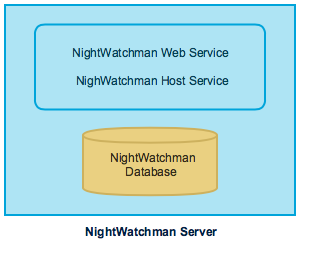
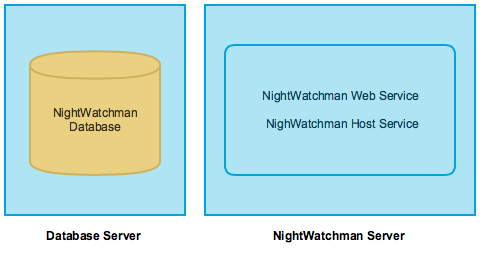
Additional steps when installing NightWatchman Management Center on a distributed environment
If you are installing NightWatchman Management Center across multiple servers, install the database component first – it can be done remotely from a server where one or more of the other components are installed.
If you are performing a clean NightWatchman Management Center installation or are upgrading NightWatchman Management Center and all the WakeUp Server components, permissions for the service account are set automatically as part of the installation process. The NightWatchman Console administrator account (used to define primary NightWatchman Console administrators) can be a domain user or group account.
If you are upgrading NightWatchman Management Center, have legacy WakeUp Servers or intend to use the NightWatchman console to implement remote wake-ups (which is done after installing the WakeUp Server):
add the Console service account to the N1E/WakeUp namespace and grant the following permissions:
Execute Methods
Full Write
Enable Account
Remote Enable
To set permissions:
Run the WMI MMC (
wmimgmt.msc) plug-in on the WakeUp Server.Right-click the root node and select Properties.
In the WMI Control (Local) Properties dialog, select the Security tab.
Navigate to the N1E/WakeUp node and click the Security button.
In the Security for ROOT\N1E\WakeUp dialog, add the console service account and check the permissions listed above.
Accounts needed to install the WakeUp server
To install the WakeUp server, you will need:
Installation account
Must be a domain user account with local admin rights on the server
If you are installing the WakeUp server in a distributed Configuration manager environment, WakeUp Server must be installed on each Configuration Manager site server. The installation account requires:
a SQL Login with db_datareader rights in each Configuration Manager SQL database
Administrator rights in the Configuration Manager Administrators Console - this can be Full Administrator or spfic rights decrobed below:
Application – Read
Boundaries – Read
Boundary Group – Read
Collection – Read, Read resource
Configuration policy – Read
Package – Read
Query – Read
Site – Read
Software Updates – Read.
WakeUp Server service account
Must be a domain user account, or Network Service account, to validate the WakeUp server in the NightWatchman Management console and to edit the priority of the WakeUp servers and their subnets or IP ranges
Must have a security role in the NightWatchman console that includes a minimum of View and Edit rights for WakeUp servers.
If you are installing the WakeUp server in a distributed Configuration manager environment, WakeUp Server must be installed on each Configuration Manager site server. The service account requires the following rights on each site server:
Have Log on as service rights on the Configuration Manager site server
Be a member of the local administrators group on the Configuration Manager site server or at least have full read and write access to the 1E registry key.
32-bit platforms:
HKEY_LOCAL_MACHINE\SOFTWARE\1E64-bit platforms:
HKEY_LOCAL_MACHINE\SOFTWARE\WOW6432Node\1E
Have the following NTFS permissions:
Minimum Read and Execute rights on the
INSTALLDIRfolderMinimum Full rights on the
LOGPATHand the following folders if located anywhere other thanLOGPATH(DATAFILESDIR,SPOOLDIR,WUSPOOLDIR,HEALTHSTATUSDIR).
Have full WMI permissions for the following WMI namespaces - some of these are set already for the Network Service account and SMS Admins group, these permissions are set manually in
Computer Management/Services and Applications/WMI Control/Security,or can be set using our freeWmiConfigPermsutility.root\ccmroot\cimv2root\smsroot\sms\site_<SiteCode>
In the Configuration Manager Console, grant the account specific Configuration Manager class security rights as described below for the relevant version of Configuration Manager.
The service account requires the following Administration rights in Configuration Manager before installing WakeUp Server. We recommend creating a new security role and adding the permissions. Doing this causes the specified account/group to be added to the SMS Admins local group on the provider server.
Collection class – Read, Read resource
Configuration policy class – Read
Query class – Read
Site class – Read.
NightWatchman Management Center Console service account
The service account for the NightWatchman Management Center Console service connects to the WMI namespace on the WakeUp server when requesting wake-ups (alarm clocks, maintenance windows and on demand wake-ups from the NightWatchman Management Center Console including Web WakeUp if installed). Therefore, to have the necessary WMI permissions, this service account must be one or more of the following:
A member of the Administrators local group on the WakeUp Server
Specified during WakeUp Server installation as the WakeUp Server's WMIACCOUNT
A member of the AD Group which is specified during WakeUp Server installation as the WakeUp Server's WMIACCOUNT
Administrators using remote WakeUp server Admin Consoles require remote access rights to the WMI namespace and DCOM Security, as a result administrators require one or more of the following:
Membership of the Administrators local group
WMIACCOUNT is specified as an AD group containing the administrator accounts or groups.
The service account for the NWM Console service connects to the WMI namespace on the WakeUp server when requesting wake-ups. Therefore, the service account requires one or more of the following:
Membership in the Administrators local group
Is the same as the WMI account
Is a member of a group that is specified as the WMI account.
NWM Console service account will be added by the NightWatchman Management Center Installer to the N1E and WakeUp namespaces with the following permissions:
Execute Methods
Full Write
Enable Account
Remote Enable.
Accounts needed to install Web WakeUp
To install Web WakeUp, you will need the following accounts.
Note
1E Client 5.1 or later (with WakeUp client enabled) must be installed on target computers if you want to wake them with Web WakeUp.
For details on installing the 1E Client with the WakeUp client module enabled, please refer to 1E Client - Deploying 1E Client on Windows: WakeUp.
Installation account
Must be a domain user account with local admin rights.
Application pool account
Only if the Web WakeUp site is running on a different computer to the NightWatchman Management Console service, then you must configure the Web WakeUp Application Pool to use Network Service or a domain account.
Accounts needed to install the NightWatchman Agent and 1E Client
Installation account
To install the 1E NightWatchman Agent and 1E Client, you will need an Installation account which must be a domain user account with local admin rights on the targeted client computers.
For details on installing the 1E NightWatchman Agent, please refer to Installing the 1E NightWatchman Agent for Windows.
For details on installing the 1E Client with the WakeUp client module enabled, please refer to 1E Client 24.3 - Deploying 1E Client on Windows: WakeUp.
Note
WakeUp Servers also require the 1E Client to be installed with its WakeUp module enabled. The WakeUp Server must be installed first. If the 1E Client is installed first then the WakeUp Server installer only allows only the Administration Console installation option, and not WakeUp Server
Accounts needed to install Enterprise View
To install Enterprise View, you will need the following accounts.
Installation account
Must be domain user account
Must have local admin rights on the server where Enterprise View is being installed
Must have sysadmin rights on the SQL Server instance, unless the EnterpriseView database is pre-created by a DB administrator. This right can be temporary.
Networking
1E NightWatchman Agent and 1E WakeUp client
Note
For NightWatchman Enterprise 7.2.500 and later, the legacy 1E Agent has been split into 1E NightWatchman Agent and 1E WakeUp client module of the 1E Client.
Port | Traffic | Notes | Configurable |
|---|---|---|---|
UDP 1776 | Inbound and Outbound | Communication with 1E WakeUp client and magic packets. | |
TCP 80 (HTTP) | Outbound | Communication with the NightWatchman Web service. | |
TCP 80 (HTTP) | Outbound | Communication with the NightWatchman Management Center. |
RPC/WMI with admin rights is required between 1E NightWatchman Agent (NWM) when using a remote NightWatchman.exe command-line
Incoming Internet Control Message protocol (ICMP) must be whitelisted on routers. It is used by the 1E WakeUp Server to discover 1E WakeUp clients.
The 1E WakeUp client and 1E NightWatchman Agent can each use both HTTP and HTTPS protocols, configurable during installation using command-line installer properties, and after installation by changing registry values. YOu can set values so tha tthe client agents communicate with the NightWatchman Management Center Web Service using the following protocols and security levels in the following order:
HTTP.
HTTPS without certificate.
HTTPS using certificate subject match.
HTTPS using certificate issuer match.
ActiveEfficiency
ActiveEfficiency is required only for the NightWatchman catalog update service, which is not used by NightWatchman 7.2.500 and later.
Port | Traffic | Notes | Configurable |
|---|---|---|---|
TCP 135 (RPC) | Between NightWatchman and ActiveEfficiency servers | Communication with the queue managers. A dynamic port typically assigned by remote procedure calls (RPC) for handshaking with an independent client or with an RPC server for the message queuing server to determine the fixed ports. | |
TCP 1801 (MSMQ) | Between NightWatchman and ActiveEfficiency servers | Communication with the queue managers. |
NightWatchman admin console
Port | Traffic | Notes | Configurable |
|---|---|---|---|
TCP 8732 (SMB) | Outbound | Communication with the NightWatchman console service. |
NightWatchman console service
Port | Traffic | Notes | Configurable |
|---|---|---|---|
TCP 1443 (ADO .NET) | Outbound | Communication with the NightWatchman (AFR) database. | |
TCP 135 (RPC) | Outbound | Communication with the ActiveEfficiency server. |
Import wizard
Port | Traffic | Notes | Configurable |
|---|---|---|---|
TCP 1443 (ADO .NET) | Outbound | Communication with the NightWatchman (AFR) database. |
Reporting console
Port | Traffic | Notes | Configurable |
|---|---|---|---|
TCP 80 (HTTP) | Inbound | Communication with the NightWatchman Reporting Website. | |
TCP 1443 (ADO .NET) | Outbound | Communication with the NightWatchman (AFR) database. |
NightWatchman AFWebService website
Port | Traffic | Notes | Configurable |
|---|---|---|---|
TCP 80 (HTTP) | Inbound | Communication with the NightWatchman and WakeUp 1E WakeUp client and from WakeUp Server for registration, boundary maintenance and statistics reporting Communication with the database. | |
TCP 8732 | Inbound | Communication with the Import wizard and NightWatchman Admin console. | |
TCP 8750 | Inbound | Communication with Web WakeUp. | |
TCP 1443 (ADO .NET) | Outbound | Communication with the NightWatchman (AFR) database. |
Web Wakeup
Port | Traffic | Notes | Configurable |
|---|---|---|---|
TCP 8750 | Outbound | Communication with the NightWatchman Web service. |
WakeUp Server service
The WakeUp Server also has an installation of a WakeUp client and should therefore included their communications.
Port | Traffic | Notes | Configurable |
|---|---|---|---|
TCP 443 (HTTPS) | Outbound | Communication with the NightWatchman Web service. | |
TCP 1777 | Inbound | Communication with 1E WakeUp clients. | |
TCP 1776 | Outbound | Communication with 1E WakeUp clients. |
IPv4 network is necessary
RPC/WMI incoming from the NightWatchman Management Center Console service, any remote WakeUp Server consoles, any SCCM Console WakeUp extensions. Potentially used by custom WakeUp applications, however Web WakeUp is recommended instead for custom wakeup applications)
Internet Control Message protocol (ICMP) must be whitelisted on routers. It is used by the WakeUp server to discover 1E WakeUp clients (WakeUp).
Things to bear in mind
RPC/WMI incoming from the NightWatchman Management Center server and any remote consoles
Incoming Internet Control Message protocol (ICMP) must be whitelisted on routers. It is used by the WakeUp server to discover agents
Port 135 is a dynamic port typically assigned by remote procedure calls (RPC) for handshaking with an independent client or with an RPC server for the message queuing server to determine the fixed ports
IPv4 network is necessary.
Preparing a server for web applications
NightWatchman Management Center deploys Web applications which are built on .NET (Report console and Web service). We recommend preparing the Web server by installing the runtime libraries for these applications as follows:
Web server (IIS) role with default role services (which should include Windows authentication and ASP.NET role services).
Application server role with .NET 4.5 and HTTP Activation role services.
.NET 4.5 or later, ensuring that the OS specific ASP.NET is installed and enabled, refer to Configuring ASP.NET for Windows Server 2012 R2 for details.
If these runtime libraries are installed in a different order, or other applications hosted on the same Web server have modified the default IIS ASP.NET settings, it may be necessary to re-register the ASP.NET 4.5 runtime with IIS prior to running the NightWatchman Management Center installer.
You can do this with (we assume you are using the default paths):
On 32-bit systems:
C:\Windows\Microsoft.NET\Framework\v4.0.30319\aspnet_regiis.exe -iruOn 64-bit systems:
C:\Windows\Microsoft.NET\Framework64\v4.0.30319\aspnet_regiis.exe -iru
Note
It is important to specify the -iru switch to avoid causing problems with other web applications which are running under .NET 2.0.
General security measures
To comply with security certification criteria, we recommend the following measures for our products on your production environment:
Folders and user data – restrict the
\Program Files\1Efolder to administrators to prevent unauthorised modification to configuration files.Secure 1E product communications – when using products that make use of a centralized web component, restrict access to the configuration files and XML transforms as well as any spooler directories running on the clients. Additionally, use HTTPS communications between the centralized web component and its local agents. The NightWatchman Management Center and associated components can be configured for FIPS compliance, refer to NightWatchman Management Center installer properties for more information.
Note
This property must be the same value for the NightWatchman Management Center, WakeUp server and the 1E Agents.
Secure operational environments – secure networks running our products by preventing magic packets from outside the enterprise network boundary from being routed to machines inside the network by configuring network routers/firewalls boundary devices to prevent magic packets routing.
Restrict physical access to servers – restrict access to these devices to authorised administrators only.
Secure 1E administration consoles – install 1E administration consoles on a secure environment and follow best practices such as changing administrative passwords on a regular basis.
Guidelines for large environments
NightWatchman deployments range from 500 to 300,000 seats and are supported by a single management service and is highly scalable. For customers at the upper end of this range (100,000+), these guidelines ensure optimal performance.
Performance is difficult to predict and is affected by many factors such as server hardware, disk configuration, network bandwidth, etc. Customers with similar numbers of clients can experience different performance. Our scalability testing is run against simulated activity from 300,000 computers over two years and is executed on mid-range enterprise hardware.
Note
Server specifications are typically: 8 core machine, 12-16 GB RAM, 5-6 SAS disks in 2-3 sets of RAID 0, gigabit Ethernet.
Data retention
If you have particular requirements or concerns about your deployment, contact 1E for further information and assistance. When you install NightWatchman Management Center, you will be asked the approximate size of your environment (number of clients). This figure is used to configure how often agents report power data and request policies, as well as the frequency and workload size of the batch jobs. Make sure you select the most appropriate option for your environment.
As a general guideline, assuming all features are being used with their default configuration, the database storage required after a year is approximately 1MB per client. For each computer being managed, NightWatchman stores detailed power consumption data, as well as aggregated data (for reporting purposes). Data is aggregated by day, month and year. To help keep the database size down, each of these data stores is periodically trimmed. For large (100,000+ seats) deployments, we recommend changing the default retention values to:
Table and Configuration Setting (in tbNWM_Settings) | Setting name | Default | Suggested |
|---|---|---|---|
Detailed consumption (tbNWM_Report_Consumption) | | 90 | 15 |
Aggregated daily (tbNWM_Report_Consumption_Daily) | | 90 | 30 |
Aggregated monthly (tbNWM_Report_Consumption_Monthly) | | 731 | 366 (1 year) |
Aggregated yearly (tbNWM_Report_Consumption_Yearly) | | 3653 | 1826 (5 years) |
Note
Increase ReportConsumption_KeepDays if you are not yet certain how you wish to compare ongoing energy, cost and emission savings with previous periods in different parts of the organization. The raw consumption table (tbNWM_Report_Consumption) is used when creating power behaviors and by the NightWatchman analysis reports wizard.
A power behavior is a snapshot of how a specific group of machines behaved over a specific period of time. Typically, you create a power behavior to act as a baseline in order to calculate ongoing savings for that group of computers. Increasing the number of days kept allows you to delay the choice of which groups to analyze. However, it is good practice to decide early on how many days are kept and use this as a deadline for the baseline of your power savings project. For more information about power savings projects, see Using a NightWatchman baseline to identify power savings.
Tariffs and hardware power consumption values do not affect power behaviors but do affect energy, cost and emission reports, and aspects of the reports produced by the NightWatchman analysis reports wizard, refer to Piloting NightWatchman Enterprise: Running the NightWatchman analysis reports wizard. It can take time for these variables to be finalized, at which point reports can be produced for different periods and compared.
Reporting
Almost all NightWatchman Management Center reports (particularly those related to energy, cost and emissions) are run against aggregated data tables (see data retention). Where possible, we recommend running reports which use monthly/yearly data (rather than daily data) – this will not provide as much detail in the report itself, but will give better performance and should be sufficient for most data analysis.
Batch jobs
Be aware that system performance is impacted while the batch jobs are running, so allow for this. Batch jobs can be monitored using Operations reports from NightWatchman Report Console. If they are significantly impairing performance, they can be reconfigured to run less frequently and at more convenient times.
SQL Server
SQL Server offers enormous scope for configuration. We pre-configure our database based on the type of environment you select during installation; other configuration options are better suited to per-installation tuning. Specifically, you may wish to monitor database growth rates and adjust them accordingly. There is also potential to use file groups to improve performance.
Hardware configuration
Component | Notes |
|---|---|
Processor | NightWatchman server-based components have greater I/O than CPU needs; that is to say that a server's disks are more likely to become a performance-limiting factor than its processors. Configuration options such as |
Disks | Disks are a very important consideration in achieving consistently high system performance. Where possible, we recommend the use of enterprise-class disks (SAS, 10-15k RPM) supported by a hardware RAID controller. To make the best use of disk resources, it is common to place SQL Server data, log and temporary files on different disks to maximize throughput. Contact 1E for more information. It is also worth mentioning that disk space can be consumed very quickly in a large deployment. A database supporting 100,000 clients will grow to several hundreds of gigabytes of disk space, therefore proactive monitoring and adjustments to data retention settings is advised. |
RAM | For large-scale deployments, we strongly recommend use of 64-bit operating and SQL Server systems, preferably using the most recent Microsoft OS and SQL versions. 32-bit architectures have inherent memory limitations, and later Microsoft platform versions continue to be optimized for performance. We recommend a minimum of 16GB of RAM for hosting SQL Server in a large NightWatchman deployment – typically, most of this memory will be required for the SQL Server caching subsystems. |
Network | Even with hundreds of thousands of computers reporting, a NightWatchman deployment typically uses very little network bandwidth. During intensive scalability testing, we see send/receive peaks of no more than 2-3 megabytes per second (20mbps). This kind of throughput can be handled comfortably by gigabit-enabled networking hardware. |
Virtualized Hardware | For large-scale deployments, we recommend physical, rather than virtualized hardware where possible, especially for the database server. If you have a specific requirement to support a large-scale virtualized deployment, we would recommend use of a bare-metal or native type hypervisor. |
Scaling-up versus scaling-out
NightWatchman Management Center Web and database components can be deployed across multiple servers to help distribute workload. Although this can increase administrative complexity, using separate database and web-servers (scaling-out) can dramatically improve performance.
However, consider this option only if you are unable to achieve acceptable performance with a single server. Additional hardware, especially disk resources, can help improve the performance of a single server (scaling-up).
Client hardware requirements
To utilize Wake-On-LAN (WoL) technology, you need the following hardware configurations:
Hardware | Configuration |
|---|---|
Network card | A network card which can support Wake-On-LAN. Your network card vendor can tell you if your network adapter supports Wake-On-LAN. If it does, it must be configured to enable remote wake up. Some adapter drivers are disabled by default within the operating system. |
System BIOS | Wake-On-LAN must be enabled in the system BIOS. This option can usually be found in the Boot menu of the BIOS configuration program. Some BIOS have a 'Maximum Power Savings' or 'Low Power S5' option, which should be disabled in order to allow some power to the network card. |
Power management | APM or ACPI should be enabled, otherwise the user of the machine should ensure that it is powered off by hitting the off button after shutdown. |
A quick way to tell if a system is Wake-On-LAN ready, is to power down the system then look at the network adapter display LED's. If the lights are still on, then chances are that the system is OK. Windows must have been powered down gracefully (either off or sleep) in order for it to prepare the network card for WOL.
1E also provides a diagnostic tool called Magic Test that determines if a machine can react to a magic packet wake up. Download Magic Test and other free tools from 1E’s Free Tools page.
Tip
Please contact 1E if you require guidance with WoL configuration on Windows operating systems and enterprise vendor hardware including Dell, HP and Lenovo computers.
Sizing and deployment considerations
For a single-server NightWatchman deployment: | |||||
|---|---|---|---|---|---|
| |||||
Number of machines | 5,000 | 25,000 | 50,000 | 100,000 | |
Benchmark configuration | |||||
Number of clients polling and posting messages per hour | 5,000 | 12,500 | 25,000 | 50,000 | |
Messages per batch/client | 12 | 15 | 15 | 18 | |
Number clients to be deployed concurrently | 2,500 | 2,500 | 5,000 | 5,000 | |
NightWatchman server | |||||
CPU cores | 1 | 1 | 2 | 3 | |
RAM | 6 GB | 6 GB | 8 GB | 8 GB | |
SQL Server instance max memory | 2 GB | 2 GB | 4 GB | 4 GB | |
Database connection max pool size | 10 | 15 | 15 | 20 | |
Total disk space required for databases | 6.5 GB | 30 GB | 55.5 GB | 111 GB | |
SQL Server HDD requirements | |||||
NightWatchman database MDF | 5 GB | 24 GB | 45 GB | 90 GB | |
NightWatchman database LDF | 1 GB | 5 GB | 9 GB | 18 GB | |
TempDB MDF | 100 MB | 500 MB | 1 GB | 2 GB | |
TempDB LDF | 40 MB | 200 MB | 400 MB | 800 MB | |
For a distributed Nightwatchman deployment: | ||||
|---|---|---|---|---|
| ||||
Number of machines | 50,000 | 200,000 | 500,000 | |
Benchmark configuration | ||||
Number of clients polling and posting messages per hour | 25,000 | 100,000 | 250,000 | |
Messages per batch/client | 15 | 18 | 18 | |
Number clients to be deployed concurrently | 5,000 | 5,000 | 5,000 | |
NightWatchman server | ||||
CPU cores | 1 | 2 | 4 | |
RAM | 4 GB | 4 GB | 4 GB | |
Database server | ||||
CPU cores | 1 | 2 | 4 | |
RAM | 8 | 10 GB | 12 GB | |
SQL Server instance max memory | 4 GB | 6 GB | 8 GB | |
Database connection max pool size | 15 | 40 | 70 | |
Total disk space required for databases | 55.5 GB | 222 GB | 554 GB | |
SQL Server HDD requirements | ||||
NightWatchman database MDF | 45 GB | 180 GB | 450 GB | |
NightWatchman database LDF | 9 GB | 36 GB | 90 GB | |
TempDB MDF | 1 GB | 4 GB | 10 GB | |
TempDB LDF | 400 MB | 2 GB | 4 GB | |
For the WakeUp servers: | |||||||
|---|---|---|---|---|---|---|---|
| |||||||
Number of machines | 5,000 | 25,000 | 50,000 | 100,000 | 200,000 | 500,000 | |
Number of WakeUp servers | 1 | 1 | 1 | 2 | 4 | 10 | |
Wakeup server | |||||||
CPU cores | 2 | 2 | 2 | 2 | 2 | 2 | |
RAM | 2 GB | 2 GB | 2 GB | 2 GB | 2 GB | 2 GB | |
Time to wake-up (approximate) | 5 mins | 10 mins | 15 mins | 15 mins | 15 mins | 15 mins | |
Benchmarking criteria
Benchmarked against Windows Server 2012 R2 Hyper-V infrastructure, with database and application server components setup on separate VMs
CPU (NWM Server) - Hyper-V host CPU configuration - 2x Intel Xeon CPU E5-2407 v2 @ 2.40GHz, 10M Cache, 4C, Max Mem 1333MHz
CPU (WakeUp Server) - Hyper-V host CPU configuration - Intel Xeon Processor E5-2620 v3 @ 2.40GHz, 15M Cache, 6C/12T, Max Mem 1833MHz
All VMs connected over a 1Gbps link through a 1Gbps physical switch
Database storage – Samsung 850 EVO solid state drives attached locally to the Hyper-V host, with up to 98k/90k IOPS (4K random read/write QD32), and MDF, LDF and TempDB on separate SSDs.
Recommendations
Servers can be deployed either on physical or virtual machines. For deployment on a virtual machine, assign the CPU cores at 100% virtual machine reserve
NightWatchman server:
based on the numbers of clients machine, tune the
Max Pool Sizedatabase connection parameter inC:\Program Files (x86)\1E\NightWatchman Management Center\WebService\Web.configinstall no more that 2,500 new clients concurrently in environments up to 25,000 machines
install no more that 5,000 new clients concurrently in environments with 50,000 machines or more.
NightWatchman database server:
deploy data, logs and TempDB on separate physical disks
configure SQL Server with maximum server memory limit and not at the defaults to consume unlimited memory
4GB RAM should be added for the operating system on top of SQL Server instance RAM requirements.
WakeUp Server
have separate Wakeup servers for every 50,000 clients.