Instruction Management
Managing the 1E instructions made available to ServiceNow.
1E provides a large number of instructions available from the 1E exchange and used to investigate devices or fix issues across your entire enterprise. Using the 1E ITSM Connect application, you can now access the same capabilities from within ServiceNow. To enable this, the instructions available in 1E should be synchronized and cached in ServiceNow to allow the running of instructions and collection of responses directly in a ServiceNow incident.
Instruction Management in 1E
The 1E instructions that are available to any ServiceNow user with the x_1e_connect.Tachyon_User role, must be defined in 1E by setting the appropriate permissions on the proxy user role in 1E, for more details see Add the 1E ITSM Connect app proxy user to 1E.
Enabling or disabling approval for a 1E Instruction
An admin user can enable or disable approval for a 1E Instruction by setting the state of Is Approval Required checkbox to checked or unchecked on the Instruction definition detail page. The admin user can also update its value from the Instruction Definitions page by setting the value in the Is Approval Required column to true or false.
Note
If approvals are disabled for the application from 'App Configuration' page then even approval is enabled for a 1E instruction then too it will not ask for approval at the time of execution.
An admin user will retrieve 1E Instruction from 'App Configuration' page.
Instruction retrieval in ServiceNow
1E instructions are made available in ServiceNow by clicking on the Retrieve Instructions button on the App Configuration page. This fetches details of all the instructions currently available to the 1E ITSM Connect app 1E user along with their parameters and stores them in the ServiceNow tables.
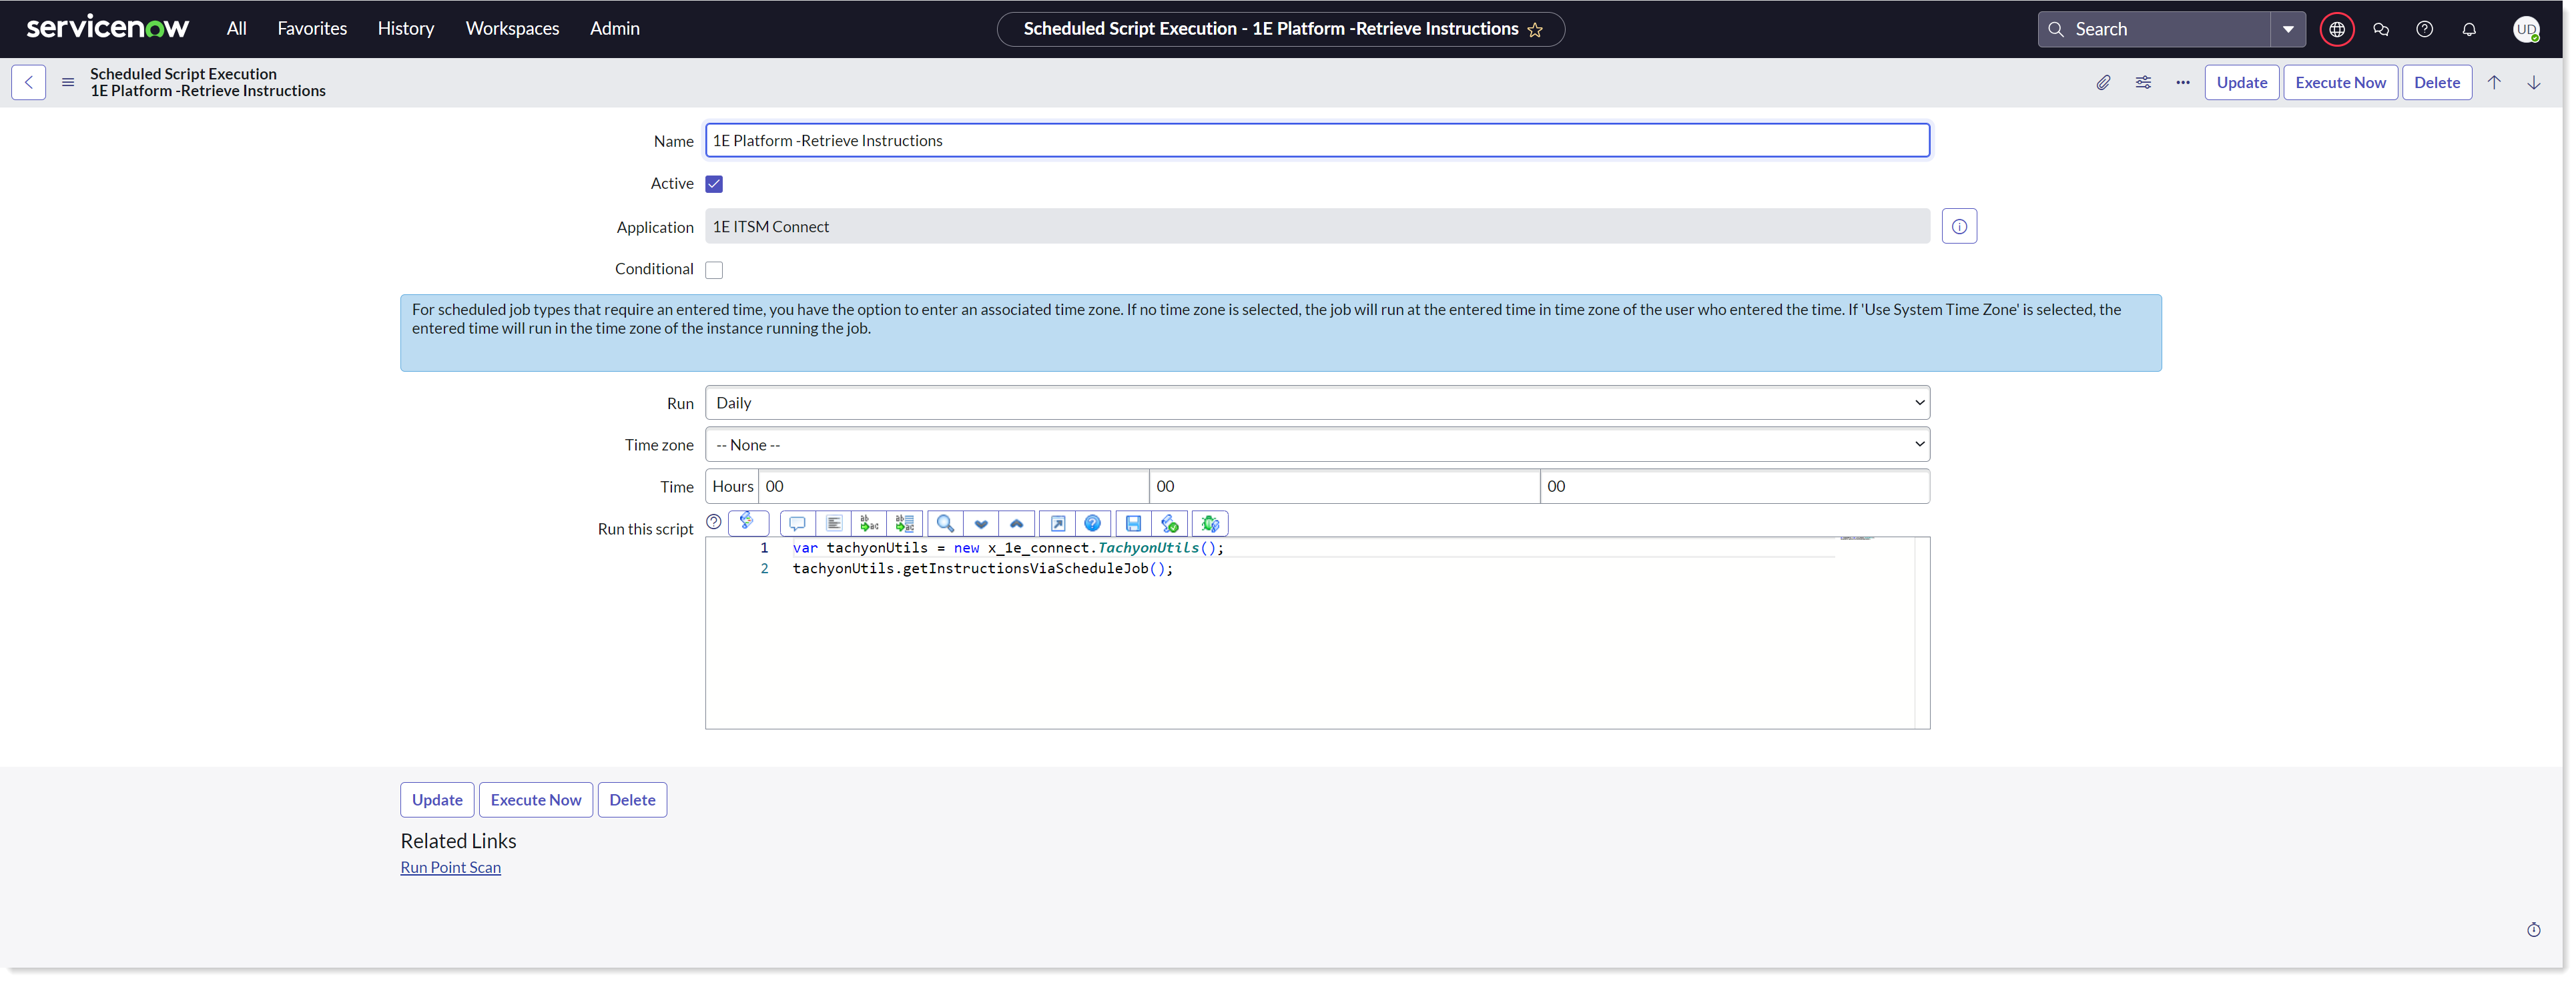
There is also a schedule job 1E Platform-Retrieve Instructions under the Administration section to retrieve instructions. This job allows the user to set the periodic retrieval of instructions from 1E.
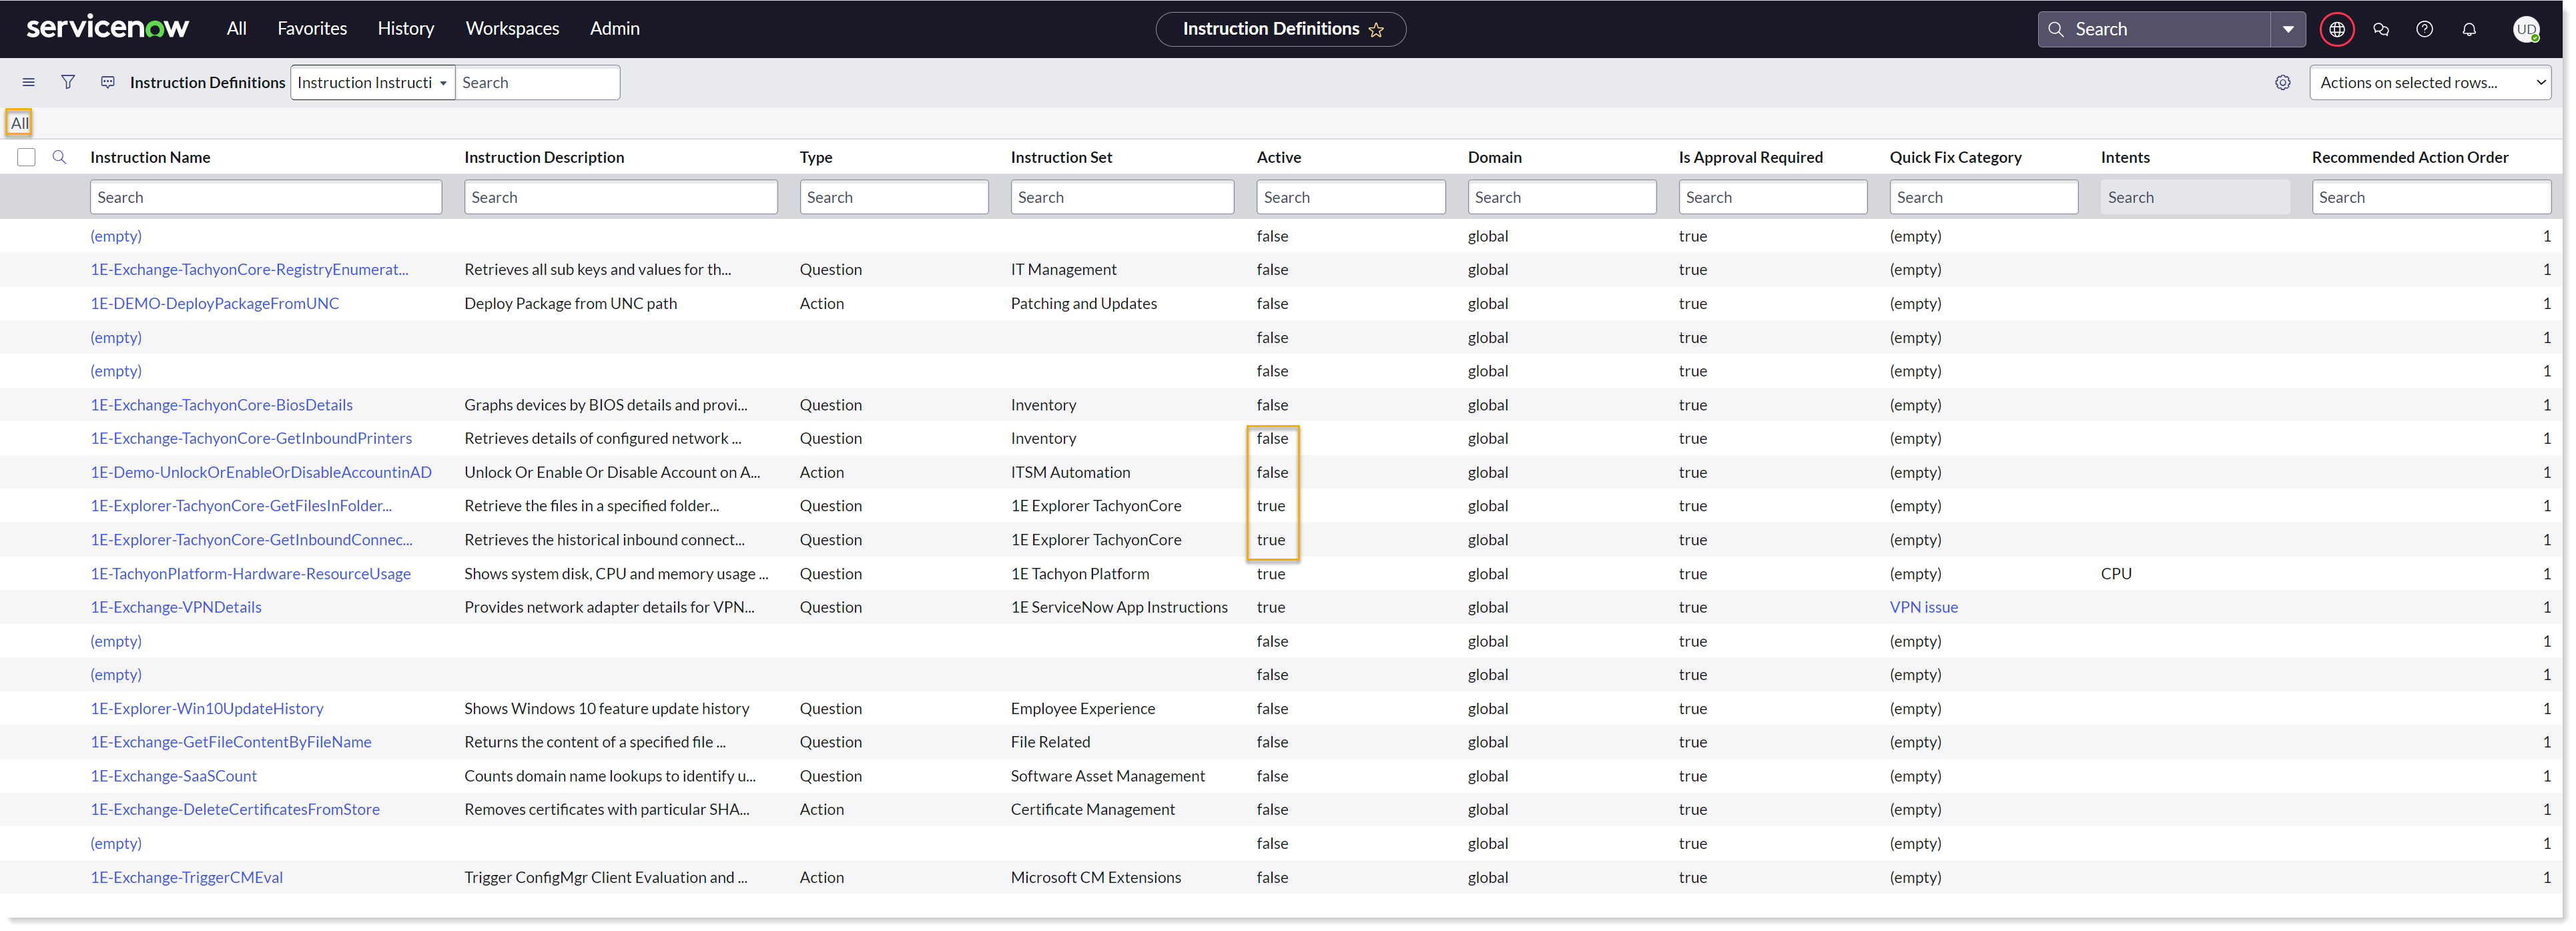
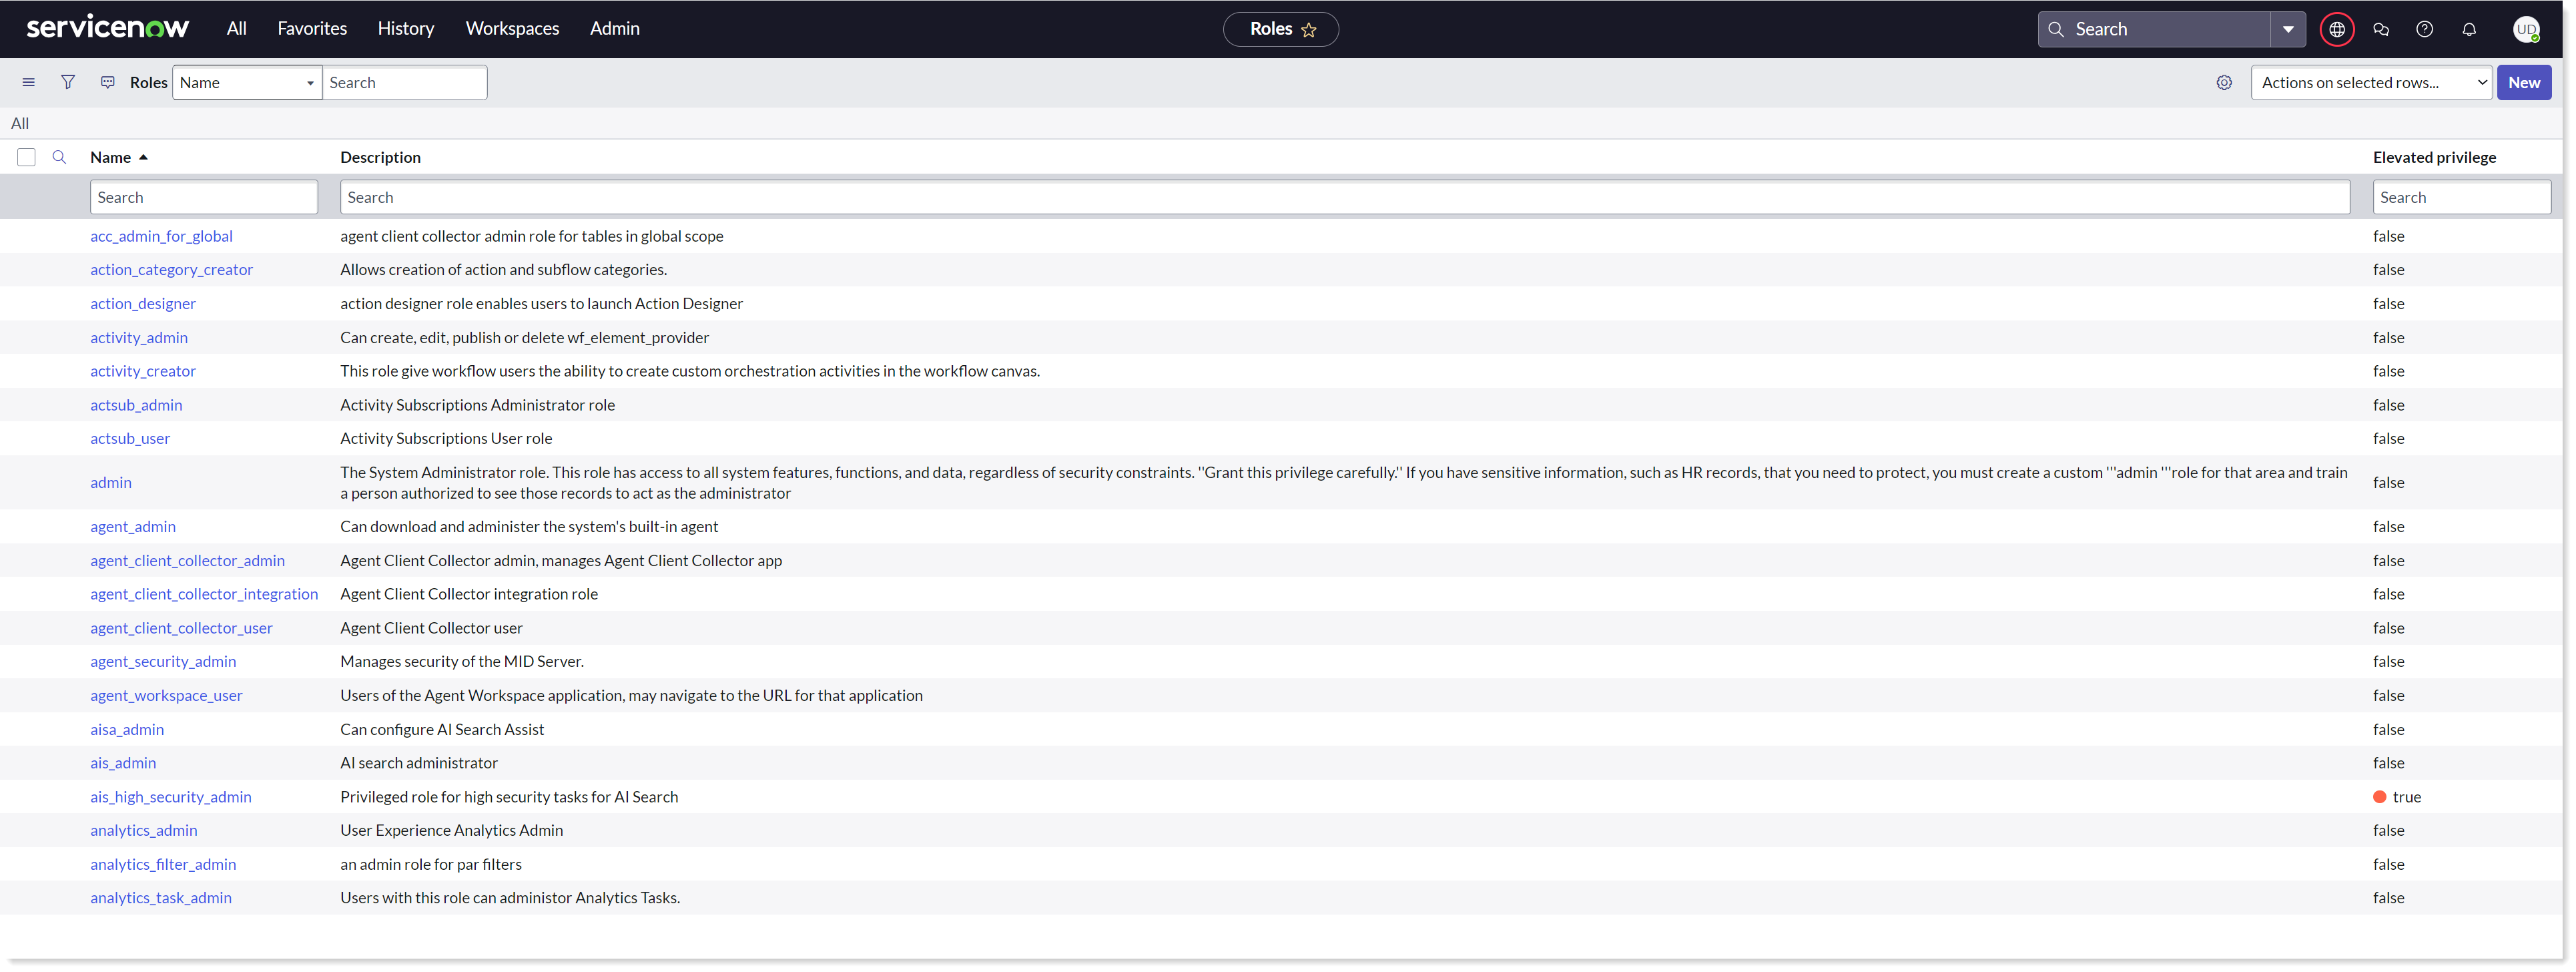
Instruction definitions page
All the instructions available in ServiceNow can be seen on the Instruction Definitions page. All the basic details about the instructions, such as: the instruction name, description, Instruction Set etc. are displayed on this page. The Type of the instruction is also visible on the page and tells you whether an instruction is an action or a question.
Instructions can be automatically disabled and marked as inactive by displaying false in the Active column, please refer to Updating Instruction sets in 1E and automatically disabled instructions for more details about automatically disabled instructions. The contents of the Instruction Definitions page are filtered so that only active instructions are displayed on the page by default.
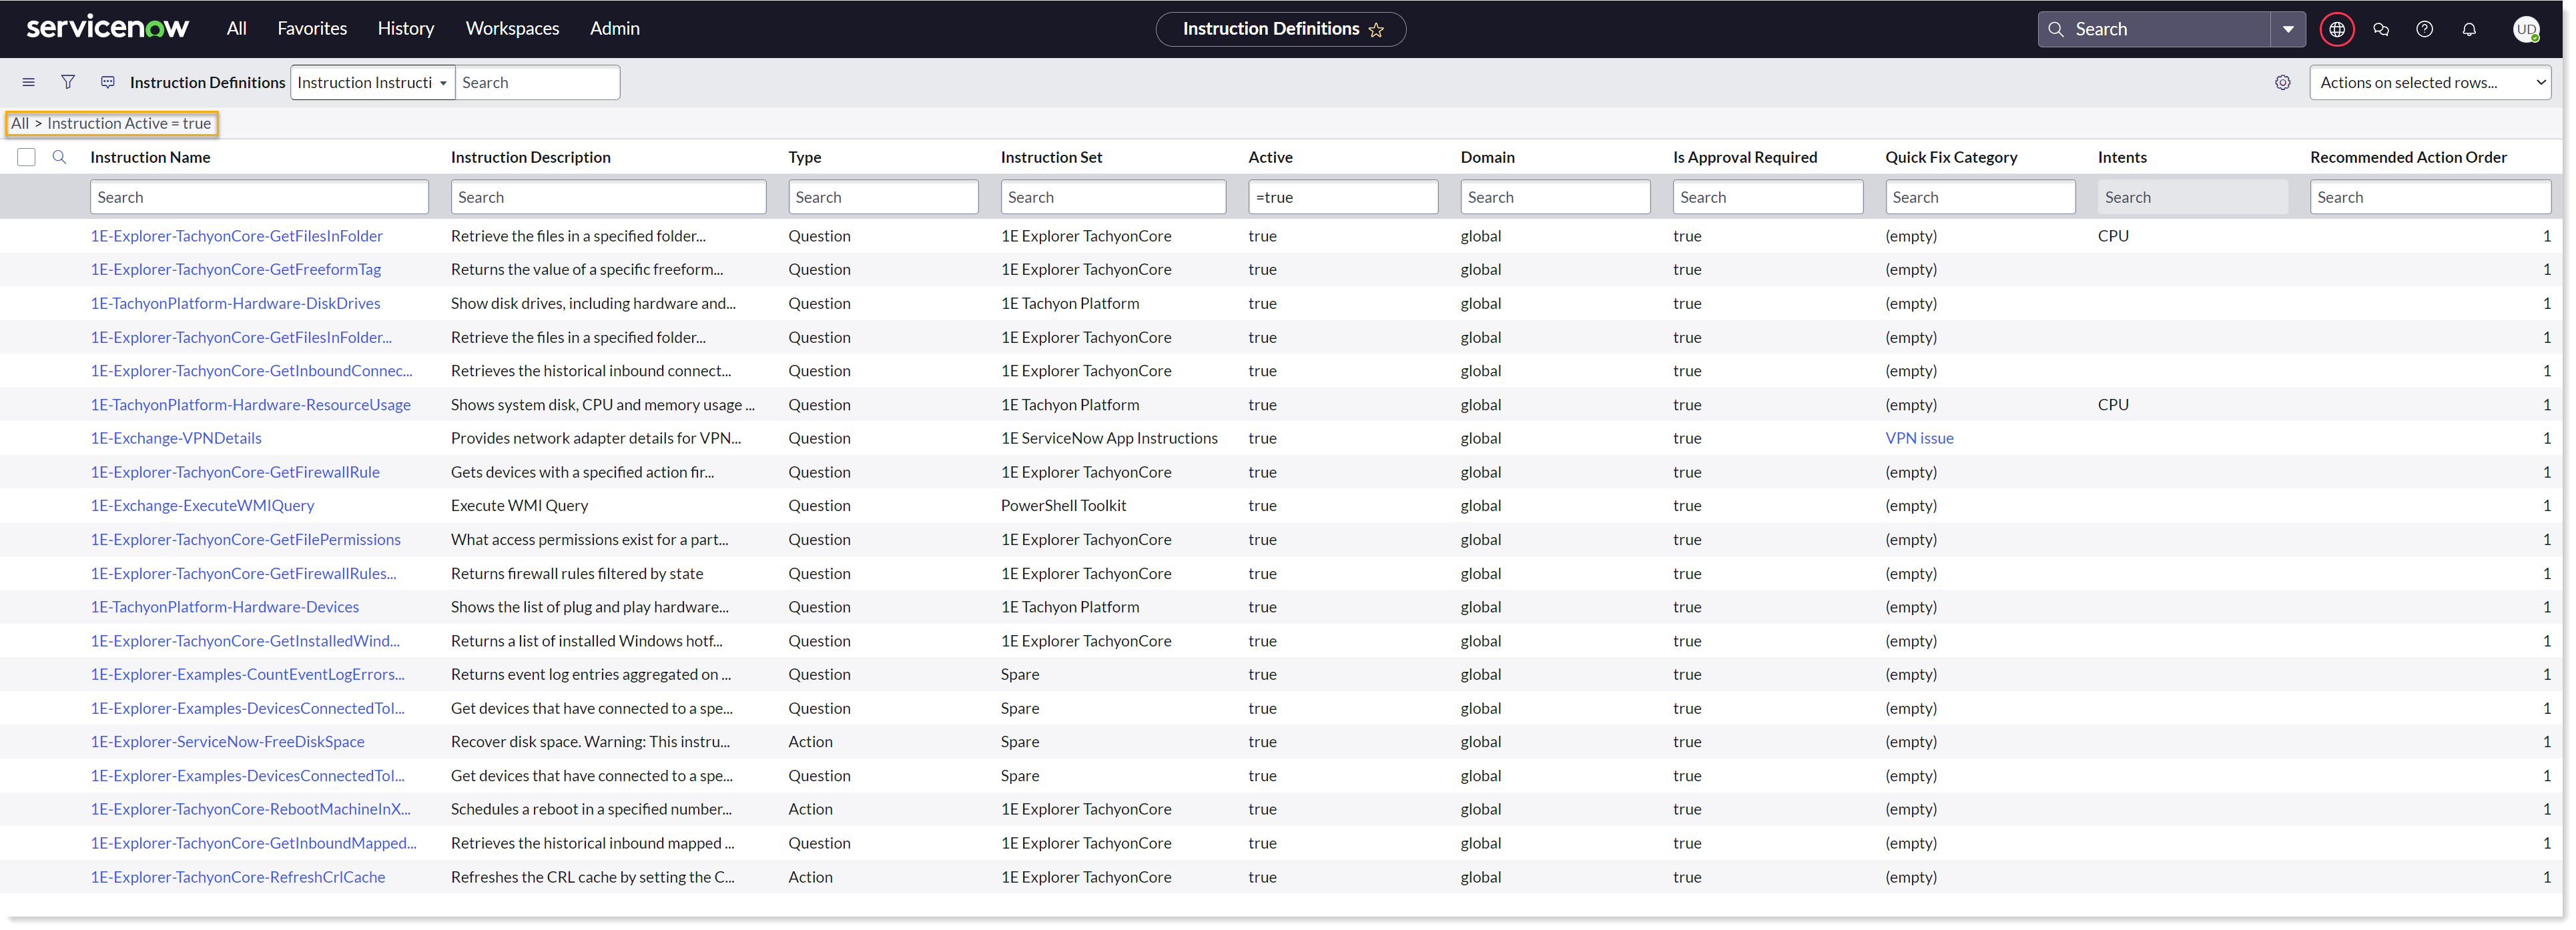
In order to see all the instructions, including the inactive ones, the default filter should be removed by clicking the All link just before the filter condition.
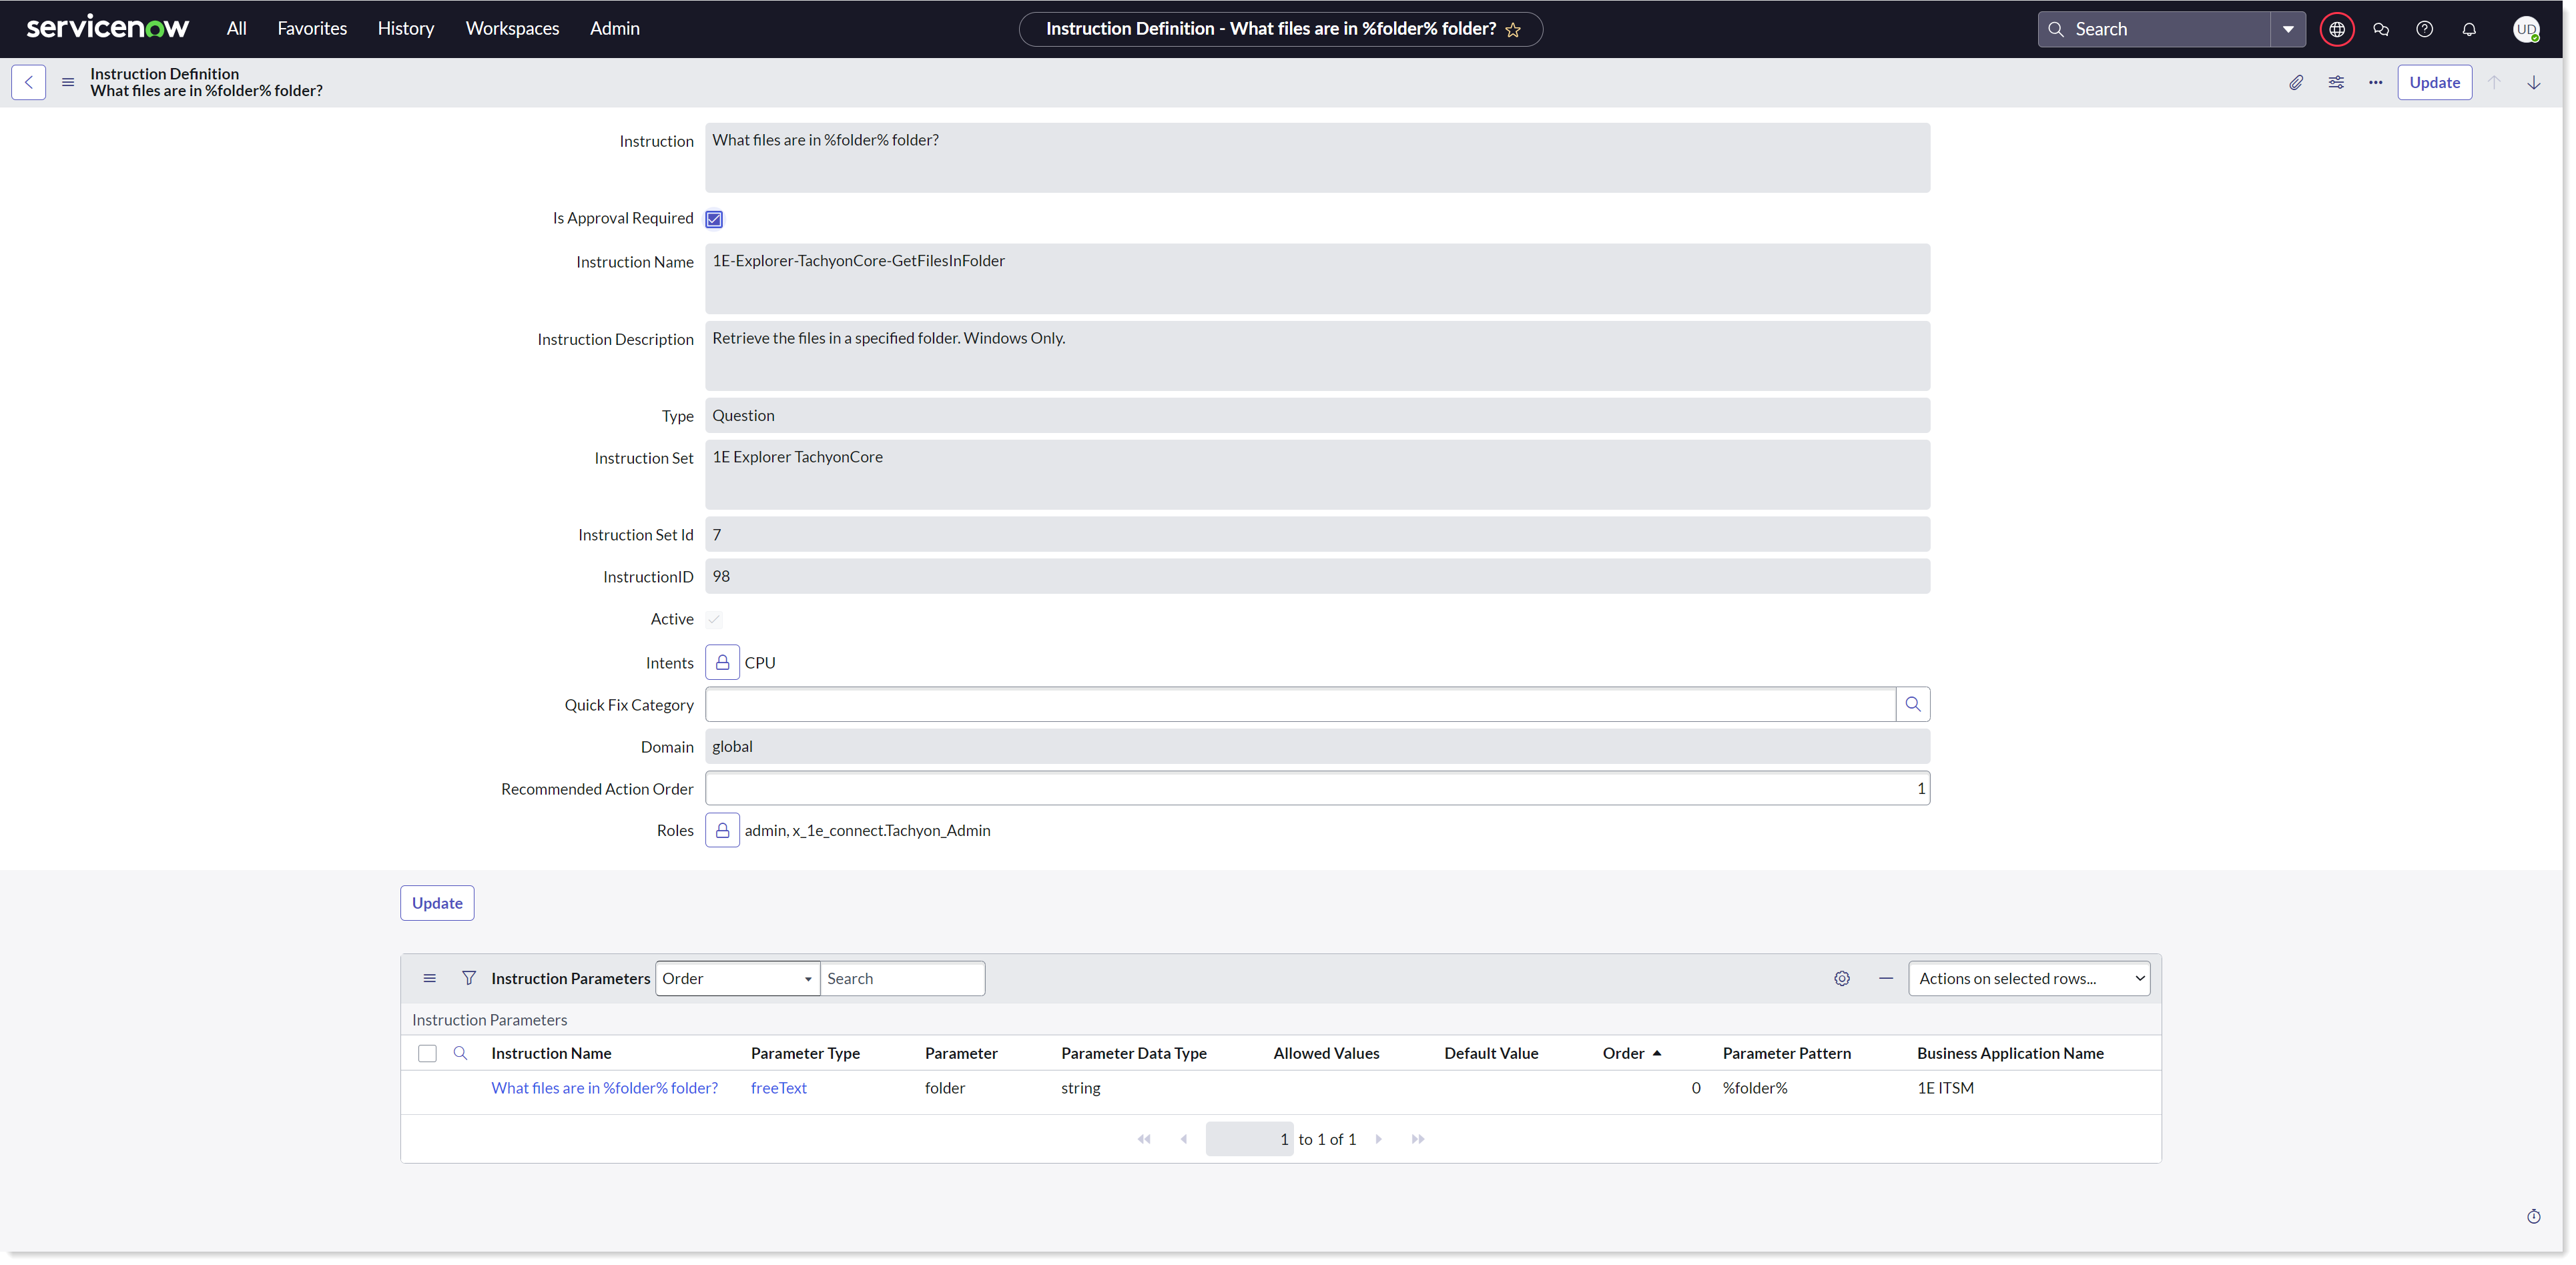
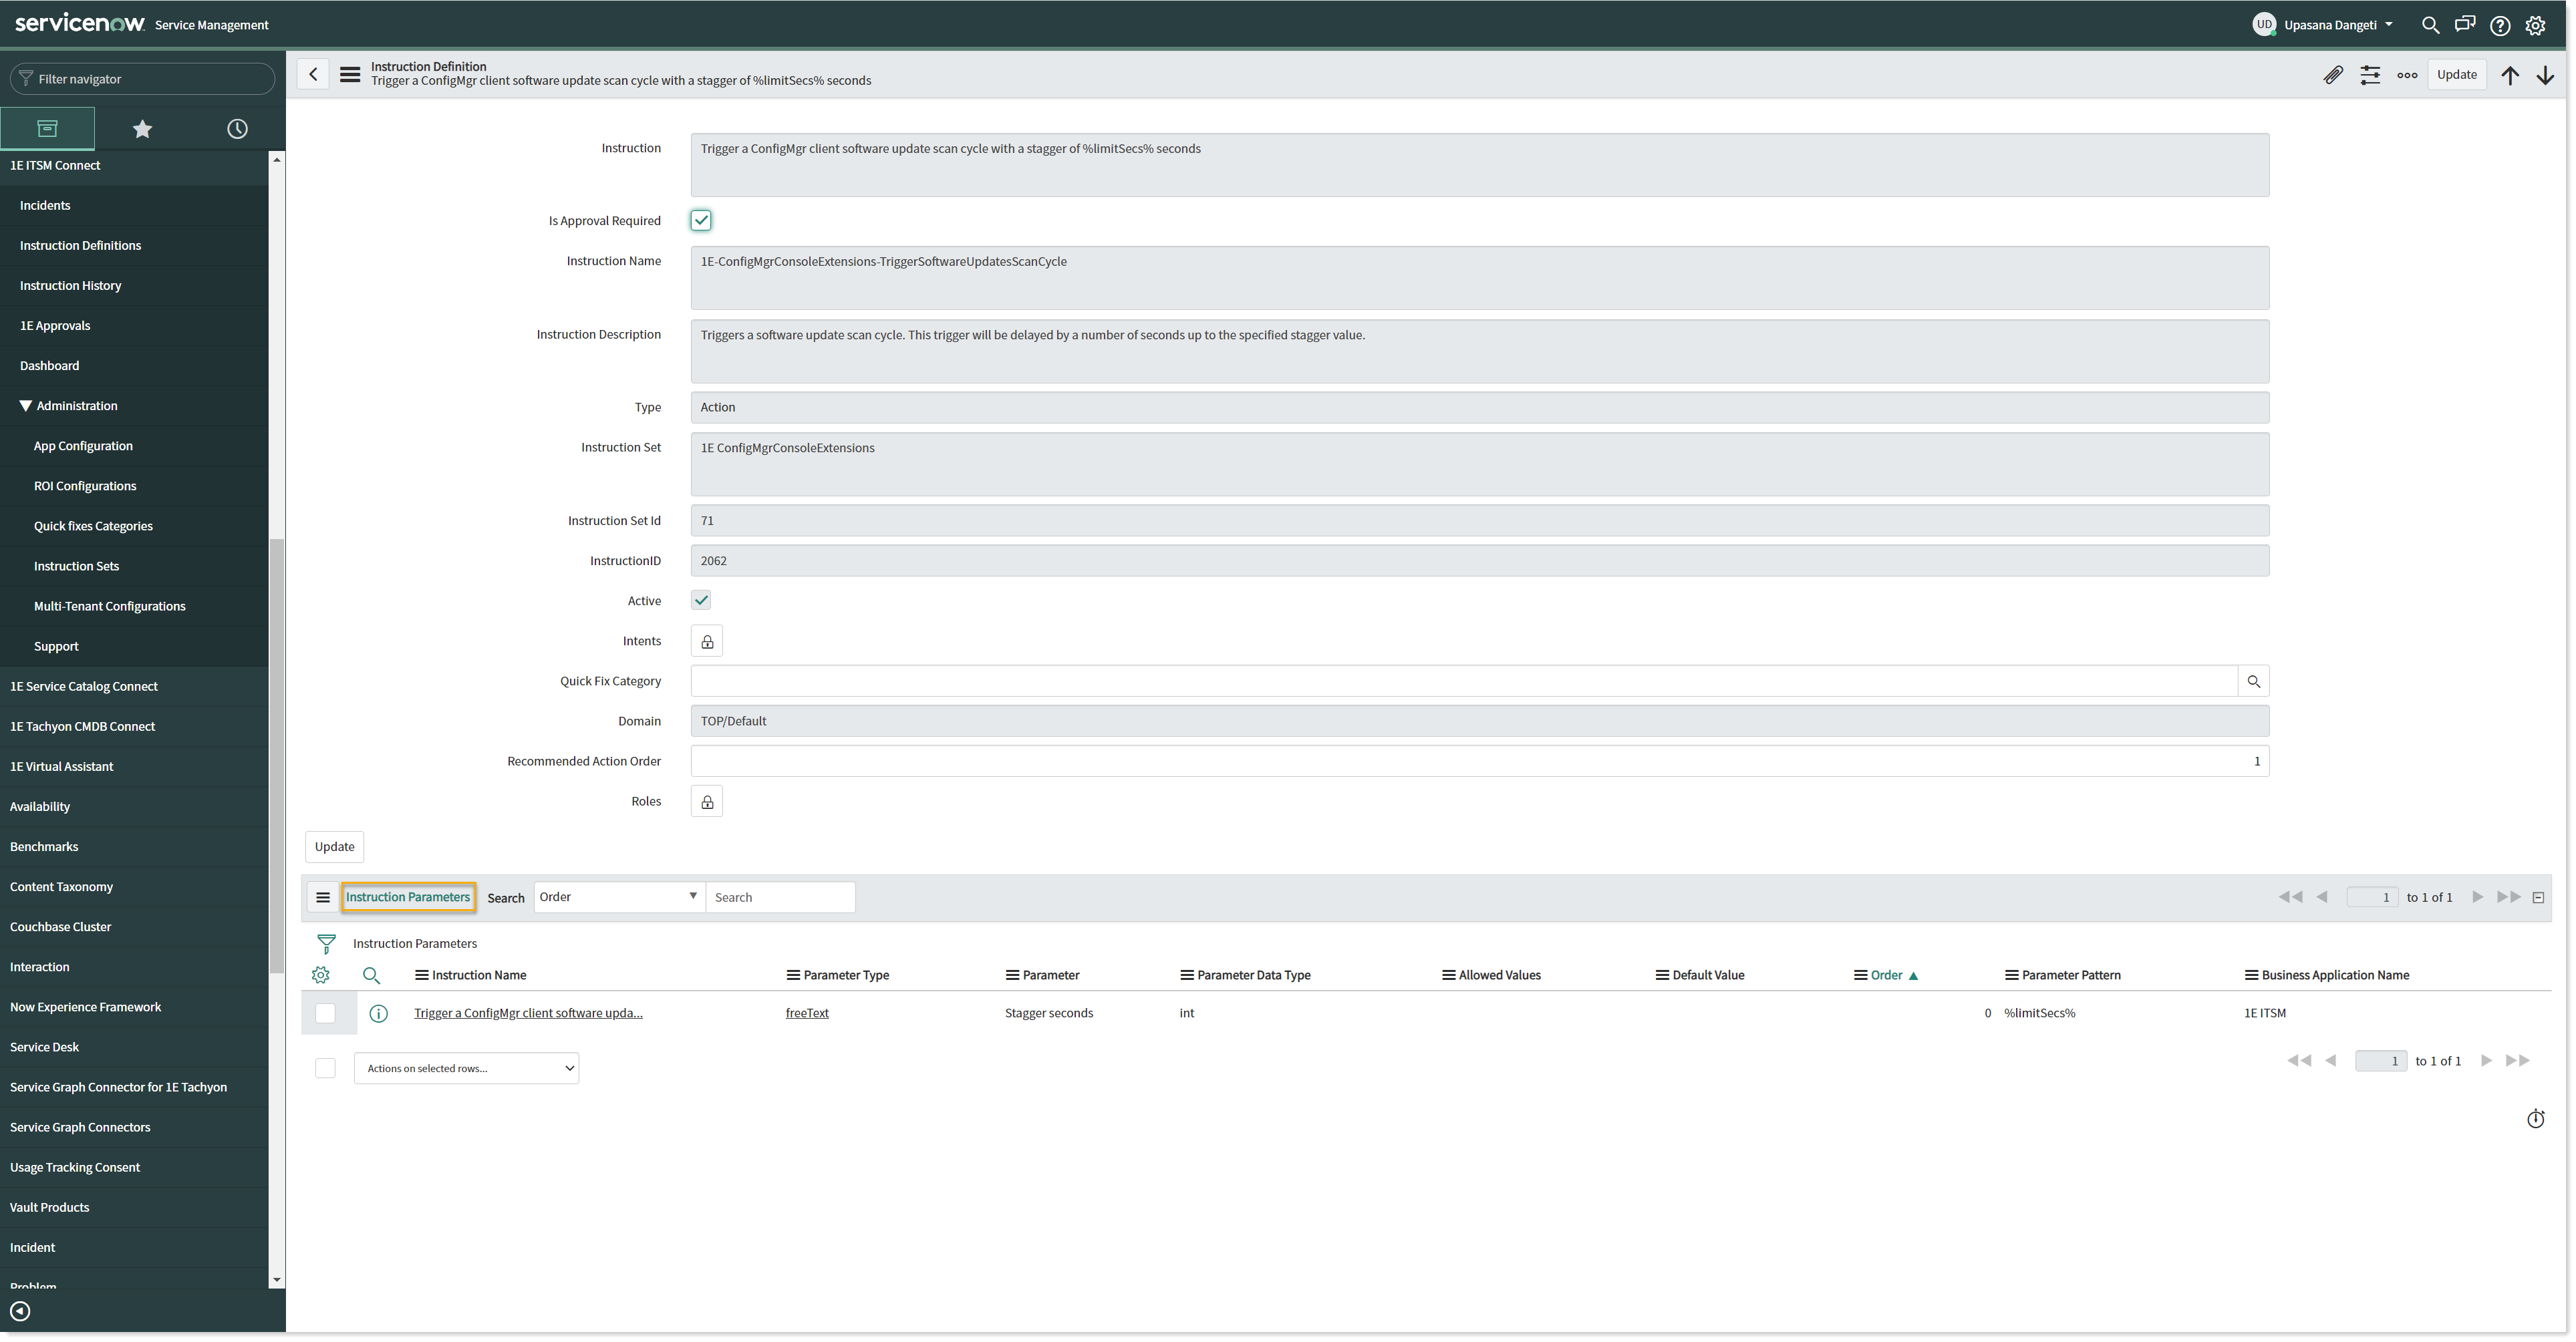
Instruction detail page
When you click an Instruction name link on the Instruction Definitions page, the Instruction Definition page, showing the details for the selected instruction, is opened. This page has all the additional details for an instruction not displayed on the instruction definitions page.
Specifically, the list of Instruction Parameters required by an instruction is shown on this page. The Instruction Parameters table shows the Parameter name, Parameter Type, the Default Value and the Allowed Values. The allowed parameter types are free text and value picker.
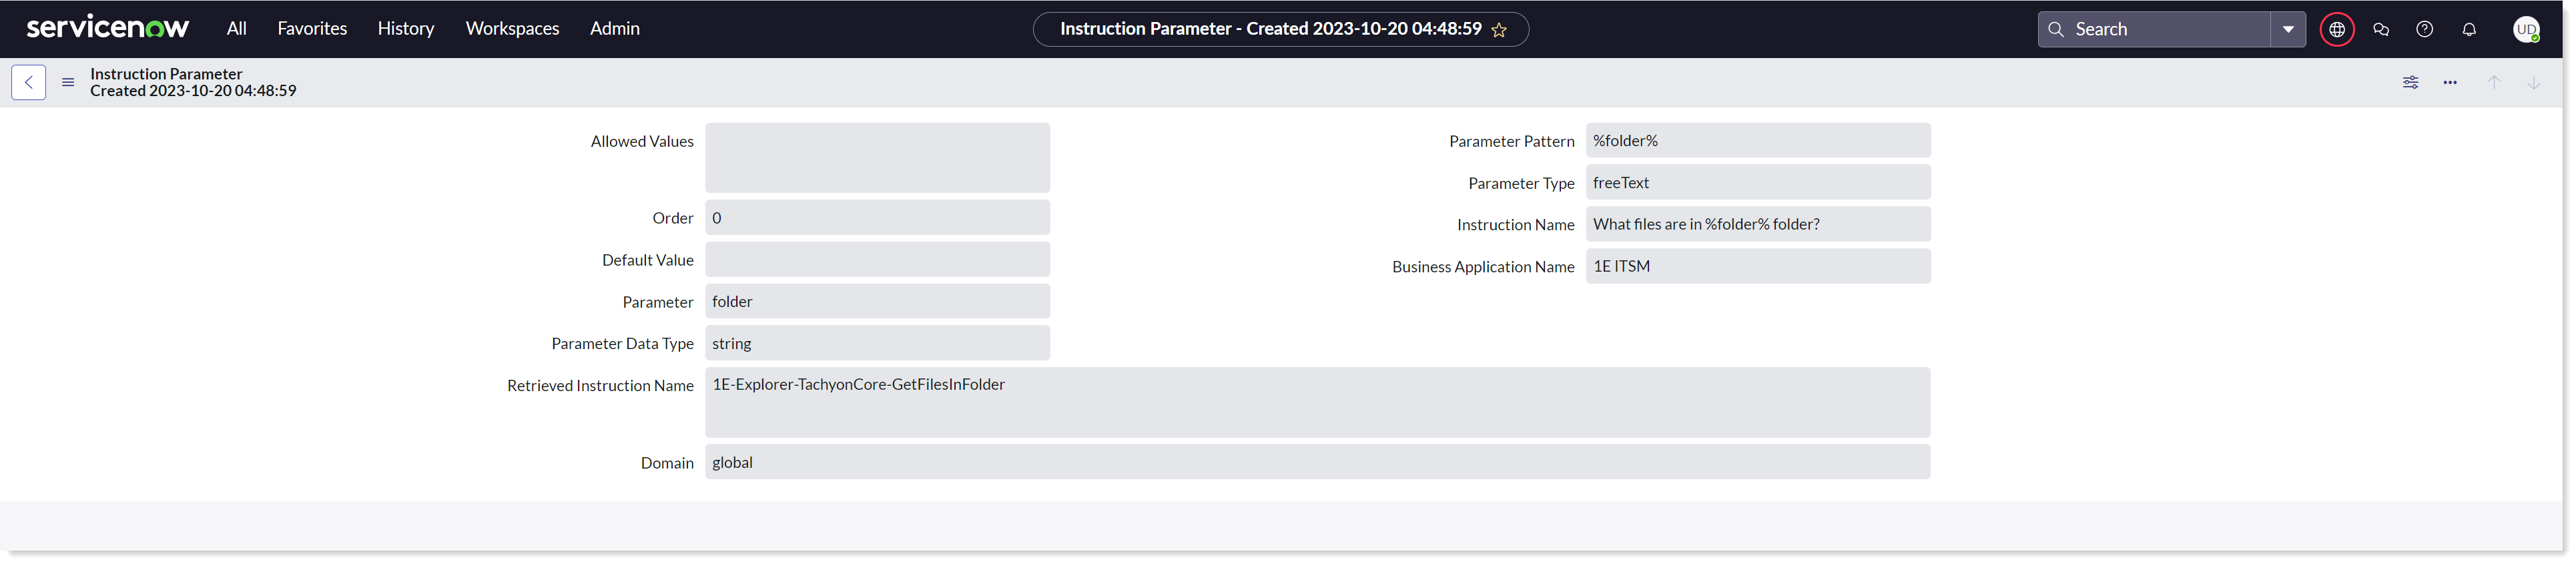
Parameter detail page
When you click on the Parameter Type link on the Instruction Parameters table, the Instruction Parameter details page is displayed. All the details for the selected parameter are displayed on this page.
Updating Instruction sets in 1E and automatically disabled instructions
Instructions or instruction sets that are assigned to the proxy user specified in 1E User Name field of the API Configuration Page may be deleted, updated, or permissions changed within 1E. In this case, instructions are no longer available to the 1E ITSM Connect app users. These instructions are not deleted from the app, instead they are automatically disabled (Active status set to false).
When an administrator user tries to retrieve the latest set of instructions using the Retrieve Instructions button, a new set of instructions is returned from 1E, which might have added, updated or deleted instructions. Depending on which of those states an instruction belongs to, there are three actions taken:
New instructions are added to the ServiceNow database directly.
Updated instructions are modified in the ServiceNow database and the updates made available to users from that point on.
Instructions that are deleted from 1E and therefore no longer available to 1E ITSM Connect users are not deleted from ServiceNow database, instead they are automatically disabled by setting their Active status to false. This ensures data integrity by providing full support for the historical data if any of these instructions have been run.
Assigning devices to CI selector
1E ITSM Connect allows you to view the list of Configuration Items (CI) associated to a user. To configure this user assets icon to the desired field, follow the below given steps.
Login to your ServiceNow instance.
Navigate to 1E ITSM Connect → Incidents.
Change your application to Global.
Open the incident from the list that you want to work on.
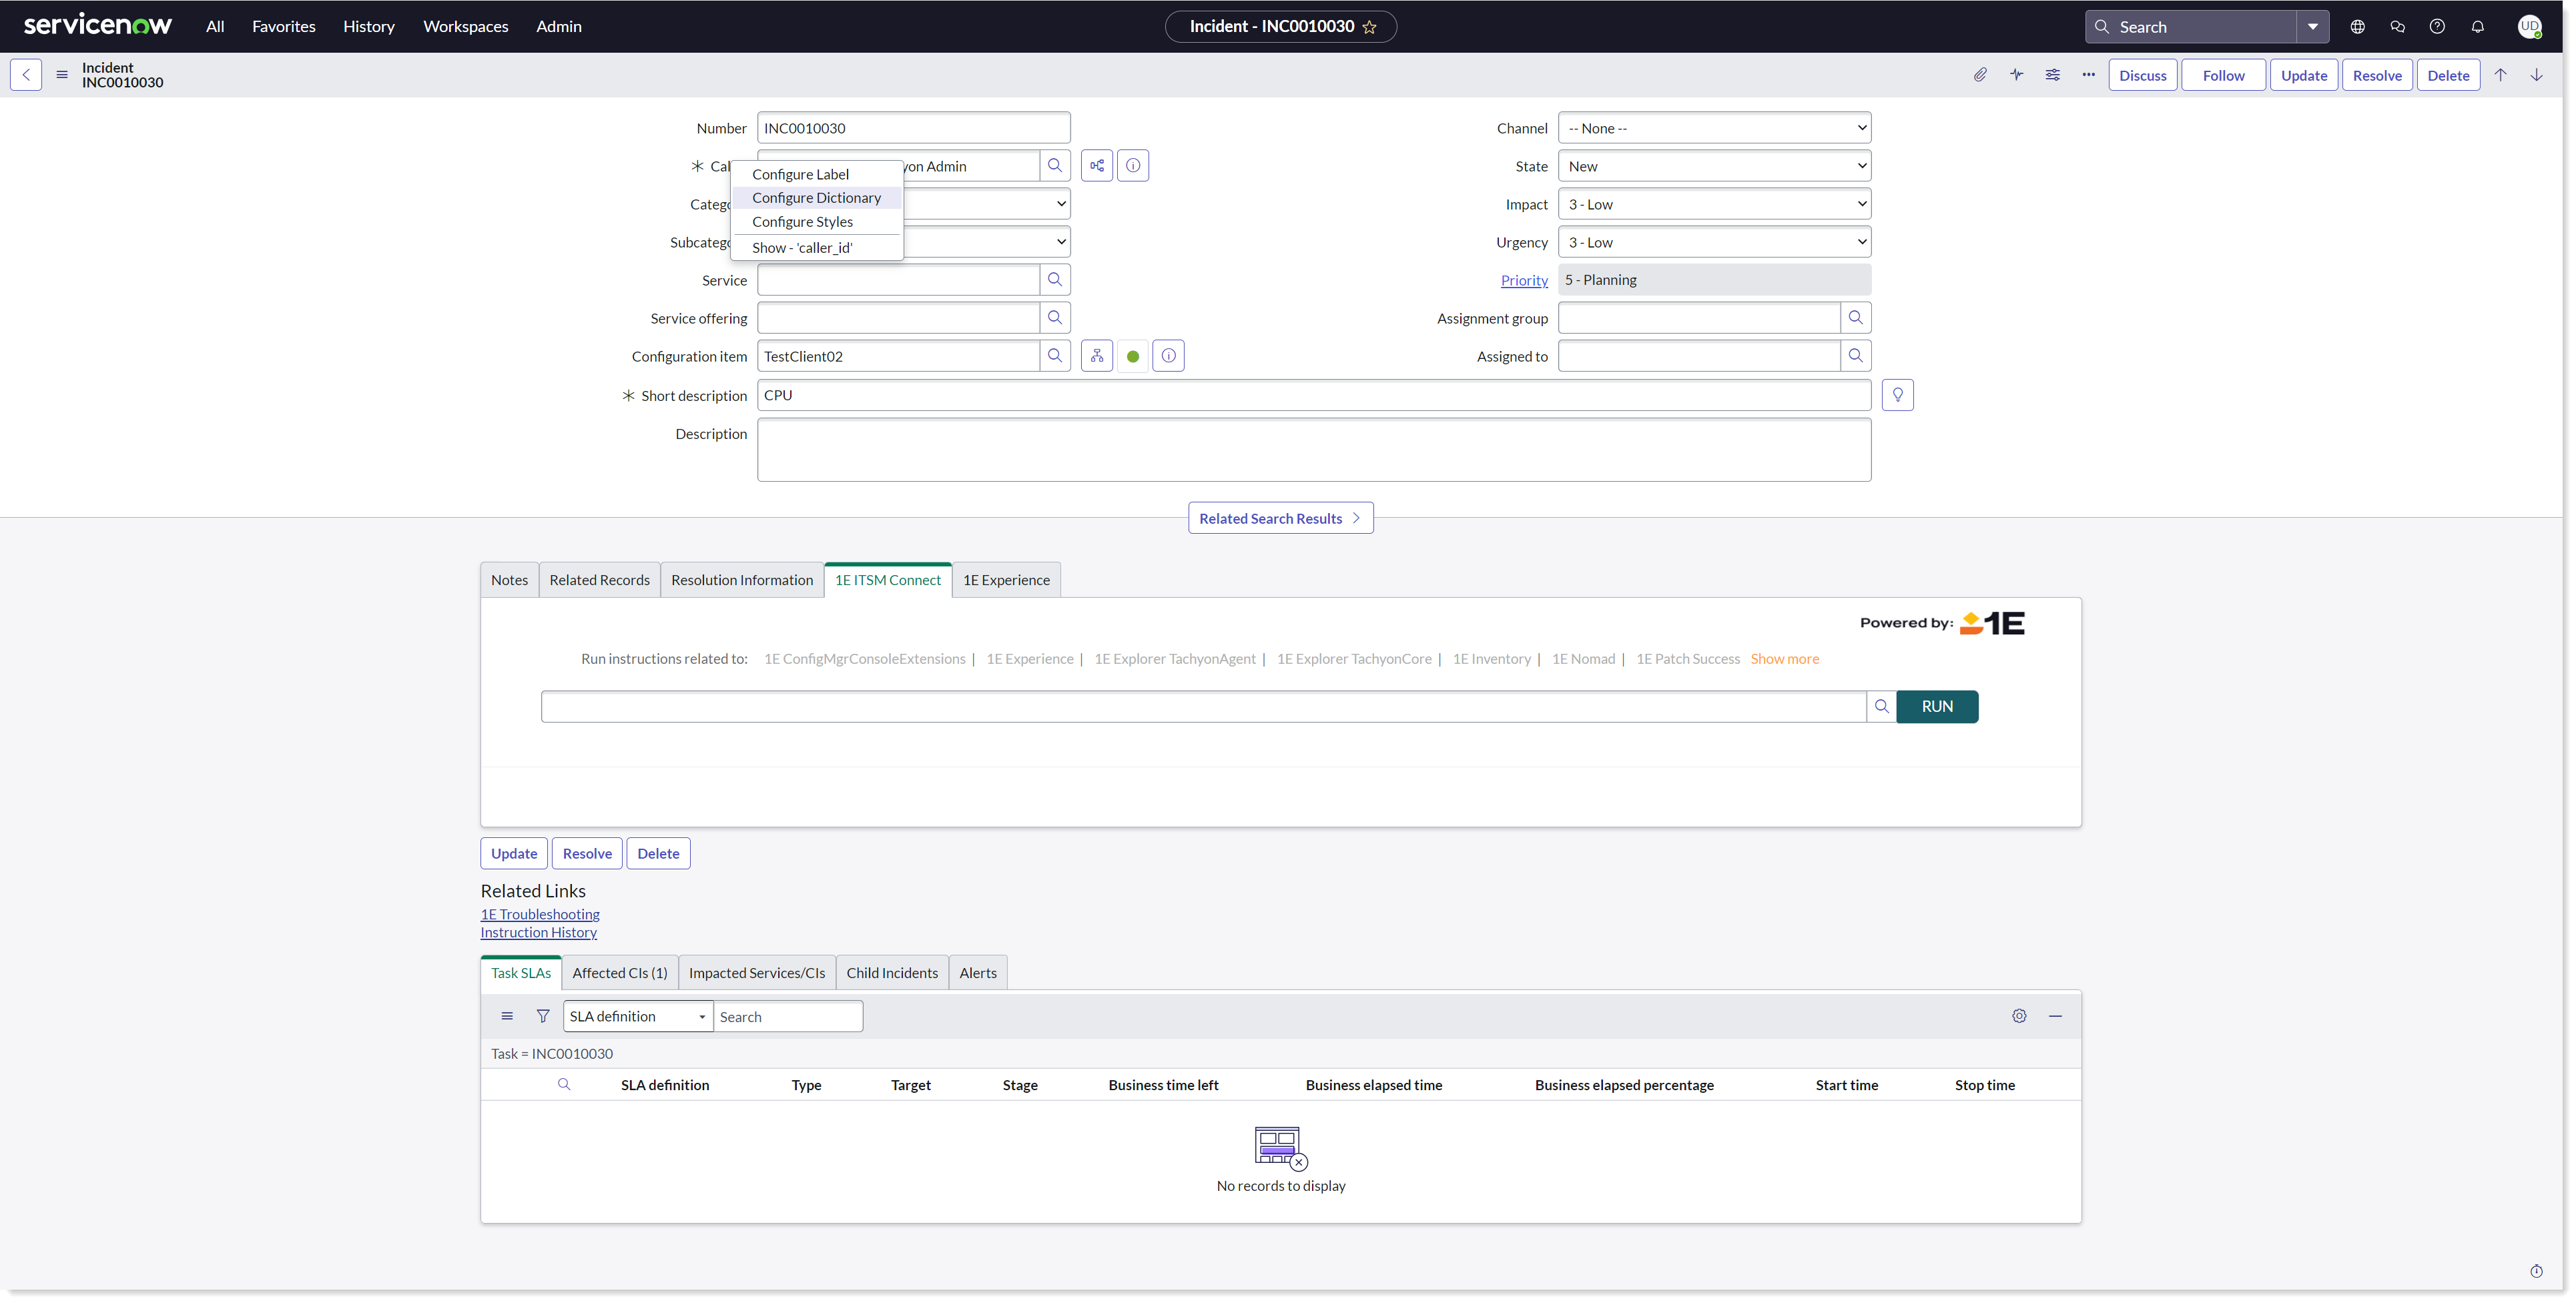
Now choose the field from the incident form to which you want to add the CI selector icon. Here, in our example, we have chosen the Caller field as shown in the picture below.
Right-click on the field label and select Configure Dictionary from the dropdown list that appears.
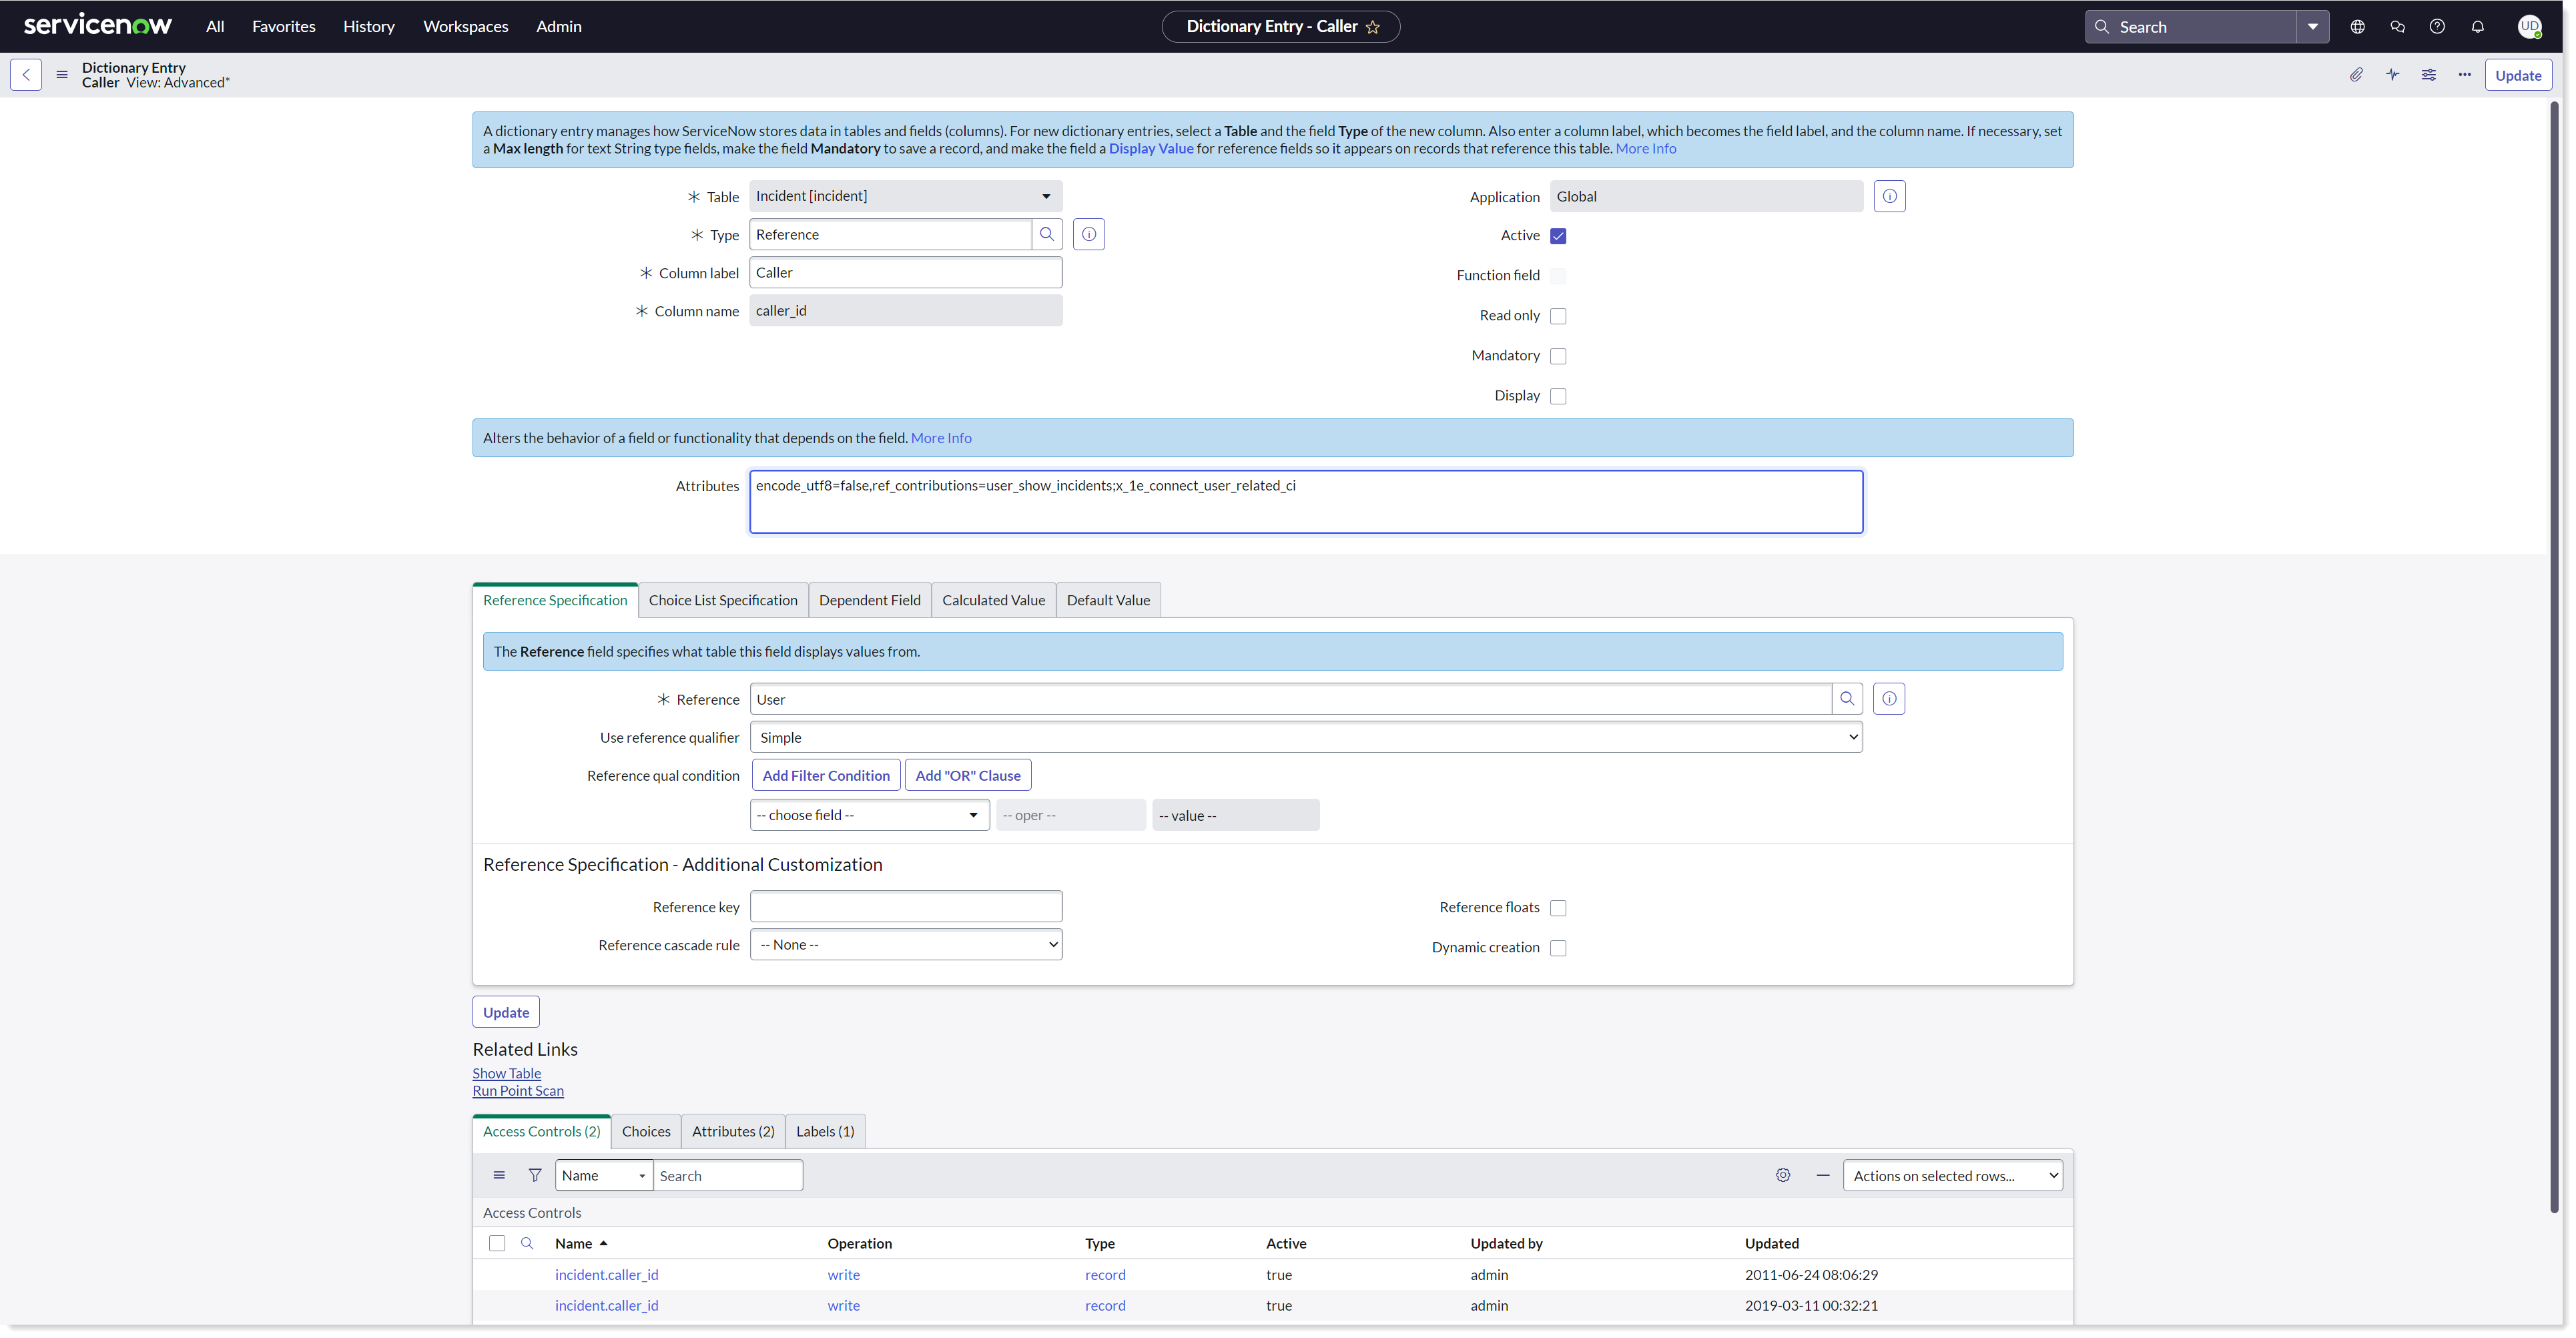
It opens up into a Dictionary Entry - Caller page. Now select the column with label Attributes on the page and append the value with x_1e_connect_user_related_ci. Click on Update to save the changes.
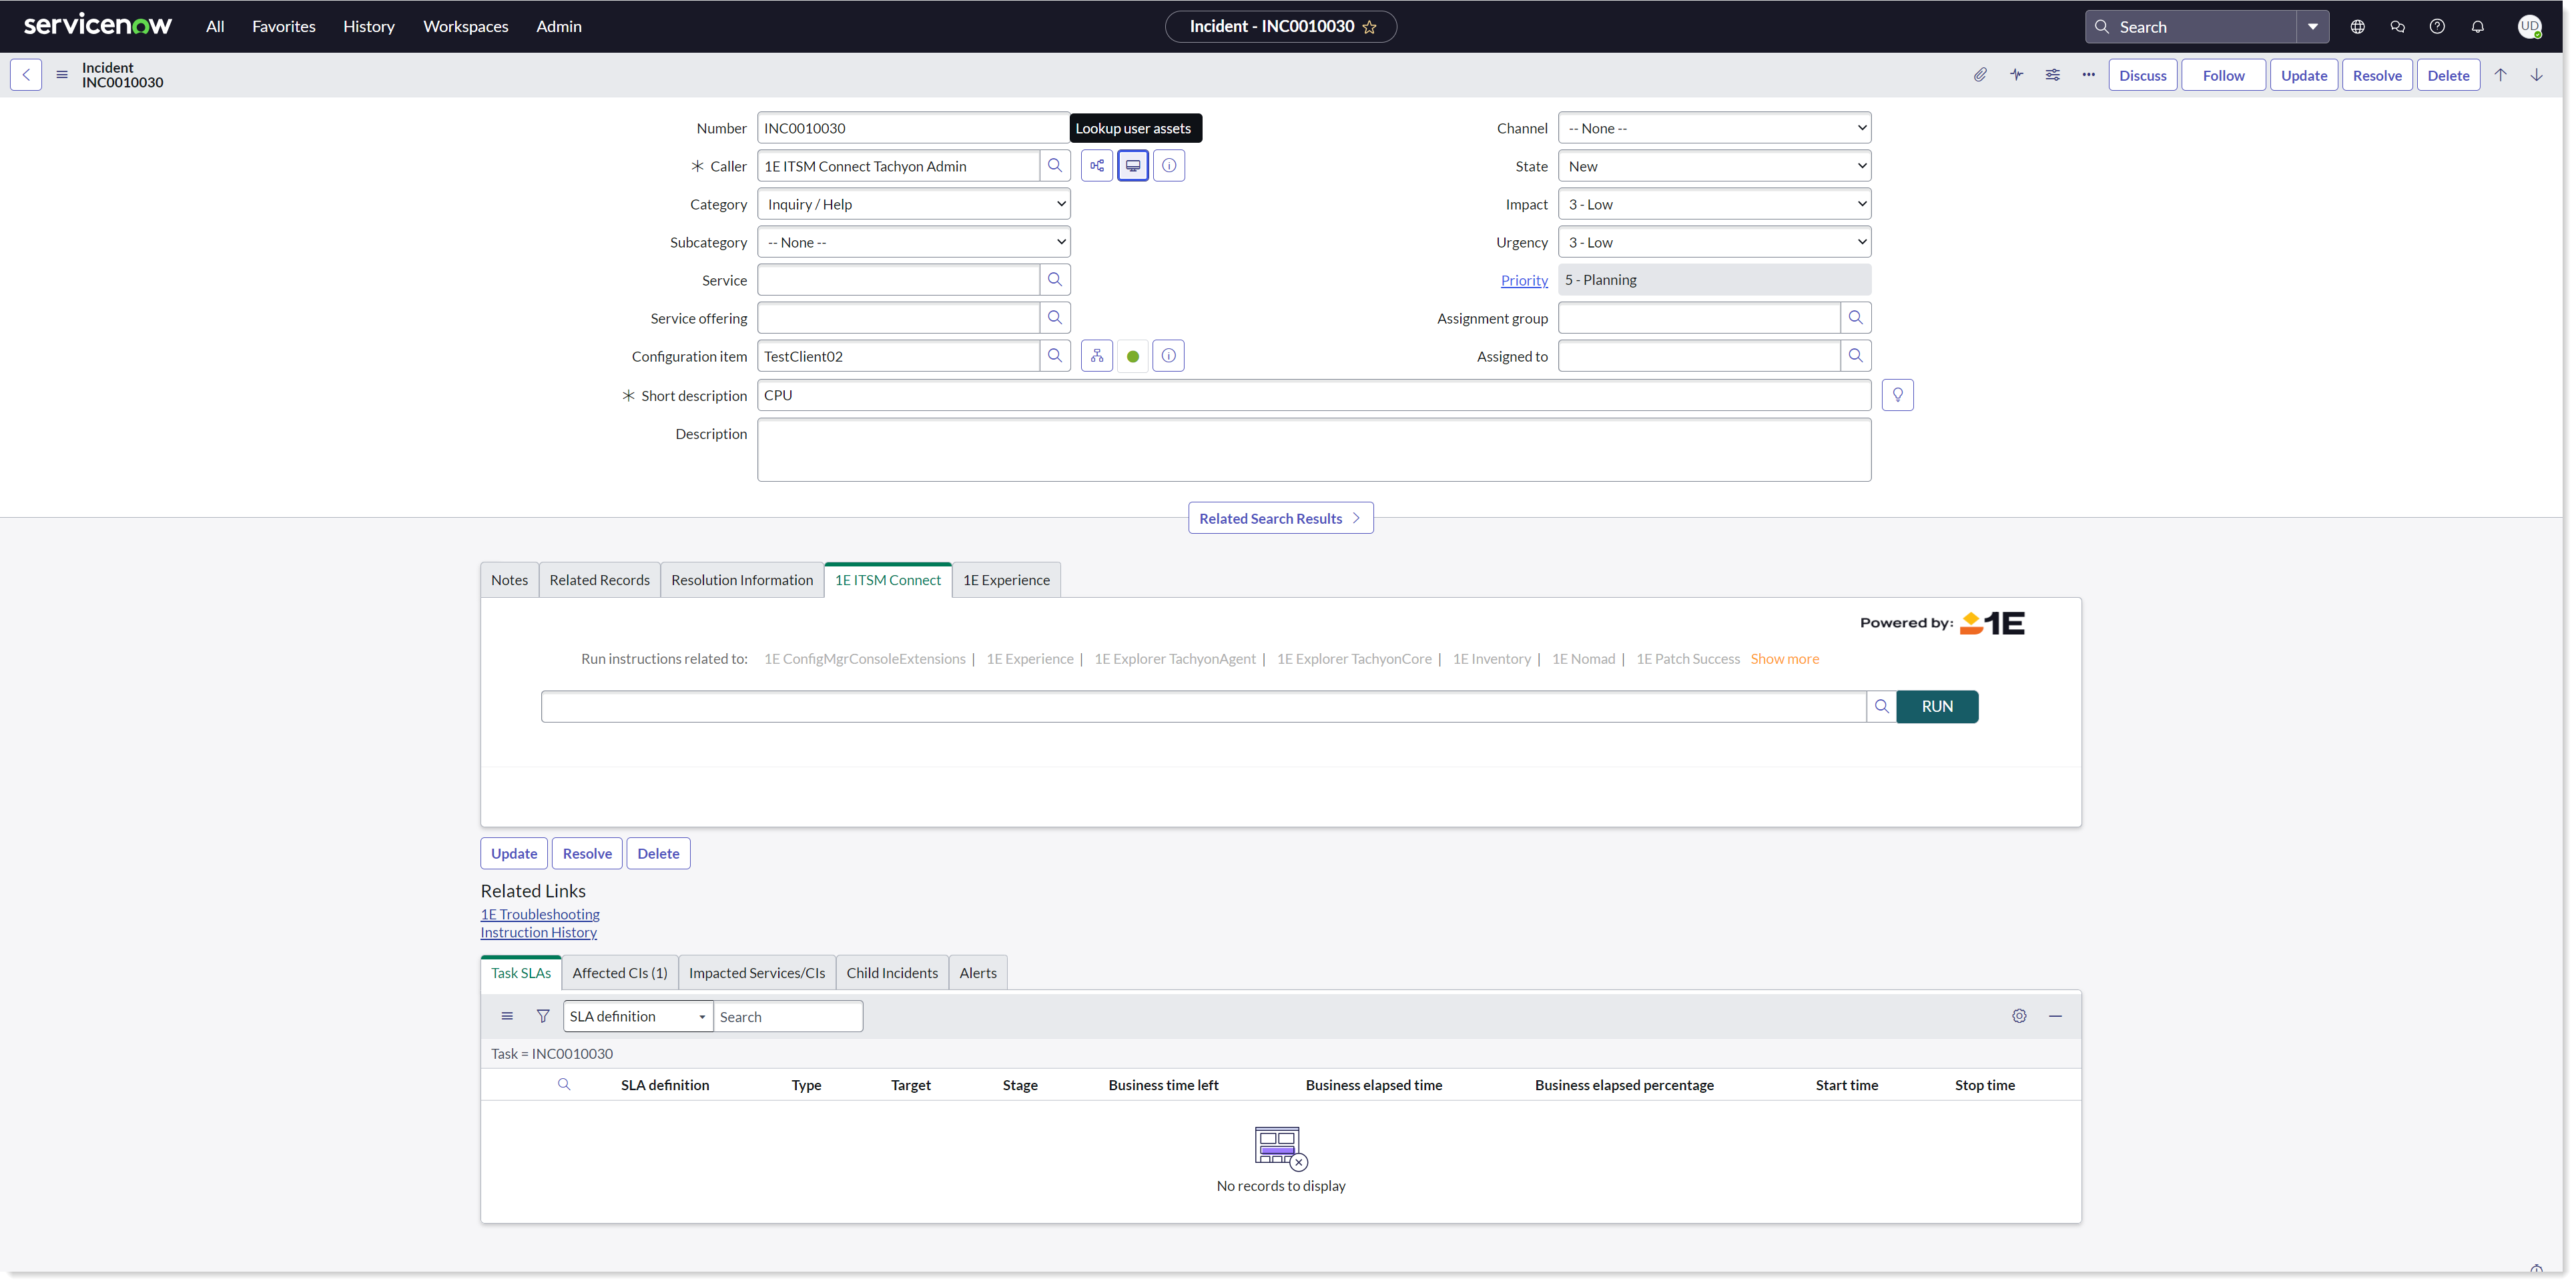
An icon now appears on the selector field that provides you with the lookup list for user assets.
Mapping Roles to Instruction Set
This feature is used to segregate instructions as per the user roles. The x_1e_connect.Tachyon_Admin user can assign the roles to the desired instruction sets. To map roles to the instruction sets, follow the below given steps:
Login to your ServiceNow instance.
Navigate to 1E ITSM Connect → Administration → Instruction Sets.
Click on any instruction set from the list that you want to assign role(s) to.
Now click on Roles field, and it allows you to select a role(s) using the lookup list.
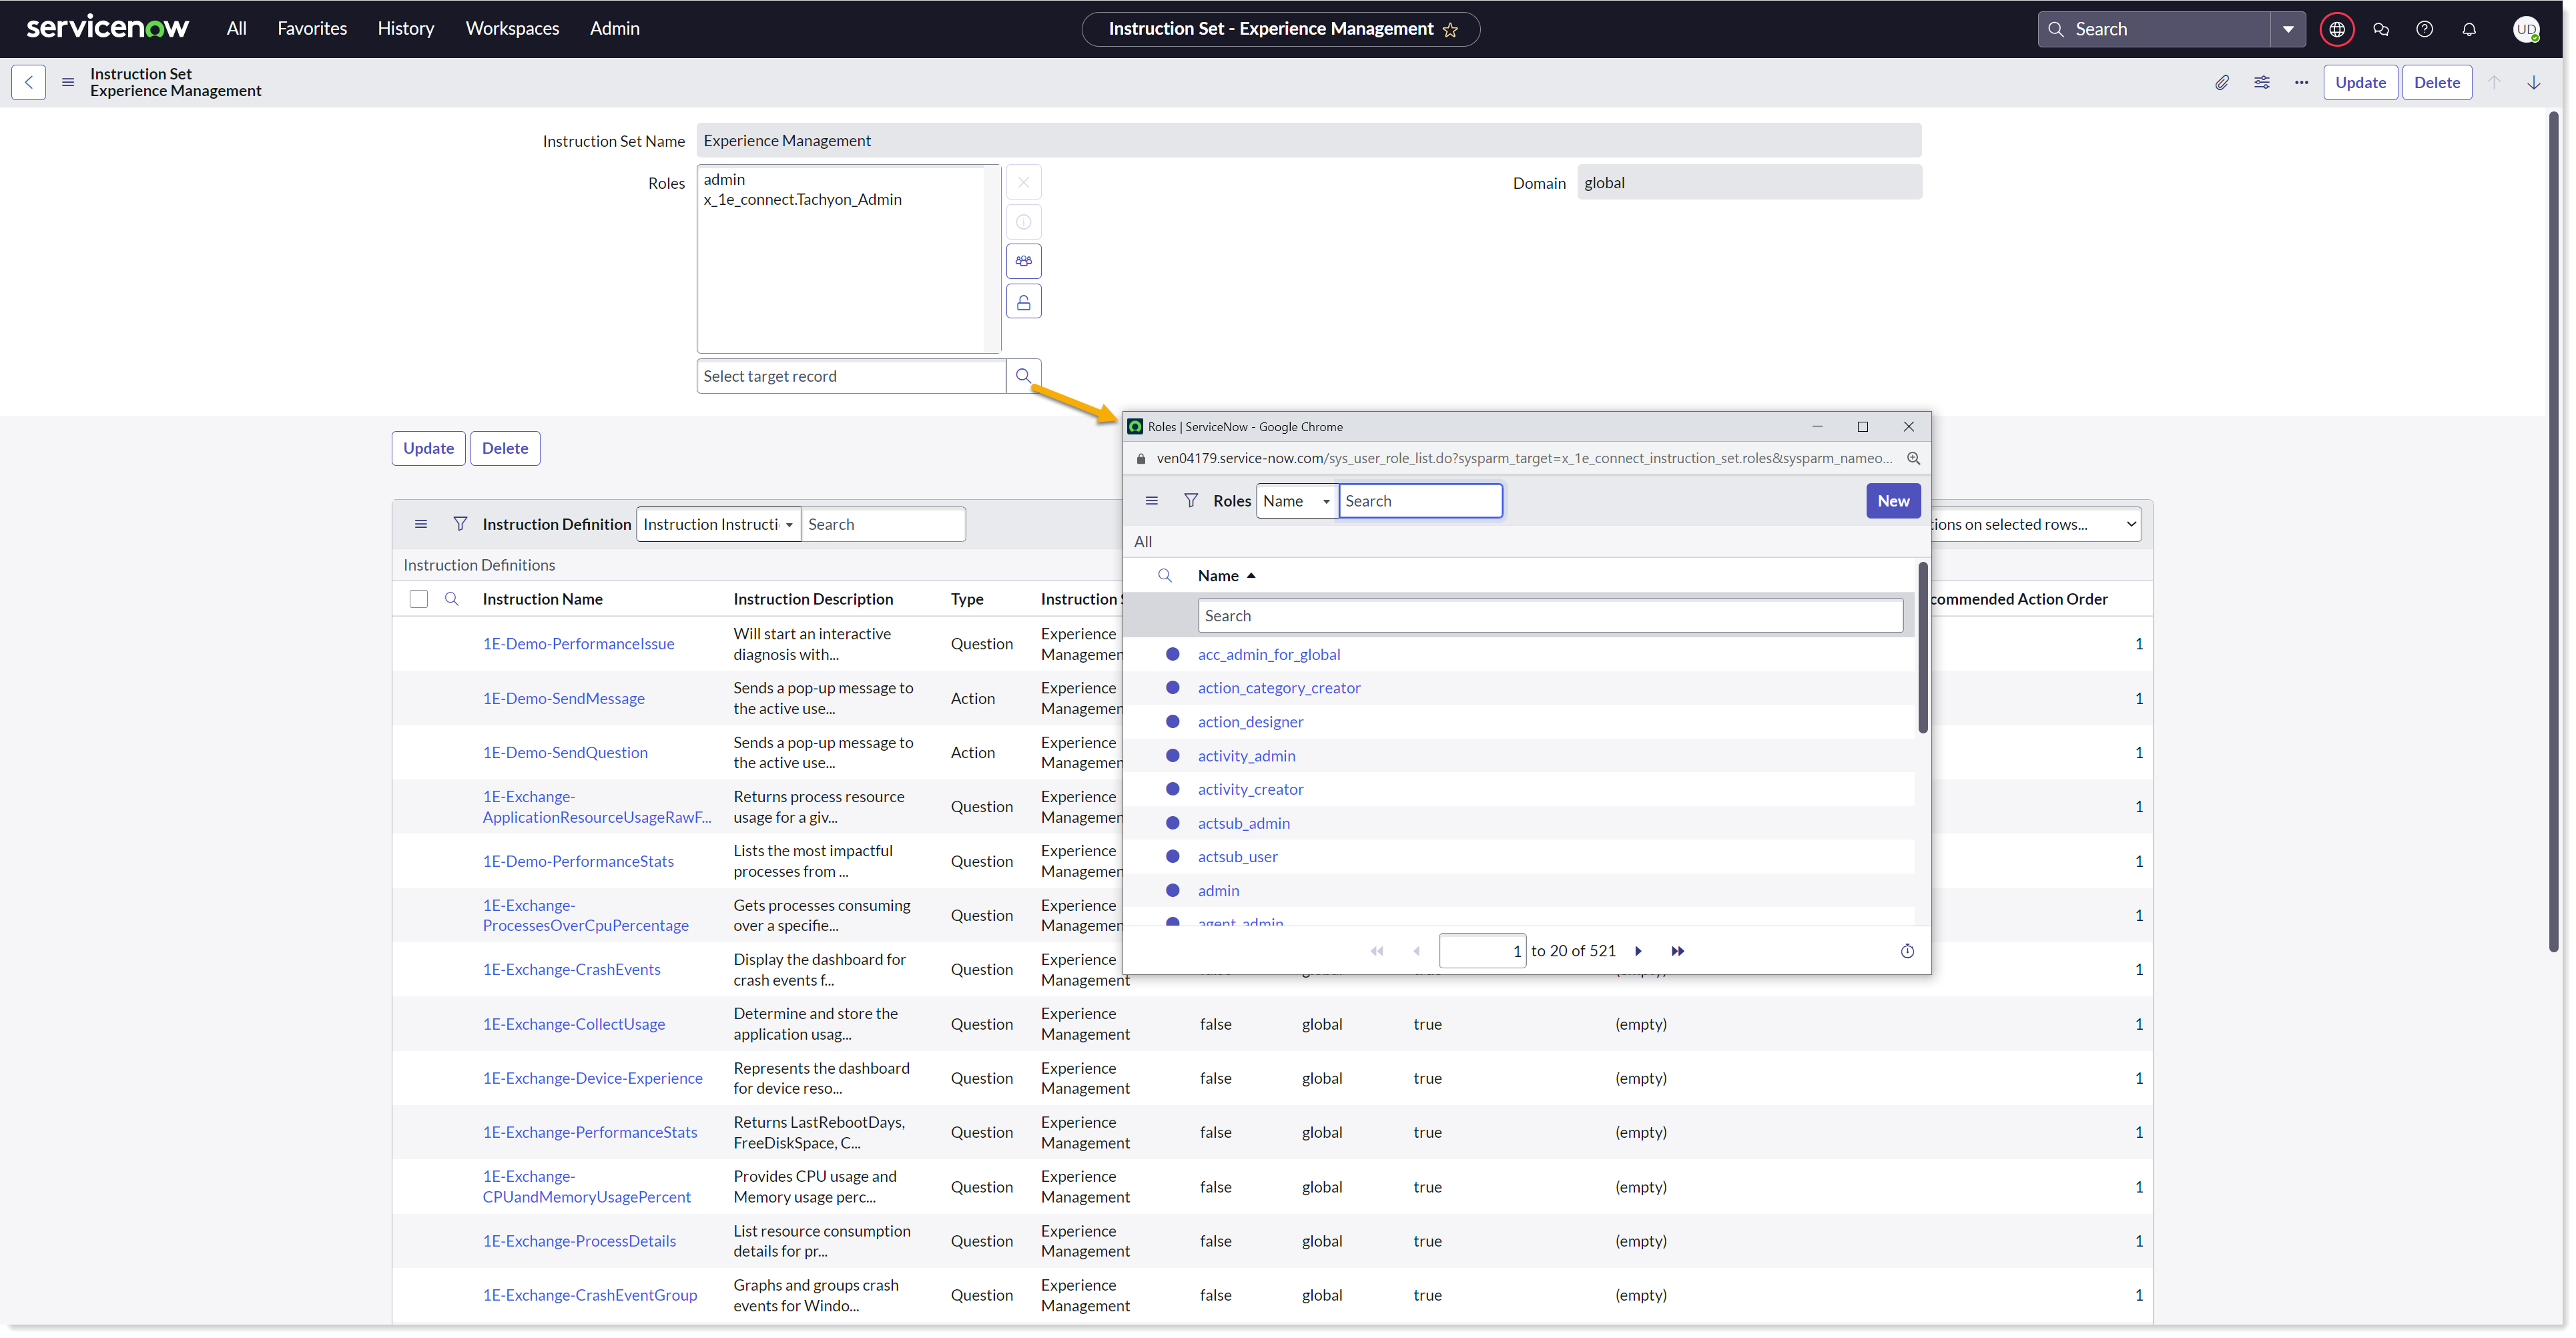
Click on Update to save the form.
You can see that all the instructions under the instruction set will have the same roles assigned.
Now, the users can only see the instruction sets that are assigned to them under the 1E ITSM Connect tab.
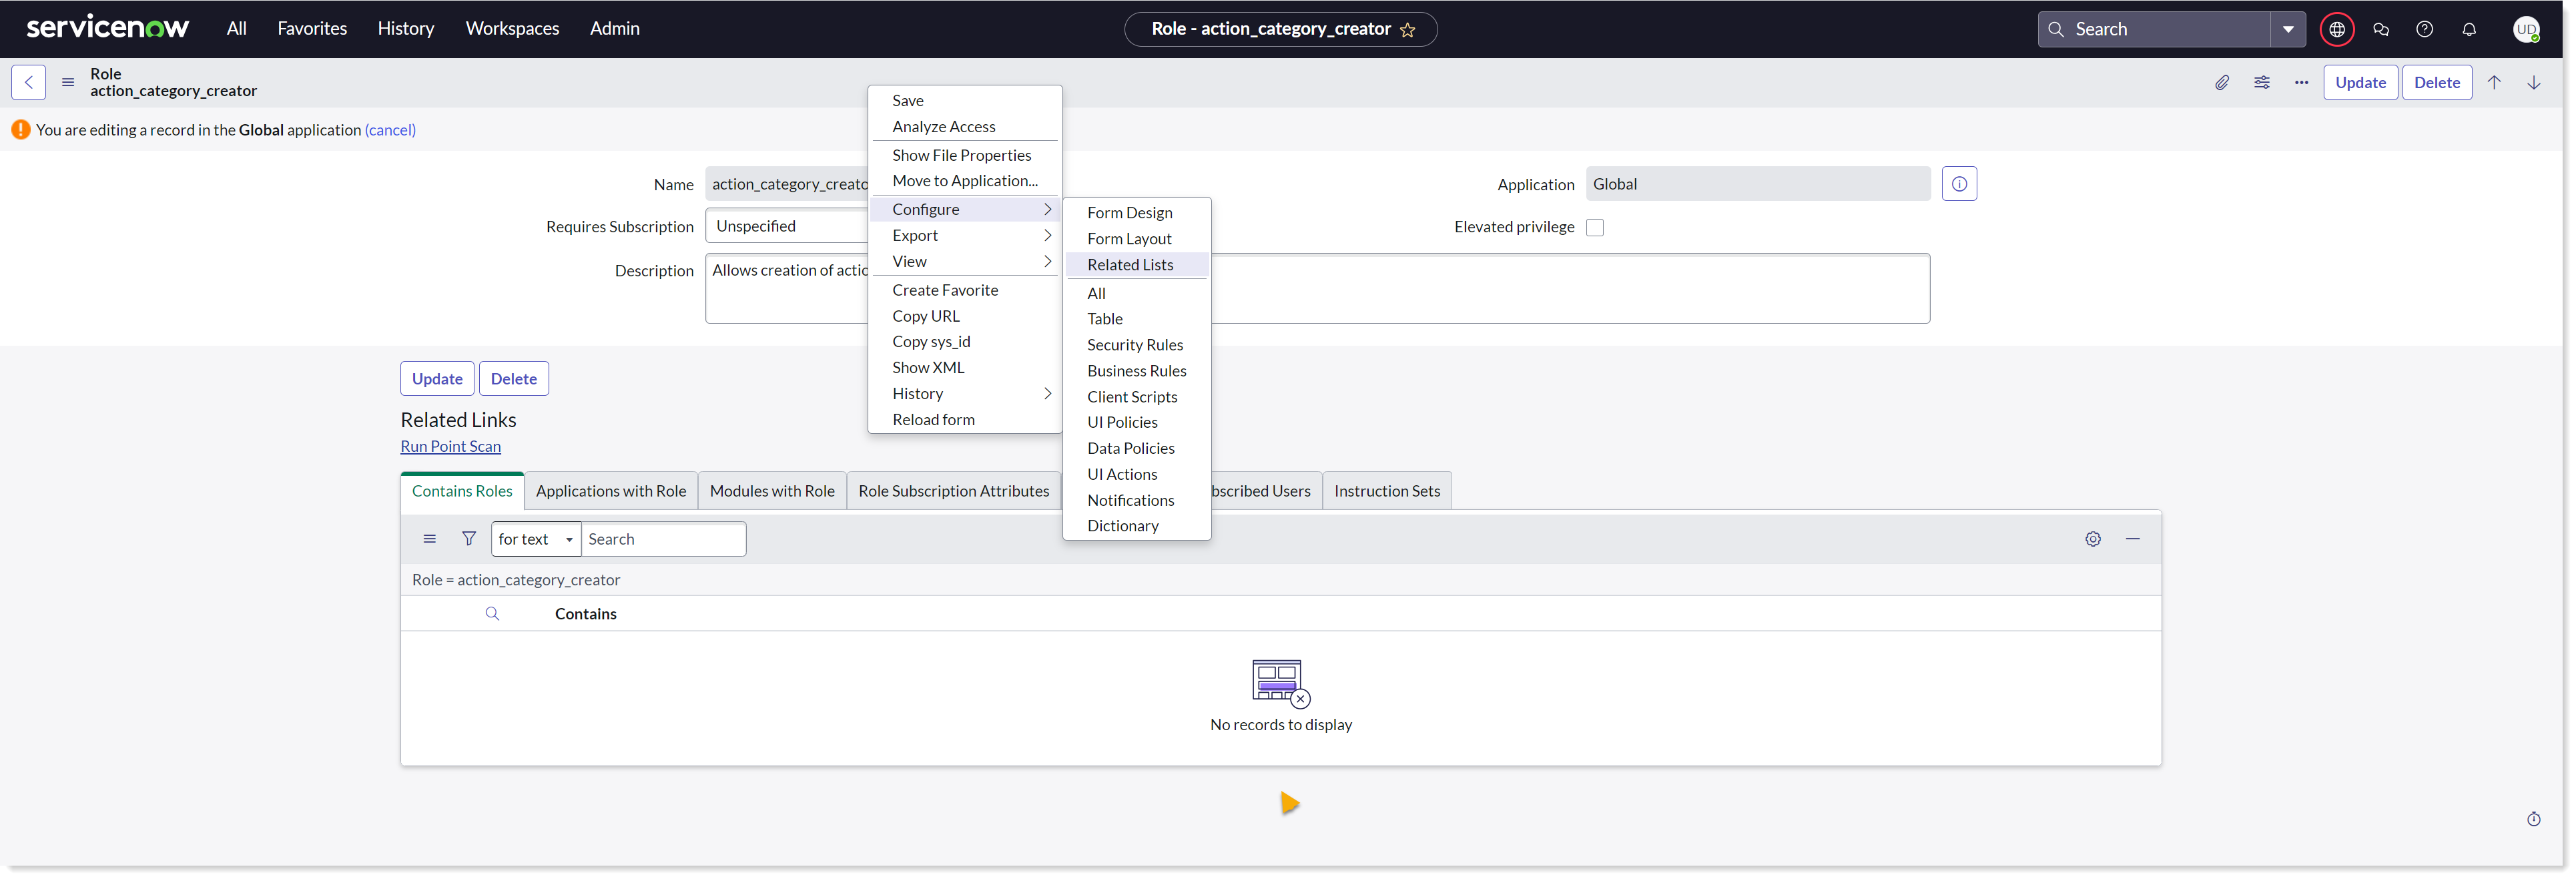
A role can also be added to the bulk of instruction sets by configuring a setup in sys_user_role table. Follow the below given steps to map roles:
Login to your ServiceNow instance.
To open Roles table, type sys_user_role.list in the filter navigator and press enter.
Click on any of the role to which you want to add instruction sets.
Ensure that the scope of the application is Global to make the below given configuration.
Right-click on the header and select Configure → Related lists from the menu options.
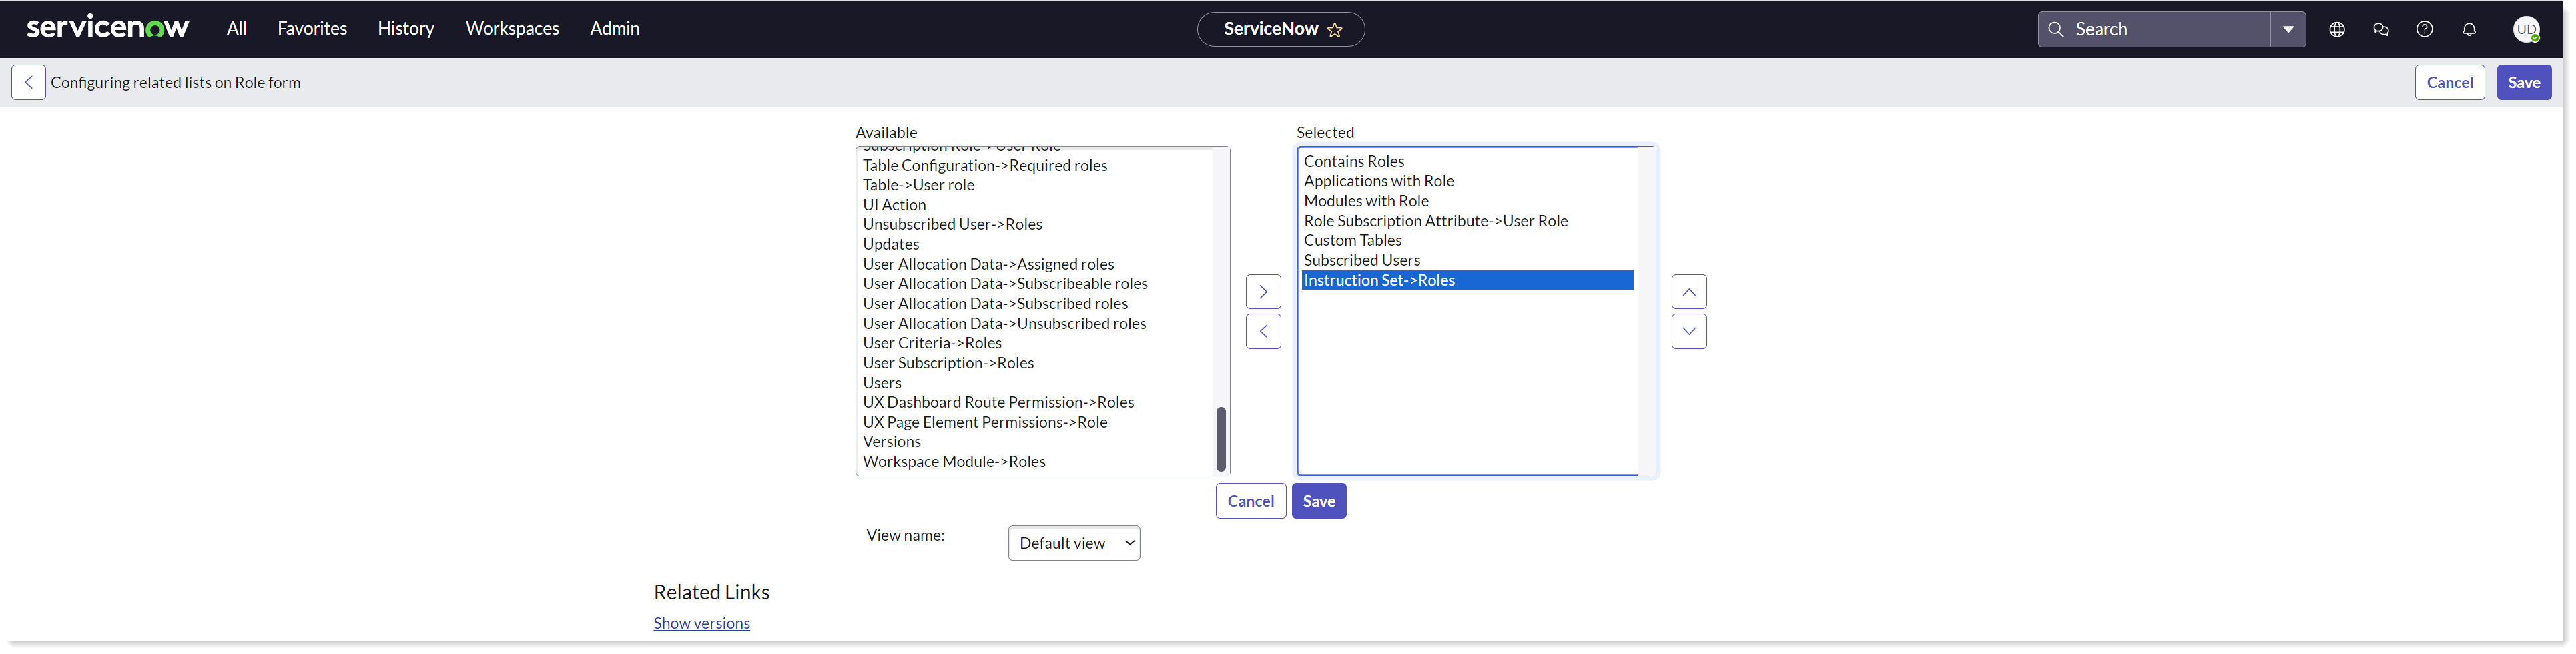
This opens into Configuring related lists on role form, now add the Instruction set->Roles item from Available to the Selected list box. Click on Save to save the changes.
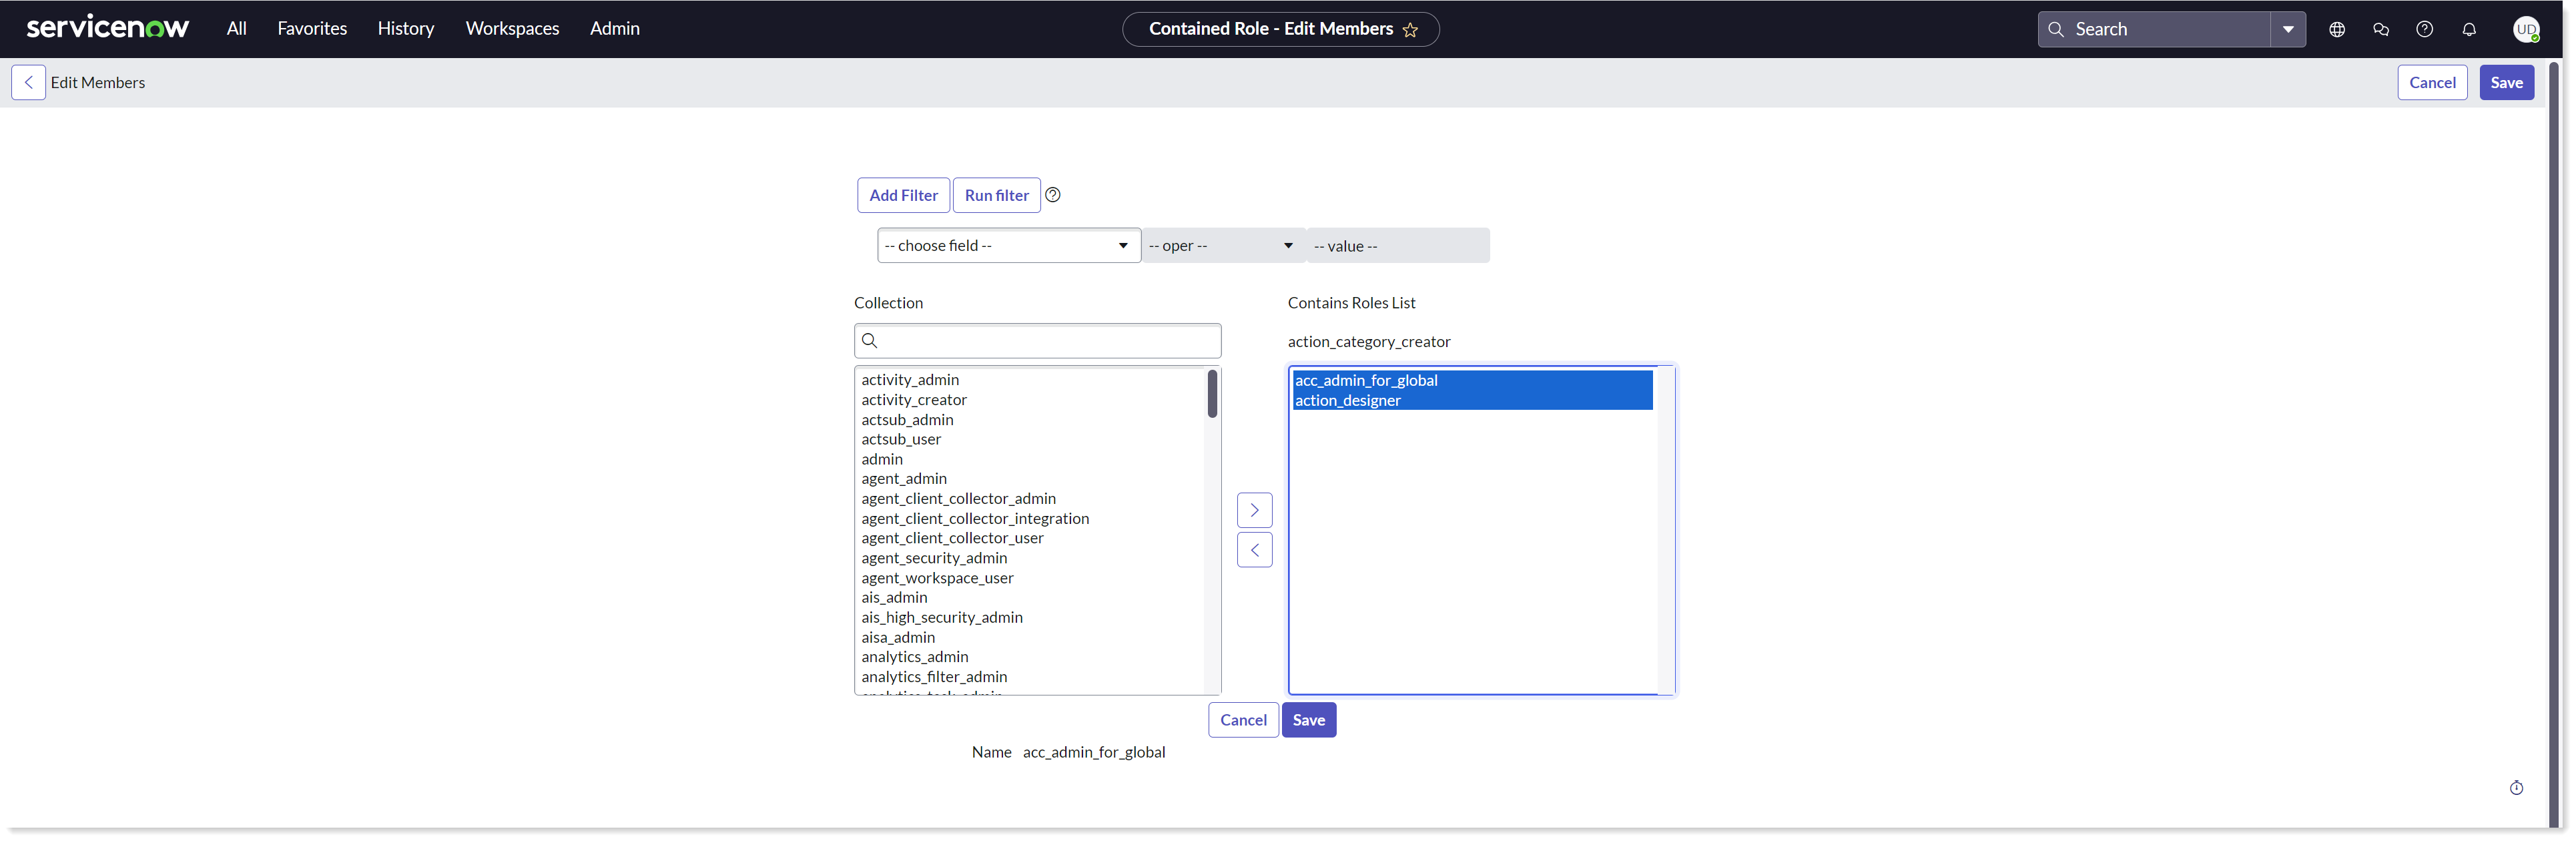
Click on the Edit... button given against Instruction Sets under Related lists.

This opens into Edit Members page, now add all the instruction sets you want to assign role to from Available to the Selected list box. Click on Save to save the changes.
Now, go to Incidents and the users will only see the instruction sets that are assigned to them under the 1E ITSM Connect tab.
Configure these system properties
Any table any field support to pick device FQDN
To support this feature of any table any field, the system property x_1e_connect.device_fqdn_field has to be configured. This property allows the admin user to specify from which table and column values the value of device FQDN should be picked. The default value of this property is cmdb_ci.fqdn, where cmdb_ci is the table name and FQDN is the column name. The table and column names are separated by a .(dot).
Ensure that FQDN column is available in the computer table, otherwise add it to the compute table. Navigate to cmdb_ci_computer.list table and open an existing record. Click on the hamburger icon and then select Configure → Form Layout. Now move Fully qualified domain name into selected on the Configuring Computer form.
Note that the Configuration item and any other field that you want to pick should have a business rule is not empty as shown below to support the above feature.

CI Criteria
Any type of incident can be raised for any kind of CI in ServiceNow. To have a control on what type of CIs the 1E ITSM Connect functionality (i.e. Device Info icon, 1E ITSM Connect and 1E CMDB Connect) should work, the app should configure the system property x_1e_connect.device_info_ci_criteria. The default value of this property is sys_class_name=cmdb_ci_pc_hardware^ORsys_class_name=cmdb_ci_computer, which states that the selected device class should be either ci_pc_hardware or cmdb_ci_computer. This property contains an encoded query to define the criteria for valid CIs. Therefore, any incident where CI fulfills this criterion will show the 1E ITSM Connect functionality.
Device Info Sync Time
The system property x_1e_connect.DeviceInfoSyncTime accepts an encoded query that is used to filter the device information data from x_1e_connect_device_info table. If the query returns a record, then it means that data is not fetched from 1E, rather it is the saved data that is shown on the UI. The default value of this system property is 15 minutes, and the encoded query is sys_updated_on>=javascript:gs.beginningOfLast15Minutes().
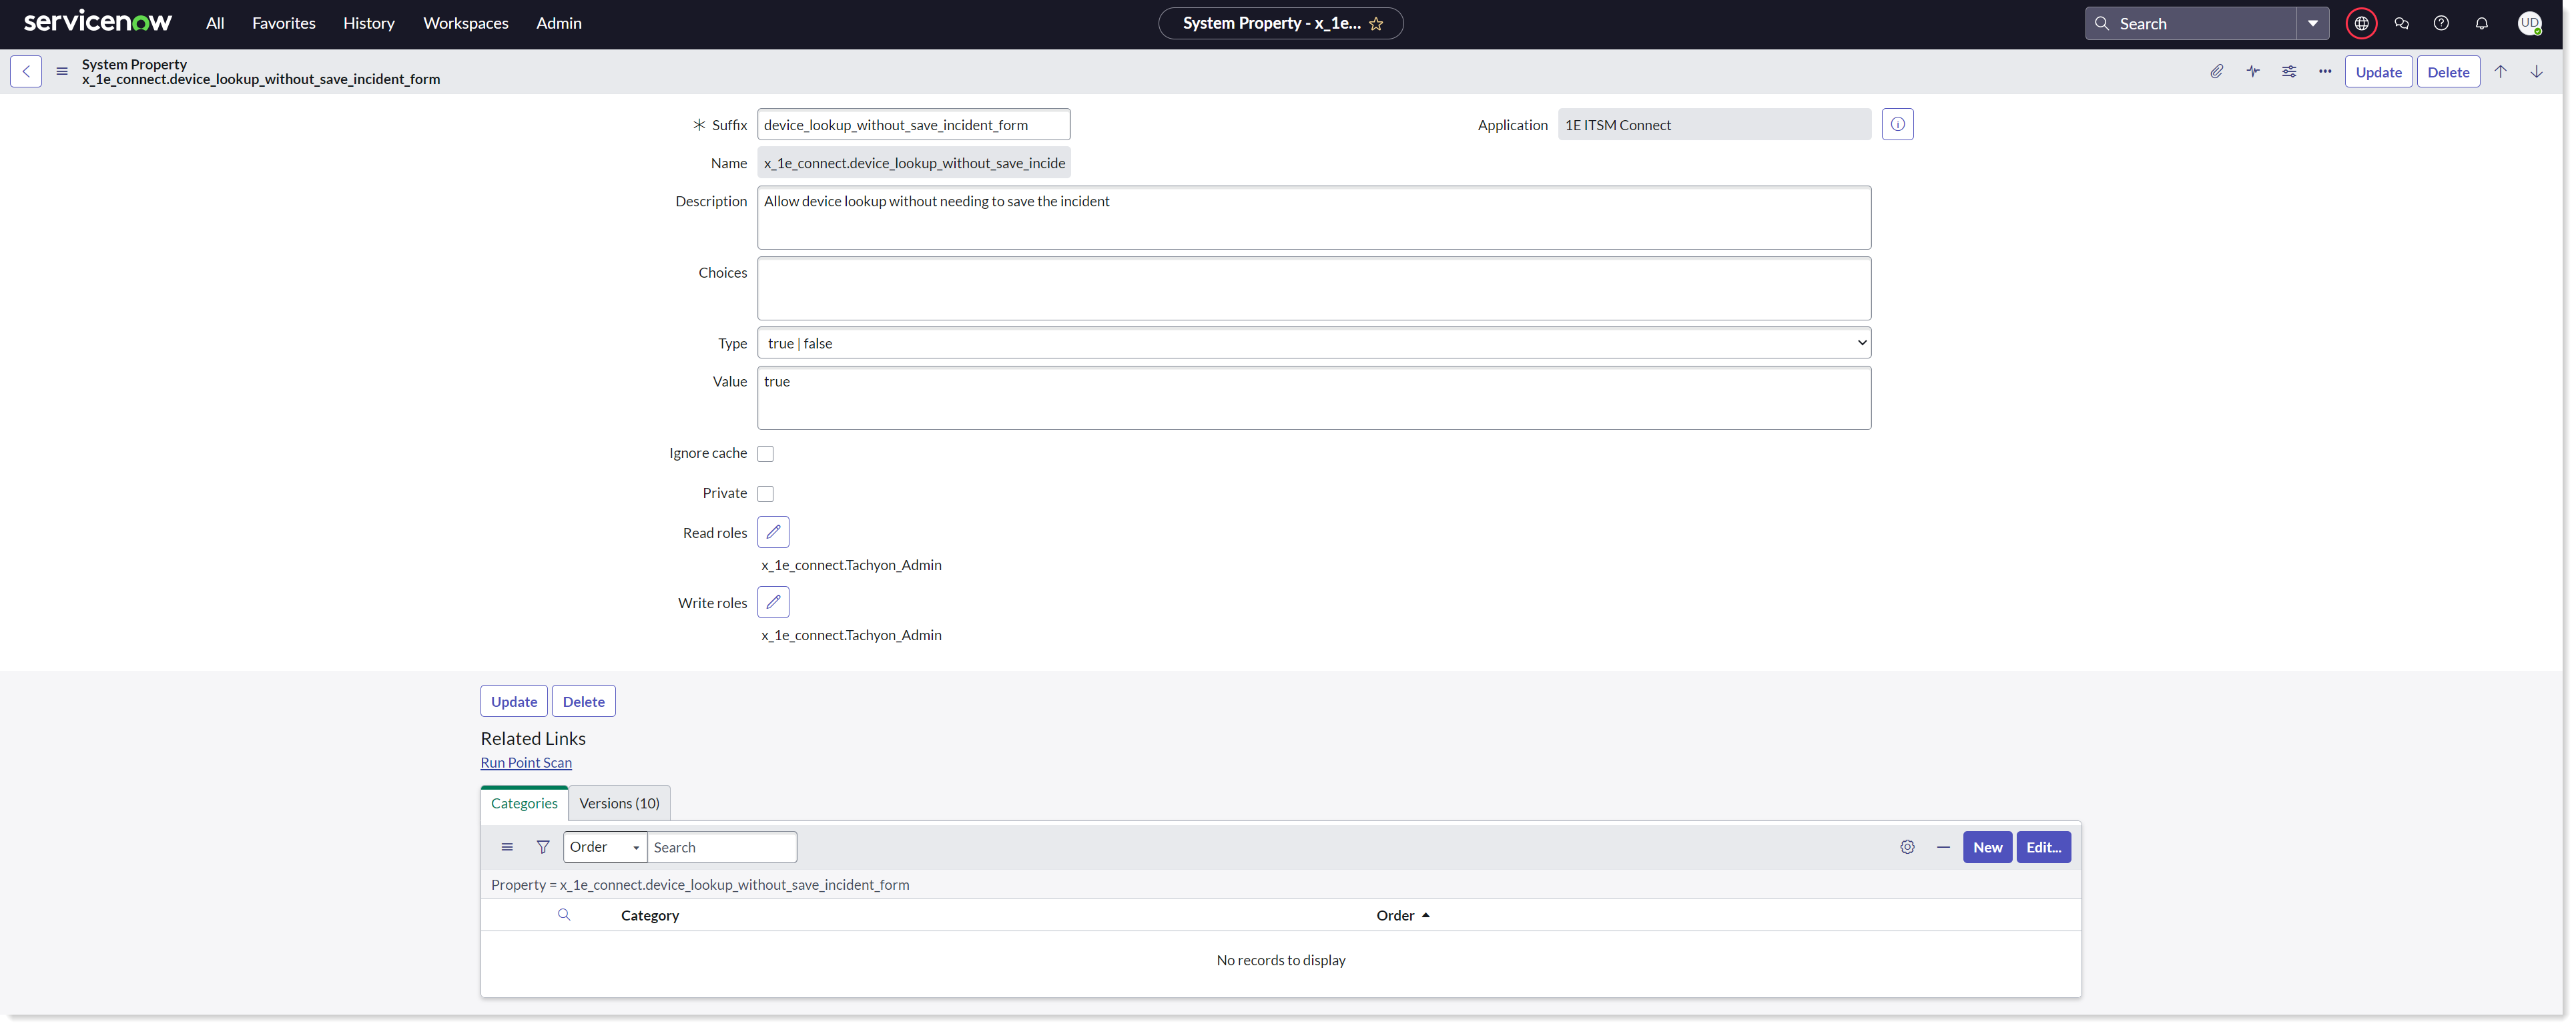
Device lookup without saving the Incident form
This feature allows all the functionalities like device information, executing an instruction and experience score to work on change of the device related to the incident even without saving the form in native UI. So the user can always switch between the available devices and view the device related details, execute any instruction, and view experience score prior to saving the incident form in native UI, as shown in the picture below.
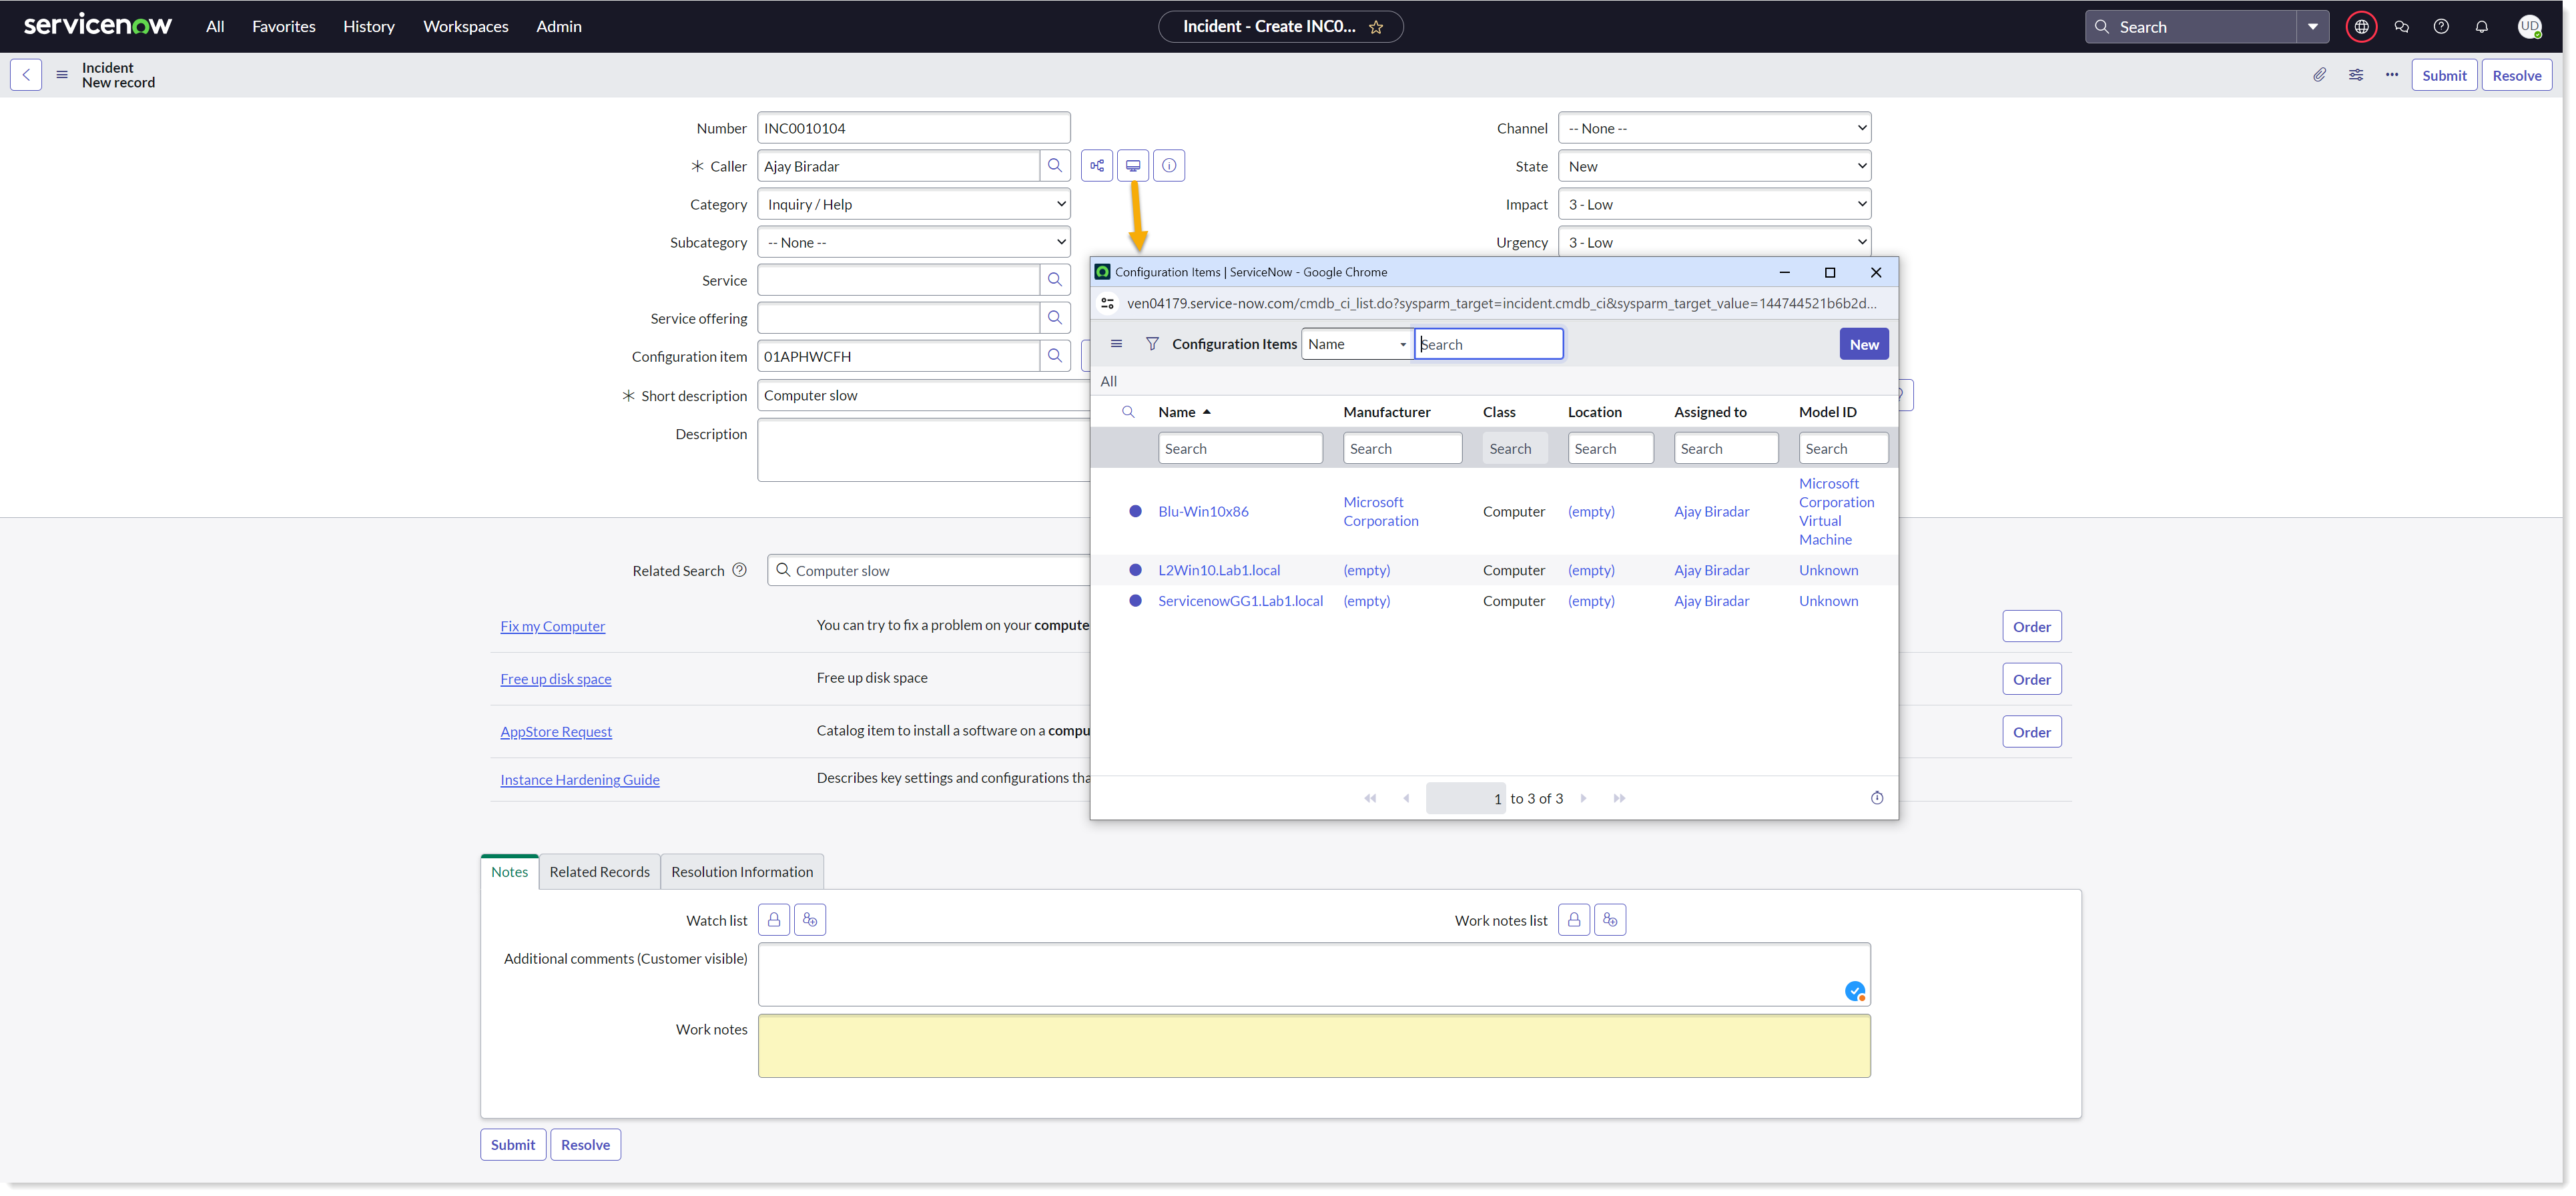
To enable this feature, the system property x_1e_connect.device_lookup_without_save_incident_form has to be configured, and the value is set to true. By default, this property is set to false.
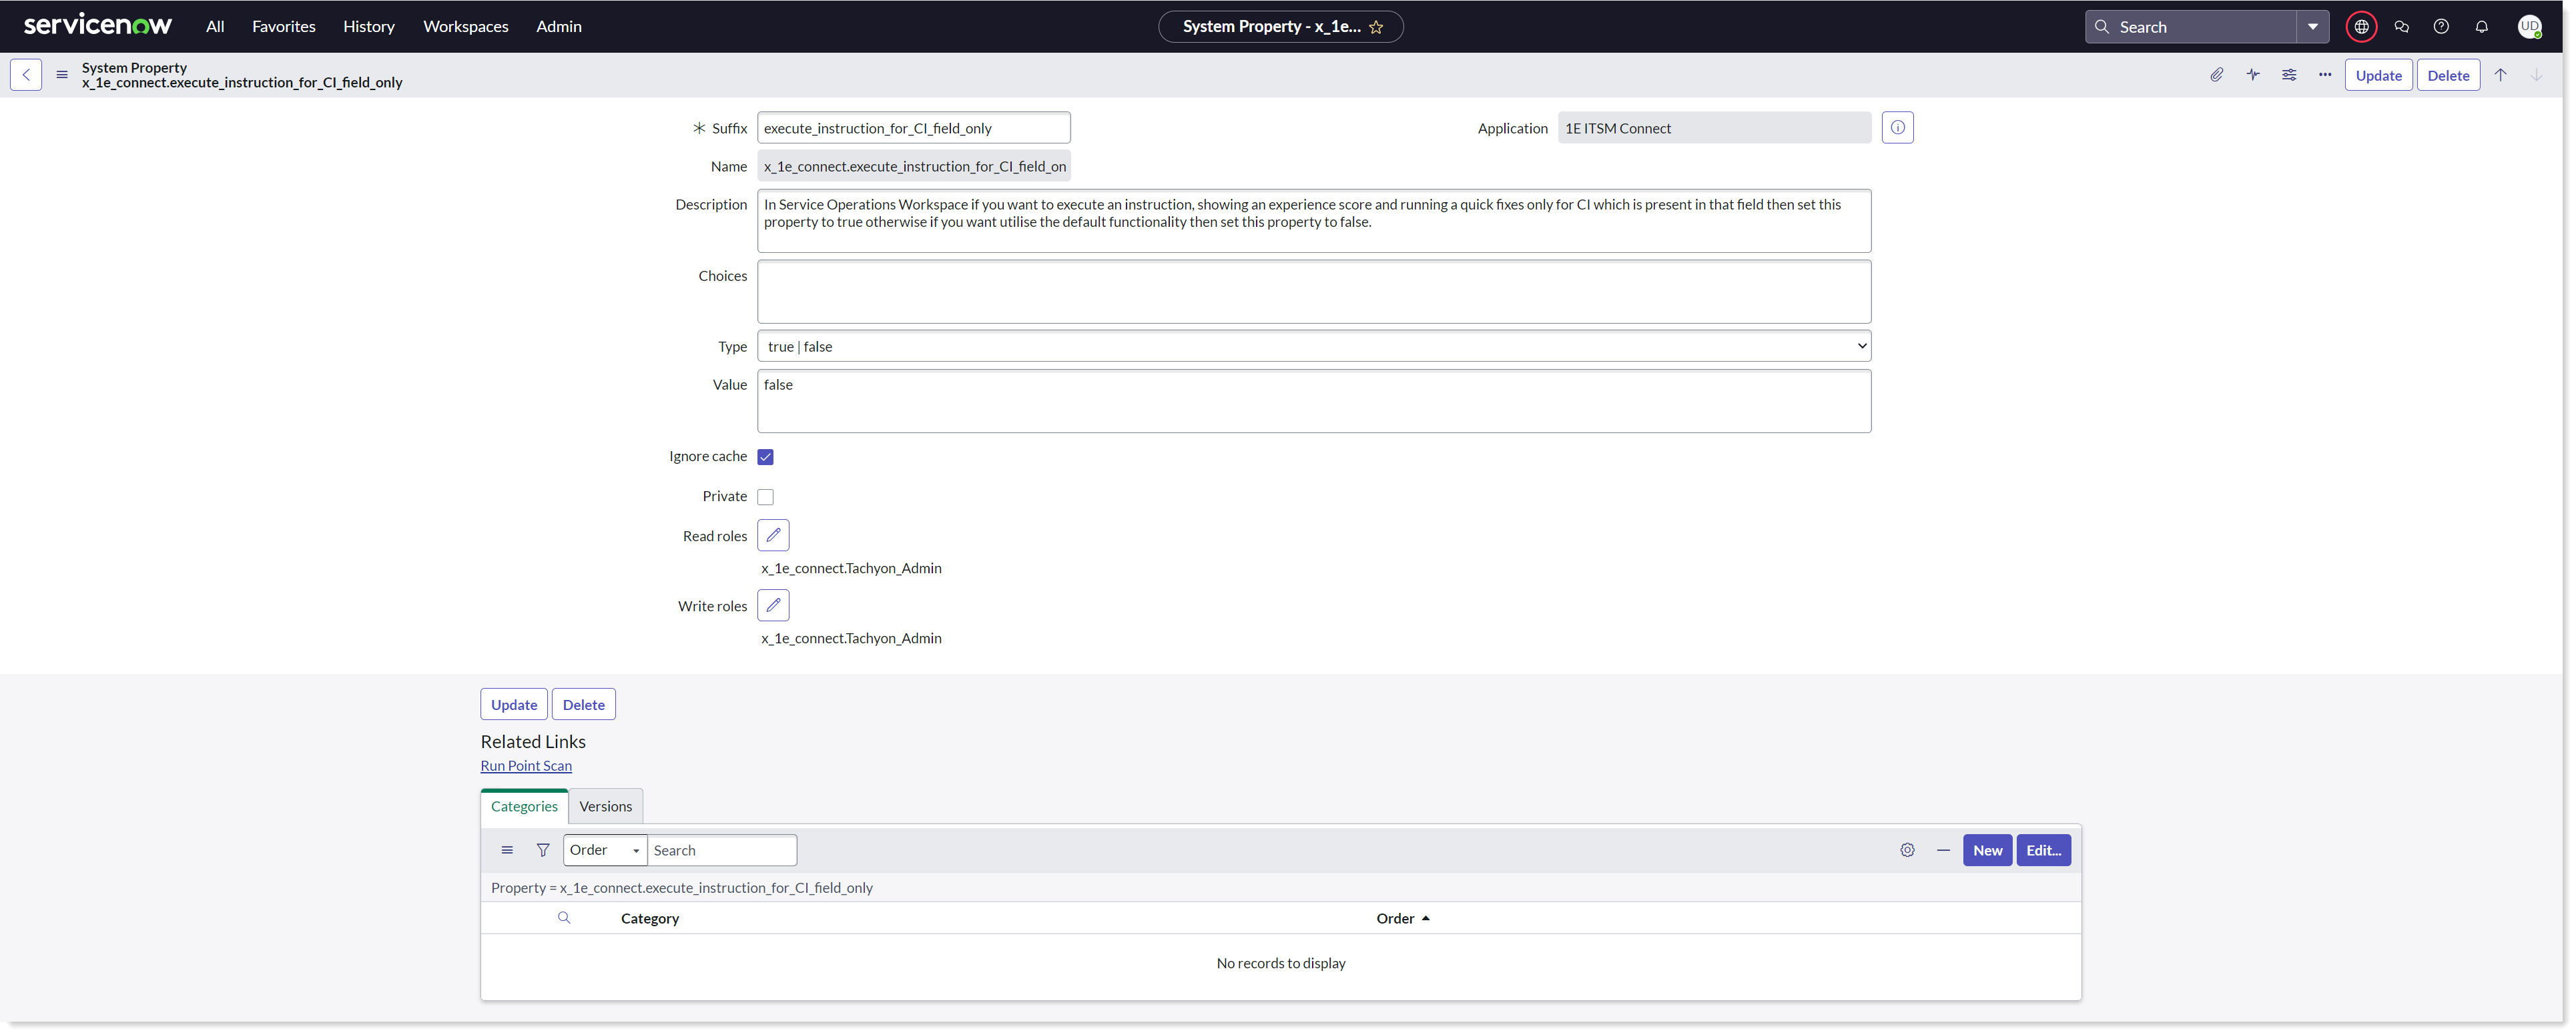
Execute instructions, Quick fix and Experience score only on the selected CI field
This feature restricts the use of affected CIs while using 1E functionalities in Service Operations Workspace. When this feature is added it allows executing instructions, displaying an experience score and running Quick fix only on the device that is added to the incident form in Service Operations Workspace.
To enable this feature, the system property x_1e_connect.execute_instruction_for_CI_field_only has to be configured, and the value is set to true. By default, this property is set to false.
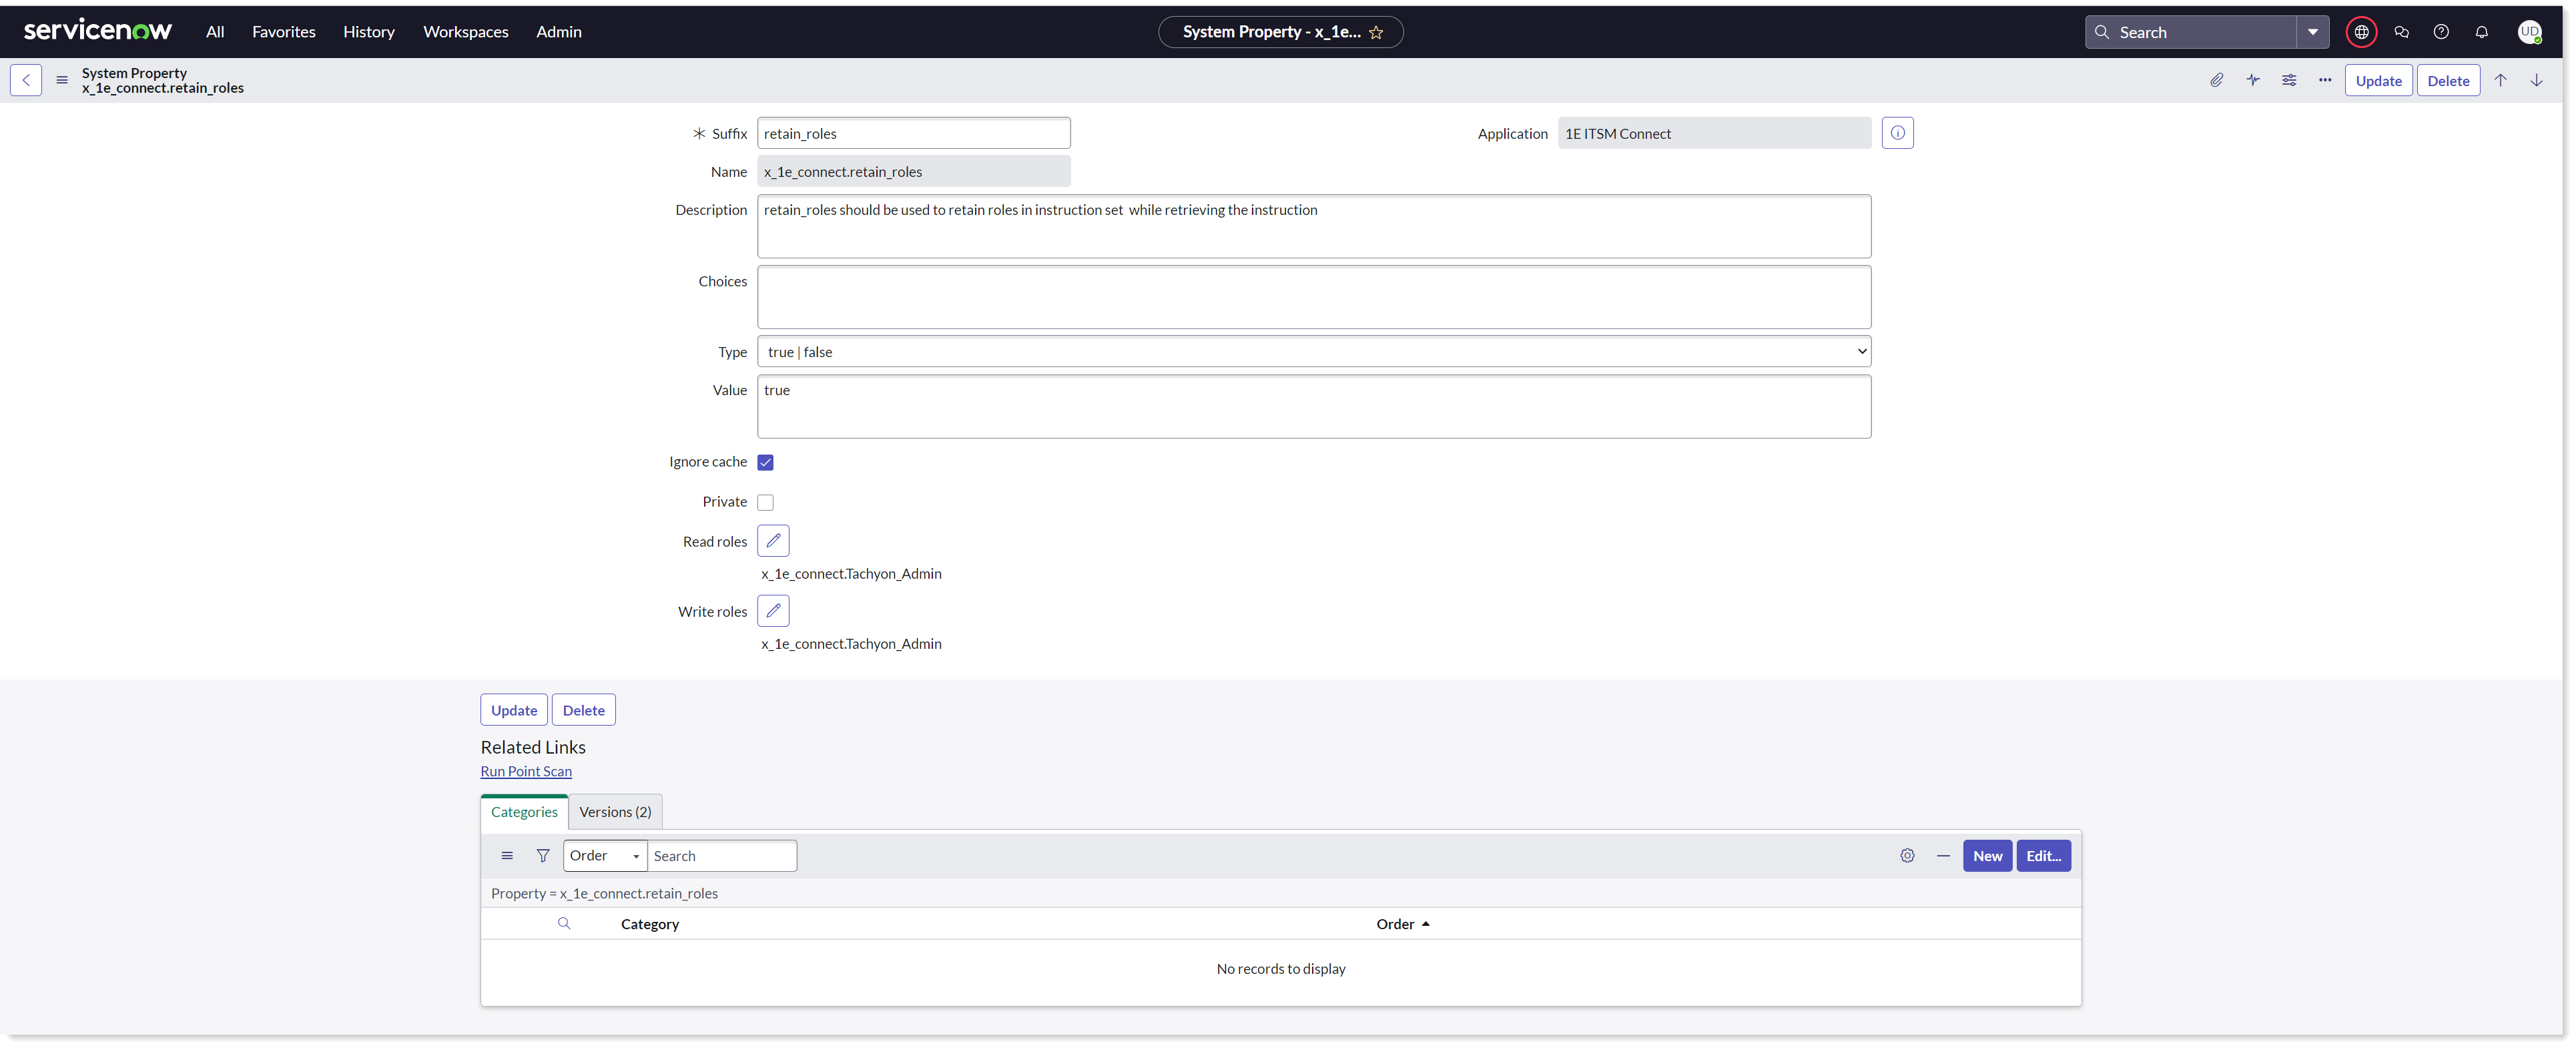
Change in default role mapping to instruction sets
The 1E ITSM Connect application's default behavior is that whenever the instructions are retrieved, the respective instruction sets are generated and each instruction set is assigned admin and tachyon admin as default roles.
In case the instruction set already exists and there is a role added to the instruction set, then retrieving the instructions will again add admin and tachyon admin roles to the already added list of roles to the instruction set.
To enable this feature, the system property x_1e_connect.retain_roles has to be configured, and the value of the property is set to true to disable the default behavior. By default, this property is set to false. Once the property is set to true then the roles will not be added to instruction sets by default.
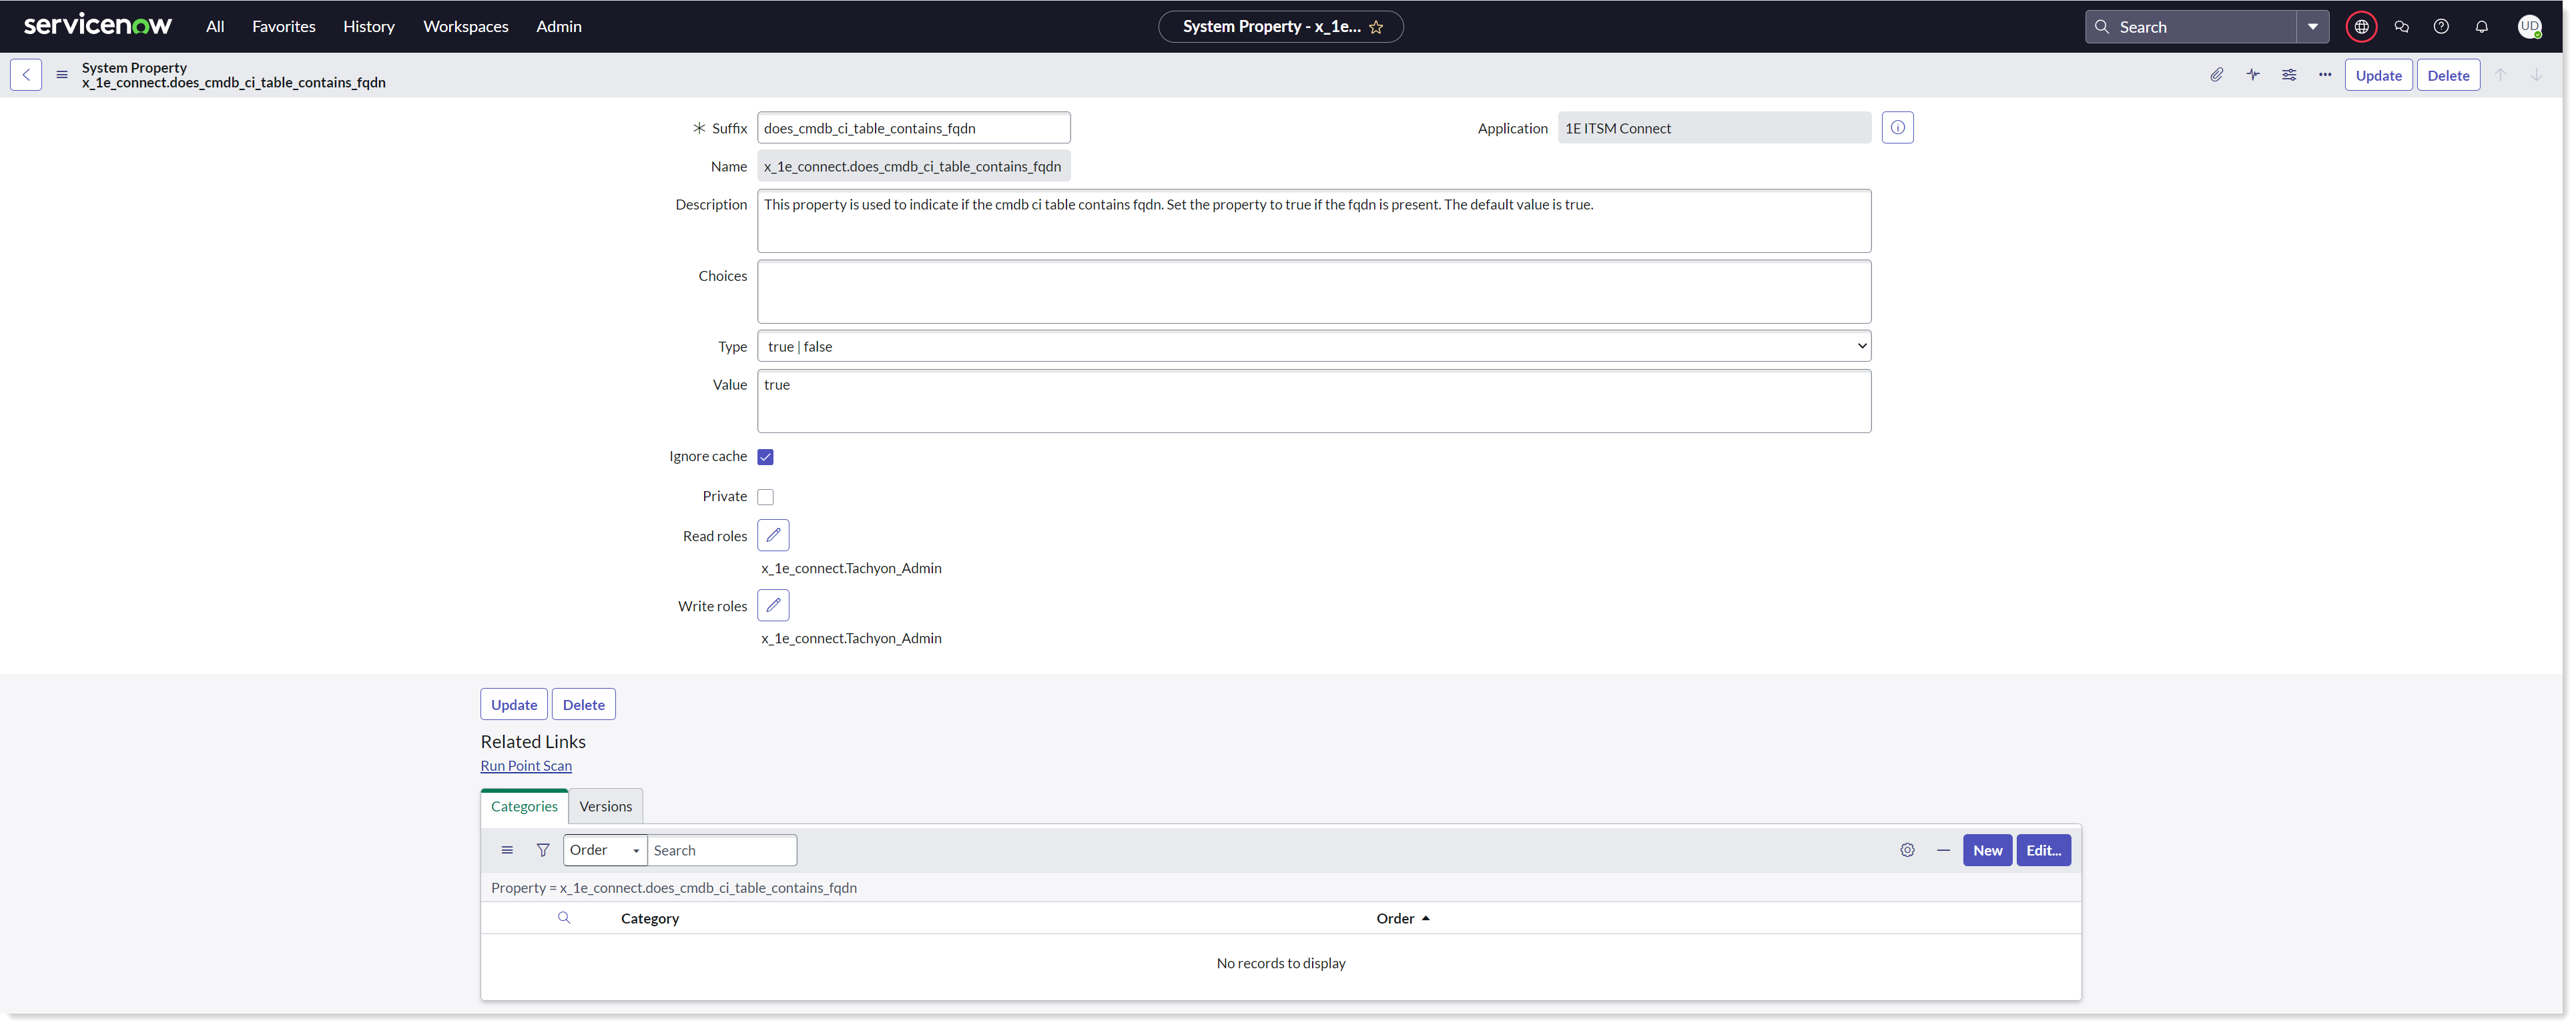
Removed duplicate entries of devices on Device Info tab
This feature remove duplicate entries of devices that appear on Device Info tab in Service Operations Workspace, when a custom connector is used. Now there is only one entry per device that shows the current status of the device and experience score.
To enable this feature, the system property x_1e_connect.does_cmdb_ci_table_contains_fqdn has to be configured, and the value is set to false if custom connector is used. By default, this property is set to true.