Authenticate against the 1E Platform and obtain a token
This page describes the interactive authentication and code samples that can be adapted by the customer while writing their own integration software.
It should also be understood that these pages will use {apiRoot} symbol for the Root of the Portal (not Consumer) API, as it is Portal API that deals with authentication requests. The root of that API will look like https://your.tachyon.server/Tachyon/api (for 9.X and 23.X) or https://your.tachyon.server/api for versions 24.1 and later. (note the word “Tachyon” is missing in 24.1 and later versions). It is assumed that the code contained on these pages will be adapted by configuring the {apiRoot} correctly and that any other configuration (like JWT certificates and user mapping) have also been carried out.
Authentication via IdP’s web page
Interactive authentication is performed via the IdP’s web page and requires username/password and few other steps to complete the authentication. This mode of authentication is the best option for the applications having a UI that allows the user to navigate to IdP’s page and where explicit authentication is not an issue.
Authentication using a JWT
Non-interactive authentication using JWT is performed in-code and does not require any usernames or passwords. This authentication mode can be used for applications where UI cannot display IdP’s login page or where such display would be an issue. It can also be used for service accounts or to group all (or some) users of an application behind a single (or several) accounts in the 1E Platform without having a one-to-one mapping between an IdP user and a 1E Platform principal.
Implementing interactive authentication
This page describes how to perform interactive authentication against the 1E Platform and your IdP in order to obtain a token.
How it works
Authentication process requires a secret (as explained in the later steps) to be created and has the following steps:
Initial request for authentication is made to the 1E Platform that returns state and a URL that needs to be called in order to perform authentication with the IdP
Visit the URL provided in the previous step and perform the required authentication
Poll for status change to establish in the background when the token is ready, or the process is failed
Upon successful authentication, retrieve the token
Before we begin
Authentication process requires a secret called a nonce. This is usually an array of random 32 bytes that should be created before the authentication process is started.
Once you have the array, you need to create two things:
A URL-safe Base64 encoded of the nonce. Let’s call this BASEDNONCE
A URL-safe Base64 encoded SHA256 of the nonce (you need to obtain SHA256 of the nonce and then Base64 encode it). Let’s call this HASHEDNONCE
The original nonce is not used afterwards and only those two values, BASEDNONCE and HASHEDNONCE are used.
It is strongly advised that nonce is randomized each time a new request is made, as reusing a nonce decreases security of the authentication process.
Authentication request
Initial request should be made to {apiRoot}/Authentication/RequestAuthentication and this request should have a query string parameter called ecpn. You should put the HASHEDNONCE as the value of the parameter.
This means that the initial request will look something like this:
https://your.tachyon.server/api/Authentication/RequestAuthentication?ecpn=e0bebd22819993425814866b62701e2919ea26f1370499c1037b53b9d49c2c8a
and you will receive something like this from the API as a response:
{
	"AuthenticationUrl": "https://login.microsoftonline.com/06c15aaf-bd3b-4eac-aac9-ef6e9ce805b0/oauth2/v2.0/authorize?response_type=code&prompt=login&client_id=9858ac43-555e-4500-9ccd-bac33e1ddfba&state=5PVOGbg0lh_Juj5P9D7dLAAhkY4N-f4KgXJ8jgH88dQ.ZDQ2ZDQyNDNjMTM3ZGZhY2YzNzNmYzBhOGFmYmYzNTNiZDJjNzU4OGVjNTQ0YTY4NTdjYjExOTljNjFhMGE1Ng.in_yI295_1yUC-nvqdHgIS_-3gOVVj9G4SANupo8JCdWoqaHb7iqYsPEJvqEKa0EzrualgWociVuL63HttqbN79bgy_ZRHXO3-EYBwn_JE6dvIckpOBkAKQghdMyCn4ctidAhnkIF0IER8pHI4aNuMVRa4_um7KILM4GwW36luVOEgP_3xpGrofgKp_dDHYFuJq6a216qok65_vGK_fzc6sES9pcau9axE-1DWZ2a_JTwXZy0K3xx38hx4oxSfb5cnFn-e1A0hP06In4dWImF6t_6Lawc06-Ya84vPUmg2SR45NwudUJamHdjsC_G_rqWIWi98aIOEqjJGJDZvOGNg&scope=openid&redirect_uri=https://your.tachyon.server:443/Portal/api/Authentication/IdentityProviderRedirect&code_challenge=h1oqLd3TmMmk82j_O72FIZWN_4vKFN9mEDXndQpLAdw&code_challenge_method=S256",
	"State": "5PVOGbg0lh_Juj5P9D7dLAAhkY4N-f4KgXJ8jgH88dQ.ZDQ2ZDQyNDNjMTM3ZGZhY2YzNzNmYzBhOGFmYmYzNTNiZDJjNzU4OGVjNTQ0YTY4NTdjYjExOTljNjFhMGE1Ng.in_yI295_1yUC-nvqdHgIS_-3gOVVj9G4SANupo8JCdWoqaHb7iqYsPEJvqEKa0EzrualgWociVuL63HttqbN79bgy_ZRHXO3-EYBwn_JE6dvIckpOBkAKQghdMyCn4ctidAhnkIF0IER8pHI4aNuMVRa4_um7KILM4GwW36luVOEgP_3xpGrofgKp_dDHYFuJq6a216qok65_vGK_fzc6sES9pcau9axE-1DWZ2a_JTwXZy0K3xx38hx4oxSfb5cnFn-e1A0hP06In4dWImF6t_6Lawc06-Ya84vPUmg2SR45NwudUJamHdjsC_G_rqWIWi98aIOEqjJGJDZvOGNg"
}
Examining the response to initial authentication request
The response you received contains two properties.
First is the authentication URL. You should take this URL and using your web browser, navigate to display the IdP login page.
Second property is called State. This identifies your request and you will need this to check what is happening with your request and to retrieve the token.
Authenticating against the IdP
Authentication against your IdP has to be done outside the bounds of the 1E Platform, as the IdP is an independent system. You can handle it however you like, but the process must be completed successfully in order for the authentication process to complete. As the IdP will call 1E Platform when you have successfully authenticated. If that call never comes, the token will not be issued.
Checking the status of your authentication request
After the authentication process has been initiated, you should start polling to check if it has completed.
You do that by calling GET on {apiRoot}/Authentication/CheckAuthenticationState while providing a payload with the state you have received in the response to the authentication request:
{
    "State" : "5PVOGbg0lh_Juj5P9D7dLAAhkY4N-f4KgXJ8jgH88dQ.ZDQ2ZDQyNDNjMTM3ZGZhY2YzNzNmYzBhOGFmYmYzNTNiZDJjNzU4OGVjNTQ0YTY4NTdjYjExOTljNjFhMGE1Ng.in_yI295_1yUC-nvqdHgIS_-3gOVVj9G4SANupo8JCdWoqaHb7iqYsPEJvqEKa0EzrualgWociVuL63HttqbN79bgy_ZRHXO3-EYBwn_JE6dvIckpOBkAKQghdMyCn4ctidAhnkIF0IER8pHI4aNuMVRa4_um7KILM4GwW36luVOEgP_3xpGrofgKp_dDHYFuJq6a216qok65_vGK_fzc6sES9pcau9axE-1DWZ2a_JTwXZy0K3xx38hx4oxSfb5cnFn-e1A0hP06In4dWImF6t_6Lawc06-Ya84vPUmg2SR45NwudUJamHdjsC_G_rqWIWi98aIOEqjJGJDZvOGNg"
}
Warning
Do not provide any other data with these requests. Specifically, do not provide BASEDNONCE as seen in the next paragraph. You can only attempt token retrieval once. If you don't do it correctly you will not be able to retrieve the token again and you will have to start the authentication process again.
The API will respond with following data:
{
  "Status":"AuthenticationRequested",
  "Data":""
}
The status can be one of following values:
AuthenticationRequested - means the authentication is still in progress but it hasn’t finished yet. Token isn’t ready and you should keep pooling
AuthenticationResultNotAvailable - this means this authentication attempt has failed and you will not be able to retrieve the token. You have to start a new authentication process. The system does not return a specific reason on purpose as a security measure
AuthenticationSuccessful - means the authentication has been successful and the token can be retrieved
Retrieving the token
Token is retrieved via the same endpoint you used to check the authentication state, but you have to also provide BASEDNONCE:
{
    "State" : "5PVOGbg0lh_Juj5P9D7dLAAhkY4N-f4KgXJ8jgH88dQ.ZDQ2ZDQyNDNjMTM3ZGZhY2YzNzNmYzBhOGFmYmYzNTNiZDJjNzU4OGVjNTQ0YTY4NTdjYjExOTljNjFhMGE1Ng.in_yI295_1yUC-nvqdHgIS_-3gOVVj9G4SANupo8JCdWoqaHb7iqYsPEJvqEKa0EzrualgWociVuL63HttqbN79bgy_ZRHXO3-EYBwn_JE6dvIckpOBkAKQghdMyCn4ctidAhnkIF0IER8pHI4aNuMVRa4_um7KILM4GwW36luVOEgP_3xpGrofgKp_dDHYFuJq6a216qok65_vGK_fzc6sES9pcau9axE-1DWZ2a_JTwXZy0K3xx38hx4oxSfb5cnFn-e1A0hP06In4dWImF6t_6Lawc06-Ya84vPUmg2SR45NwudUJamHdjsC_G_rqWIWi98aIOEqjJGJDZvOGNg"
    "Nonce": "your BASEDNONCE goes here"
}
If the data you have provided is correct you will receive the token:
{
  "Status":"AuthenticationSuccessful",
  "Data":"your token will be here"
}
Warning
You have only one attempt to retrieve the token. This means that for given state (for given request) the system will allow you to make precisely ONE call to {apiRoot}/Authentication/CheckAuthenticationState where your provide both State and Nonce. If you provide wrong data or make the call too early, you will not be able to retrieve the token and you will have to start a new authentication request.
What if something goes wrong?
Every API call response should be examined for errors. In most cases you will receive standard 1E Platform errors (see Handling errors returned by Tachyon for more details), but there might be situations where something else is returned.
Consumer SDK support
Currently Consumer SDK does not support authentication and you have to write you own code. We’re providing examples to help you with that.
Implementing interactive authentication - C# example
This page contains a code example written in C# that demonstrates interactive authentication. This code sample should be adapted by the customer when writing their own integration software.
Note
Any code given is without any warranty and is meant only for demonstration and is not production ready code. This means that the code has brevity omitted things like error and exception handling.
using System;
using System.Diagnostics;
using System.Runtime.InteropServices;
using System.Security.Cryptography;
using System.Text;
using System.Text.Json;

namespace InteractiveAuthenticationClient
{
    public class Program
    {
        private const string ApiRoot = "https://your.tachyon.server.address/api/";
        private const string RequestAuthenticationEndpoint = "Authentication/RequestAuthentication?ecpn={0}";
        private const string CheckAuthenticationStateEndpoint = "Authentication/CheckAuthenticationState";

        static void Main(string[] args)
        {
            Console.WriteLine("Creating authentication nonce...");
            // Prepare nonce
            var nonce = CreateNonce(); // original nonce, never supplied to any api
            var basedNonce = ToUrlSafeBase64(nonce); // base64 encoded nonce, used when retrieving a token
            var hashedNonce = CreateSha256(nonce); // hash of the original nonce, never supplied to any api
            var basedHashedNonce = ToUrlSafeBase64(hashedNonce); // base64 encoded has of the nonce, to be supplied in the original authentication request
            using (var client = new HttpClient())
            {
                var endpoint = ApiRoot + string.Format(RequestAuthenticationEndpoint, basedHashedNonce);
                Console.WriteLine($"Calling {endpoint} to initiate authentication");
                AuthRequestResponse obj = Get<AuthRequestResponse>(client, endpoint);
                if (obj != null)
                {
                    if (!string.IsNullOrEmpty(obj.AuthenticationUrl))
                    {
                        Console.WriteLine($"Received authentication URL {obj.AuthenticationUrl} and state {obj.State}. Opening web browser for the user to complete authentication process.");
                        OpenBrowser(obj.AuthenticationUrl);
                        string token = LoopForToken(obj.State, basedNonce);
                        if (token != null)
                        {
                            Console.WriteLine($"Token retrieved: {token}");
                        }
                        else
                        {
                            Console.WriteLine("Token could not be retrieved. Please try again.");
                        }
                    }
                }
            }
        }

        private static string LoopForToken(string objState, string basedNonce)
        {
            var continueLoop = true;
            string retVal = null;
            var endpoint = ApiRoot + CheckAuthenticationStateEndpoint;
            using (var client = new HttpClient())
            {
                while (continueLoop)
                {
                    var payload = new AuthenticationCheckRequestPayload
                    {
                        State = objState
                    };
                    var result = Post<AuthenticationEvent, AuthenticationCheckRequestPayload>(client, payload, endpoint);
                    if (result != null)
                    {
                        switch (result.Status)
                        {
                            case "AuthenticationResultNotAvailable":
                            {
                                // There's an issue with the request. Either the state is incorrect or you tried to retrieve the token incorrectly or it already has been redeemed.
                                // You will need to initiate new authentication request as you cannot continue with this one.
                                Console.WriteLine("Something went wrong during the authentication process. Please start a new authentication process.");
                                continueLoop = false;
                                break;
                            }
                            case "AuthenticationRequested":
                            {
                                Console.WriteLine("Authentication process is still in progress. Will try again in a few seconds.");
                                Thread.Sleep(2000);
                                // Authentication request is still being processed.
                                break;
                            }
                            case "AuthenticationSuccessful":
                            {
                                Console.WriteLine("Authentication process has finished. Retrieving token...");
                                // Authentication has been successful and token can be retrieved.
                                var payload2 = new AuthenticationCheckRequestPayload
                                {
                                    State = objState,
                                    Nonce = basedNonce
                                };
                                var result2 = Post<AuthenticationEvent, AuthenticationCheckRequestPayload>(client, payload2, endpoint);
                                if (result2 != null)
                                {
                                    retVal = result2.Data;
                                }
                                else
                                {
                                    Console.WriteLine("Failed to retrieve token.");
                                }

                                continueLoop = false;
                                break;
                            }
                        }
                    }
                    else
                    {
                        Console.WriteLine("Call to retrieve authentication request has failed.");
                        continueLoop = false;
                    }
                }
            }

            return retVal;
        }

        private static byte[] CreateSha256(byte[] buffer)
        {
            using (var sha256 = new SHA256CryptoServiceProvider())
            {
                return sha256.ComputeHash(buffer);
            }
        }

        private static byte[] CreateNonce()
        {
            byte[] nonce = new byte[32];
            Random rand = new Random();
            rand.NextBytes(nonce);
            return nonce;
        }

        private static string ToUrlSafeBase64(byte[] arg)
        {
            var Base64PadCharacter = '=';
            var Base64Character62 = '+';
            var Base64Character63 = '/';
            var Base64UrlCharacter62 = '-';
            var Base64UrlCharacter63 = '_';

            var s = Convert.ToBase64String(arg);
            s = s.Split(Base64PadCharacter)[0]; // RemoveAccount any trailing padding
            s = s.Replace(Base64Character62, Base64UrlCharacter62); // 62nd char of encoding
            s = s.Replace(Base64Character63, Base64UrlCharacter63); // 63rd char of encoding

            return s;
        }

        public static void OpenBrowser(string url)
        {
            try
            {
                Process.Start(url);
            }
            catch
            {
                // hack because of this: https://github.com/dotnet/corefx/issues/10361
                if (RuntimeInformation.IsOSPlatform(OSPlatform.Windows))
                {
                    url = url.Replace("&", "^&");
                    Process.Start(new ProcessStartInfo("cmd", $"/c start {url}") { CreateNoWindow = true });
                }
                else if (RuntimeInformation.IsOSPlatform(OSPlatform.Linux))
                {
                    Process.Start("xdg-open", url);
                }
                else if (RuntimeInformation.IsOSPlatform(OSPlatform.OSX))
                {
                    Process.Start("open", url);
                }
                else
                {
                    throw;
                }
            }
        }

        private static T Get<T>(HttpClient client, string url)
        {
            var result = client.GetAsync(url).Result;
            if (result.IsSuccessStatusCode)
            {
                var data = result.Content.ReadAsStringAsync().Result;
                if (!string.IsNullOrEmpty(data))
                {
                    T obj = JsonSerializer.Deserialize<T>(data);
                    if (obj != null)
                    {
                        return obj;
                    }
                }
            }

            return default;
        }

        private static TOut Post<TOut, TIn>(HttpClient client, TIn payload, string url)
        {
            var stream = new MemoryStream();
            JsonSerializer.Serialize(stream, payload);
            stream.Seek(0, SeekOrigin.Begin);
            var reader = new StreamReader(stream);
            var serializedPayload = reader.ReadToEnd();
            reader.Close();
            stream.Close();
            var content = new StringContent(serializedPayload, Encoding.UTF8, "application/json");
            var result = client.PostAsync(url, content).Result;
            if (result.IsSuccessStatusCode)
            {
                var data = result.Content.ReadAsStringAsync().Result;
                if (!string.IsNullOrEmpty(data))
                {
                    TOut obj = JsonSerializer.Deserialize<TOut>(data);
                    if (obj != null)
                    {
                        return obj;
                    }
                }
            }

            return default;
        }

        private static string Post<TIn>(HttpClient client, TIn payload, string url)
        {
            var stream = new MemoryStream();
            JsonSerializer.Serialize(stream, payload);
            stream.Seek(0, SeekOrigin.Begin);
            var reader = new StreamReader(stream);
            var serializedPayload = reader.ReadToEnd();
            reader.Close();
            stream.Close();
            var content = new StringContent(serializedPayload, Encoding.UTF8, "application/json");
            var result = client.PostAsync(url, content).Result;
            if (result.IsSuccessStatusCode)
            {
                return result.Content.ReadAsStringAsync().Result;
            }

            return default;
        }

        private class AuthRequestResponse
        {
            public string AuthenticationUrl { get; set; }
            public string State { get; set; }
        }

        private class AuthenticationCheckRequestPayload
        {
            public string State { get; set; }
            public string? Nonce { get; set; }
        }

        private class AuthenticationEvent
        {
            public string Status { get; set; }

            public string Data { get; set; }
        }
    }
}
Implementing non-interactive (JWT) authentication
This type of authentication is useful for external applications created by systems integrators that need to interact with various platform components without using interactive browser-based authentication.
How it works
Authentication is performed based on having access to the private key of a certificate. This can be a self-signed certificate; it does not need to be issued by a trusted Certification Authority. The trust is managed by uploading the public key of the certificate to the Identity Provider you are using. The private key needs to be accessible to the local application that wants to communicate with the Platform.
In the diagram below, you can see at the left-hand side how the private key of the certificate is available to the External Integration subsystem (the application that wants to call the Platform APIs) while at the right-hand side the public key is available to the Identity Provider (abbreviated as IdP in the following text).
In an IdP such as Azure Active Directory, the association of the private key to the IdP is configured by the intermediation of something called a “Registered application” which allows for configuration of an item at the IdP where you assign permissions for external applications.
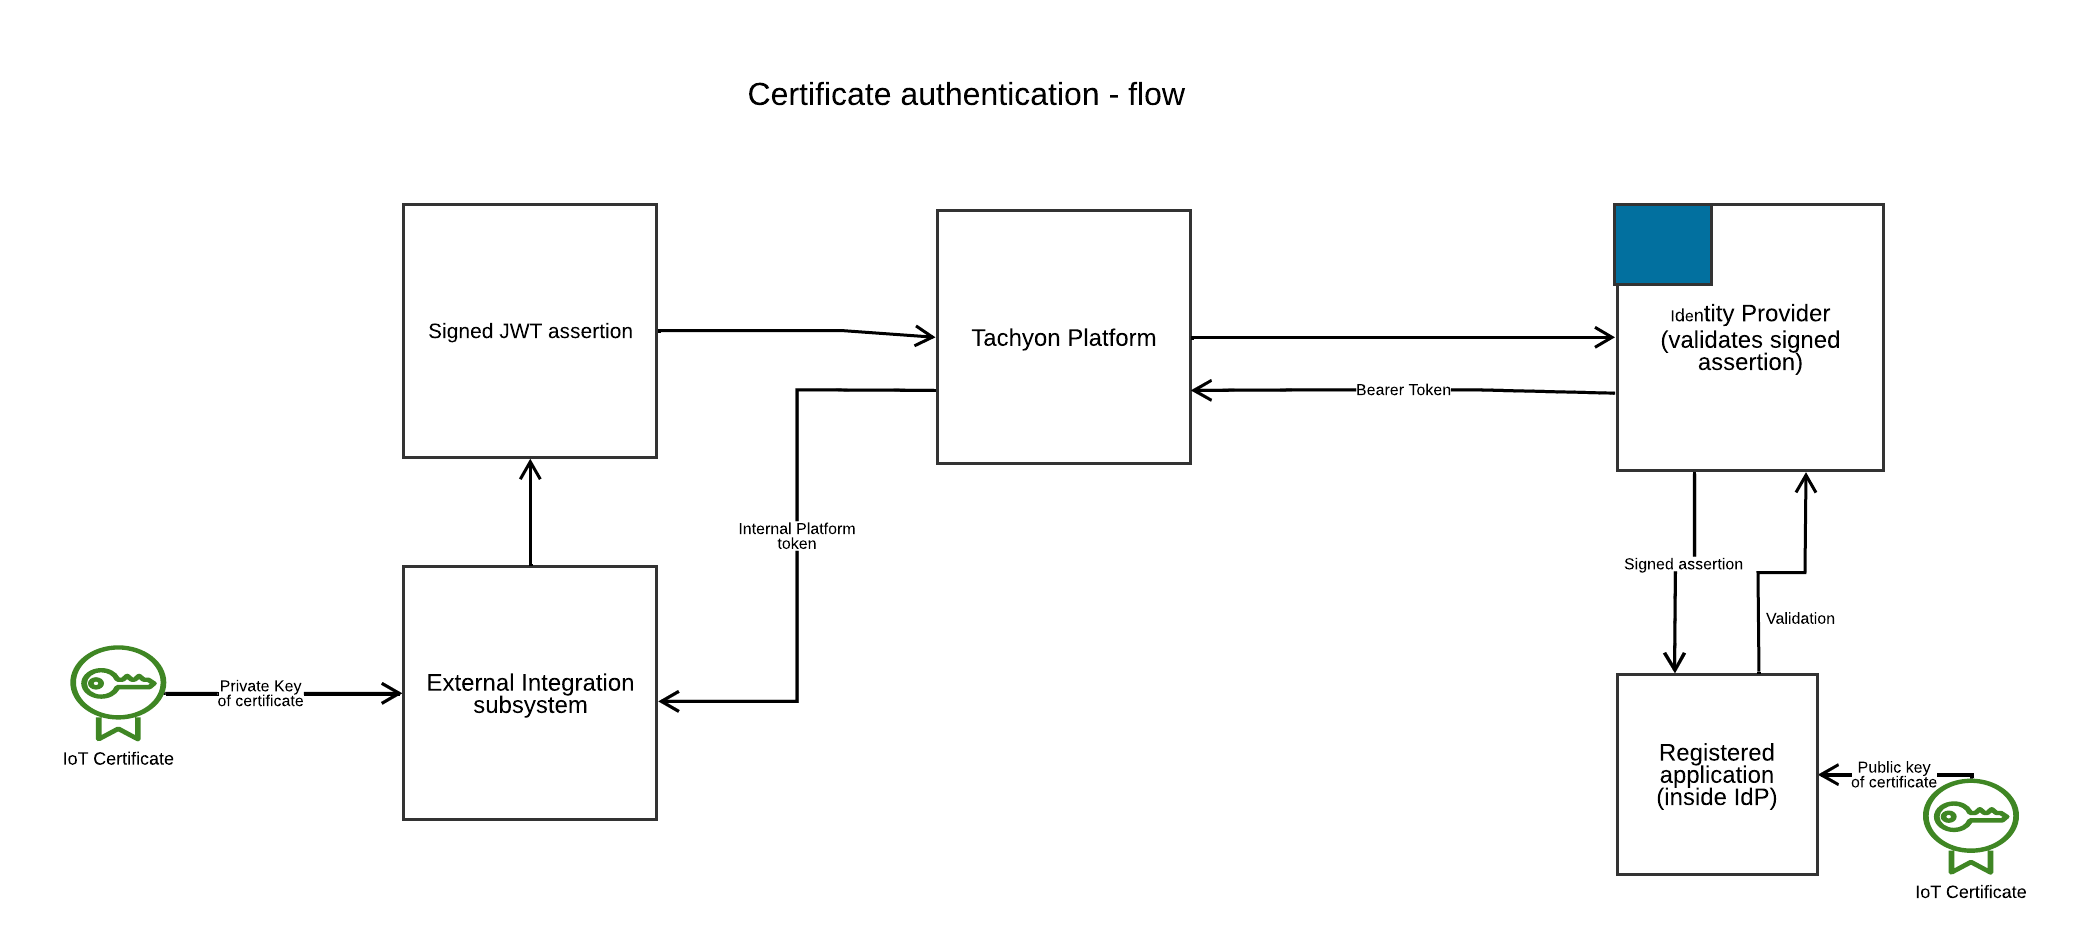
When the External integration subsystem wants to connect to the Platform, the flow of information is as follows:
The External integration subsystem generates a JWT. This is a string of text that encodes the identity of the user and is cryptographically signed. The signature is done with the private key of the certificate.
The JWT is sent to an endpoint in the Platform.
The platform verifies the JWT locally and only when it is satisfied with local verification it sends the JWT to the IdP, which is able to verify the signature thanks to the public key of the certificate.
If the IdP is able to verify that the signature is correct, it notifies the Platform.
In the next step, the Platform generates a token and returns it to the integration subsystem.
The Tachyon Token has a limited lifetime. If it is used after its expiration, the API will return a 401 (Access Denied) status to the caller. Contrary to an interactive login, the tokens acquired through the non-interactive process cannot be refreshed. This means that the caller will need to repeat all the previous steps to acquire a new Tachyon Token and then retry the operation using the new token.
Configuration
Prior to using this feature, your Platform installation must be configured correctly in order for JWT authentication to work.
Authentication steps
The header members x5t and kid are typically set to the base64-encoded thumbprint of the certificate used to sign the JWT. This allows the receiving identity provider to know which certificate to use when validating the JWT. The Platform will accept any arbitrary value for the kid without requiring it to match the thumbprint of the certificate. This “kid” value is the one you will map to a Principal in Tachyon using the KidToUpnMapping table.
The body members are as follows:
aud - Audience - this is usually set to the URL of the IdP's token issuing endpoint.
exp - Expiry - expiration timestamp for the JWT, defined in Unix Epoch seconds
iss - Issuer - this is usually set to the Application Id in the IdP that will handle the client assertion grant flow and validate the JWT.
sub - Subject - The subject is usually set to be the same as the issuer
jti - This is just a random GUID to make each JWT unique; good practice requires that it be set freshly each time a JWT is created
iat - Issued At - This timestamp allows potential validation that the JWT is no more than a short time period old, for additional security hardening.
Tachyon.upn - and body optional field (not shown in the example above) that allows you to specify which Principal you would like to authenticate as in cases where a single certificate can be used for multiple Principals.
Each of these members is known as a 'claim'. There is another reserved claim which is not included in this JWT and not required by IdPs normally. This is 'nbf' which is a timestamp before which the JWT is not valid.
The standard also allows custom claims to be added. There is a custom claim that we add if you want to be a specific principal (needed if the kid mappings allow it), which is Tachyon.upn. The code sample at the bottom mentions where to add it.
For the aud parameter, an external integration script can determine the IdP token issuing endpoint by making a GET request to the <server>/api/Authentication/MetadataEndpoint endpoint. This will return the openId metadata endpoint for the configured IdP. This endpoint is unsecured and allows any IdP consumer to determine all of the endpoints that the IdP supports - the token issuing endpoint will be among these. The integration script, having retrieved the metadata endpoint, queries this to in turn retrieve the token issuing endpoint it needs to fill in the JWT it is going to submit.
Non-interactive authentication - Principal to certificate mapping
This page discusses how to manage certificate to principal mapping using the PowerShell Integration Toolkit.
About certificate to principal mapping
Platform-neutral authentication relies on certificates for external integration subsystems to authenticate to the 1E Platform. These certificates are used to sign Json Web Tokens (JWTs) which can then be verified by the IdP.
The 1E platform allows certificates to be mapped to Principals. A set of PowerShell cmdlets allows the user to set up and manage mapping entries.
Please note while you could use another language to perform this task as it is essentially all about sending right data to certain API endpoints, it is strongly advised to use Powershell toolkit published by 1E as it contains all the cmdlets required to perform these tasks.
Connecting to the platform
You cannot use certificate authentication to connect to the target platform until you have set up principal mappings. Consequently, to set these up you will connect to the target platform using interactive authentication. You will be prompted for credentials by the configured platform Identity Provider. These must correspond to a user in the platform with the appropriate privileges to manage mappings - typically, a full platform administrator.
To connect to the target platform, run the set-1eserver cmdlet from the PowerShell toolkit. You must first ensure that the toolkit is loaded. You need only do this once in a session.
Assuming you are in the folder into which the toolkit files were copied:
import-module .\ps1etoolkit.psd1 -force
Then connect to the platform server:
set-1Eserver <server name>
You can then run the cmdlets discussed below to set up certificate mappings. For example, auth4ui2.platformeng.cloud.1e.com You can then run the cmdlets discussed below to set up certificate mappings.
You use the get-1ecertificatethumbprint to list all certificates in a specified store. The ‘Kid’ property is the thumbprint represented in base-64 URL-safe encoding. You use this property to represent a certificate when setting up a mapping.
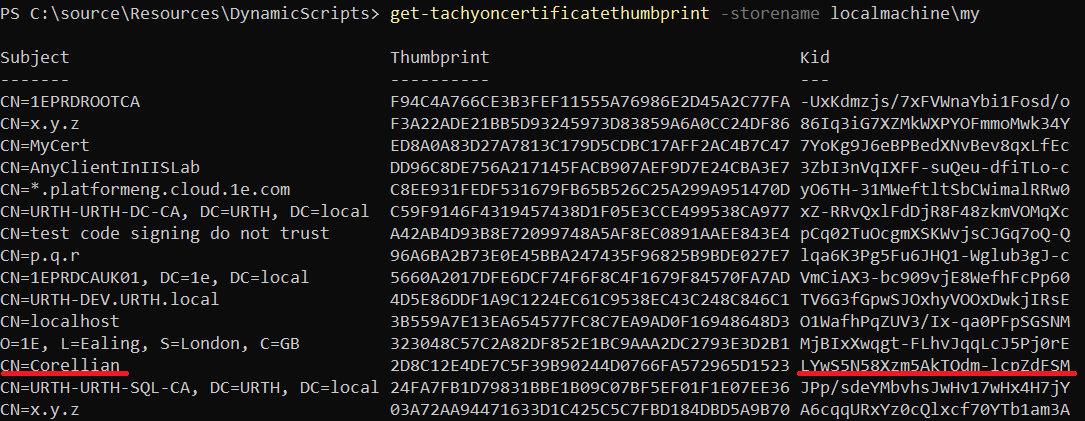
We can see here the certificate we want to set up a mapping for and its ‘Kid’ property.
If you are generating your own JWT tokens, you can use any arbitrary string for the ‘kid’ field. Although you would typically set it to match the certificate thumbprint, the 1E platform does not actually require this. When creating the mapping, use whatever value you are using for your kid field, regardless of whether it matches the certificate thumbprint or not.
Note
You must be authenticated as a principal with appropriate rights in order to perform these operations, typically Full Administrator.
You use the add-1ejwtprincipalmapping cmdlet to add a mapping. We map the certificate highlighted above to the principal Darth.Vader@corellianengineering.onmicrosoft.com.

Having set up this mapping, any time an external integration subsystem uses the above certificate to authenticate, it will retrieve a token for the above principal and have all the permissions that the principal has in the 1E platform environment.
Note
You cannot add groups as principals. You must add specific user principals. However a user principal need not be directly represented in the 1E platform RBAC system. If any group or groups of which the principal is a member exists in the platform’s RBAC database, then the permissions of the group or groups are applied.
RBAC checks are made when the signed JWT is presented for validation, not at the time of creating a mapping. Therefore, authentication may fail if the principal you have mapped to does not have rights in the platform’s RBAC either directly or via group membership, at the time of authentication.
Advanced principal mapping options
Verifying mappings
You can use the 1E PowerShell toolkit to verify that your mappings are correctly set up. To do this, you need the application Id of the Identity Provider app configured to perform authentication and the subject of the signing certificate to be used. Your account on the endpoint on which you are running must have access to this certificate in the local machine certificate store, and it must have rights to retrieve the private key of this certificate.
Note
The application Id you require will be configured in the tenant’s configuration on the platform.
This is found either in the ClientAssertionAppId setting, or, if this is empty, the DirectoryAppId setting.
You should also be able to find this Id in your IdP as it will be the Id of the application you have configured for JWT authentication.
Using a dedicated identity provider application for external integration
The installation process currently assumes that you will share the identity provider application that the platform uses for directory search operations, for external integration.
In some cases, you may prefer to set up a dedicated identity provider application for external integration. This allows to restrict the permissions of that application. If a consumer were to obtain an identity provider bearer token directly from the directory search application, that bearer token would allow the consumer to read users, profiles and groups.
If you wish to control these permissions, they can set up a third application in their identity provider. They do this exactly as they do for the directory search application, but they can then choose that this application has only the default permissions, or customise accordingly.
When a JWT is submitted to the 1E platform, the application identity to which it will be forwarded within the identity provider is checked against two settings in the tenant configuration.
Normally only one of these settings is configured. In the example below, the directoryappid setting corresponds to the application id which is used by the platform for directory searches. It will also be shared for external integration.
              "DirectoryAppId": "0c83091d-fc2f-40b5-8aca-940e4cf5f9b5",
              .........
              "ClientAssertionAppId": null,
When the JWT is submitted, the 1E platform confirms that the application id in the JWT matches the DirectoryAppId setting and then, if so, forwards the JWT to the identity provider for validation.
This check is made to prevent an attacker from submitting a JWT signed by an identity provider they control, instead of the expected identity provider.
If the platform did not verify the application Id, it would be possible to forward the JWT to an external attacker-controlled identity provider which would validate it, and then in turn the platform, believing the JWT to be valid, would return an internal token to the caller.
Specifying a dedicated identity provider application for external integration
To specify a separate application for external integration, you should set the ClientAssertionAppId member of the tenant’s configuration to the separate application Id.
That way the JWTs submitted to the platform are checked against this application Id. Only JWTs specifying the new application Id are then passed to the identity provider. A JWT which specifies the shared directoryappid value will now be rejected and cannot be used for external integration.
Note
It is strongly recommended that you set up a dedicated identity provider application if possible. Doing so means that the bearer token returned by this application has only minimal privileges.
If you share the directory search application for external integration, then the bearer token returned by the identity provider will have the rights to read your user and group information from the identity provider (although it will not be able to change this information).
An external caller who can negotiate the oAuth grant flow directly with the identity provider can therefore obtain this bearer token directly. When you configure a dedicated application for external integration, you need not give the application any privileges as the bearer token returned is only used by the platform to verify the caller’s identity. This means that any external caller who obtains this bearer token will have no privileges within the identity provider itself.
Implementing non-interactive (JWT) authentication - C# example
The code sample below is a complete Console application that compiles under the .NET Framework version 4.8.
Note
This is simplified for illustration. It is not production-ready code. Among other things, it lacks any error-checking for simplicity.
When the code does “Base64” it is actually doing what is commonly called “Url-Safe Base64”. This replaces some characters used by standard Base64 because they are not compatible with the character set allowed in a URL.
Before starting
Remember to configure the four constants at the top:
ApplicationId is the identifier for the Application that you added under your Azure portal for the purpose of doing non-interactive authentication. For testing or preproduction, you can use here the same application Id that you are using for Directory Access. However, for production you will want to use here a separate application with no permissions on your Azure Active Directory.
MetadataEndpoint is the endpoint in Azure that you call for getting the metadata for your application.
TachyonServer is the base address of your Tachyon server. Only the server – do not append the name of the Site and do not add a slash at the end.
CertificateThumbprint is the Thumbprint of the certificate that you are using to authenticate the calls made by your external application into Tachyon. This is the same certificate whose public key you have authorised to access ApplicationId. Remember to grant access on the private key to the user who will be executing the sample application. Also, remember that it needs to be mapped to a Tachyon user through the KidToUpnMapping. This sample program does not allow mapping one certificate to multiple users; to do this, you need to add the Tachyon.upn member to the JWT (see the comment in the code).
Implementing non-interactive (JWT) authentication - Python example
This page shows some sample Python code to perform non-interactive authentication to the platform. This code will sign a JWT, present it to the platform, receive an authentication token and then call the /devices endpoint to retrieve a list of all devices that are known to the platform as an example API call.
Setting up the environment
Implementing non-interactive (JWT) authentication - Typescript example
This page shows a sample implementation of non-interactive authentication to the 1E Platform using TypeScript.
Please note that this is simplified for illustration. It is not production-ready code. Among other things, it lacks any error-checking for simplicity. This code was written to run inside the ‘bun’ environment, which is basically similar to node.js, so there should be equivalent library functionality in both environments.
Note
This example retrieves the JWT signing certificate from a local PFX file.
This does not represent optimum security best practice. As with any implementation, regardless of language, there are other mechanisms available to retrieve certificates. For example:
From the local Windows certificate store (where applicable).
From a mounted Kubernetes secret.
From the Azure Credential Vault.
Obtaining the certificate from any of those sources is outside the bounds on this article.