Preparation
The following are what you will need to prepare in advance of implementing Shopping in your network. Typically, these are tasks that may take some time, depending on how your organization works. A more complete checklist of tasks is provided in Requirements.
1E Infrastructure
Tachyon Platform
If you want to use the Tachyon-related features - client-side Order Tracking and Tachyon Instruction Applications - you will need:
Tachyon license with Shopping-specific instructions enabled
Tachyon Platform 9.0 (on-premises)/23.11(SaaS) or later server infrastructure
1E Client (the latest hotfix applied) with the Shopping client and Tachyon Agent enabled.
You will need a Tachyon license that covers the Shopping-specific instructions if you want to use the client-side features of Shopping's Order Tracking feature. Contact 1E for a Shopping addition to your Tachyon license if you do not already have it.
Note
To automatically enable and configure this feature in Tachyon during installation or upgrade of Shopping Central, the Shopping Installer Account must be a Tachyon user assigned to the following roles. This can be temporary, and removed after installation.
Tachyon 8.x - Full Administrator assigned to All Devices.
In Tachyon, you will also need:
A Tachyon user - a domain account that will be used as a proxy by Shopping
A Tachyon role called Shopping Administrator - assigned to the Tachyon user
A Tachyon consumer called Shopping
An Instruction set called 1E Shopping with Actioner permission assigned to the Shopping Administrator role
An instruction (file name 1E-Shopping-ShowNotification.xml) added to the Instruction set that interfaces with the 1E Client Shopping module
Note
All of these are added to Tachyon automatically by the Shopping Central installer, if you enable Tachyon integration when installing or upgrading Shopping, and you have configured the Installer Account permissions listed above.
To prepare for integration with Tachyon please refer to Enabling Tachyon integration. That page includes details on manually adding the account and Shopping-specific instruction to Tachyon. It also shows how to define the Shopping Administrator role, configure the Shopping Tachyon consumer and modify the database to change the consumer workflow.
Preparation for Modern Authentication (Introduced in Shopping 6.2)
For more information on how to prepare initially, refer to .
Below are the prerequisites that are needed before the Shopping installation takes place.
.pfx certificate (containing a private key, client authentication and 2048 key)
This .pfx certificate is given either by your internal PKI team, sometimes by a third party, or you can generate a self-signed certificate by yourself.
To create your own self-signed certificate, use the New-SelfSignedCertificate PowerShell cmdlet. This would create a certificate in the local machine personal certificate store on the device you have run the cmdlet. You can then export this certificate as a .pfx file, which includes the private key, using the CERTLM.MSC utility.
Ensure that the Setup user has the read access on the private key.
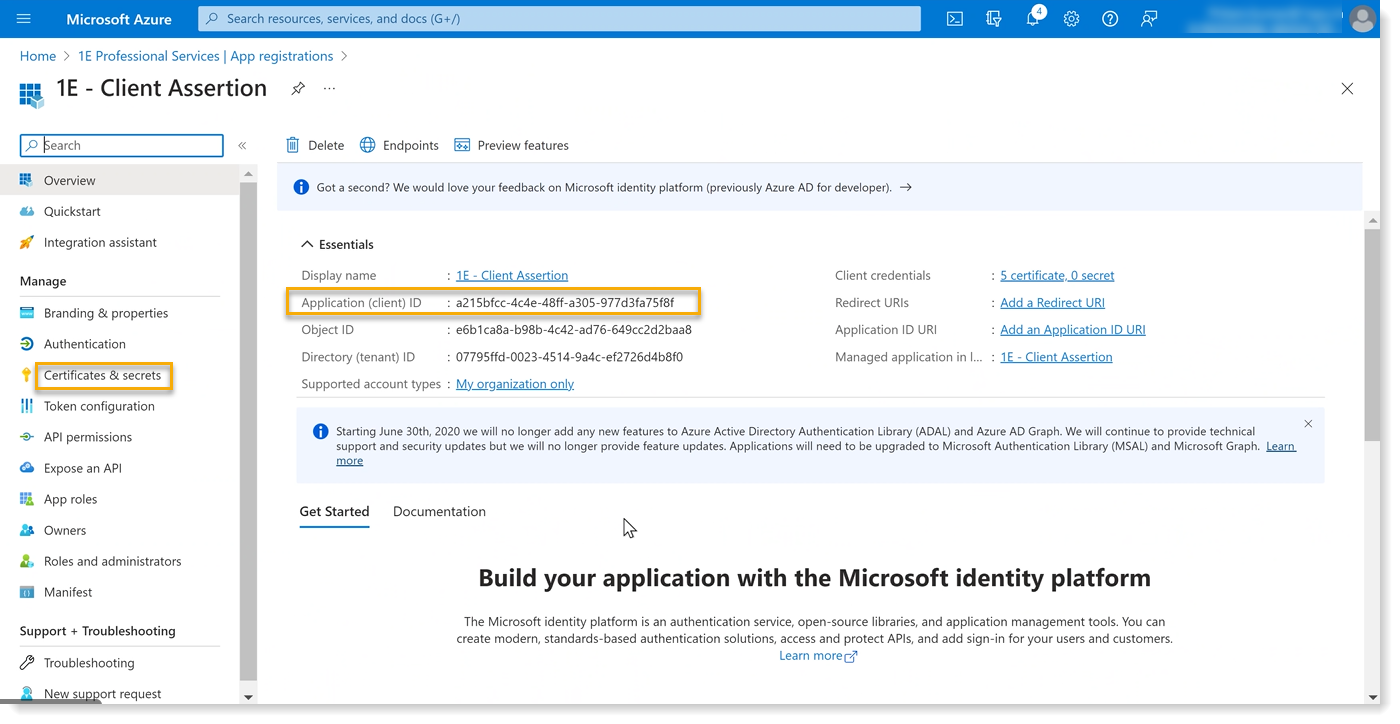
The client assertion Application ID from Microsoft Entra ID, as shown in the picture below.
You also need the 1E PowerShell toolkit (available on 1E Support portal).
Configure Microsoft Entra ID for integration with 1E using following steps:
Create certificate/principal mapping in 1E Platform
Install the certificate with private key locally to the local machine personal certificate store. Ensure that you have added the required permissions to access the private key to the Shopping installer account.
Login to your 1E instance using Set-1E Server as shown below.
Get the certificate kid using:
Get-1ECertificateThumbprint -StoreName localmachine\my | fl *
The kid value of a certificate is a base 64 encoding of the certificate thumbprint.
Now create a mapping using:
Add-1EJwtPrincipalMapping -Identifier <Certificate-Kid> -Principal <1EUser@domain.com>
Note that the above proxy user should be a principal with appropriate permissions in 1E.
Upload the public key PEM file in Microsoft Entra ID
Export the certificate that you have imported in the above steps in .CER format.
Login with the administrator principal role.
Navigate to Azure Active Directory → App Registrations → 1E Client Assertion → Certificates and upload the certificate.
1E Client
1E Client must be deployed to all in-scope clients with the Shopping module enabled, in order for users to access the Shopping self-service portal. 1E Client also includes the following:
Nomad client module
WakeUp client module which supports Wake-on-LAN as part of a 1E NightWatchman 7.3 solution
Tachyon client - to support Tachyon real-time features as part of a Tachyon Platform solution (Versions 9.0(on-premise)/23.11(SaaS) or later of Tachyon Platform and 1E Client).
Client modules can be optionally enabled during deployment of 1E Client or after deployment by enabling features in its configuration file.
Shopping self-service portal
The Shopping module of the 1E Client provides support for users connecting to the Shopping Portal, by providing information such as the computer name which browsers are not able to provide. This feature is a direct replacement for the previously available Shopping Agent (no longer supported). You can optionally enable Loopback Exemption.
Note
When users connect to the Shopping Portal, the website needs to get the latest details about the local computer. Shopping may already have details from the Configuration Manager database, but these need to be confirmed and updated. Browser standards only allow websites to get limited information about the user and computer, therefore the website needs to make loopback calls to the local computer via the Shopping client. The following browsers permit loopback calls by default:
All versions of Chrome
All versions of Firefox
Non-Metro UI based Internet Explorer browsers (including legacy Internet Explorer)
If your Shopping users are using Edge and Metro Internet Explorer browsers, you must enable a Loopback Exemption to allow these browsers to make loopback calls. Exemption affects the browser as a whole and is not just restricted to the Shopping website. Before enabling this option, check your corporate security policy and be aware of the implications of allowing access between browsers and the local machine. By enabling loopback, you are only setting the Edge/Metro Internet Explorer browsers to the same level of security as other browsers which allow this setting already.
If you are running an unattended install, you can use MODULE.SHOPPING.LOOPBACKEXEMPTIONENABLED for all OS but it only works on Windows 8, 8.1, 10 and Windows Server 2012 R2 and later.
Shopping client only allows inbound connections to localhost (127.0.0.1) which prevents remote access.
Self-Service OS Deployment
Please refer to Self-service Operating System deployment which explains the difference between the following:
Users shopping for ConfigMgr Applications (Task Sequences) in the same way as any other Shopping application
Users shopping for OSD Applications which run an OSD Wizard in the Shopping web portal to schedule an OS Deployment
Application Migration
Application Migration is a separately licensed product from 1E that replaces the Application Mapping feature in Shopping with a much more feature rich solution.
When Shopping is integrated with Application Migration, the Shopping OSD Wizard and the Windows Servicing Assistant show the user which applications will be migrated.
Application Migration replaces Application Mapping:
there is currently no automated method to migrate rules from the legacy Application Mapping feature to Application Migration. Please contact 1E if you require help with this (email Support@1e.com)
you may wish to consider using AppClarity, which can be installed on Tachyon Platform alongside Application Migration.
Note
Expand... Installing Application Migration on Tachyon Platform
Install Tachyon Platform, optionally installing Nomad, Application Migration, and/or AppClarity
Install Shopping Central and Receiver(s)
Configure Shopping to integrate with Application Migration. Please refer to Integrating with Application Migration
Configure mapping rules in Application Migration.
Deploy 1E Client with Shopping, WSA, and Nomad features enabled.
Licenses
Shopping and Windows Servicing Assistant are licensed separately. Both license keys must be provided when installing Shopping Central server.
To use the client-side elements of the Shopping Order Tracking feature, you will need:
Tachyon Platform 9.0(on-premises)/23.11(SaaS) or later
1E Client (with the latest hotfix applied)
A Tachyon license that includes Shopping
Microsoft Endpoint Configuration Manager requirements
If you use Shopping's ConfigMgr integration, you will need the following installation accounts, ConfigMgr security role, and database access.
Shopping installation accounts
The user installing Shopping Central or Shopping Receivers requires membership of the Full Administrator security role in Configuration Manager, as described in Accounts needed to install Shopping.
1E Shopping Receivers security role
The Receiver service account or group requires the following permissions in Configuration Manager.
Classes | Permissions |
|---|---|
|
|
|
|
These permissions are defined in an XML file and can be imported using the Configuration Manager console to create a 1E Shopping Receivers security role. Each Receiver service account or the Receivers group can then be assigned to this role. This is a one-time only manual procedure prior to installation of the first Receiver. The permissions for the 1E Shopping Receivers role were changed in Shopping 5.6 to include support for Configuration Manager client notification. You will need to import one of the following files, depending on your Configuration Manager version:
1E Shopping Receivers Security Role in CB1906 (includes Folder Class introduced in CB1906)
<SMS_Roles>
  <SMS_Role CopiedFromID="SMS0002R" RoleName="1E Shopping Receivers" RoleDescription="">
    <Operations>
      <Operation GrantedOperations="1879047847" ObjectTypeID="1" />
      <Operation GrantedOperations="1" ObjectTypeID="2" />
      <Operation GrantedOperations="1" ObjectTypeID="4" />
      <Operation GrantedOperations="1" ObjectTypeID="6" />
      <Operation GrantedOperations="805708823" ObjectTypeID="11" />
      <Operation GrantedOperations="1" ObjectTypeID="20" />
      <Operation GrantedOperations="1" ObjectTypeID="28" />
      <Operation GrantedOperations="1" ObjectTypeID="31" />
      <Operation GrantedOperations="1047" ObjectTypeID="32" />
      <Operation GrantedOperations="1" ObjectTypeID="42" />
      <Operation GrantedOperations="1" ObjectTypeID="43" />
      <Operation GrantedOperations="1047" ObjectTypeID="226" />
    </Operations>
  </SMS_Role>
</SMS_Roles>
Note
You can copy the details given above, paste it in a notepad and save as an XML file. Then import it to SCCM console.
When a Receiver creates a collection for deploying an application, it needs to specify its limiting collection. By default, that is either All Systems or All Users and User Groups. However, these defaults are configurable in the Receiver's config file. Other collections can be mapped if the Shopping RBAC feature is used. If these collections are known, specify them, otherwise select All instances of the objects that are related to the assigned security roles option in the Security Scopes tab. For more information see Role based access control in Shopping.
Note
When upgrading 1E Shopping Receivers from versions prior to Shopping 5.6, because later version now use Configuration Manager client notification, you will need to update the 1E Shopping Receivers security role in Configuration Manager CB1810 and later. This can be done in the following way:
Remove any users assigned to the existing 1E Shopping Receivers security role in Configuration Manager - noting them down for re-assigning later. If a user only has that role, you will need to assign the user to a temporary role, for example Read-only Analyst.
Remove the existing 1E Shopping Receivers security role from Configuration Manager.
Import the 1E Shopping Receivers security role using the appropriate xml file for the version of Configuration Manager you are using.
Re-assign the previous users to the new 1E Shopping Receivers security role.
Unassign the users from any temporary roles.
Configuration Manager site databases
Shopping Central - the Shopping Central Service account (SVCUSER) must be a member of the Shopping Configuration Manager Database Access (SHOPPINGCONSOLESMSUSERS) group. This group requires a login with db_datareader rights and execute permission on the fn_GetAppState and fnGetSiteNumber functions. If the Shopping Central installer has sufficient rights on the Configuration Manager database, then these database rights will be configured automatically during installation.
Shopping Receivers - in all Configuration Manager Site databases, ensure the Shopping Receiver service account has a login with db_datareader rights and execute permission on the fnGetSiteNumber function. If the Shopping Receiver installer has sufficient rights on the Configuration Manager database, then these rights will be configured automatically during installation.
Configuration Manager deployment notifications
To enable deployment notifications, the following settings must be made:
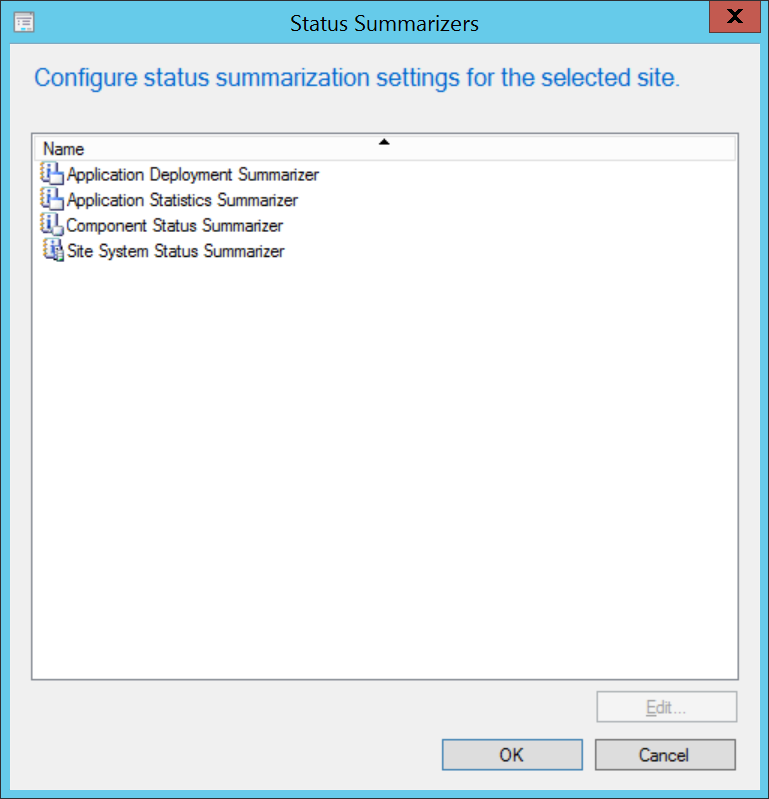
In the Configuration Manager Admin Console, the following summarizers must be enabled in the Configuration Manager Admin Console (Administration → Site Configuration → Sites → <top-level Site> → Status Summarizers) settings must be made:
Application Deployment Summarizer
Application Statistics Summarizer
Component Status Summarizer
Site System Status Summarizer
Microsoft Intune requirements
To use Shopping's Intune integration, then you require the following:
A working Intune instance
Clients must be Intune enabled for them to receive Intune applications
User accounts must have email addresses
The relevant Shopping Requirements must be met.
You can then:
Define the two Azure Active Directory (AAD) authentication applications required
Configure administrator and service accounts
Make appropriate settings for Intune in Shopping
Enable the Configuration Manager co-management feature.
Using the Intune integration is very similar to using Configuration Manager, with Shopping for both administrators and end-users.
To prepare for integration with Intune please refer to Enabling Intune integration.
Shopping Intune integration supports the Intune application types that are most useful for Windows clients. Additional application types might be supported in future versions. See Managing Intune applications page for more details.
Note
Device used with Shopping's Intune integration must be Hybrid Azure AD joined in Azure Active Directory (AAD). User accounts (including administrator and service accounts) must be "Windows Server AD" sourced in AAD and must have a global domain suffix (Contoso.com, for example, not Contosocom.onmicrosoft.com). If the accounts are for a local domain, a universal principal name (UPN) can be used.
Shopping Intune integration assumes that user accounts can be uniquely identified by their e-mail addresses. In other words, Shopping end-users accounts do not share e-mail addresses.
You will also need the following Azure Active Directory accounts for these purposes:
Account Purpose | Member of | Usage | Notes |
|---|---|---|---|
Configuration | Global administrator and Intune administrator AAD roles | During setup and as needed for troubleshooting | This account does the steps described in Enabling Intune integration. |
Service | Intune administrator AAD role | Ongoing for the Shopping Central service to access AAD user and device details and app deployment status | This is the AAD hybrid account that corresponds to the service account used to run the Shopping Central service. |
Intune Administrators | Intune administrator AAD role | Ongoing for Intune app management | You might prefer to apply the Intune administrator role to a group and add relevant administrator accounts to the group. |
Shopping administrators | User and groups setting for the Shopping Console Authentication Client App (see Enabling Intune integration for details) | To access Intune apps from the Shopping console and to trigger on-demand AAD device and user synchronizations | You might prefer to add a group to the User and groups list and add relevant Shopping administrator accounts to the group. The Intune administrators and Shopping administrators might all be the same accounts but they do not have to be. Intune administrators could manage the Intune apps but not have Shopping privileges. Shopping administrators could use the Intune apps but not be able to manage them. |
Accounts needed to install Shopping
Shopping Central installation account
The user installing Shopping Central requires the following:
Must be a domain user
Must be a member of the Shopping Administrators (ADMINACCOUNT) group
Must have local admin rights on the server on which Shopping Central will be installed. If the Shopping Central Service and Web components are to be installed on separate servers, the user installing them must have local admin rights on each server.
Must have local admin rights on the Configuration Manager site server.
Must be a member of the Full Administrator role in Configuration Manager as the installer adds ConfigMgr Security rights for the Shopping Central Service Account.
Requires one of the following sets of rights on the SQL instance hosting the Shopping database
sysadmin (can be temporary for the duration of installation), or
ALTER ANY LOGIN (on the SQL Server instance) and dbcreator (on the instance) if the installation will create the database, or
ALTER ANY LOGIN (on the SQL Server instance) and db_owner (on the database) if the Shopping database already exists
Requires one of the following sets of rights on the SQL Server instance hosting Configuration Manager database:
sysadmin (can be temporary for the duration of installation), or
ALTER ANY LOGIN and db_owner
If you want to enable Tachyon integration during Shopping Central installation, the installation account must have privileges to create Tachyon objects. See Enabling Tachyon integration for details on specifically what objects.
Shopping Receiver installation account
The user installing the Shopping Receiver requires the following
Must be a domain account
Must have sysadmin rights on each SQL instance hosting the Configuration Manager database
Must be a member of the Full Administrator role in Configuration Manager
Useful to be a Shopping Administrator with access to the Sites node in order to select the Primary Site, otherwise another Administrator can complete that step after installation.
Service accounts
Shopping Central service account
Must be a domain account with local admin rights on the Shopping server
Must have NTFS security
read and execute permissions on the Shopping program files installation folder
full permissions to the Shopping log folders
the above will be automatic if Shopping is installed using default locations on a default installation of Windows
the above security permissions are particularly relevant if you use non-default installer properties INSTALLDIR or LOGPATH
We recommend restricting the account with Deny logon locally
Must be a member of the Shopping Configuration Manager Database Access (SHOPPINGCONSOLESMSUSERS) group. If the Shopping Central installer account has permissions to add accounts to this group, then it will automatically add the account to the group during installation.
For AppClarity integration, must have integration services permission enabled from the AppClarity console
Object | Security requirements |
Access to the Shopping Central database | The Shopping Central service requires access to the Shopping database. Db_owner permissions are automatically configured during installation of Shopping Central. |
Access to the SCCM Site’s SMS Provider | The Shopping Central service requires read-write access to the “SMS Provider” on the SCCM CAS. During installation of Shopping Central, the installer adds the necessary permissions in the SCCM Admin Console. |
Access to the SCCM Site’s database | During installation of Shopping Central, the installer adds the necessary permissions in the SCCM Central SQL database in order for the service to function. During installation of Shopping Central, the MSI installer adds the necessary permissions in the SCCM Admin Console, but must be added to the local “SMS Admins” group separately. If the SQL Server is using a non-standard port, the SMSDBPORT switch must be specified during installation, or a SQL Alias used. |
SMTP service | The Shopping Central service must be capable of creating mails at the attached SMTP mail gateway or service. If the SMTP gateway is configured to reject mail from a non-existent sender address, then it is necessary to configure the Shopping service account with an email address. |
AD integration groups | The Shopping Central service requires write access to Shopping “AD Integration” groups. Access rights can be achieved by granting the Shopping Central service account, or an AD group it is a member of, using either of the following methods, or a mixture.
|
Local Server NTFS | The Shopping Central service has requires NTFS “read” access to the Shopping install folder and “modify” access to the log file folders. This is achieved using the “Users” local group. |
AppClarity Integration | The Shopping Central service requires AppClarity User permission ‘User can access Integration Services’. |
Shopping Receiver service account
If you use Shopping's ConfigMgr integration, you will need at least one Shopping Receiver.
Each Receiver needs a service account, which can be either a dedicated or shared domain user account or Network Service
We recommend restricting the account with Deny logon locally
The Receiver is installed on each ConfigMgr Site server, and the service account must have local admin rights on the Site server
at the very least it must have read access to the binaries, and full permissions to the Receiver log folders
if you upgrade the Shopping Receiver with a different service account, it must have
Read/Writepermissions to%sysdrive%Programdata/1Eor~All Users/1E
Must have permissions in the Configuration Manager Console and its SQL database, depending on the version of Configuration Manager, .as described above in . Microsoft System Center Configuration Manager requirements .
Installation of Shopping Central requires details of the Receiver service account or an AD Security group containing Receiver service accounts, so that Receivers can access the Central web service:
a shared service account can be used if all Receivers use the same account, and an AD group is not required
a domain security group must be used if each Receiver has its own service account, or uses Network Service, which must be members of this group
we recommend using a domain security group if other services need access to the Central web service, for example if Shopping API scripts are used by OSD Task Sequences, then the group should include the Configuration Manager Network Access account. This security group should be Universal, but can be global if only one domain is involved.
Note
A key design decision is whether Shopping Receivers should use a single shared service account, individual service accounts, or Network Service. Either way, to allow new accounts to be added or existing accounts to be changed more easily, we recommend you include the Receiver accounts in an AD Security Group and use this group when granting access to each of the following:
Administrators localgroup on the local Configuration Manager site server, where the Receiver will be installed
Configuration Manager security role, as described above in Microsoft System Center Configuration Manager requirements
In the Shopping Central installer's Service Account screen.
Object | Security requirements |
Access to Shopping Central Web Services | The Shopping Receiver services connect to the Shopping Central Web Site using HTTP and are validated against the (RECEIVERACCOUNT) account/group specified during installation of the Shopping Central. Using a group is recommended in order to simplify configuration and grant access to necessary objects. This is described in section 3.7.9 below. |
Access to the associated SCCM Site’s SMS Provider | The Shopping Receiver service requires read-write access to the “SMS Provider” on the associated SCCM Site servers. This is achieved by creating a “1E Shopping Receivers” role for the (RECEIVERACCOUNT) group. |
Access to the associated SCCM Site’s SQL Server | During installation of Shopping Receivers, the installer grants db_datareader permissions in the SCCM SQL database in order for the Receiver service to function. If the SQL Server is using a non-standard port, the SMSDBPORT switch must be specified during installation, or use a SQL Alias instead. |
Local Server NTFS | The Shopping Receiver service has requires NTFS “read” access to the Shopping install folder and “modify” access to the log file folders. This is achieved using the “Users” local group. |
Active Directory security groups
Note
AD security groups must be Universal if more than one trusted domain is involved, but can be Universal or Global if only one domain is involved. If your AD domain functional level is Windows 2000 server mixed mode then the AD security groups must be domain Global.
Shopping Console Access groups
Three separate AD groups are required to enable access to the Shopping Admin Console and optionally support the Shopping Console node security feature.
Shopping Full Database Admin Access (SHOPPINGCONSOLEADMINUSERS)
Shopping Configuration Manager Database Access (SHOPPINGCONSOLESMSUSERS)
Shopping Limited Database Admin Access (SHOPPINGCONSOLEUSERS)
Note
You cannot use the same group to serve all three roles, these must be handled using three separate groups. Any attempt to use the same group for more than one role will result in the installation failing with database errors and rolling back.
The Shopping Console node security feature is enabled by default, but can be disabled in the Shopping Console settings panel. If the Shopping Admin Console Node Security feature is to be used, then the Shopping Full Database Admin Access (SHOPPINGCONSOLEADMINUSERS) group must have Modify permissions in Active Directory to manage membership of itself and the other two Shopping Access groups in the table below. You can permission each group, or permission an OU which contains the groups.
If the Shopping Console node security feature is not used, then the groups should have the following membership. The names in brackets are the Shopping Central installer properties, which are referenced elsewhere in this documentation.
Shopping AD Group | Members | Member of | Notes |
|---|---|---|---|
Shopping Full Database Admin Access (SHOPPINGCONSOLEADMINUSERS) |
|
|
|
Shopping Configuration Manager Database Access (SHOPPINGCONSOLESMSUSERS) |
|
|
|
Shopping Limited Database Admin Access (SHOPPINGCONSOLEUSERS) |
|
|
|
Shopping Administrator groups
These are accounts or groups that have administrator rights in the Shopping Admin Console and web portal.
In addition to the Shopping Access groups, you need three further role-based security groups. Shopping allows these groups to be specified as individual domain user accounts, but then you are restricted to only these users being administrators, and using the Shopping Admin Console Node Security to manage additional user accounts. If your organization prefers to manage access rights through AD or other identity managements system, then you should use groups and disable the Shopping Admin Console Node Security feature.
Shopping AD Group | Members | Member of | Notes |
|---|---|---|---|
Shopping Administrators (ADMINACCOUNT) |
|
|
|
Reporting Managers (REPORTSACCOUNT) |
|
|
|
Licensing Managers (LICENSEMGRACCOUNT) |
|
|
|
Note
As Shopping makes extensive use of automated email processing, the accounts and groups must have email addresses defined in AD. Where groups are used, the member accounts must also have email addresses defined in AD.
When configuring an AD security group to have an email address, this does not mean it has to be changed to a Distribution group type; it must remain as a Security group type.
Shopping Receiver Account group
During a Shopping Central installation, you must provide details for a Receiver Account. Instead of specifying an account, we recommend you specify an AD Security group, which contains individual Receiver service accounts. See Shopping Receiver service account.
Active Directory Server
During a Shopping Central installation, you must provide details for an Active Directory Server. This can be an AD domain controller or an actual domain name. By default, Shopping performs AD queries using the global catalog, in which case you can specify the Active Directory Server as the domain name or nominate a domain controller server that is a global catalog server.
If the global catalog is not available or not required (for example, in a single domain environment) then select a domain controller with the primary domain controller (PDC) emulator FSMO role if it is well connected. The PDC emulator is the preferred domain controller because it manages account and group changes for the domain. If the PDC emulator role is transferred, then update the Active Directory Server setting in the Admin Console settings.
Groups and Organisation Units
Shopping does not support mixed domain AD Groups, i.e. AD Groups in one domain that contain AD users, computers or groups from another domain. To use AD Groups with Shopping, ensure that the Groups and the objects it contains belong to the same domain. Nested OUs, up to 5 levels deep, are supported but it does not support Groups within OUs.
Multi-domain configurations
Shopping supports implementations that span multiple domains. During installation, Shopping must be pointed at a Configuration Manager server which is used as its main contact. A Shopping Receiver must be installed on that server and on all other Configuration Manager site servers that Shopping interacts with. The Shopping Central and Shopping Receiver components may be installed on different domains but you must configure the DNS settings as follows:
If the Shopping Central service and main Configuration Manager contact are hosted on different domains, you must ensure that the SMS Provider (returned by the Configuration Manager server used during installation) is resolved to the correct domain name before you install Shopping central. This can only be done if a DNS search suffix for the Configuration Manager domain is added to the TCP/IP stack for the Shopping Central server's network card.
If the Shopping Central service and Shopping Receiver are hosted on different domains, add the DNS search suffix for the Receiver's domain to the TCP/IP stack for the Shopping Central server's network card. This must be done before users on the domain is serviced by that Shopping Receiver.
DNS search suffixes are added on the DNS tab in the Advanced TCP/IP Settings for the IPv4 Properties of the Shopping Central server's network card.
Multi-forest configurations
Shopping is designed to cater for two types of multi-forest Active Directory configurations: root-level forest trusts and external trusts. Each trust type has different requirements for where Shopping components must be installed, and rules that must be followed when creating Shopping accounts and groups.
The AD forests may be single or multi-domain. Multi-domain considerations are decribed in Multi-domain configurations.
For both trust types, Shopping components are installed as follows:
On the AD forest where the Configuration Manager central site is located, install the following on the domain where the trust originates:
Shopping Web and API, Central service, Shopping database, and Shopping Admin Console
Shopping installation accounts
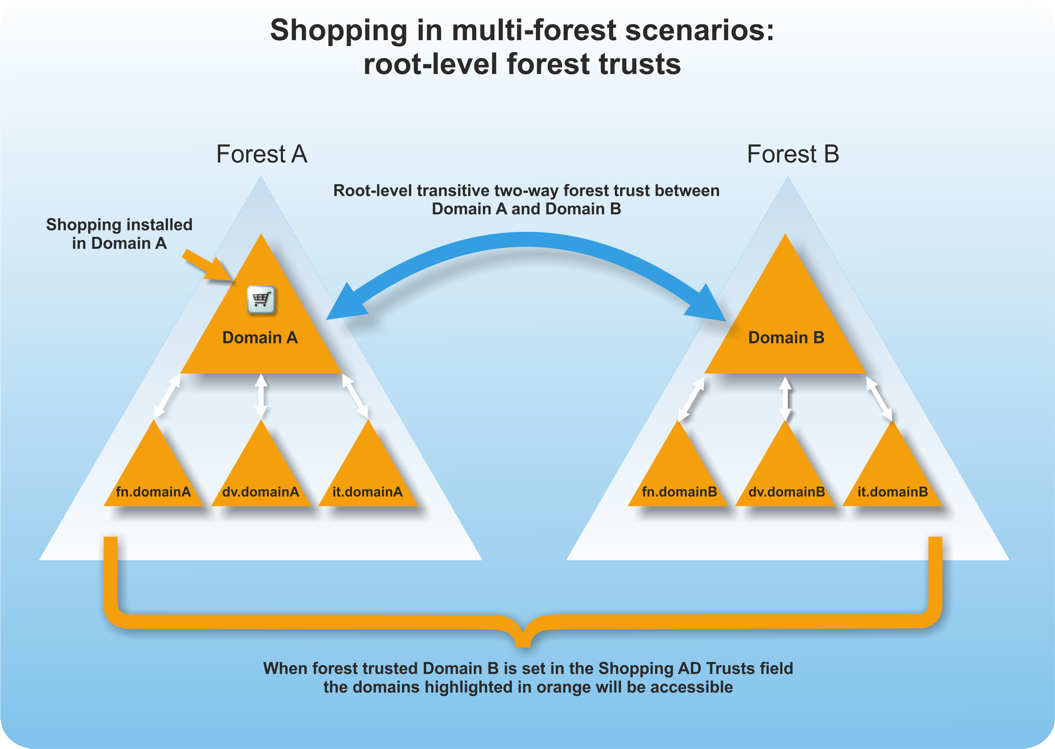
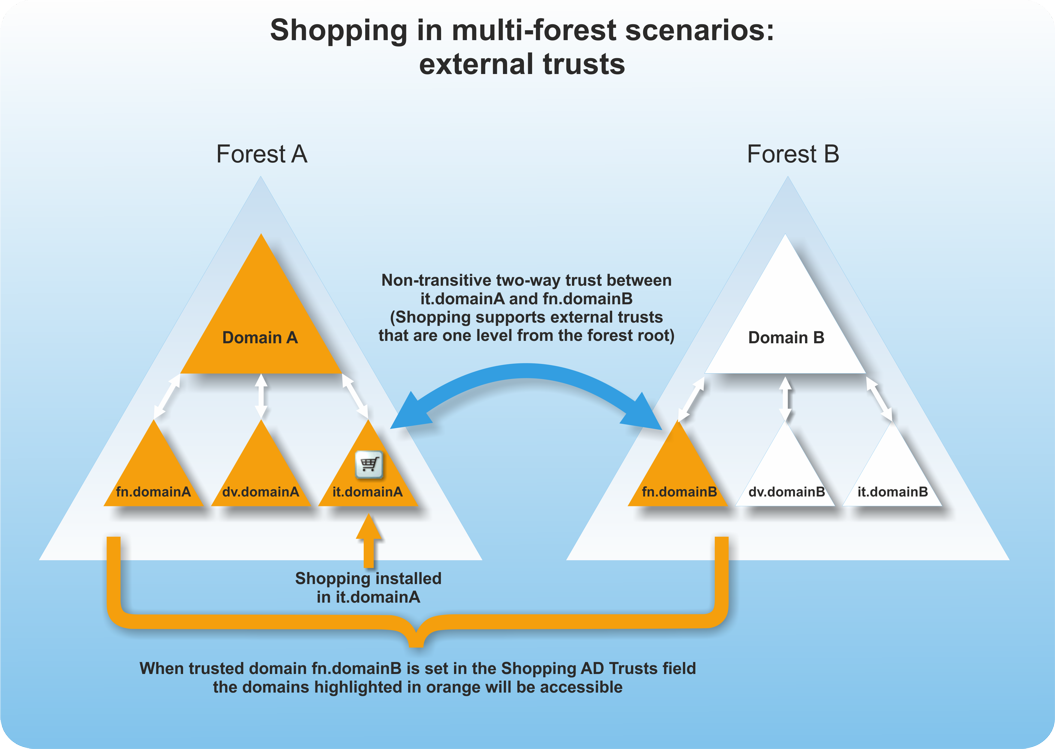
On either AD forest, where appropriate, install the following on the accessible domains (shown in orange in the below diagrams):
Shopping Receivers, clients, and end-user accounts (for example Shopping approvers)
Root-level forest trust
When a root-level forest trust is used, install Shopping Central (Web, API and service) on the root domain of the forest. This is the forest where the Configuration Manager site used by Shopping as its central site is located. In this scenario, all domains in the trusted forest is accessible, in addition to all the domains in the local forest.
External trust
When an external trust is used, install Shopping central on the domain where the external trust originates. This is the forest where the Configuration Manager site used by Shopping as its central site is located. Shopping supports external trusts where these exist one-level down from the forest root domain. In this scenario, only the external trusted domain is accessible, in addition to the domains in the local forest.
Restrictions on multi-forest environments
Though Shopping supports the dual-forest domain scenarios illustrated above, there are specific restrictions on the configuration of groups to be used with Shopping and certain implications associated with the way that the domain and trust relationships work with it.
Groups must be uniform – they must only contain AD objects from the same domain and forest. All the contained users, machines or groups must be in the same domain and forest as the group itself. If you need to add objects from another domain or forest, add them to a group that belongs to that domain or forest.
Shopping only supports security type groups – you can only use security type groups with Shopping but they may have any scope type.
Installation domain and accounts – the domain specified during installation is set as the starting point for all AD searches. Any accounts used during installation must belong to that domain and associated forest. Node security users and groups added later using the Shopping Admin console must come from the same domain/forest specified during installation. All other AD groups used in Shopping may come from either forest.
Trust relationship and type – Shopping supports two-way trusts where there is an up-level trust between the domains. Both domain controllers in the supported dual forest scenarios must be Windows 2000 server or above.
Trusted domains must be configured correctly and the trusted domain exist – AD searches in Shopping is severely impacted if there is a trust relationship for a domain that no longer exists.
Shopping website
There are a number of items that need to be configured to enable the Shopping website to be browsed by your users.
Shopping Server certificate
From Shopping 6.1 the Shopping Central installer defaults to configuring an HTTPS site, this means that a Shopping Server certificate is required.
Only one Web Server certificate is required. This certificate must be provided on the server prior to installation of Shopping.
The Web Server certificate requires the minimum of the following:
Issued by a trusted Certificate Authority (CA)
The certificate for the Root CA in the Certification Path must exist in the Trusted Root CA store of the server
The above CA certificate must exist on Shopping client devices.
Has at least the following Key Usage:
Digital signature
Key encipherment.
Has at least the following Enhanced Key Usages:
Server Authentication.
Tip
The default template Web Server available with a Microsoft PKI is suitable for requesting a Shopping Web Server certificate.
DNS Alias
The Shopping Web Portal and API are created under the Shopping website, they are not created under the Default Web Site. The website has an HTTPS binding, using a host header - normally specified as the FQDN of the Shopping DNS Alias, which all users and computers accessing the Web Portal and Shopping API must use. Therefore, choosing a suitable name for the DNS Alias is perhaps the most important design decision you will make.
Ensure that all clients using the Shopping system are able to correctly resolve the DNS Alias using their DNS lookup methods. This is typically why the FQDN of the DNS Alias is used.
In DNS, you can create a CNAME or Host (A) record. The example below uses a CNAME alias of SHOPPING for the host server ACME-SRV6.ACME.LOCAL which results in a host header FQDN of SHOPPING.ACME.LOCAL. In this case, the server's FQDN suffix is the same as the Alias FQDN's suffix, but they do not need to be the same.
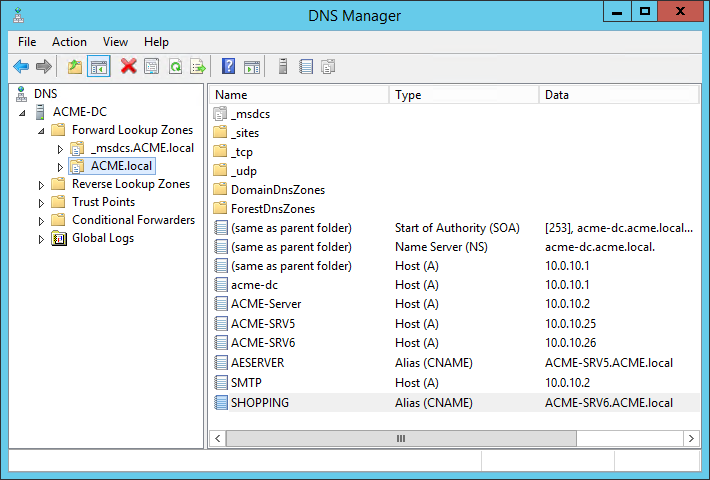
When installing Shopping Central, the installer setting IISHOSTHEADER is used to configure the HTTPS binding on the Shopping website, and the Console settings for the Web URL and API URL. The Web URL setting is used in Shopping emails.
It is possible to manually add additional HTTP/S bindings to the Shopping Website. Any HTTPS bindings you add must also exist in the Shopping server certificate. For example, if you are adding an HTTP binding you can install using the server's DNS Alias FQDN, and then manually add a second HTTPS binding for the DNS Alias without the suffix. This would allow users to access the Shopping Portal using either name.
Service Principal Names
Service Principal Names (SPN) are attributes of AD accounts. Servers and service accounts are able to automatically create and update their own SPNs if they have AD permissions. Normally server accounts have these permissions by default, therefore if a service is using Network Service built-in account, there is no need to create any SPN. However, user accounts typically do not have permission and you need to create or update the SPN manually using an account that does have the rights, such as a domain administrator account. You can create an SPN by editing the attribute directly in the AD service account object, or use the SetSPN utility. More information about SPNs can be found in Microsoft's knowledge base.
SPNs must exist for the HTTPS host header for the following accounts:
the account used for the Shopping application pool, which is normally the Network Service. (optionally: the Shopping Central service account)
The following is a example of how to create SPNs for the Shopping Central service account (assuming that the IIS application pools for Shopping have been configured to run as the Shopping Central service account, this is considered a non-typical configuration ).
setspn -s HTTPS/shopping ACME\svc_ShoppingCtrl
setspn -s HTTPS/shopping.acme.local ACME\svc_ShoppingCtrl
The following is a example of how to create SPNs for the Shopping Central application pools. If the IIS application pools for Shopping use Network Service, then specify the server's machine account. (this would be the most common configuration)
setspn -s HTTPS/shopping ACME-SRV6
setspn -s HTTPS/shopping.acme.local ACME-SRV6
To determine if SPNs exist for the Shopping Central service account and Network Service on the server itself:
setspn -l svc_ShoppingCtrl
setspn -l ACME-SRV6
More complex scenarios can be configured which requires in-depth knowledge of IIS, SPN and DNS configuration and are beyond the scope of this documentation.
Note
You can use -a or -s with setspn. -s checks for an existing SPN before assigning a new one.
Shopping Central IIS configuration
The following roles, role services and features must be installed/enabled as a minimum. The Name column is the reference used in PowerShell commands.
In the case of .NET Framework features we refer to 4.X in the Display Name, as X may be different depending on the server OS. The PowerShell Name always uses 45 instead of the actual version.
Role or Feature | Display Name | Name | Notes |
|---|---|---|---|
Web Server | Web Server (IIS) | Web-Server | |
Web Server Common HTTP Features | Default Document | Web-Default-Doc | Included in Web-Server. |
Directory Browsing | Web-Dir-Browsing | Included in Web-Server. | |
HTTP Errors | Web-Http-Errors | Included in Web-Server. | |
Static Content | Web-Static-Content | Included in Web-Server. | |
HTTP Redirection | Web-Http-Redirect | ||
Web Server Health and Diagnostics | HTTP Logging | Web-Http-Logging | Included in Web-Server. |
Web Server Performance | Static Content Compression | Web-Stat-Compression | Included in Web-Server. |
Web Server Security | Windows Authentication | Web-Windows-Auth | |
Web Server Application Development | .NET Extensibility 4.X | Web-Net-Ext45 | Included in Web-Asp-Net45. |
ASP.NET 4.X | Web-Asp-Net45 | ||
ISAPI Extensions | Web-ISAPI-Ext | Included in Web-Asp-Net45. | |
ISAPI Filters | Web-ISAPI-Filter | Included in Web-Asp-Net45. | |
Web Server Management Tools | IIS Management Console | Web-Mgmt-Console | |
IIS 6 WMI Compatibility | Web-WMI | ||
.NET Framework 4.8 (or later) Features | .NET Framework 4.X | Net-Framework-45-Core | |
ASP.NET 4.X | Net-Framework-45-ASPNET |
The following roles, role services and features should be removed/disabled.
Parent | Display Name | Name |
|---|---|---|
Web Server Common HTTP Features | WebDAV Publishing | Web-DAV-Publishing |
The following PowerShell commands can be used to install relevant IIS roles and features on Windows Server 2012 R2 and later, and record the server configuration in a file.
Do this even if IIS is already installed because it will ensure all the required features and roles are installed.
Click Read more... to view Install-IIS.ps1 or click download....
Installing when TLS 1.0 is disabled
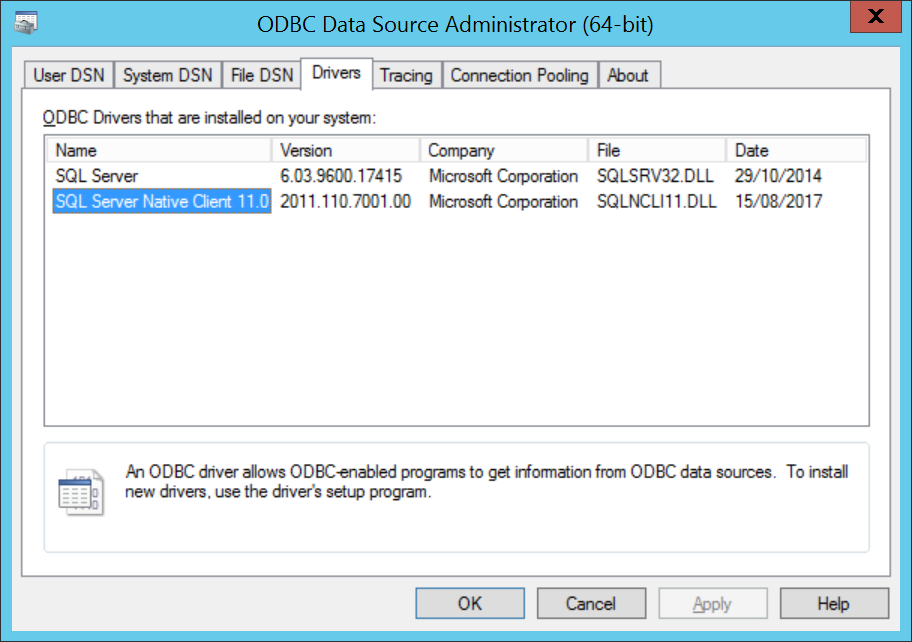
SQL Server Native Client 11.0 is referenced in database connection strings as SQLNCLI11. It provides a suitable ODBC (OLE DB) driver that supports TLS 1.1/1.2 necessary for the MSI installer, and is not required for .NET Framework applications.
Also known as SQL Server 2012 Native Client you can download the installer (sqlncli.msi) from the following link: https://www.microsoft.com/en-us/download/details.aspx?id=50402, and then install the Client Components feature. This version supports SQL Server 2012, 2014, 2016 and 2017.
You can confirm the driver is installed using the ODBC Data Sources utility, as shown opposite.
If TLS 1.0 is disabled and you attempt to install without SQL Server Native Client 11.0 then the installer will fail with Error 27502. Could not connect to Microsoft SQL Server ... SSL Security error.
Remote Servers and Consoles need MSDTC configuration
If you are using a remote computer for any of the following, you must configure MSDTC on the Shopping Central server as well on the remote computer
Installing a remote Shopping Admin Console
SQL Server hosting the Shopping database
Installing a remote Shopping Website with the Web Only option.
Ensure the Distributed Transaction Coordinator (MSDTC) service is enabled and running.
Optionally use the registry import, which will set the values which you can then verify using the following steps.
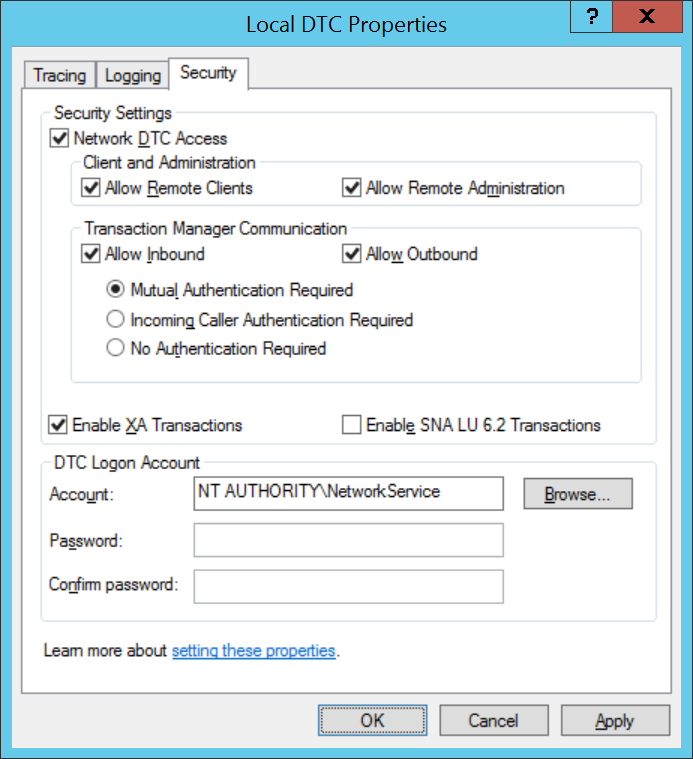
Start Component Services (comexp.msc) and expand Component Services → Computers → My Computer → Distributed Transaction Coordinator → Local DTC.
Right-click on Local DTC and from the context menu, choose Properties.
Select the Security tab and enable the following, leaving other settings as default.
Network DTC Access
Allow Remote Clients
Allow Inbound
Allow Outbound
Mutual Authentication Required
Enable XA Transactions
Click OK – if any changes were made this will restart the MSDTC service.
If you used the registry import, you will need to restart the MSDTC service.
Windows Registry Editor Version 5.00

[HKEY_LOCAL_MACHINE\SOFTWARE\Microsoft\MSDTC]
"FallbackToUnsecureRPCIfNecessary"=dword:00000000
"AllowOnlySecureRpcCalls"=dword:00000001
"TurnOffRpcSecurity"=dword:00000000

[HKEY_LOCAL_MACHINE\SOFTWARE\Microsoft\MSDTC\Security]
"NetworkDtcAccess"=dword:00000001
"NetworkDtcAccessClients"=dword:00000001
"NetworkDtcAccessAdmin"=dword:00000000
"NetworkDtcAccessInbound"=dword:00000001
"NetworkDtcAccessOutbound"=dword:00000001
"NetworkDtcAccessTransactions"=dword:00000001
"NetworkDtcAccessTip"=dword:00000000
"XaTransactions"=dword:00000001
"LuTransactions"=dword:00000000
Note
You can choose if you want to enable Allow Remote Administration or not, it is not critical to Shopping operation. The screenshot shows it enabled. The registry import shows it disabled.
Network requirements
For a full reference of Shopping components and their associated ports, refer to Communications Ports.
Sizing and deployment considerations
For Shopping server sizing and deployment considerations, refer to Server Sizing.