Upgrading Shopping Components
Upgrade Shopping Central
Intune
If you're planning to use Shopping with Intune, you should follow the instructions on Enabling Intune integration before starting the installation of Shopping central.
Tachyon
To use Shopping with Tachyon, you should follow the instructions on Enabling Tachyon integration before starting the installation of Shopping Central.
You will need a Tachyon license that covers the Shopping-specific instructions if you want to use the client-side features of Shopping's Order Tracking feature. Contact 1E for a Shopping 6.1 addition to your Tachyon license if you do not already have it.
To upgrade Shopping Central:
Copy the Shopping Central installer (ShoppingCentral.msi) to a local folder.
Start a command prompt with administrative privileges (Run as administrator).
Change directory to the folder where the Shopping Central installer was copied.
Run msiexec /i ShoppingCentral.msi /l*v ShoppingCentralInstall.log to start the Shopping Central install wizard:
On the Welcome screen for an upgrade, a pop-up message is displayed indicating successful back up of files. Click OK on the popup then click Next on the Welcome page to proceed.
On the Prerequisites screen, ensure all checks passed and click Next.
On the License Agreement screen, accept the terms of the license agreement and click Next.
On the Installation Type screen, select Complete Install
Optionally, click Enable integration with Intune.
Click Next.
On the Customer Information screen, enter your Shopping license key and optionally enter your WSA license key.
On the Custom Setup screen, ensure the Install to: location matches with the current installation. If not, click Change... and browse to the correct location and click Next.
On the Database Server screen, ensure the SQL Server field shows the name of the SQL server where the current Shopping database is installed. Ensure the Drop any existing Shopping Database option is unchecked and click Next.
On the Active Directory Integration screen, ensure the Active Directory Server field displays either the AD Domain or a Domain Controller that Shopping is currently using and click Next .
On the Service Account screen, ensure the User Name field shows the current Shopping Central service account. Enter the password in the Password field. Ensure the current Shopping Receiver service account (or group containing the Shopping Receiver service accounts) is displayed in the Shopping Receiver Username\Group field. Click Next.
On the Exchange or SMTP server screen, ensure the correct SMTP server name is displayed and click Next.
On the SMS/System Center Configuration Manager Integration screen, ensure the correct Configuration Manager Site Server is displayed and click Next.
On the Admin Console Node Security screen, ensure the correct Shopping and ConfigMgr database access groups are displayed and click Next.
On the Shopping Management Accounts screen, ensure the correct admin, report manager and license manager users or groups are displayed and click Next.
On the Website Configuration screen, ensure the correct Shopping Website properties are displayed and click Next.
On the Shopping URL Prefix screen, ensure the correct Shopping URL prefix is shown (this should be https://<hostheader>, where hostheader is the host header currently used for Shopping and defined as an alias in DNS, which may be an FQDN). Click Next.
If you enabled Intune integration on the Installation Type screen the Intune Integration page will be displayed at this point, here you specify the Azure tenant ID, service authentication client app ID, and Console authentication client app ID. Those values are available from Azure Active Directory after you have followed the steps detailed on the Enabling Intune integration page. Click Next.
On the Tachyon Platform portal screen, select the Enable Tachyon Integration checkbox to enable integration - you must then enter the Tachyon Platform base URL and set the username and password for a user account that will be added to Tachyon and assigned the appropriate permissions to support the client-side Order Tracking feature and used to run any Tachyon instructions made available as Shopping Applications.
On the Ready to Install the Program screen, click Install.
When the installation completes, click Finish.
Warning
To minimize service disruption after installing Shopping Central, you will need to update any currently implemented Shopping client module of the 1E Client to use HTTPS for the location of the Shopping portal.
This can be done by sending the following command-line (after setting the correct Shopping URL) to each 1E Client device:
"%ProgramFiles%\1E\Client\1E.Client.exe" -reconfigure Module.Shopping.ShoppingCentralUrl=https://<ShoppingURL> -restart -immediate
where <Shopping URL> is the URL set for Shopping in the Shopping Central installer.
You will also need to update any WSS Task Sequences to point to the new HTTPS URL for Shopping.
Add the Shopping Central computer account to the ConfigMgr Read-only Analyst Security Role in ConfigMgr
To support Windows Servicing Assistant (WSA), the Shopping Web application pool service account requires the Read-only Analyst security role in Configuration Manager. This is required to enable it to parse task sequences using WMI. This is a one-time only manual procedure prior to after installation of Shopping Central.
Import the 1E Shopping Central Security Role.xml file into the Configuration Manager console to create a role called 1E Shopping Central. This role has the same permissions as the Read-only Analyst security role.
The Shopping Web application pool service account runs in the context of Network Service, in which case if Configuration Manager and the Shopping Web service are installed:
on different servers then the computer$ account of the Shopping Web server must be added to the Read-only Analyst security role (or 1E Shopping Central security role if you have created it)
on the same server then the NT AUTHORITY\Network Service account should be added to the Read-only Analyst security role (or 1E Shopping Central security role if you have created it).
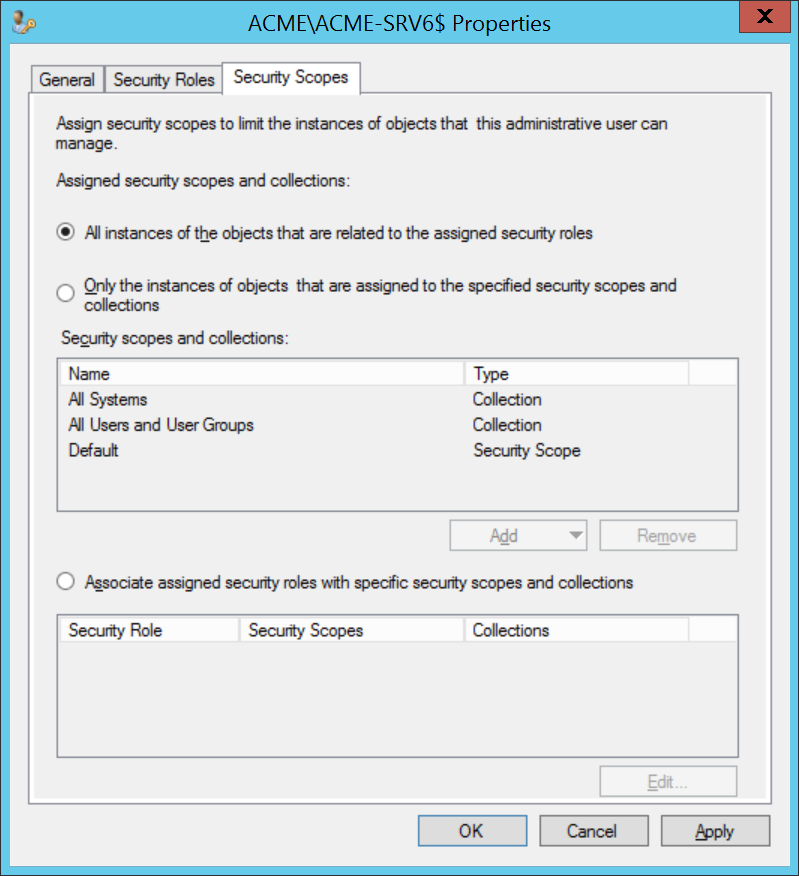
You must change the Security Scopes tab for the user from the default of Only the instances... to All Instances of the objects that are related to the assigned security roles, which will cover all existing and future security scopes. Alternatively, you can leave the default setting and add all the security scopes that you are using for task sequences and related content.
Redefine HTTP Redirection
If your Shopping website previously had HTTP redirection enabled (as described in IIS Redirect) you will need to reconfigure this after Shopping has been upgraded.
Upgrade the Shopping Receivers
Note
When upgrading 1E Shopping Receivers from versions prior to Shopping 5.6, because later version now use Configuration Manager client notification, you will need to update the 1E Shopping Receivers security role in Configuration Manager CB1810 and later. This can be done in the following way:
Remove any users assigned to the existing 1E Shopping Receivers security role in Configuration Manager - noting them down for re-assigning later. If a user only has that role, you will need to assign the user to a temporary role, for example Read-only Analyst.
Remove the existing 1E Shopping Receivers security role from Configuration Manager.
Import the 1E Shopping Receivers security role using the appropriate xml file for the version of Configuration Manager you are using.
Re-assign the previous users to the new 1E Shopping Receivers security role.
Unassign the users from any temporary roles.
Please refer to Preparation: 1E Shopping Receivers security role for more details.
The Shopping Receiver must be upgraded on each ConfigMgr Primary Site (including the CAS in a multi-site hierarchy), as follows:
Copy the Shopping Receiver (ShoppingReceiver.msi) to a local folder.
Start a command prompt with administrative privileges (Run as administrator).
Change directory to the folder where the Shopping Receiver installer was copied.
Run msiexec /i ShoppingReceiver.msi /l*v ShoppingReceiverInstall.log to start the Shopping Receiver installation wizard.
On the Welcome page, click Next.
On the License Agreement page, select I accept the terms in the license agreement and click Next.
On the Install Type page, select Upgrade and click Next.
On the Destination Folder page, click Change to modify the installation folder or click Next to use the default folder shown.
On the Receiver Service Account page, if you are currently using a specific service account for the Shopping Receiver, select This Account and enter the username and password for the Shopping Receiver service account. Alternatively, select Use Network Service Account. Click Next.
On the Policy Refresh page, ensure the correct policy refresh option and Policy Refresh delay is selected and click Next.
On the Shopping URL Prefix page, enter the correct Shopping URL Prefix (this should be https://<hostheader>, where <hostheader> is the host header currently used for Shopping and defined as an alias in DNS which may be an FQDN). Click Next.
On the Default Advanced Client Flags, if 1E Nomad is being used, select Always download from DP, otherwise select Default and click Next.
On the Configuration Manager Database Connection page, click next if TLS 1.0 is enabled. If TLS 1.0 is disabled select TLS 1.0 disabled - install using TLS 1.1 / 1.2 - ensure that SQL Server Native Client 11.0 is installed before selection this option.
On the Ready to Install the Program page, click Install.
When the installation completes, click Finish.
Upgrade the Shopping Client via the 1E Client
The 1E Client must be deployed to all computers from which users will be connecting to the Shopping portal.
If you want to use the client-side Order Tracking feature or run Tachyon instructions that have been made available as Shopping Applications, you must use 1E Client 5.2 (with the latest hotfix applied) or later.
Please refer to 1E Client 8.1 for more details on the 1E Client. The best way to deploy the 1E Client is to use the 1E Client Deployment Assistant, for more details please refer to 1E Client Deployment Assistant 8.1.
Note
1E Client 5.2 provides client features for Tachyon, Nomad, PXE Everywhere, WakeUp and Shopping/WSA, all of which can be optionally enabled when upgrading - taking the following into consideration:
You should only enable the client modules for Nomad or WakeUp if you have upgraded the Nomad or WakeUp back-end servers to the latest versions.
Regardless of the Tachyon version you are working with, you can install the 1E Client 5.2 because its Tachyon features are compatible with older versions of Tachyon Server.