Creating a Wipe and Load (Non-destructive) WSA Deployment Application
Who can do this?
Shopping administrators with the privileges to create WSA applications in Shopping.
What is it for? To enable users to self-service their OS deployments using the Windows Servicing Assistant. Before you start You must create the deployment task sequence in Configuration Manager – you'll need this for the General Details screen.
A Wipe and Load (Non-destructive) Deployment should be used when the task sequence does not include steps to partition or format the disk. In this scenario, although the majority of the disk content is deleted, the Task Sequence working folder (_SMSTaskSequence) is preserved throughout the entire deployment. Content can be downloaded to the local Nomad cache in preparation, then saved to this folder when the task sequence executes before the disk is wiped. User data can also be stored here also using the hard links feature of the User State Migration Tool (UMST).
Preparation
Before creating a Wipe and Load (Non-destructive) Windows Servicing Assistant Deployment Application in Shopping, ensure you have completed the following in Configuration Manager
Create a Task Sequence following the guidelines for Creating a WSA Wipe and Load Non-destructive Task Sequence.
Create an empty Collection that will be targeted with a deployment of the WSA Wipe and Load Non-destructive Task Sequence
Deploy the WSA Wipe and Load Non-destructive Task Sequence created in step 1 to the empty Collection created in step 2.
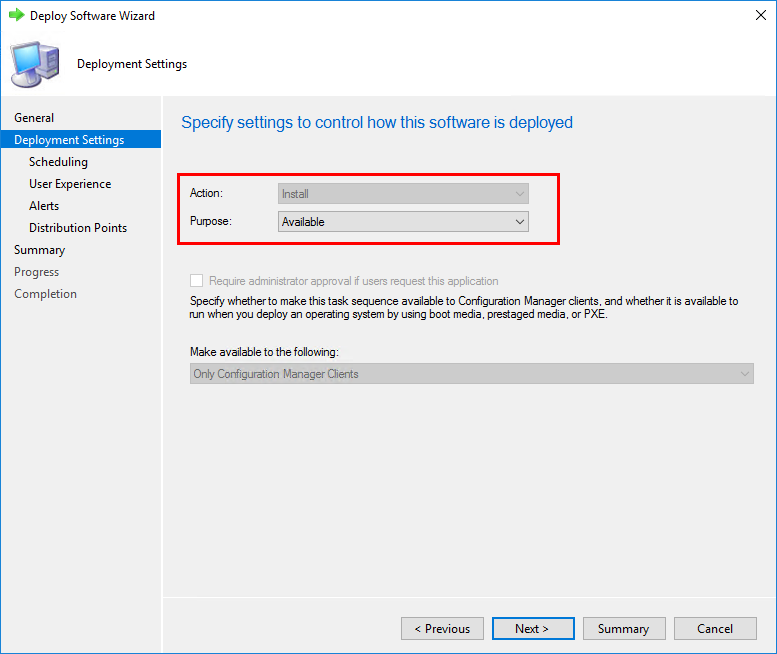
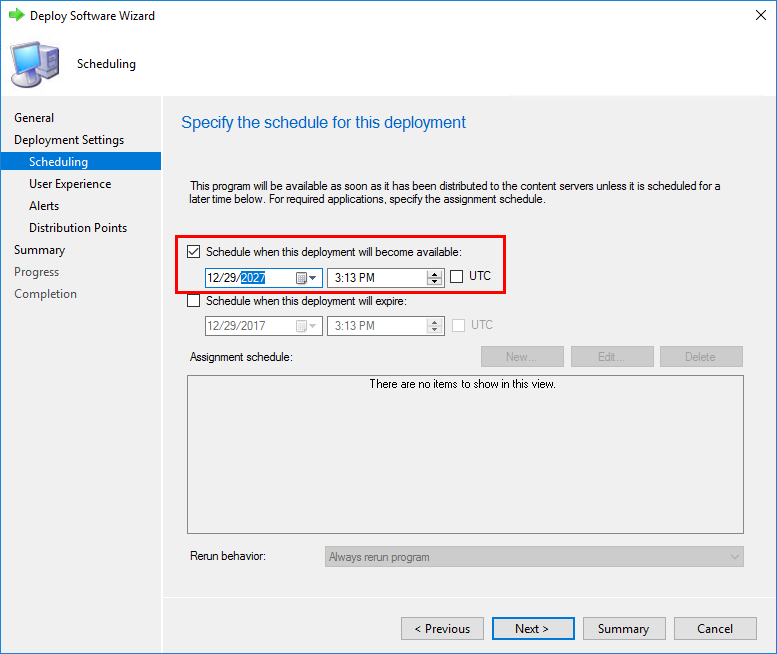
The deployment should be configured as Available (not Required), and scheduled to become available 10 years in the future as indicated below. This prevents the deployment from appearing in Software Center until the available date, thereby preventing the user from executing the task sequence outside the Windows Servicing Assistant.
Creating the Wipe and Load Non-destructive WSA Deployment Application
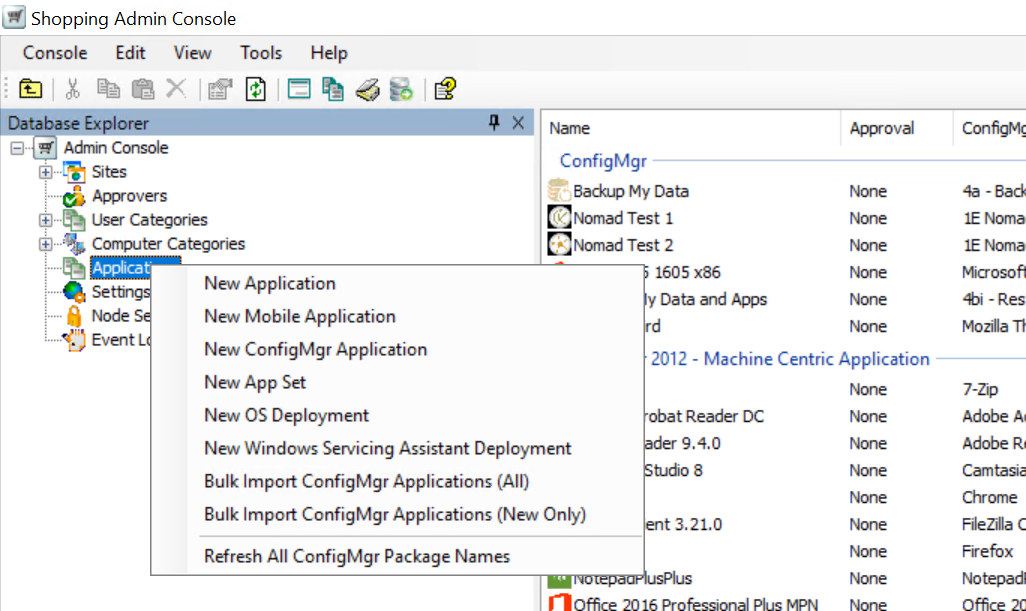
In the Shopping Admin Console, right-click the Applications node and from its context menu, choose New Windows Servicing Assistant Deployment.
On the Welcome screen, click Next.
On the General Details screen:
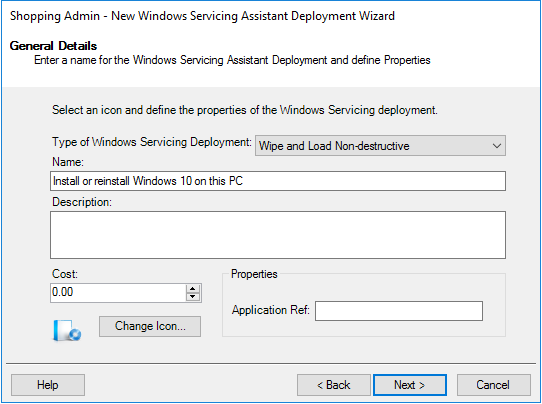
Select Wipe and Load Non-destructive from the Type of Windows Servicing Deployment drop-down.
In the Name field, enter the name of this application as you want it to appear to the end user in the wizard.
Optionally, enter a brief description in the Description field (note that the description, cost and icon are never displayed to the end user for WSA Deployment Applications).
Click Next.
On the SMS/Config Mgr collection screen:
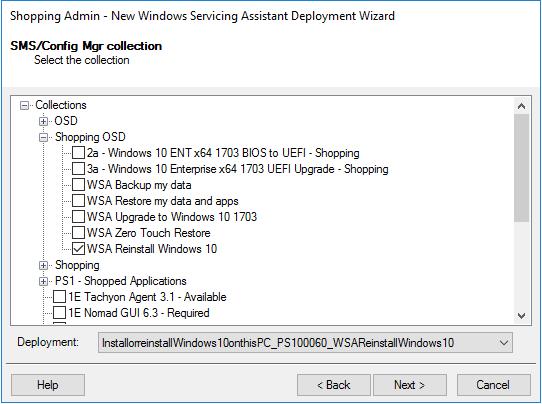
Select the Collection that the Wipe and Load Task Sequence was deployed to (see Preparation above).
From the Deployment drop-down, select the deployment that was created to deploy the Wipe and Load Task Sequence to the Collection selected previously.
Click Next.
On the Permissions screen:
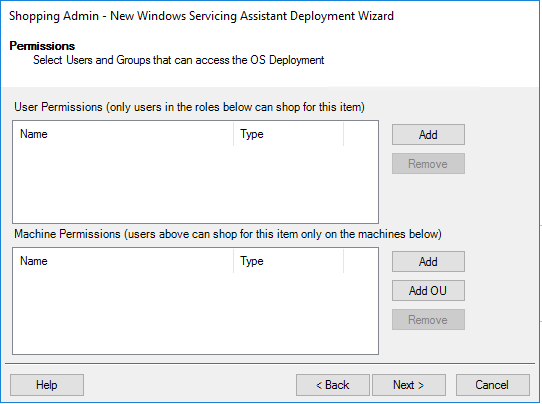
If you want this Wipe and Load Deployment to be available to everyone, click Next (i.e. do not restrict the deployment to any users or computers).
If you want to restrict this Wipe and Load Deployment to specific users, click Add (to the right of the User Permissions list) and add the user or group that you want to restrict access to. Repeat to add multiple users or groups.
If you want to restrict this Wipe and Load Deployment to specific computers, click Add (to the right of the Machine Permissions list) and add the computer or group that you want to restrict access to. Alternatively, click Add OU to add an OU that contains the computers that you want to restrict access to. Repeat as appropriate to add multiple computers, groups or OUs.
On the Completing the Windows Servicing Assistant Deployment Wizard screen, click Finish.
Configuring the Wipe and Load (Non-destructive) WSA Deployment

Once the Wipe and Load (Non-destructive) WSA Deployment has been created, it may be necessary to configure additional properties that are applicable specifically to Wipe and Load (Destructive) deployments.
In the Shopping Admin Console, select the Applications node and double-click the Wipe and Load (Non-destructive) WSA application you just created (it will be listed under WSA as shown below – use the search feature if necessary) to open the Properties dialog.
We are going to walk you through each of the tabs in the Properties dialog for the Wipe and Load (Non-destructive) Deployment and show you what the respective settings do and how they impact the behavior of the deployment in terms of the user experience. There is a masterclass on how to create the deployment at the end of this section.
The General tab
The General tab | The Start screen |
|---|---|
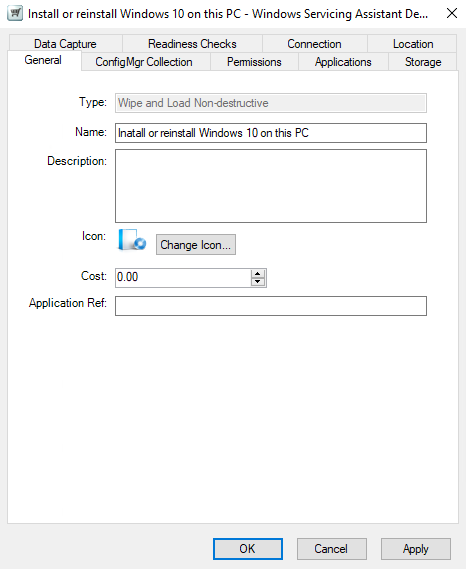 | The General tab is populated with the settings defined when the application was created. It controls what is displayed on the Start screen. You can change the name of the deployment (changing the description, cost and icon has no effect as these are never displayed to the end-user). However, Type cannot be changed. For example, if you change the name of the deployment from Install or reinstall Windows on this PC to Reinstall Windows on My PC, users see this when they click Launch from the Upgrade to Windows 10 banner in the Shopping Web. Your browser does not support the HTML5 video element |
The ConfigMgr Collection tab
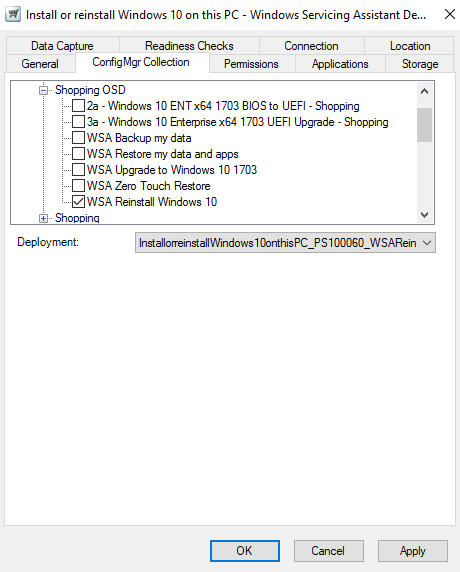 | The ConfigMgr Collection tab is populated with the selections made when the application was created. These can be modified if necessary, but not recommended unless it is to correct an error. If you do modify these, ensure you select a deployment of a Wipe and Load (Non-destructive) Task Sequence. |
The Permissions tab
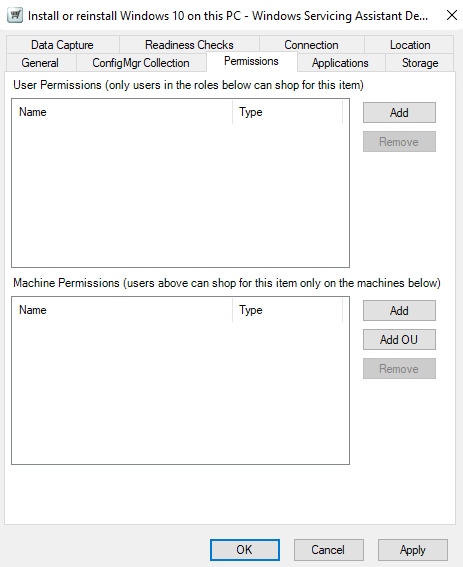 | The Permissions tab is populated with the selections made when the application was created. You can modify the permissions from this tab to restrict access to specific users and/or computers. |
The Applications tab
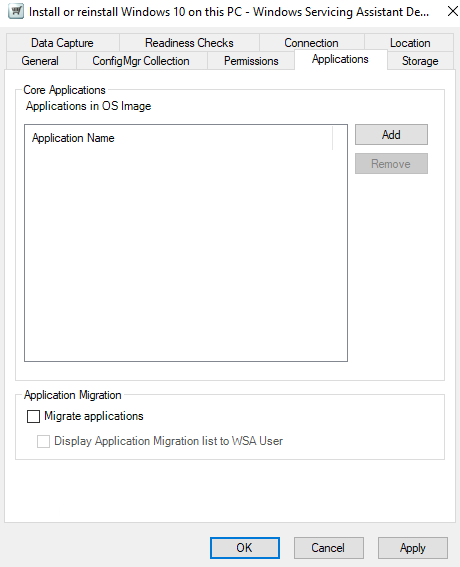 | The Applications tab controls what users see on the Applications screen. The list of applications you add to the Applications in OS Image list is displayed on the left of the Applications screen. Your browser does not support the HTML5 video element |
| |
The Storage tab
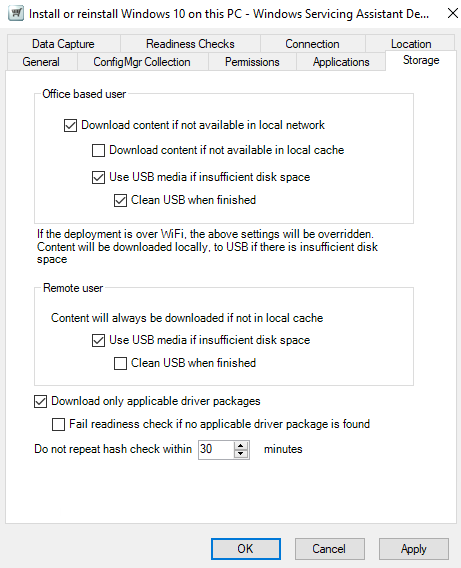 | The Storage tab controls what options are available to the user depending on whether they are in the office or are remote (connected via VPN with no local peers). 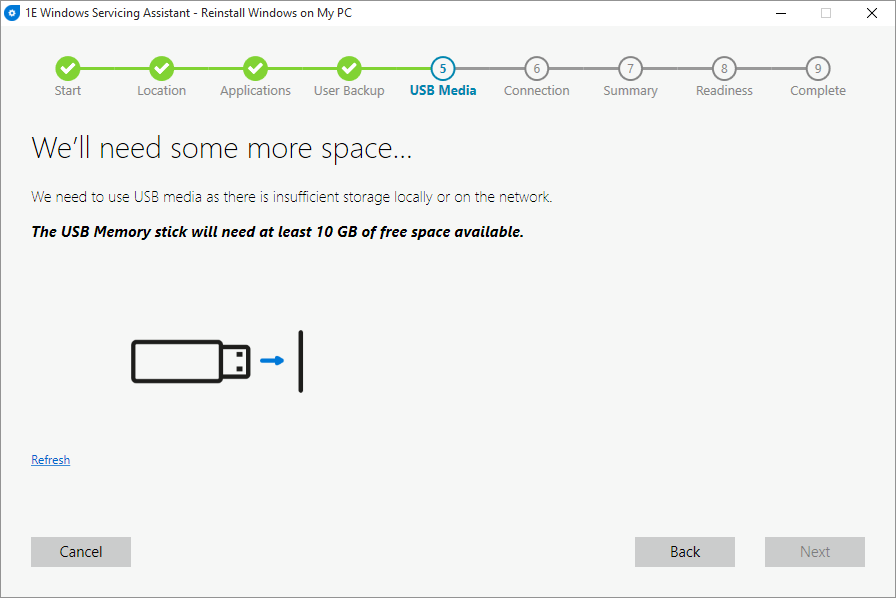 |
Content will always be downloaded to the local Nomad cache, as the assumption is there will be no local peers:
Hash checking: WSA will perform a content hash check on all downloaded content as part of the readiness checks. As the readiness checks may be run a second time (when the user actually starts the deployment), you can avoid the hash checks being repeated within the time period defined in the Do not repeat hash check within option. The value is defined in minutes between 0 and 480 minutes (8 hours) - 0 will result in hash checks always being performed. | |
The Data Capture tab
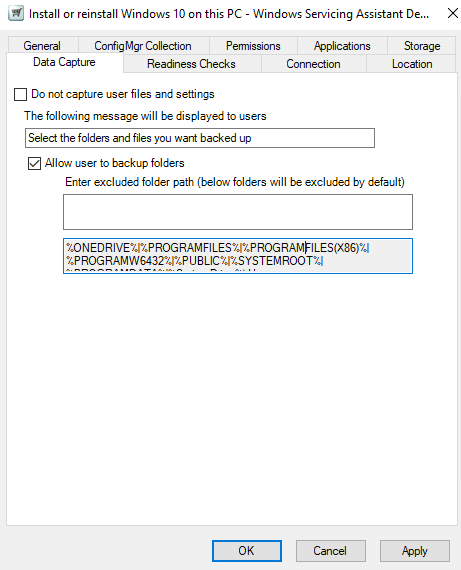 | The Data Capture tab controls the options available to the user on the User Backup screen. Your browser does not support the HTML5 video element | |
| ||
User Backup exceptions and how to fix them
These must be resolved before the deployment can continue:
We've found something that prevents us from continuing at this time. Please retry later, or contact your administrator if the issue continues to occur.
Error code
Likely causes
Remedial action
0x00001001
Communication error – failure to send a size estimation message to the Tachyon service.
Ensure the Tachyon service is up and running.
0x00001002
Timeout duration exceeded – the Tachyon service was not able to send a size estimation message for over the 1 minute timeout duration.
-1
Task is cancelled.
0x0100
Failure to get task sequence references from the Shopping API
Ensure that the Shopping Web is up and running.
In Configuration Manager, ensure that the Shopping AppPool user is granted the Read-only Analyst role.
0x0101
Source machine does not exist in SLA platform.
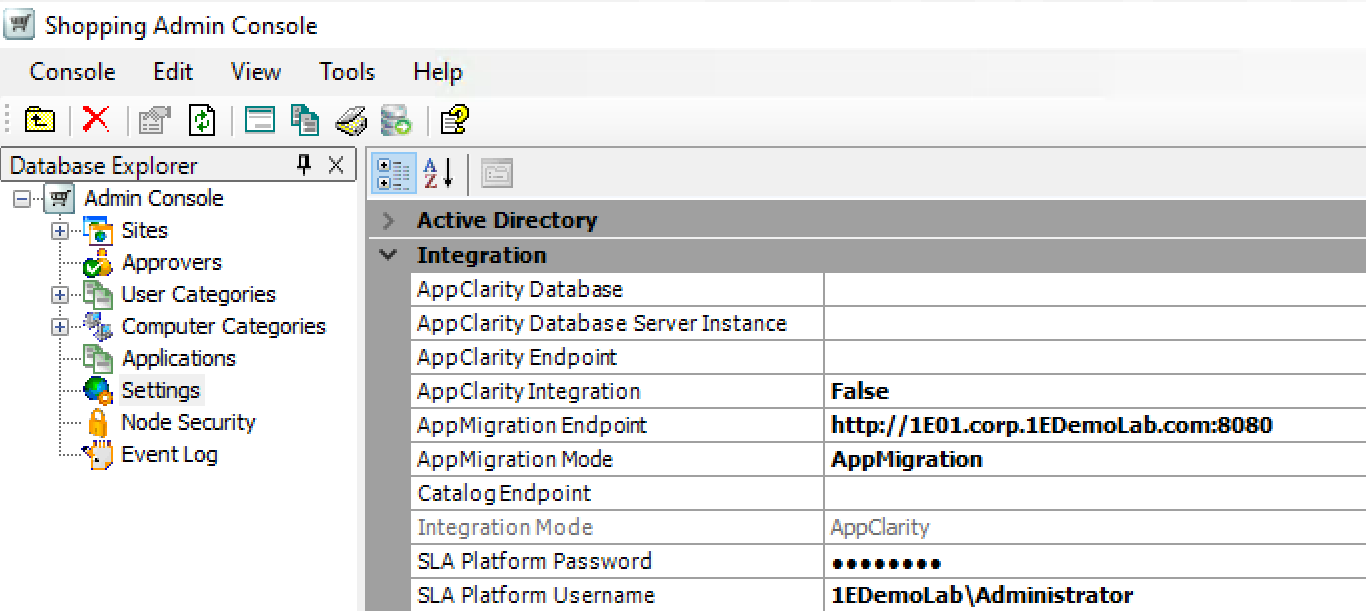
Missing or invalid SLA platform credentials under Settings in Shopping Admin Console.
Ensure that the source machine exists in the SLA platform. If it does not, run a sync to refresh the data.
Ensure that the SLA platform credentials are correct under Settings in Shopping Admin Console.
0x0102
Unable to get USMT Capture step configuration.
Ensure that the task sequence contains a Capture step.
0x0103
Unable to get the task sequence XML as:
The Shopping server is unavailable.
The Shopping AppPool user has not been granted the Read-only Analyst role in Configuration Manager.
Ensure that the Shopping Web is up and running.
In Configuration Manager, ensure that the Shopping AppPool user is granted the Read-only Analyst role.
0x0204
Missing details in the WSA order.
Contact 1E Support for assistance.
0x0300
Unable to fetch Nomad cache size details.
Ensure that the Nomad service is running and get the user to retry.
0x0301
Unable to get content location.
Ensure that Nomad service is running, and the client machine is present in the required boundary groups, and get the user to retry.
0x0302
Unable to find PBA host.
Ensure that the PBA hosts are responsive by running a ping, check the PBA configuration and get the user to retry.
0x0400
Unable to locate applicable driver package in the task sequence for this machine.
Ensure that the task sequence contains driver package valid for that machine. Otherwise, modify the WSA application settings in Shopping Admin console such that it does not fail when drivers are not available.
0x0406
Unable to locate USMT Package in the task sequence references.
Ensure that the USMT package is referenced in the task sequence.
0x0602
ScanState.exe unable to estimate user state data size.
Ensure that the Tachyon service is up and running. If it is running, check scanstate.log (its location is found in TachyonAgent.log).
0x0603
Unable to locate a compatible version of Nomad.
Ensure that you have Nomad 6.3.200 or later installed.
The Readiness tab
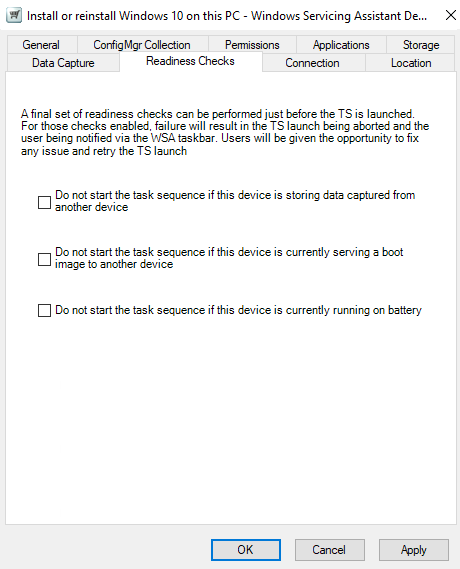 | The Readiness Checks tab lets you choose the machine readiness tests in the Readiness screen. 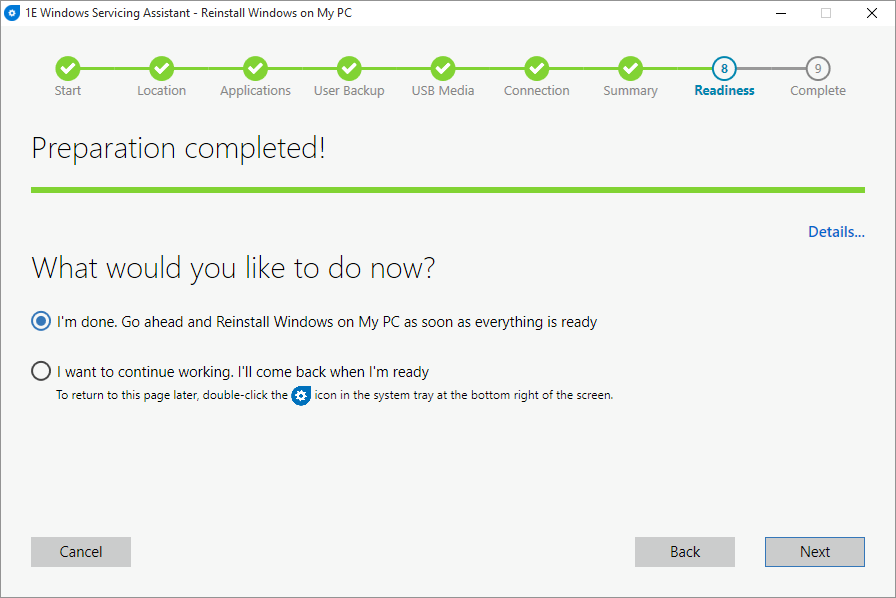 |
| |
The Connection tab
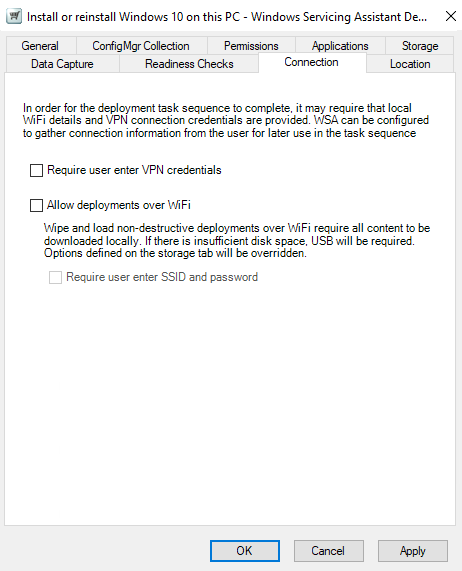 | The Connection tab controls whether or not the user can execute execute the deployment on a wireless connection and whether they are prompted for VPN credentials and wireless connection details in the Connection screen. 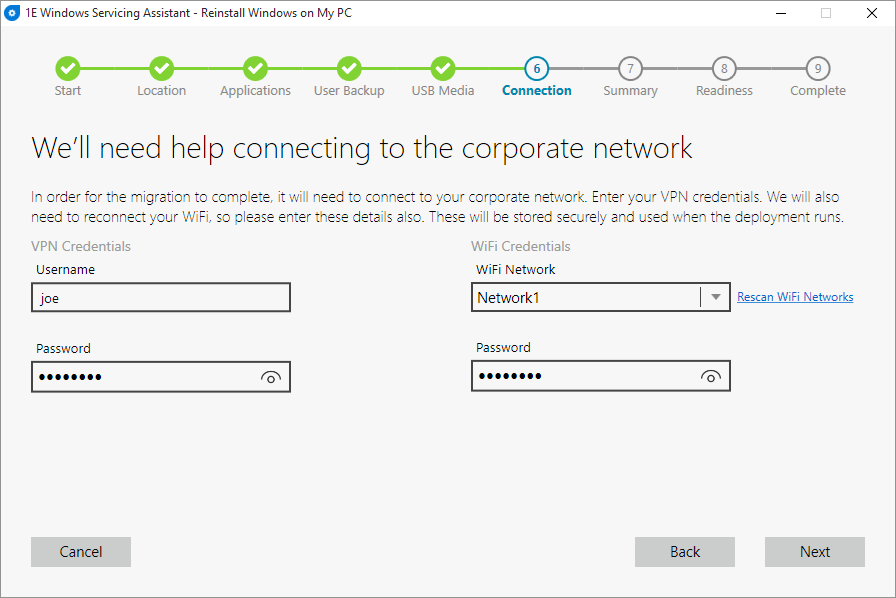 |
| |
The Location tab
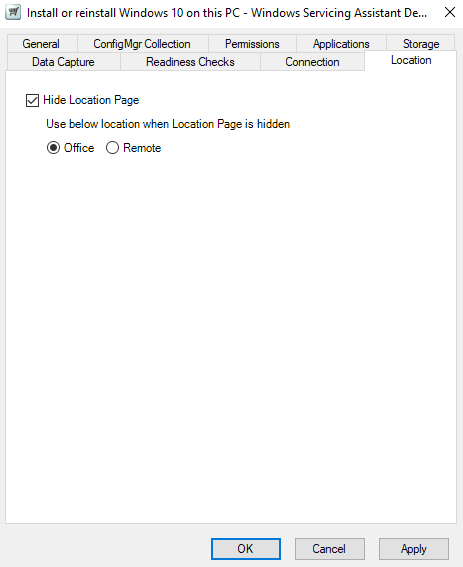 | The Location tab controls is displayed for the user to tell us where they are initiating the deployment. If you choose to hide the Location page you must specify the location users will see, either Office or Remote. 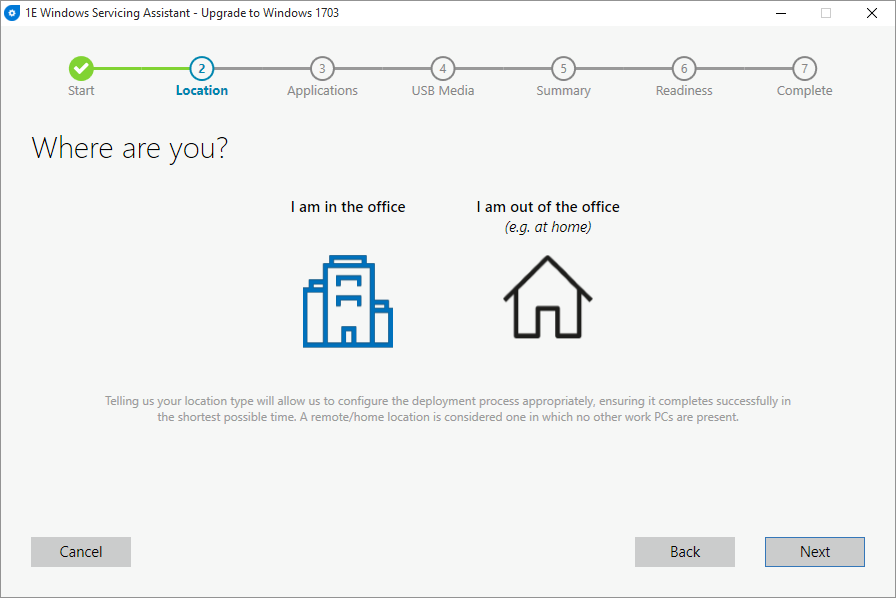 You will not see this screen if:
|
Other operational errors
Exceptions on Completion screen and how to fix them
Error code | Likely causes | Remedial action |
|---|---|---|
0xA0070700 | The task sequence failed to start. | This is not likely to happen happen unless the Windows Management Instrumentation (WMI) is corrupted. If this happens, get the user to rerun the deployment. Error is displayed on the Completion screen as follows:
|
0xA0070701 | SCCM execution history is missing. | Check the status messages in Configuration Manager for the task sequence deployment as well as the ExitCode in the WSA execution history for the Task Sequence package id ( Error is displayed on the Completion screen as follows:
|
0xA0070702 | WSA execution history is missing – most likely cause is that the task sequence failed in WinPE. | Check the status messages in Configuration Manager. Error displayed on the Completion screen as follows:
|
0xA0070703 | Unable to establish a WIFI connection. | Get the user to run the deployment again with the emphasis on providing their correct connection credentials – on the Connection screen, click Reveal to check the accuracy of the password they entered. Error displayed on the Completion screen: There was a problem connecting to the WiFi network. Please rerun the Assistant and ensure that the WiFi connection details are entered correctly |
0xA0070704 | Unable to establish a VPN connection. | Get the user to run the deployment again with the emphasis on providing their correct connection credentials – on the Connection screen, click Reveal to check the accuracy of the password they entered. Error displayed on the Completion screen: There was a problem connecting to the VPN. Please rerun the Assistant and ensure that the VPN connection details are entered correctly |
0xA0070705 | WSA execution history is invalid. | Contact 1E Support for assistance for assistance. Error displayed on the Completion screen as follows:
|
A masterclass in creating a Wipe and Load (Non-destructive) WSA Deployment Application
