Setup
Setup shows a step-by-step guided procedure to configure SGC for 1E.
The guided Setup is available under the Service Graph Connector for 1E menu items in the application navigator. This Setup contains the basic configuration steps you will need to complete to get the application working.
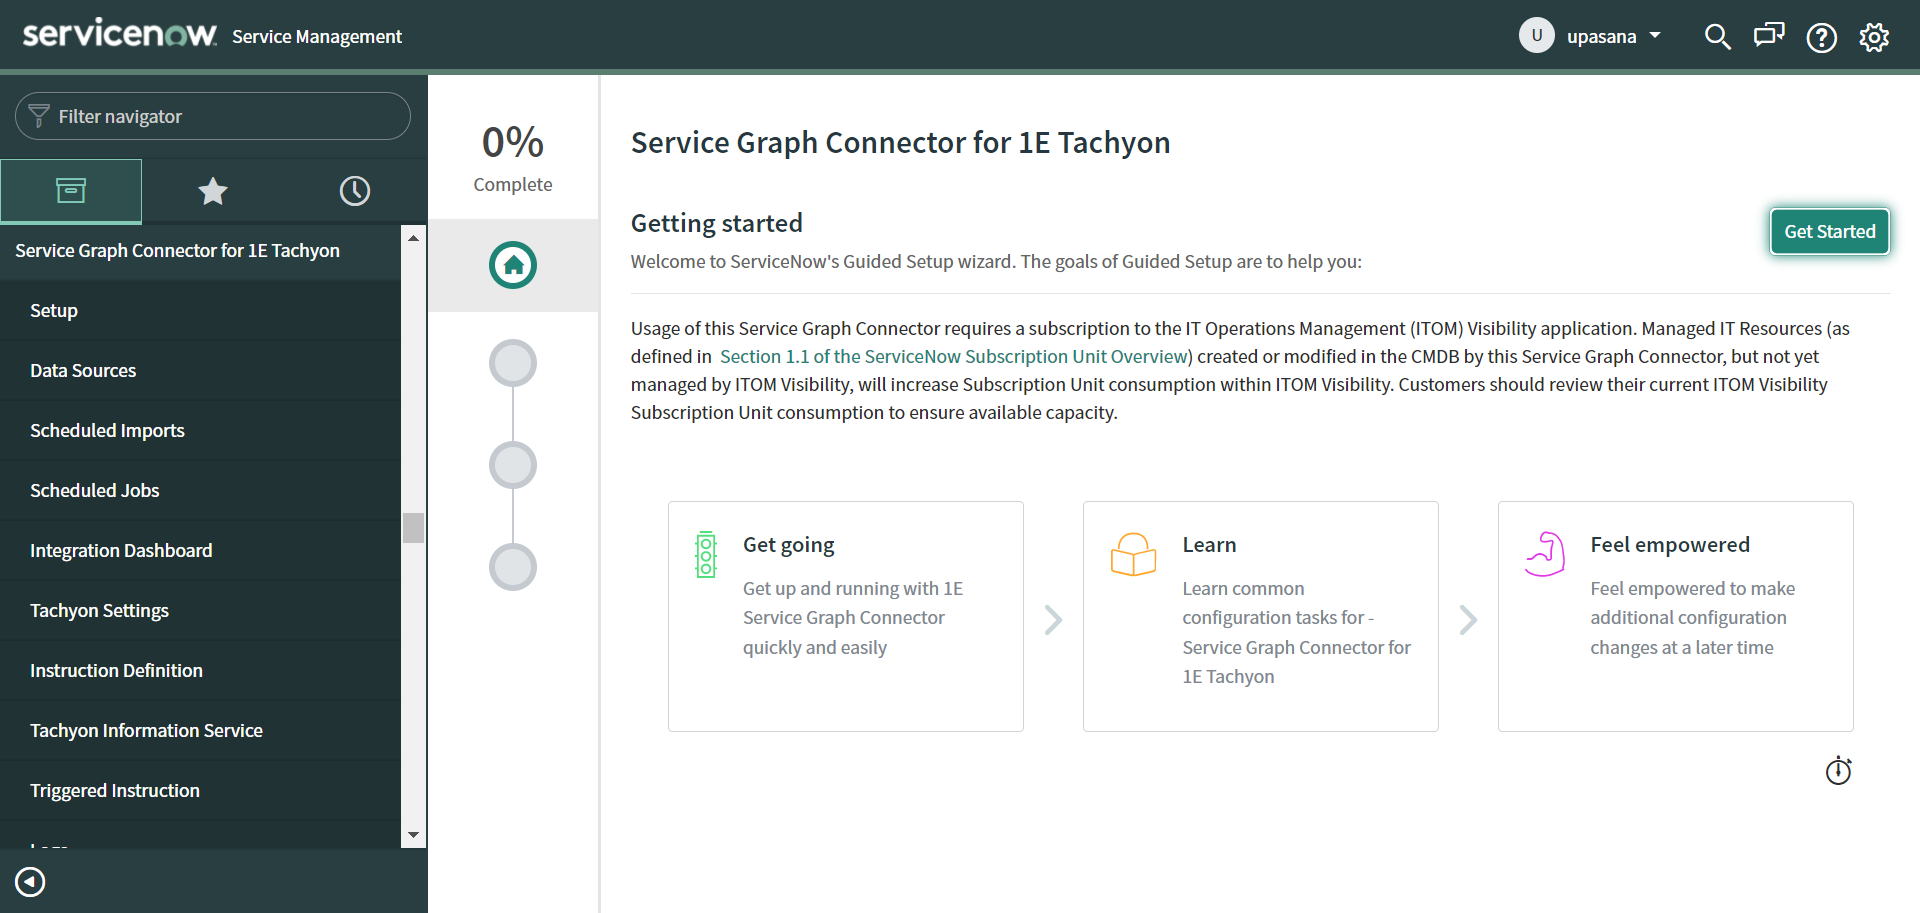
Getting Started
Click on Setup to open the Getting started page on the right-pane of the ServiceNow window, as shown in the picture.
Click on the Get Started button to start the guided setup and configure the connector.
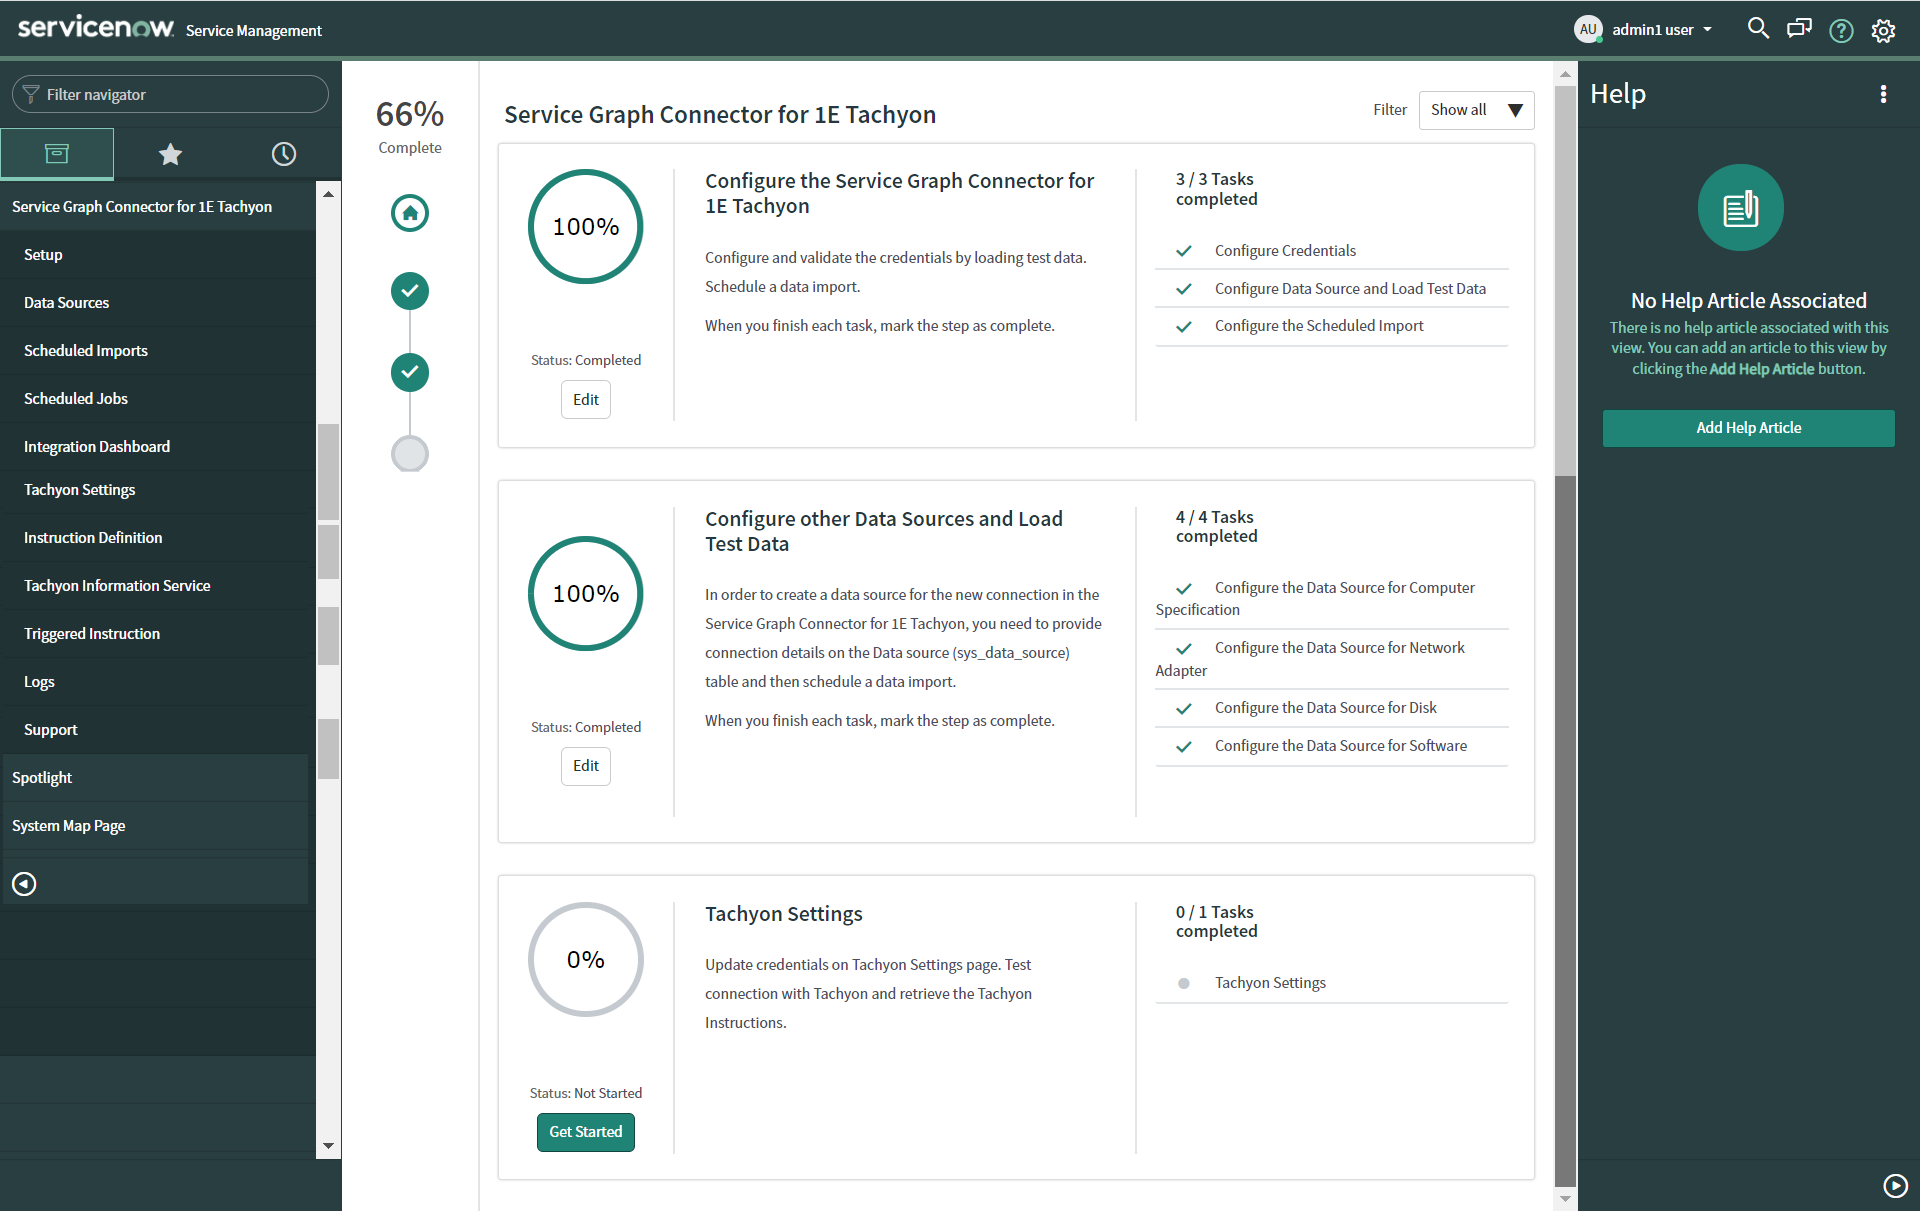
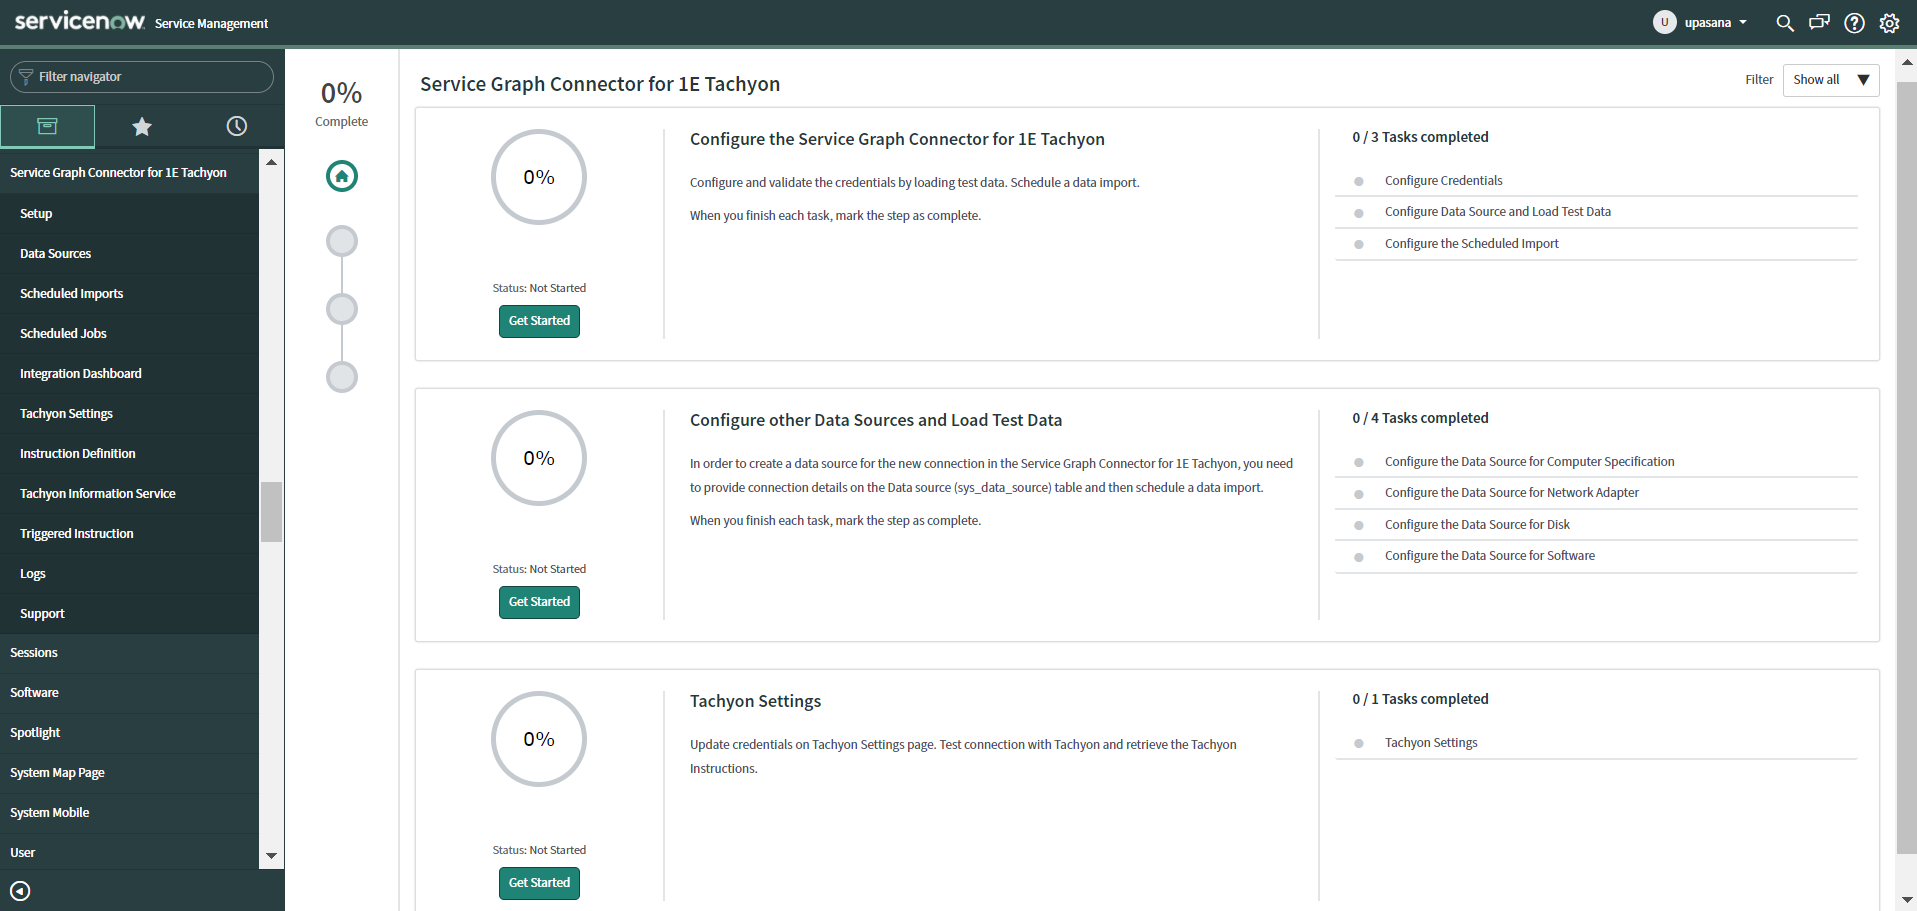
The configuration process has three steps, as shown in the picture, these are:
Configure the Service Graph Connector for 1E
Configure other Data Sources and Load Test Data
Tachyon Settings
Click on Get Started button to view each step's associated tasks.
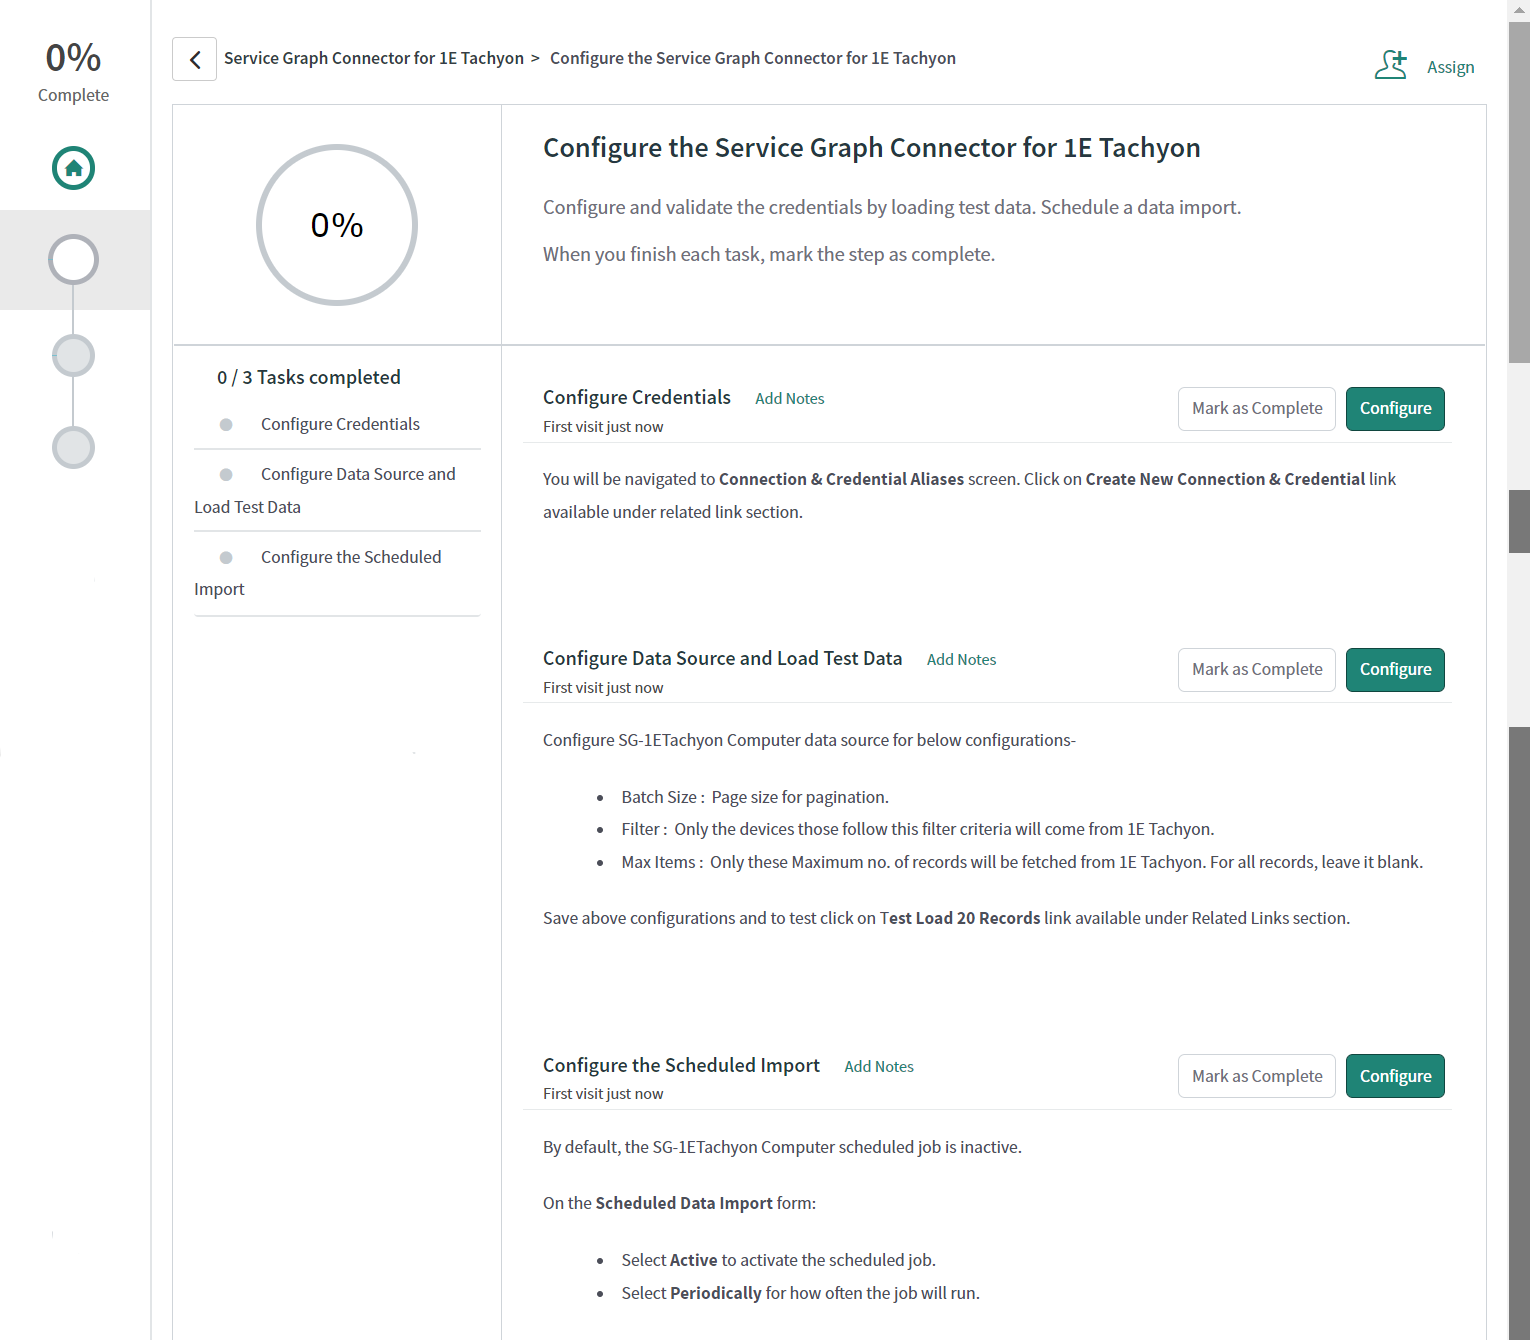
Configure the Service Graph Connector for 1E
The step Configure the Service Graph Connector for 1E has three tasks to complete, as shown in the picture.
Configure Credentials
Configure Data Source and Load Test Data
Configure the Scheduled Import
Click the Configure button to work on each task. The accompanying Help section explains how to configure each task.
Each step has to be completed before moving onto the next one. As you finish configuring each task, click on Mark as Complete button and move on to the next one.
You can configure the Data Sources and Schedule Import tabs available under Service Graph Connector for 1E menu items after completing the above configuration steps.
Note
As you complete the configuration of each task, your progress shows as a percentage at the top of the page.
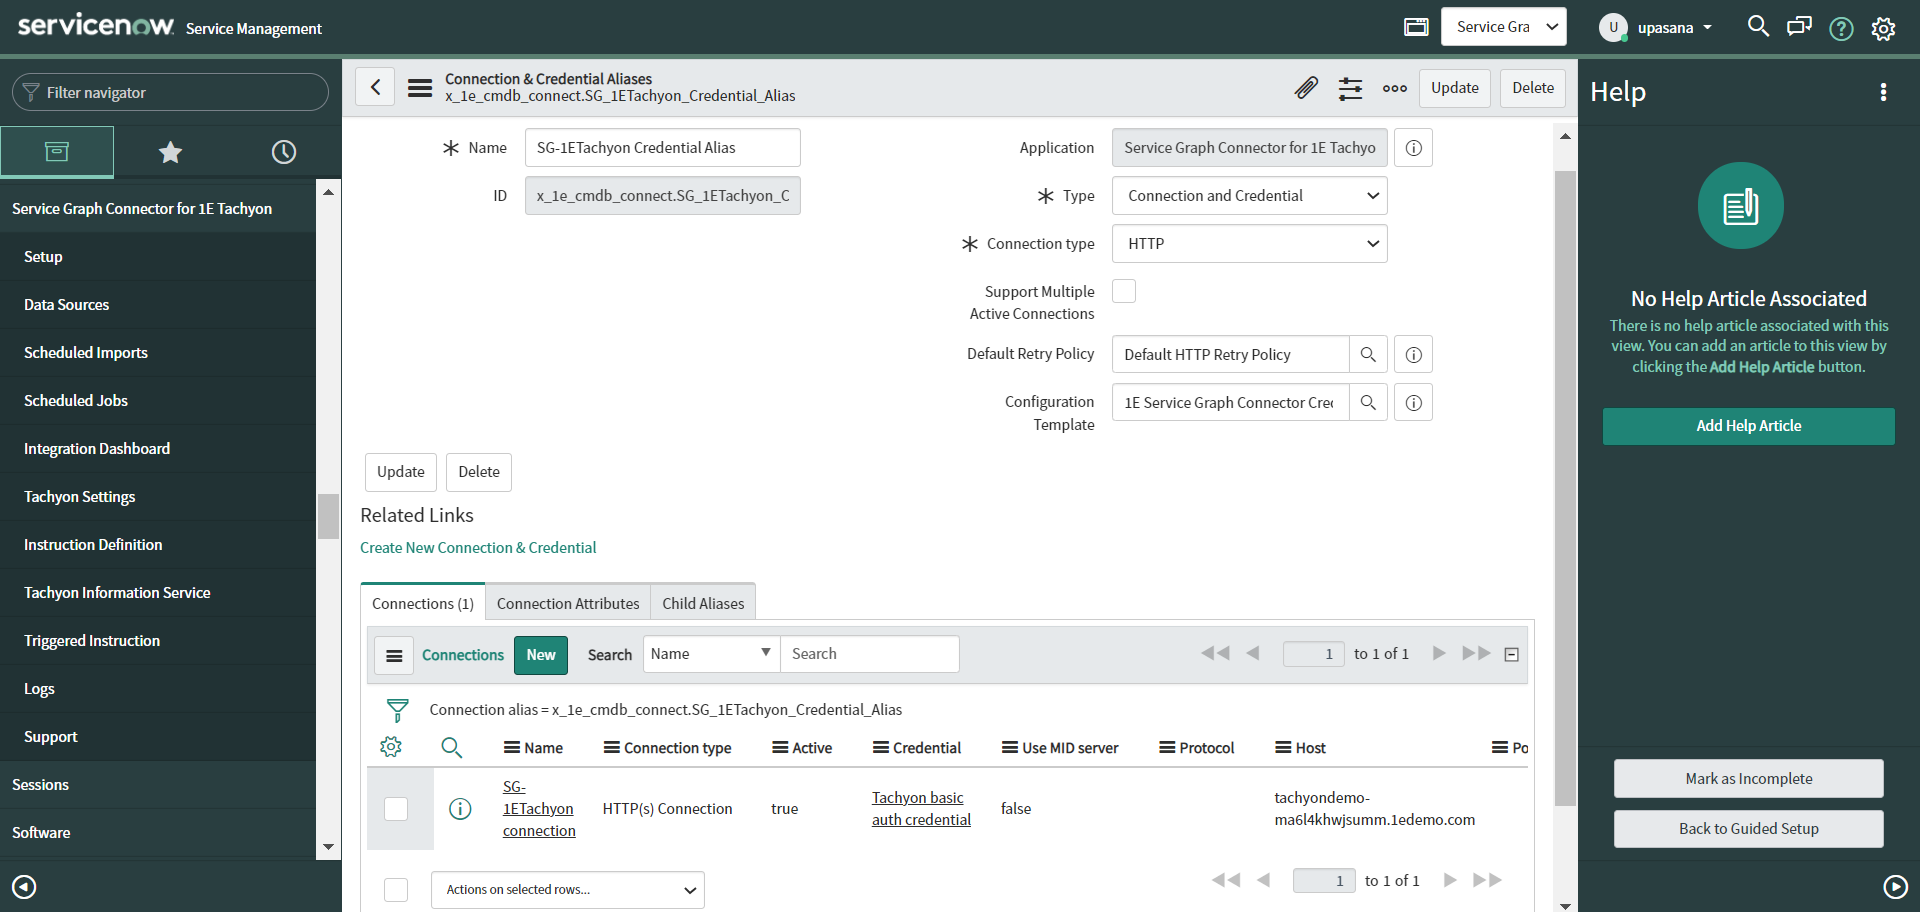
Configure Credentials
If you click on the Configure button, it redirects you to the Connection & Credential Aliases page as shown in the picture below. This helps you to set up the connection.
To create a new connection:
Select the appropriate Configuration Template from the lookup list, for Basic Authentication select 1E Service Graph Connector Credential and for Modern Authentication select 1E JWT OAuth Configuration.
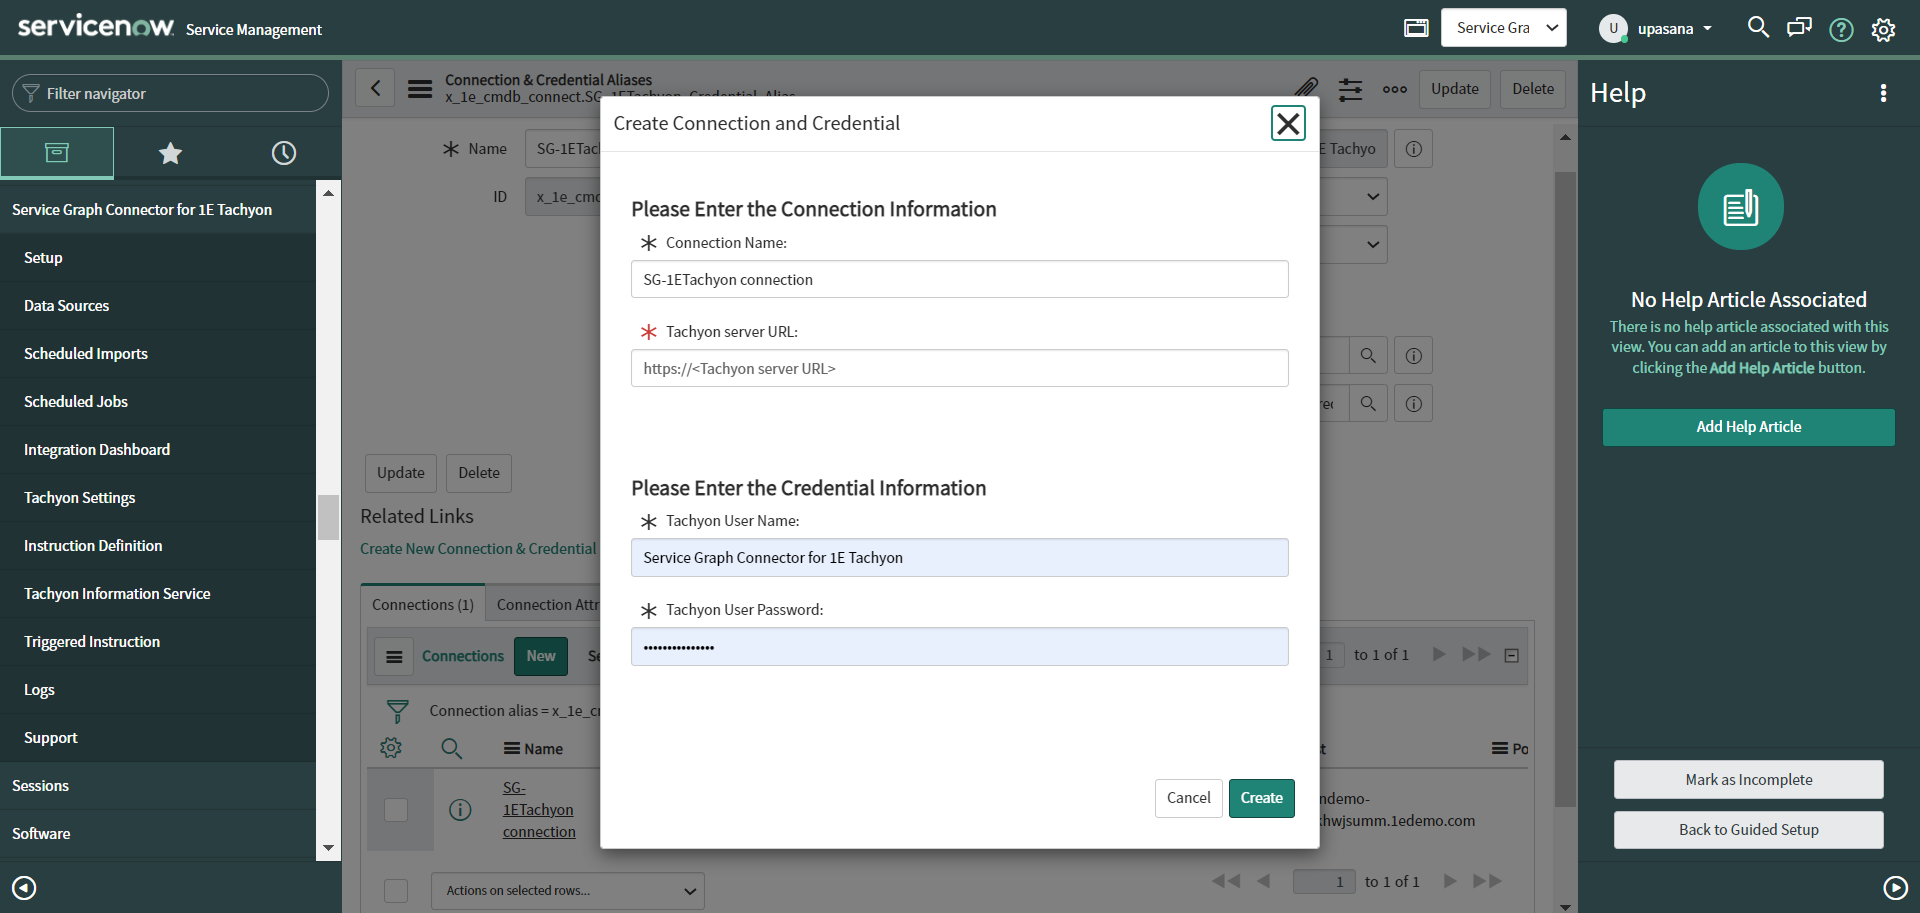
Now click on Create New Connection & Credential under the Related Links, the Create Connection and Credential pop-up appears that prompts you to provide Connection and Credential information.
Click on Create button to save the connection record.
You can now see a record is added in Connections.
For Basic Authentication-
For Modern Authentication-

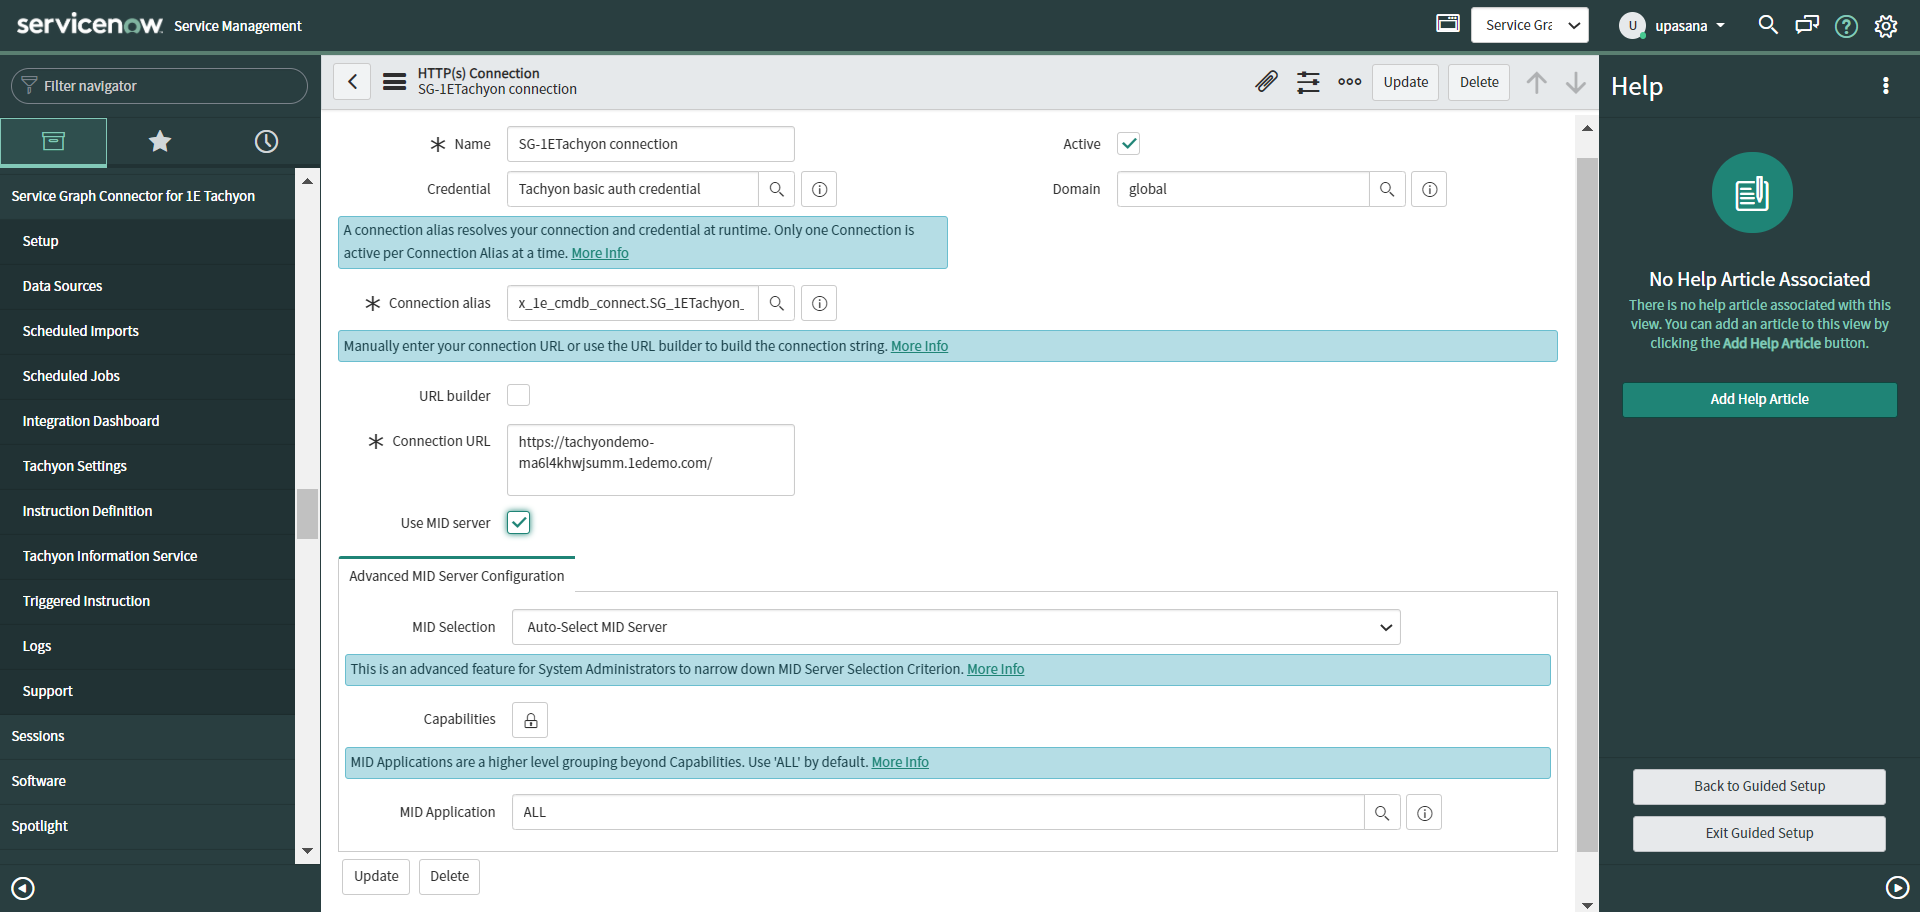
Enabling Mid-Server
If your 1E is set up on premises, follow the below steps to enable the Mid-Server on the connector:
Open the recently added record in Connections.
Check the Use Mid-Server checkbox on HTTP(s) Connection page.
Verify the Advanced Mid-Server Configuration.
To save the above changes, click on Update button.
Once you complete the above actions, click on Mark as Complete to complete this task of configuration and move on to the next part.
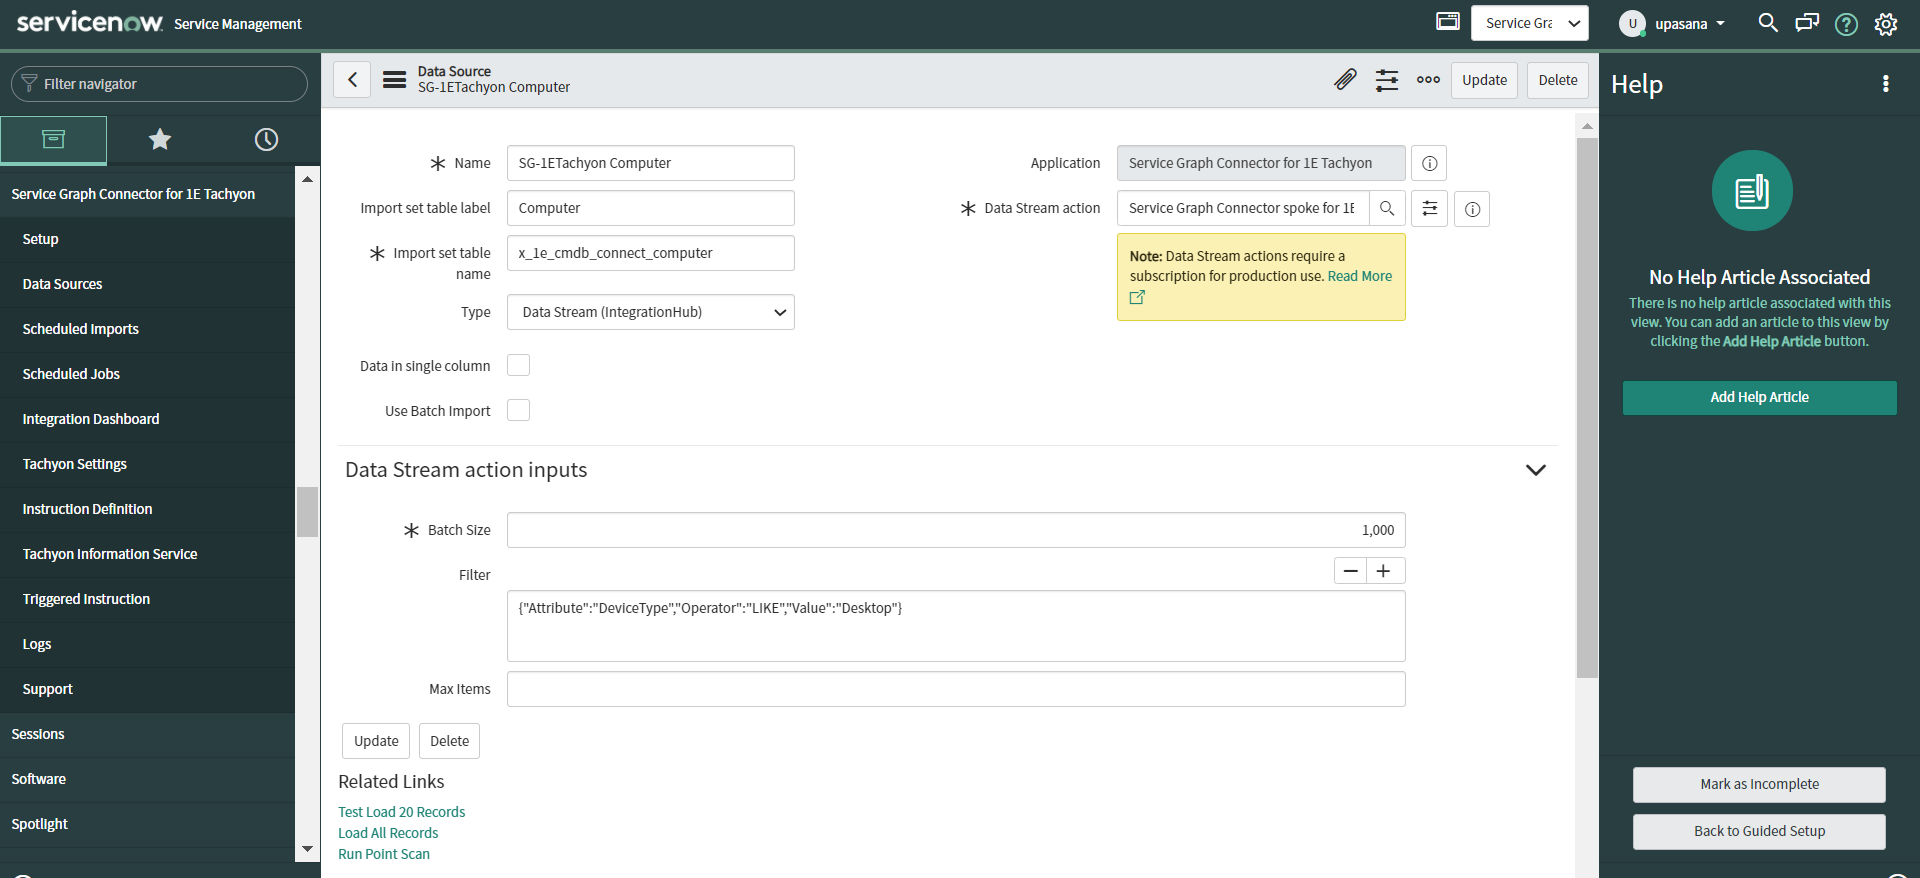
Configure Data Source and Load Test Data
If you click on the Configure button, it redirects you to the Data Source page as shown in the picture. This helps you to set up data import into defined tables.
You need to provide the following inputs under Data Stream action inputs section:
Batch Size - set the number of pages for pagination.
Filter - set up the criteria to filter the devices that are fetched from 1E.
Max Items - the maximum number of records that are fetched from 1E.
To save above changes, click on Update button.
To see if the connection is established properly and the data is retrieved correctly, click on the Test Load 20 Records link available under Related Links.
Once you complete the above actions, click on Mark as Complete to complete this task of configuration and move on to the next part.
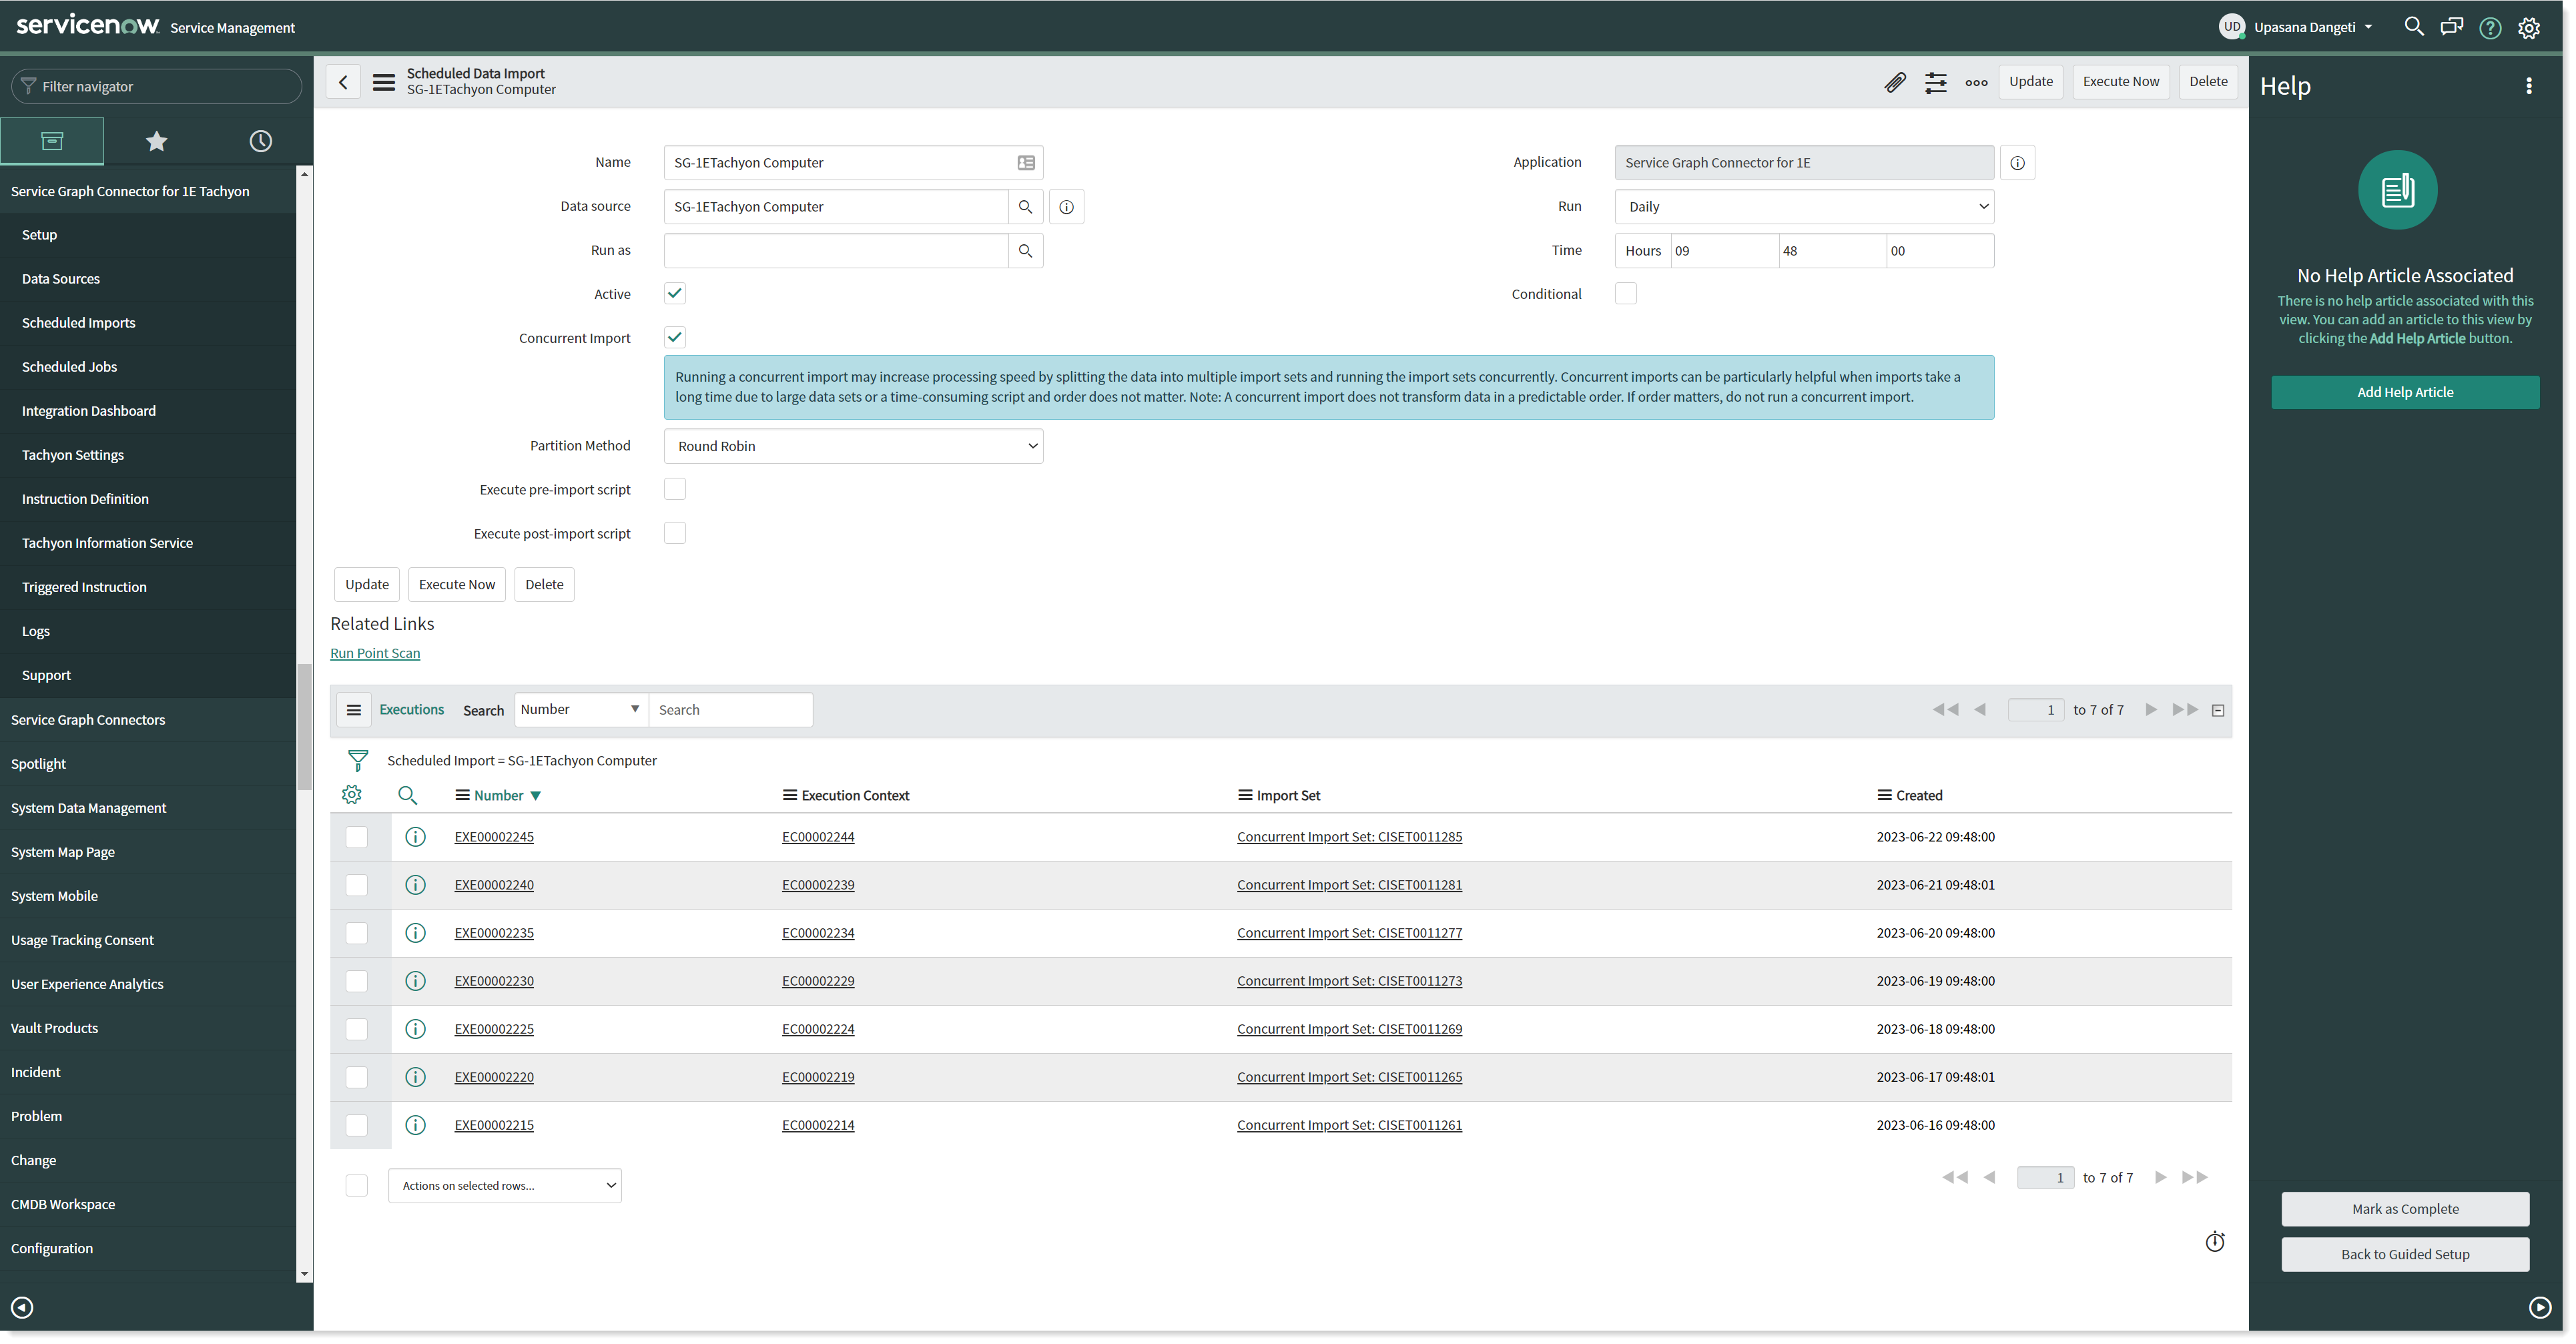
Configure Scheduled Import
If you click on the Configure button, it redirects you to the Scheduled Data Import page as shown in the picture. This helps you to set up scheduled jobs to periodically retrieve data.
You need to perform the following actions on this page:
Check the Active checkbox, to activate the scheduled job.
To set the frequency of a schedule job, select the appropriate period from the Run dropdown list and enter the desired Time.
To save the above changes, click on Update button.
Once you complete the above actions, click on Mark as Complete to complete this task of configuration and move on to the next part.
As you have completed the configuration of the connector, your progress should now show 33% complete.
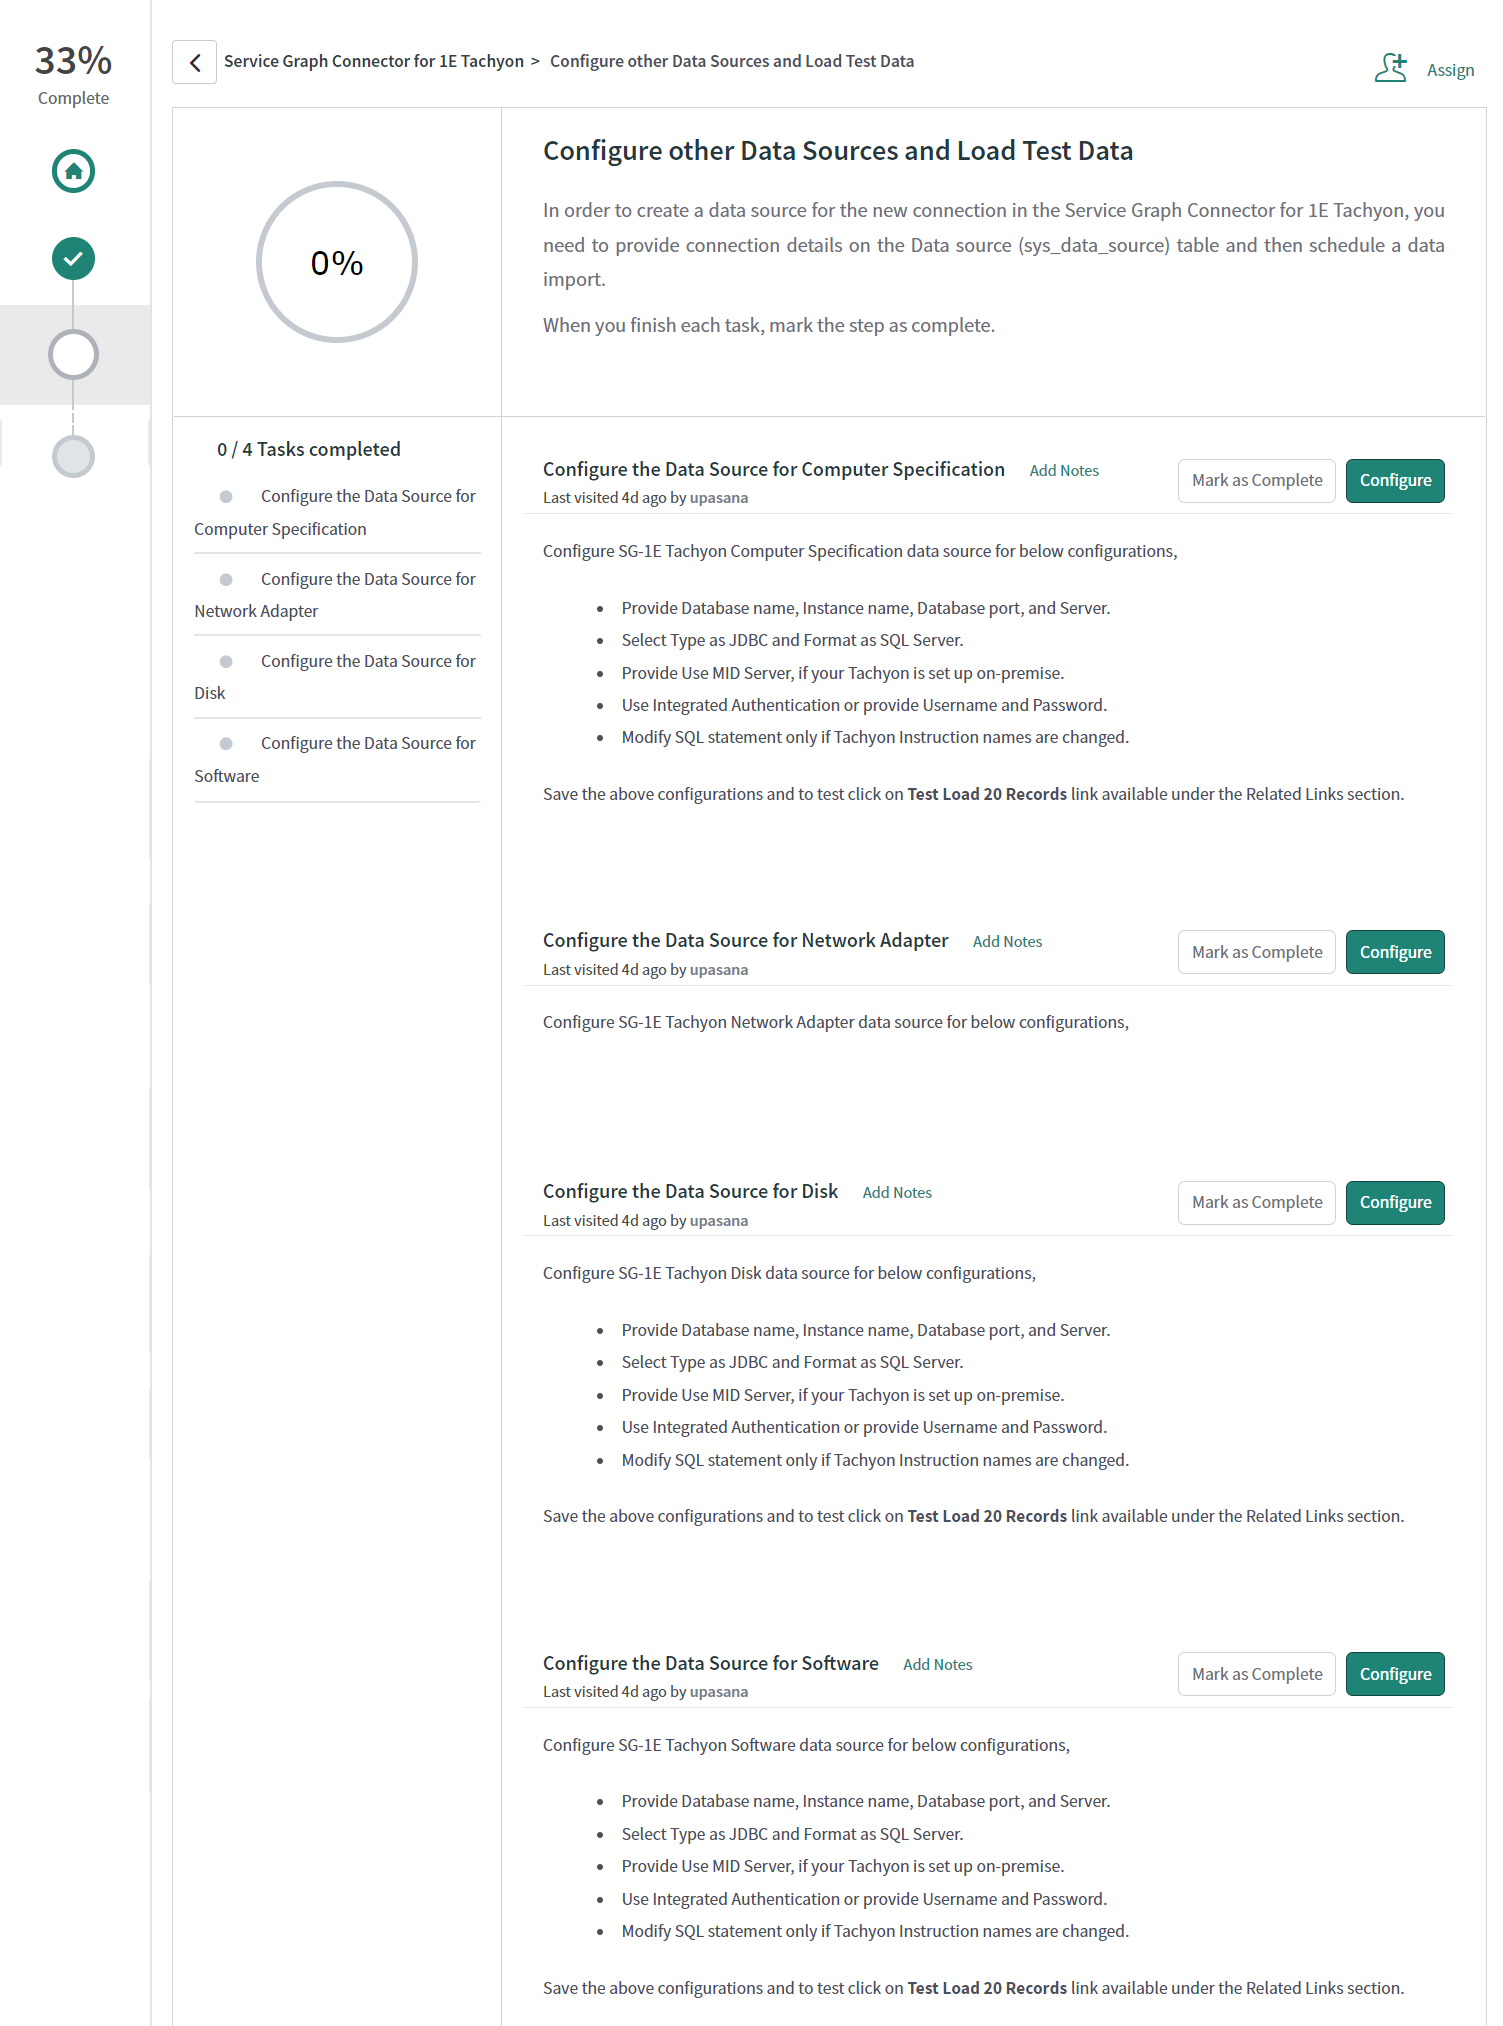
Configure other Data Sources and Load Test Data
The step Configure other Data Sources and Load Test Data has four data sources, as given below.
Configure the Data Source for Computer Specification
Configure the Data Source for Network Adapter
Configure the Data Source for Disk
Configure the Data Source for Software
The above listed Data Sources have to be configured in addition to the SG-1E Tachyon Computer to set up data import into defined tables.
Click the Configure button to work on each task. The accompanying Help section explains how to configure each task. Each step has to be completed before moving onto the next one. As you finish configuring each task, click on Mark as Complete button and move on to the next one.
You can further configure the Data Sources tab available under Service Graph Connector for 1E menu items after completing the above configuration steps.
Note
As you complete the configuration of each task, your progress shows as a percentage at the top of the page.
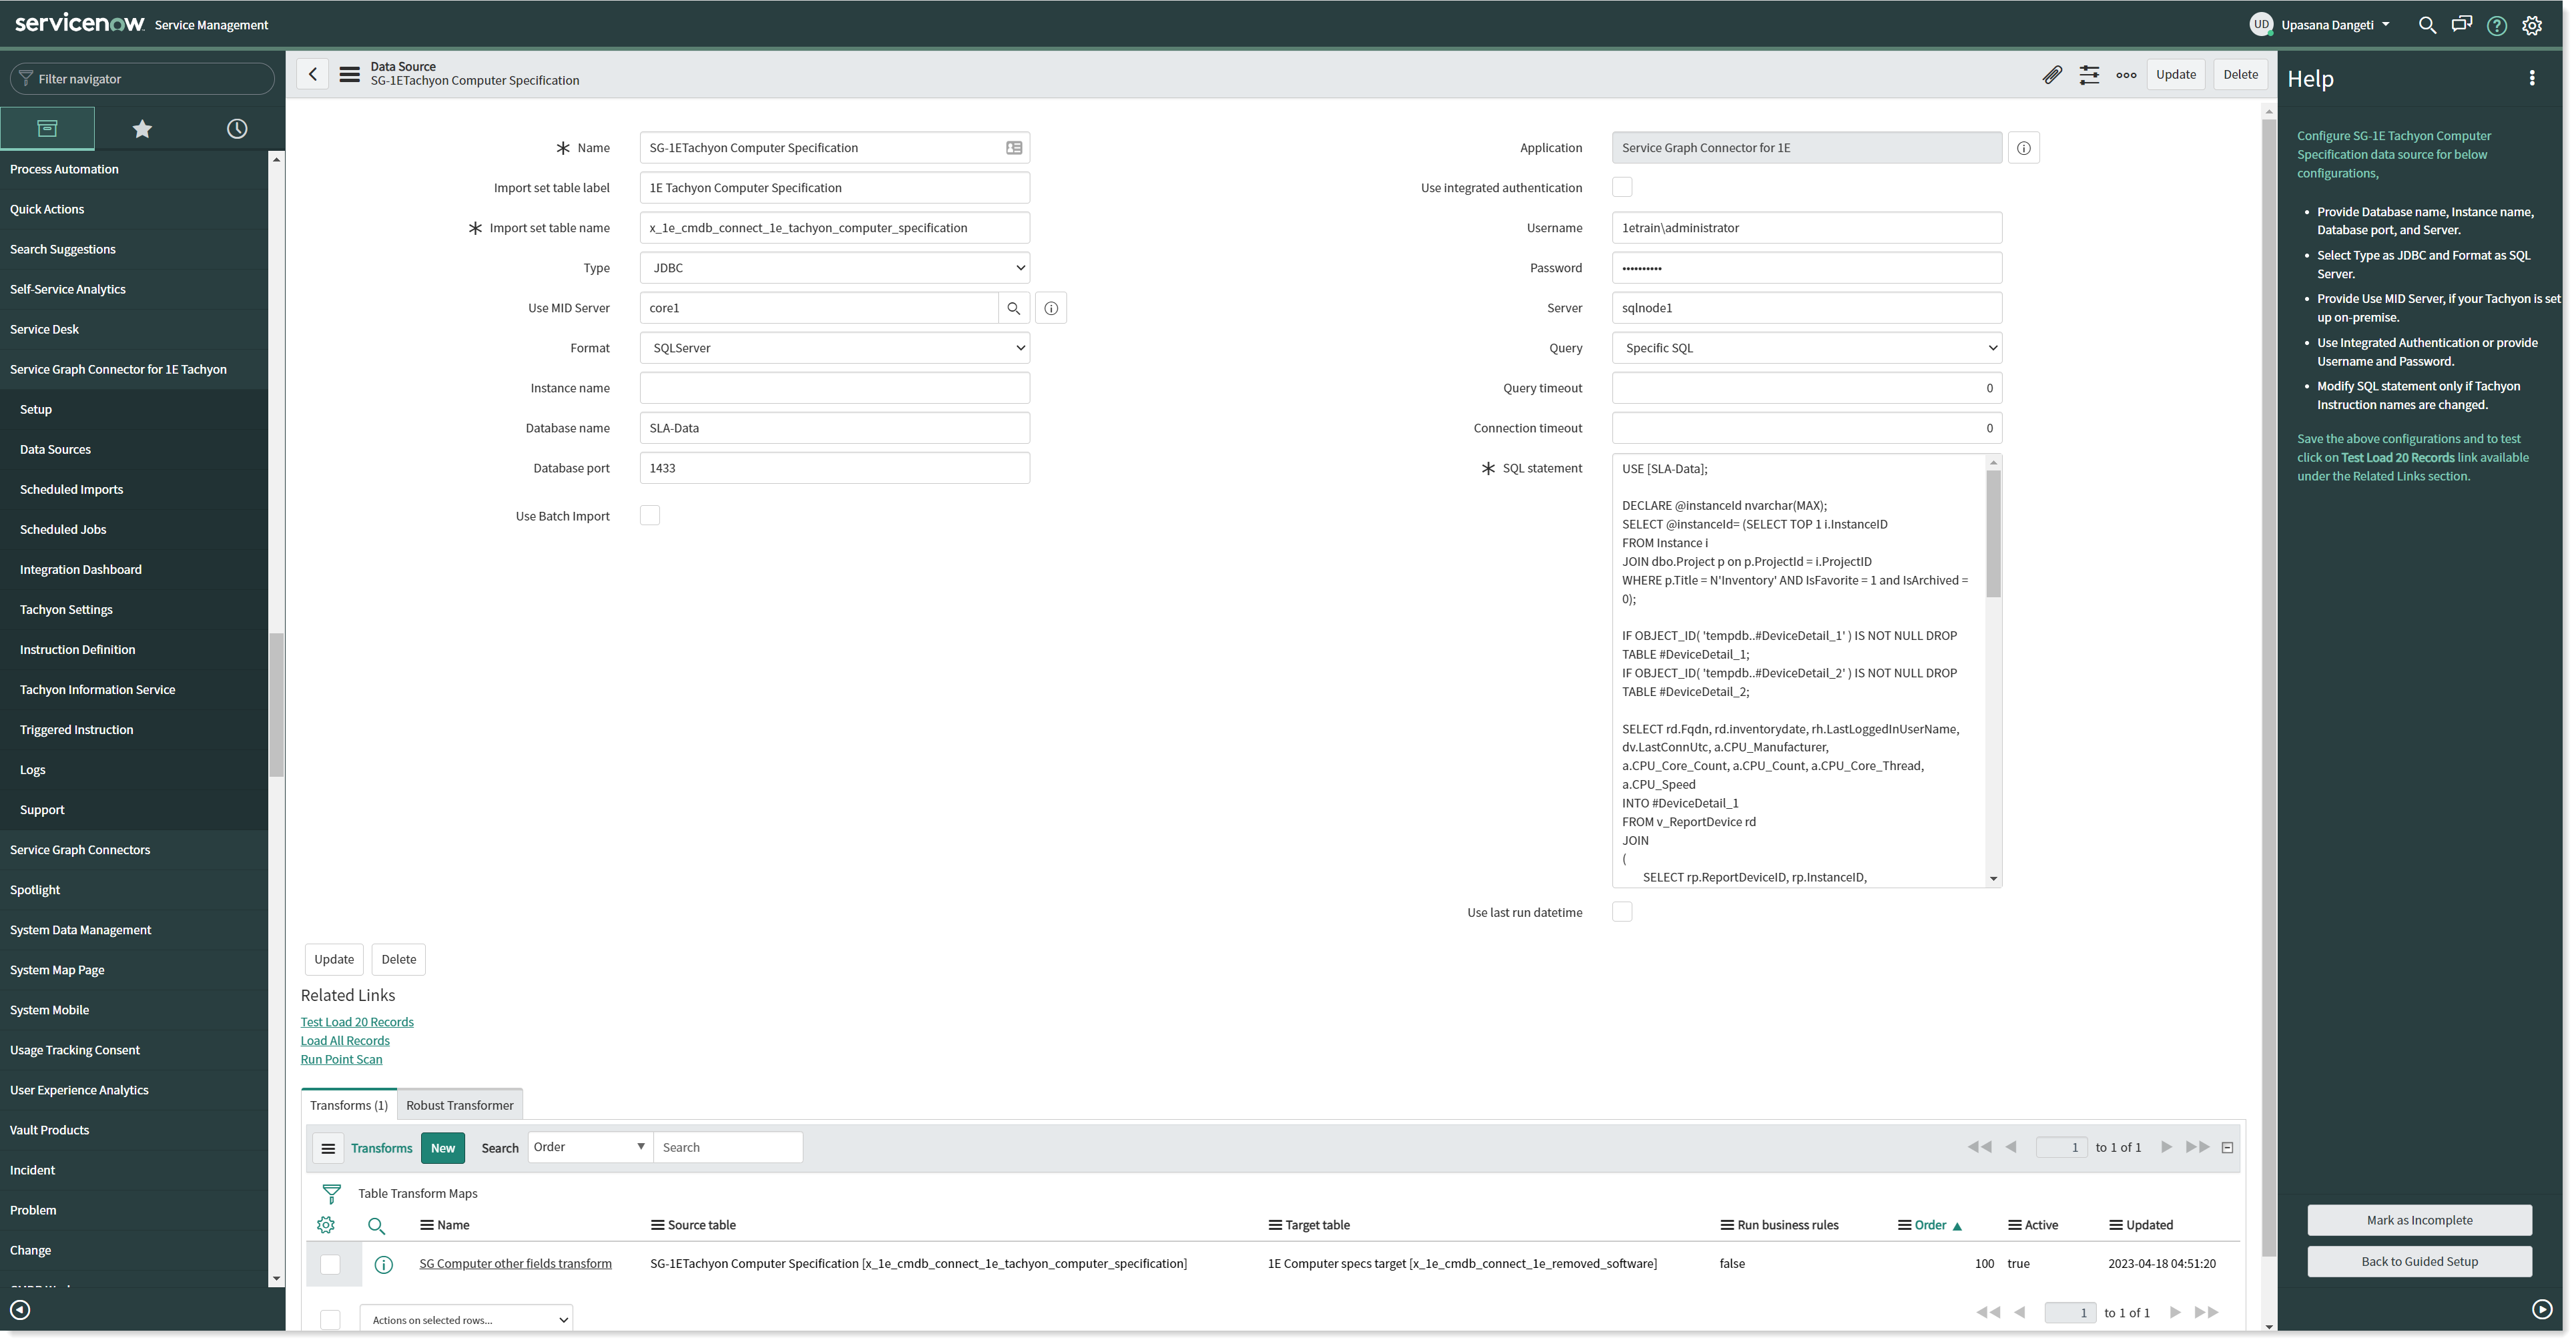
Configure the Data Source for Computer Specification
If you click on the Configure button, it redirects you to the Data Source page as shown in the picture. This helps you to set up data import into defined tables.
You need to perform the following actions on this page:
Provide the Database name, Instance name, Database port and Server.
Select Type field as JDBC and Format as SQLServer.
Lookup the required Use MID Server from the available list, if your 1E is set up on-premises.
Check the Use integrated authentication checkbox to use the predefined code or provide Username and Password.
Modify the SQL statement only if 1E instruction names are changed.
To save your changes, click Update.
To see if the connection is established properly and the data is retrieved correctly, click on the Test Load 20 Records link available under Related Links.
Once you complete the above actions, click on Mark as Complete to complete this section and move on to the next part.
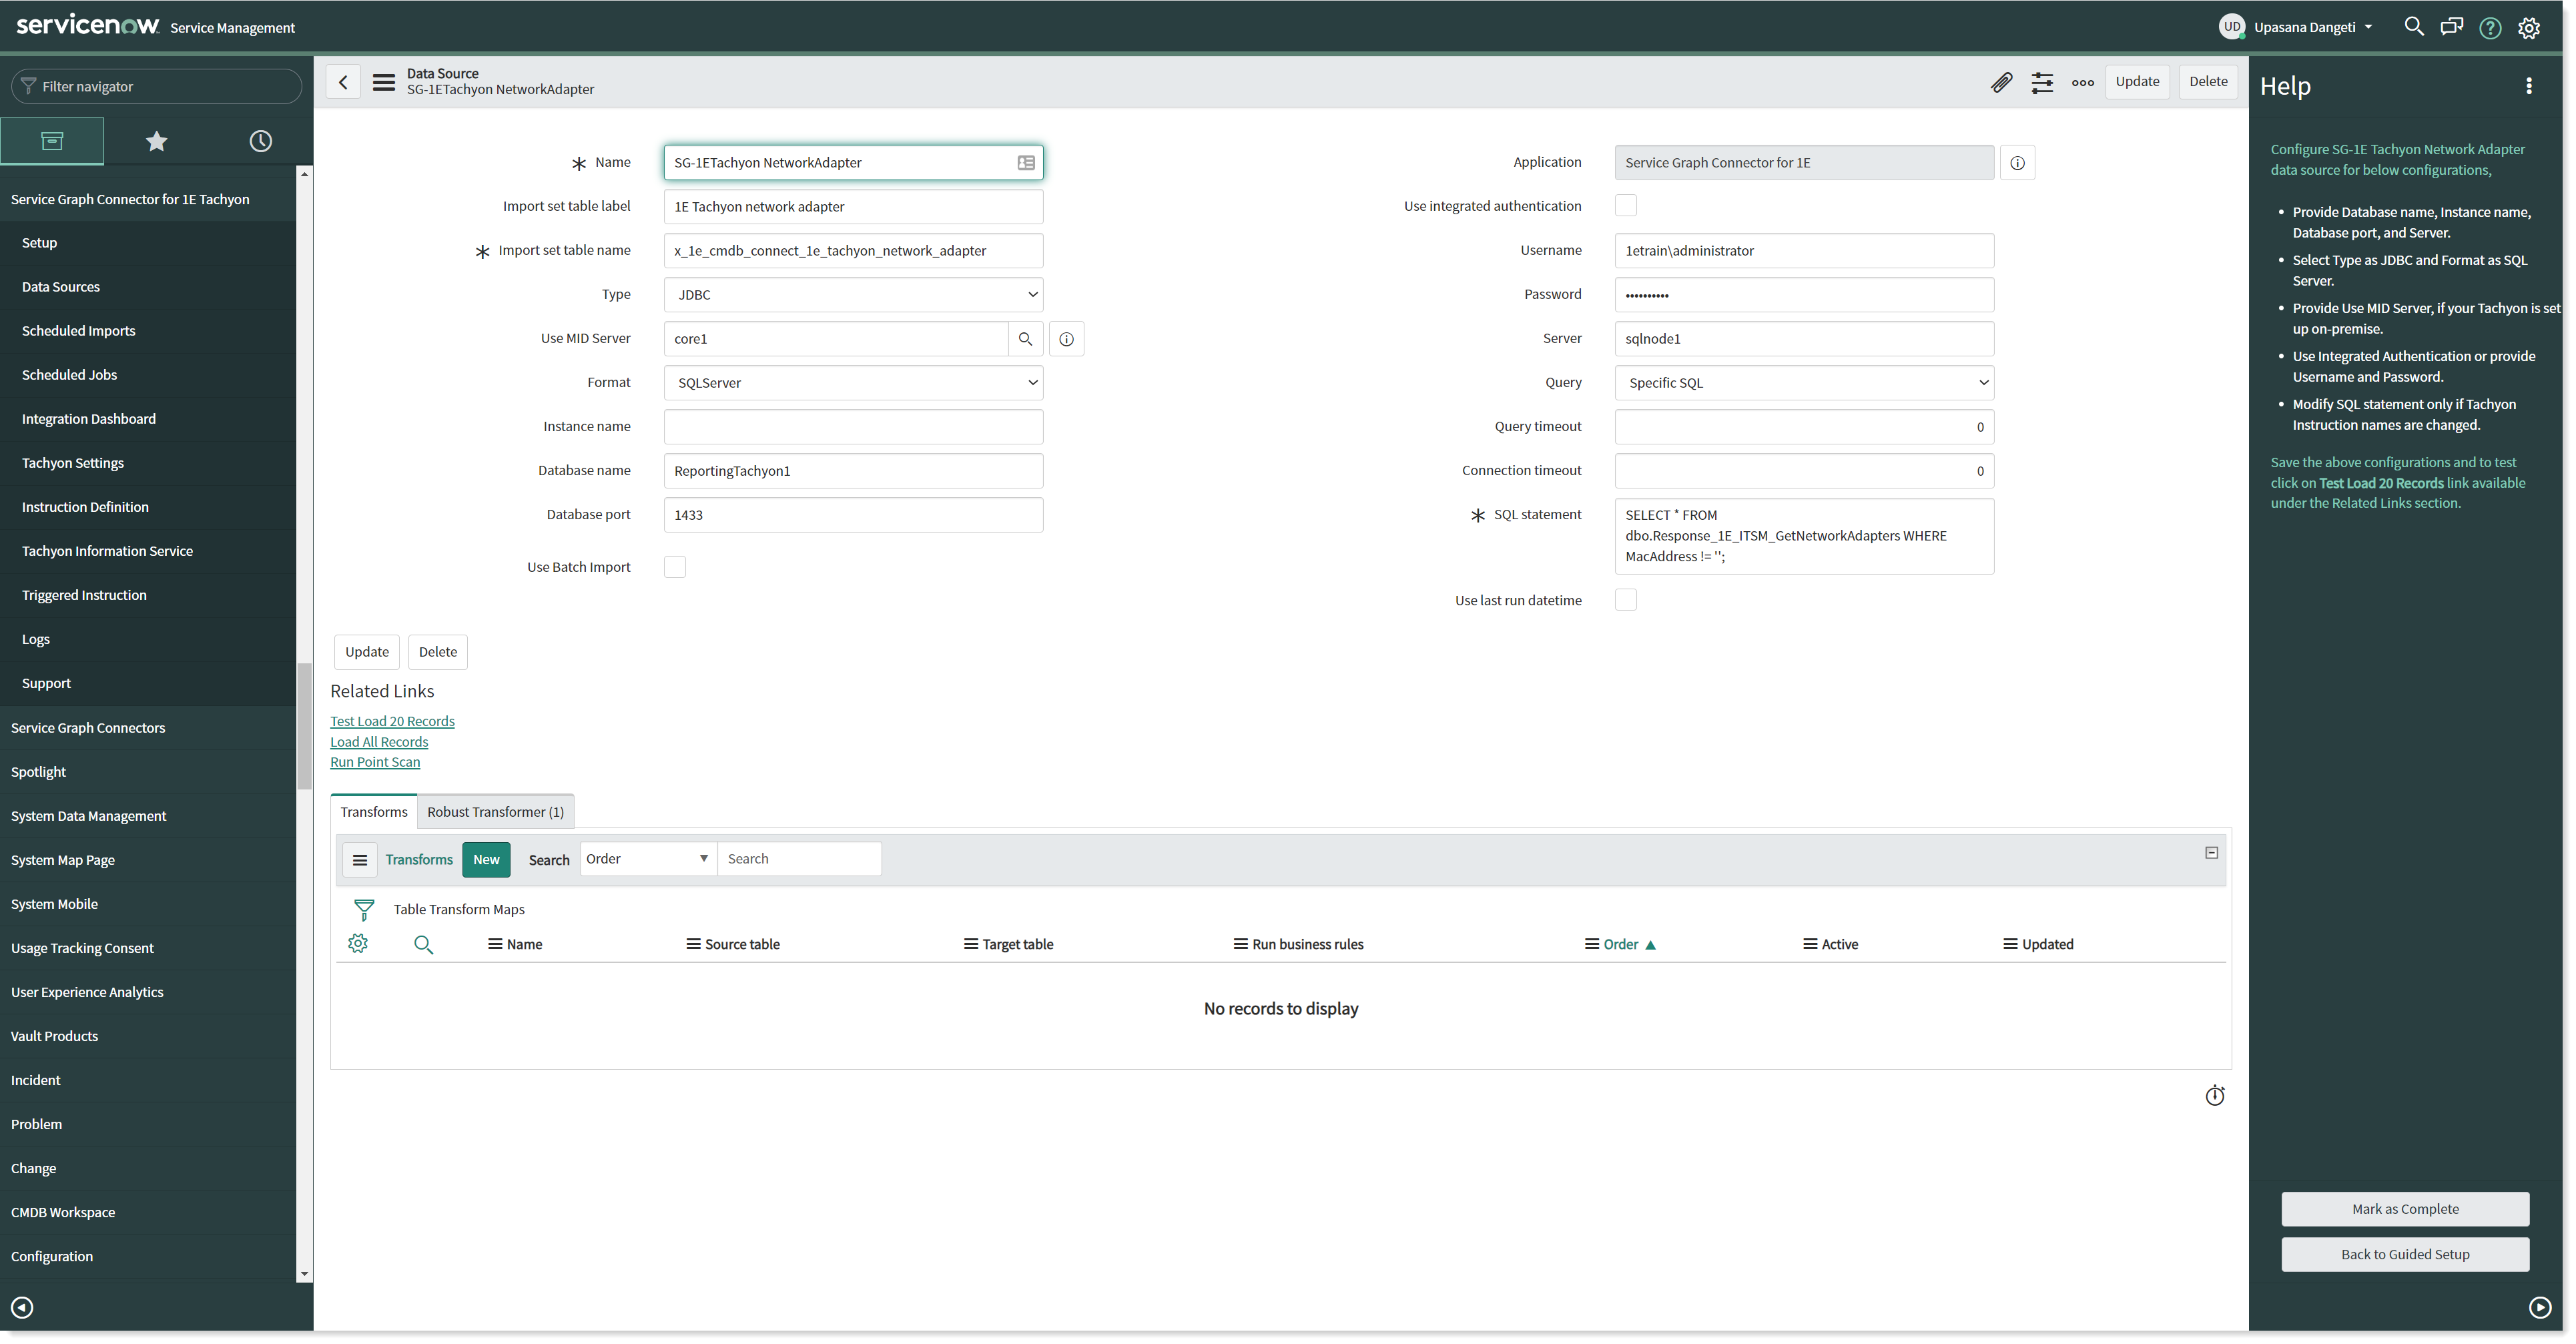
Configure the Data Source for Network Adapter
Clicking the Configure button redirects you to the Data Source page as shown in the picture. This helps you to set up data import into defined tables.
You need to perform the following actions on this page:
Provide the Database name, Instance name, Database port and Server.
Select Type field as JDBC and Format as SQLServer.
Lookup for the required Use MID Server from the available list, if your 1E is setup on-premises.
Check the Use integrated authentication checkbox to use the predefined code or provide Username and Password.
Modify the SQL statement only if 1E instruction names are changed.
To save your changes, click Update.
To see if the connection is established properly and the data is retrieved correctly, click on the Test Load 20 Records link available under Related Links.
Once you complete the above actions, click on Mark as Complete to complete this task of configuration and move on to the next part.
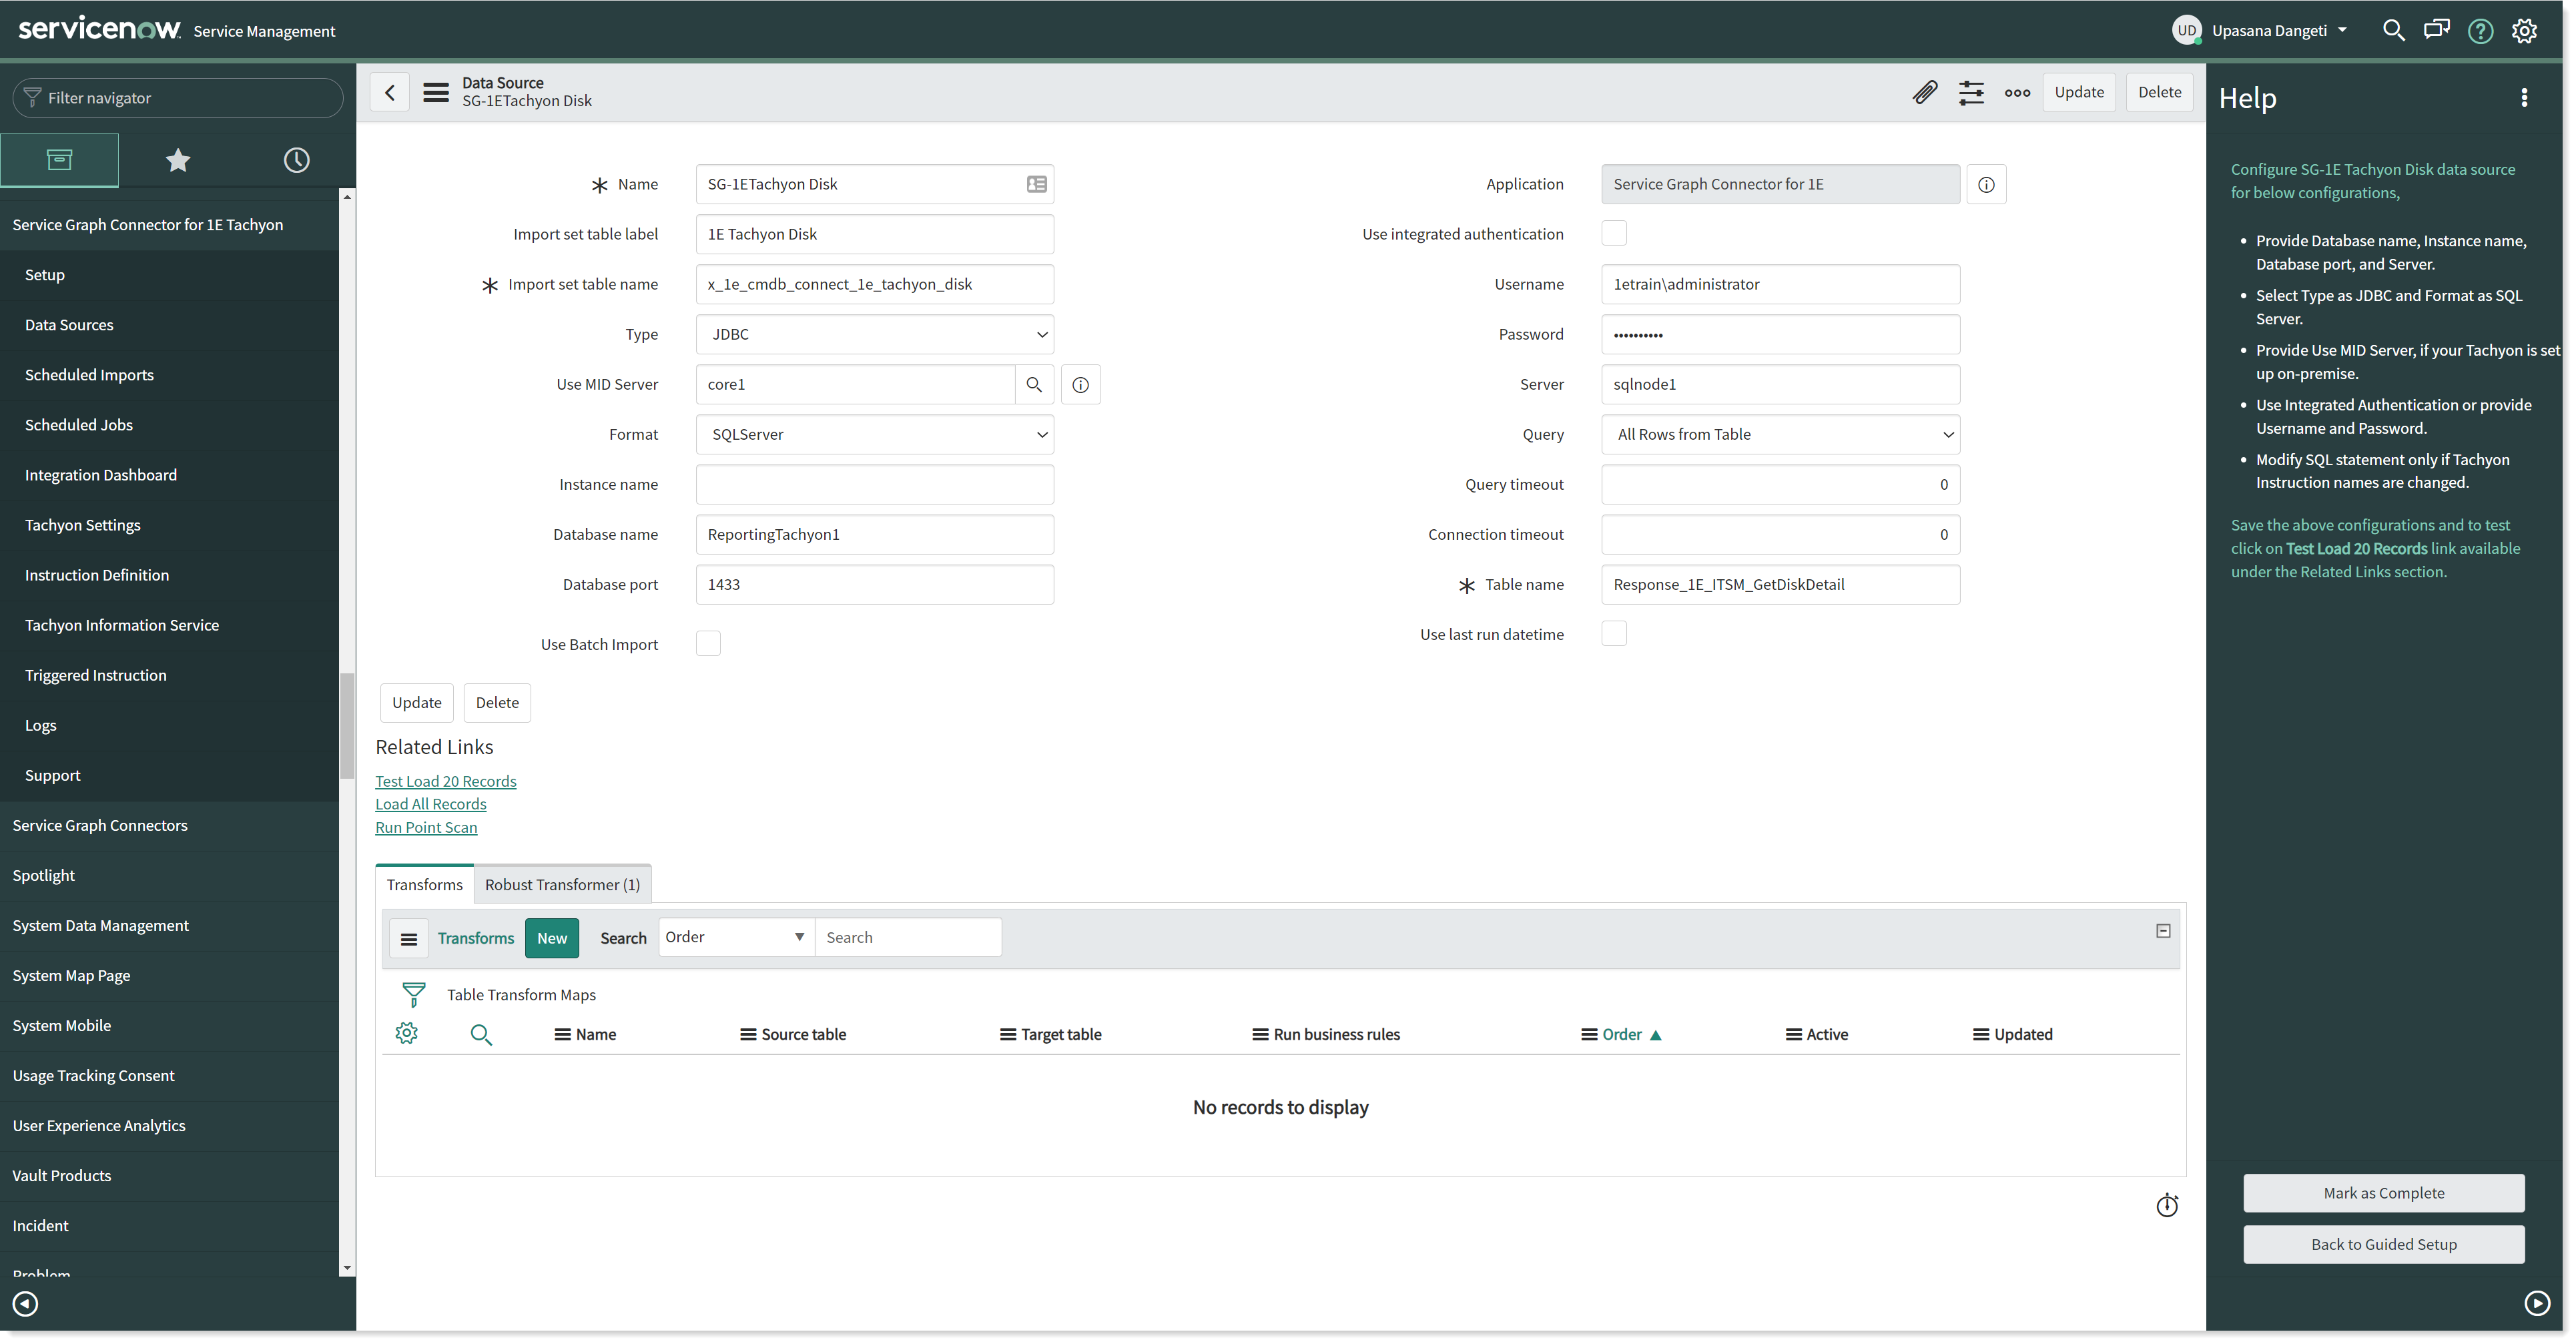
Configure the Data Source for Disk
Clicking the Configure button, redirects you to the Data Source page as shown in the picture. This helps you to set up data import into defined tables.
You need to perform the following actions on this page:
Provide the Database name, Instance name, Database port and Server.
Select Type field as JDBC and Format as SQLServer.
Lookup for the required Use MID Server from the available list, if your 1E is setup on-premises.
Check the Use integrated authentication checkbox to use the predefined code or provide Username and Password.
Modify the SQL statement only if 1E instruction names are changed.
To save your changes, click Update.
To see if the connection is established properly and the data is retrieved correctly, click on the Test Load 20 Records link available under Related Links.
Once you complete the above actions, click on Mark as Complete to complete this task of configuration and move on to the next part.
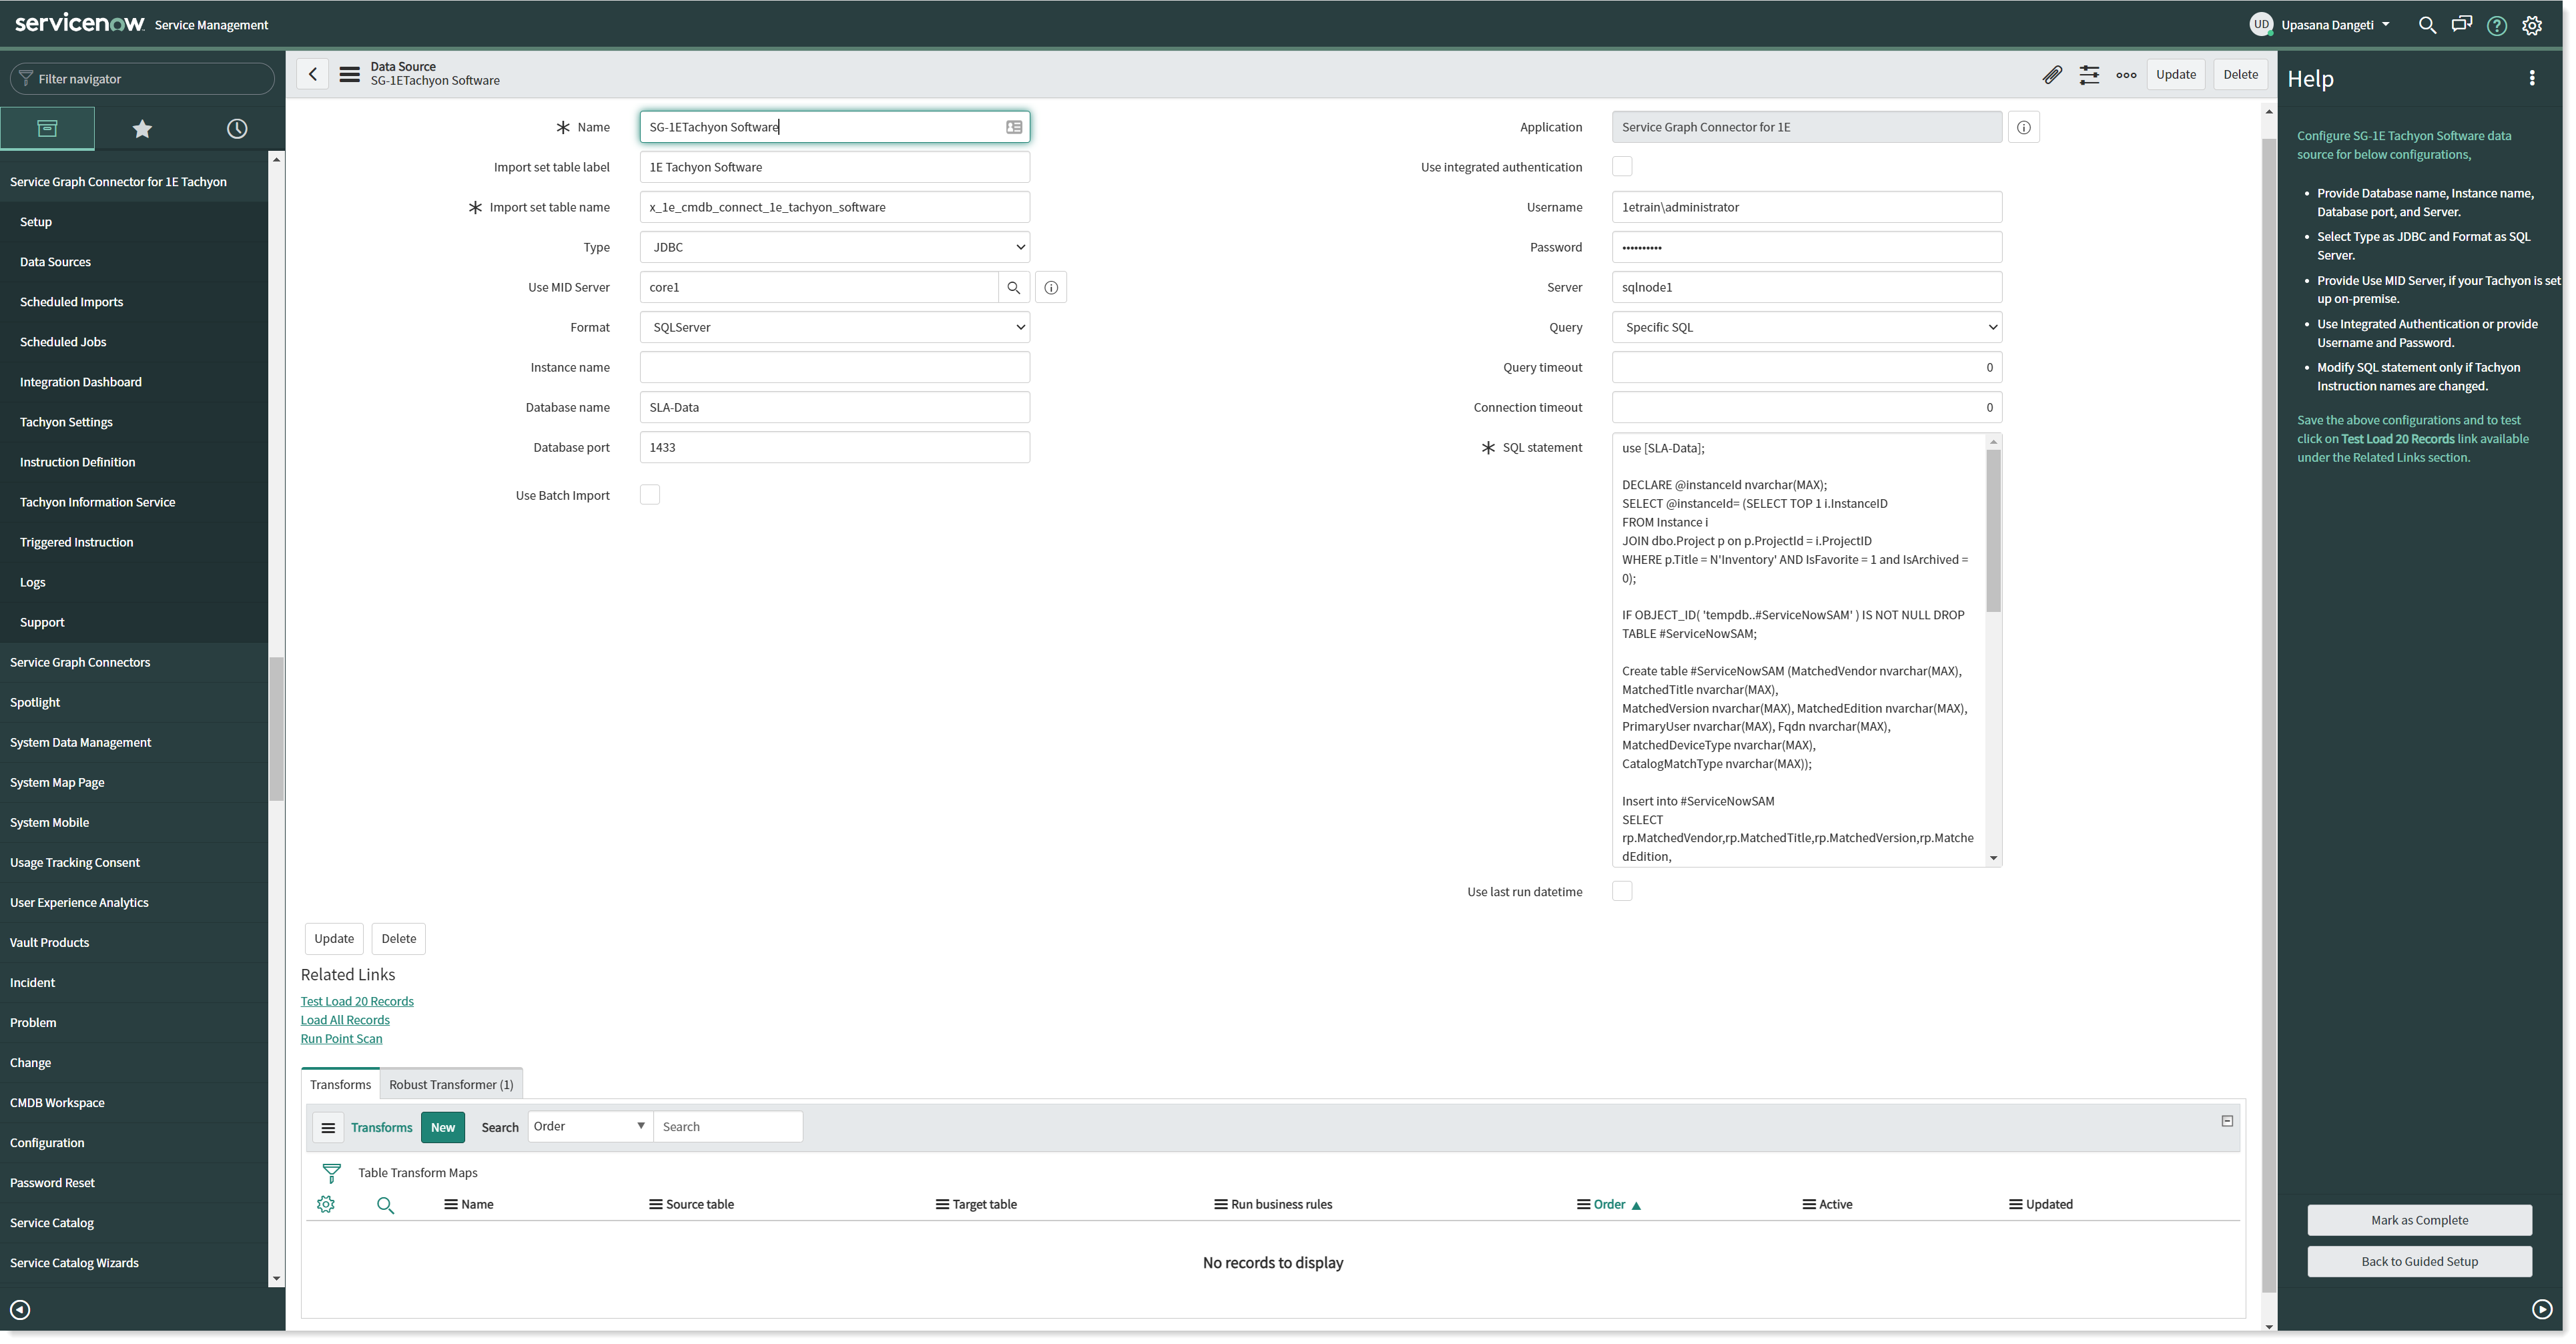
Configure the Data Source for Software
If you click on the Configure button, it redirects you to the Data Source page as shown in the picture. This helps you to set up data import into defined tables.
You need to perform the following actions on this page:
Provide the Database name, Instance name, Database port and Server.
Select Type field as JDBC and Format as SQLServer.
Lookup for the required Use MID Server from the available list, if your 1E is setup on-premises.
Check the Use integrated authentication checkbox to use the predefined code or provide Username and Password.
Modify the SQL statement only if 1E instruction names are changed.
To save your changes, click Update.
To see if the connection is established properly and the data is retrieved correctly, click on the Test Load 20 Records link available under Related Links.
Once you complete the above actions, click on Mark as Complete to complete this task of configuration and move on to the next part.
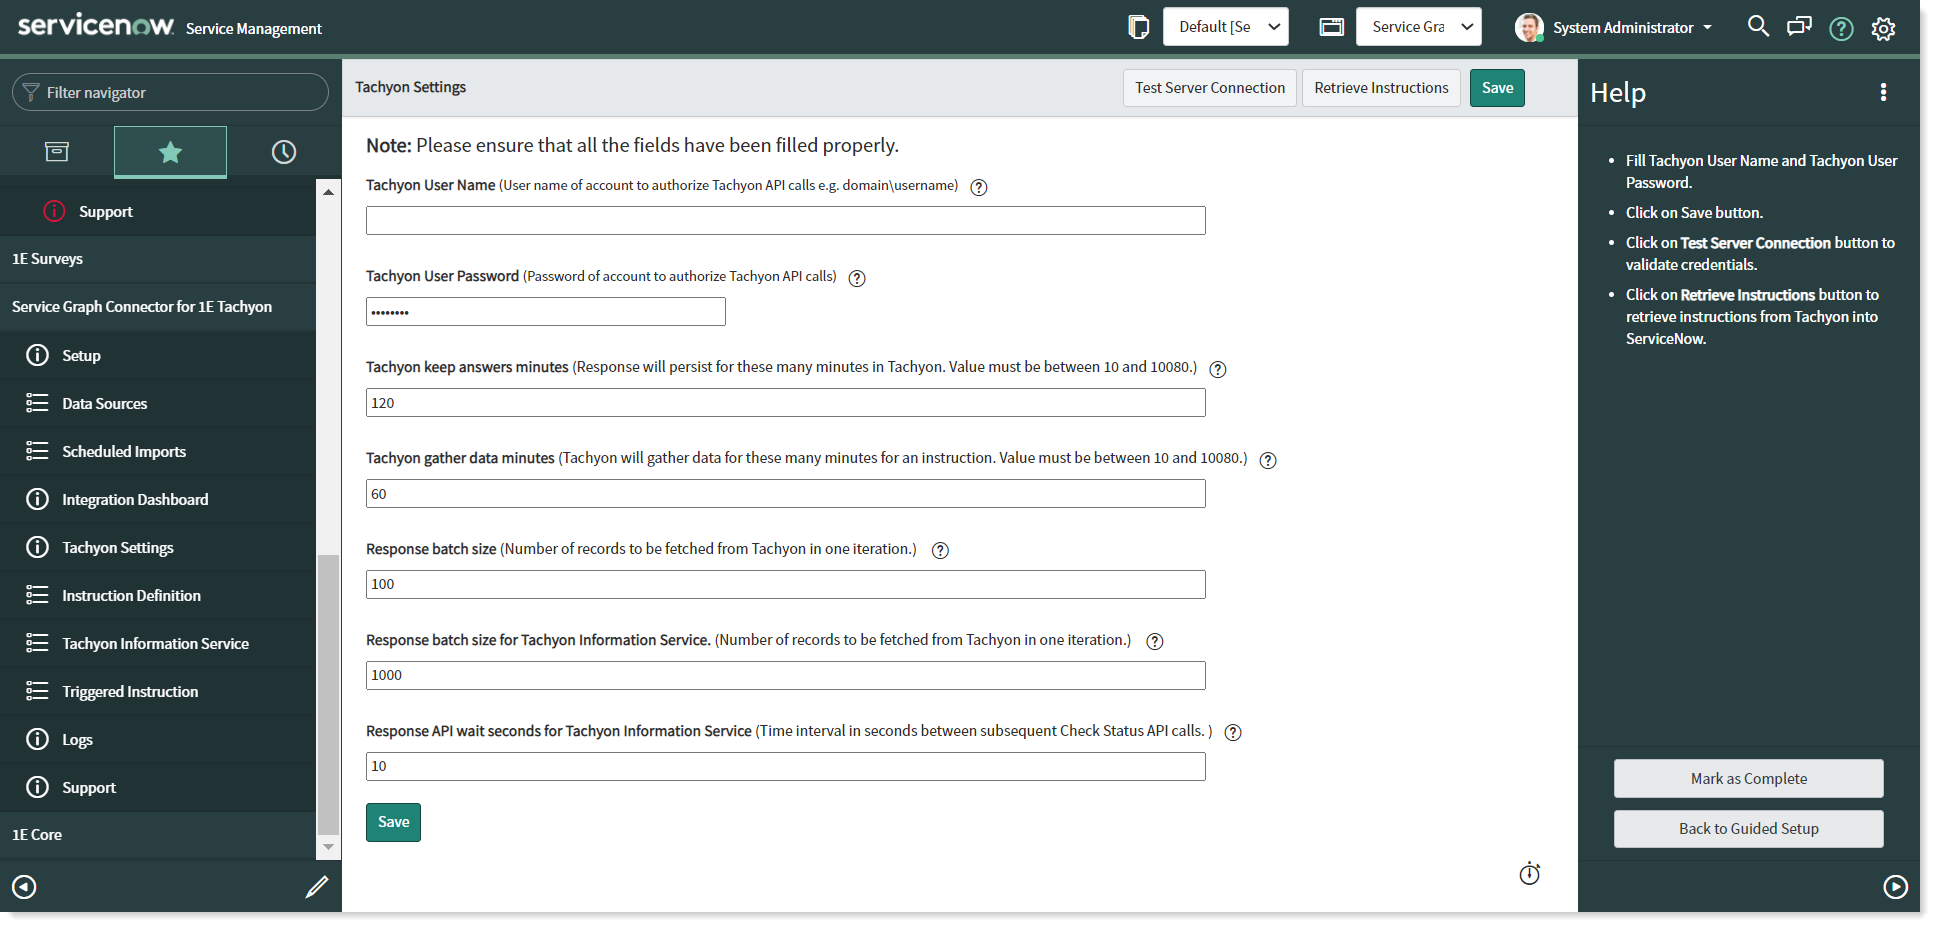
Tachyon Settings
This step guides you in configuring Tachyon settings for your connector, click the Configure button to continue.
After a successful SGC for 1E install, the admin user must complete and save the Tachyon Settings form as shown in the picture. Completing this configuration allows the SGC for 1E app to communicate with 1E. To test whether the application is successfully synced with 1E server, click on Test Server Connections in the top right corner. Once the connection is established, click on Retrieve Instructions to import the instructions from 1E into ServiceNow.
The accompanying Help section explains how to configure each task.
Once you complete the above actions, click on Mark as Complete to complete this task of configuration and move on to the next part.
With the completion of this last step, your configuration is now complete, and the progress should show 100% complete.