Evaluating NightWatchman Enterprise
In this example, we show you how to install NightWatchman Management Center in a small test environment and how to associate devices with groups and applying policies. Once the environment is set up, the evaluation should take around an hour to complete.
Creating the test environment
Create the environment – the evaluation environment needs six networked computers, two servers and four 1E Agent clients. Configure one of the servers as a domain controller with Active Directory – this is purely to support the network and can be any configuration you want; the other is used for the NightWatchman Management Center.
Set the server as follows:
Category | Notes |
|---|---|
Windows server OS |
|
SQL Server | SQL Server must be configured to use a case-sensitive, accent-sensitive collation as the server default (the preferred collation is SQL_Latin1_General_CP1_CI_AS)
|
Web server | IIS Windows authentication must be enabled.
|
Runtime libraries | .Net is used by NightWatchman Management Center components except the database (refer to Using the core components for more information). Silverlight is only used by Enterprise View, refer to Installing Enterprise View for more information. You will be prompted to install it if it is not already available.
|
The client devices must be APM or ACPI-capable and be running Windows 7, Windows 8.1, or Windows 10.
The simplest way to install is to run as a system administrator and then use the administrator's account as the Nightwatchman Console administrator account and the Console service account.
The system administrator needs the following privileges:
Full rights to SQL database
Log on as service enabled.
Installing NightWatchman
Server installation
Install NightWatchman Management Center – install it on the non-domain controller server, the NightWatchman clients are installed on the client computers. NightWatchman Management Enterprise is provided as a number of msi installers.
NightWatchmanManagementCenter.msi
WakeUpSvr.msi
1ENightWatchmanAgent.msi or 1ENightWatchmanAgent-X64.msi
Note
For the WakeUp client, install the 1E Client. Tachyon server does not have to be installed and Tachyon functionality does not have to be enabled, refer to 1E Client - Deploying 1E Client on Windows for details.
Default server install – install all NightWatchman Management Center components on the NightWatchman Management Center server. For example, this can be done using the command-line:
msiexec
 /i NightWatchmanManagementCenter.msi
ACTIVE_DIRECTORY_SERVER=<DomainSvr>
ADMINACCOUNT=<Domain\UserName> SVCUSER=<Domain\UserName>
SVCPASSWORD=<UserPswd> /qn
where ACTIVE_DIRECTORY_SERVER is the fully qualified domain name of the domain controller or the domain name. Set the ADMINACCOUNT to the username for the person performing the evaluation otherwise they will not be able to open the NightWatchman Console. However, it is best practice to specify an AD group with the installer and evaluator accounts as members. SVCUSER and SVCPASSWORD are the domain account and password for the NightWatchman Console service account, which is normally added to the server's local administrator's group.
Client installation
1E NightWatchman Agent client installs – on each of the four client computers, install the NightWatchman agent. For example, this can be done using a command-line:
msiexec /i 1ENightWatchmanAgent.msi REPORTINGSERVER=<RepServ> /qn
where <RepServ> is the FQDN (recommended) or NetBIOS host server name where NightWatchman Management Center Web service is installed (local server for this evaluation).
Note
For the WakeUp client, install the 1E Client. Tachyon server does not have to be installed and Tachyon functionality does not have to be enabled, refer to 1E Client - Deploying 1E Client on Windows for details.
Configuring NightWatchman
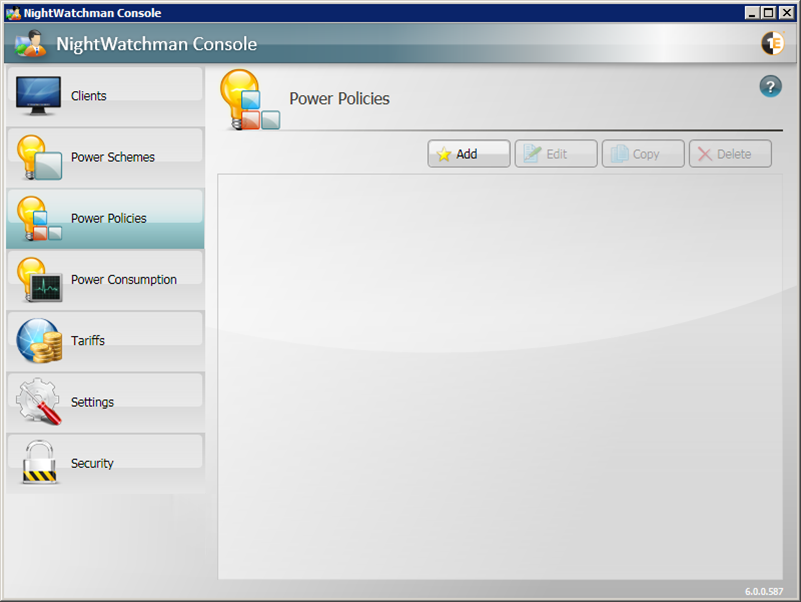
Open the NightWatchman Console – on the server where the NightWatchman Management Center is installed, locate the NightWatchman Console on the Start Menu and click it. This is where client computers are organized into groups and power policies are created and applied.
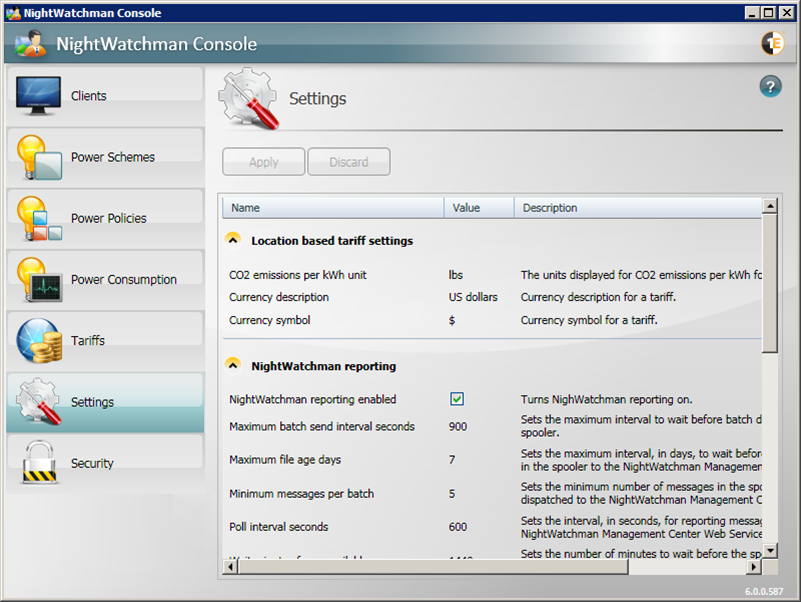
Set the currency symbol, description and CO2 emissions units – these are used in all reports and also in Enterprise View. By default, the currency is displayed in US dollars and the emission units in lbs per kWh. If you are in Europe, it is likely that you will want the currency displayed in Euros and the emission units in kg per kWh.
Note
The currency units are set when Installing NightWatchman Management Center. You can alter these post-installation using the The NightWatchman Settings section.
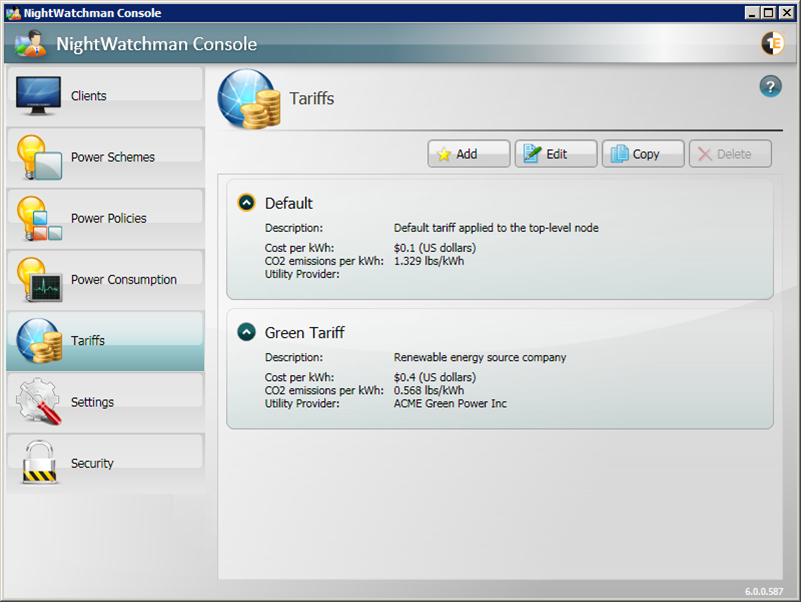
Update the default Tariff and create a new Tariff – reports use Tariff settings to determine the costs and CO2 emissions for the devices reporting back to the NightWatchman Management Center.
Note
A tariff consists of a cost and a quantity of CO2 produced per kWh of electricity used and the name of your utility provider providing the electricity at that cost.
The default tariff used in the absence of any other is 0.1 dollars per kWh and 1.329 lbs per kWh – these are system based and are not affected by updates you make. To edit the tariff, click Tariffs followed by Edit.

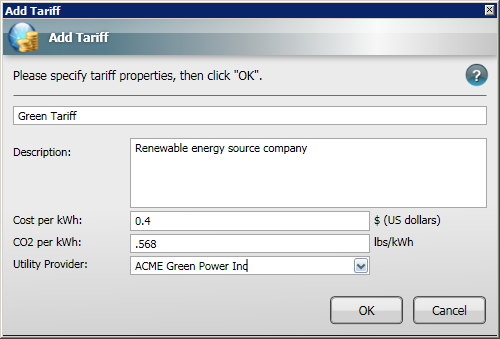
If you have locations using different utility providers, you can create tariffs to apply to computers in those regions, Click Add, populate the Add Tariff screen and click OK.
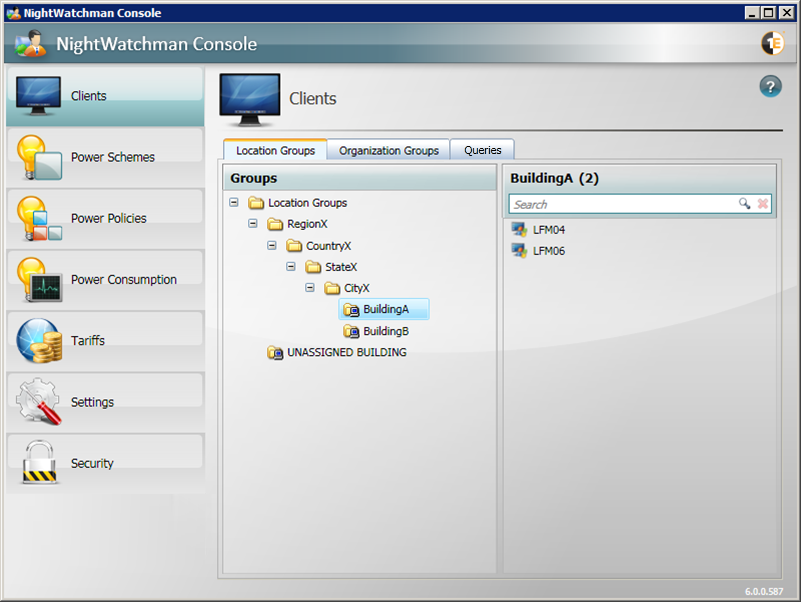
Create two new groups – create two groups to hold the client computers when the information has been returned by the NightWatchman clients. We'll use these to illustrate the use of the default and created tariffs. In this evaluation, we will create BuildingA and BuildingB as follows:
RegionX
 --> CountryX
      --> StateX
           --> CityX
                --> BuildingA
                --> BuildingB
To add these groups:
Select the Clients section.
Choose the Location Groups tab.
Right-click the Location Groups node.
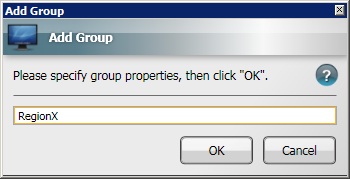
Select Add Group... from the context menu.
Enter RegionX to Add Group and click OK.
Click the group just created and add the next group below it in the same way. Keep repeating the process, creating the last two groups under RegionX.
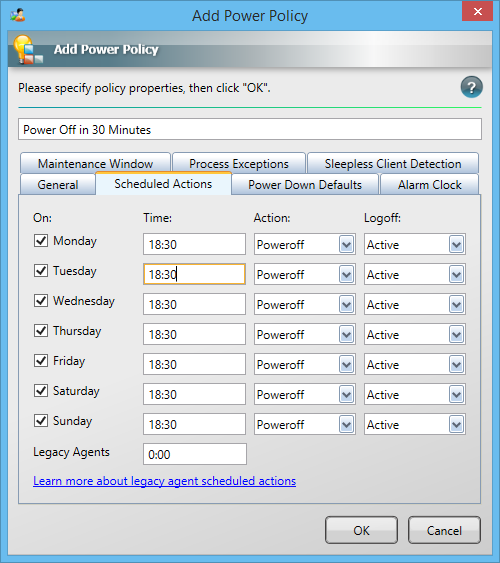
Create two new power policies – to shutdown the devices in 30 and 35 minute's time.
To add a new power policy:
Click Add to open the Add Power Policy dialog.
In the Schedule Actions tab, set a Poweroff time 30 minutes beyond the current time. In our example, if the current time is 18:00, we set the time to 18:30 and add a suitable name to be displayed when NightWatchman kicks in.
Click OK to save the power policy.
Repeat step a.
In the Schedule Actions tab, set a Poweroff time 35 minutes beyond the current time and add a suitable name to be displayed when NightWatchman kicks in.
Click OK to save the power policy.
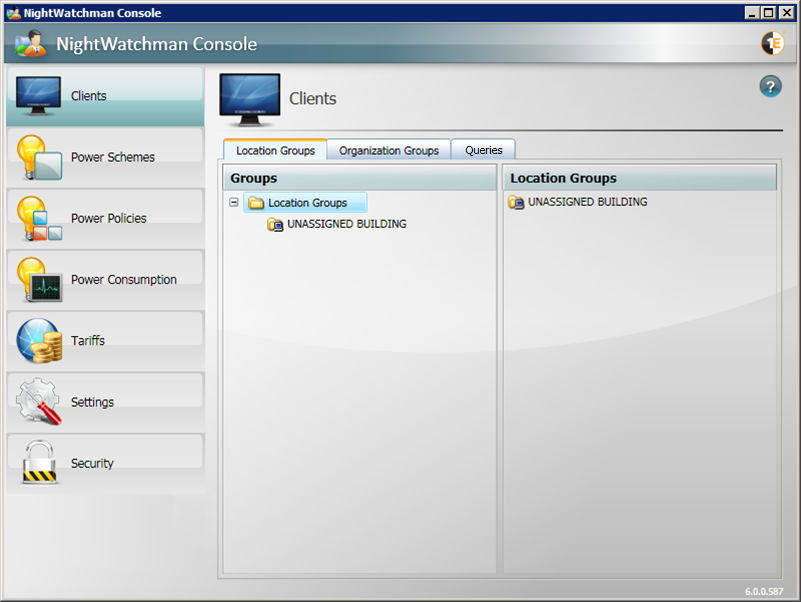
Verify the 1E agent client devices have appeared – click Clients and on the Location Groups tab, look for UNASSIGNED BUILDING. In our example, LFM04, LFM06, LFM07 and LFM08 are displayed.
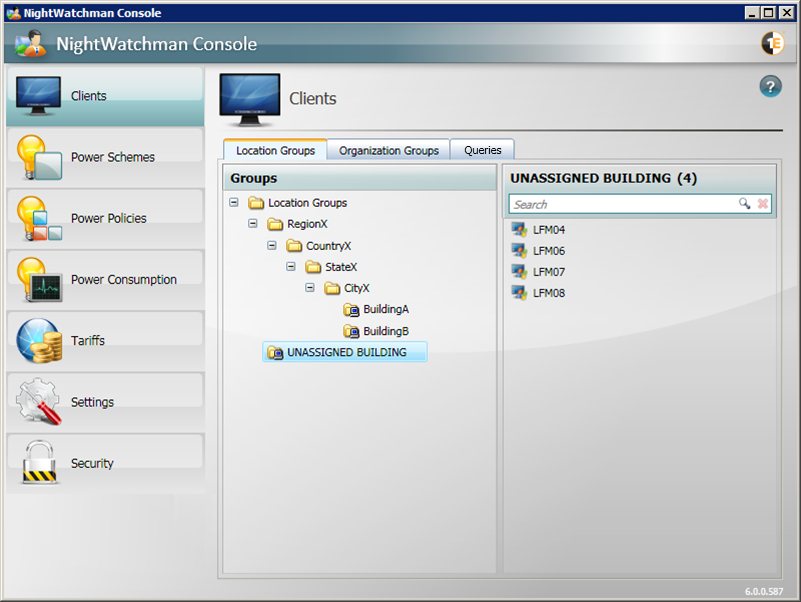
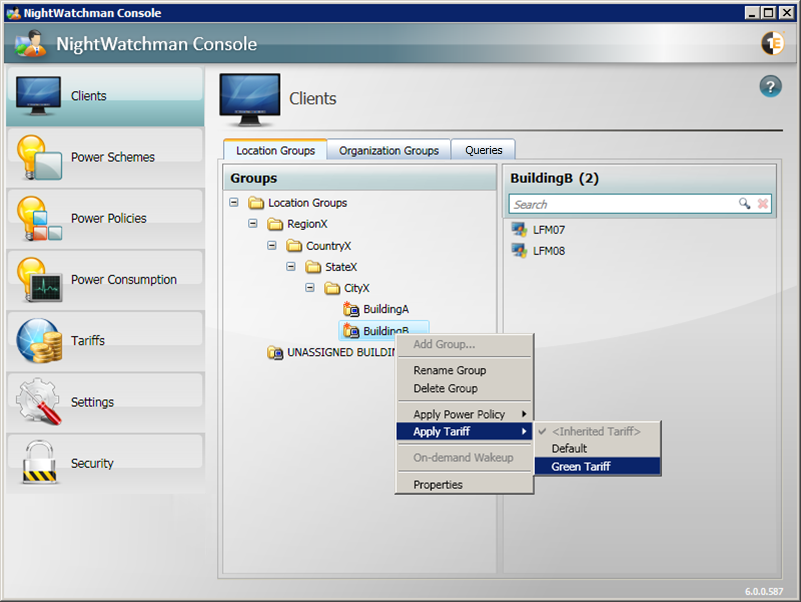
Assign the 1E agent devices to the groups – drag and drop the devices from UNASSIGNED BUILDING to of the two groups you created earlier. In our example, LFM04 and LMF06 are associated with BuildingA and LMF07 and LMF08 with BuildingB

Apply the power policies, one to each group – right-click the group node and from the context-menu choose Apply Power Policy and select the power policy to associate with that group.

By default the NightWatchman clients fetches their policies approximately every 15 minutes. You can choose to get the NightWatchman clients to update their policy sooner by running the following command in the NightWatchman installation directory on each client computer:
NightWatchman.exe - powerpolicyrefreshnow
This will refresh the policy only if the policy is new or has changed.
Apply the new tariff to one of the groups – right-click the group and from the context-menu, choose Apply Tariff and select Green Tariff.
Wait for the computers to shut down at their scheduled times – the computers in one group will shut down followed by those in the second group 5 minutes later. A countdown dialog is displayed for the first group with the message Power off at six thirty. When the countdown expires, NightWatchman shuts down LFM04 and LFM06 in BuildingA. Similarly, a countdown dialog is displayed for the second group with the message Power off at six thirty five. When the countdown expires, LFM07 and LFM08 are shut down.
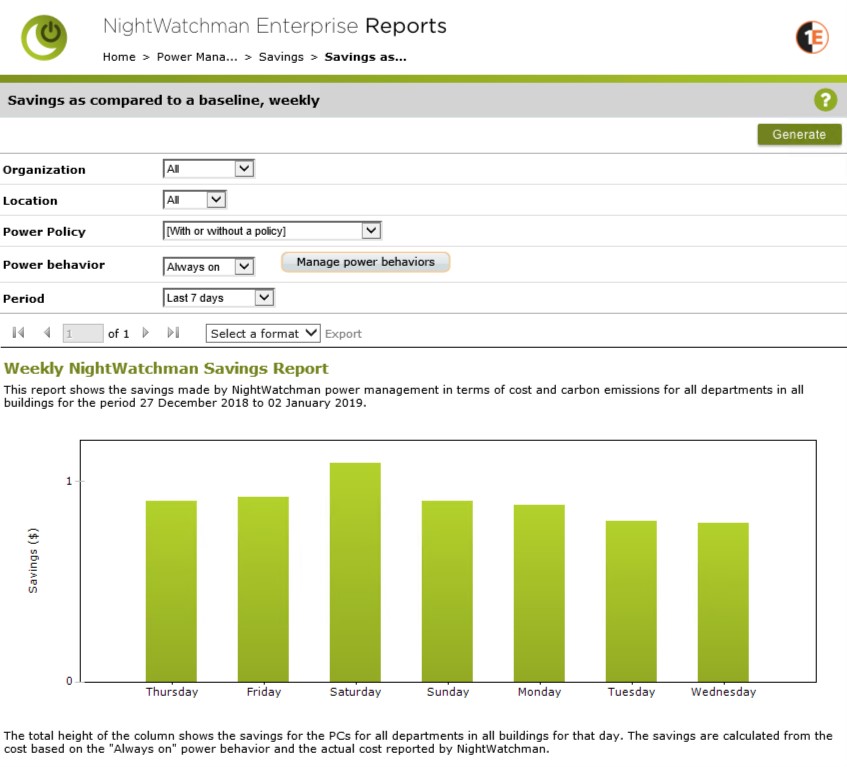
View the cost and savings reports – after a week of running, you can view the reports. The savings reports for BuildingA display savings based on the default power behaviour (always on) whilst BuildingB uses the Green Tariff.
Conclusion
This evaluation has demonstrated how:
NightWatchman Management Center and NightWatchman and WakeUp clients are installed on a test network
NightWatchman and WakeUp clients return information to the NightWatchman Management Center
Groups are defined to organize the computers
Power policies are created and applied to the groups
Tariffs are created and applied to location groups
Computers running the NightWatchman clients retrieve their policies associated with the groups they belong to
Power policies control the computers and shut them down at the set times
Settings made in the console effect the reports on the power consumption data returned by the computers.