Installing Web WakeUp
The 1E Client 4.1 or later must be installed with the WakeUp module enabled on target computers if you want to wake them with Web WakeUp.
Installing Web WakeUp with the wizard
To install Web WakeUp using the wizard:
On the Welcome screen, click Next.
On the License Agreement screen, agree the terms and conditions and click Next.
On the Destination Directory screen, choose the installation directory. The default is
On 32-bit systems:
C:\Program Files\1E\WebWakeUpOn 64-bit systems:
C:\Program Files (x86)\1E\WebWakeUp
On the NightWatchman Console Service screen, choose the location for the service. The location is not validated by the installer. Optionally, check Enable ActiveX integration (enables Web WakeUp web pages to use ActiveX controls) or Enable Remote Desktop (enables a remote session on a woken up computer).
On the Ready to Install screen, click Next.
Click Finish.
Installing Web WakeUp in unattended mode
To install Web WakeUp in unattended mode, on the command-line, run:
msiexec command-line, run: /i WebWakeUp.msi SERVICELOCATION=<SERVICE> /qn
where <SERVICE> is the location for the NightWatchman Console service.
For more details on the installer properties, see Web WakeUp installer properties.
Post-installation configuration
If the Web WakeUp website is installed on a different computer to the NightWatchman Console Service and you get errors attempting to access the Web WakeUp website, perform the following post-installation configuration:
Firewall access – on the server where the NightWatchman Console service is installed, enable TCP port 8750 access from the computer where the Web WakeUp website is installed.
NightWatchman Console service – set the SPN for the server where the NightWatchman Console service is running with
setspn –a WEBWAKEUP/SERVICE <NWMCAccount>where<NWMCAccount>is the account the NightWatchman Console service is running under in the formatdomain\serviceacctWeb WakeUp website – set the SPN for Web WakeUp website by editing the
<client>element in itsweb.configfile.<client> <endpoint address="net.tcp://ACMENWMC:8750/MachineSearchService" binding="netTcpBinding" bindingConfiguration="NetTcpBinding_MachineSearchService" contract="MachineSearchService.MachineSearchService" name="NetTcpBinding_MachineSearchService"> <identity> <servicePrincipalName value="localhost" /> </identity> </endpoint> <endpoint address="net.tcp://ACMENWMC:8750/AuthorisedMachineService" binding="netTcpBinding" bindingConfiguration="NetTcpBinding_AuthorisedMachineService" contract="AuthorisedMachineService.AuthorisedMachineService" name="NetTcpBinding_AuthorisedMachineService"> <identity> <servicePrincipalName value="localhost" /> </identity> </endpoint> </client>Update both values for Service Principal Name from:
<servicePrincipalName value="localhost" />
to (where the SPN NWMCSPN had been previously created):
<servicePrincipalName value="NWMCSPN" />
By default,
web.configis located in:On 32-bit systems:
C:\Program Files\1E\WebWakeUp\WebsiteOn 64-bit systems:
C:\Program Files (x86)\1E\WebWakeUp\Website
Enabling Web WakeUp authorization
You can configure Web WakeUp to prompt users for authentication to wake computers up from the Web interface. When you do this, users can only register or search for computers that they are associated with in the Web WakeUp authorisation database. You can enable wake up authorisation:
When you install NightWatchman Management Center using the
STRICTAUTHORIZATIONinstaller property on the command-linePost-installation by setting the
AuthorisedMachineModuleparameter in theNWM.ServiceHost.exe.configfile. See Turning authorization on or off.
To enable users to wake up computers on the network, you must add their credentials to the tbWWU_Authorised_UserMachines table in the AgilityFrameworkReporting database. The columns in this table are:
UserTicket – the identifier for the user returned by the authentication mechanism. For Windows, it takes the format
Domain\User.NetbiosName – the NetBIOS name for the computer the user can wake up. Use * if you want the user to wake up any computer.
DomainName – the domain name for the computer
For example, if you want Joe to wake up ACMEDEV00017 and ACMEDEV00015 and Mary to wake up all the computers on the ACME network, update the table as follows:
UserTicket | NetbiosName | Domain |
|---|---|---|
ACME\Joe | ACMEDEV00017 | ACME |
ACME\Joe | ACMEDEV00015 | ACME |
ACME\Mary | * | This field must be set to SQL NULL. This is done by entering |
The Web WakeUp additions to the Agility Framework database also include a batch job that will populate the table from a .csv input file. See Web WakeUp authorization table for further details.
Restricting access to the Web WakeUp authorization service
You must lock down the Web WakeUp authorisation service in IIS as it provides the AddAuthorisedMachine , DeleteAuthorisedMachine , GetAuthorisedMachines and UpdateAuthorisedMachine methods that make it possible to update the tbWWU_Authorised_UserMachines table programatically. If access is not restricted, any user with web access and the right knowledge can use the Web WakeUp authorization service to grant themselves or other users permissions to wake any computer.
To lock down the service, update the NTFS file permissions for the AuthorisationServices.asmx file to restrict access so that only Web WakeUp administrators can browse to the service. On a default installation, this file is located in C:\Program Files\1E\WebWakeUp\Website\WebServices
Another way of restricting user access to waking arbitrary computers is to configure the Web WakeUp site to not display the wake up computer, search and register pages. If you do this, you will need to register the appropriate computers for all users of the Web WakeUp site with the AddRegisteredMachine and GetRegisteredMachines methods to update the tbWWU_Default_UserMachine_Mapping table. These methods are accessed from http://host/WebWakeUp/WebServices/LocalServices.asmxpage. See the Web WakeUp local services API for information.
Deploying the Web WakeUp ActiveX Control to clients
The Web WakeUp ActiveX control(WebWakeUpActiveX.msi) is supplied in a stand-alone installer. This means that the control can be rolled out across a network without requiring user intervention the first time they visit the Web WakeUp site.
There is a single installer property that controls whether the ActiveX control appears on the pre-approved list which allows it to be enabled in Internet Explorer without user intervention. To run this in unattended mode with pre approval, use: Msiexec /i WebWakeUpActiveX.msi PREAPPROVED=1 /qb
Property | Default value | Description |
|---|---|---|
PREAPPROVED | 1 | Enable or disable addition to the pre-approved list without user intervention when browsing the site
|
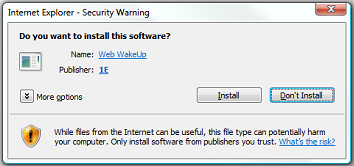
If the Web WakeUp ActiveX control has not been previously installed by the network administrator, the first time you browse to the web service, you will be prompted to install the Web WakeUp software. Installing the ActiveX control enables Web WakeUp to confirm the name of the local computer, specifically for the purpose of registering the computer as the default wake up.
If you choose not to install the ActiveX control, Web WakeUp attempts to use reverse DNS lookup in order to derive the local computer name. The accuracy of this operation is dependent on DNS being correctly configured and up-to-date and may affect Web WakeUp's ability to wake the computer at a later date.
You can use reverse DNS lookup instead of the Web WakeUp ActiveX control by changing a setting as described in Web WakeUp server configuration: ActiveX usage.
Either the Web WakeUp ActiveX control or reverse DNS lookup is required by the Register page (tab). If neither method is available to you then you can choose to remove this page from the website, as decribed in Web WakeUp server configuration: website control.
Detailed requirements
A definitive checklist of prerequisites and dependencies you need to meet in order to install Web WakeUp.
Component | Product | Notes |
|---|---|---|
OS |
| Web WakeUp server will installed on systems running these OS and can be viewed from computers running these client OS. It also supports mobile devices running BlackBerry OS 4.7 and 4.6, Apple iPhone 3G and 4, Apple iPad and Windows Mobile OS 7.0. |
Web servers |
| Web WakeUp server works with these Web servers. IIS Windows authentication must be enabled. |
Runtime libraries |
| These runtime libraries are required. |
Browsers |
| Web WakeUp works with these browsers.
You can use reverse DNS lookup instead of the Web WakeUp ActiveX control by changing a setting as described in Web WakeUp server configuration: ActiveX usage. Either the Web WakeUp ActiveX control or reverse DNS lookup is required by the Register page (tab). If neither method is available to you then you can choose to remove this page from the website, as decribed in Web WakeUp server configuration: website control. |
Mobile devices |
| Web WakeUp website is supported on these mobile device OS versions |
Installation and service accounts | To install Web WakeUp, you will need the follwing accounts. Note1E Client 5.1 or later (with WakeUp client enabled) must be installed on target computers if you want to wake them with Web WakeUp. For details on installing the 1E Client with the WakeUp client module enabled, please refer to 1E Client - Deploying 1E Client on Windows: WakeUp. Installation account
Application pool account
| |