Step through creating power policies
Tip
In this tutorial, we are going to:
Create a new power policy for Sales.
Put computers in a hibernate state at 18:00 Mondays to Fridays using a passive logoff so as not to interrupt users. Over the weekend, power off computers at 13:00 and use a force logoff to ensure that computers are powered off at that time.
Set the behavior for the weekday hibernate and weekend power off events.
Wake up computers at 07:00 on Mondays only and for the rest of the week at 07:00. We will not be waking up computers over the weekend.
To create a new power policy:
In the Power Policies section, click the Add button to open the Add Power Policy dialog.

In the General tab, we create a new power policy called Sales.
In the Power Schemes drop-down, select the Frequent User scheme and associate it with the Sales power policy.
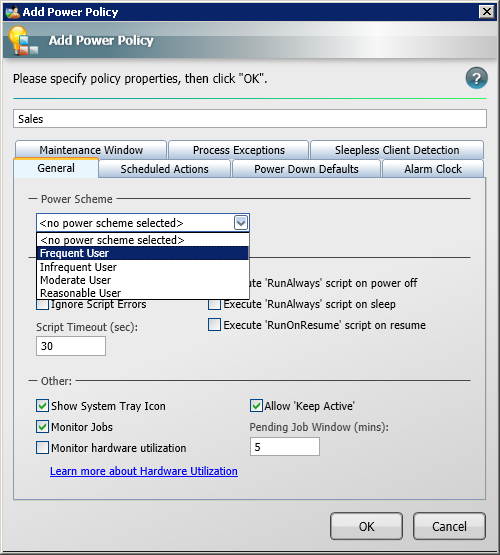
We choose this policy to minimize the impact of power management settings for sales personnel so that their displays do not turn off so often, the hard disks power down less, etc. We also leave the boxes for both the Show System Tray Icon and Allow Shutdown Deferral at their default settings. By doing this, we configure the NightWatchman client to display its system tray icon and enable the user to defer scheduled shutdowns. This option enables sales personnel to have control over the conditions of the shutdown and not interrupt a task they are involved in, such as a sales call.
Scheduled actions lets you determine the behavior of computers for Sales when a power down event takes place. In this tutorial, we are going to put computers for Sales into a hibernate state at 18:00 every Monday to Friday, but if staff are still logged in and working, they have the option to defer the hibernation. On Saturday and Sunday, we are going to power off computers at 13:00.
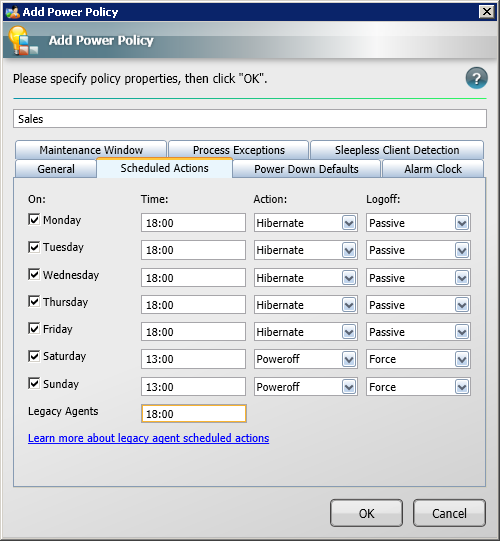
Click the Scheduled Actions button to determine what happens each day of the week.
Check the boxes for each of the days you want the event to take place and set the time, action and shutdown action for it. We set the value for Legacy Agent to 18:00 just in case we still have legacy 1E Agents in the environment (they do not support individual scheduled actions). These legacy agents will use the values for Action and Logoff in the Power Down Default tab. Power down defaults determines the behavior of scheduled actions.
Click the Power Down Defaults tab to set the default behavior for Scheduled Actions.
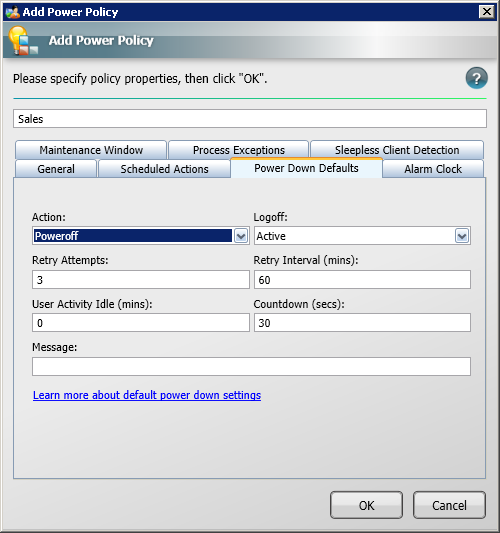
The Action: field is applicable to NightWatchman once off and legacy 1E Agents that do not support the individual daily scheduled actions of version 6.1. The Logoff: field is used by maintenance windows, NightWatchman once off and legacy 1E Agents. The rest of the fields are applicable to all scheduled actions. We are going to leave these at their default values.
Click the Alarm Clock tab. Alarm clocks lets you control when computers gets woken up. In this example, we are going to wake up computers on Mondays at 06:00 because we know that staff turn up early on Mondays and at 07:00 for the rest of the weekdays.
Note
To configure these options, you will need to have set the WakeUp integration option during installation.
Check the Enable Alarm Clock checkbox to enable wake up functionality. If you also want to turn the displays on, check the Turn On Monitor checkbox.
Set the wake up time for Monday at 06:00.
Note
The wake up time entered must comply with a valid hh:mm format, including use of a leading zero for hours 0-9am.
Set the wake up time for Tuesday through to Friday at 07:00.
Clock OK.