WakeUp servers
NightWatchman Management Center can communicate with multiple WakeUp servers to enable scalable wake up support across large and geographically diverse networks. These WakeUp servers automatically register themselves with the NightWatchman Management Center.
Site Boundaries
Normally NightWatchman uses subnets or Configuration Manager site boundaries to determine which WakeUp server is used to wake up a client computer with a particular IP address.
In non-Configuration Manager environments, the site boundaries for the WakeUp servers are set in the NightWatchman console. In this configuration, the first WakeUp server to register is initially given a global site boundary so that it may cover all wake up requests until the boundaries for all the registered WakeUp servers have been configured.
In a Configuration Manager environment, the site boundary for each WakeUp server corresponds to the site boundary of the Configuration Manager server where the WakeUp server is installed. In the NightWatchman console, the site boundaries are imported automatically from Configuration Manager and are read-only, though additional inclusion and exclusion lists can be added.
For both Configuration Manager and non-Configuration Manager environments, additional exclusion and inclusion lists can be defined to tailor the coverage of the WakeUp servers.
WakeUp servers have an implied order that governs which server is used when the site boundaries overlap. This Server order can be modified in the NightWatchman console. You can delete WakeUp servers from the NightWatchman console, doing this prevents the deleted server from processing any future wake up requests. If a deleted WakeUp server subsequently re-registers with NightWatchman Enterprise, it will re-appear in the NightWatchman console.
Site Codes
As an alternative to boundaries, NightWatchman can use Configuration Manager site codes in Configuration Manager environments. By default, NightWatchman will use check the site code first and only use the boundaries if a match is not found. This feature was introduced with 7.0.0 and was announced in the release notes as "WakeUp server mapping process able to map based on assigned Configuration Manager site". However, there is a known issue with this feature in 7.0.0, so you must also use the latest NightWatchman Accumulated hotfix for 7.0.0.
The NightWatchman console enables the network address for a particular WakeUp server to be modified. The new address is used when building the WMI namespace for connecting to the server to issue wake up requests. The validity of the namespace can be verified in the NightWatchman console.
The legacy WakeUp server
When an upgrade is made from a version prior to 6.0.500, a legacy server will appear in the NightWatchman console with a global boundary so that it handles all wake up requests. In earlier versions, only one WakeUp server could be registered with the NightWatchman Management Center.
Following the upgrade, this previously used WakeUp server appears in the NightWatchman console as #Upgrade# and has a global boundary of 0.0.0.0 - 255.255.255.255. As you upgrade your WakeUp servers, these will automatically register with NightWatchman Management Center and you can adjust the server boundaries as necessary to provide scalable coverage.
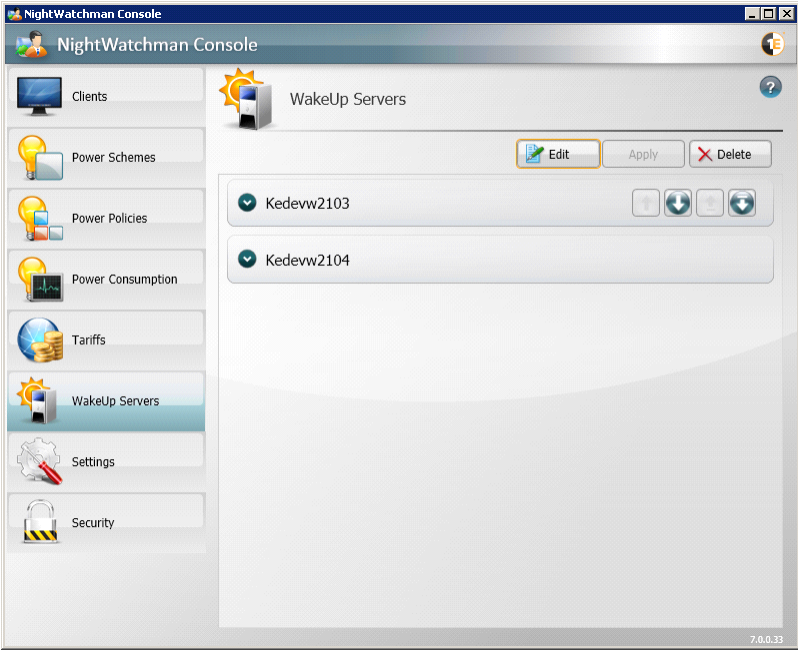
Managing WakeUp servers in the NightWatchman console
In the NightWatchman console, the WakeUp servers section displays a list of registered servers where you can:
Edit each server's subnet site boundaries
Edit IP address
Edit the server order which dictates which WakeUp server gets takes precedence in the event of subnet and IP addresses overlapping,
Delete server registrations to prevent a particular WakeUp server from being used.
Note
When you modify any of these values, the changes may take several minutes to resolve, depending on the number of servers involved and the speed of the network.
Editing server site boundaries
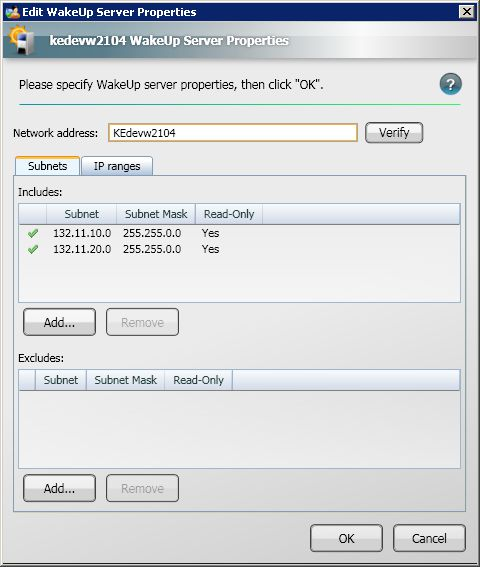
WakeUp servers use site boundaries that determine which server is used to wake up a client computer with a particular IP address. Site boundaries are defined using IPv4 and are represented using either subnets or IP ranges or a combination of the two. These are configured with inclusions and exclusions to allow maximum control over which IP addresses are covered by the WakeUp server.
In ConfigMgr environments, there are entries for subnets that come from the ConfigMgr server where the WakeUp server is installed. These entries cannot be removed but they can be adjusted by adding further inclusions or exclusions.
To edit a particular server's site boundaries, select the server from the WakeUp server list and click the Edit button to open the Edit WakeUp server Properties dialog. For example, WakeUp server kedevw2104 has 2 inclusions and no exclusions.
Adding a subnet inclusion or exclusion
To add new subnet:
Click the Subnets tab in the Edit WakeUp Server Properties dialog.
Click the Add... button for Includes: or Excludes: to open the Enter IPv4 subnet dialog.
Enter the subnet address and subnet mask. Each subnet is defined using its base subnet address and a subnet mask.
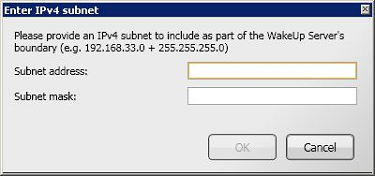
Click OK to save the new subnet inclusion or exclusion.
Adding an IP range inclusion or exclusion
To add an IP range, select the IP ranges tab in the Edit WakeUp Server Properties dialog, as shown in the following picture, then click on the Add... button below either the Includes or Excludes lists.
Click the IP ranges tab in the Edit WakeUp Server Properties dialog
Click the Add... button for Includes: or Excludes: to open the Enter IPv4 range dialog.
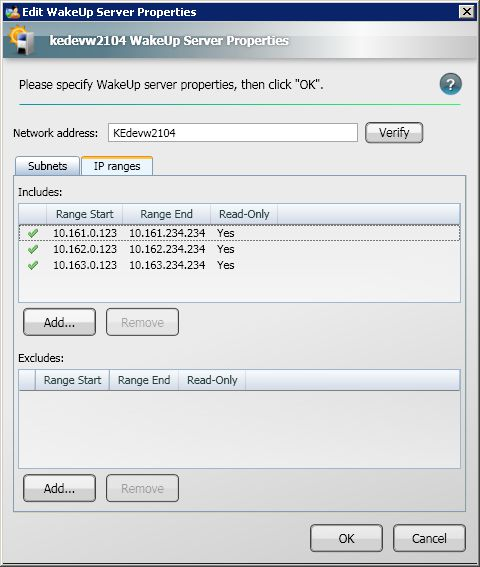
Enter the IP addresses for the range you want created.
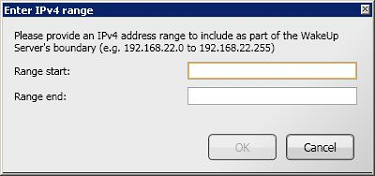
Click OK to save the IP range.
Server order
WakeUp servers have an implied order that governs which server is used when site boundaries overlap. This order is maintained in the NightWatchman Console. The servers at the top of the list takes precedence over those below it.
To change the order of the WakeUp servers:
Select the server to promote or demote from the list.
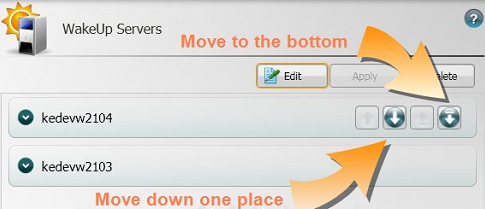
If the server is already at the top of the list, click the Move down one place or Move to bottom arrow to reposition the selected server in the list.
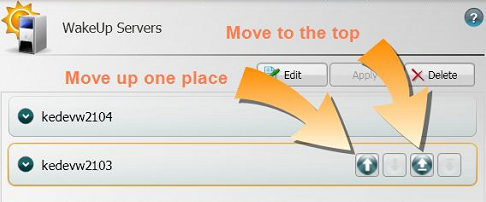
If the server is not the top most in the list, click the Move up one place or Move to the top arrow to reposition the selected server in the list. Click the Apply button to accept the new order for the server.
Deleting servers
You can delete WakeUp servers from the NightWatchman Console to stop it from processing wake up requests. If a deleted WakeUp server subsequently re-registers with NightWatchman Enterprise, it will re-appear in the NightWatchman Console.
To delete an existing WakeUp server:
Select the server from the WakeUp servers list.
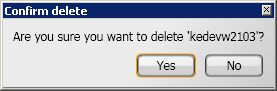
Click the Delete button.
In the Confirm delete dialog, click Yes to delete the server or No to cancel.
WakeUp servers which do not report for 30 days are deregistered and no longer displayed in console.
Managing network address for WakeUp servers
The NightWatchman Console enables the network address for a particular WakeUp server to be modified. The new address is used when building the WMI namespace for connecting to the server to issue wakeup requests. The validity of the namespace can be verified in the console. As WakeUp only returns the NetBIOS name for the WakeUp server, you will need to change it if:
The DNS in your environment is not fully configured, set this to the FQDN for the WakeUp server
Your network is configured to only use FQDN, set this to the FQDN for the WakeUp server
You have load balanced the WakeUp server for high-availability, set this to the cluster node name for the WakeUp server.
To change the network address for a particular WakeUp server:
Select the server from the WakeUp server list.
Click the Edit button.
In the Edit WakeUp Server Properties dialog, enter the new network address.
Click the Verify button to check its validity.