Upgrading to NightWatchman Management Center 7.3
You can upgrade NightWatchman Management Center 7.2 or 7.2.500 to 7.3 directly. Upgrades of prior versions of NightWatchman Management Center have been tested with only their successive version or its successive version and so you should upgrade to intermediate releases if you are using an older version of NightWatchman Management Center. Contact 1E Support if that is not practical.
The process to upgrade an existing NightWatchman Management Center installation to 7.3 is:
When running the NightWatchman Management Center installer, accept all default options except where stated otherwise. The installer checks the prerequisite are met and detect that this is an upgrade scenario
On the Custom Setup screen, ensure that all components are selected for installation. If NightWatchman Management Center has been installed at a non-default location, ensure that the 7.3 install path matches – click Browse and navigate to the correct location.
On the Database Server Configuration screen, ensure that the correct SQL server is selected.
Note
Ensure that the option to Drop any existing NightWatchman Management Center database is not selected.
On the Website Configuration screen, ensure that the same IIS settings are used as the original installation.
On the Console Service Configuration screen, ensure that the same domain and account settings are used as the original installation. You will need to enter the password for the NightWatchman service account.
On the 1E ActiveEfficiency Server screen, you can enable and configure the integration with ActiveEfficiency - ActiveEfficiency Server must already be installed and be accessible on the network before you do the integration.
See the NightWatchman Enterprise and ActiveEfficiency page for more details
On the Environment Setup screen, ensure that the appropriate environment size is selected - this setting governs the default timings and intervals for server and client tasks. On an upgrade, an attempt will be made to default the currency code to the one set in the previous version. If this is not possible the currency code will be set to the one associated with the current system locale.
After the installation wizard has completed successfully, if the application pools were stopped using Method 2, these must be stopped again using the previously described steps.
Once executed successfully, the remaining NightWatchman Management Center and WakeUp SQL agent jobs will be enabled.
NightWatchman Console
When all SQL Agent jobs are enabled, start the NightWatchman Console and check all tabs for the preservation of data including structure, power policies, power consumption values and security.
Custom reports
This section can be skipped if using the standard reports. If there is a requirement to re-map custom reports, the following steps can be used
Copy any custom report files (.rdlc and .rdlx) obtained in the preparation steps from the temporary location to the NightWatchman Management Center installation directory. By default this is
C:\Program Files (x86)\1E\NightWatchman Management Center\ReportConsole\Source\Report DefinitionsNote
Depending on version installed prior to the upgrade, these files may exist in
C:\Program Files (x86)\1E\NightWatchman Management Center\ReportConsole\Source, if so these can be moved to the Report Definitions subfolder.Check each custom report
.rdlxfile (open with a text editor) and confirm that the referenced stored procedure exists within the AgilityFrameworkReporting database. If it does not exist, open the equivalent .sql file created during the preparation steps and execute against the AgilityFrameworkReporting database to create the stored procedure.If the SQL Server database is installed locally, check the permissions of the custom stored procedures and ensure that
NT AUTHORITY\NETWORK SERVICEhas execute permissionsIf the SQL Server database is remote, ensure that the machine account DOMAIN\Machine$ has execute permissions
Open each custom report
.rdlxfile with a text editor and note the "category"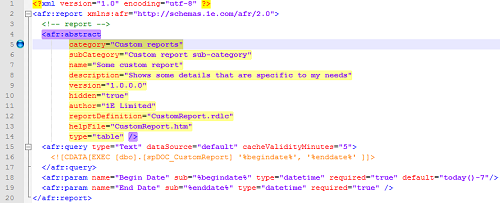
In the reports source directory, which is by default
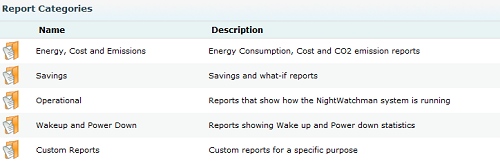
C:\Program Files (x86)\1E\NightWatchman Management Center\ReportConsole\Source, editreportcategories.xmland add a category name as per the.rdlxfile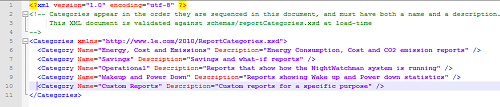
Restart the NightWatchman Management Center Reports Console, select the custom report menu and run the report
Repeat steps for all required custom reports
Note
If a custom report returns an error on execution and there is an on-going requirement for this information, contact 1E Support for assistance. As custom reports are not covered by the standard 1E support agreement, any remedial work to allow compatibility with 7.2 may be chargeable.
Upgrading the Import Wizard scripts
If import scripts are used to manage the NightWatchman Console structure and assignment of computers, the following steps can be used:
Copy any import script files (
.vbsand.csv) obtained in the preparation steps from the temporary location to the NightWatchman Management Center installation directory which is by defaultC:\Program Files (x86)\1E\NightWatchmanManagement Center\ConsoleService\ImportScriptsTo verify that the import wizard process works following the upgrade, in the NightWatchman Console, move a computer from an in-use location or organization tier to the UNASSIGNED BUILDING or UNASSIGNED DEPARTMENT folder
Run the import wizard using the GUI (or using the Task Scheduler if previously configured) and select the appropriate script from the earlier version. Ensure that the import wizard completes successfully and the computer is moved to the expected location or organization tier.