The Agents screen
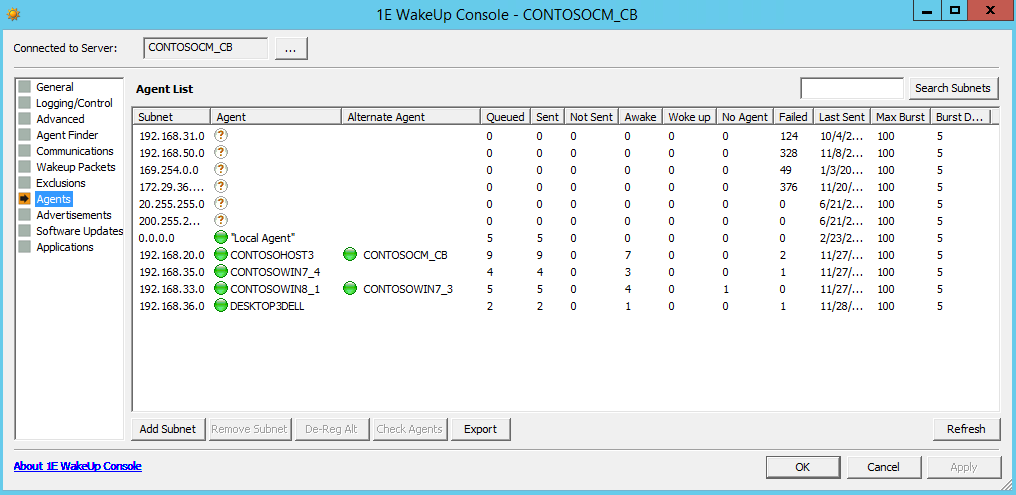
The Agent screen displays a list of all discovered 1E Agent systems and enables centralized control over their settings. When a subnet is discovered, the Primary and Alternative Agents are displayed under Agent List.
In Dedicated Agent mode the 1E Agent systems populate the list box by registering with the WakeUp Server at service start-up. In multi-agent mode the 1E Agents are listed after they have been found. In the Agent screen, you can:
Controls | Notes |
|---|---|
Add Subnet | Adds a specific subnet to the Agent List. Once the subnet is added, you can check for 1E Agents on it. Subnets are added automatically as these are checked when a scheduled wakeup is performed. |
Remove Subnet | Removes a subnet from the Agent List. Only enabled when the selected subnet has no registered Agents. |
De-Reg Agent | Only enabled when a subnet is selected from the Agent List. De-registers the primary agent for the selected subnet from use by WakeUp Server. If a previously discovered alternate agent exists it will become the new primary agent. Note1E Agents re-register at start-up so the de-registered 1E Agent may re-appear. If you do not want that machine to be used as an 1E Agent, remove the 1E Agent from the machine. |
De-Reg Alt | De-registers the alternative 1E Agent for the selected Subnet. |
Check Agents | Checks the primary agent and alternative agent on the selected subnet. The check pings selected 1E Agents. If the scan fails for the primary and alternative agents, a complete scan for the subnet is done. NoteThe process is completely automatic as the Primary and Alternative Agents are also checked when a scheduled wakeup is performed. |
Export | Export the subnets to a CSV file. In Microsoft Excel or a similar program you can then analyze the subnets to identify problems, review results, etc. |
Refresh | Refreshes the details for selected 1E Agent system. |
Search Subnets | Enter the first part of a subnet or subnets you're interested in to and then click Search Subnets to have only subnets starting with that part. For example, "192.168" will return all subnets start with 192.168. Start with a percentage sign if you want any subnets including the part. For example, "%168" will return all subnets that include "168" anywhere in them. |
Explaining the Agent List box
The following describes the columns for the Agent List box:
Agent | Explanation |
|---|---|
Subnet | Lists the subnets managed by the WakeUp server. |
Agent | Lists the name for the Primary Agent. It is the computer on each subnet that manages wakeup requests for the subnet. |
Agent state | This is a column in the export file and the icon next to the Agent name in the console. See the next table (below) for the significance of the status icons. |
Alternate Agent | Lists the name for the Alternate Agent. The computer will serve as the purpose of the primary agent if the primary agent is not available. |
Alternate state | This is a column in the export file and the icon next to the Alternate Agent name in the console. The icons are the same as the Agent State icons. |
Queued | Lists the number of wake ups that have been received from the WakeUp server and sent on the subnet. |
Sent | Lists the number of computers sent a wake up signal |
Not Sent | Lists the number of computers not sent a wake up signal. |
Awake | Lists the number of target computers which were already on when the primary or alternate sent out the magic packet. Only available in Multi-Agent mode. |
Woke Up | Lists the number of target computers waking up in response to the magic packet. Only available in Multi-Agent mode. |
No Agent | Lists the number of computers already awake but without a 1E Agent installed (and therefore could not respond to wakeup requests). |
Failed | After sending magic packets, the primary or alternate waits for a pre-determined time for replies. Any computers which have not responded are sent an ICMP ping. Computers responding to this are classified as No Agent (they are awake, but WakeUp cannot be certain if this is due to a magic packet or if the machine was awake already). Computers not responding to the ping are classified as Failed. |
Last Sent | Lists the last time a wake up signal was sent. |
Max Burst | Lists the MAXBURST value set for the primary and alternate agents. |
Burst Delay | Lists the BURSTDELAY value set for the primary and alternate agents. |
In Site | This is a column in the export file that doesn't have an equivalent in the WakeUp Console. Its value is always 1, indicating that the subnet belongs to the WakeUp server you connected the console to. |
See the Understanding WakeUp Status page for more details.
The significance of the status icons are:
Icon | Export file value | Status | Notes |
|---|---|---|---|
 | 0 | Unknown | 1E Agent has an unknown status. When a new subnet is added the primary and alternative agents have not yet been discovered thus having unknown status. |
 | 3 | OK | 1E Agent has been discovered and is working as expected. |
 | 1 | Unavailable | The 1E Agent has de-registered itself. |
 | 2 | Connection failed | Connectivity to the 1E Agent is severed. The machine may have been powered down or a network cable removed so that it could not de-register. |
Clicking on a column a column header will cause the list to be sorted in ascending order of that column. Clicking the column header again will cause the list to be sorted in descending order.
Manually adding a new subnet
The Agent Discovery Process is a background task that automatically locates and processes new subnets. It is also possible to manually add a new subnet – most useful in lab environments or during a roll-out when performing targeting testing.
You can manually add a new subnet to the WakeUp discovery by clicking on the Add Subnet button to open the Add Subnet dialog.
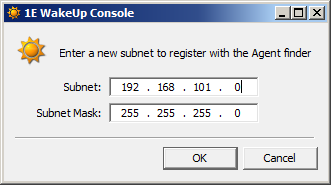
Once a new subnet has been added, it is displayed in the console. Adding the subnet also triggers a discovery, though you may have to wait for the WakeUp Console to refresh before the 1E Agents are listed. You can always force a discovery by selecting the subnet and clicking the Check Agents button.
Modifying the discovered agents
Agent discovery is largely automatic, but from the console you do have the ability to de-register both the primary and alternate agents and trigger a discovery for a particular subnet. You can modify the primary and alternate agents for a subnet by selecting a subnet in the Agent List. If the subnet has already been discovered, the De-Reg Agent, De-Reg Alt and Check Agents buttons are enabled.
Clicking the De-Reg Agent button de-registers the primary agent for the selected subnet. If an alternate agent has been previously discovered, it will become the new primary agent.
Clicking the De-Reg Alt button de-registers the alternate agent for the selected subnet.
Clicking the Check Agents button forces a rediscovery of the selected subnet. This may rediscover previously de-registered 1E Agents.