Installing the Mac 1E Agent
The process to install the Mac 1E Agent is:
Prerequisites
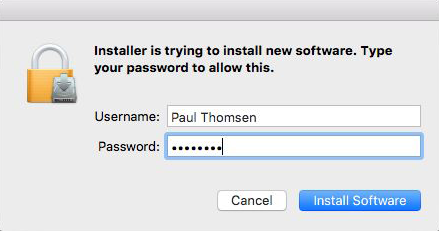
You must have administrative privileges to the machine to run the installer. Throughout this process, you will be prompted to enter the administrative password at various stages of the installation.
If you are using FIPS communications, ensure that the same setting is made for all NightWatchman Management Center, WakeUp Server and 1E Agent components. See options for secure communications for further details.
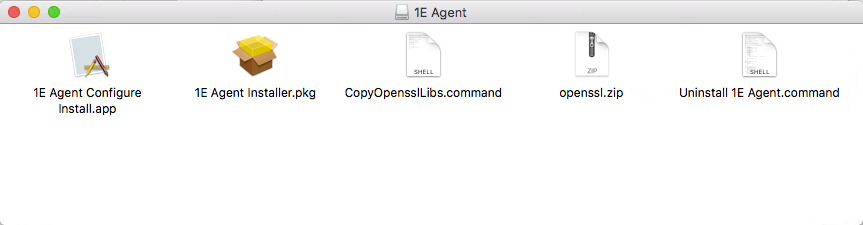
Before you can run the installer, you must mount the 1E Agent.dmg disk image. Once you have mounted the disk image, you will see five files in it.
 |
Installing the Open SSL libraries
To install the Open SSL libraries:
Double-click CopyOpensslLibs.command to install the Open SSL libraries.
Enter your administrator password. If the Open SSL libraries are already installed, you will not be prompted for your administrator password.
A window is displayed to notify you that the process has completed.
Close that window.
Installing the Mac 1E Agent
The main 1E Agent files are installed at the root of the system disk in: /Library/Application Support/1E/NightWatchman
To enable remote deployments in unattended mode:
The installer supports an optional pre-configuration file. This must be located on the computer where the installation is taking place with the following path and file name:
/Library/Preferences/com.1E.NightWatchman.PreConfiguration.plistIf the installer locates the file, it looks for the license number, the location (HTTP or HTTPS) of the server and applies them to the NightWatchman preference file. If the server is not found, it sets reporting to false.
At the end of installation, the installer creates an installer configuration file in /Library/Preferences. When the installer launches the 1E Agent daemon, the daemon looks for this installer configuration file and updates the installer settings. After applying those changes, it deletes the installer configuration file. APreConfiguration file takes precedence over the installer configuration file.
To install the Mac 1E Agent:
Double-click 1E Agent Configure Install.app.
Enter your production license key. If you do not provide one, you are subject to a 30-day evaluation period.
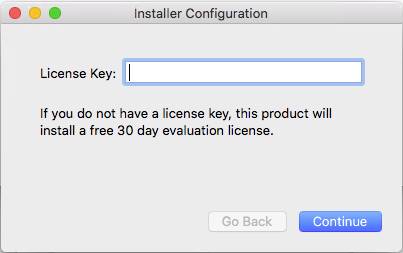
Click Continue.
Choose your communications protocol.
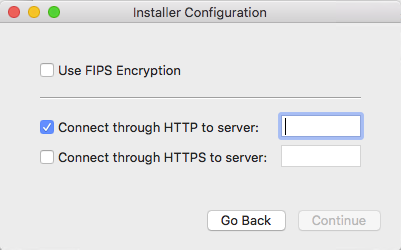
If the connection protocol you are using is HTTP, check the Connect through HTTP to server option and provide the NetBIOS name of the NightWatchman Management Center website server next to it.
If the connection protocol you are using is HTTPS, check the Connect through HTTPS to server option and provide it's FQDN to the NightWatchman Management Center website server next to it.
If you are using FIPS encryption, check the Use FIPS Encryption option. Ensure that the same setting is made for all NightWatchman Management Center, WakeUp Server and 1E Agent components. See options for secure communications for further details.
The installer will validate the location of the NightWatchman Management Center Web server. In the even that it fails to locate it, you will be prompted with a message.
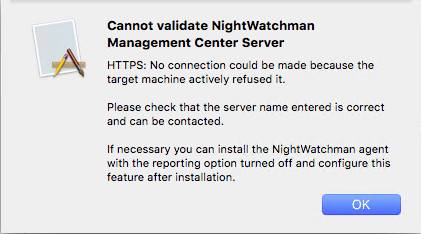
Click OK.
Check the server name is correct and that the NightWatchman Management Center website is up and running and contactable from the computer where the installation is taking place.
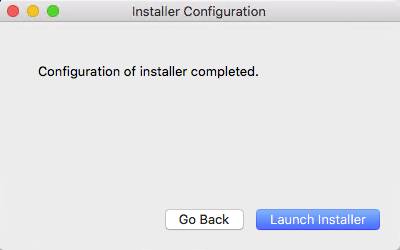
When the configuration for the installer is done, click Launch Installer.
On the Introduction screen, click Continue.
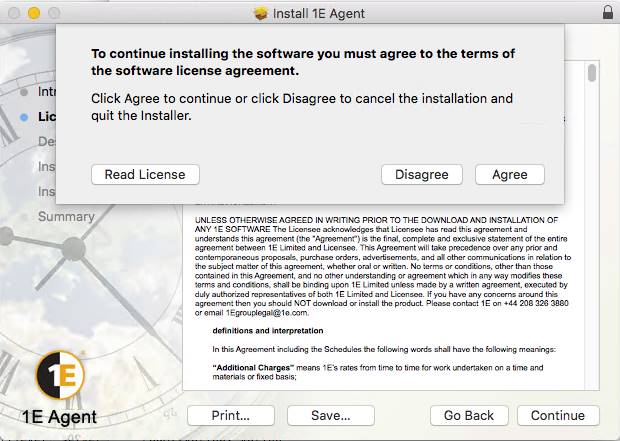
On the License agreement screen, accept the terms of the agreement and click Continue.
On the Installation Type screen, click Install to accept the default installation location which is /Library/Application Support/1E/NightWatchman
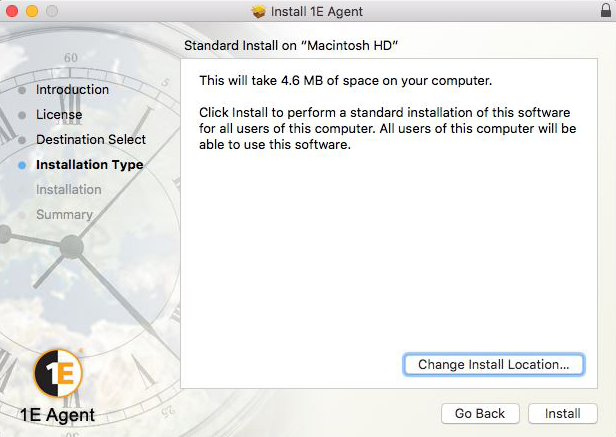
To install the files to a different location click Change Install Location and select a new destination for the installation files. Click Install when you are done.
You will be prompted that the machine requires a reboot after the installation takes place.
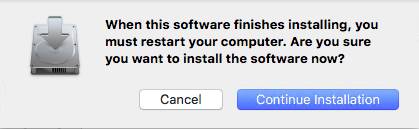
Click Continue Installation.
Enter your administrative password and click Install Software.
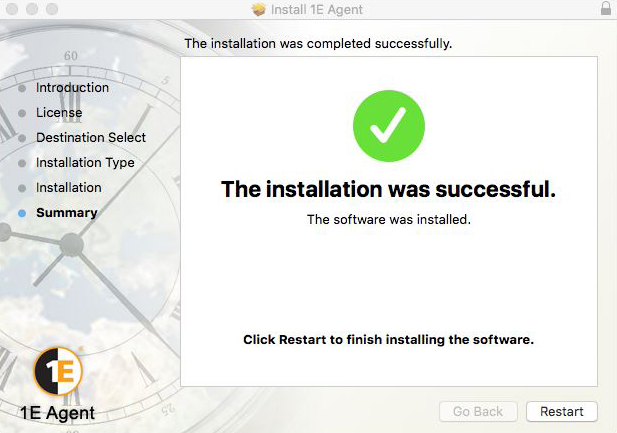
On the Summary screen, click Restart.
Licensing the 1E Agent
The most important key that must be included in the pre-configuration file is the 1E Agent license. This key is called LicenseNumber and is set using following command-line: defaults write /Library/Preferences/com.1E.NightWatchman.PreConfiguration LicenseNumber <1ELicKey> where <1ELicKey> is your commercial or evaluation license key.
You have two options before you run the installer:
Create the pre-configuration file and push it to the client machines. For example, using Copy Items in Apple Remote Desktop.
Create the pre-configuration file using the command-line on the client computer. For example:
defaults write /Library/Preferences/com.1E.NightWatchman.PreConfiguration HTTPServer <NWMC SERVER> defaults write /Library/Preferences/com.1E.NightWatchman.PreConfiguration LicenseNumber <1ELicKey>
where
<NWMC SERVER>is the server where the NightWatchman Management Center website is located and<1ELicKey>is your license key.
The installer will always use the pre-configuration file if it exists, so any manual updates to LicenseNumber, HTTPServer, HTTPSServer or Reporting will be reverted by the installer.
Post-installation, you must restart the computer in order to enable the version 6 1E Agent daemon to run. If you uninstall it, you will need to restart the computer to completely remove the agent daemon.
Uninstalling the Mac 1E Agent
To uninstall the Mac 1E Agent:
Click the installer disk image.
Run the Uninstall 1E Agent command script. You must run this with administrator rights.
Beyond the Mac installation
Using any Mac systems management software product, you can distribute changes to the NightWatchman policies using command-line switches to the NightWatchman executable.
Power downs are handled by the NightWatchman component of the 1E Agent. This is controlled via the NightWatchman command-line, which allows you to set specific attributes for the NightWatchman service. After installation, the nightwatchman executable is located in the following directory:
/Library/Application Support/1E/NightWatchman
For example, to change the shutdown policy for a particular machine to "force" and remove the user's ability to defer shutdown you could open a console on the machine with administrator privileges, change to the /Library/Application Support/1E/NightWatchman directory and enter the following command-line:
sudo ./nightwatchman -s logoffaction Force systemtray off
Another common usage is to change the shutdown time for different days of the week. The following example sets a shutdown time of 20:00 on weekdays and 13:30 at weekends:
sudo ./nightwatchman -scheduledactions WEEKDAYS=20:00,PowerOff,Active WEEKENDS=13:30,PowerOff,Force
To learn more about configuring NightWatchman from the command-line, please refer to 1E Agent Mac command-line switches.
To learn more about the Mac user interface, please refer to The 1E Agents - 1E Agent for Mac.
Agent log files
The 1E Agent Mac keeps a log file of settings, state changes and interactions in /tmp/Nightwatchman agent.log where /tmp is a symbolic link to /private/tmp. This is a temporary location, with files periodically deleted by daily, weekly or monthly cron scripts and/or reboots. You should backup this file to a safer location so that it does not get deleted automatically by system routines.