Implementing AXM
Everything you need to know about getting AXM installed and running in your environment.
Role-Based Access Control (RBAC) for AXM
As an Administrator, you need to enhance security and access control, by using RBAC you can to provide a more granular level of access to features and data. This allows you to control user access based on their roles and responsibilities, improving security and ensuring that users have the appropriate level of access.
Role Name | Role Description |
|---|---|
Application Experience Management Administrator | Full app control, configures monitoring, observing dashboards and, Individual application data. |
Application Experience Management User | Observing dashboards and Individual application data without configuration abilities. |
1E Client configuration
The 1E Client supports AXM by providing user activity data for both installed applications and SaaS applications.
Gathering user activity data for these applications requires two different techniques:
Installed applications - we use the 1E Client Interaction UI to track things like per logged on user:
Which window is active and if the user is interacting with it
How responsive the window is, for example the foreground cursor
Stability - hangs, crashes
Responsiveness - busy cursor, poor response.
SaaS applications - we need insight into what is going on inside the user’s browser; the way we achieve this is using the AXM Browser Extension which captures Core Web Vitals metrics for administrator defined web sites.
AXM Browser Extension
The data for end-users interaction with Web Applications is provided using a browser extension for Chromium-based browsers. This is needed because user browser activity is only easily available from within the browser process itself.
1E has created a browser extension that ships with the 1E Client (it is embedded as a resource within the Interaction module settings.
Google Chrome | Microsoft Edge | Automated deployment | Deployment guides | |
|---|---|---|---|---|
Windows | ✓ | ✓ | ✓ (for domain joined devices) | |
MacOS | ✓ | ✓ | X | |
Linux | ✓ | ✓ | X |
Deploying AXM web monitoring
This section walks you through deploying and removing the AXM browser extension on the following operating systems.
On Windows, deployment and removal is handled by the 1E Client service itself without any user interaction.
Note
This deployment method is only supported on enterprise managed devices.
Please refer to Chrome documentation for a description of supported technologies https://admx.help/?Category=Chrome&Policy=Google.Policies.Chrome::ExtensionInstallForcelist.
By default for 1E Client 23.11, AXM web monitoring is disabled, you can enable it by toggling the
Module.Interaction.WebSessions.Enabledconfiguration setting to true. You can do this by one of the following methods:Setting it in the
1E.Client.conffileSetting it at install time be passing the mentioned property to MSIEXEC
Use the Client Deployment Assistant (CDA) to deploy the 1E Client, and change the value of
Module.Interaction.WebSessionfrom false to true, prior to running the CDAIf you have already deployed the 1E Client, you can run this instruction using Endpoint Troubleshooting:
Set 1E Client configuration property <agentconfig> to <agentconfigvalue> and restart the service after a short random delayWith the values selected:
Set 1E Client configuration property "Module.Interaction.WebSession.Enabled" to "true" and restart the service after a short random delay
When enabled, the 1E Client service ensures the correct registry settings are in place for the AXM browser extension on each startup. The deployment is carried out for both Google Chrome and Microsoft Edge browsers.
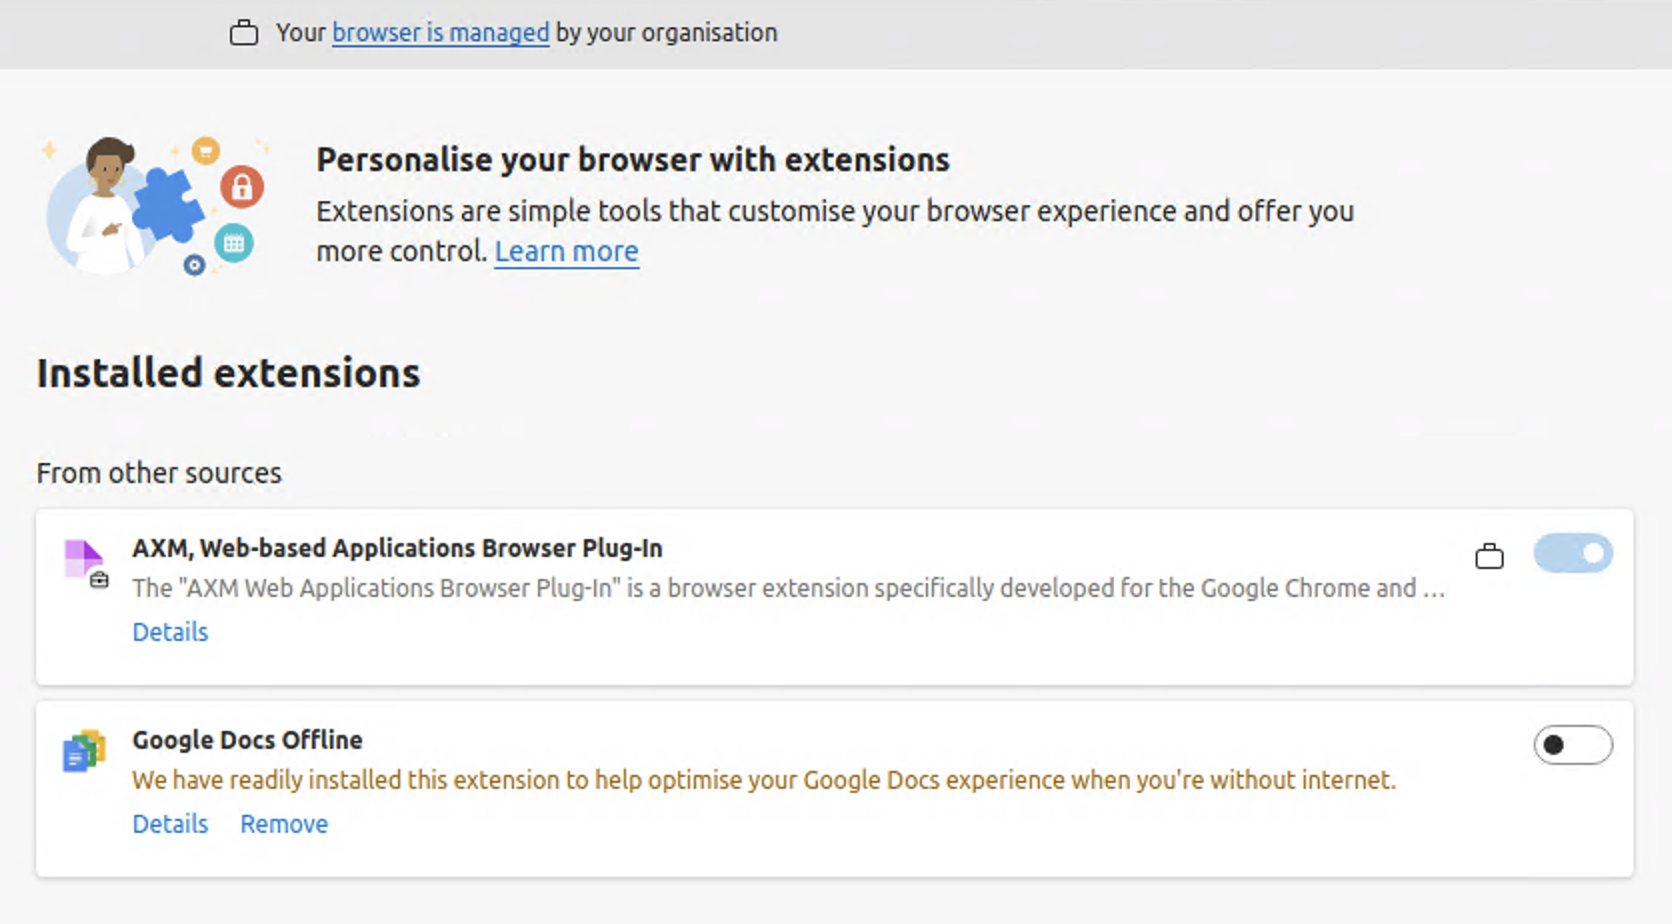
At this point the AXM extension will be deployed by the running 1E Client service. You can find it under the extensions page after a browser restart.
You will be able to see the Your browser is managed by your organization on the extension page as follows:


You can remove the AXM extension using the 1E Client service.
If the Module.Interaction.WebSessions.Enabled is set to false, the 1E Client will delete the relevant registry key values corresponding to the 1E Client and remove the AXM extension. The same process is also triggered when the 1E Client is uninstalled.
Important
The 1E web extension for MacOS can only be deployed on Enterprise Managed Devices.
You can deploy the MacOS configuration profile in two ways:
Deploy using MDM
Your IT team must deploy this configuration profile using their respective MDM tool
If the browser (Chrome or Edge) is already running it will need to be restarted before the web extension loads.
Deploy using manual steps (User Interaction)
Download the configuration profile for Mac OS.
Double click the file to install the configuration profile.
A notification will show on the top right corner of the window.

Navigate to the profile window using this path: choose Apple menu > System Settings, click Privacy and Security in the sidebar, then click Profiles.
Click the 1E Web Extension Settings entry in the downloaded list and complete the steps to set up the admin password as prompted.
At this point the AXM extension will be deployed by the running 1E Client service if the
Module.Interaction.WebSessions.Enabledconfiguration setting is set totrue. After restarting the browser you can find it under the extensions page.You will be able to see the Your browser is managed by your organization on the extension page.
You can remove the MacOS extension using either MDM which is the preferred way, or using manual steps (user interaction).
Remove using MDM (preferred)
Your IT team should pull this configuration profile back using their respective MDM tool
If the browser (Chrome or Edge) is already running it will need to be restarted before the web extension unloads.
Remove using manual steps (user interaction)
Navigate to the profile window as follows:
On your Mac, choose Apple menu > System Settings, click Privacy and Security in the sidebar, then click Profiles.
Select the 1E Web Extension Settings entry form the list.
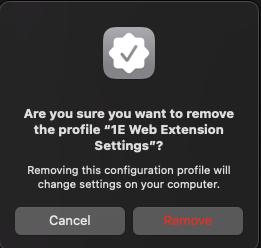
Click the “-” icon at the bottom to remove the selected profile and select Remove button on the window.

Enter the password for admin account to complete the removal of the 1E Web Extension Configuration Profile.
Unlike Windows, where the deployment is handled by the 1E Client service itself without any user interaction, on Linux this is a manual process.
Create the following directory if it does not already exist:
Google Chrome
/etc/opt/chrome/policies/managedMicrosoft Edge
/etc/opt/edge/policies/managed
If the above directory was already present and a
*.jsonfile already existed, add the following key value pairs corresponding to the AXM extension. These keys are arrays of strings and if already present in the*.jsonfile add the values to the corresponding keys as strings to the array:ExtensionInstallAllowlist: [ceiaibmchnpfjpehgahbnefnchamhgop]ExtensionInstallForcelist: [ceiaibmchnpfjpehgahbnefnchamhgop;http://localhost:7781/axm/web/extension.xml]ExtensionInstallSources: [http://localhost:7781/*]
If a
*.jsonis not present create an empty file namedPolicies.jsonand add the following lines to it:{ "ExtensionInstallAllowlist":["ceiaibmchnpfjpehgahbnefnchamhgop"], "ExtensionInstallForcelist":["ceiaibmchnpfjpehgahbnefnchamhgop;http://localhost:7781/axm/web/extension.xml"], "ExtensionInstallSources":["http://localhost:7781/*"] }At this point the AXM extension will be deployed by the running the 1E Client service if the
Module.Interaction.WebSessions.Enabledconfiguration setting is set totrue. You should be able to find it under the extensions page after a browser restart.You will be able to see the Your browser is managed by your organization on the extension page as follows:


To remove the extension you can remove the values from the *.json file added as part of the deployment steps.
If a *.json file was not already being used to manage the browser you can completely delete the file.