Management Groups page
Management Groups are containers used to group devices and the software installed on those devices. Management Groups are defined using configurable rules that look at various properties of the devices and their installed software, these are then evaluated to determine the group membership. This means that Management Group membership adapts to changes to the devices and software in your environment.
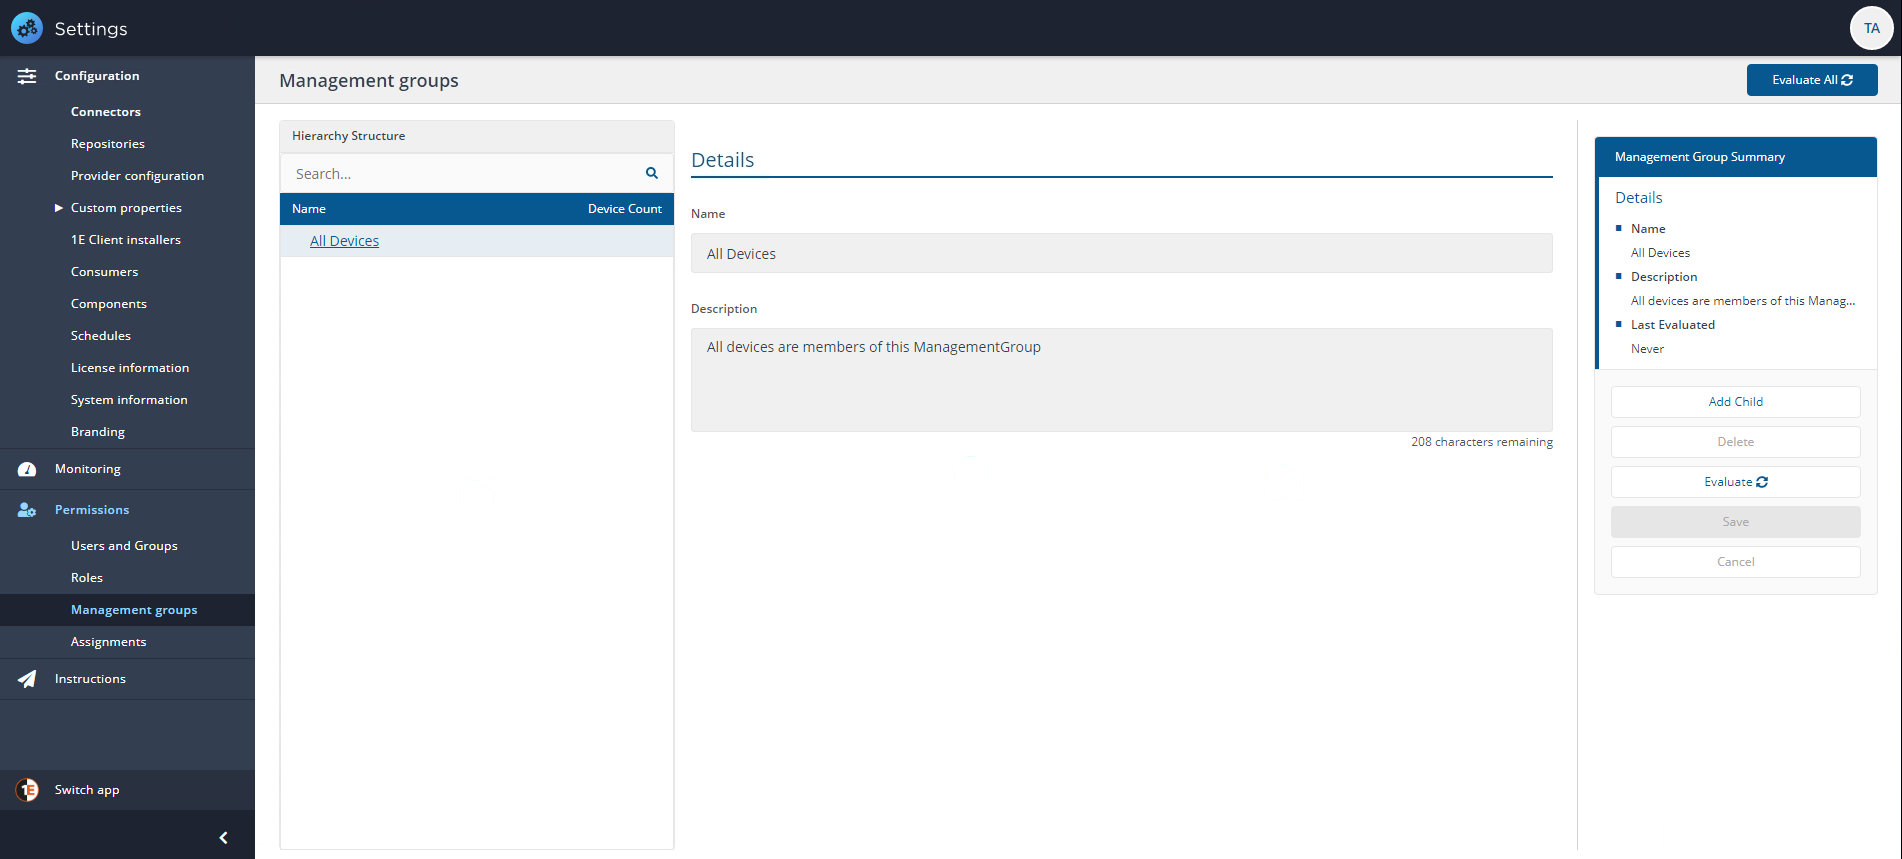
Management Groups overview
Management Groups are used by 1E to determine:
The targets for questions, actions, and reporting
User permissions for targeting to particular devices based on Management Group membership.
In terms of permissions for determining how 1E users interact with the devices in your network, Management Groups work alongside Instruction sets.
In 1E, Management Groups are created in two different ways:
Rule based - the page lets you add, edit, delete and evaluate Management Groups that are based on rules
Direct based - these use scripts to create Management Groups by importing lists of devices using FQDN names only, this type of Management Group has no associated rules and cannot be edited and evaluated from the Management Groups page. 1E recommends using the 1E PowerShell Toolkit.
Both types of Management Group have the following properties:
Each device known to 1E can be assigned to any number of Management Groups.
Roles can be associated with specific Management Groups, so that users with those roles will only be able to target the devices in their Management Groups
Management Groups can only contain devices, and they are completely independent of any other Management Group, even if they contain the same devices
Each Management Group must have a unique name which is not case-sensitive.
Note
Please note the following considerations:
Devices not assigned to any child Management Group will still be accessible, as all devices are members of the default All Devices Management Group
Child Management Groups can only be created under the default All Devices Management Group
The maximum number of child Management Groups are four (Five, including All Devices)
However, there is no current limit on the number of child or "sibling" Management Groups which can be created.
Permissions
The following roles can add Users and Groups, Roles, Management Groups, Assignments, and Delegation:
Full Administrator
Group Administrator - cannot create roles unless they are delegated.
You can find out more about the system and custom roles available in 1E on the Roles page.
Connectors
Management Groups use device data stored in an Inventory repository, which is populated using one or more inventory connectors, as described in Connectors page. This is sufficient for inventory-based applications like AppClarity, Application Migration, and Patch Success.
If you want client-based applications like Endpoint Troubleshooting, Experience Analytics and Endpoint Automation to use the Management Groups, then you must add a 1E Connector, which synchronizes its own data with inventory data. The username and password you provide for the Connector must be a valid user and belong to the Management Group Administrator role. Please refer to the 1E connector page for more details. You only require to configure the connector, you do not need to schedule or run the 1E connector unless you also want to collect data from clients.
Note
To take advantage of your Configuration Manager database and pull in its inventory and usage data, you'll need to configure a System Center Configuration Manager connector in your 1E system.
Creating direct-based Management Groups
Direct-based Management Groups are created using scripts. Two sample PowerShell scripts are provided.
Each script creates a new log file in the same folder, with file name format as <scriptname>_<ddMMyyyyhhmmss>.log which must be deleted manually.
If a Management Group already exists with the same name, the script will delete and recreate it, only with the new devices provided.
If the file or collection includes a device that is not present in the 1E Inventory repository, then it is ignored, and logged.
After a successful run, the script triggers a Management Group sync.
Once imported into 1E, your direct-based Management Groups will be added as child groups of the default All Devices Management Group.
Prerequisites
The user that is running the script must have read/write permission in the folder where the PowerShell script is present.
The user that is running the script must have permission in 1E to create Management Groups.
If Windows Task Scheduler is used to run the script, then the scheduled task should provide the current logged-in user.
A minimum of version 1.2.22 of the 1E PowerShell Toolkit must be installed.
Kid to Upn mapping should exist in the 1E Platform.
Create Direct-based Management Groups from a file
Create a folder which will contain text files to create Management Groups. This is the FolderPath passed as a parameter in the PowerShell script.
Create text files in the above folder with the name same as Management Group (for example, ManagementGroupName.txt).
Enter a description of the Management Group in first line.
Enter one or more Device FQDN from second line onwards, one device per line.
Optionally, add more files if you want to create multiple Management Groups.
Download the Create-DirectManagementGroupUsingFile.ps1 PowerShell script and execute it.
.\Create-DirectManagementGroupUsingFile.ps1 -TachyonApiBaseUrl tachyon.testlab.com -FolderPath C:\Temp\DeviceFolder -Ps1eModulePath C:\Temp\1epowershelltoolkit.v1.2.22.0
Parameter name | Description |
|---|---|
TachyonApiBaseUrl | Platform base URL, for example: https://tachyon.lab.local |
FolderPath | Folder path which contains files containing Device FQDN list. |
Ps1eModulePath | Folder path where the 1E PowerShell Toolkit is saved. |
Note
To ensure all devices are present in the 1E Inventory repository, ensure you have configured a Connectors page for the inventory source you are using to create your device lists.
Create Direct-based Management Groups from a Configuration Manager collection
Important
This script is designed to be run on the Configuration Manager Site server.
To ensure all CM devices are present in the 1E Inventory repository, ensure you have a System Center Configuration Manager connector and run its Data Sync action to populate the repository.
Create a text file which will be passed as a parameter in PowerShell script.
In the file enter the following as a comma separated single line: Collection name, Management Group Name, Management Group Description.
Optionally, enter more lines in the same format if you want to create multiple Management Groups.
Download the Create-DirectManagementGroupUsingCmCollection.ps1 PowerShell script and execute it.
.\Create-DirectManagementGroupUsingCmCollection.ps1 -TachyonApiBaseUrl tachyon.testlab.com -FilePath C:\Temp\Collection.txt -Ps1eModulePath C:\Temp\1epowershelltoolkit.v1.2.22.0
Parameter name | Description |
|---|---|
TachyonApiBaseUrl | Platform base URL, for example: https://tachyon.lab.local">https://tachyon.lab.local |
FilePath | File path, which contains details of CM Collections. |
Ps1eModulePath | Folder path where the 1E PowerShell Toolkit is saved. |
Working with direct-based Management Groups
Given the information provided in Creating direct-based Management Groups we can now give an example of how direct-based Management Groups can be added. In our example, we do not have any Management Groups except the default All Devices group. Once imported into 1E, your direct-based Management Group will be added as a child group of the default All Devices Management Group.
The device file
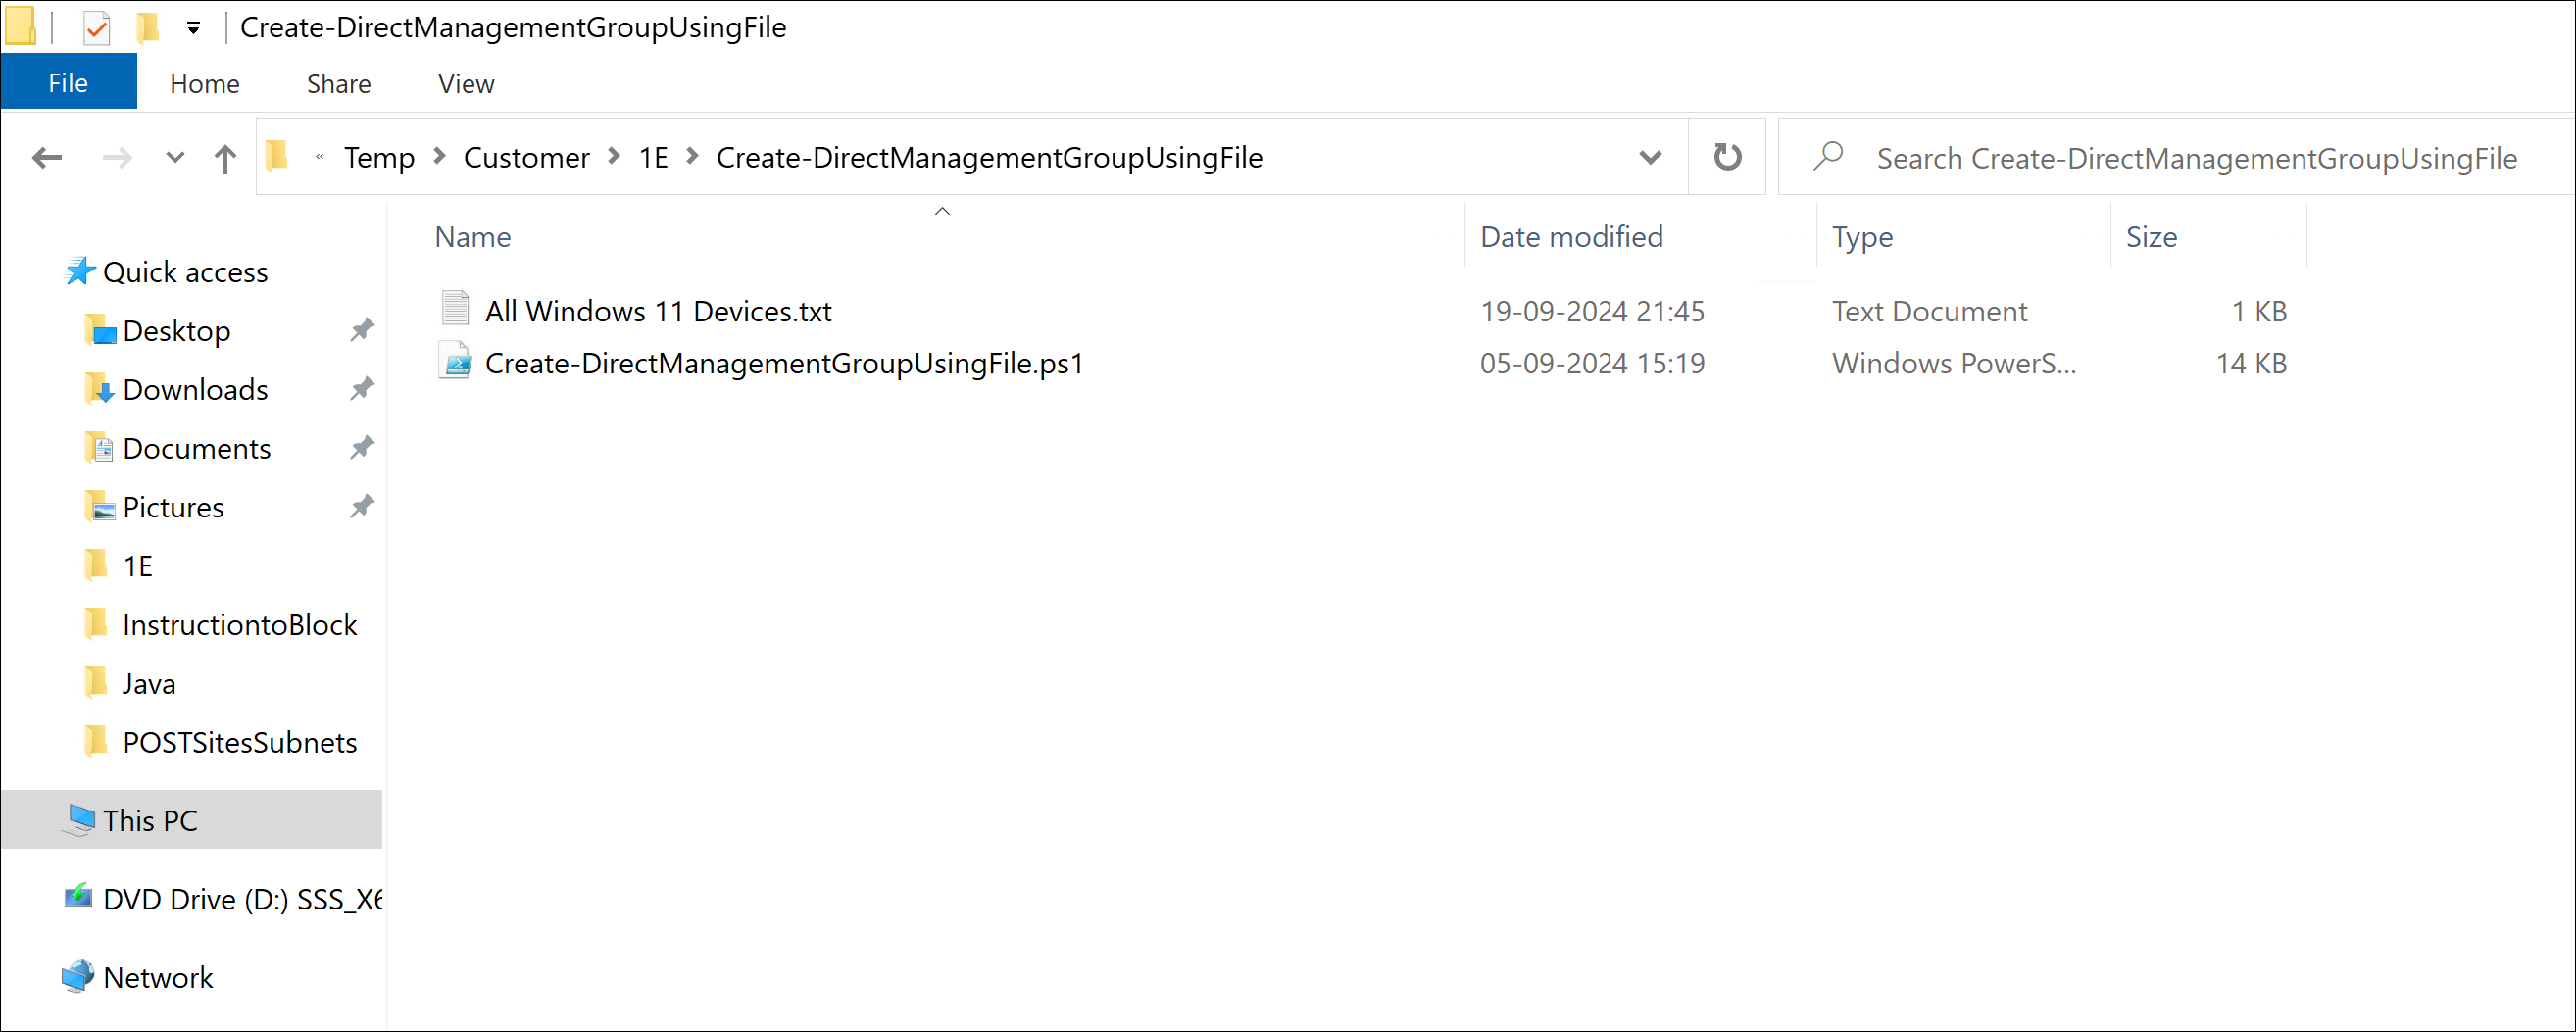
We've created an E:\Temp\Customer\1E\Create-DirectManagementGroupUsingFile folder and added two files:
All Windows 11 Devices.txt file containing a list of device FQDN on separate lines.
Create-DirectManagementGroupUsingFile.ps1 PowerShell script. In our example, we'll run the script from the same folder as the text file.

Note
Unlike rule-based Management Groups, once a direct-based Management Group is added to 1E, you cannot change the name later. To distinguish your direct-based Management Groups from your rule-based groups, you should give them a meaningful name. For the purposes of our example, we just used All Windows as a prefix.
Running the script to populate the direct-based Management Groups
With the device files in place, in our example, we run the Create-DirectManagementGroupUsingFile.ps1 file with the following command-line:
.\Create-DirectManagementGroupUsingFile.ps1 -TachyonApiBaseUrl psbetastg.stg.preprod.1e.com -FolderPath E:\Temp\Customer\1E\Create-DirectManagementGroupUsingFile -Ps1eModulePath E:\Temp\Customer\1E\1epowershelltoolkit.v1.2.22.0
The TachyonApiBaseUrl is set to our example instance of psbetastg.stg.preprod.1e.com, the -FolderPath is set to E:\Temp\Customer\1E\Create-DirectManagementGroupUsingFile, and the 1E PowerShell Toolkit folder path is set to E:\Temp\Customer\1E\1epowershelltoolkit.v1.2.22.0.

Checking the log file for Create-DirectManagementGroupUsingFile.ps1
After running the script you will find a log file is created in the same directory where the Create-DirectManagementGroupUsingFile.ps1 is located. In our example we can see that the script completed without errors.
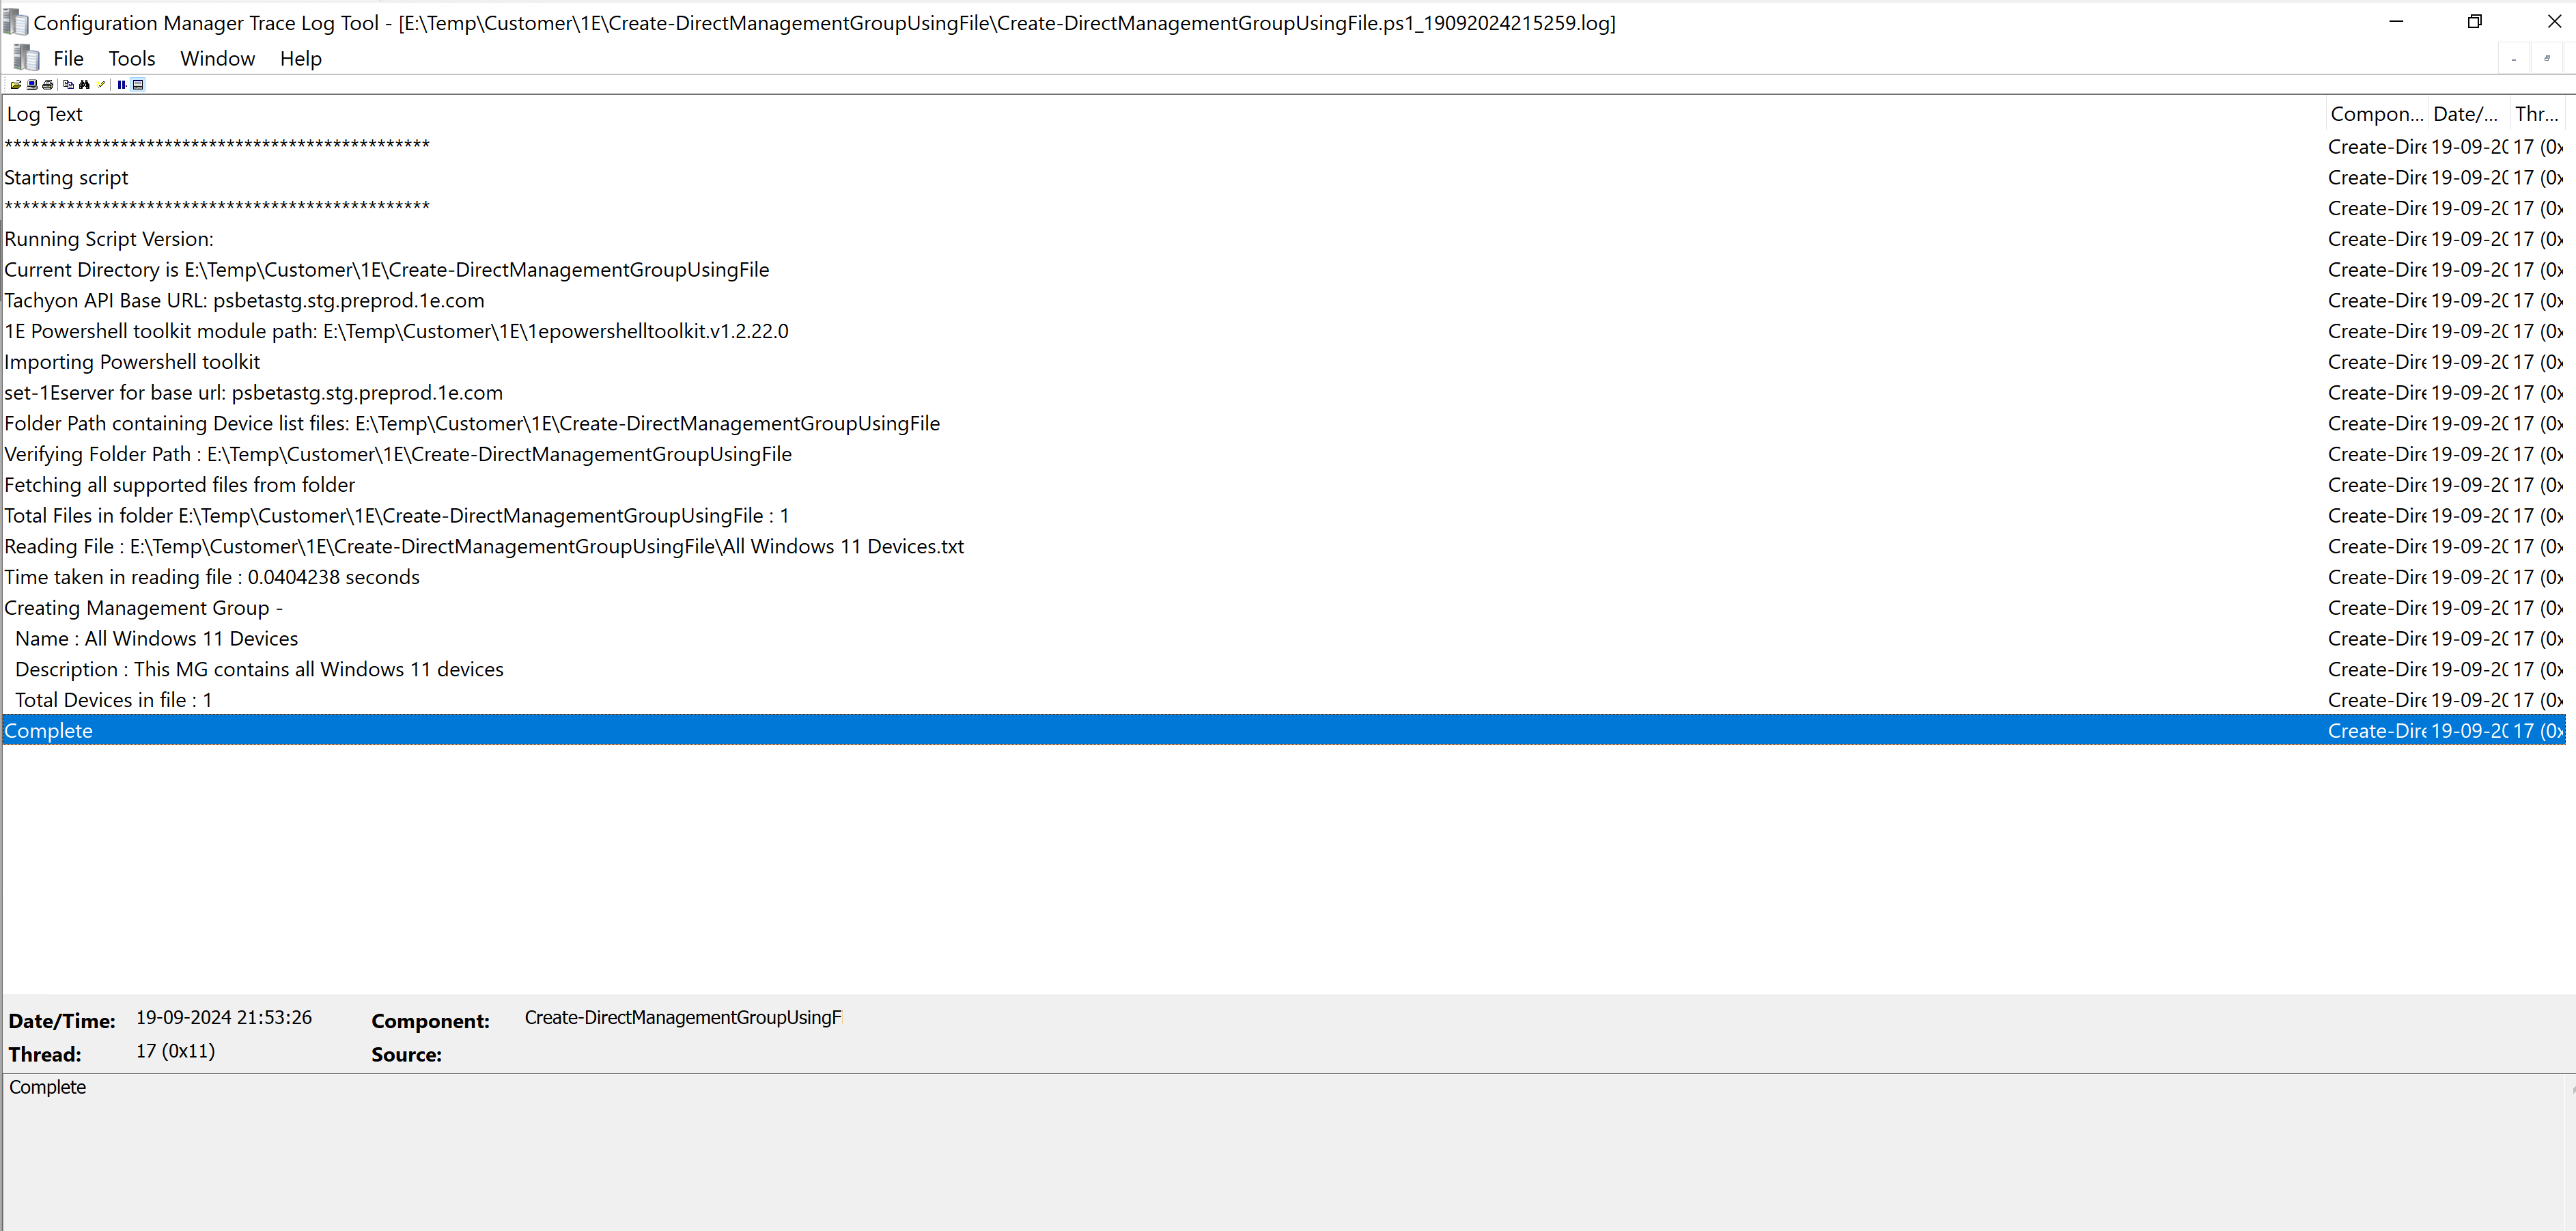
The reports for creating and enabling the direct-based Management Groups
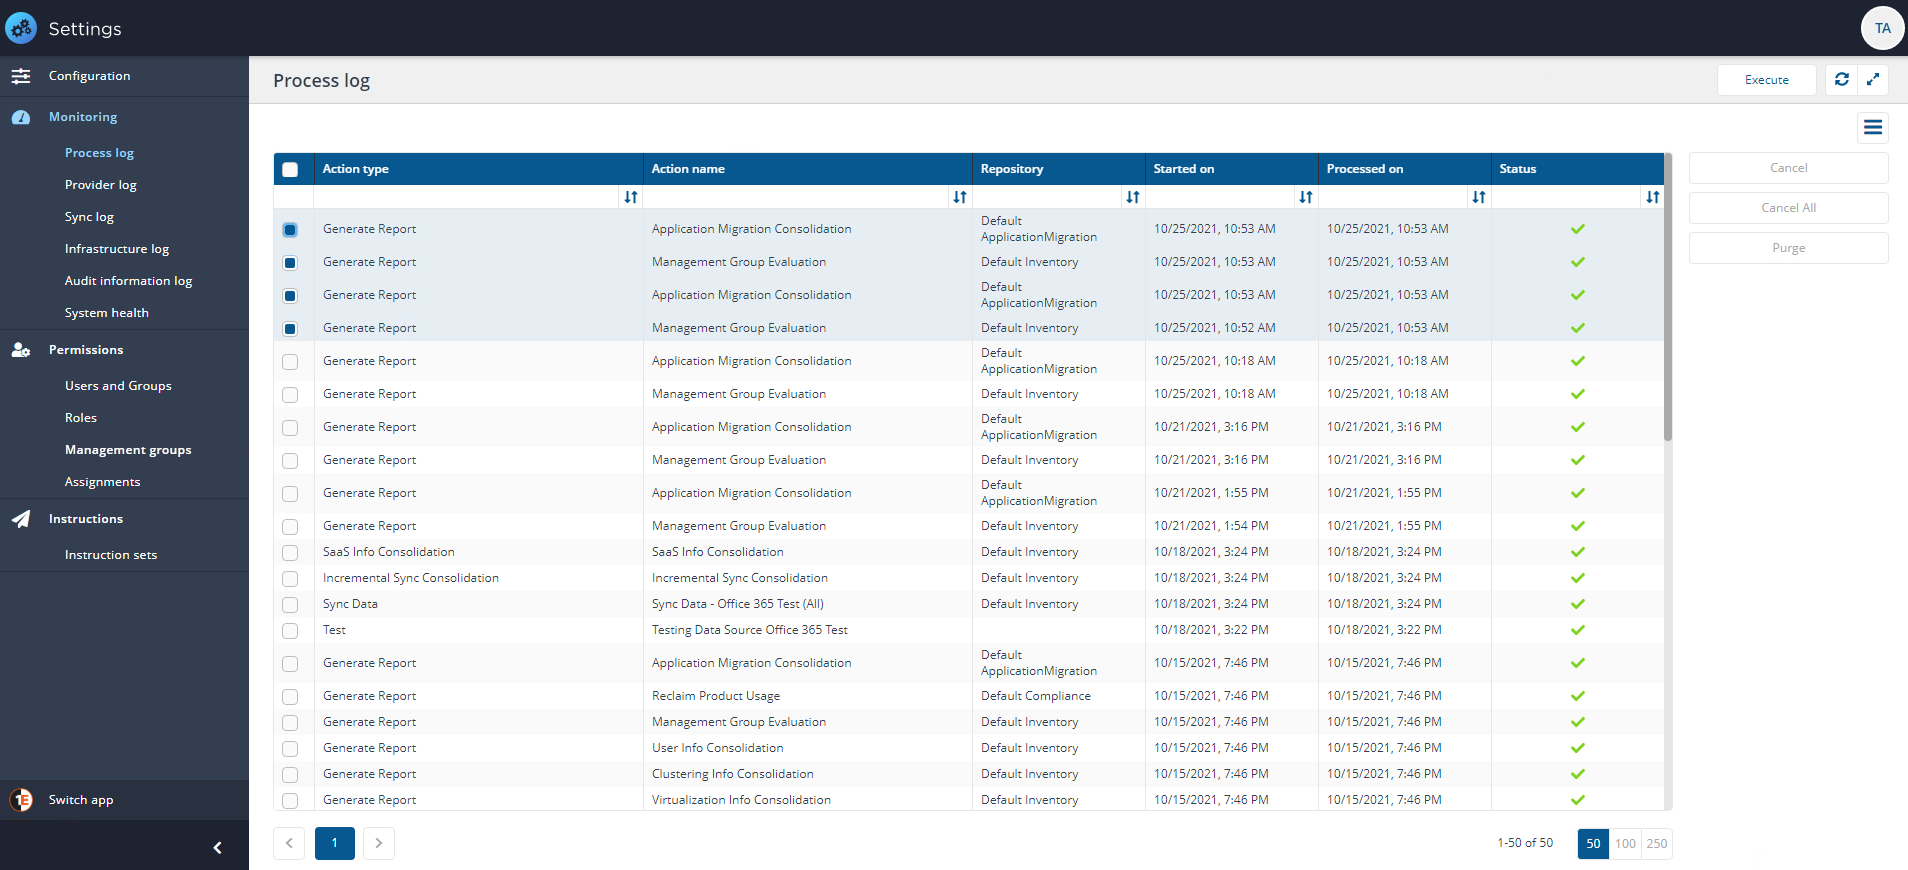
When the direct-based Management Groups are added to 1E some reports will run to enable the Management Groups to be used.
If more than one direct-based Management Groups are being added you will see two Management Group Evaluation reports run on the default Inventory repository. You will also see an additional Management Group Evaluation report run on each additional non-default inventory repositories you have in your system.
If you have Application Migration installed you will also see two Application Migration Consolidation reports run on the default ApplicationMigration repository.
In our example we have Application Migration installed, so we see four reports run when the DB Management Groups are added. Two Management Group Evaluation reports and two Application Migration Consolidation reports, as can be seen in the picture.
The direct-based Management Groups added
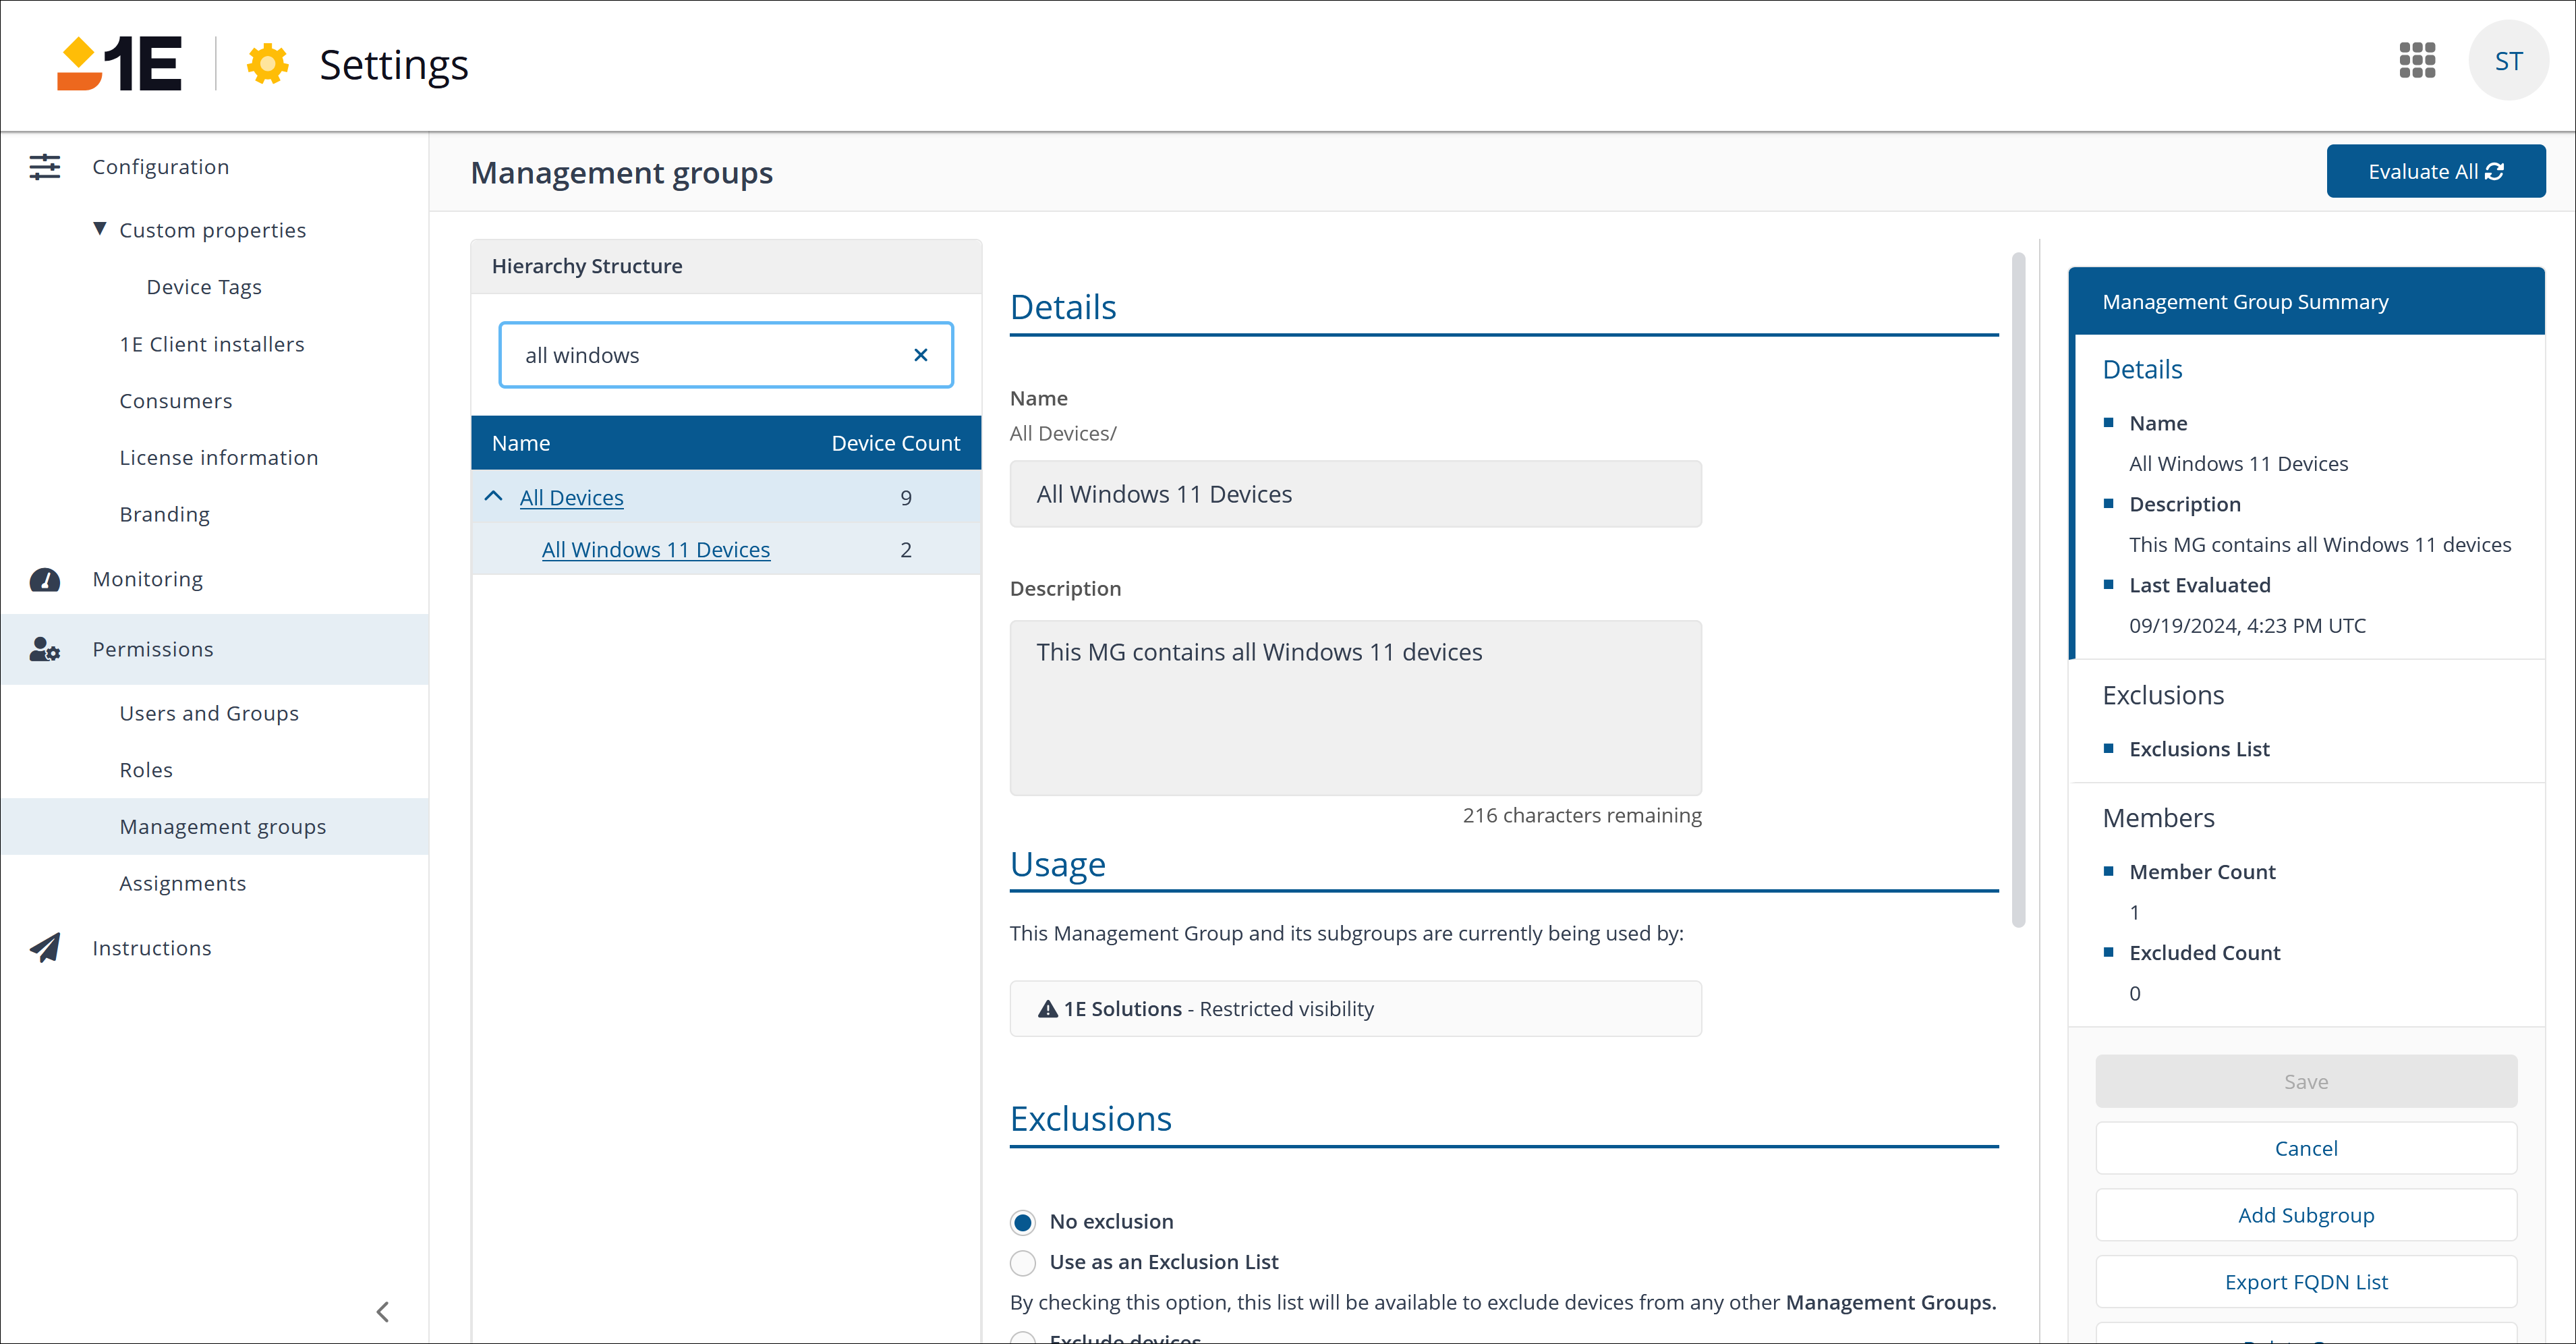
After running the script, a new direct-based Management Group called All Windows 11 Devices gets added. Click the name of the Management Group to see more details including usage, exclusions, and members. You can also export the membership as a .TSV file or add subgroups as required.
Working with rule-based Management Groups
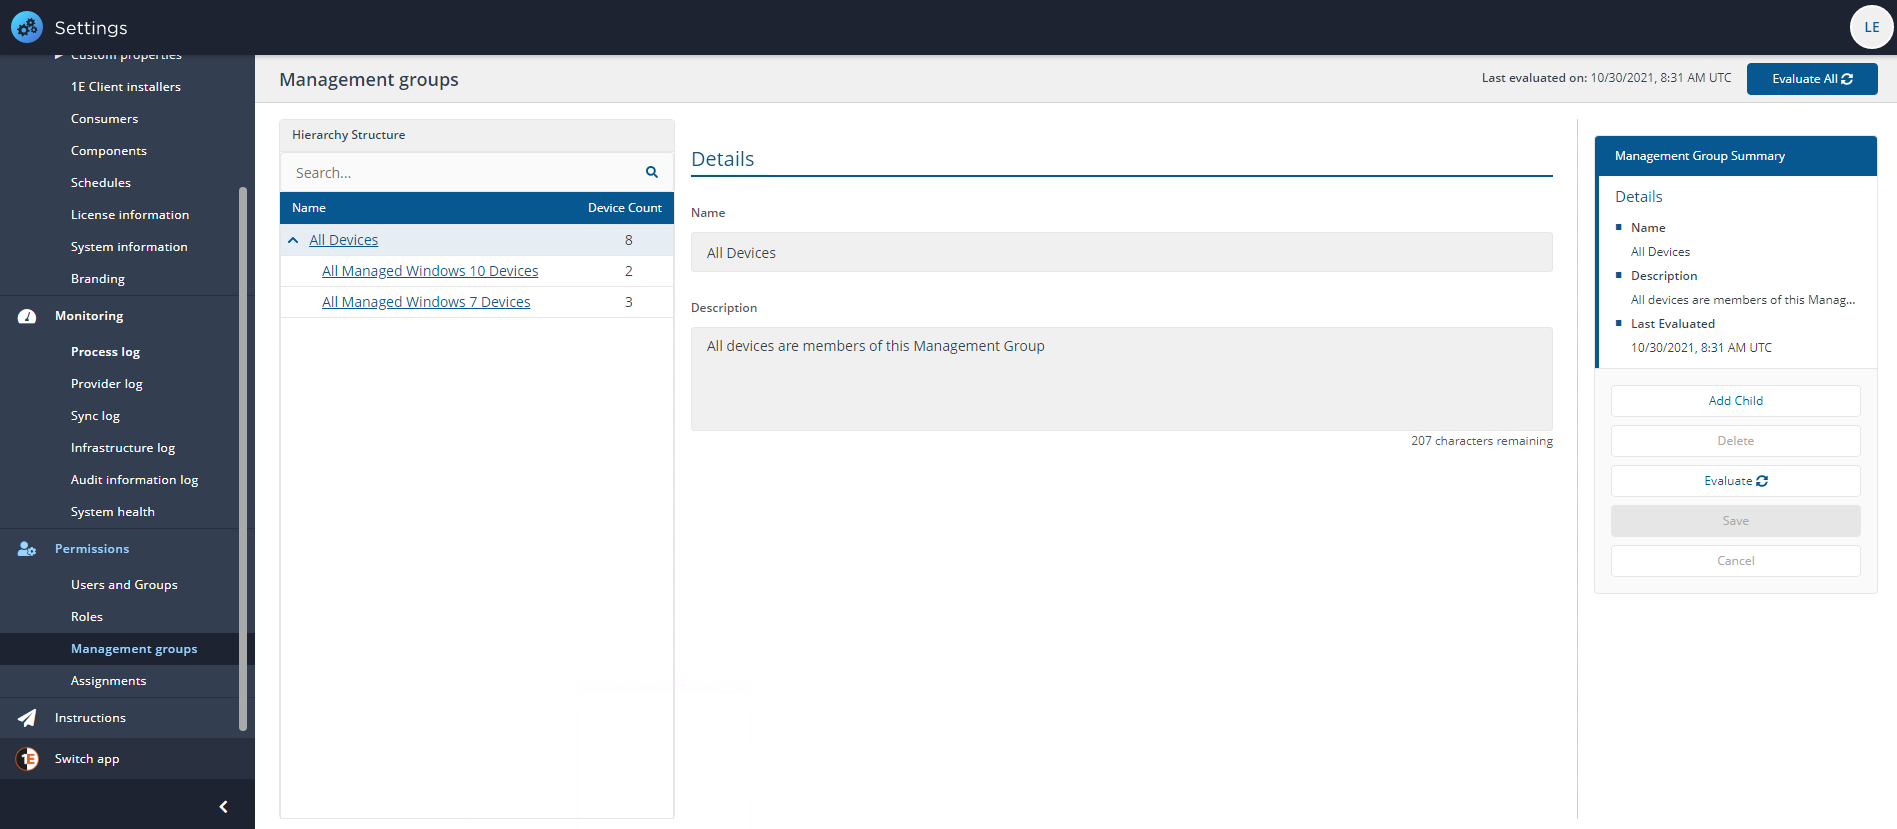
Rule-based Management Groups are defined and maintained in the Settings→Permissions→Management Groups page. They use device inventory data gathered from data sources by connectors and use Management Groups to control how instructions are applied in 1E applications. All child Management Groups must be created under the default All Devices Management Group.
You can easily create complex Management Group definitions by building rules for them, you'll find this in the Rules section of each Management Group. In the Rules section, you can define parameters that determine what devices are members of your Management Groups. The rules you create can be as simple as defining membership according to the OU path in your AD, or as complex as adding groups of rules that narrow membership down to details like Processor Matched Threads per Core. You can also use device or software tags that you have created to define Management Group membership, or a combination of all these parameters.
By default, in a new installation of 1E, all devices are members of the All Devices group. If you have upgraded from a previous version of 1E, your previously created Management Group will be preserved and will become a child Management Group of All Devices Management Group.
You can create Child Management Groups and nest them into a Hierarchy Structure where child Management Groups inherit rules from their parent groups.
Using child Management Groups you could create by hand a Management Group structure which mirrors your Configuration Manager collections, or divide your Management Groups by device type, for example into servers and workstations. You can use the delegation feature to create Management Groups that mirror your organizational structure with associated delegated roles.
To find out how to use scripts to import a Management Group structure from a file or from Configuration Manager collection, refer to Creating direct-based Management Groups.
Note
Refer to Management Groups - tutorial for a conceptual example of how you might create a Hierarchy Structure, and for details about how you can use the delegation feature.
The following sections walk through the basic steps required to:
Creating a rule-based Management Group
In this example we will create a Management Group for devices that are based in a different office location, this location contains Windows 7 devices and is named Sales. The new Management Group is going to be a child group of the All Devices group.
To create the rule-based Management Group:
Navigate to the Settings→Permissions→Management Groups page.
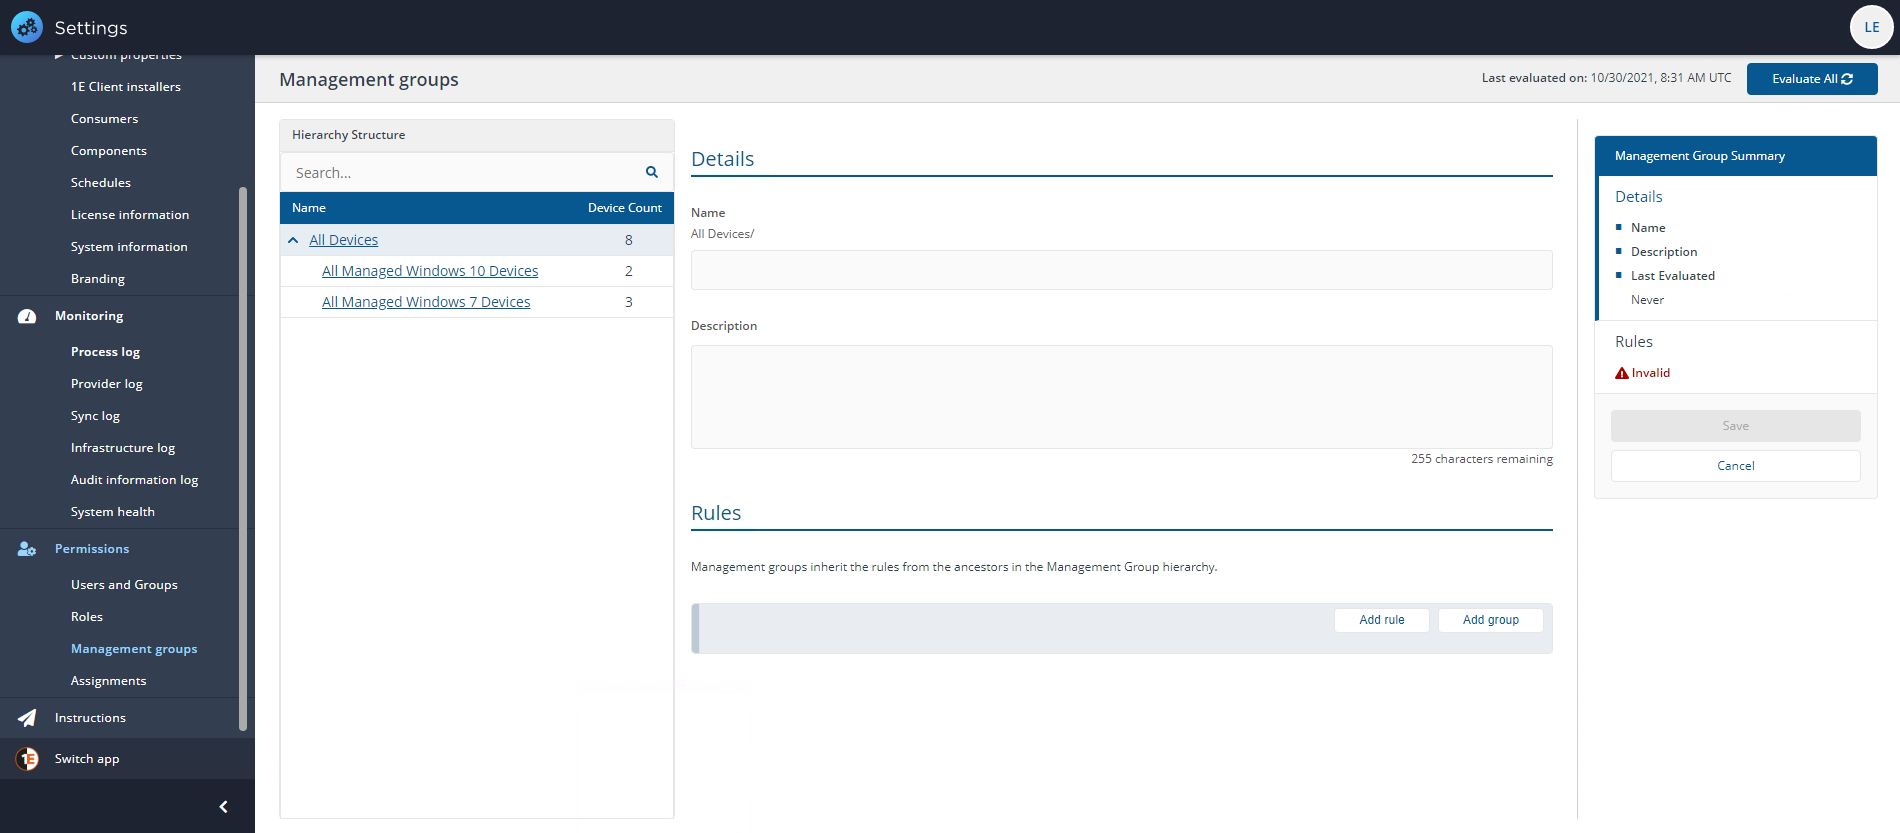
Click the Add Child button to display the new Management Group template.
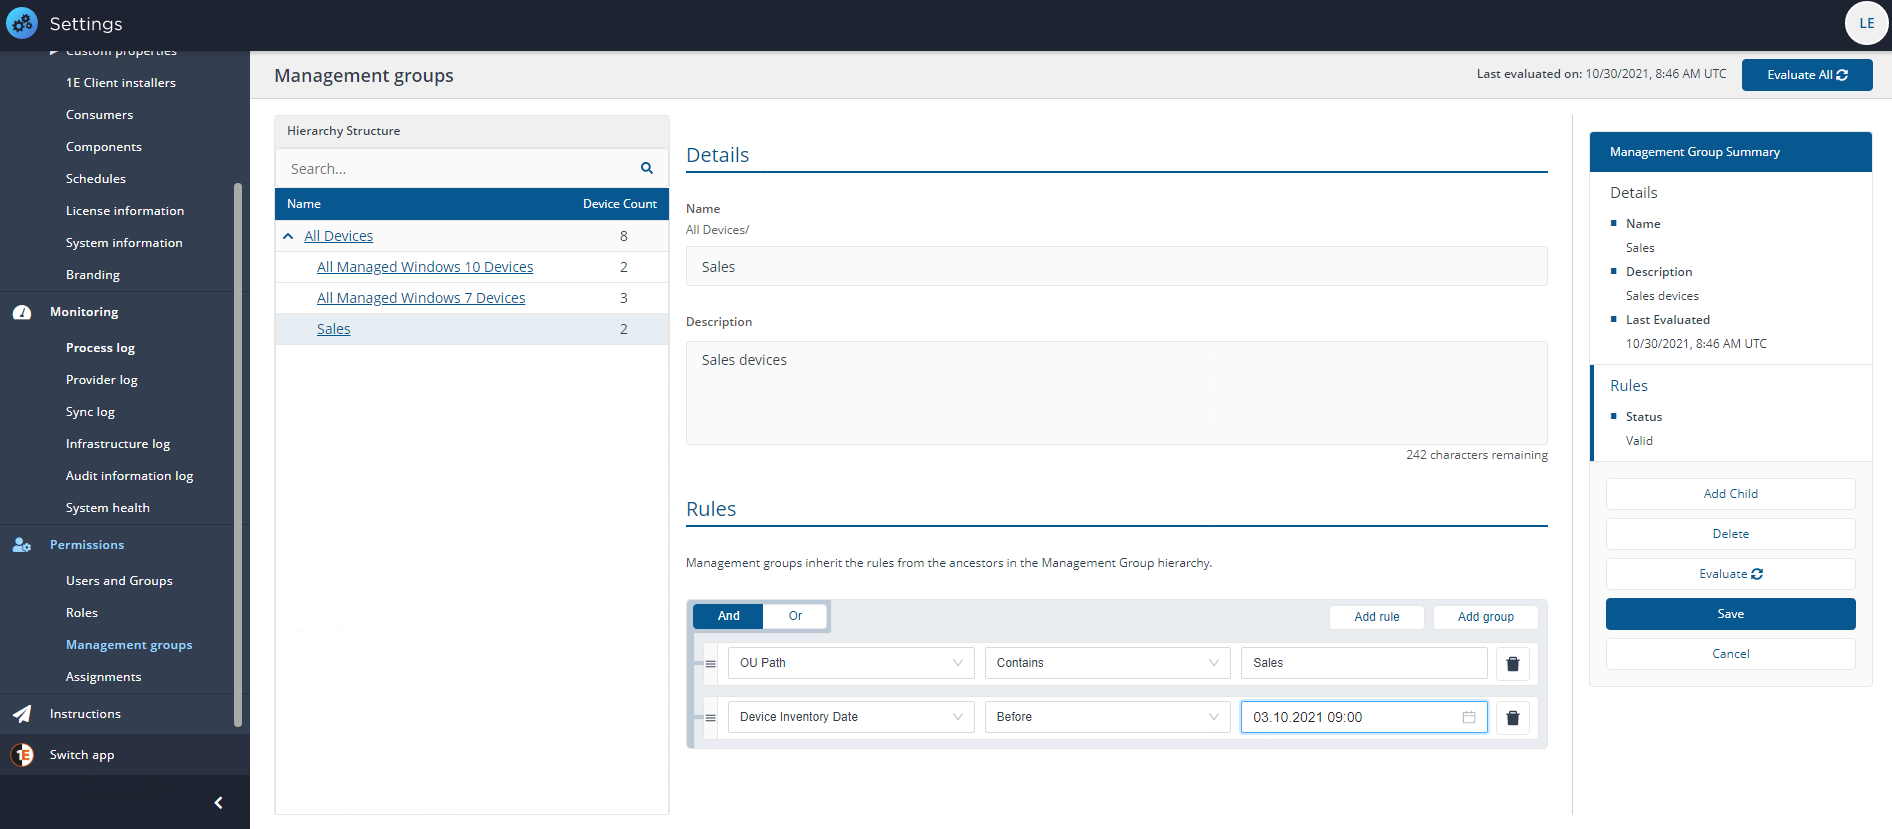
Enter a suitable Name for the Management Group. For example Sales.
Add a Description, it's a good idea to use a description that provides an outline of the rules that are used to populate the Management Group. For example OU Path Contains Sales.
To add each rule:
Click on the Add rule button. The first one is already added, all you need to do is fill out the parts of the rule.
First, you select the rule name and description, for example, OU Path.
You then select the condition. For example Contains.
To complete the rule you then set the value. For example Sales.
Click Save.
Repeat step 5 for each rule you want to define.
When you have more than one rule added, you can:
Use the gripper icon at the right-hand end of the rule to change the order the rules are applied by dragging the rule to a new place in the list.
Change the conjunction operator at the left-hand end of the rule to select between AND and OR.
When you have finished adding the rules, you need to decide whether you want the Management Group membership to be evaluated immediately on adding the Management Group. If you are just adding one Management Group, it makes sense to click the Evaluate button. If you are adding a number of Management Groups, it may be a good idea to leave Click the Evaluate All button at the top of the page.
If you click Evaluate All and there is more than one inventory repository an additional control will be displayed prompting you to select which repository you want to evaluate the Management Group rules against.
The Management Group will be added to the Hierarchy Structure.
Tip
You can create nested groups of rules using the Add group button. For example, we want to narrow the devices in the Sales group to those devices with an Intel processer and an OS of Windows 7 as we want to upgrade this legacy OS.
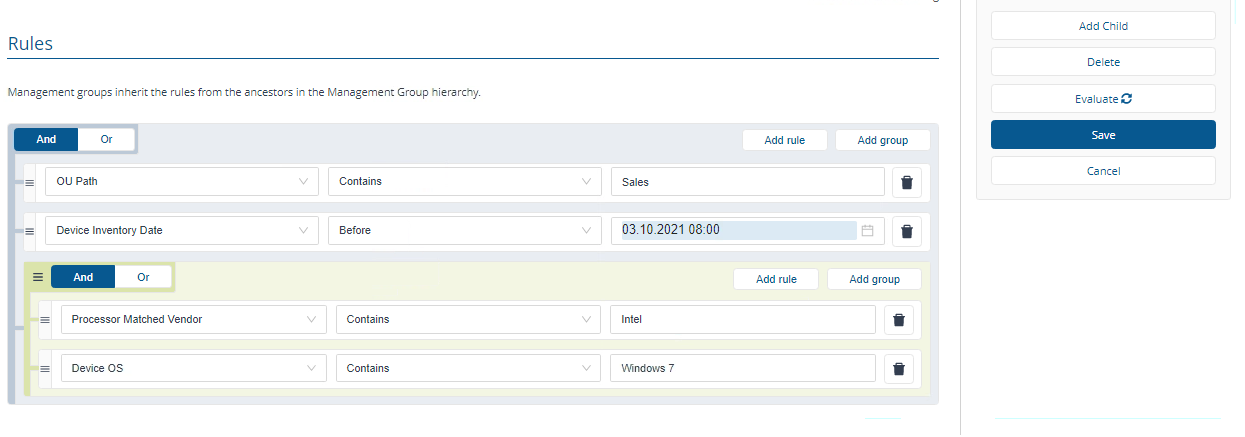
If you selected to evaluate rules immediately, the rules you set for the Management Group will be evaluated against the selected inventory repository.
To check how many devices are in the Management Group, switch to the Inventory Insights app, select the Management Group name from the drop-down.
The picture shows the details for the OU Path contains Sales Management Group, showing that it contains 2 devices.
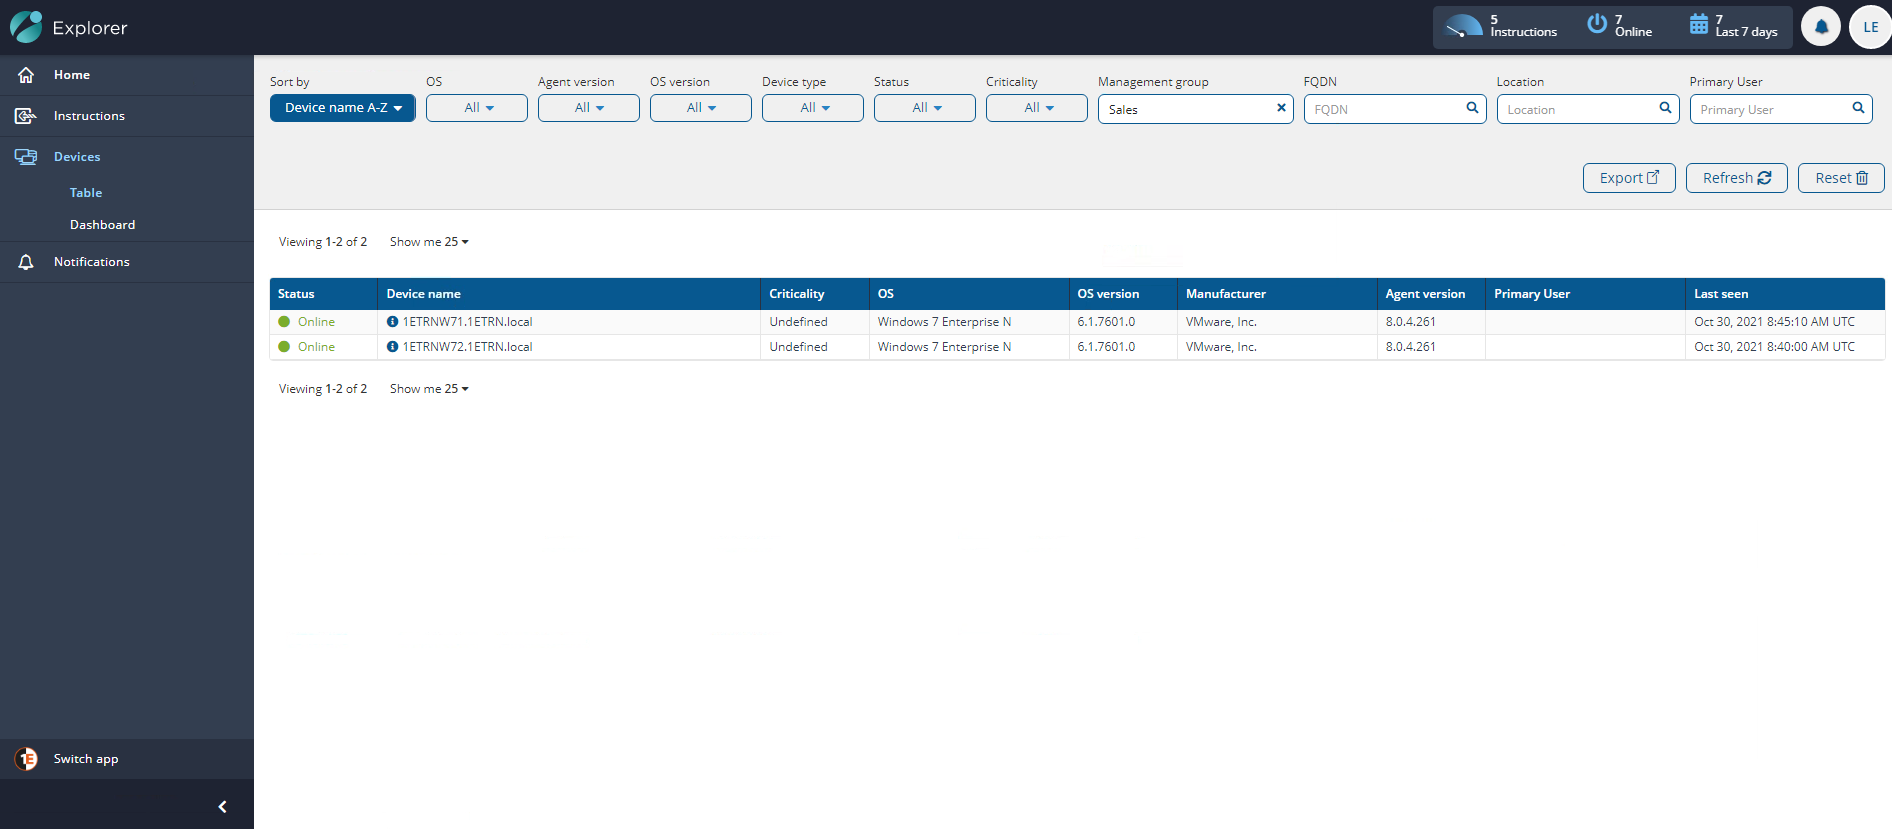
Once the Management Group rules have been evaluated, you should then be able to check the devices in Endpoint Troubleshooting contained in the group using the Endpoint Troubleshooting→Devices→Table page. The picture shows the Devices table with the Management Group filter set to Sales.

Editing a rule-based Management Group
To edit an existing rule-based Management Group:
Navigate to the Settings→Permissions→Management Groups page.
In the Management Groups table, locate the Management Group you want to edit and click the title at the left-hand end of its row in Hierarchy Structure.
Here you can edit the Name, Description and Rules that define the Management Group.
When you've finished editing, before you click the Save button you can click Evaluate, enables any modifications you've made to the rules to take effect right away. If you don't check the box, the rules won't be run, but you'll be able to evaluate the Management Groups later.

Deleting a Management Group
The following applies to rule-based and direct-based Management Groups.
To delete an existing Management Group:
Navigate to the Settings→Permissions→Management Groups page.
In the Management Groups table, locate the Management Group you want to delete and click the title at the left-hand end of its row in Hierarchy Structure.
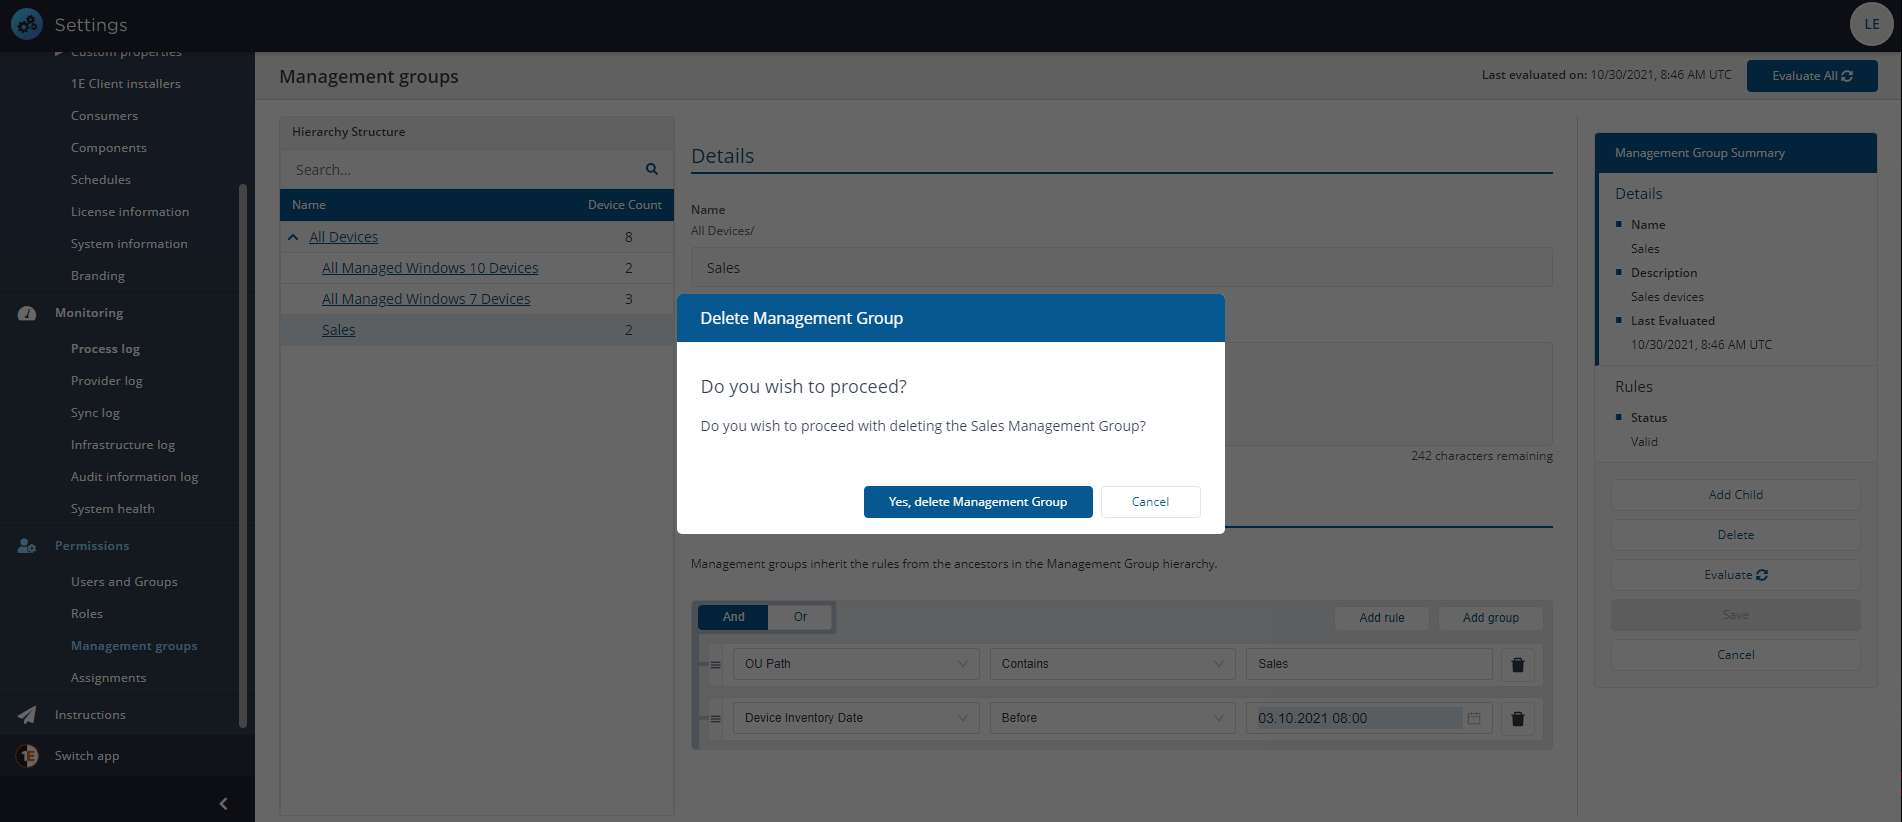
Click the Delete button. This displays the Delete Management Group popup.
Here you are asked if you want to proceed with the delete process. Click the Yes, delete Management Group button to confirm the deletion, or No to cancel.
Evaluating Management Group membership
You can select to evaluate the Management Groups at any time.
Note
When a parent Management Group gets evaluated, all child Management Groups also get evaluated.
Navigate to the Settings→Permissions→Management Groups page.
Click the Evaluate button.
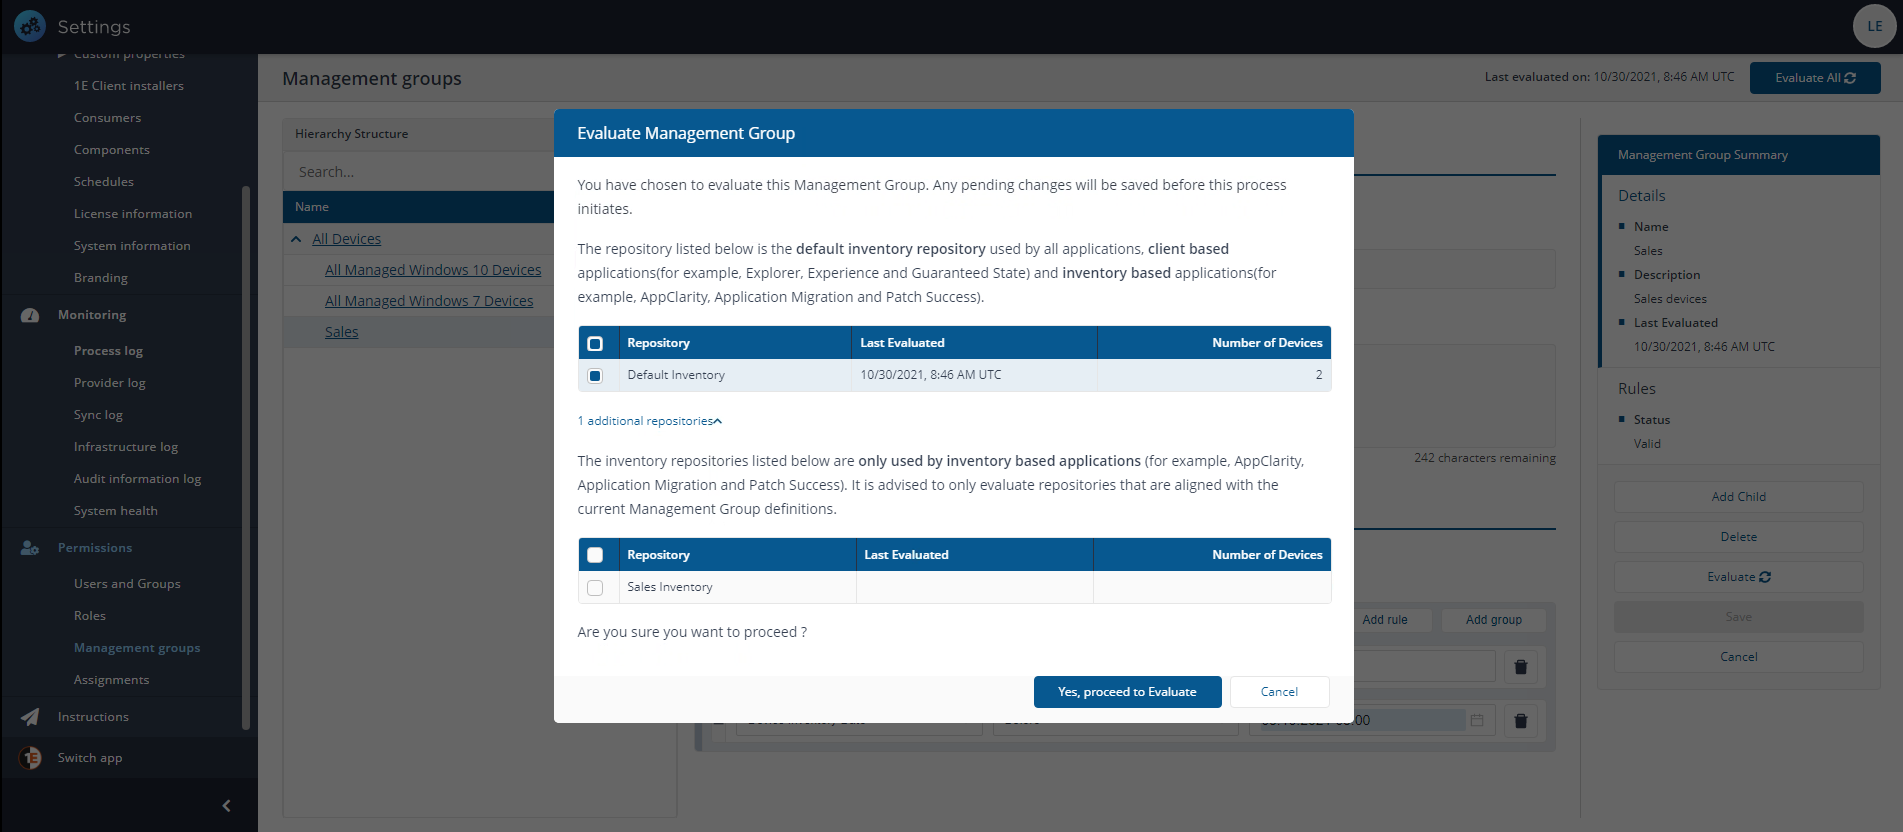
If there is only one inventory repository, the evaluation will be queued immediately. If there is more than one inventory repository, the Evaluate Management Groups popup will be displayed, and you will need to select a Repository then click the Evaluate button before the evaluation is queued.
When an evaluation is queued you will see a Management Group Evaluation action appear on the Settings→Monitoring→Process log page. From there you can view the progress of the evaluation.
When this action has run, Endpoint Troubleshooting will reflect any changes that have been made to the Management Group memberships.
Delegation in 1E
Delegation in 1E is, a concept where an administrator can delegate some of their own responsibility to other users and limit the area where they can use that responsibility. In 1E, a Full administrator can create and modify Roles. They can also assign any Role to a 1E user or group using Management Groups, there are exceptions, like the Group Administrator Role which cannot be assigned to All Devices.
For example, a local security administrator with the Group Administrator role cannot create or modify Roles, but they can assign any Role that is marked as delegatable to a Management Group they have the security permission on, or any of its child Management Groups.
The exception is that a local security administrator cannot assign a Role that has the same security permission using the same Management Group they have permissions on. Instead, they have to use a child Management Group of the one they have security permissions on.
Essentially, a local security administrator cannot create an assignment that would result in another 1E user or group having the same security permissions as they do.
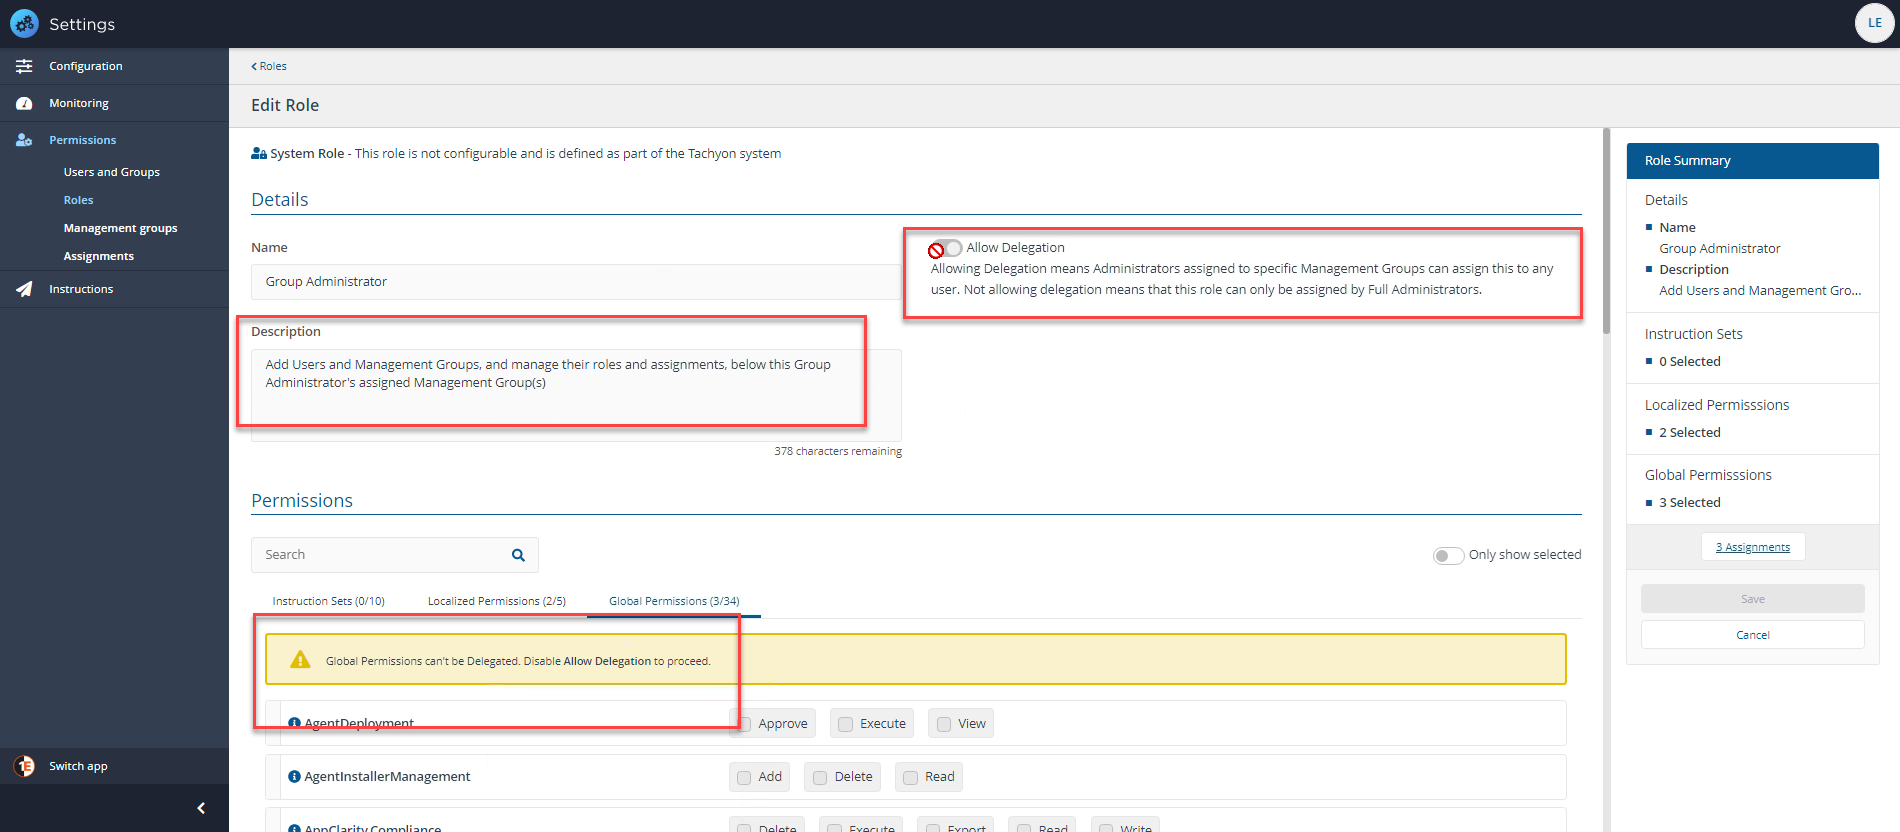
Delegation example
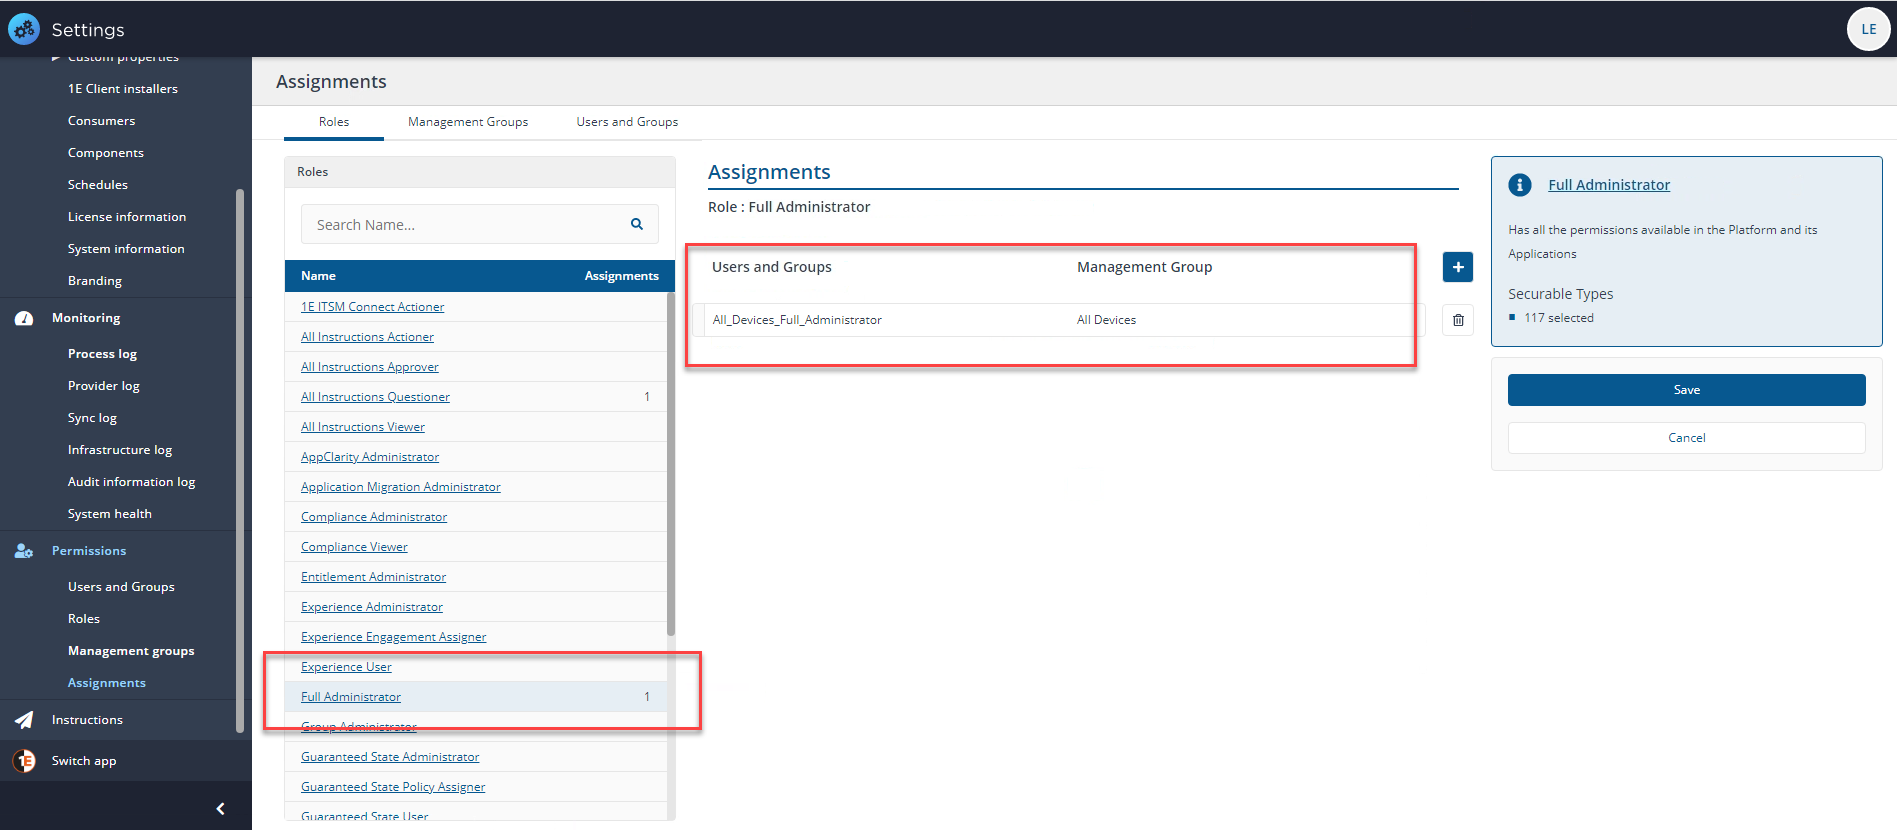
In our example we have a new 1E installation with only a few assignments, the one shown in the picture is of the Full Administrator role which is assigned to the group All_Devices_Full_Administrator and is assigned to All Devices. We have used a group to control the assignment instead of an individual user account.
In our example, we want to use the delegation feature of 1E and use the Group Administrator role to delegate some tasks to a child Management Group of All Devices called Servers to another administrator.
We'll assign the Group Administrator role to a Universal AD group called Server_Group_Administrator which we have added to 1E using the Users and Groups page.
To add the new assignment:
On the Settings→Permissions→Assignments page, we click on the title of the role to configure, in this case Group Administrator this displays the Assignments page focused on that role.
Clicking the plus sign button allows us to add our group, Server_Group_Administrator and the associated Management Group, Servers.
Once we've selected the group and Management Group, we click the Save button.

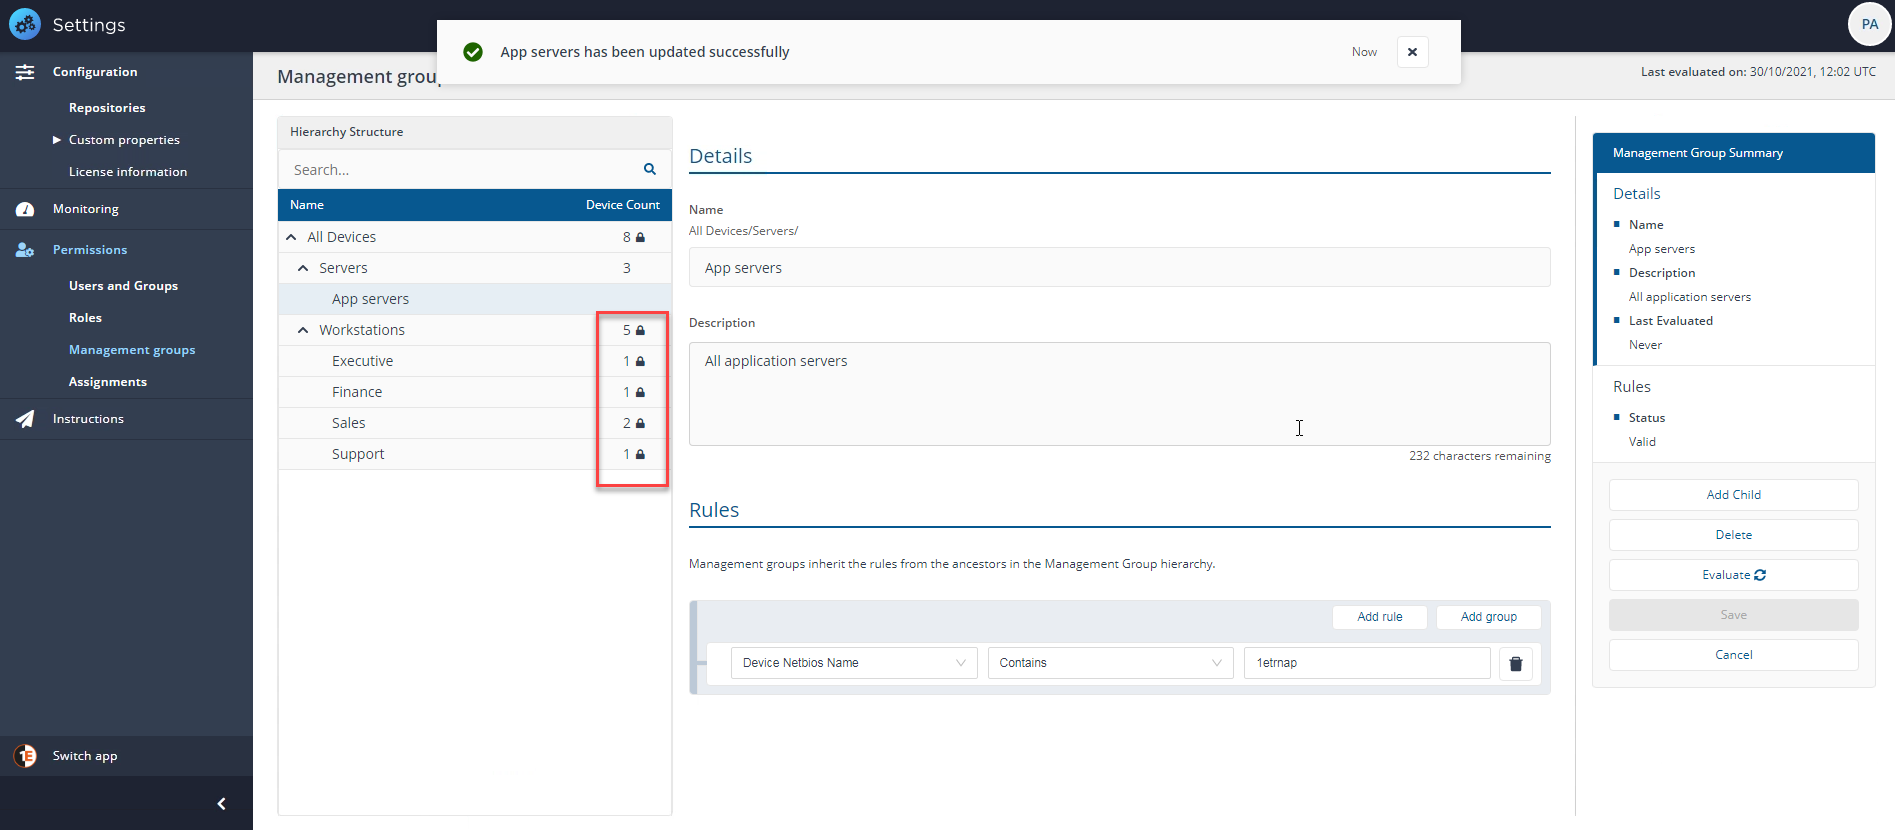
When a user in the Server_Group_Administrator group signs in to 1E, they will be able to create a child Management Group. For example a subset of the Servers Management Group for application servers called App servers, other Management Groups at the same level are locked because the Server_Group_Administrator has not been applied to those Management Groups.
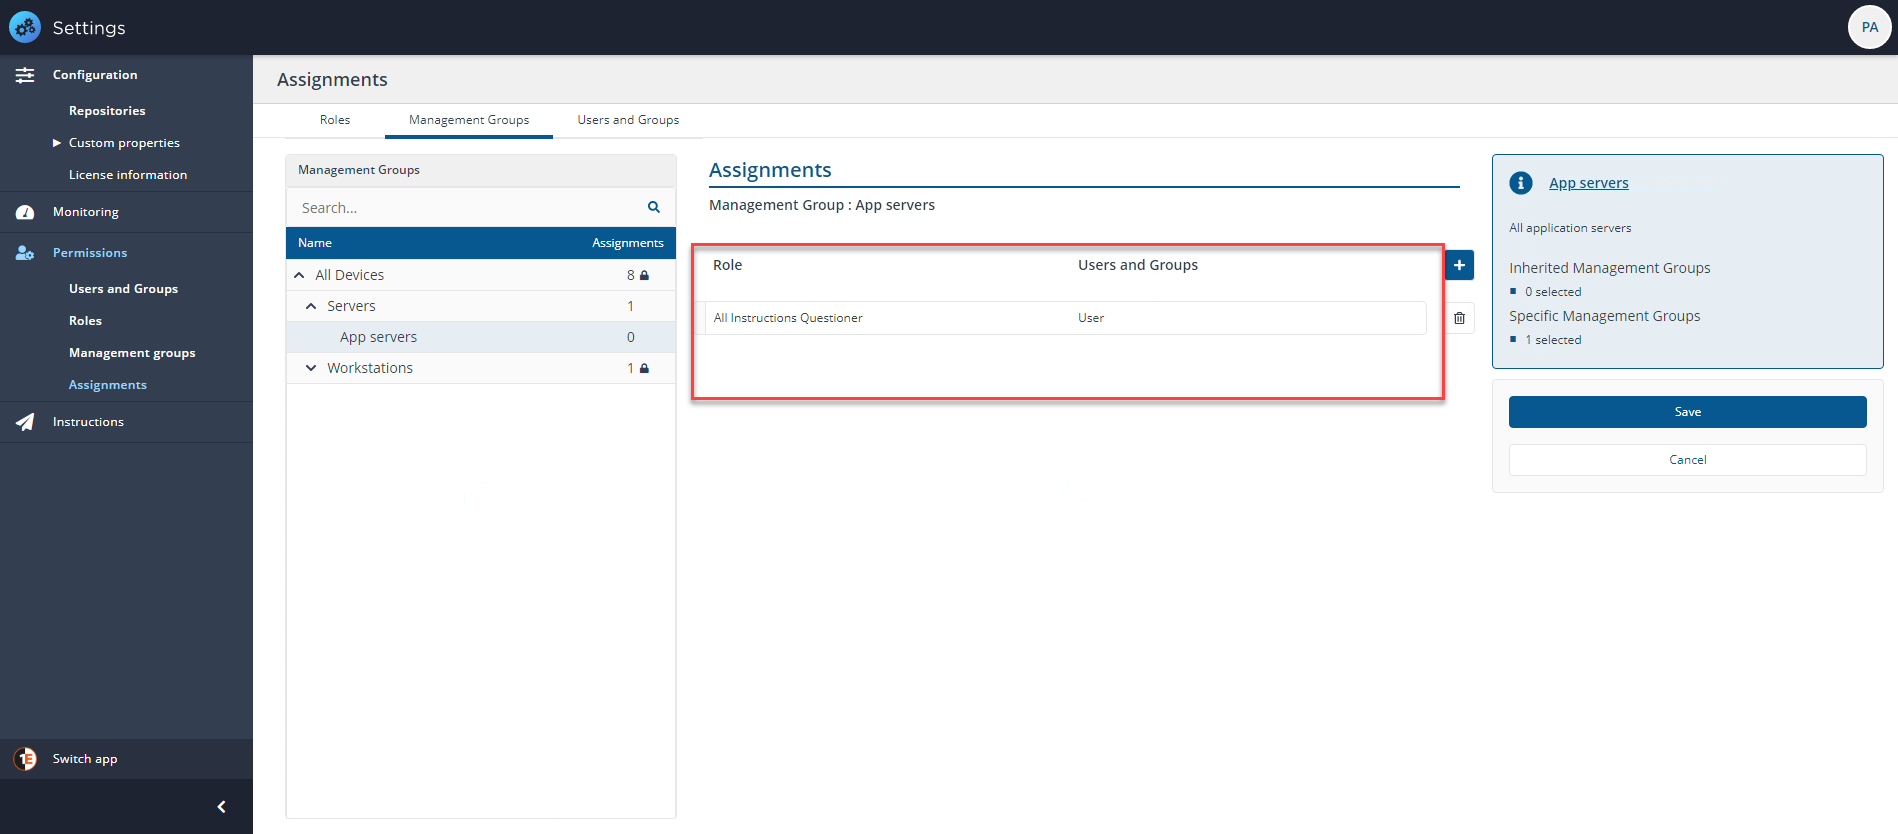
If, for example, our Server_Group_Administrator now wants to add a user with the All Instructions Questioner role to the new App servers Management Group, they can now do so.
Note
For a complete reference table of 1E roles, please refer to the Roles and Securables page.
This page contains a full list of roles, their associated permissions, whether each role is delegatable and notes indicating if the role is new or renamed for the release.
Role | Description |
|---|---|
System roles | System roles are built-in and are not configurable, however they can be assigned to users the same as any other role. |
Custom roles | Custom roles can be used to define who is able to use specific Instruction Sets to ask questions, run actions or approve actions. |
Securables and operations | A Permission is one or more Operations for a Securable. The remit for a Securable is either Localized or Global. A Role that has only Localized permissions can be delegated. |
Management Group rules and conditions
In computing, a Boolean result means an expression is either true (1) or false (0). That is, expressions such as A AND B or A OR B give you a true or false result. Boolean expressions can be much more complex, and you can use brackets (groupings) to keep the same operators together, for example A AND B AND C. You would not write an expression such as A AND B OR C because it is ambiguous. It can be interpreted as either A AND (B OR C) or (A AND B) OR C.
When you are building rules, and you get different results to the ones you expect, write down each of your rules as A, B, C etc, and put them into a simple Boolean expression, like A OR (A AND B) = A.
This is perhaps the most important point to remember when building Management Group rules, and why it helps to write down what you are trying to achieve as a Boolean expression, then simplify it. The Rule examples section has some simple examples of how Boolean expressions translates to the rules you can apply to your own Management Groups.
Rule layout
The rows in the Rules section are laid out as follows:
Conjunction | Rule Name | Operators | Value | Delete | Gripper | |||||||||||||||||||||||||||||||||||||||||||||||||||||||||
|---|---|---|---|---|---|---|---|---|---|---|---|---|---|---|---|---|---|---|---|---|---|---|---|---|---|---|---|---|---|---|---|---|---|---|---|---|---|---|---|---|---|---|---|---|---|---|---|---|---|---|---|---|---|---|---|---|---|---|---|---|---|---|
When there is more than one rule, this field determines how it is evaluated with the other rules. This may be one of:
| Determines the type of information checked when evaluating the rule. For example, selecting Device Computer Name will specify checking the set value against the information held internally for each device's computer name using the selected operand. Please refer to List of available rules below. | How the value compares against the type of information. This may be one of the following:
| The value field is either a string, date, or numeric value, depending on the chosen rule name. It may also be a Device tag. For more information about Deice tags, please refer to Device Tags page. | This field contains an icon that lets you delete the rule. | This field lets you grab the rule and change its order where there is more than one rule. |
Rule examples
The following examples may help to illustrate the logic underpinning the rules you can build and apply to the Management Groups in your environment.
Rule example 1
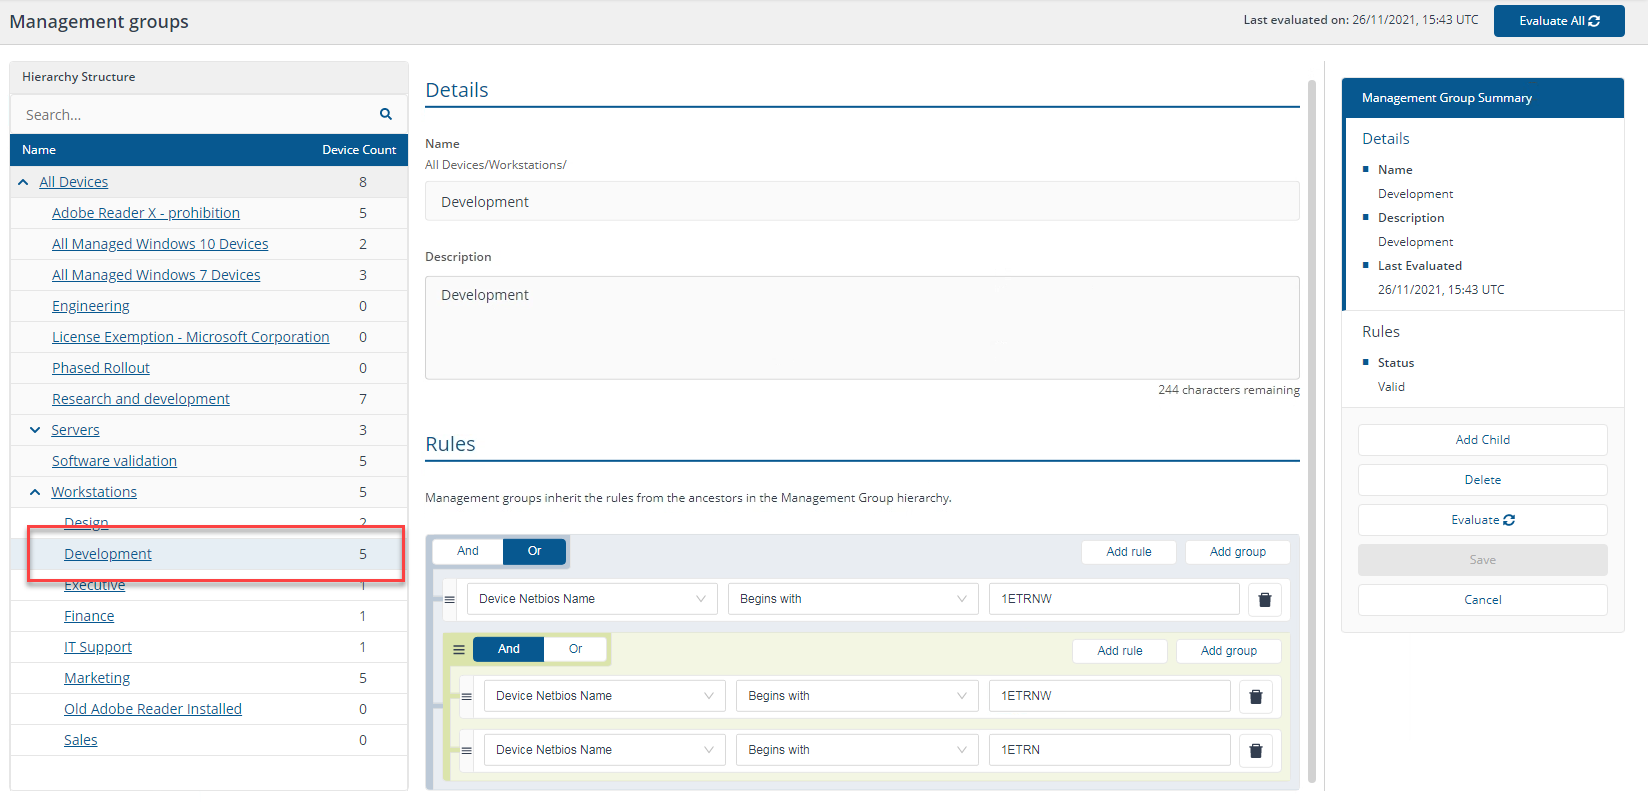
"Device Netbios Name begins with 1ETRNW" OR ("Device Netbios Name begins with 1ETRNW" AND "Device Netbios Name begins with 1ETRN")
Is the same as saying:
"Device Netbios Name begins with 1ETRNW"
You could reduce this to the statement:
A OR (A AND B) = A
In our environment, this returns all five workstation devices with the NetBIOS name beginning 1ETRNW.
Rule example 2
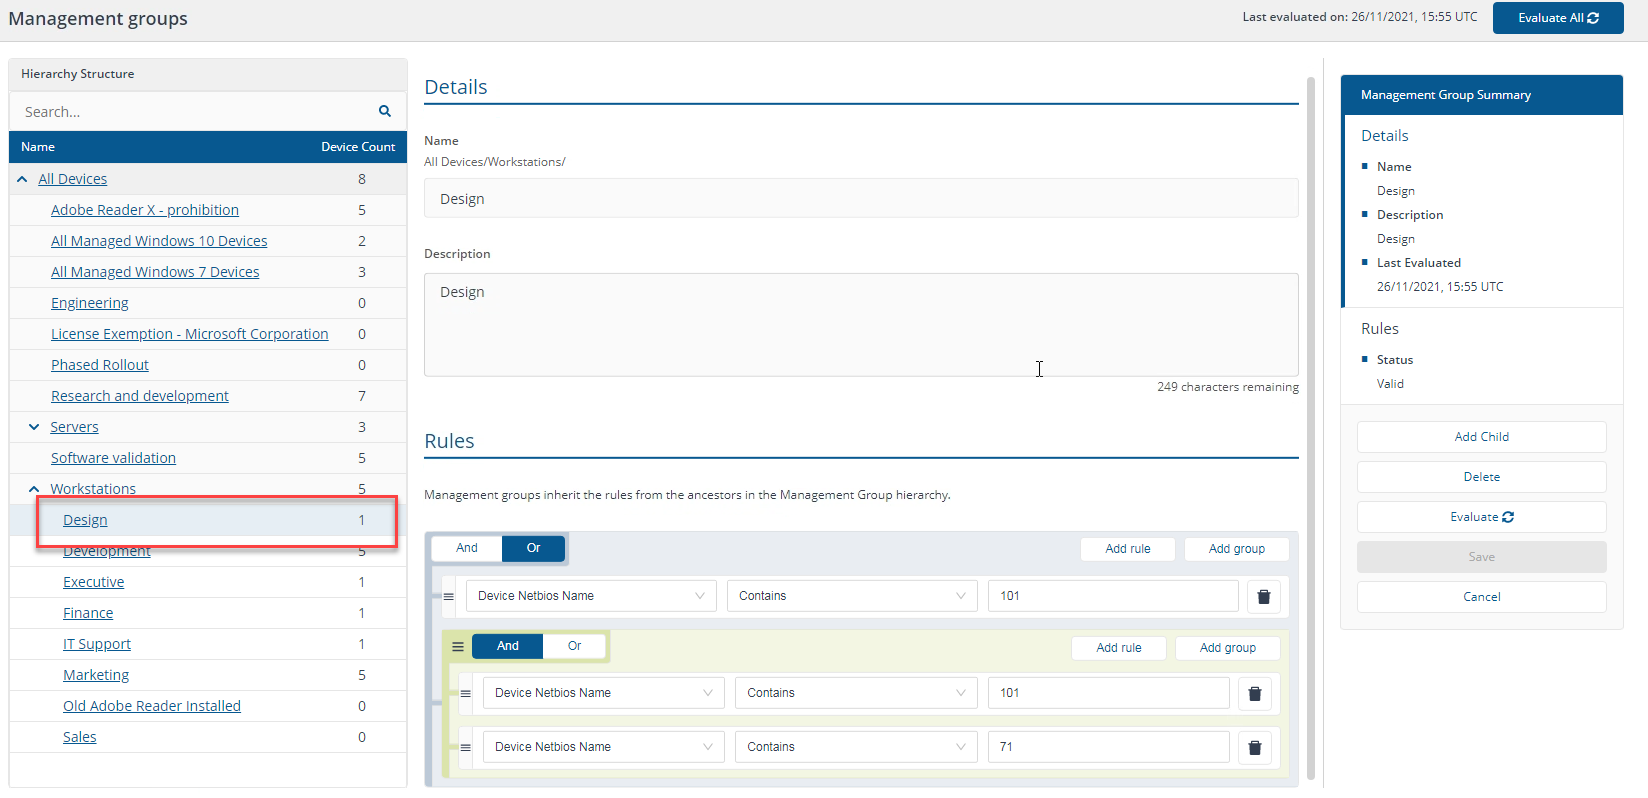
"Device Netbios Name contains 101" OR ("Device Netbios Name Contains 101" AND "Device Netbios Name Contains 71")
Is the same as:
"Device Netbios Name Contains 101"
You could reverse the logic in the statement and say:
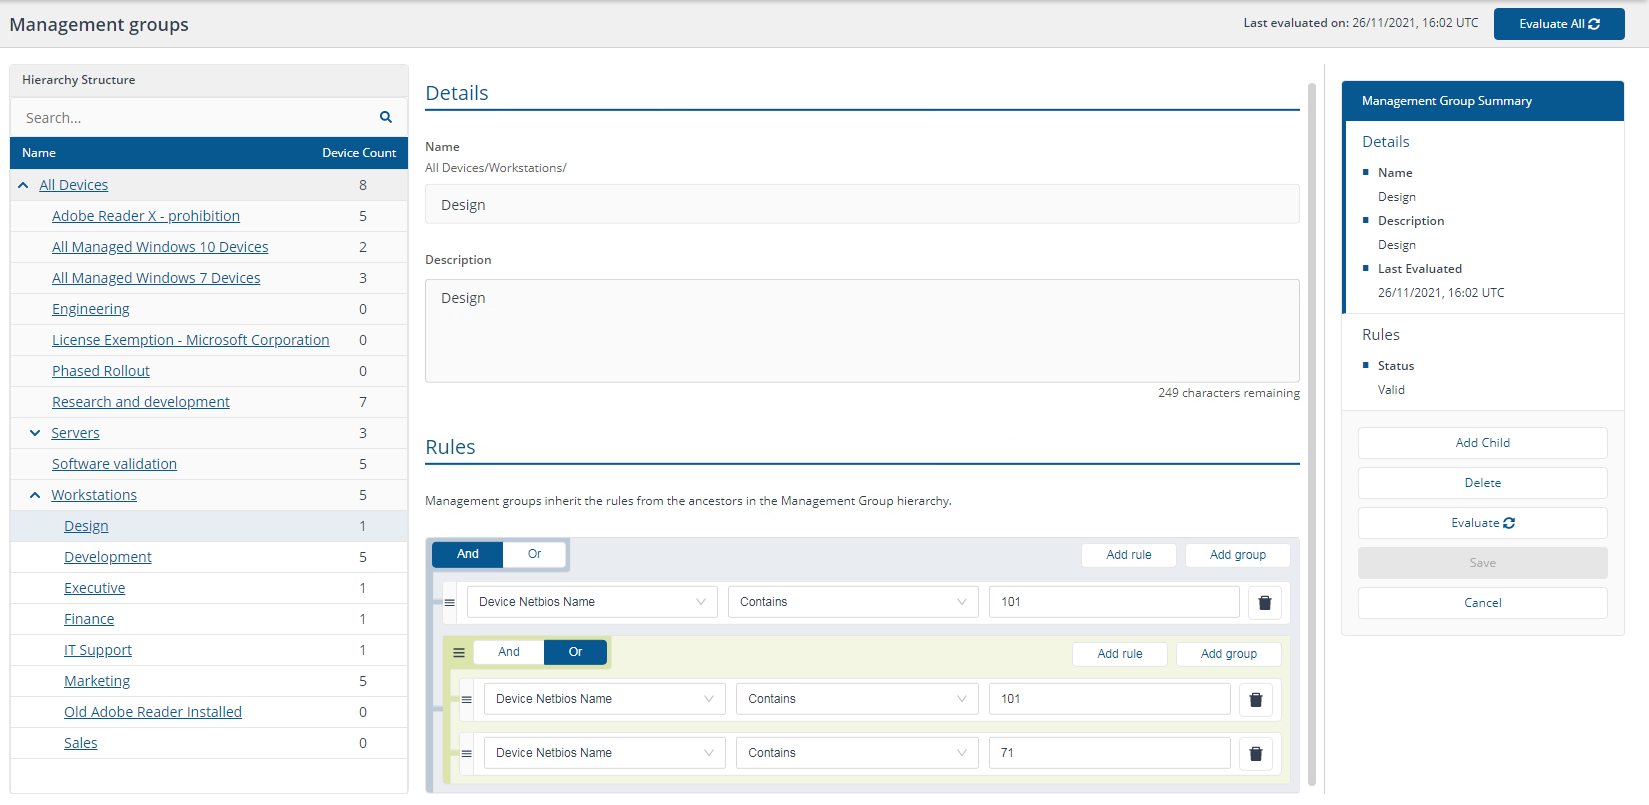
"Device Netbios name Contains 101" AND ("Device Netbios name Contains 101" OR "Device Netbios name Contains 71")
Which is the same as:
"Device Netbios Name Contains 101"
You could reduce this to the statement:
A AND (A OR B) = A
In our environment, this returns one workstation device with the NetBIOS name contains 101, which matches one device, 1ETRNW101.
Rule example 3
Management Group rules do not let you place a Boolean NOT operator around a grouping, but you can convert an expression into NOT rules, for example:
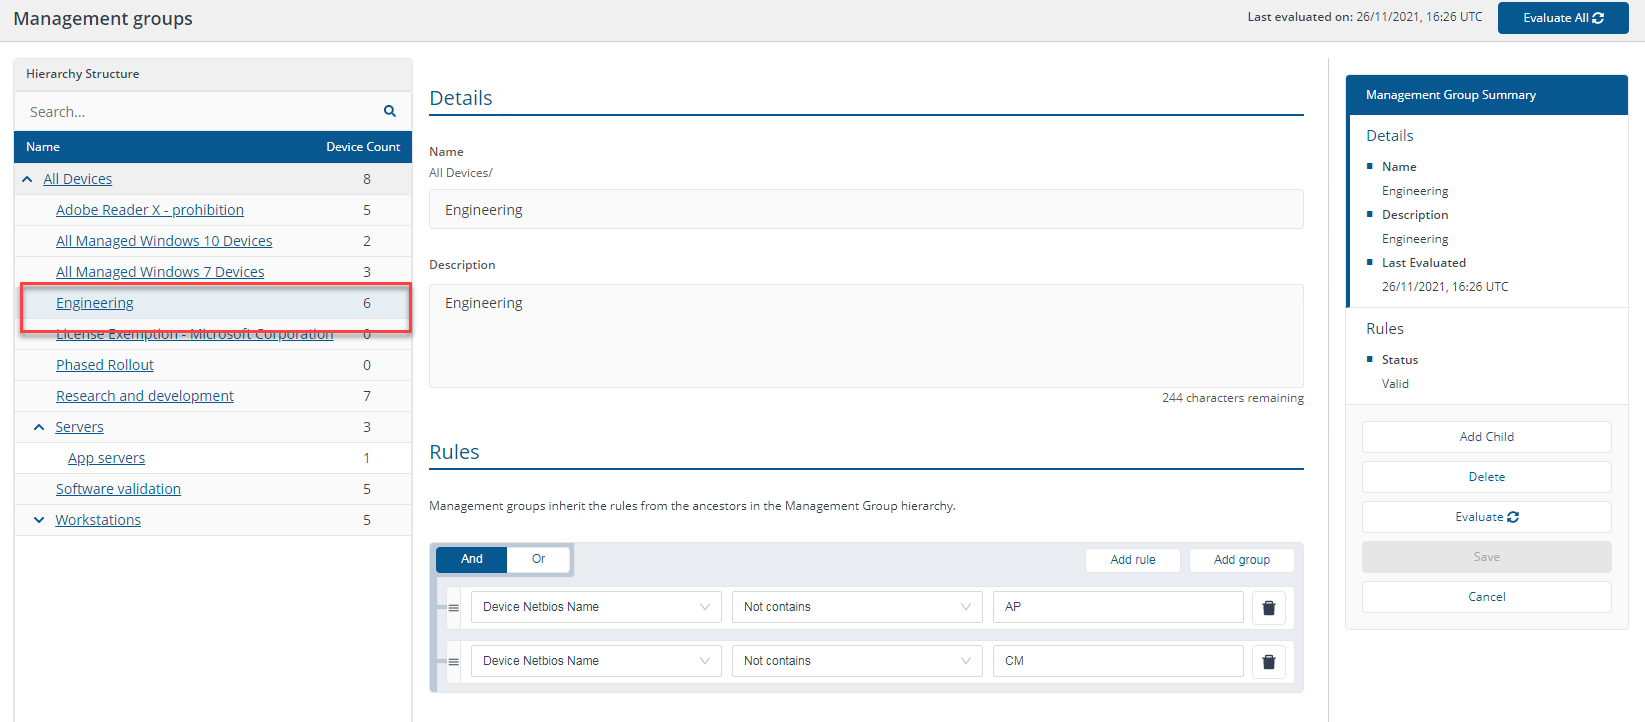
NOT ("Device Netbios Name Contains AP" OR "Device Netbios Name Contains CM")
Using rules, you can express this as:
"Device Netbios Name Not contains AP" AND "Device Netbios Name Not contains CM"
You could reduce this to the statement:
NOT (A OR B) = (NOT A) AND (NOT B)
In our environment this returns the six devices where the NetBIOS name does not contain AP or CM, which are 1ETRNAP, our application server, and 1ETRNCM, our Configuration Manager server.
List of available rules
Rules used to create Management Groups, and connectors that provide the data to support the rules.
For details of how to create and use Management Groups, please refer to Management Groups page.
Warning
The number of rules that a single Management Group can contain is variable because of many factors including SQL Server version, server configuration and rule type used. 1E recommends not exceeding 10,000 rules per rule-based Management Group.
Rule name | Description | SCCM | ServiceNow | Tachyon | OracleLMS | BigFix | BigFixInv | Intune | vCenter | WSUS |
|---|---|---|---|---|---|---|---|---|---|---|
Device ADSite Name | AD Site the device is connected to. | |||||||||
Device Assigned Cores | Maximum number of assigned cores for the device. Derived from | |||||||||
Device Classification | Classification of the device. For example, Test, Production or Development. NoteProduction is the default. | |||||||||
Device Computer Name | Hostname of the computer. | |||||||||
Device Criticality | By default, Device Criticality is set as one of the following, as described in Using Device Criticality.
| |||||||||
Device Domain Name | Domain the device is installed on. | |||||||||
Device Inventory date | Date that the device was last updated. | |||||||||
Device Matched Device Type | Normalized device type based on chassis type. For example Desktop. | |||||||||
Device Matched Family | Normalized family of the device. For example, Aspire. | |||||||||
Device Matched Model | Normalized model of the device. For example, A30. | |||||||||
Device Matched Socket count | Normalized socket count of the device. For example, 1. | |||||||||
Device Matched Vendor | Normalized vendor name of the device. For example, Acer Inc.. | |||||||||
Device Netbios Domain name | NetBIOS version of the device's domain name. | |||||||||
Device Netbios Name | NetBIOS version of the device name. | |||||||||
Device OS | The normalized product title of the OS that is running on the device. | |||||||||
Device Purchase date | Date that the device was purchased. | |||||||||
Device Serial | Serial number of the computer. | |||||||||
Device User Primary Username | The primary user of the device. | |||||||||
OU Name (Deprecated) | Name of the OU that the device is in. For example Sales. NoteAll OUs with the same name will be used, therefore the OU Path rule should be used instead. The OU Name rule is deprecated and should be re-defined using OU Path. This rule is deprecated, which means it will continue to work until it is removed in a future version of Tachyon. | |||||||||
OU Path | The name or path of the OU location in the AD hierarchy, using pipe | as the delimiter. For example, to get all the computers in OU=Sales, OU=Workstations, DC=acme, DC=local you can either specify Sales or - if there is more than one OU called Sales in the AD structure - specify the whole path acme.local|Workstations|Sales. Note that the DC and OU parts of a distinguished name are treated differently. | |||||||||
Processor Matched Chip Module Count | Normalized chip module count of the processor. For example, 1. | |||||||||
Processor Matched Core Count | Normalized core count of the processor. For example, 2. | |||||||||
Processor Matched Family | Normalized family name of the processor. For example, Athlon 64 X2. | |||||||||
Processor Matched Model | Normalized model name of the processor. For example, 3250e. | |||||||||
Processor Matched Processor Type | Normalized type of the processor. For example, Desktop. | |||||||||
Processor Matched Release Date | Normalized release date of the processor. For example, 31-03-2008. | |||||||||
Processor Matched Speed M Hz | Normalized speed of the processor. For example, 2.100. | |||||||||
Processor Matched Threads per Core | Normalized threads per core of the processor. For example, 1. | |||||||||
Processor Matched Vendor | Normalized vendor name of the processor. For example, Advanced Micro Devices, Inc. | |||||||||
Product Catalog Colloquial Version | Software colloquial version contained in the inventory source. For example, 2012. NoteThis will usually be blank. | |||||||||
Product Catalog Edition | Software edition contained in the inventory source. For example, Standard. NoteThis will usually be blank in SCCM unless the relevant MOF extensions have been installed. | |||||||||
Product Catalog Is Partial Version Matched | Flag that indicates whether the software title was partial matched or not (TRUE/1) or not (FALSE/0). | |||||||||
Product Catalog Matched Colloquial Version | Normalized software colloquial version. For example, 2016. | |||||||||
Product Catalog Matched Edition | Normalized software edition. For example, Standard. | |||||||||
Product Catalog Matched End of Support | Normalized software end of support date that of that version. For example, 31-10-2008. | |||||||||
Product Catalog Matched is Bundle | Flag indicating whether the normalized software is a bundle (TRUE/1) or not (FALSE/0). | |||||||||
Product Catalog Matched Is License Required | Flag indicating whether that normalized software title requires a license (TRUE/1) or not (FALSE/0). | |||||||||
Product Catalog Matched Release Date | Normalized software release date of that version. For example, 31-10-2008. | |||||||||
Product Catalog Matched Title | Normalized software title. For example, Office. | |||||||||
Product Catalog Matched Vendor | Normalized software vendor name. For example, Microsoft Corporation. | |||||||||
Product Catalog Matched Version | Normalized software version. For example, 10.2.233. | |||||||||
Product Catalog Title | Software title contained in the inventory source. For example, Office Standard en_pack. | |||||||||
Product Catalog UN Standard Product Service Code | UNSPC code of the normalized software title. | |||||||||
Product Catalog Vendor | Software vendor name contained in the inventory source. For example, Microsoft. | |||||||||
Product Catalog Version | Software version number contained in the inventory source. For example, 10.2.233. | |||||||||
Product Install Date | Date that software installation was installed according to the inventory source. | |||||||||
Product Instance Name | Instance name if used by a product, for example MSSQLSERVER for SQL Server. | |||||||||
Product Last Used date | Date that software installation was last run according to the inventory source. | |||||||||
Product Usage Category | Usage category assigned to a specific installation of a normalized software title. Potential categories are: - Used - Unused - Rarely used - Unreported |