Preparation
What you will need to prepare in advance of implementing a Tachyon server in your network. Typically, these are tasks that may take some time to organize, depending on how your organization works.
Implementation Overview
Please review all tasks to decide how you wish to proceed, and record all configuration details.
Implementation of Tachyon can be extremely quick if all necessary preparations have taken place, and is typically performed in this order:
Obtain the Tachyon License file - ensure it includes entries for the consumer applications you have purchased.
Provision the Tachyon Web and SQL server hardware refer to Server Provisioning.
Install the Windows Server OS
Configure Network interfaces
Create the server's DNS Names (see note) and Service Principal Names
Obtain and install the server's Web Server Certificate, for which you will need to know the server's DNS Name
Install IIS roles, role services and features, refer to Windows Server roles and features.
Optionally pre-create the Tachyon databases, refer to Tachyon databases (you can allow the Tachyon server installer to create the databases using default settings).
Prepare the Mail Server.
Identify and create AD Accounts and Groups, refer to Active Directory.
Review each of the requirements pages under Planning for Tachyon.
Run Tachyon Setup.
Manually install clients on a few test devices, refer to Deploying 1E Client.
Use the Tachyon Verification Product Pack to verify the installation, refer to Verifying.
To install other Instruction Definitions refer to Instruction sets page - from the Tachyon Platform zip, and from https://exchange.1e.com/
Add the Instruction Definitions to Instruction Sets to determine their permissions, refer to the Instruction sets page.
Install Tachyon Consumers (documentation not provided here).
Package the Tachyon client as required by your software deployment tool (see note).
Deploy the client to more pilot devices.
Pilot testing.
Start rollout of clients.
Use the SDK to begin developing your own instructions and testing your use cases.
Note
If your organization requires the client to be packaged, then you can do this once you know the DNS Name(s). Then you can prepare for deploying the client in parallel to preparing and installing the server.
Details required when using Tachyon Setup to install a Tachyon server
The table below lists details required on each of the Tachyon Setup screens. You can review screens in the Tachyon Setup page. Items marked * can wait until after installation.
Tachyon Setup | Documentation Reference | All components installed on a single server | Master Stack | Response Stack | DMZ Server |
|---|---|---|---|---|---|
Tachyon License file | The license file is required to complete Setup and confirm internet access to the 1E licensing service. | The license file is required to complete Setup, and confirm internet access to the 1E licensing service. | The license file is required to complete Setup and to cross-check the number of devices supported by this server. | The license file is required to complete Setup and to cross-check the number of devices supported by this server. | |
Configuration | Decide which applications you want to install from the following list:
| Decide which applications you want to install from the following list:
| Select Nomad if you are using, or plan to use Nomad. | Select Nomad if you are using, or plan to use Nomad. | |
Check prerequisites | All prerequisites must be checked, including:
| All prerequisites must be checked, including:
| All prerequisites must be checked, including:
| All prerequisites must be checked. | |
Server certificate | Web Server Certificate(server) | A web server certificate is required for:
| A web server certificate is required for:
| A web server certificate is required for:
| A web server certificate is required for:
|
Client certificates | Web Server Certificate (clients) * | Decide whether you will require certificates to be presented by the clients. Import the certificates of any trust authorities used by devices and remote servers that do not match the trust authority used by the Server certificate. | Decide whether you will require certificates to be presented by the clients. Import the certificates of any trust authorities used by devices and remote servers that do not match the trust authority used by the Server certificate. | Import the certificates of any trust authorities used by devices and remote servers that do not match the trust authority used by the Server certificate. | Import the certificates of any trust authorities used by devices and remote servers that do not match the trust authority used by the Server certificate. |
Database servers | Name of the SQL Server instance that will host the new TachyonMaster database. Name of the SQL Server instance that will host the new TachyonResponses database. Names of the SQL Server instances that will host the additional databases used by any bundled components that are selected for installation. Keep old DB or not (n/a for new installation). If using a remote SQL Server, please refer to Network interfaces. | Name of the SQL Server instance that will host the new TachyonMaster database. Names of the SQL Server instances that will host the additional databases used by any bundled components that are selected for installation. Keep old DB or not (n/a for new installation). | Name of the SQL Server instance that hosts the existing TachyonMaster database. Name of the SQL Server instance that will host the new TachyonResponses database. Keep old DB or not (n/a for new installation). If using a remote SQL Server, please refer to Network interfaces. | This page is greyed out. The DMZ Server does not have direct access to SQL Servers. Access to databases is via the Core API on the internal Response Stack. Manual steps are required to configure access to the Core API, as described in Implementing a Tachyon DMZ Server. | |
SSAS servers | BI SSAS user - only if the BI component is selected for installation | Name of the SQL Server SSAS instance that will host the multidimensional data cube for BI (required by Patch Success). Account credentials that will be used for the BI services. | Name of the SQL Server SSAS instance that will host the multidimensional data cube for BI (required by Patch Success). Account credentials that will be used for the BI services. | n/a | n/a |
Number of devices | Specify the number of devices supported by this server in order to calculate the number of Switches required, as well as the number of Workers and Slots used by the Switches. | The number is only used to cross-check against the number in the license file. | Specify the number of devices supported by this server in order to calculate the number of Switches required. | Specify the number of devices supported by this server in order to calculate the number of Switches required. | |
Switch configuration | Select an IP Address for each Switch. All Switch IP Addresses will typically use the same DNS Name. If the TachyonResponses database is remote from the server, and the number of devices is more than 500, provide an additional interface so that SQL traffic uses a different IP address to the Switch(es), and see and Configuring a persistent route for SQL traffic. | This page is greyed out. The Master Stack does not require Switch configuration. | Select an IP Address for each Switch. All Switch IP Addresses will typically use the same DNS Name. If the TachyonResponses database is remote from the server, and the number of devices is more than 500, provide an additional interface so that SQL traffic uses a different IP address to the Switch(es), and see and Configuring a persistent route for SQL traffic. | Select an IP Address for each Switch. All Switch IP Addresses will typically use the same DNS Name. Provide an additional interface so that internal traffic uses a different IP address to the Switch(es), and see and Configuring a persistent route for SQL traffic. | |
Website configuration | Required for website. | Required for website. | Required for website. | Required for website. Specify names for the internal facing network interface. The HTTPS binding for the external facing network interlace is created manually after installation. | |
Active Directory and email | Email and 2FA requirements: SMTP server Email and 2FA requirements: Two-factor Authentication requirements | Required for Master Stack components. | Required for Master Stack components. | n/a (Uncheck Enable SMTP) | n/a (Uncheck Enable SMTP) |
Telemetry | Optional. | Optional. | n/a | n/a | |
SLA and 1E Catalog | Confirm internet access to the 1E Catalog. | Confirm internet access to the 1E Catalog. | n/a | n/a | |
Nomad | Nomad (Only if installing Nomad) | If Nomad is enabled:
| If Nomad is enabled:
| If Nomad is enabled:
| If Nomad is enabled:
|
Other requirements:
Server Installation Account, refer to Installation Accounts
Server sizing for on-premises, refer to On-premises installation
Server sizing for AWS and Azure, refer to On-premises installation
Post-installation requirements:
Client devices preparation, refer to License file.
License file
You will need to obtain a valid license file from 1E. For more details, please refer to License requirements.
Whitelisting for license activation and validation
Ensure the following URL is whitelisted:
This URL must be accessible from the Tachyon Server during the setup and running of Tachyon.
The Tachyon license must be validated on a regular basis via internet contact with the 1E license service. The regular validation period is set when the license is requested.
For whitelisting purposes, the Tachyon Server (specifically the Coordinator Workflow module in Master Stack) requires an Internet connection to the 1E license service, as defined in the license file itself. If activation fails, then the system will install but not be usable until the activation is completed.
Upgrading
When upgrading, you are recommended to get a new license file and update your whitelist with the new URL. The old URL (https://license.1e.com) is suitable only for 8.0 and earlier. However, if you are upgrading and your license file has the old URL then you should also whitelist the old URL.
Note
Other URL must also be whitelisted, please refer to Whitelisting connections to 1E Cloud.
Code Signing Certificates
You will need your own code signing certificate, and have it registered in your Tachyon license, if you want to develop your own custom Tachyon instructions, or modify those of other authors. Instructions that are provided in the Tachyon Platform or downloaded from the 1E Exchange have already been code signed using the Platform and Exchange certificates from 1E. Your license controls whether you can use these instructions.
Ideally, all of your instruction developers should share a single code signing certificate between them. Each code signing certificate must be registered in your license and associated with your organization's instruction name prefix. When you have chosen your prefix and have your code signing certificate(s) you then need to send details of these to 1E, who will update your license. This will then automatically activate on your Tachyon Server (assuming it has connection to the Internet).
Server Provisioning
An IIS Web Server should be provisioned. SQL Server can be installed on the same server or the databases can be hosted on remote SQL Server instance(s). Please refer to Server sizing requirements regarding hardware and software specifications for on-premises and cloud servers.
In addition, the Tachyon Server requires the following, which requires more thought and preparation:
DNS Names and their Service Principal Names
Install and configure IIS, refer to Windows Server roles and features
Network interfaces
For the remote SQL Server requirement, please refer to Configuring a persistent route for SQL traffic. However, please ensure you also consult your server, firewall, and networking teams.
Cloud implementations have special configuration requirements for SQL Server and network interfaces described in Server sizing requirements.
Configuring a persistent route for SQL traffic
The following example steps can be used to configure IPv4 network routing so that a specific network interface is used for all traffic going to the specified SQL Server. The example is for a Response Stack and SQL Server on different subnets, but also works if both servers are on the same subnet.
Note
If you add a new interface for SQL traffic after installing Tachyon, then ensure the interface is not registered in DNS using the same DNS Name that devices use to connect to Switches or Background Channel. If you intend to use the new interface to support inbound HTTP traffic from remote Response Stacks then you will also need to configure the Tachyon website to include the IP Address of the new interface as described in Server installation issues.
In our example below we would add 10.0.10.31. Installation and upgrades will automatically configure IP Address and Domain restrictions.
On the Tachyon Server (single-server or Response Stack) open a PowerShell command prompt
The following command should resolve the name and IP Address of the SQL Server, and show the existing network route. In our example the 10.0.20.20.
pathping ACME-SQL02
If not already installed on the server, add a new interface. Configure its properties as follows:
Disable IPv6
Configure IPv4 properties and assign a static IP Address and subnet mask. In our example, these are 10.0.10.31 and 255.255.255.0.
You do not need to configure a default gateway. You can if required, but you will receive a warning later about multiple default gateways and redundancy. However, you do need to know the default gateway for the route to the SQL Server, in our example, this is 10.0.10.1.
Click Advanced... and click on the DNS tab. Uncheck Register this connection's addresses in DNS so that the interface IP Address is NOT registered in DNS.
Click OK twice to save, and then Close
You can give the interface a name to help distinguish it from Switch interfaces. In our example, this is Interface used for SQL
Warning
This interface must not be registered in DNS if the DNS Name of the server is a CNAME Alias for (A) Host records registered by Switch interfaces because clients need to use the DNS Name to connect to Switches. If you need this interface to be registered in DNS, then do this with a (A) Host record.
Enter the following PowerShell command, which provides all the details you need to confirm interfaces have been configured correctly.
Get-NetIPConfiguration
This provides output similar to the following and tells us the interface index for the new interface. In our example, this is 7.
InterfaceAlias       : Interface used for SQL
InterfaceIndex       : 7
InterfaceDescription : Microsoft Hyper-V Network Adapter #4
NetProfile.Name      : ACME.local
IPv4Address          : 10.0.10.31
IPv4DefaultGateway   : 10.0.10.1
DNSServer            : 10.0.1.2
                       10.0.1.3

InterfaceAlias       : Interface used for Switch 1
InterfaceIndex       : 5
InterfaceDescription : Microsoft Hyper-V Network Adapter #3
NetProfile.Name      : ACME.local
IPv4Address          : 10.0.10.32
IPv4DefaultGateway   : 10.0.10.1
DNSServer            : 10.0.1.2
                       10.0.1.3
Use the route command to add a persistent route. The mask must be255.255.255.255and NOT the same as the interface mask configured earlier because the persistent route to the SQL Server is for its IP Address and not its subnet.
route -p add <SQL Server IP Address> mask 255.255.255.255 <Interface used for SQL IPv4DefaultGateway> metric 1 if <Interface used for SQL InterfaceIndex>
In our example:
route -p add 10.0.20.20 mask 255.255.255.255 10.0.10.1 metric 1 if 7
Note
For networks with no routing, such as a lab, the default gateway is 0.0.0.0. Therefore, <Interface used for SQL IPv4DefaultGateway> must be specified as 0.0.0.0. In our example:
route -p add 10.0.20.20 mask 255.255.255.255 0.0.0.0 metric 1 if 7
If your lab has no routing then you should ensure other means for your Tachyon Server to connect to the 1E license service via the Internet.
Enter the following command to confirm that the <SQL Server IP Address> has a persistent route with the details specified. In our example, this is 10.0.20.20.
route print
Enter the following command to verify the route works and uses the correct interface.
pathping ACME-SQL02
The first line (hop 0) must show the name of the Tachyon Server and the IP Address of the interface. This IP Address will then be selected as used for SQL in the Switch configuration screen of Tachyon Setup. In our example this would be:
0 ACME-TCN01.ACME.local [10.0.10.31]
Computername
The computername of a Tachyon Server must comply with Microsoft NetBIOS naming standards, which includes having a length of 15 characters or less.
Microsoft's guidance can be found here: https://docs.microsoft.com/en-us/windows/desktop/SysInfo/computer-names.
DNS Names
Each server that has Tachyon platform components installed requires its own DNS Name. A DNS Name can be a DNS alias, CNAME or Host (A) record.
The Master Stack is used by the following, therefore it helps users if it has a recognizable and convenient DNS Name such as Tachyon - this is specified during installation of the Tachyon Server using Tachyon Setup.
Platform services also reside on Master Stack, which non-Tachyon platform clients connect to, for example:
| |
The DMZ Server is a type of Response Stack used to provide Tachyon Real-time and Inventory services to Internet-based clients. It requires an external DNS Name - for example, tachyonext - this is specified during installation of the DMZ Server using Tachyon Setup. The DNS Name is shared between the Switch network interfaces and Background Channel on the DMZ Server, and specified during installation of Tachyon clients, and stored in their configuration file. | |
A Response Stack is used to provide Tachyon Real-time and Inventory services to clients on the internal (corporate) network. The choice of DNS Name is discussed in the table below. The DNS Name is shared between the Switch network interfaces and Background Channel on the Response Stack, specified during installation of Tachyon platform clients, and stored in their configuration file. |
The number of DNS Names used by a system depends on the location of Tachyon and other Platform services. The table below describes the options.
A Tachyon system can have a single DNS Name if all components are installed on the same server, for example, tachyon - this is specified during installation of the Tachyon Server using Tachyon Setup. If the server has multiple Switches, and therefore multiple network interfaces, then the same DNS Name can be shared by all Switches, the Background Channel, and Master Stack. | |||||||||
The following client-facing components can each have their own DNS Name:
NoteMaster and Response Stacks must have different DNS Names if they exist on different servers:
When a Response Stack is installed on the same server as Master Stack, it will normally share the same DNS Name as Master Stack as described under Single DNS Name. However, if you have multiple Response Stacks and want them to share the same DNS Name, then the Master Stack must use a different DNS Name. This approach of all Response Stacks sharing the same DNS Name simplifies adding further Response Stacks at a later date. During installation - using Website configuration - you need to consider the following:
If Master and Response Stacks are on the same server and you want them to have different DNS Names, then use the main binding for client connections to the Response Stack (because it is client-facing) and use the Alternate binding for other connections to Master Stack. A simpler option is to put the Response Stack on its own server. Remote Response Stacks are recommended if Master Stack is also hosting services AppClarity Software Reclaimer or Application Migration. If you want to configure Switches on the same server to use multiple DNS Names, you will need to seek guidance from 1E. In most cases, this is not required or recommended. | |||||||||
A DMZ Server is a special example of a Response Stack. The DMZ Server itself requires two DNS Names:
NoteBoth DNS Names must be included in the web server certificate. You can manually replace the external/client facing certificate after installation, to comply with best practice not to expose internal names in an external facing certificate. The internal Response Stack also requires an additional DNS Name - for example tachyonalt - for internal communications with the DMZ Server. Please refer to Implementing a Tachyon DMZ Server for more detail about DMZ Servers. |
Note
Note
Tachyon Setup supports installation of one HTTP and up to two HTTPS bindings, but you can manually add more bindings after installation.
Tachyon Setup currently supports only one Web server certificate, which must contain all the DNS Names used by the HTTPS bindings on that server. Each DNS Name must be included as a DNS Name in the Subject Alternate Name (SAN) entry of the web server certificate.
You can manually add more certificates, and change bindings. Please refer to Certificate requirements . Please note that Tachyon Setup helps maintain the main and alternate HTTPS bindings using one certificate.
Where possible the Tachyon Server DNS Name should be a CNAME Alias which references the (A) Host records for each of the Switch network interfaces registered in DNS.
Warning
Ensure network interfaces used for anything other than Switches, for example, the SQL interface, are not registered in DNS. If they are registered ensure the DNS Name used by Switches only has Switch IP Addresses assigned.
For multiple Switches to share the same DNS Name, the load balancing options include:
DNS round-robin. Create a CNAME record which references the (A) Host records for each of the Switch network interfaces registered in DNS.
Network Load Balance (NLB) and register the Tachyon Server's DNS Name as the NLB Name, and configure the NLB to forward to each of the Switch IP Addresses.
Note
DNS round-robin provides reasonable load balancing so that devices should be evenly spread across all Switches. Each device will cache the IP Address given to it by DNS and keep using that, even if the Switch using that IP Address is not available until the TTL expires or the DNS cache is flushed.
A Network Load Balancer (NLB) allows all the Switches to share the same DNS Name which is actually the IP Address of the NLB Cluster, which can then intelligently route the connection to a Switch interface.
Service Principal Names
Tachyon platform and applications use underlying IIS and SQL Server technology, and only require HTTP or MSSQLSvc class SPNs if your company security policy has configured IIS or SQL Server to use Kerberos authentication.
If your IIS server is using Kerberos, then each DNS Name used to access a Tachyon Web Server requires an HTTP class Service Principal Name (SPN) to be registered against the relevant service account in Directory, which is computer$ by default. This allows Tachyon web applications to authenticate clients using Windows Authentication where Kerberos is an authentication provider (primary, fallback, or negotiated).
Note
If your IIS server is using Kerberos then HTTP SPNs are required for web applications that use Windows Authentication, and are created using:
The web application pool's service account, which is Network Service for all Tachyon application pools, and therefore is the computer$ account
Each (A) Host record used to access the web application. If the server is accessed using a CNAME record, then you need to register an SPN for each (A) Host record used by the CNAME. A CNAME will have multiple (A) Host records when using round-robin or NLB to access the web server.
SPNs are not required for DNS Names used to connect to Switches or Background Channel, because they do not use Windows Authentication. However, bear in mind the same DNS Name might be used to access other web applications.
If an SPN is not created, then you will see "401 Not authenticated" errors in the browser and/or log files.
Service Principal Names (SPN) are attributes of AD accounts. A domain administrator will need to create an HTTP class SPN for the Tachyon web server service account, by using one of the following methods:
By editing the ServicePrincipalName attribute of the web server's computer account
Using the following SETSPN commands, substituting your DNS Name, server and service account:
setspn -l ACME\ACME-TCN01$
setspn -s http/acme-tcn01.acme.local ACME\ACME-TCN01$
setspn -s http/tachyon.acme.local ACME\ACME-TCN01$
Use each command as follows:
List existing SPNs for the service account. Run this to record details before you request for any new SPN(s) to be created. Re-run this after creation, ensuring you wait sufficient time for AD replication to occur.
Use this if tachyon.acme.local is a CNAME record and its (A) Host record is acme-tcn01.acme.local.
Use this if tachyon.acme.local is a (A) Host record.
The above example assumes:
The service account for all Tachyon web application pools is Network Service
The Tachyon server name is ACME-TCN01 with a computer account in the ACME domain, which means the service account is ACME\ACME-TCN01$
The DNS Name for the server is tachyon.acme.local.
Tip
If in doubt, it does no harm to create an SPN for each DNS Name used to access the Tachyon Server, including its CNAMEs and (A) Host records using: setspn -s http/<DNS Name> ACME\ACME-TCN01$
To determine which type of record a DNS Name is, run the following command:
nslookup tachyon.acme.local
If the command returns Name: acme-tcn01.acme.local and alias tachyon.acme.local then tachyon.acme.local is a CNAME record
If the command returns Name: tachyon.acme.local and no aliases then tachyon.acme.local is a (A) Host record.
More complex scenarios can be configured which requires in-depth knowledge of IIS, SPN and DNS configuration and are beyond the scope of this documentation.
Web Server Certificate
What do I need to begin?
You will need to have requested a Web Server certificate from your Certificate Authority, using the specification below.
To get the certificate in your organization you will have either:
Submitted a CSR and received a password protected .pfx file
Used the Certificate Enrollment wizard to request a suitable Web Server certificate.
Note
In earlier versions of Tachyon the private key had to be exportable to create certificate files for Tachyon Switches, but this is no longer required for Tachyon 5.0 onwards.
Import the Web Server certificate
Once the Web Server certificate has been provided it must be imported into the Tachyon Server's local computer Personal Certificates store.
After importing, you should give the certificate a Friendly Name, so that you can easily identify it for the post-installation task Tachyon Server post-installation tasks.
On the Tachyon Server, start certlm.msc (or start mmc and add the certificates snap-in for the local machine).
Navigate to the Personal Certificates store.
Locate the Web Server certificate you have just imported.
Right-click on the certificate and select Properties.
In the General tab enter a Friendly name, for example, 1E platform.
Click OK to save.
Web Server certificate specification
Each server that has Tachyon Server components installed requires its own Web Server certificate (except for a remote SQL Server). This certificate is also used by the Tachyon Switch and the Tachyon Coordinator. Therefore, a single-server installation requires only one Web Server certificate. This certificate must be provided on the server prior to the installation of Tachyon.
The Web Server certificate requires the minimum of the following:
Issued by a trusted Certificate Authority (CA)
The certificate for the Root CA in the Certification Path must exist in the Trusted Root CA store of the server
If the issuing CA is not the Root CA then the certificate for the issuing CA and any intermediate CA in the Certification Path must exist in the Intermediate CA store of the server
The above CA certificates must exist on the Tachyon Web Server and Windows client devices
Most organizations have automated distribution of these CA certificates to servers and clients, using Group Policy for example.
Has at least the following Key Usage:
Digital signature
Key encipherment
Has at least the following Enhanced Key Usages:
Server Authentication
Revocation information is included
References at least one CRL Distribution point that uses HTTP - see DMZ Server note below
Must have a private key available
Tip
The default template Web Server available with a Microsoft PKI is suitable for requesting a Tachyon Web Server certificate.
DMZ Server
Please ensure you note the additional certificate requirements described below, when installing any server in a system that also contains a DMZ Server. Internal Master and Response Stack servers, and DMZ Server, each requires two HTTPS bindings, as described in DNS Names. For details, please refer Implementing a Tachyon DMZ Server.
Also, note the requirement for server certificates to reference at least one CRL Distribution point that uses HTTP. These CRL DPs are likely to be in the internal network, and the firewall will need to allow the DMZ server to access these internal servers.
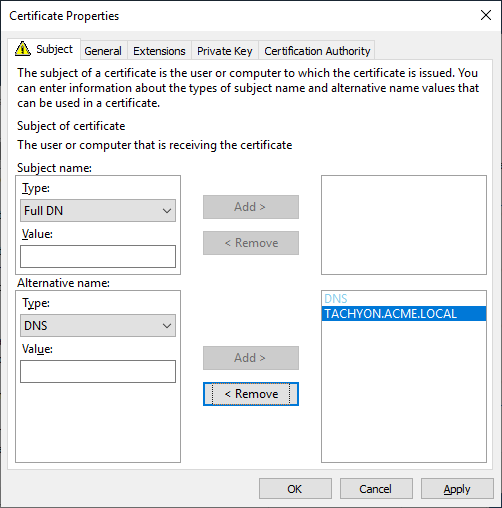
Web Server certificates used by Tachyon Servers must be issued with their fields set as follows. Example DNS Names are discussed in DNS Names.
Fields | Example Option 3 type certificate | |
|---|---|---|
Subject Common Name Field (subject:commonName) | Subject (CN) can be any valid name and is no longer mandatory as required by previous versions of Tachyon. | |
Subject Alternative Name Extension (extensions:subjectAltName), type dnsName | The Tachyon Server DNS Name FQDN (DNS Alias) of the server. This is mandatory, the same as required by previous versions of Tachyon. On a Master Stack - example: DNS Name=TACHYON.ACME.LOCAL On a Response Stack - example: DNS Name=TACHYONRS.ACME.LOCAL On a DMZ Server - example: DNS Name=TACHYONEXT.ACME.COM | |
Subject Alternative Name Extension (extensions:subjectAltName), type dnsName | An Alternate DNS Name FQDN (DNS Alias) of the server. This is usually mandatory, for example if there is more than one server in your Tachyon system, as discussed in DNS Names. On a Master Stack, example: DNS Name=TACHYONALT.ACME.LOCALorDNS Name=TACHYON.ACME.LOCAL On a Response Stack - example: DNS Name=TACHYONALT.ACME.LOCAL On a DMZ Server - example: DNS Name=TACHYONDMZ.ACME.LOCAL | |
Example |
|
Note
Earlier versions of Tachyon required the certificate to have a CN and used SAN fields differently. If you are upgrading your Tachyon server from an earlier version, it may still be using this type of certificate. When upgrading Tachyon, you can issue a replacement certificate, or continue using the old style certificate (because the new-style certificate requires only a SAN DNS Name that matches the DNS Alias, which are provided by the old style certificates).
Examples of old-style certificates.
Fields | Example of old Option 1 type certificate |
|---|---|
Subject Common Name Field (subject:commonName) | The DNS Alias FQDN of the server Example: CN=TACHYON.ACME.LOCAL |
Subject Alternative Name Extension (extensions:subjectAltName), type dnsName | The DNS Alias FQDN of the server Example: DNS Name=TACHYON.ACME.LOCAL The computername FQDN of the server Example: DNS Name=ACME-TCN01.ACME.LOCAL |
Example certificate request | 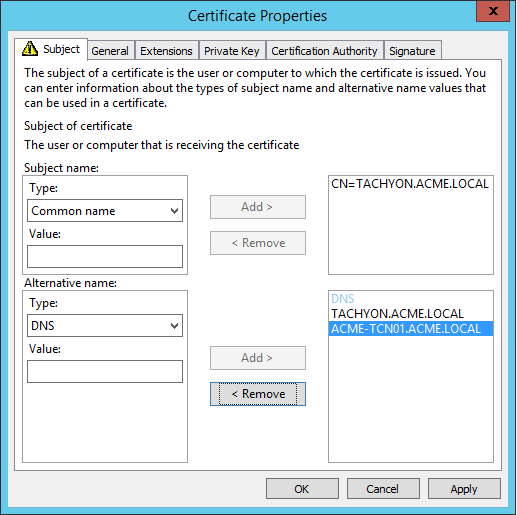 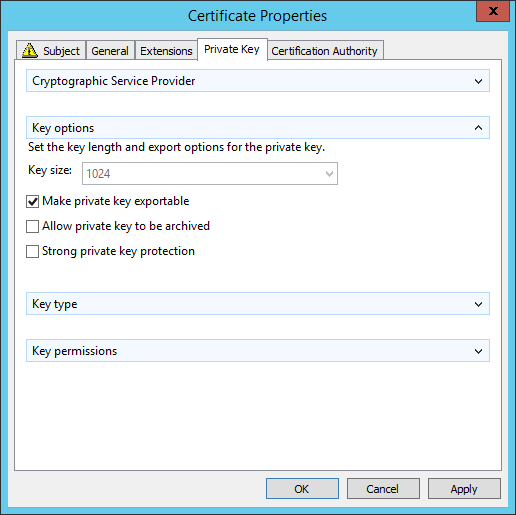 NoteOption 1 type certificates required the CN to be the DNS Alias, and the list of Subject Alternate Names (SAN) to contain the computername FQDN. Also, prior to Tachyon 5.0 the certificate required its private key to be exportable. Tachyon 5.0 and later is able to use this type of certificate when upgrading from an earlier version of Tachyon. |
Fields | Example old Option 2 type certificate |
|---|---|
Subject Common Name Field (subject:commonName) | The computername FQDN of the server Example: CN=ACME-TCN01.ACME.LOCAL |
Subject Alternative Name Extension (extensions:subjectAltName), type dnsName | The DNS Alias FQDN of the server Example: DNS Name=TACHYON.ACME.LOCAL TipAdd any additional DNS Names here. |
Example certificate request | 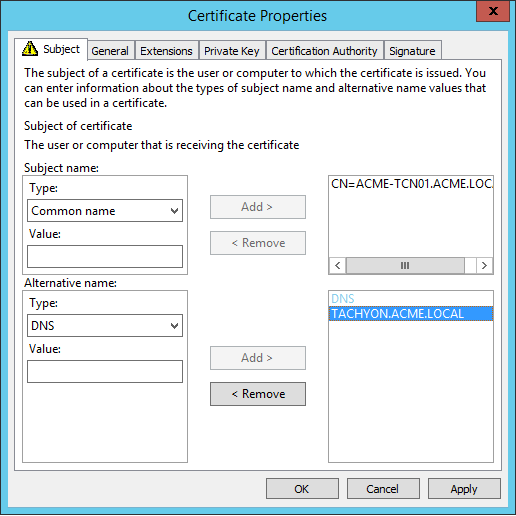 NoteOption 2 type certificates required the CN to be the computername FQDN, and the list of Subject Alternate Names (SAN) to contain the DNS Alias. Also, prior to Tachyon 5.0 the certificate required its private key to be exportable. Tachyon 5.0 and later is able to use this type of certificate when upgrading from an earlier version of Tachyon. |
Switch certificate files
Tachyon Switches use certificates in the Windows Certificate Store. From version 5.0 onwards they no longer use Switch Certificate files.
Windows Server roles and features
Note
Tachyon Setup will create a website with the necessary bindings, therefore please do not pre-create a website of the same name.
The following PowerShell commands can be used to install relevant IIS roles and features and record the server configuration in a file.
Note
When you run Tachyon Setup, you may choose to let the Setup perform this operation for you instead of downloading and running the script manually. Just click on the Install missing prerequisites button after you have run the checks in the Check prerequisites page.
Click here to download - RolesInstall.ps1
RolesInstall.ps1 - Configure IIS using PowerShell
Import-Module ServerManager

Get-WindowsFeature | Out-file $PSScriptRoot\ServerManager-1.txt -Append
Install-WindowsFeature Web-Server,
Web-Http-Redirect,
Web-Dyn-Compression,
Web-Basic-Auth,
Web-IP-Security,
Web-Windows-Auth,
Web-Asp-Net45,
Web-Mgmt-Console,
Net-Framework-45-Core,
Net-Framework-45-ASPNET

Uninstall-WindowsFeature Web-DAV-Publishing

Get-WindowsFeature | Out-file $PSScriptRoot\ServerManager-2.txt -Append
Note
When running the above command, if you receive an error that contains The source files could not be downloaded you will need to supply the source path to your Windows Server OS installation media \Sources\sxs folder.
Append -source X:\Sources\sxs or -source \\Server\Path\Source\sxs to the command line, adjusted for your drive letter or UNC path.
Note
PowerShell always uses 45 in the names of .NET Framework features, irrespective of the actual version of .NET Framework 4.X installed on the server, like:
4.8 in Windows Server 2022 (note: from Tachyon 8.1 onwards, any Tachyon component that requires .NET Framework, requires version 4.8)
4.7.2 in Windows Server 2019
4.6.2 in Windows Server 2016
For details of .NET Framework versions, please refer to https://docs.microsoft.com/en-us/dotnet/framework/get-started/system-requirements#supported-server-operating-systems.
Tip
If you prefer to use the Add Roles and Features Wizard to manually enable features then you can use the Display Names listed in the table Windows Server roles and features.
Note
Web-Http-Redirect is only required to support legacy Nomad clients after an In-place upgrade of ActiveEfficiency Server for Nomad.
Web-Basic-Auth is only required if you will be installing 1E ITSM Connect or 1E Core for integrating ServiceNow and Tachyon.
ASP.NET Core Hosting Bundle
This is required on the Tachyon Master Stack server if you are installing Content Distribution features.
If it is not already installed, Tachyon Setup will attempt to automatically download and install version 3.1.1. However, this supposes your installation account and the server is whitelisted to allow download from https://download.visualstudio.microsoft.com/download/pr/d8b046b7-c812-4200-905d-d2e0242be9d5/53d5698d79013be0232152ae1b43c86b/dotnet-hosting-3.1.11-win.exe.
If you want to download it yourself, or a later version, then go to https://dotnet.microsoft.com/download/dotnet and then install it using a command similar to the following:
dotnet-hosting-3.1.11-win.exe OPT_NO_X86=1 /install
The parameter OPT_NO_X86=1 causes the installer to only install the 64-bit version, which is what Tachyon requires.
You may experience an error if some bundle components are already installed. If this happens, then re-run using /repair instead of /install .
Note
You can run the following command to list the installed versions of .NET
%ProgramFiles%\dotnet\dotnet.exe --list-runtimes
If TLS1.0 is disabled
Web server registry settings
If TLS 1.0 is disabled on the Web server, you must add the following two registry entries, for the 1E Catalog Update Service to successfully connect to the 1E Cloud Catalog.
Import registry entries
Windows Registry Editor Version 5.00

[HKEY_LOCAL_MACHINE\SOFTWARE\WOW6432Node\Microsoft\.NETFramework\v4.0.30319]
"SystemDefaultTlsVersions"=dword:00000001

[HKEY_LOCAL_MACHINE\SOFTWARE\Microsoft\.NETFramework\v4.0.30319]
"SystemDefaultTlsVersions"=dword:00000001
SQL BCP
The Export all feature is described in Exporting data from Explorer. To enable Tachyon users with the appropriate permissions to use the Export all feature you must ensure that Microsoft Bulk Copy Program (BCP) is installed on each Tachyon Response Stack, specifically the Response server where the Core component is hosted.
If Microsoft SQL Server is installed on the same server as the Tachyon Response Stack, then BCP will normally be present.
If the TachyonResponses database is remote to the Tachyon Response Stack and there is no local copy of Microsoft SQL Server, then you will need to install BCP.
You can confirm BCP is installed by starting a command prompt and typing bcp and usage information is displayed. The command bcp -v displays the version.
Note
The information here applies regardless of which version of SQL Server is being used. This does not imply that Tachyon itself is supported under every possible version of SQL Server that falls within those ranges. See Windows Server requirements for the supported versions and required Service Packs.
Install the following components to get BCP working:
Installer file name | Product Name | Where to get it from |
|---|---|---|
vc_redist.x64.exe | Visual C++ 2017 Redistributable | https://support.microsoft.com/en-gb/help/2977003/the-latest-supported-visual-c-downloads |
msodbcsql.msi | Microsoft® ODBC Driver 13.1 for SQL Server® | https://www.microsoft.com/en-us/download/details.aspx?id=53339 This needs to be installed because of a known issue in the Microsoft Command Line Utilities 15 for SQL Server. |
msodbcsql.msi | Microsoft® ODBC Driver 17 for SQL Server® | https://docs.microsoft.com/en-us/sql/connect/odbc/download-odbc-driver-for-sql-server Use version 17 (x64). |
MsSqlCmdLnUtils.msi | Microsoft Command Line Utilities 15 for SQL Server | https://docs.microsoft.com/en-us/sql/tools/bcp-utility The msi includes BCP and SQLCMD. |
To verify the components have been installed, you can use AppWiz.cpl and check for the Product Name.
Services and NTFS Security
Tachyon and SLA Platform services, including web application pools, use built-in accounts Local System (SYSTEM) and Network Service (NETWORK SERVICE) by default, and 1E recommends this configuration.
You must ensure these built-in accounts have the necessary NTFS security permissions on the Tachyon and SLA Platform installation and log folders.
If you are using default installation settings for the Tachyon server on a default configuration of Windows Server, then Local System has the necessary permissions by default, but Network Service requires some additional steps. The simplest method is to add Network Service to the Administrators localgroup, which allows the default installation and logs folders to be created during installation.
However, adding Network Service to the Administrators localgroup is not considered best practice, therefore alternative methods are described below.
The table below lists the Tachyon services and their default service accounts.
Tachyon service | Service account name | Description | SID |
|---|---|---|---|
Tachyon Switch Host service | NT AUTHORITY\SYSTEM | Local System | S-1-5-18 |
1E Catalog Update Service 1E SLA Platform services (3) 1E Tachyon Coordinator service Web application pools:
| NT AUTHORITY\NETWORK SERVICE | Network Service | S-1-5-20 |
The table below lists the default folder locations which must have NTFS security permissions configured for all service accounts.
The Tachyon installation process does not modify permissions, except for the %ProgramData%\1E\Licensing\ folder which does receive full permissions for Network Service.
Folder | Default location | Service account | NTFS security |
|---|---|---|---|
Installation folders | %ProgramFiles%\1E\Catalog\ %ProgramFiles%\1E\SLA Platform\ %ProgramFiles%\1E\Tachyon\ | Network Service SYSTEM | Minimum of read & execute permission (folder, subfolders and files). |
Logs folders | %ProgramData%\1E\Catalog\ %ProgramData%\1E\DatabaseUpgrade\ %ProgramData%\1E\Licensing\ %ProgramData%\1E\Platform Consumer\ %ProgramData%\1E\SLA Platform\ %ProgramData%\1E\Tachyon\ | Network Service SYSTEM | Minimum of Full Control permission (folder, subfolders and files). |
For a default installation of Tachyon on a default configuration of Windows Server, Local System (SYSTEM) has the necessary permissions by default, but Network Service requires some additional steps.
You have a choice of how to configure NTFS security for Network Service, using one of the following options, according to your organization's policies.
You can pre-create the Tachyon installation and logs folders prior to installation and apply NTFS permissions on these instead of their parent folders.
Choice | Method |
|---|---|
Administrators localgroup | Add NETWORK SERVICE to the Administrators localgroup (this is the simplest method but not best practice). |
Users localgroup | Add NETWORK SERVICE to the Users localgroup, and grant this group permissions on the folders.
|
Direct permissions | As above, but grant NETWORK SERVICE direct rights on the folders |
Note
The Tachyon Server Installation Account should be a member of the Administrators localgroup, so that it has full rights on the server.
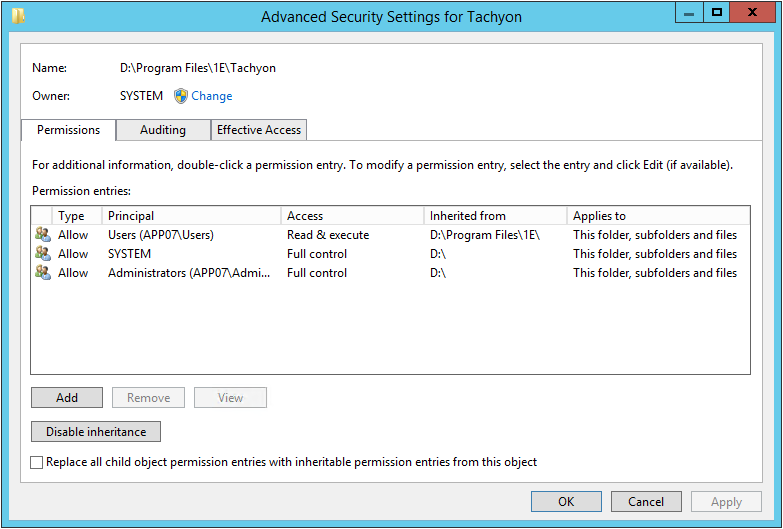
Using a non-default location for the Installation Folder
If you are installing in a non-default installation folder, or the default installation folder has non-standard NTFS security, then before installation, you must ensure the installation folder is pre-created with suitable NTFS security applied. If this is not done, some services will fail to start, or users will not be able to access the website.
The NTFS security for the service accounts described above must be explicitly applied.
In addition, the Users or Authenticated Users localgroup must have a minimum of read & execute permission on each of the Web application folders (folder, subfolders and files). This is simplest to achieve by granting permission on the INSTALLDIR folder.
The example screenshot shows:
A non-default installation INSTALLDIR=D:\Program Files\1E\Tachyon\
RX permissions for the Users group is applied to the 1E folder
Other permissions are inherited from the root of the D: drive
INSTALLDIR permissions are inherited from the 1E folder
NETWORK SERVICE is a member of the Users localgroup
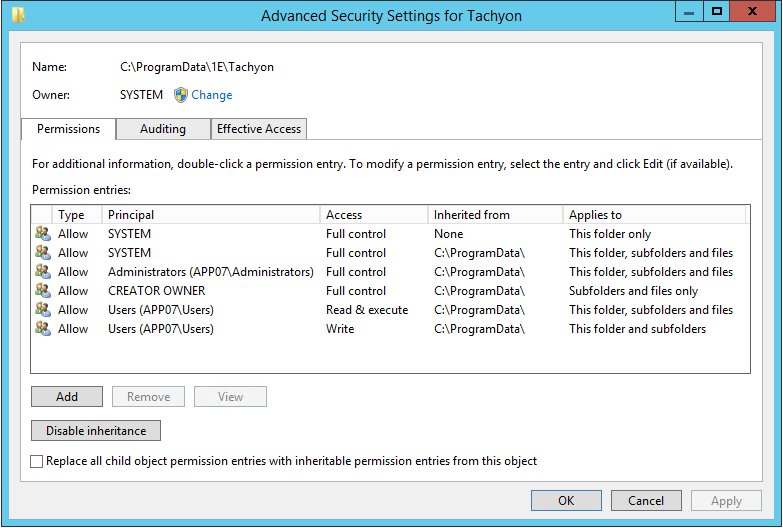
Using a non-default location for the Logs Folder
The accounts used by Tachyon services and application pools must have a minimum of Full Control permission on the logs folder (folder, subfolders and files.
The example screenshot shows a default installation. For a default installation, the only permissions necessary are SYSTEM and Administrators, both Full Control.
SQL Databases
Tachyon platform databases can be installed on one or more SQL Server database instances. These SQL Server instances can be on the Tachyon application server (local) or remote. You can allow the Tachyon Setup to create the databases in their default locations, or you can pre-create them with appropriate permissions before installation if you want to select the location and sizes of the databases. For a new installation, and for upgrades, the Installation Accounts requires a SQL Login with appropriate permissions.
Please refer to High Availability options for SQL Server.
Tachyon platform supports the following High Availability (HA) options for SQL Server:
AlwaysOn Availability Group (AG) using an AG Listener
Failover Cluster Instance (FCI).
The following is a list of databases used by Tachyon platform. In the Database servers screen, you can select the name of the SQL Server instance, but it does not let you change the database names.
1ECatalog
SLA databases must be installed on the same instance:
SLA-Data
SLA-Shared
SLA-Integrate.
ContentDistribution (required for Nomad)
SLA-BI (this is the Business Intelligence database required for Patch Success)
TachyonMaster
TachyonResponses (required for a Response Stack)
TachyonExperience (required for Experience).
The following is a list of database cubes used by Tachyon platform. In the SSAS servers screen, you can select the name of the SQL Server instance, but it does not let you change the database names.
SLA-BI (this is the Business Intelligence cube required for Patch Success).
Default configuration of databases
If you allow the installer to create new databases, they each have the following default settings. Databases will grow automatically to the sizes estimated in Server sizing requirements.
Property | Value |
|---|---|
Owner | If the Installer is used to create the databases, this will be the Tachyon Server Installation Account . The best practice is to change the owner to 'sa' as shown in, Example SQL scripts for creating a SQL Login and granting roles. |
Collation | SQL_Latin1_General_CP1_CI_AS |
Path | Default SQL location |
Initial Size MDF | 128MB |
Autogrowth MDF | By 128MB |
Initial Size LDF | 128MB |
Autogrowth LDF | 10% |
Recovery Model | Simple |
Note
If the model system database has been changed to have a larger size than the values specified in the table above, then the Tachyon Server installer may report an error executing 'Bootstrap.sql' on MasterDatabase. Rebooting the SQL Server may cure the error.
Creating your own databases
You may be required to create databases by hand before installation. This is also known as pre-creating databases. Below are some of the reasons why your SQL administrator may require you to do this:
Tachyon Server Installation Account is only allowed rights on existing databases and not allowed rights to create them
Locations of the database files need to be different from the defaults used on the SQL Server instance(s)
The initial size of the database files needs to be set to their estimated full size given in Server sizing requirements.
SQL Login for the server installation account
The server installation account requires SQL permissions during installation and upgrade, which can be temporary or permanent. The level of SQL permissions required by the installation account depends on which Tachyon components it is installing.
Master Stacks
For master stacks sysadmin is required as follows, to:
Install 1E Catalog
Create Linked Servers for SLA, which requires sysadmin for the SQL database instances for both SLA and 1E Catalog databases
Create Linked Servers for BI, which requires sysadmin for the SQL database instances for both SLA and BI databases, and the SSAS instance for the BI cube (required only by Patch Success).
Response Stacks
Sysadmin availability on SQL instance(s) | SQL Login permissions | ||||||
|---|---|---|---|---|---|---|---|
sysadmin SQL Server role is permitted | The server installation account requires the sysadmin SQL Server role on the SQL Server instance(s) that host the TachyonMaster and/or TachyonResponses database(s). This can be used for a new installation, or for an upgrade. | ||||||
sysadmin SQL Server role is not permitted | The SQL Login permissions required by the server installation account vary depending on which choice is implemented, as described in the following table:
NoteIn addition to the permissions given in the table above, the server installation account also needs to ALTER ANY LOGIN Securables permission in order to allow the creation of the Example SQL scripts for creating a SQL Login and granting roles, used by the Tachyon Server web applications and services. Example scripts are provided below to create a SQL Login and grant roles. During installation, the Tachyon Server installer will always attempt to grant db_owner permission to the server installation account on each of the Tachyon databases. NoteDatabases must be configured in multi-user mode. |
Example SQL scripts for creating a SQL Login and granting roles
The following examples assume ACME\TCNinstaller01 is the Tachyon Server Installation Account.
When the account is not permitted to have the sysadmin SQL Server role, then a sysadmin can use the following script to create a SQL Login and grant it rights.
Create SQL Login and grant ALTER ANY LOGIN Expand source
USE [master]
GO
CREATE LOGIN [ACME\TCNinstaller01] FROM WINDOWS
GO
GRANT ALTER ANY LOGIN TO [ACME\TCNinstaller01]
GO
If the Tachyon Server Installation Account is permitted to create the databases, then a sysadmin can use the following script to add the SQL Login to the dbcreator role.
Grant dbcreator Expand source
USE [master]
GO
ALTER SERVER ROLE [dbcreator] ADD MEMBER [ACME\TCNinstaller01]
GO
If the databases have been pre-created, then a sysadmin can use the following script to add the SQL Login to the db_owner role on each pre-created database.
Grant db_owner Expand source
USE [TachyonMaster]
GO
CREATE USER [ACME\TCNinstaller01] FOR LOGIN [ACME\TCNinstaller01];
ALTER ROLE [db_owner] ADD member [ACME\TCNinstaller01];
GO
USE [TachyonResponses]
GO
CREATE USER [ACME\TCNinstaller01] FOR LOGIN [ACME\TCNinstaller01];
ALTER ROLE [db_owner] ADD member [ACME\TCNinstaller01];
GO
After the databases have been created, best practice is to change the owner of each database to sa, to avoid issues if the owner's Windows account is deleted in future.
The following script can be used to change the owner of each Tachyon database to sa. This will work even if the sa login has been disabled, which is also best practice.
Change owner to 'sa' Expand source.
ALTER AUTHORIZATION ON DATABASE::TachyonMaster To "sa"
GO
ALTER AUTHORIZATION ON DATABASE::TachyonResponses To "sa"
GO
Note
Ensure the Tachyon Server Installation Account retains the db_owner role on the database to support re-configuration and upgrades. If the account is removed from being owner, then it will also be removed from the db_owner role and will need to be re-assigned, for example by using the Grant db_owner SQL script.
The owner user and db_owner role are both mapped to the database dbo user. It is preferable for the account to be a member of the db_owner role, instead of being the owner user.
SQL Login for the Tachyon service account
The SQL Login that is used by the Tachyon Server web applications and services depends on whether the SQL Server is remote from the Tachyon Server or is local, as described in the following table:
Installation scenario | Service account SQL Login |
|---|---|
Tachyon Server is remote from SQL | The computer account of the remote Tachyon Server. For example ACME\ACME-TCN01$ |
Tachyon Server and SQL are local | The local network service account, NT AUTHORITY\NETWORK SERVICE |
Note
Before upgrading Tachyon, or installing or upgrading Consumer applications like Application Migration or AppClarity, the SQL Login must be granted the following rights to support Database Snapshot of the 1E Catalog and SLA databases, to restore them if an error occurs:
dbcreator rights on the SQL database instance hosting the 1E Catalog database.
dbcreator rights on the SQL database instance hosting the SLA databases.
During installation, the Tachyon Setup will always:
Attempt to create the SQL Login
Grant it db_owner permission on each of the Tachyon databases
Remove the db_owner permissions when installation is completed.
Keeping databases during re-installation and upgrade
If re-installing or upgrading Tachyon, you need to decide if you will keep the existing databases or create new ones.
Note
Before doing a re-installation or upgrade of the Tachyon Platform, make a backup of the following (but first see the note below about automatic backups):
Tachyon Master database
Note
Backing up the Tachyon Responses database is not usually needed, unless there are instruction responses that you need to keep. Tachyon responses are not permanently held data and will naturally expire according to the settings specified when an instruction was run, typically in hours or possibly days. If in doubt, there is no harm in backing up the Tachyon Responses database as well.
Tachyon Server installation directory.
including the config files, which may have been manually updated in the previous installation.
Switch certificate files.
Earlier versions of Product Packs that have been modified.
Note
Tachyon Setup will automatically perform a backup of the following items:
Tachyon Server installation directory. This is backed up to a subfolder named Tachyon.bak under the root installation folder for Tachyon . All files, including the .config files and certificate files, will be copied.
IIS configuration. This is done by taking a copy of the applicationhost.config file from the Windows system folders. The backup file is placed at the same location and is named like the original file with a suffix that indicates the date and time when the copy was taken.
The following databases are backed up to the default location for backups that is configured in the database server. By default, this points to a subfolder named "Backups" under the folder where the executable for SQL Server is installed. Unless you are installing a small lab or proof-of-concept, this is usually not a good location for the backups, so make sure that you configure the backup location in SQL Server to an adequate folder before starting the Tachyon upgrade:
1ECatalog
ContentDistribution (optional, required by Nomad )
SLA-Data
SLA-Shared
SLA-Integrate
TachyonMaster
TachyonResponses
TachyonExperience (optional, required for Experience ).
The Product packs are not copied by themselves, but they are kept in a table within the TachyonMaster database, which is backed up.
SSAS Databases
If Business Intelligence is selected for installation, then you will need to provide an instance of SQL Server Analysis Services (SSAS) configured in Multidimensional (not Tabular) mode.
Make sure that the SSAS instance is enabled, reachable, configured in Multidimensional mode, and the Server installation account has sufficient permissions. The Setup program is not able to perform a full validation of the SSAS server, so you need to ensure a proper configuration during the preparation phase.
Business Intelligence is a component required by Patch Success and requires a BI SSAS user.
The BI SSAS User account has the following requirements:
The account name and its password will be specified in the SSAS servers screen.
Must be a domain user account
Configured with Password never expires
Although this user might be referred to as a service account, it does not require Logon as a service on the server.
During installation, the SLA BI installer (used by Tachyon Setup) does the following with the user account:
Stores its credentials encrypted in the following places:
A linked server connection for the BI database to access the BI cube
In the configuration file used by the MDX API to query the BI cube.
Creates a SQL Login, with rights on the SLA-BI database.
Note
Prior to Tachyon , Experience required its own SSAS database.
This is no longer necessary. If you are upgrading to Tachyon or later, then you can delete the Experience SSAS database after the upgrade is completed.
Tachyon users and approvers require AD accounts with email addresses to support approval workflow and notifications.
Mail Server
For details about mail server requirements, please refer to SMTP server.
Active Directory
Tachyon Server must be installed on a domain-joined server, except for a DMZ Server, where this is optional. Clients do not have to be installed on domain-joined devices but must have a certificate.
Installation Accounts
Tachyon Server Installation Account
The server installation account has the following requirements on the server.
Local admin rights on the Tachyon Server. It must be an Active Directory domain user account that is a direct or indirect member of the Administrators local group on the server where Tachyon Server will be installed.
Can be disabled (not deleted) in Active Directory after additional Tachyon admin users have been created in Tachyon , and installation has been verified.
In addition, the server installation account requires SQL rights as described in SQL Databases above.
Tachyon client Windows Installation Account
The 1E Client installer installs a service as local system, therefore the installation account for Windows clients must be capable of being elevated in order to run the installer. The simplest way of achieving this is for the account to have full local administrator rights (as a member of the localgroup administrators, either directly or indirectly).
Tachyon client Non-Windows Installation Account
To install the 1E Client on a non-Windows client the installation account must have privileges to run the sudo command.
Tachyon Users Accounts
Each Tachyon user requires an account in the Identity Provider used. All accounts must have their userPrincipalName (UPN) attribute populated, which is normal, but may be missing if users accounts have been created using scripts.
Tachyon users and approvers should have email addresses to support approval workflow and notifications. Email addresses are mandatory if Two-factor Authentication is enabled.
Groups that are setup in the Identity Provider are recommended for role-based access control (RBAC) within Tachyon but are not mandatory. Groups can be assigned to Tachyon roles after installation, they are not required during installation. They are added as Tachyon groups and configured in the same way as user accounts. A Tachyon user can therefore be a user account or in a group within the Identity Provider. Groups are not mandatory because users can be assigned to roles and managed within Tachyon instead of the Identity Provider, or a combination.
Tachyon Setup assigns a limited set of permissions to the Setup user account (specified during installation/updates), as described on the Roles page which cannot be edited. It is possible to increase this user account to have Full Administrator access during installation/upgrade, 1E recommend that this user account is viewed as a service account and kept with the minimum permission.
A group is also useful to configure access to the CatalogWeb Admin page, as described in Rebuilding the 1E Catalog .
Note
AD distribution groups are not supported.
If AD security groups are nested (groups within groups), they can slow down the performance of the Tachyon Portal for administrators. Therefore, we recommend nesting is not used, and each administrator and approver account is a member of a group used in Tachyon . You can improve performance further by disabling the recursive search used by Tachyon , bearing in mind this will not support nested groups. Please refer to the Post Installation page.
Domain Local security groups are not supported.
Service accounts
Tachyon platform uses either Network Service or Local system for all its services and web application pools.
Please refer to the following sections regarding any rights these accounts may require:
Microsoft Endpoint Configuration Manager preparation
Tachyon platform requires permission to access various features of Configuration Manager when you implement any of the following optional features:
Configuring SQL rights in the Configuration Manager database
The Network Service account of the Tachyon Master Stack server requires a SQL Login, with all the following rights in the Configuration Manager site database.
db_datareader database role
Explicit Execute permissions to the scalar value function fn_GetAppState
Explicit Execute permissions to the scalar value function fnGetSiteNumber.
If the connector is using Windows Authentication, then you can use one of the following:
Create a SQL Login for the Tachyon server's computer$ account, and explicitly grant it the above rights.
Add the Tachyon server's computer$ account to the ConfigMgr_DViewAccess localgroup on the Configuration Manager database server - this is the preferred method.
Note
You may already be familiar with configuring ConfigMgr_DViewAccess if you have previously set up Configuration Manager access for older versions of Nomad Dashboard which used ActiveEfficiency Server, or the ActiveEfficiency Scout, as used for AppClarity 5.x or Shopping 5.x and 6.0
The existence of the ConfigMgr_DViewAccess localgroup depends on the version of Configuration Manager. It should exist for a Primary Site, but may not exist for a CAS. If it does not already exist, it is safe for you to manually create the localgroup on the SQL Server used by the Configuration Manager database. If it already exists, you will need to confirm it has a SQL Login and all the necessary rights, as the Configuration Manager setup does not always configure this group correctly.
The following SQL script can be used to create a SQL Login for ConfigMgr_DViewAccess and grant it permissions on the Configuration Manager database. Before you run the SQL script, you must first:
Manually create the localgroup on the SQL Server
Add the Tachyon server's computer$ account to the localgroup.
Click here to download - ConfigMgr_DViewAccess_permissions.SQL
When you run Tachyon Setup, the Nomad screen will attempt to validate the existence of the ConfigMgr_DViewAccess localgroup and membership of the Nomad server's computer$ account. The validation test will fail if the installation account does not have sysadmin rights on the SQL Server instance used by Configuration Manager. This is not a fatal error as long as you are sure the computer$ account is a member of the ConfigMgr_DViewAccess localgroup.
If you opt to use a specific SQL Login:
If the connector is using a SQL Login, then create the login on the Configuration Manager database and grant it the above rights.
To install Nomad features, Tachyon Setup requires your server installation account to have the following rights. Please refer to Tachyon Setup.
Read-only Analyst rights in Configuration Manager Console - so that Setup can query the Site Server for details of the Configuration Manager database.
SQL Login (with public role) on the SQL database instance that hosts the Configuration Manager database - so that Setup can run a SQL query to validate that the machine account is a member of the ConfigMgr_DViewAccess localgroup on the SQL Server.
Note
If either of the above rights are not provided then Setup will issue a warning to say it was not possible to verify the machine account is a member of the ConfigMgr_DViewAccess localgroup.
Configuring Site Settings in Configuration Manager
You must enable certain Configuration Manager site settings if you plan to use the System Center Configuration Manager connector to populate Inventory.
Tachyon client devices preparation
Please ensure devices that will be used to validate and test the Tachyon installation has the following.
Be a supported device platform, (refer to 1E Client requirements), capable of having the installed
Have appropriate scripting support - please refer to Tachyon scripting requirements
Have a computer certificate (refer to Tachyon client certificate requirements) suitable for use by the Tachyon platform client features of 1E Client.
Tachyon integration with Nomad on Windows devices
Configuration Manager present
You do not need to make any configuration changes to Nomad for it to integrate with Tachyon. Please refer Introducing Nomad for guidance on designing and deploying Nomad.
Configuration Manager not present
You can deploy Nomad to Windows devices where the Configuration Manager client is not present. You will need to enable the following bits in relevant installer properties:
CompatibilityFlags bit 1 - enable long hashes
SpecialNetShare bit 13 - enable HTTP(S)
These are enabled by default in the Nomad client module of the 1E Client.
Tachyon client certificate requirements
If you have configured Tachyon Server to require client certificates (Client certificates) then each device requires a certificate with the following properties, so the client can be authenticated by the Tachyon Switch.
Issued by a trusted Certificate Authority (CA)
The certificate for the Root CA in the Certification Path must exist in the Trusted Root CA store of the client.
If the issuing CA is not the Root CA then the certificate for the issuing CA and any intermediate CA in the Certification Path must exist in the Intermediate CA store of the client.
If either of these CA certificates is different from those used by the Tachyon Web Server, they will need to be exported and imported on the Tachyon Web Server.
Most organizations have automated distribution of these CA certificates to clients and servers, using Group Policy for example.
Has at least the following Enhanced Key Usage.
Client Authentication.
Has at least the following Key Usage.
Digital Signature
Key encipherment.
Has a private key.
For workgroup and non-Windows devices, the private key must be exportable.
Revocation information is included.
References at least one CRL Distribution point that uses HTTP.
Has a Subject Name of type Common Name (CN=<computername>) or Subject Alternative Name (DNS Name=<computername>) where <computername> depends on the type of device:
On domain-joined Windows PCs this must be the computername FQDN of the computer, for example W701.ACME.LOCAL.
On workgroup Windows PCs and non-Windows devices, this must be the computername of the computer - as returned by the hostname command, for example on Windows PC this could be W701, and on a Mac this could be MAC01.local.
Note
Tachyon clients and Switches use OpenSSL and its validation process to verify certificates.
In organizations that have an established PKI, the client devices will probably have a suitable certificate already, along with relevant Trusted Root CA certificates.
For non-Windows devices, the certificate files must be included in the 1E Client installation folder structure, as described below in Configuring the Non-Windows Tachyon certificate using OpenSSL.
Certificate Authority (CA) public keys
Tachyon clients need to authenticate Switches and Switches need to authenticate Tachyon clients. In each case, one end of a secure connection requires the public key for each CA in the other end's certificate certification path (trust chain).
The Tachyon client needs the public key of each CA in the Switch's certification path. These public keys are stored differently on the client device depending on the type of OS.
For Windows devices, CA public keys are normally stored in the Windows Trusted Root Certification Authorities store.
For non-Windows devices, CA public keys are stored in a cacert.pem located in the 1E Client installation folder.
For macOS devices, you have a choice of storing CA public keys in the macOS KeyStore or using the cacert.pem file approach required by other non-Windows devices.
The following points should be noted for Windows devices:
If each client device has an identical certification path as the Switch, then its CA certificates (public keys) will probably already exist in the Windows Trusted Root Certification Authorities store. This is a typical situation in a small-scale lab with a simple PKI.
If any client device has a different certification path then the certificates (public keys) of the different CAs will need to be added to the corresponding certificate store on Windows devices, either Trusted Root Certification Authorities or Intermediate Certification Authorities.
In each of the above cases, the CA certificates (public keys) may have been deployed by Group Policy.
Note
If any of these CAs has its certificate renewed or re-issued then:
The appropriate Certification Authorities store will need to be updated on the Tachyon Server and Windows devices. Most organizations have automated processes for this task.
An updated cacert.pem file must be distributed to non-Windows devices. This should include old and new keys to aid with the transition.
Configuring the Non-Windows Tachyon certificate using OpenSSL
Each non-Windows device requires its own certificate. Below is a guide for using a Microsoft CA to issue a certificate (which is the same for Windows computers), then exporting it and using OpenSSL to prepare it before installing it on a non-Windows device.
First, you will need to have created a new Certificate template on your Certificate Authority by making a duplicate of either the Computer or Workstation template and configuring it with at least the following properties:
General - use a suitable name such as Tachyon Devices and validity period
Request Handling - Allow private keys to be exported
Subject Name - Allow information to be supplied in the certificate request, rather than being built from Active Directory information
Extensions - Application Policies should contain only Client Authentication
Security - ensure relevant users and computers will be able to request certificates.
Once the new template is created on the CA, issue it.
Using the issued template, request a certificate for a target device, export it in .pfx form and remember the password.
The target device requires a copy of the basic cacert.pem and the .pfx file with its password removed. You can do this using the following steps. Use the relevant OpenSSL version for the OS. OpenSSL is normally available by default on Linux and Mac devices. If you want to follow these steps on Windows, you will need to download the open-source version appropriate to your OS.
First, extract the certificate:
openssl pkcs12 -clcerts -nokeys -in <YourPKCSFile>.pfx -out certificate.crt
Second, the CA key:
openssl pkcs12 -cacerts -nokeys -in <YourPKCSFile>.pfx -out ca-cert.ca
Now, the private key:
openssl pkcs12 -nocerts -in <YourPKCSFile>.pfx -out private.key -passout pass:TemporaryPassword
Remove the passphrase:
openssl rsa -in private.key -out new.key -passin pass:TemporaryPassword
Put things together for the new PKCS-File (on Windows, type can be used instead of cat):
cat new.key > PEM.pem
cat certificate.crt >> PEM.pem
cat ca-cert.ca >> PEM.pem
And create the new .pfx file, when prompted for a password ensure that you enter an empty password (that is press enter when prompted for the password and confirmation without entering any text):
openssl pkcs12 -export -nodes -CAfile ca-cert.ca -in PEM.pem -out Tachyon.pfx
Now you have a new PKCS12 key file without a passphrase on the private key part. This Tachyon.pfx file and the cacert.pem file, must be placed in one of the following locations - depending on the OS. These are hidden folders.
On Linux and Solaris:
/etc/1E/Client/.sslcerts
On Mac:
/Library/Application Support/1E/Client/.sslcerts
Configuring the Tachyon certificate for macOS
The 1E Client for macOS devices supports the Configuring the Non-Windows Tachyon certificate using OpenSSL approach described above. Alternatively, the 1E Client for macOS also supports certificates stored within the macOS Key Store.
1E Catalog
Tachyon Setup will install 1E Catalog on the Tachyon server and ensure the server meets the requirements for installation.
Ensure the following URL is whitelisted:
https://catalog.1e.com
This URL must be accessible from the Tachyon Server during the setup and running of 1E 1E Catalog. This enables the Catalog Update service to connect to the 1E Cloud Catalog and download the latest catalog entries.
Note
1E Catalog may need additional configuration to support proxy servers, but this depends on the configuration you have in your current environment. Please contact 1E Support if you need help doing this.