Deploying 1E Client on Windows
Guidance for deploying 1E Client onto Windows computers, including installation and uninstallation.
If you are upgrading Tachyon Agent or other 1E Client agents to 1E Client, then please consult Upgrading 1E Client.
If you are reconfiguring 1E Client, then please refer to Reconfiguring 1E Client.
Requirements
Please review Planning for 1E Client pages. After installation, please review the Verifying page.
For details of supported OS platforms, please refer to Common client requirements page.
The guidance below is for deployment on Windows devices. For other platforms, please refer to Deploying 1E Client on macOS and Deploying 1E Client on Linux.
Note
1E Client does not have a license key. Even so, you must adhere to the terms of your license agreement.
Deployment choices
You must decide how you will configure the 1E Client and deploy to devices.
Note
For more information about configuring 1E Client properties during and after installation, please refer to 1E Client configuration settings and installer properties.
Use your existing software deployment tool to deploy 1E Client, for example, Microsoft System Center Configuration Manager. Some organizations may require the 1E Client to be packaged prior to deployment. The Introducing 1E Client Deployment Assistant is designed to help install Windows versions of 1E Client and other 1E agents using Configuration Manager. It includes template transform files for each combination of client/agent for 32-bit and 64-bit platforms, and automatically creates collections and deployments in Configuration Manager, so that you only need to populate the collections.
Tip
CDA is the recommended method of deploying 1E Client on Windows if your organization uses Configuration Manager. It is a wizard that guides you through common settings for clients and deployments, and provides additional options that the installers do not.
CDA is available as a zip file which you can download from the 1E Support Portal.
You use the CDA wizard to do the following:
Create a MST transform file for each MSI containing your chosen settings
Create a text file that contains the command-line for deploying each MSI
Optionally allow deployment of an MSP patch file for each MSI
Optionally connect to Microsoft Endpoint Configuration Manager to:
Create applications and packages
Create deployments and collections for the applications
Distribute source files to Distribution Points.
The CDA wizard creates an answer file that records the chosen settings (the wizard uses a template answer file that controls the default settings seen in the wizard).
You can download the latest Accumulated Hotfix MSP for each client, from the 1E Support Portal. The CDA zip that you download may already contain an MSP file for each client. You should remove this if you have alternate methods of deploying patches.
If you are using Configuration Manager, you must run the CDA Wizard on a computer that has the Configuration Manager console installed. Windows ADK (with WinPE add-on) is also required locally if CDA is used to configure a deployment of PXE Everywhere.
Windows installation account
The 1E Client installer installs a service as local system, therefore the installation account for Windows clients must be capable of being elevated in order to run the installer. The simplest way of achieving this is for the account to have full local administrator rights (as a member of the localgroup administrators, either directly or indirectly).
Preparation
1E Client installation files are available for download from https://support.1e.com/.
1E Client should be installed on all Windows clients. You must use the correct installer file according to the Windows architecture of the device:
1E.Client-x64.msi is for 64-bit architectures
1E.Client-x86.msi is for 32-bit architectures.
Pending Reboots
Please ensure you allow for a reboot, especially for mission-critical servers. After installing the 1E Client, the computer may request a reboot that appears to be caused by 1E Client, but is actually caused by a pending reboot from a previous software or patch installation. Pending reboots and notifications can occur up to several hours after installation, depending on policies in your organization, such as Computer Restart settings for Configuration Manager clients.
Installing the 1E Client interactively
When running the MSI directly or using a command line, please ensure the installation account has the required permissions as described in Installing the 1E Client interactively
The following panels describe each screen of the 1E Client installer.
Welcome
The welcome screen, just click Next to continue.
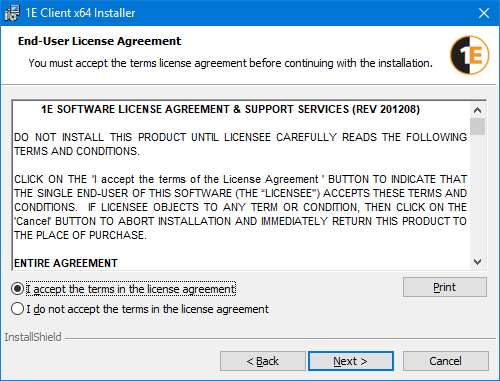
End-User License Agreement
You must read and then accept this license information by clicking I accept the terms in the license agreement before you can continue with the installation. Once this is done click Next.
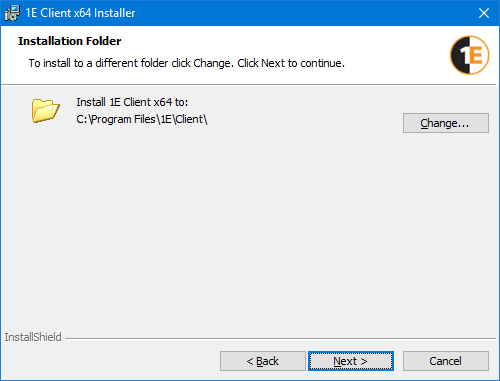
Installation Folder
The next screen lets you to choose the folder where the 1E Client will be installed:
By default, this is set to:
%programfiles%\1E\Client\
But you can browse to a new folder using the Change... button.
Once the desired folder has been set you click the Next button to continue to the next screen.
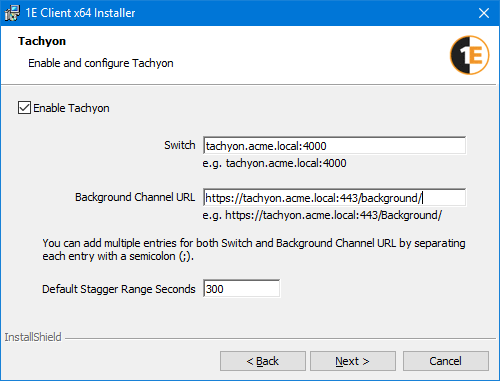
Tachyon
On this screen you configure how the 1E Client connects with the Tachyon platform. If you are installing the 1E Client only to support Nomad, Shopping or WakeUp and do not have the Tachyon platform installed, uncheck the Enable Tachyon checkbox and click Next.
Setting | Description |
|---|---|
Enable Tachyon | Check this box to enable Tachyon. |
Switch | Sets the name and port of the server where the Tachyon Switch is located. The default port is 4000. If Tachyon and Nomad client features are not required then the connection to Tachyon platform is not required, and both Switch and BackgroundChannelUrl settings must be set to none when doing a non-interactive (silent/quiet) install using installer properties on a command-line or in a MST transform file. When doing an interactive install then you must uncheck the Enable Tachyon checkbox. Client features are not required if the 1E Client is being installed only to support PXE Everwhere, Shopping, or WakeUp. They are only required for Nomad if using Nomad features of the Tachyon platform. To connect to the Tachyon platform then Switch will have one or more entries in the format: Switch=<SwitchName>:<SwitchPort> <SwitchName> is the DNS Name FQDN for one or more Switches. This is the same as the following except in a custom configuration where the Switch is installed on its own:
<SwitchPort> is the Port number, which has default value of 4000. Any other port number is used only in a complex configuration if advised by 1E. In systems where there are multiple DNS Names, there will be multiple entries using a semi-colon (;) as the delimiter between entries. For example: Switch=tachyon.acme.local:4000;tachyon.acme.com:4000 |
Background Channel URL | Sets the fully qualified URL that the 1E Client will use to connect to the Tachyon background channel used to transfer large content. If the Tachyon server has been installed to use a custom port for the background channel, the port number must be specified in the URL, for example https://tachyon.acme.local:8443/Background. If Tachyon and Nomad client features are not required then the connection to Tachyon platform is not required, and both Switch and BackgroundChannelUrl settings must be set to none when doing a non-interactive (silent/quiet) install using installer properties on a command-line or in a MST transform file. When doing an interactive install then you must uncheck the Enable Tachyon checkbox. Client features are not required if the 1E Client is being installed only to support PXE Everwhere, Shopping, or WakeUp. They are only required for Nomad if using Nomad features of the Tachyon platform. To connect to the platform then BackgroundChannelUrl will have one or more entries in the format: BackgroundChannelUrl=https://<BackgroundChannelServer>:<BackgroundChannelPort>/Background/ <BackgroundChannelServer> is the DNS Name FQDN of the server, which is the same as the:
<BackgroundChannelPort> is the Port number, which is the same as:
In systems with multiple server and multiple DNS Names, there will be multiple entries on one line using a semi-colon (;) as the delimiter between entries. For example: BackgroundChannelUrl=https://tachyon.acme.local:443/Background/;https://tachyon.acme.com:443/Background/ |
Default Stagger Range Seconds | Sets the scope for the random delay used by the 1E Client to prevent overburdening the Tachyon Background Channel. Some operations (including HTTPS downloads from the BackgroundChannel) are randomly time-staggered across Tachyon platform clients. This property dictates the upper-limit on the default randomization period in seconds. Range is 0 to 3600. Default is 300. Use 0 to instruct Tachyon platform client not stagger operations by default. NoteDo not change this value unless advised by 1E. Only use 0 or a low value in systems that support less than 500 clients. NoteNoteThis setting is not used for HTTPS downloads from the BackgroundChannel if NomadContentDownloadEnabled is true, because Nomad does the bandwidth management. |
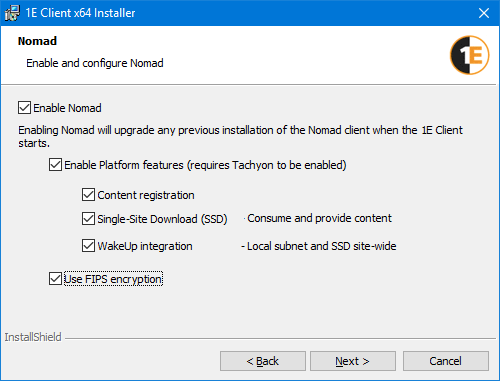
Nomad
When using Nomad with Configuration Manager you must enable Nomad on Configuration Manager clients and Distribution Points. The 1E Client Nomad module replaces the NomadBranch client from previous versions of Nomad. You can also use the Nomad client with Tachyon to improve the efficiency of content downloads.
Setting | Description | ||||||||||||||
|---|---|---|---|---|---|---|---|---|---|---|---|---|---|---|---|
Enable Nomad | Check this box to enable Nomad. Nomad is used to support efficient content download for Configuration Manager and Tachyon. For Tachyon, its Nomad content download feature is enabled by default but only used if Nomad is enabled. NoteIf Nomad is enabled, when the 1E Client starts it will upgrade any previous installation of the NomadBranch client. | ||||||||||||||
Enable 1E Platform features | Check this box to let you configure the Single-Site Download (SSD) options and WakeUp integration.
If you need to enable reporting but prevent the Nomad client from acting as an SSD provider, then use installer properties or mst transform files to configure MODULE.NOMAD.SSDENABLED and MODULE.NOMAD.CONTENTREGISTRATION. For more information about SSD, please refer to Single Site Download (SSD).
NoteThe Platform settings are only available if you have enabled Tachyon. NoteThese settings do not affect other Platform features such as Pre-caching. | ||||||||||||||
Use FIPS encryption | Checking to Use FIPS Encryption configures the Nomad module to use FIPS-encrypted encrypted communications. You must ensure that Nomad is configured with the same FIPS encryption setting on all your 1E Client. |
Tip
If you are licensed to use Nomad, you should enable it if you have enabled Tachyon, so that Tachyon can take advantage of its content download features that intelligently manage bandwidth and use its peers when downloading content from Tachyon Background Channel and other HTTP/S sources.
You do not require Configuration Manager in order for Tachyon to use Nomad. For more information on this feature, please refer to Downloading client content and Nomad integration.
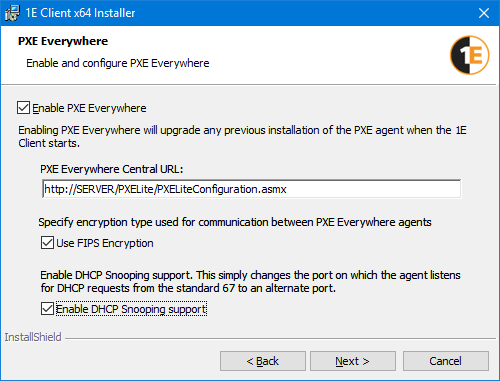
PXE Everywhere
If you are using PXE Everywhere 4.0, 8.0, 8.1 or later, you must enable PXE Everywhere. The 1E ClientPXE Everywhere Agent client module of the replaces the PXE Everywhere Agent from previous versions of PXE Everywhere.
Setting | Description |
|---|---|
Enable PXE Everywhere | Check this box to enable PXE Everywhere Agent client module. NoteIf enabled, when the 1E Client starts it will attempt to automatically remove any previous installations of PXE Everywhere Agent. Other fields are only enabled if this checkbox is checked. |
PXE Everywhere Central URL | URL for the PXE Everywhere Central web service in the format: where NoteThe http prefix to the URL is case-sensitive and must be entered in all lower case letters. The URL is not verified by the installer, so you will need to ensure that the correct URL is entered. |
Use FIPS Encryption | Checking to Use FIPS Encryption configures the PXE Everywhere Agent module to use FIPS encrypted communications. You must ensure that PXE Everywhere is configured with the same FIPS encryption setting on all your 1E Client. |
Enable DHCP Snooping support | Enable this option if your network uses DHCP Snooping. You will also need to implement one or more PXE Everywhere Responders as described in Design Considerations. |
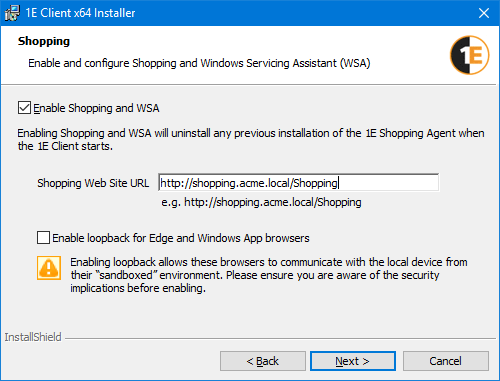
Shopping
If you are using Shopping 6.0 or later, you must enable Shopping. The 1E Client Shopping module replaces the Shopping Agent from previous versions of Shopping.
Setting | Description |
|---|---|
Enable Shopping and WSA | Check this box to enable Shopping Integration and the Windows Servicing Assistant. Shopping must be enabled so that users of a computer can use the 1E Shopping self-service portal, the Windows Servicing Assistant, and the 1E Virtual Assistant. NoteIf enabled, when the 1E Client starts it will attempt to automatically remove any previous installations of the 1E Shopping Agent. |
Shopping Web Site URL | This field is only enabled if the Enable Shopping and WSA checkbox is checked. Example: This is the URL of the Shopping Central website, comprising:
The URL is not verified by the installer, so you will need to ensure that the correct URL is entered. |
Enable loopback for Edge and Windows App browsers | Enable this option if users will connect to the Shopping website using Edge or other Metro-style browsers. When users connect to the Shopping Portal, the website needs to get the latest details about the local computer. Shopping may already have details from the Configuration Manager database, but these need to be confirmed and updated. Browser standards only allow websites to get limited information about the user and computer, therefore the website needs to make loopback calls to the local computer via the Shopping client. The following browsers permit loopback calls by default:
If your Shopping users are using Edge and Metro Internet Explorer browsers, you must enable a Loopback Exemption to allow these browsers to make loopback calls. Exemption affects the browser as a whole and is not just restricted to the Shopping website. Before enabling this option, check your corporate security policy and be aware of the implications of allowing access between browsers and the local machine. By enabling loopback, you are only setting the Edge/Metro Internet Explorer browsers to the same level of security as other browsers which allow this setting already. If you are running an unattended install, you can use MODULE.SHOPPING.LOOPBACKEXEMPTIONENABLED for all OS but it only works on Windows 8, 8.1, 10 and Windows Server 2012 R2 and later. Shopping client only allows inbound connections to localhost (127.0.0.1) which prevents remote access. |
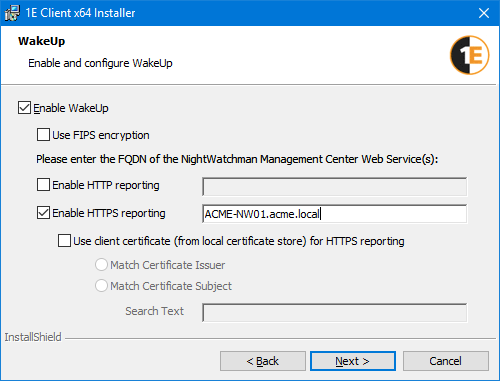
WakeUp
If you are using version 7.2.500 or later of NightWatchman Management Center or WakeUp Server you must install the 1E Client with this option enabled on client devices and on WakeUp server. The 1E Client WakeUp module replaces the WakeUp Agent from previous versions of the 1E Agent.
Setting | Description |
|---|---|
Enable WakeUp | Check this box to enable WakeUp integration. WakeUp integration is required to enable 1E WakeUp capabilities on this device. NoteIf WakeUp Integration is enabled, when the 1E Client starts it will attempt to automatically remove any previous installation of the 1E WakeUp Agent. The 1E NightWatchman Agent is not affected. |
Use FIPS encryption | Checking Use FIPS Encryption configures the WakeUp module to use FIPS encrypted communications. You must ensure that the NightWatchman Management Center, WakeUp Server and 1E NightWatchman Agent components are all set to the same option. |
Enable HTTP reporting | Check this box if the NightWatchman Management Center Web Service is configured to use HTTP and you want communications from the WakeUp module to use HTTP. Do not use this option when installing on a WakeUp Server. When checked you must set the DNS Name FQDN for the server hosting the NightWatchman Management Center Web Service in the edit field provided. |
Enable HTTPS reporting | Check this box if the NightWatchman Management Center Web Service is configured to use HTTPS and you want communications from the WakeUp module to use HTTPS. Do not use this option when installing on a WakeUp Server. When checked you must set the DNS Name FQDN for the server hosting the NightWatchman Management Center Web Service in the edit field provided. |
Use client certificate (from local certificate store) for HTTPS reporting | This checkbox is only enabled when the Enable HTTPS reporting checkbox is checked. You will need to check this option if the NightWatchman Management Center Web Service has been configured to request a client certificate. The certificate is retrieved from the local certificate store and is found by providing a certificate issuer or certificate subject search text. The first certificate found that matches the text will be used to authenticate the client with the NightWatchman Management Center Web Service. |
Match Certificate Issuer | This option is only enabled when the Use client certificate for HTTPS reporting checkbox is checked. When selected this option sets the search in the local certificate store to match against the certificate issuer field of the certificate. |
Match Certificate Subject | This option is only enabled when the Use client certificate for HTTPS reporting checkbox is checked. When selected this option sets the search in the local certificate store to match against the certificate subject field of the certificate. |
Search Text | This option is only enabled when the Use client certificate for HTTPS reporting checkbox is checked. When enabled this edit field should be set to the search text used to locate and retrieve the client certificate from the local certificate store. This will be matched against either the certificate issuer or the certificate subject, depending on which option has been selected above. |
Note
When installing on client devices, enable HTTP or HTTPS reporting in order for NightWatchman Management Center to track which subnet the client device is on when it powers down. The WakeUp module reports back subnet changes more frequently than the NightWatchman Agent.
WakeUp Server must be installed before installation of the WakeUp client. If WakeUp client is installed first the WakeUp Server installer only provides the WakeUp Administration console installation option.
When installing on a WakeUp Server, do not enable HTTP or HTTPS reporting, because that prevents the server from appearing as a client in the NightWatchman Management Center Admin Console. This will only disable Agent reporting whilst the WakeUp Server itself should have reporting enabled for reporting statistics.
Warning
Enter the DNS Name FQDN for the server hosting the NightWatchman Management Center Web Service, do not enter the full URL.
Ready to Install the 1E Client
Once you have finished entering all the settings, you can begin the installation by clicking on the Install button on this screen.
InstallShield Wizard Completed
After the attempted installation the InstallShield Wizard Completed screen will display the results and give you the option to View the 1E Client installation log file. To exit the installer click the Finish button.

Installing the 1E Client by command-line
In most cases the 1E Client will be installed in quiet mode from the command line using a software deployment tool such as Configuration Manager.
Because the expected length of the 1E Client installer command line is likely to exceed the limit imposed by Configuration Manager you will need to use MST transform file(s) for this to work. Please contact your packaging team if you need help creating transform files.
The Introducing 1E Client Deployment Assistant is designed to help install Windows versions of 1E Client and other 1E agents using Configuration Manager. It includes template transform files for each combination of client/agent for 32 and 64-bit platforms, and automatically creates collections and deployments in Configuration Manager so that you only need to populate the collections.
The installer properties listed on this page are for the options visible in the interactive installer above:
Additional installer properties are available for:
Some Command-line examples are also provided below.
1E Client
The following are common settings for the 1E Client.
Installer property | Description |
|---|---|
Sets the installation folder. This value is not stored in the 1E Client configuration file. This value is stored as InstallationDirectory in the Windows registry under HKLM\SOFTWARE\1E\Client\ and must not be changed. Some client modules that run on Windows store their registry settings under their own keys in HKLM\SOFTWARE\1E. NoteThis installer property is for Windows only. |
Tachyon platform client
When installing the full 1E Client (to be used with the Tachyon platform), the following are typical installer properties to use. Additional installer properties are described on the Platform features of the 1E Client page.
As with other Windows installers, uninstallation will leave behind any files, folders and registry entries that were created after installation.
Installer property | Description |
|---|---|
If Tachyon platform and Nomad client features are not required then the connection to Tachyon Platform is not required, and both Switch and BackgroundChannelUrl settings must be set to none when doing a non-interactive (silent/quiet) install using installer properties on a command-line or in a MST transform file. When doing an interactive install then you must uncheck the Enable Tachyon checkbox. Tachyon client features are not required if the 1E Client is being installed only to support PXE Everwhere, Shopping, or WakeUp. They are only required for Nomad if using Nomad features of the Tachyon platform. To connect to the Tachyon platform then BackgroundChannelUrl will have one or more entries in the format: BackgroundChannelUrl=https://<BackgroundChannelServer>:<BackgroundChannelPort>/Background/ <BackgroundChannelServer> is the DNS Name FQDN of the server, which is the same as:
<BackgroundChannelPort> is the Port number, which is the same as:
In systems with multiple server and multiple DNS Names, there will be multiple entries on one line using a semi-colon (;) as the delimiter between entries. For example: BackgroundChannelUrl=https://tachyon.acme.local:443/Background/;https://tachyon.acme.com:443/Background/ | |
If Tachyon and Nomad client features are not required then the connection to Tachyon platform is not required, and both Switch and BackgroundChannelUrl settings must be set to none when doing a non-interactive (silent/quiet) install using installer properties on a command-line or in a MST transform file. When doing an interactive install then you must uncheck the Enable Tachyon checkbox. Tachyon platform client features are not required if the 1E Client is being installed only to support PXE Everwhere, Shopping, or WakeUp. They are only required for Nomad if using Nomad features of the platform. To connect to the Tachyon platform then Switch will have one or more entries in the format: Switch=<SwitchName>:<SwitchPort> <SwitchName> is the DNS Name FQDN for one or more Switches. This is the same as the following except in a custom configuration where the Switch is installed on its own:
<SwitchPort> is the Port number, which has default value of 4000. Any other port number is used only in a complex configuration if advised by 1E. In systems where there are multiple DNS Names, there will be multiple entries using a semi-colon (;) as the delimiter between entries. For example: Switch=tachyon.acme.local:4000;tachyon.acme.com:4000 | |
Some operations (including HTTPS downloads from the BackgroundChannel) are randomly time-staggered across Tachyon clients. This property dictates the upper limit on the default randomization period in seconds. Range is 0 to 3600. Default is 300. Use 0 to instruct Tachyon client not stagger operations by default. NoteDo not change this value unless advised by 1E. Only use 0 or a low value in systems that support less than 500 clients. NoteNoteThis setting is not used for HTTPS downloads from the BackgroundChannel if NomadContentDownloadEnabled is true, because Nomad does the bandwidth management. |
Note
The BACKGROUNDCHANNELURL and SWITCH properties are mandatory. If you want to install the 1E Client with the 1E Client modules for Shopping or WakeUp enabled, and the full Tachyon platform infrastructure has not been installed, you should set both of these properties to none.
However, note that during an upgrade of Tachyon Agent, you must enable the connection to the Tachyon platform, therefore you must define the BACKGROUNDCHANNELURL and SWITCH properties.
Disabling the connection to the Tachyon platform is presently only possible for new installations of the 1E Client. If you wish to disable the connection following an upgrade, you must reconfigure the 1E Client once the upgrade has been completed. For more detail please refer to Reconfiguring 1E Client after installation.
Nomad client
When installing the 1E Client to support Nomad 7.0 or later, the following installer properties are available. Additional installer properties are described on the Content Distribution client settings page.
As with other Windows installers, uninstallation will leave behind any files, folders and registry entries that were created after installation.
Installer property | Description |
|---|---|
Nomad is used to support efficient content download for Configuration Manager and Tachyon. For Tachyon, the Nomad content download feature is enabled by default. NoteIf Nomad is enabled, when the 1E Client starts it will upgrade any previous installation of the NomadBranch client. | |
This installer property is no longer supported. The Nomad installer determines the location of servers from the platform client. Specifically, it communicates with Response Stack Switches and Background Channel. | |
Set to 1 to enable the Nomad client to act as a content provider across subnets when using Single Site Download. | |
Set to 1 to enable Single-site download, which requires Tachyon platform with Nomad. If you enable both Single-Site Download and Content Registration then Nomad will make its own content available to other Nomad peers. If you enable Single-Site Download but not Content Registration then Nomad will be able to fetch downloads from registered peers on other subnets but will not make its own content available. | |
Set to 1 to enable WakeUp integration, which requires an ActiveEfficiency Server. If you enable WakeUp integration but not Single Site Download, any attempt to wake-up peers with particular content will only be on the local subnet. If Single Site Download is also checked, Nomad will try to wake peers with particular content in neighboring subnets on the site if peers on the local subnet do not wake. | |
Set to 1 to configure the Nomad module to use FIPS encrypted communications. You must ensure that Nomad is configured with the same FIPS encryption setting on all your 1E Client. |
Note
Previous versions of Nomad required a license key (installer property PIDKEY). 1E Client and the Nomad client module do not require a license key. Even so, you must adhere to the terms of your license agreement.
PXE Everywhere Agent
When installing the 1E Client to support PXE Everywhere or later, the following installer properties are available.
Installer property | Description |
|---|---|
Set this property to true to enable the PXE Everywhere Agent client module. The default value is false. NoteIf enabled, when the 1E Client starts it will attempt to automatically remove any previous installations of PXE Everywhere Agent. | |
URL for the PXE Everywhere Central web service in the format: where NoteThe http prefix to the URL is case-sensitive and must be entered in all lower case letters. The URL is not verified by the installer, so you will need to ensure that the correct URL is entered. | |
You must use the same FIPS encryption setting on all PXE Everywhere Agents. Use of FIPS compliant encryption for communications.
| |
This installer property is set to 2067 if Enable DHCP Snooping support is checked during an interactive installation of the 1E Client installer. This is the UDP port on which the PXE Everywhere Agent will listen for PXE requests. If DHCP Snooping is not being used, then this port must be 67 (default), and you do not need to install Responders. When manually installing the PXE Everywhere Agent, if the DHCP Snooping option is enabled in the installer UI, the default port is changed from 67 (43 hex) to 2067 (813 hex). If the MODULE.PXEEVERYWHERE.DHCPPORT installer property is used to specify a port other than 67, the installer UI assumes the DHCP Snooping option is enabled. If DHCP Snooping is being used, then DhcpPort on Agents must be the same value as AltPxeServerPort on Responders. The default value of AltPxeServerPort is 2067. If a value other than 2067 is specified as a custom port number on Agents, you will also need to manually create the AltPxeServerPort (and AltPxeClientPort) registry values on Responders, refer to AltPxeClientPort. |
Shopping client
When installing the 1E Client to support Shopping v5.5 or later, the following installer properties are available.
Installer property | Description |
|---|---|
Shopping must be enabled so that users of a computer can use the 1E Shopping self-service portal, the Windows Servicing Assistant, and the 1E Virtual Assistant. NoteIf enabled, when the 1E Client starts it will attempt to automatically remove any previous installations of the 1E Shopping Agent. | |
Example: This is the URL of the Shopping Central website, comprising:
| |
Optional. Default value is false. Set this value to true if users are likely to use Microsoft Edge or other Metro browsers to access the Shopping website. The Shopping client requests this value from the Shopping Central website (admin console setting: Loopback exemption enabled). If the client fails to connect to the website, it defaults to using this local setting and retries later. |
WakeUp client
When installing the 1E Client to support the WakeUp component of NightWatchman Enterprise v7.3 or later, the following are typical installer properties to use. Additional installer properties are described on the WakeUp client settings page.
Installer property | Description |
|---|---|
Set this property to true to enable the WakeUp client module. The default value is false. Enabling this will also cause any installation of the 1E Agent's WakeUp component to be uninstalled the first time the 1E Client is started, leaving the NightWatchman component if that was installed. NoteWhen true then you must also specify either the name of the NightWatchman Management Center reporting server, or that reporting is turned off. For details of these and all other installer properties please refer to WakeUp client settings. | |
Set to 1 to force the WakeUp agent to use a FIPS-compliant algorithm for:
If enabled, then all components in the NightWatchman and WakeUp system must have FIPS enabled. EncryptionLevel and FIPS settings used by WakeUp do not affect other 1E Client communications. | |
Enables WakeUp reporting. Sets whether the Agent sends reporting messages to the NightWatchman Management Center Web Service. May be set to one of the following values:
TipWhen installing the 1E Client on a WakeUp Server, set MODULE.WAKEUP.REPORTING=OFF so that the server does not appear as a client in the NightWatchman Management Center Admin Console. This will only disable Agent reporting whilst the WakeUp Server will have reporting enabled for reporting statistics. | |
Set this parameter to the FQDN (recommended) or NetBIOS name of the server hosting the NightWatchman Management Center Web Service. WarningMandatory when WakeUp reporting is enabled (default) and using HTTP for communications. TipIf HTTP is not using standard port 80 then specify the port number as part of the server name: MODULE.WAKEUP.REPORTINGSERVER="ACMESERVER.ACME.COM:8080" | |
Set this parameter to the FQDN (required) or NetBIOS name of the server where the NightWatchman Management Center Web Service component secure site has been installed. WarningMandatory when WakeUp reporting is enabled (default) and using HTTPS for communications. TipIf HTTPS is not using standard port 443 then specify the port number as part of the server name: MODULE.WAKEUP.SECUREREPORTINGSERVER="ACMESERVER.ACME.COM:7433" | |
Specify the text used to search for a client certificate in the client certificate store. Either MODULE.WAKEUP.CERTISSUER or MODULE.WAKEUP.CERTSUBJECT is mandatory when all the following are true:
If this property is used, it will use the first certificate it finds where the specified text matches the certificate's Issuer CN. | |
Specify the text used to search for a client certificate in the client certificate store. Either MODULE.WAKEUP.CERTISSUER or MODULE.WAKEUP.CERTSUBJECT is mandatory when all the following are true:
If this property is used, it will use the first certificate it finds where the specified text matches the certificate's Subject CN. |
Command-line examples
When installing 1E Client, you should include /l*vx for verbose logging to a log file. The following examples also use /qn for a non-interactive (silent/quiet) installation.
Example command-line using a MST transform file
msiexec /i 1E.Client-x64.msi TRANSFORMS="1EClient.mst" /qn /l*vx C:\Windows\temp\1EClient-install.log
An MST typically only works with a specific version of an MSI, therefore you should test before using an old MST file. An MST may work with both 32 and 64-bit versions of an MSI, provided the MST does not contain any transforms that are platform-specific. Please contact your packaging team if you need help creating transform files.
The Introducing 1E Client Deployment Assistant is designed to help install Windows versions of 1E Client and other 1E agents using Configuration Manager. It includes template transform files for each combination of client/agent for 32 and 64-bit platforms and automatically creates collections and deployments in Configuration Manager so that you only need to populate the collections.
Example which enables only Tachyon client
Example Windows 1E Client installer command-line with only the 1E Client features enabled, other client modules are not enabled. Tachyon uses HTTPS only.
msiexec /i 1E.Client-x64.msi SWITCH="tachyon.acme.local:4000" BACKGROUNDCHANNELURL="https://tachyon.acme.local:443/Background/" /qn /l*vx C:\Windows\temp\1EClient-install.log
Example which enables only Nomad client
Example Windows 1E Client installer command-line with only Nomad module enabled, which also requires Tachyon client features to be enabled. Tachyon uses HTTPS only.
msiexec /i 1E.Client-x64.msi SWITCH="tachyon.acme.local:4000" BACKGROUNDCHANNELURL="https://tachyon.acme.local:443/Background/" MODULE.NOMAD.ENABLED=true MODULE.NOMAD.CONTENTREGISTRATION=1 MODULE.NOMAD.SSDENABLED=1 /qn /l*vx C:\Windows\temp\1EClient-install.log
Example which enables only PXE Everywhere Agent
Example Windows 1E Client installer command-line with only PXE Everywhere Agent client module enabled, and Tachyon features disabled (by setting SWITCH and BACKGROUNDCHANNELURL to none). PXE Everywhere uses only HTTP.
msiexec /i 1E.Client-x64.msi SWITCH=none BACKGROUNDCHANNELURL=none MODULE.PXEEVERYWHERE.ENABLED=true MODULE.PXEEVERYWHERE.CONFIGSERVERURL="http://pxecentral.acme.local/PXELite/PXELiteConfiguration.asmx" /qn /l*vx C:\Windows\temp\1EClient-install.log
Example which enables only Shopping client
Example Windows 1E Client installer command-line with only Shopping client module enabled, and Tachyon features disabled (by setting SWITCH and BACKGROUNDCHANNELURL to none). Ensure you use HTTP or HTTPS as appropriate.
msiexec /i 1E.Client-x64.msi SWITCH=none BACKGROUNDCHANNELURL=none MODULE.SHOPPING.ENABLED=true MODULE.SHOPPING.SHOPPINGCENTRALURL="https://appstore.acme.local/shopping" MODULE.SHOPPING.LOOPBACKEXEMPTIONENABLED=true /qn /l*vx C:\Windows\temp\1EClient-install.log
Example which enables only WakeUp client
Example Windows 1E Client installer command-line with only WakeUp client module enabled, and Tachyon features disabled (by setting SWITCH and BACKGROUNDCHANNELURL to none).
msiexec /i 1E.Client-x64.msi SWITCH=none BACKGROUNDCHANNELURL=none MODULE.WAKEUP.ENABLED=true MODULE.WAKEUP.REPORTINGSERVER="nwmserver.acme.local" /qn /l*vx C:\Windows\temp\1EClient-install.log
Sysprep and OS images
The following steps are required if the 1E Client will be included in an OS image.
Stop the 1E Client service.
Stop the NomadBranch service (if Nomad is enabled).
Delete the logs folder and its contents. Default is %ALLUSERSPROFILE%\1E\Client
Delete the registry key and its contents HKLM\SOFTWARE\1E\Client
Delete the registry key and its contents HKLM\SOFTWARE\1E\Common
Other registry keys for clients may exist. Please refer to their product documentation for details of sysprepping them.
HKLM\SOFTWARE\1E\NightWatchman
HKLM\SOFTWARE\1E\NomadBranch
HKLM\SOFTWARE\1E\PXEEverywhere
HKLM\SOFTWARE\1E\WakeUpAgt
HKLM\SOFTWARE\1E\WSA
You can disable the services during image preparation and re-enable it as an OS Deployment step. The folder and registry keys will be automatically re-created when the services are restarted after the OS is deployed.
Note
By default, the OS resolves %ALLUSERSPROFILE% to C:\ProgramData\
If you have 1E WakeUp client module enabled, or 1E NightWatchman Agent installed, then please refer to Installing the 1E NightWatchman Agent for Windows: The 1E NightWatchman Agent, Sysprep and diskimaging.
Uninstalling 1E Client
Manual uninstallation
1E Client can be uninstalled manually by using Windows Apps and Features (appwiz.cpl). A reboot is not normally required.
Disabling a feature or client module
Please refer to Reconfiguring 1E Client for examples of how to use the -reconfigure command-line to reconfigure the 1E Client.
Uninstallation using the Windows Installer
1E Client can be uninstalled automatically by using a Windows Installer command line, where the {product code} is dependent on the version of the 1E Client. The example below also includes switches that prevent prompting and restart and creates a log file.
msiexec /x {BF6F5FA9-64C8-4B72-A6B6-14A582BF96B8} /qn /norestart /l*vx C:\Windows\temp\1EClient-uninstall.logTidy up after uninstallation
After the uninstallation of 1E Client, the following is left behind. As with other Windows installers, uninstallation will leave behind any files, folders, and registry entries that were created after installation.
Location | Artifacts | Recommendation |
|---|---|---|
Installation folder | None. | |
Logs folder | Log files remain. Please refer to Log files for log file locations of 1E Client and its client modules. | The log files can be deleted or renamed. If not deleted, then a new installation that uses the same logs folder will continue to use the old log file. |
Client\Persist folder remains. | Leave this folder which contains status information about current instructions. The Persist folder should be deleted only if you do not intend re-installing the 1E Client with Tachyon enabled, or when preparing OS images, refer to Sysprep and OS images for details. | |
Tachyon client registry | HKLM\SOFTWARE\1E\Client\Persist | This registry exists if the Tachyon platform client feature of the 1E Client is enabled. It is used to keep a record of hash values for its persistent storage files, which includes status information about current instructions. This registry key should be deleted only if you do not intend re-installing the 1E Client with Tachyon enabled, or when preparing OS images, refer to Sysprep and OS images for details. |
Nomad Cache | %ALLUSERSPROFILE%\1E\NomadBranch | The folder should be deleted only if you do not intend re-installing the 1E Client with Nomad enabled. Downloaded content is retained so that if the Nomad client is re-enabled it will be scanned and re-registered, to make it available for peer sharing with other Nomad clients. |
Note
HKLM\SOFTWARE\1E\Common and HKLM\SOFTWARE\1E\NightWatchman are used by the 1E NightWatchman Agent, previously part of the 1E Agent.