Using TIMS
Installing and starting TIMS
Please refer to Installing TIMS and Starting TIMS.
Creating an Instruction XML file
Instruction XML files allow code written in TIMS to be uploaded to the Tachyon server, so that the instructions can be invoked by asking a question or requesting that an action be performed.
Note
Instruction names must be less than 64 characters in length, otherwise 1E platform will return an error, and the instruction will not be saved.
About questions and actions
Questions are instructions that can be searched for, and invoked, directly from the Tachyon Explorer 'I want to know' page. Questions should generally not alter the state of any endpoint on which they are run.
Actions are instructions that can only be searched for and invoked once an initial question has been asked. You 'follow up' the initial question either by asking further questions or by invoking actions.
Note
The default instruction type for a new instruction was a question up to TIMS 5.1, but from TIMS 5.2 it is an action. This is to ensure that potentially dangerous instructions require authentications and authorisation by default. If the instruction is harmlessly "read only" then change it to a question.
Suppose that we want to create a new instruction XML file from our example above. It will perform the incredibly useful function of telling us "What time is it"
Tip
The definitions of each element of an Instruction definition are decribed in the Instruction Definition Reference. The guidance below refers to most elements but not all.
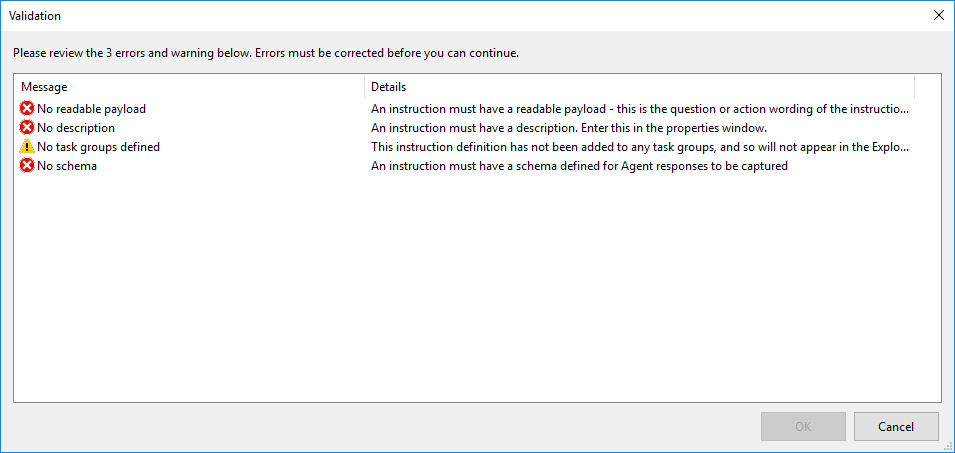
Validating the file
Select File/Save or File/Save As from the TIMS main menu.
In this case you will see a set of validation errors that need to be addressed before the file can be saved.
Note
You can also see any validation errors at any time by pressing the Validate toolbar button
Mandatory Settings
We will now correct the errors by adding a payload and description to the property pane.
Description
should explain what the instruction does
should contain useful words that will help searches
useful to contain details such as platforms it will run on, if it downloads a script, or any restrictions
Name
The name must be unique within your Tachyon system; you cannot load two instruction XML files into Tachyon that share a common name. If you do, the second file will overwrite the contents of the first.
A default name has automatically been filled in
the first time you start TIMS the prefix is based on your Active Directory Domain Name
you can change the default name in Tools→Preferences
ReadablePayload
is exactly what you see in the Tachyon Explorer when searching for questions and actions
helps to be a grammatically correct question or action statement
if the instruction has Instruction Parameters then these must be included so that Explorer users can see and enter the parameters.
Version
can be a single digit or a dotted notation with 2, 3 or 4 parts.
When using Tachyon Explorer to search for instructions, the search will parse the ReadablePayload and Description fields.

Tip
See Instruction Definition Reference (InstructionDefinition) for descriptions of the other settings (elements).
Adding a schema
The schema defines how the instruction output is actually displayed in Tachyon Explorer.
You must define the schema, or format, of the information that will be displayed in Tachyon Explorer, which may be different to what is actually output by the instruction and returned by the Tachyon client to the Server. You would not normally want to send back more data than you want to display.
The schema also defines how the data will be rendered. Normally, you would code your instruction so that its output column names are the same as you want to display. However they may be circumstances when you prefer to use the schema definition to change column names, or reformat or render in a different way.
Press the schema button to define or modify the schema.
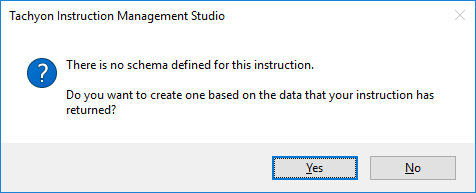
TIMS can infer a schema based on the data returned by your instruction, or you can manually define one.
If you select No in the above dialog you will be presented with an empty schema dialog like this.
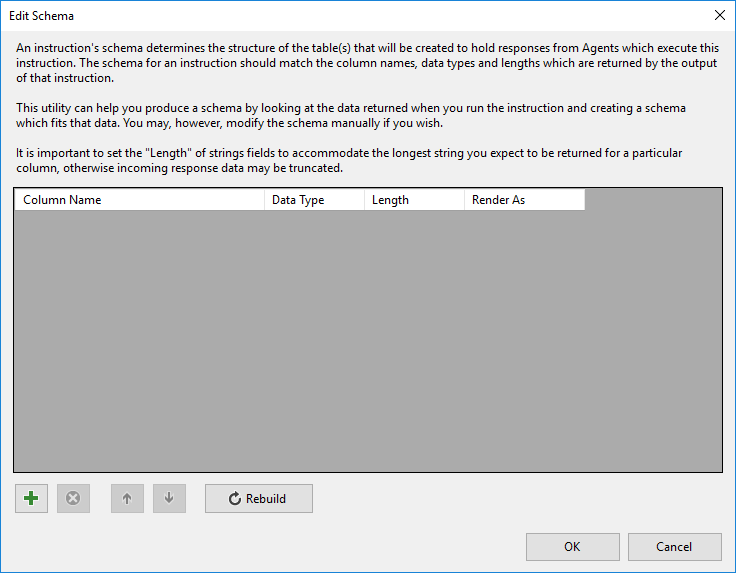
Use the + button to add a new schema entry, specifying the column name, data type and (optionally) the length
Note
The 'render as' field is an optional field and will not be used in this example.
If you select Yes in the above dialog, TIMS will attempt to infer a schema by examining the results that running the instruction produced
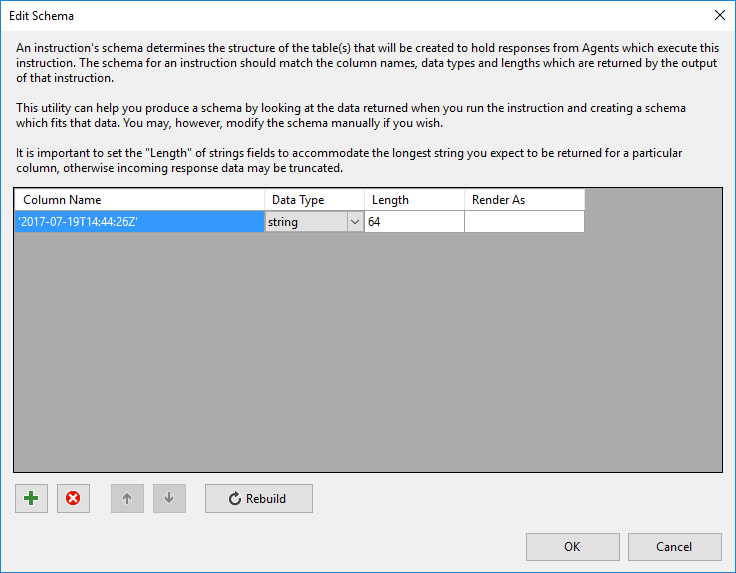
However in the latter case, note that the column name is not valid. You will be notified of this when you try and confirm the schema by pressing OK

Alter the column name to a valid name
Alter the column name to 'currenttime'. You will now be able to save the schema
The 'render as' schema item property
This field allows you to select a rendering scheme which will be applied to the column when it is displayed in the Tachyon Explorer.
There are three rendering schemes currently available
preformatted
ipAddress
currency
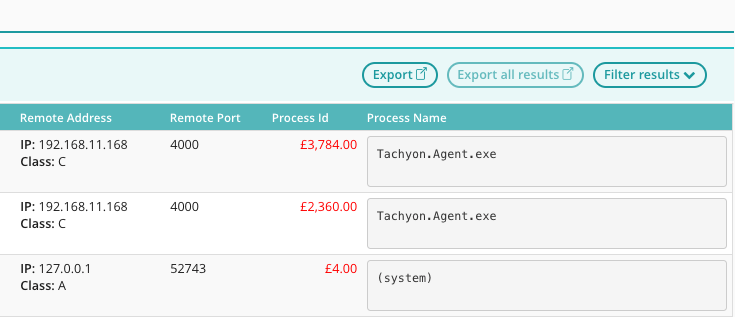
The screenshot below shows the effect of each of these.
The Remote Address column has been associated with the ipAddress rendering scheme.
The process ID column has been associated with the currency rendering scheme.
The Process Name column has been associated with the preformatted rendering scheme
Tip
See Instruction Definition Reference (SchemaJson) for more detail about Schema.
Adding a task group
You will receive a warning if you try and re-save the file, that you have not associated this instruction XML file with any task group in Tachyon. Task groups allow you to associate instructions with specific tasks in Tachyon, which are visible from the Tachyon Explorer task pane.
It is not mandatory to associate an instruction XML file with a task group.
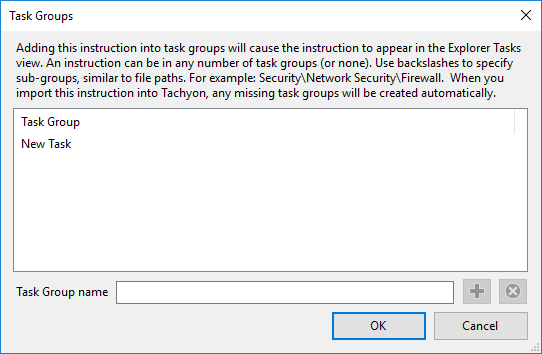
If you wish to do so, click the Task groups button on the TIMS toolbar
Enter a task group name and press the + button to add the task group name.
Note
You can enter multiple task groups, and you can also create task group hierarchies, by separating each part of the task group name with a backslash (\).
Press OK to save changes
Tip
See Instruction Definition Reference (TaskGroups) for more detail about Task Groups.
Saving the instruction XML file
You have now addressed all the validation errors and warnings and have a valid instruction XML file.
Select Save or Save As and specify the file name if required.
Examining the XML file
This is what the generated XML file looks like, at this point
<?xml version="1.0" encoding="utf-8" standalone="yes"?>
<InstructionDefinition Author="Andrew.Mayo" Name="1E-NewInstruction-1" ReadablePayload="What time is it" Description="What time is it" InstructionType="Question" InstructionTtlMinutes="10" ResponseTtlMinutes="10" Version="1.0" xmlns="http://schemas.1e.com/Tachyon/InstructionDefinition/1.0">
  <Payload><![CDATA[SELECT "%environment:now%";

]]></Payload>
  <SchemaJson><![CDATA[[
  {
    "Name": "currenttime",
    "Type": "string",
    "Length": 64
  }
]]]></SchemaJson>
  <TaskGroup>
    <TaskGroup Name="New Task" />
  </TaskGroup>
</InstructionDefinition>
Adding resources
Resources are additional files that are required when executing instructions in an instruction XML file. Resources are downloaded from the Tachyon content URL by the Tachyon client, when they are accessed.
TIMS embeds resources directly into the instruction XML file, so that when this is loaded into Tachyon, the embedded resources are automatically extracted and copied to the Tachyon content URL.
To add a resource, click the Import Resource toolbar in the TIMS menu. Browse to the file and select it.
TIMS will automatically determine the resource type and compute its SHA-256 hash and size as shown in the dialog below
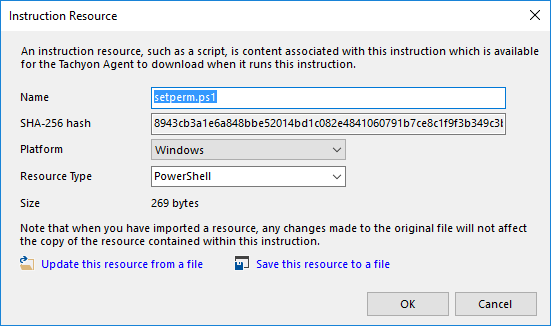
The options 'update this resource from a file' and 'save this resource to a file' will be discussed shortly. They are mainly useful when managing already-embedded resources.
Press OK to insert the resource. The code block below shows how the instruction XML file looks after the resource has been embedded. Note that the base-64 encoding of the resource has been truncated for clarity.
<Resources>
    <Resource Name="setperm">
      <Content Type="PowerShell" FileName="setperm.ps1" Size="269" Platform="Windows" Hash="8943cb3a1e6a848bbe52014bd1c082e4841060791b7ce8c1f9f3b349c3bd8b64">
                <![CDATA[JGFjbD1nZXQ.................]]>
          </Content>
    </Resource>
  </Resources>
Managing embedded resources
Once a resource has been embedded, TIMS shows it in the script pane footer, like this
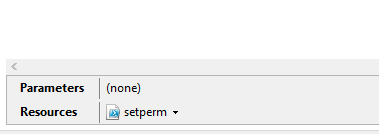
Click on the resource dropdown to see the available resource management options
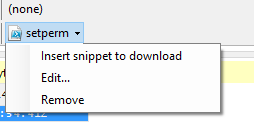
Insert Snippet to Download
The Insert Snippet to Download option inserts code to download the resource programmatically. For example, for the PowerShell resource we embedded, the snippet will look like this
@resource1 = HttpGetFile(URL:"setperm.ps1", Size:269, Hash:"8943cb3a1e6a848bbe52014bd1c082e4841060791b7ce8c1f9f3b349c3bd8b64");
Resource downloading in the TIMS environment
When your instruction is deployed in the Tachyon environment, the above HttpGetFile request will download the resource file from the Tachyon server content endpoint URL.
However while you are developing your instruction in TIMS, when the HttpGetFile is executed, TIMS will instead retrieve the embedded resource from its internal memory and populate the result variable, just as if the file had actually been downloaded.
Edit
The Edit option will display the resource dialog we saw previously. You can amend any resource property from this dialog.
You can also select the two options which were mentioned previously.
Update this resource from a file
When this option is selected, you will be prompted to select a file. The file contents completely replace the current resource.
Save this resource to a file
When this option is selected, you will be prompted to enter a file name. A copy of the resource is saved to the file you specify
Remove
The resource is removed from the instruction XML file.
Tip
See Instruction Definition Reference (Resources) for more detail about resources.
Instruction Parameters
Our example instruction did not require any input parameters. For instructions that require parameters, TIMS allows you to define each parameter, along with its type, and various other attributes.
If you specify a parameter in TIMS, you will be prompted to enter a parameter value each time you run the instruction. The previous entry entered during that editing session is remembered.
Let's change our example to accept a single parameter.
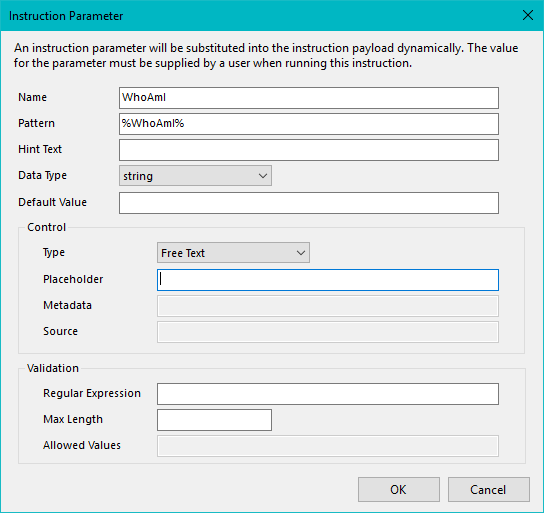
Remove the existing instruction and then click the Add Parameter toolbar on the TIMS menu
Enter a parameter name WhoAmI
The parameter pattern - by which it will be referred to in code - is automatically inserted for you, wrapped by the required % symbols.
Field | Description |
|---|---|
Name | Parameter name - must be unique in the instruction |
Pattern | When the instruction is run, this text will be substituted in the instruction payload and readable payload with the parameter's value. The text must be enclosed by % symbols and should be the same as the unique paramter name. |
Hint Text | The alternative text to show (instead of the name) in the readable payload. |
Data Type |
|
Default Value | default value for the parameter. |
Control Type |
|
Control Placeholder | The text to show as a prompt to the user if th econtrol s empty. Valid for Free Text only. |
Control Metadata | Ths must match an existing custom property type (e.g. "Coverage Tag"). Valid only for Custom Property Key and Value. |
Control Source | The parameter name of the corresponding custom property key. Valid only for Custom Property Value. |
Validation Regular Expression | Regular expression, in .NET Framework regular expression syntax. Valid only for string Free Text fields. |
Validation Max Length | Maximum number of characters. Valid only for string Free Text fields. |
Validation Allowed Values | List of allowed values, separated by commas. Valid only for Value PIcker entry type. |
Note
In order for a user to enter parameter values when running an instruction in Explorer, the Readable Payload must include the same parameter names. For example: Say hello to %WhoAmI%
Add an instruction in the top pane of TIMS
select "%WhoAmI%";
Run the instruction. You are prompted for a parameter value.
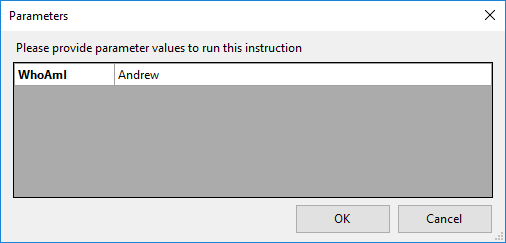
Enter a parameter value and press OK. The instruction runs and the result is displayed.
Note
Parameter patterns are case-sensitive. %whoami% would not be the same parameter as %WhoAmI%
Instruction parameter considerations
Since parameter values are substituted directly into the Agent’s payload, you must take care to avoid the possibility of SQL or statement injection. Tachyon takes precautions against this (e.g. escaping double-quotes and backslashes within string parameter values), but you should consider the following when parameterizing instructions:
Although the format %ParameterName% is the preferred convention for a parameter placeholder, you are free to use any substitution placeholder you wish
Parameters should be defined as the most appropriate data type (string, integer, float, Boolean)
String parameters should, where possible, be constrained using a regular expression to prevent invalid input
Placeholders for string parameters should be placed within double-quotes within the Agent Language – the Tachyon Consumer API will automatically perform escaping of the parameter’s value
Placeholders for non-string parameters should not be placed in double-quotes
Within SQL statements, you may wish to consider using a CAST("%parameter%" AS NUMBER) expression for type-safety
Although it is possible to use parameters to build "dynamic statements" within the Agent Language, it is NOT recommended unless you take extreme care (and limit the possible values which can be supplied for the parameter)
Adding multiple parameters
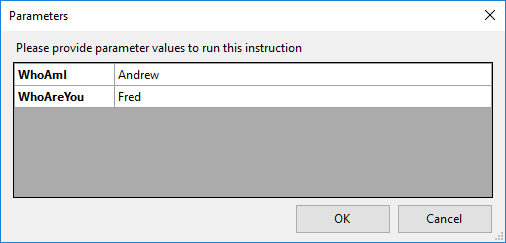
If you add more parameters, then when you run an instruction you see all parameters and their current values in the parameters dialog, like this
Managing parameters
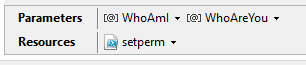
As with resources, parameters that have been added are shown in the footer pane of the script pane, like this
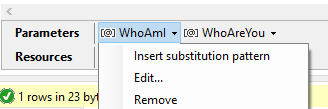
Click on a parameter dropdown to see the parameter menu.
Insert substitution pattern
This option just inserts the parameter pattern (such as %WhoAmI%) in the script pane.
Edit...
This option brings up the parameter dialog which we saw earlier, and allows you to change any property of the parameter
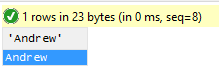
Remove
This option removes (deletes) the parameter. Any references to the parameter in instruction code will also be removed, and replaced with the current value of the parameter. For example, if I remove the %WhoAmI% parameter my code changes to
select "Andrew";
Parameter properties
The parameter dialog shows a number of parameter properties which control how it appears in the Tachyon Explorer along with default values, validation patterns and so forth. Because each field has a descriptive tooltip that appears when you hover over it, I will not repeat this information in the documentation here.
Note
In earlier versions of TIMS the parameter properties dialog includes a field for Numeric Restrictions. It is ignored. This feature does not exist yet. This field is removed from later versions of TIMS, pending support for this feature in a future version of Tachyon.
Tip
See Instruction Definition Reference (ParameterJson) for more detail about parameters.
Aggregation
Instruction results can be automatically aggregated by Tachyon, so that when a user clicks on an aggregated result, Tachyon then 'drills down' and displays the data that was aggregated.
To aggregate results you need to return at least two columns from the instruction.
One column will be used to group the results. Results in each group are then aggregated by one or more of the remaining columns in the result set. Aggregation means computing some value across all the results, such as their sum, min, max etc.
Note
You can group results by multiple columns as well. However in our example we will group by only one column to keep things simple.
We will modify the instruction schema and instruction that we have been working with in order to set up aggregation.
Tip
See Instruction Definition Reference (AggregationJson) for more detail about Aggregation settings.
Note
TIMS allows you to author instructions which use aggregation but it cannot display the aggregated result nor does it support the ability to drill down. You will have to upload the instruction to Tachyon in order to utilize aggregation. When run under TIMS, only the raw (non-aggregated) results are displayed.
Configure Aggregation
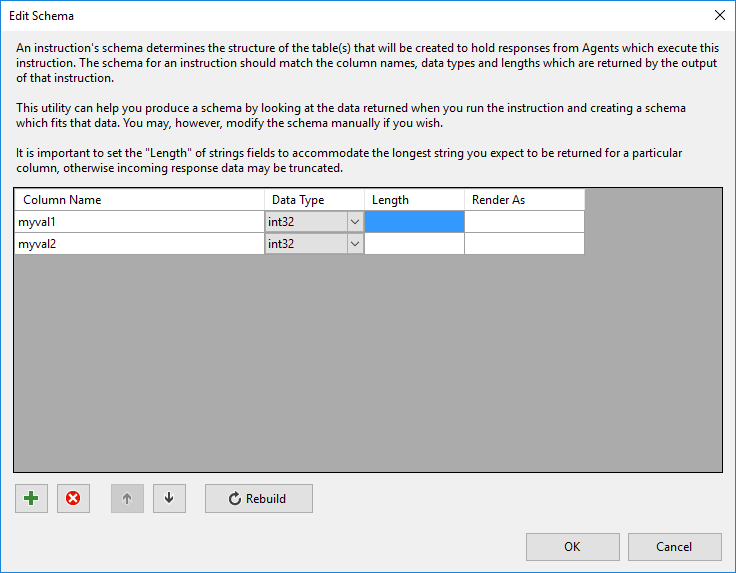
Press the schema button and modify the schema to return two columns, myval1 and myval2 of type int32
Note
Use the + button to add additional columns to the schema.
Press OK and then modify the instruction to read
select 1 myval1, 2 myval2;
Run the instruction and observe that values are returned for the two columns

We will now define an aggregation for the results. This will control how the Tachyon server processes the raw results from each endpoint when this instruction is executed
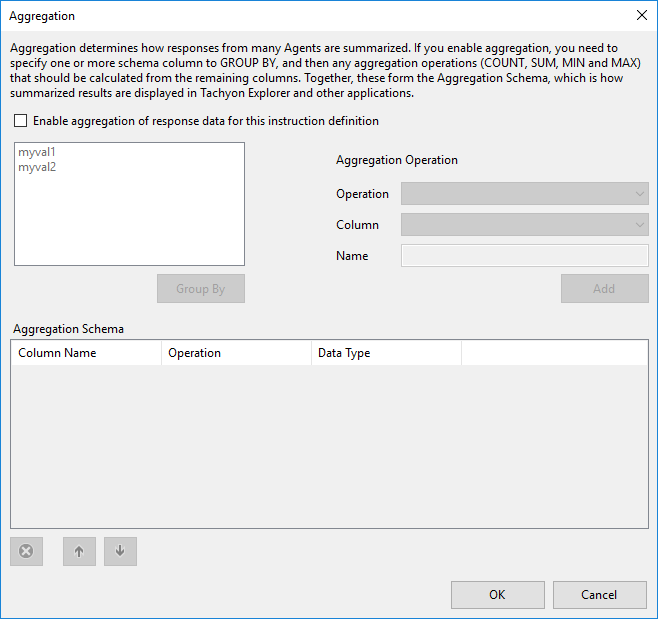
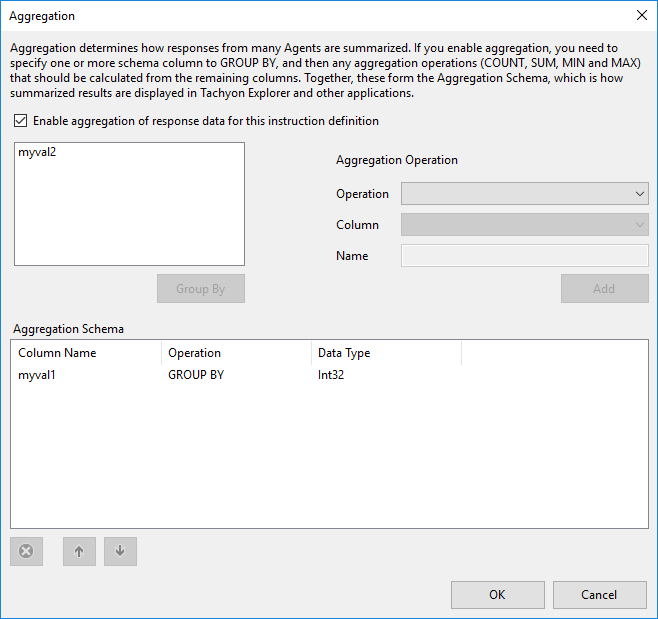
Enable aggregation and select a 'group by' column
First you must tick the 'Enable aggregation checkbox
Then select the column you wish the results to be grouped by on the server side. In this case we have selected that the results should be grouped by the 'myval1' column, by clicking the column name and then clicking the Group By button
Choose an aggregation operation and a target column
Choose 'sum' from the operation dropdown list and choose the myval2 column from the column dropdown list
We will name the result 'SumofMyval2'
Then click Add to add the aggregation operation
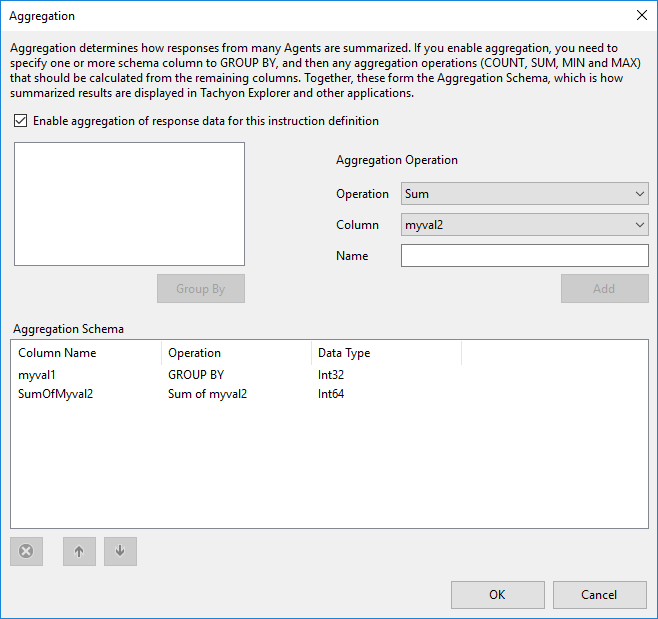
Press Ok to save changes
The aggregation data is added to the instruction XML file. It will look like this (note: the XML has been reformatted for clarity)
 <AggregationJson>
        <![CDATA[
                        {"Schema":[
                                                {"Name":"myval1","Type":"int32","Length":"0"},
                                                {"Name":"SumOfMyval2","Type":"int64","Length":"0"}
                                          ],
                                                "GroupBy":"myval1","Operations":[{"Name":"SumOfMyval2","Type":"sum(myval2)"}]}
        ]]>
</AggregationJson>
When data is collected by the Tachyon client, the results will be grouped by the value of the myval1 column for all devices that respond. Then, the myval2 column will show the sum of the values of each device's myval2 column results, for that particular grouping value returned in myval1. For example:
Raw data collected from all endpoints
Device | myval1 | myval2 |
|---|---|---|
D1 | 1 | 2 |
D1 | 1 | 3 |
D2 | 1 | 4 |
D2 | 2 | 1 |
D3 | 2 | 5 |
Aggregated data
myval1 | SumofMyval1 |
|---|---|
1 | 9 |
2 | 6 |
You can then 'drill down' by clicking on any aggregated row to view the raw data that was aggregated to produce the results.
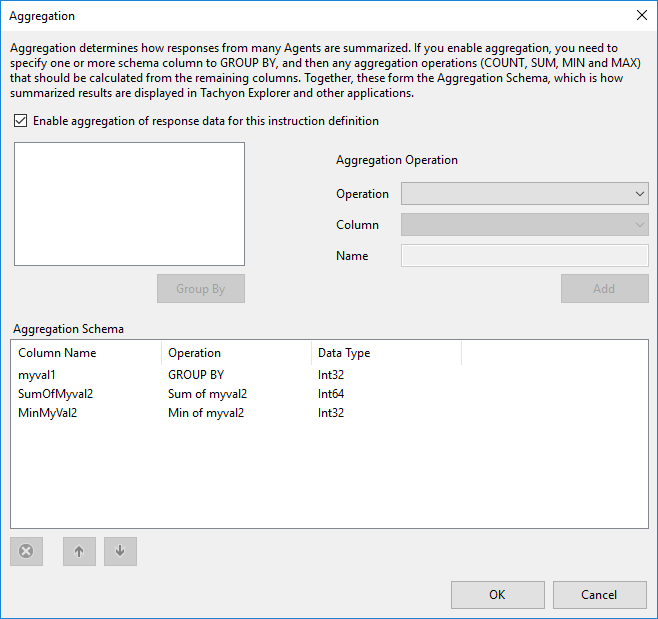
Computing multiple aggregated results
Just as you can group by multiple columns, you can compute aggregated results multiple times, either for the same column or for different columns.
These columns cannot be part of the aggregate grouping columns, however.
In the example below we compute both the sum of the myval2 columns returned and the minimum value of the myval2 columns.
Enabling and disabling aggregation
The 'enable aggregation' checkbox in the aggregation dialog allows you to disable aggregation at any time. However, note that if you do this, your current aggregation settings are immediately lost when you close the dialog.
Workflow
Tachyon questions and actions are associated with workflow definitions which define how the questions and actions are processed when they are submitted.
There are two global workflow settings which are used by default.
One global workflow setting is associated with questions, and one with actions.
You can override the global defaults for an instruction by clicking the workflow button in the toolbar
Choosing the empty drop-down option means that the default globally configured workflow option will be used when the instruction is run. The global default will depend on whether the instruction is a question or action
Otherwise, choosing an alternative workflow option will override the global default for the instruction.
Workflow options are discussed in more detail in the documentation on Tachyon Workflow
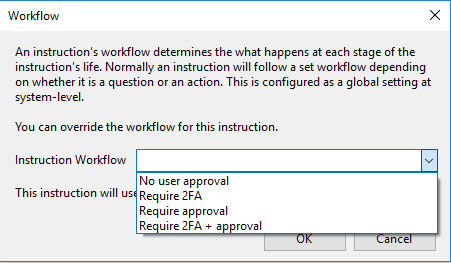
Note
For potentially state-altering actions, use caution in overriding the default workflow.
If workflow is overridden, the instruction XML file will contain a workflow section, such as this
<Workflow><![CDATA[{"StateMachine":"State with Approval"}]]></Workflow>Digital signing
You can choose whether or not the instruction XML is digitally signed, and if so, whether or not you should be prompted to sign it when saving an instruction definition.
Instructions...
do not need to be signed if you only want to develop and test instructions locally in TIMS, or share with other developers
must be signed with an appropriate code signing certificate if you want to import instructions into a Tachyon system and run them, as described in Running instructions in Tachyon for the first time.
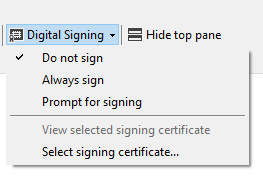
The Digital Signing menu allows you to select a signing certificate that has previously been imported into your certificate store.
In order to use any of the signing options you must have an appropriate certificate. If you do not, the following warning dialog appears
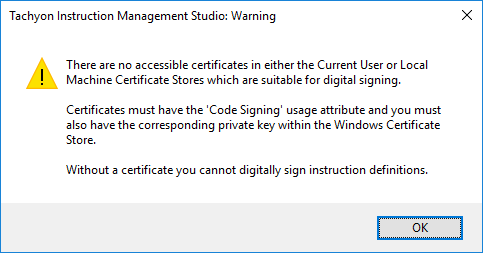
Warning
Known issue: The current version of TIMS does not support CNG code signing certificates. You can select a CNG certificate but when you attempt to save an instruction then you will see an error: Tachyon Instruction Management Studio: Warning. The file <xml file> could not be digitally signed. Invalid provider type specified.
Templates
Templates allow you to add visualisation capabilities to your instruction. Visualisation allows you to show results graphically in a variety of formats, as opposed to simply showing tabular results.
At present TIMS does not support the manipulation of visualisations, and requires you to copy a template XML directly into the Template panel, which is then saved as part of the instruction definition.
Tip
See Custom Response Visualizations for details of how to create the XML to insert into this panel.