Using Nomad with Operating System Deployment OSD
Nomad can integrate with Operating System Deployment (OSD) strategies to maximize the efficiency of distributing large OS content across the network. It does this by providing a number of Task Sequence steps that can be integrated directly into your OSD Task Sequences.
As a system administrator you can use Nomad for OSD refresh. In the following scenario we'll show how you can use Nomad to integrate with the ConfigMgr OS Deployment process to refresh workstations in remote locations that do not have a local server. This will involve:
Preparing the boot image to allow content to be sourced from a local peer
Preparing the deployment Task Sequence to use Nomad
Deploying the modified task sequence to target clients.
OSD integration requires both NomadBranchTools.msi and NomadBranchAdminUIExt.msi to be installed:
NomadBranchTools.msi - are installed on the CM Site server(s) and SMSProvider server(s) and install the Nomad files that get injected into a boot image
NomadBranchAdminUIExt - is installed wherever the ConfigMgr console is installed. It adds the custom Task Sequence steps, among other ConfigMgr console extensions.
Refer to Installing Nomad Branch Toolsfor more details about installing the Nomad OSD tools.
Note
You can use the Nomad app, powered by the Tachyon Platform to get a visual snapshot of download activity in your environment. The Nomad app will be available after you install the Tachyon Platform and can be accessed using the Tachyon DNS Alias FQDN, for example https://tachyon.acme.local/Tachyon
The section Monitoring Nomad on this page provides an overview of how you can use the app to view download progress for large and small scale deployments.
Preparing a task sequence to use Nomad
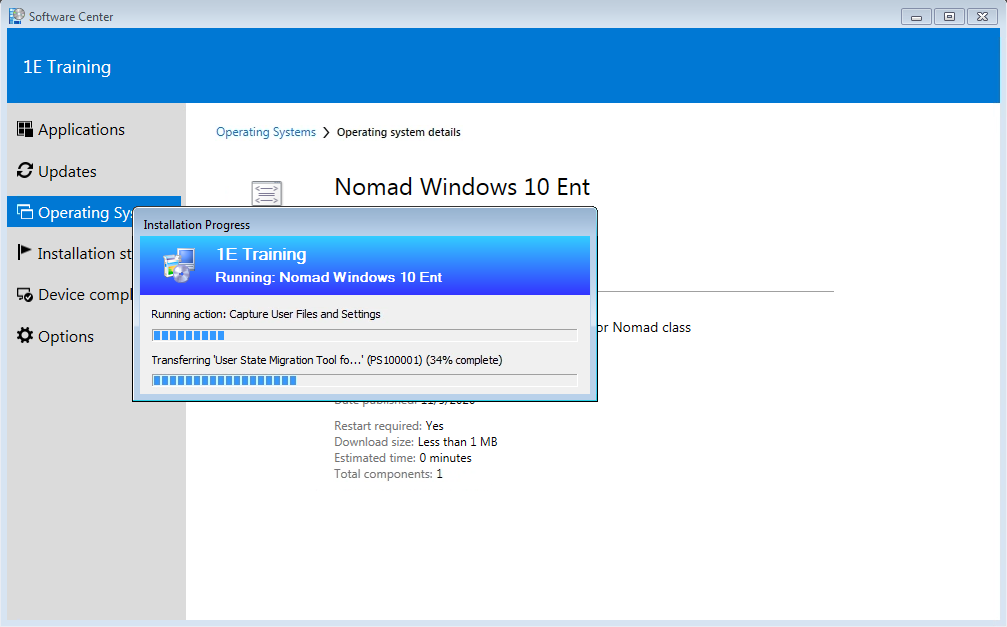
In this scenario, we will use an pre-existing example Task Sequence we have called Nomad Windows 10 Ent to upgrade a device to Windows 10, and make modifications to integrate Nomad. This will ensure that content is obtained from a local peer whenever available or downloaded from the Distribution Point in a bandwidth controlled manner using Nomad. Additionally, we will add actions to store the captured User State on a local peer and retrieve the User State after the new operating system is in place.
Note
For details beyond the scope of this example about using Nomad to carry out an OSD refresh including task sequence deployments, refer to OS deployment task sequences - Using Nomad for an OSD Refresh.
Set Nomad as the Download Program
To support an Alternate Content Provider in a Task Sequence, Microsoft introduced the SMSTSDownloadProgram task sequence environment variable. The SMSTSDownloadProgram task sequence environment variable contains the path to the download program's executable file.
In the case of Nomad, this file will be SMSTSNomad.exe , the Nomad OSD Tools use a custom task sequence action that we use in this task to set the SMSTSDownloadProgram variable toSMSTSNomad.exe.
To set Nomad as the Download Program, we can:
Right-click our Nomad Windows 10 Ent task sequence from Software Library→Operating Systems→Task Sequences and select Edit.
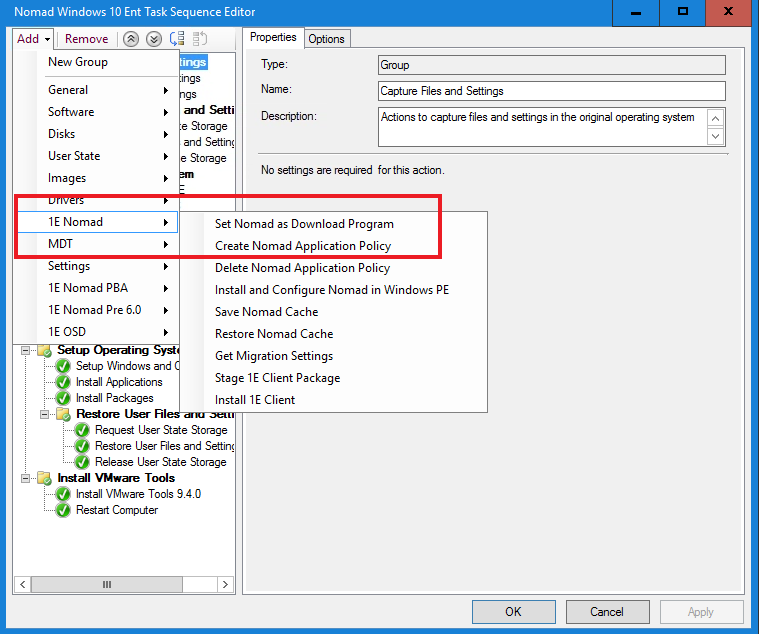
Select the Capture Files and Settings group.
Select the Add dropdown we select 1E Nomad and select Set Nomad as Download Program.
Right-click the Set Nomad as Download Program task and select Move Up. We then make sure the Set Nomad as Download Program task now appears above the Capture Files and Settings group at the top of the Task Sequence before any content is needed.
Click Apply to save the change.
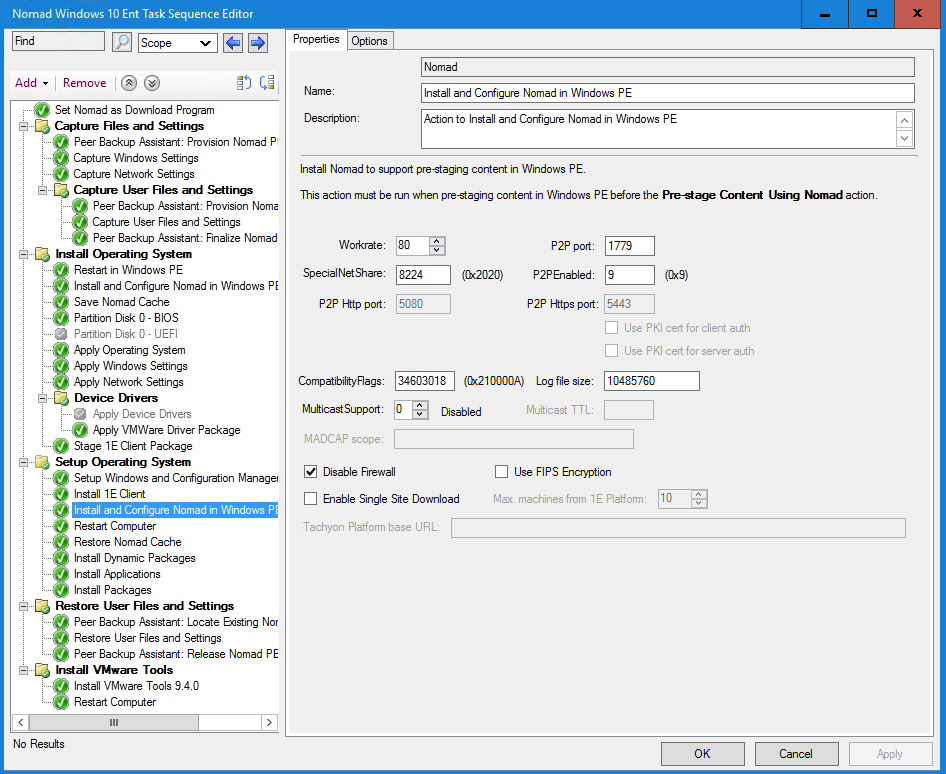
Install and Configure Nomad in Windows PE
We install and configure Nomad in WinPE so that Nomad is used to download content during the Windows PE stage of a task sequence.
The NomadBranchTools updates the OSDInject manifest with the Nomad files to be added to the boot image. The process of updating the boot image on Distribution Points injects them into the boot image, When the boot image is loaded the Nomad files are there but the Nomad service is not installed.
Note
This manifest defines the files that are to be added into the Windows PE boot image when it is updated on a distribution point. The additional tools are added to this manifest, ensuring that they are included in all boot images that are updated on a distribution point from this point on.
We set this step up by:
Selecting the Restart in Windows PE step in the Install Operating System group.
Clicking Add > 1E Nomad and select Install and Configure Nomad in Windows PE.
Changoing the SpecialNetShare value to 8240 (0x2030).
Setting the Compatibility Flags value to 538443786 (0x2018000A).
Setting the P2PEnabled value to 73 (0x49).
Clicking Apply.
Selecting the Install and Configure Nomad in Windows PE step, click Add→1E Nomad and select the Save Nomad Cache task. The Operation value will be Move and the Wipe CCM Cache option is selected.
Clicking Apply to save the task sequence.
Note
The settings we used for SpecialNetShare , Compatibility Flags and P2PEnabled match those on the Nomad clients installed in our environment, the settings for your environment may be differant. If there is a mismatch in certain settings between clients, Nomad may might not work as expected.
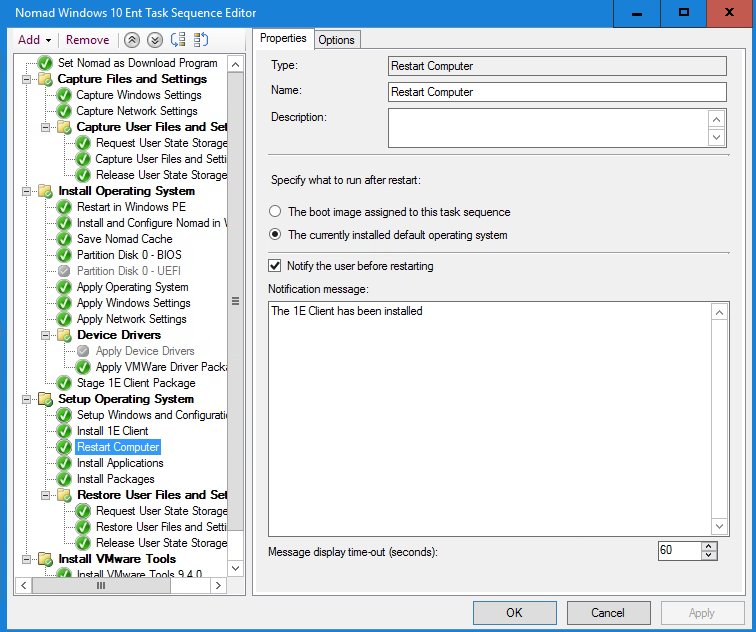
Install the 1E Client in the New Operating System
Once the ConfigMgr client is installed in the new operating system, we need to install the 1E Client so it can register as the Alternate Content Provider (ACP) and retrieve the content for all the other packages, applications and software updates to be installed in the new operating system. We achieve this by:
Selecting the Setup Windows and Configuration Manager task In the Nomad Windows 10 Ent Task Sequence Editor and from the Add dropdown selecting 1E Nomad→Install 1E Client.
Clicking Add→General→Restart Computer with the Install 1E Client step selected.
Choosing The currently installed default operating system in the Specify what to run after restart: section. We ensure the Notify the user before restarting check box is checked and change the Notification message to The 1E Client has been installed. We then click Apply.
Note
A reboot is required after the Install 1E Client task to ensure the system path is properly updated so the Nomad tools ( like, NBCacheActions) can be located by the operating system.
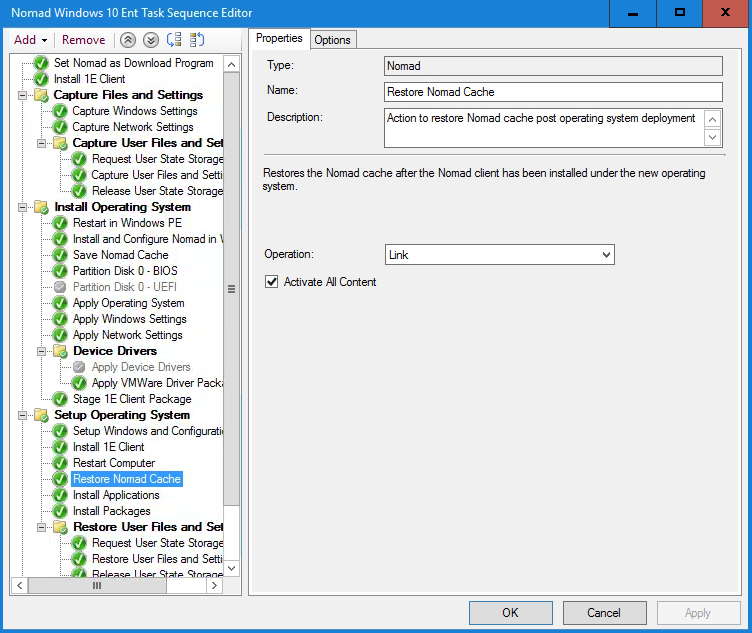
Restore the Nomad Cache
Once Nomad is installed, we want to restore the content that was used during the build into the Nomad cache of the newly built OS.
In the Install and Configure Nomad in Windows PE section the added Save Nomad Cache is used to save the Nomad cache either in WinPE or a full Microsoft Windows operating system. The Save Nomad Cache step copies, links or moves previously downloaded content to the protected task sequence runtime folder so that it is not deleted by the standard Apply Operating System task sequence action.
We now do this by:
Selecting the Restart Computer task and from the Add dropdown select 1E Nomad > Restore Nomad Cache.
In the Properties tab, ensuring Link is the operation and selecting Activate All Content then click Apply to save the task sequence.
Note
This task will restore the Nomad cache from the persisted _SMSTaskSequence folder to the newly installed Nomad cache. The option to Link the content (i.e. create a link from the folder in _SMSTaskSequence to the Nomad Cache folder) is optimal in this scenario; copying would take a long time and moving it may prevent subsequent tasks (such as MDT tasks) from completing properly.
The Nomad cache is essential to Nomad's download once to branch feature. The cache enables Nomad to hold its downloaded content so that it can be distributed locally to other Nomad peers. The Nomad cache contains downloaded content (such as packages, applications, and software updates) which can vary in size from relative small patches to rather large OS image files. For more details refer to Nomad cache.
Working with Dynamic Packages
We now add a package to be installed using a variable. We will manually set the variable to demonstrate the behavior, but any means of populating the variable will give the same result. Nomad will be called by the task sequence by SMSTSNomad.exe being specified as the default task sequence download program.
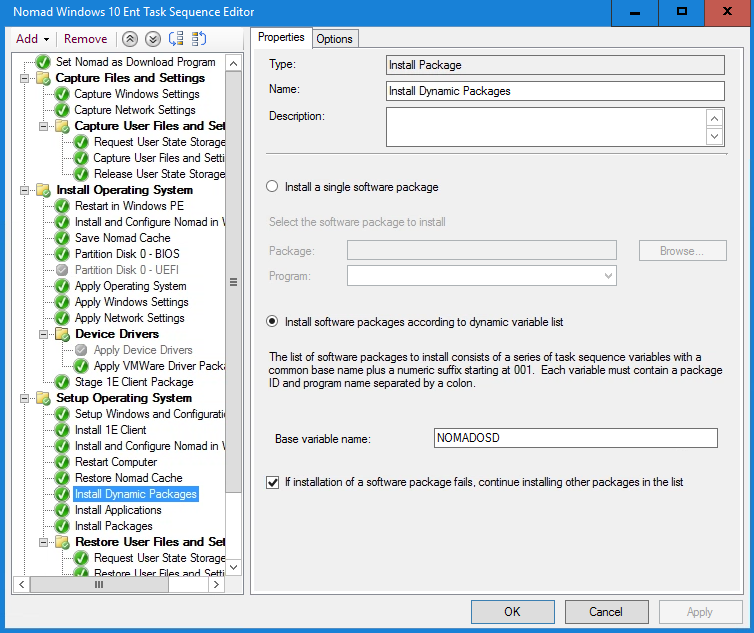
Add the dynamic package to the Task Sequence
We will add an Install Package task to the Nomad Windows 10 Ent task sequence that uses a variable name to define the Package and Program to be executed at runtime. For the purpose of this example, we will define this variable directly within the task sequence to demonstrate how Nomad handles dynamic packages. We do this by:
Selecting the Restore Nomad Cache task in the Setup Operating System group.
Clicking Add and selecting Software→Install Package.
In the Properties tab, entering Install Dynamic Packages as the name.
Selecting Install software packages according to dynamic variable list and entering a Base variable name of NOMADOSD. Select If installation of a software package fails, continue installing other packages in the list and click Apply.
Selecting the Restore Nomad Cache task again, clicking Add and selecting General→Set Task Sequence Variable.
In the Properties tab, naming the task Set NOMADOSD001. Enter NOMADOSD001 as the Task Sequence Variable and set the Value to PS10001B:Install Skype.
Clicking on the Options tab on the task, and checking the Continue on error box.
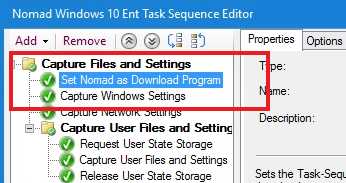
Clicking Apply. The task sequence now looks like image on the right, we click OK to save the updated Task Sequence.
Note
In this step we are defining the first (and only, in this case) dynamic package through the NOMADOSD001 Task Sequence variable before the Install Dynamic Packages task executes. The value of this variable is in the format <PackageID>:<Program Name>. The Skype Package has a Package ID of PS10001B.
In a production environment, variables associated with dynamic packages are commonly set by scripts or other processes that determine what applications are required at runtime.
Note
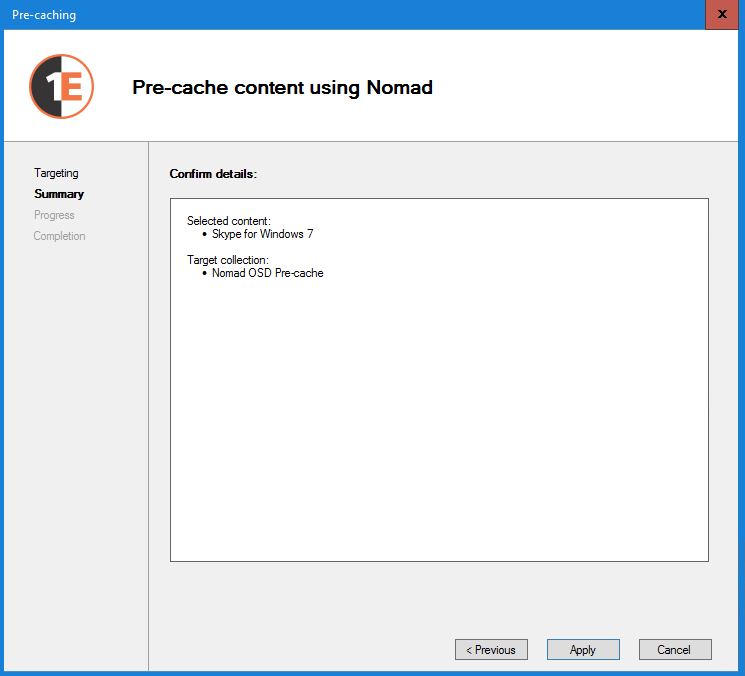
Packages deployed in a task sequence using a dynamic variable will not be listed on the references tab of a task sequence. For that reason, we must initiate a separate pre-cache job for any packages deployed using a dynamic variable. In the Nomad Windows 10 Ent task sequence, the Skype package is installed using a dynamic variable.
Now we return to the CM console and select Packages from the Application Management folder in the Software Library node of the ConfigMgr console, then we:
Right-click on the Skype for Windows 7 package, select Properties and go to the Nomad tab.
Enable Nomad for the Skype package and click OK.
Right-click on the Skype for Windows 7 package, select Pre-cache content using Nomad to launch the Nomad Pre-caching wizard.
On the Targeting page, select the Nomad OSD Pre-cache collection and click Next.
Click Apply on the Summary page.
When the job completes, click Finish on the Completion page.
Using Peer Backup Assistant (PBA)
In an OS refresh or replace scenario, you will typically need to migrate user data and settings using the User State Migration Tool (USMT). In refresh scenarios, USMT will typically achieve this by saving the user state locally in the preserved _SMSTaskSequence folder and restoring it after the new OS has been installed, for more details refer to https://docs.microsoft.com/en-us/mem/configmgr/develop/reference/osd/sms_tasksequence-server-wmi-class.
Note
There are two common scenarios where a ConfigMgr State Migration Point would normally be required, such as:
Where the computer is being replaced, so the data needs to be stored off the old device
In a refresh scenario where the task sequence includes a step to format the disk before installing the new OS image, in which case the local _SMSTaskSequence folder is lost.
Nomad includes the PBA functionality, which allows a local peer to be used to temporarily store the user state from the computer being built. This removes the need for a User State Migration Point, keeping the user data local. In this example, we enable the Nomad clients as Peer Backup Assistant hosts, allowing them to store user state data that USMT has collected from their peers. We then configure the Task Sequence to include the necessary steps to capture and restore the user state using USMT and the selected Nomad peer as the store location.
Refer to Peer Backup Assistant - PBA for more background and further details, including:
Single-site PBA
High-availability PBA
Configuring PBA hosts
Using PBA with HTTP and HTTPS P2P
Using PBA with Configuration Manager task sequences.
Enable Peer Backup Assistant
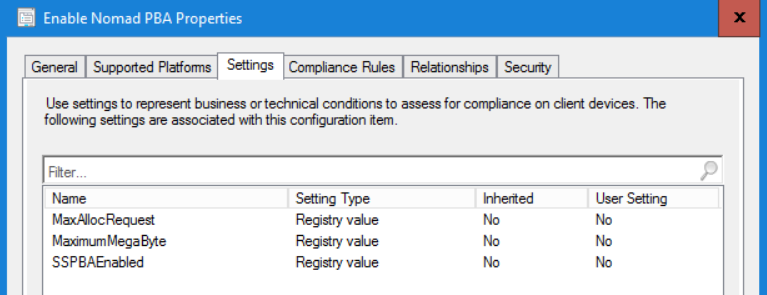
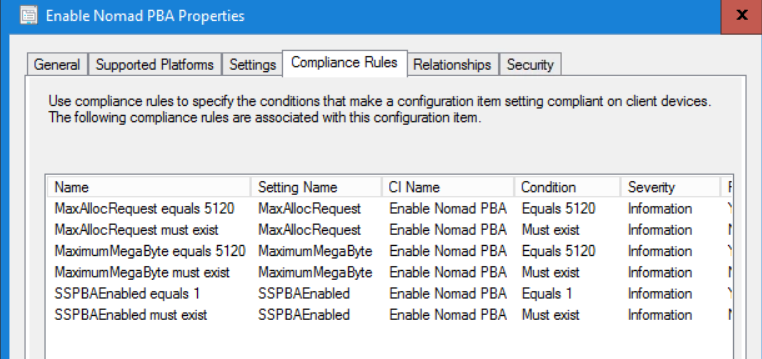
Peer Backup Assistant (PBA) functionality needs to be enabled on Nomad clients to enable them to become potential hosts for storing user state information from other computers on the subnet. Enabling PBA involves setting the MaximumMegaByte and MaxAllocRequest registry values, the following example uses a ConfigMgr Configuration Item to apply them.
This example shows how you can enable PBA on existing Nomad clients and makes use of a preconfigured ConfigMgr Configuration Item called Enable Nomad PBA with the opposite Settings and Compliance Rules.
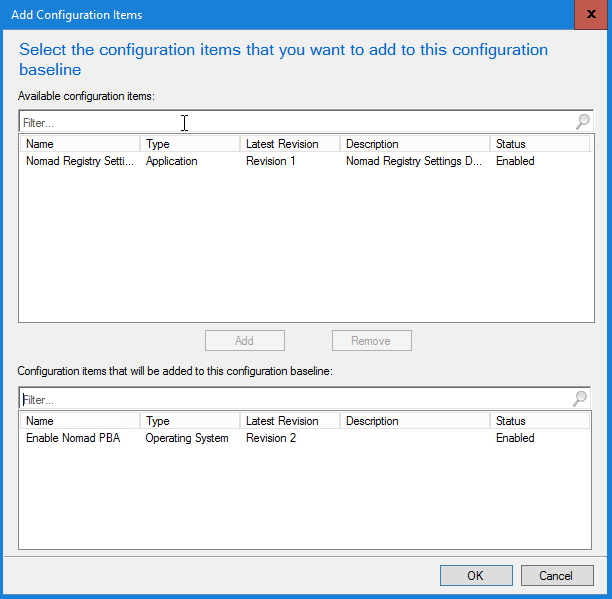
From the Assets and Compliance workspace we select the Configuration Baselines node, right-click our 1E Client Configuration baseline and select Properties.
From the 1E Client Configuration Properties dialog box, we select the Evaluation Conditions tab, then click Add and select Configuration Items
In the Add Configuration Items dialog box we select the Enable Nomad PBA Configuration Item and click Add to add this to the 1E Client Configuration baseline. We click OK to return to the 1E Client Configuration Properties dialog box, then click OK to save the changes.
From the Assets and Compliance workspace we select the Device Collections node.
Right-click our Lab Workstations Collection and then select Client Notification→Download Computer Policy to ensure all our clients get the updated configuration baseline.
Note
The Enable Nomad PBA Configuration Item configures the following registry values under the HKLM\Software\1e\NomadBranch key in the registry:
\NMDS\MaximumMegaByte=5120: The MaximumMegaByte setting defines the maximum space which can be allocated by the peer machine for PBA. This is the amount of disk space you want to allow Nomad to use for PBA functionality.
\NMDS\MaxAllocRequest=5120: The MaxAllocRequest is the maximum space that any single machine can use during a PBA task. In a production environment, multiple machines might be offloading user state data onto a single machine, so this setting needs to be defined based on the maximum data expected from any single machine. In our lab, we will only be executing a single task sequence using PBA, so we have configured the setting to the same value as MaximumMegaByte.
SSPBAEnabled=1: The SSPBAEnabled setting enables PBA to work in conjunction with Single Site Download.
Configure the Task Sequence to Capture User State
In this example we add tasks to the Nomad Windows 10 Ent task sequence to redirect the store location to a local peer selected at runtime and then capture the user state:
In the ConfigMgr console, we right-click our Nomad Windows 10 Ent Task Sequence and select Edit.
We delete the Request User State Storage and Release User State Storage tasks in the Capture User Files and Settings task group and click Apply, then repeat this for the Restore User Files and Settings task group.
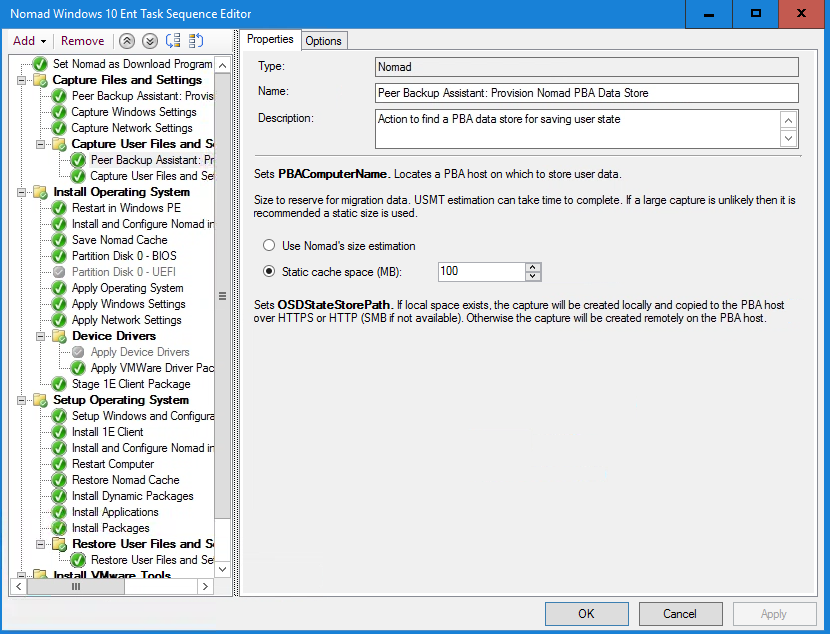
We select the Capture User Files and Settings task group, click Add and select 1E Nomad PBA→Peer Backup Assistant: Provision Nomad PBA Data Store .
In the Properties tab, we check the Cache space (MB) is set to 100 and then click Apply.
Note
Using the Peer Backup Assistant: Provision Nomad PBA Data Store step replaces the native ConfigMgr Request User State Storage step.
Similarly the Peer Backup Assistant: Finalize Nomad PBA Data Store step replaces the native ConfigMgr Release User State Storage step in the Capture User Files and Settings task group.
Note
In this step, we are setting an arbitrary estimated capacity requirement (100MB) for storing user data. If the Microsoft Deployment Toolkit (MDT) has been integrated into the ConfigMgr environment, using ZTIUserState.wsf will estimate how much space is required to store the user state from the current computer and write this to the USMTESTIMATE Task Sequence variable, in which case you can enter %USMTESTIMATE% in this field.
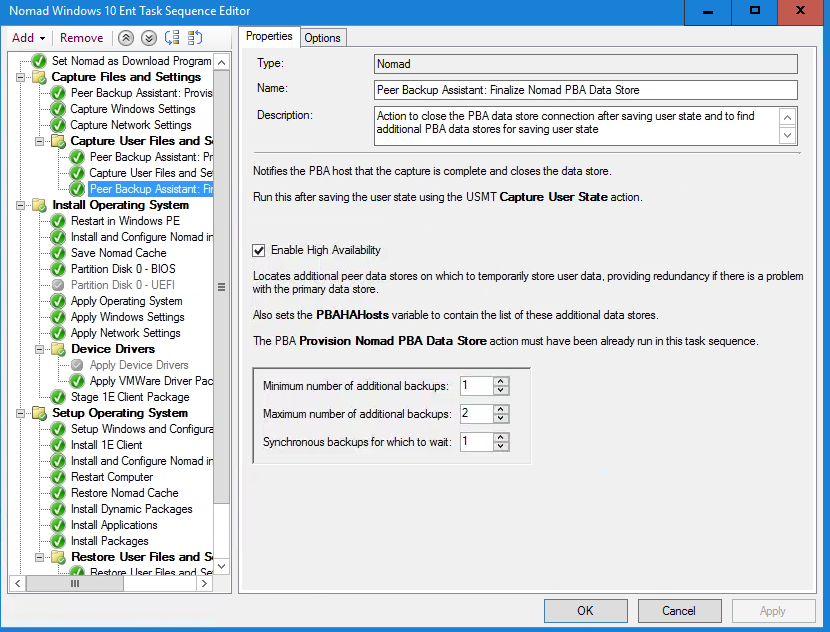
With the Capture User Files and Settings task selected, we click Add and select 1E Nomad PBA→Peer Backup Assistant: Finalize Nomad PBA Data Store.
We check the Enable High Availability box. By using Enable High Availability, we can automatically store additional backup copies of the PBA data store, after the primary data store has been created with Peer Backup Assistant: Provision Nomad PBA Data Store and after the USMT data has been saved and closed with Peer Backup Assistant: Finalize Nomad PBA Data Store.
In the Properties tab, we set the following properties and click Apply.
Minimum number of additional backups: 1
Maximum number of additional backups: 2
Synchronous backups for which to wait: 1
Note
The Peer Backup Assistant: Finalize Nomad PBA Data Store step releases the connection to the state store share on the remote computer and results in the saved user state content being preserved for 7 days (configurable using the PostCompleteTimeoutHours value in the NomadBranch\NMDS registry key on the store host).
Unless this task is executed, the content is only available for 3 hours (configurable using the PreCompleteTimeoutHours value in the NomadBranch\NMDS registry key on the store host).
Configure the Task Sequence to Restore User State
In this next step, we add the State Restore steps that complement the State Capture steps configured in the previous task to restore the user state from the local peer when the new OS has been installed.
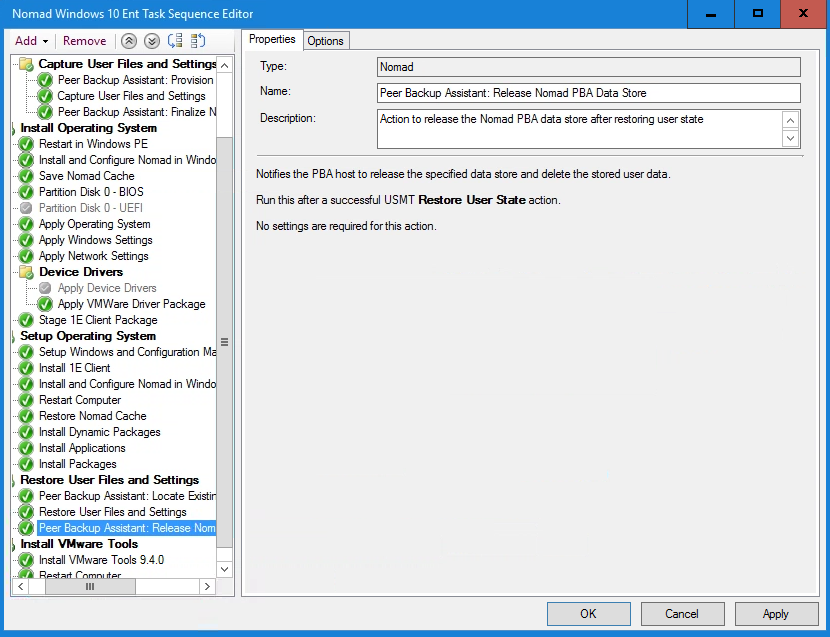
We right-click the Restore User Files and Settings task group, select Move down so the group is no longer indented within the Setup Operating System group, then we click Apply.
With the Restore User Files and Settings task group selected, we click Add and select 1E Nomad PBA→Peer Backup Assistant: Locate Existing Nomad PBA Data Store .
Note
Using the Peer Backup Assistant: Locate Existing Nomad PBA Data Store step replaces the native ConfigMgr Request User State Storage step in the Restore User Files and Settings task group.
Similarly the Peer Backup Assistant: Release PBA Data Store step replaces the native ConfigMgr Release User State Storage step in the Capture User Files and Settings task group.
Note
This task will get Nomad to locate the user state store location for the computer being built (defined by the COMPUTERNAME Task Sequence variable) and set the OSDStateStore variable to this path in the Task Sequence environment.
With the Restore User Files and Settings task selected, we click Add and select 1E Nomad PBA→Peer Backup Assistant: Release Nomad PBA Data Store, then click Apply.
Note
This step will delete the user state from the peer client and release the disk space for other clients to use for storing state during a migration.
The Restore User Files and Settings group now looks like the picture opposite.
Performing an OSD refresh using Nomad
Now we have completed our preparation, our Nomad Windows 10 Ent deployment task sequence can be used to refresh a Windows 7 client, and migrate it to Windows 10 Enterprise.
Deploy the Nomad Windows 10 Ent task sequence
To deploy the task sequence and migrate our Windows 7 client to Windows 10:
In the ConfigMgr console, in the Assets and Compliance workspace we select the Device Collections node and create a Collection named Nomad Windows 10 Refresh with Lab Workstations as the Limiting Collection and add 1ETRNW72 to the Collection.
We then open the Software Library workspace, expand the Operating Systems node and select the Task Sequences node, then we right-click the Nomad Windows 10 Ent task sequence and select Deploy to start the Deploy Software Wizard.
On the General page, we select Nomad Windows 10 Refresh as the target Collection and click OK.
On the Deployment Settings page we ensure the Purpose is set to Available and click Next.
On the Scheduling page we select the check box next to Schedule when this deployment will become available and keep the default setting.
On the User Experience page and the Alerts page we click Next.
Finally on the Distribution Points page, we select: Download content locally when needed by running task sequence (default).
Note
We chose Download content locally when needed by running task sequence to avoid a potential failure due to lack of disk space.
On our computer 1ETRNW72 we open Software Center from the desktop, and navigate to the Operating Systems node. Then we select Nomad Windows 10 Ent and click Install.
A dialog box will be displayed asking for confirmation of the of a new operating system. We then click INSTALL to run the task sequence.
Note
As an Administrator you will want to know where the content your Task Sequence requires has been cached. You can use the Nomad app to do this using the Task Sequences page to identify things like:
Download Status by Network Site
Device Count by Operating System
P2P Efficiency by Content Source.
In this example, we introduced how Nomad is used to obtain content while a task sequence is executing. The task sequence variable, SMSTSDownloadProgram, is set to SMSTSNomad.exe, which defines it as the default download program for the task sequence.
The Save Nomad Cache step not only saves the Nomad cache in WinPE to use the reserved folder location, but also gets the content of the offline Nomad cache (in the current OS) and sets that location as the new default cache path and renames and moves the logs into that location as well.
We have shown how the Nomad Peer Backup Assistant can be configured within a task sequence to enable user state to be stored temporarily on a local peer. The process involves:
Enabling the peers for Peer Backup Assistant by modifying values in the NMDS registry key
Using the Peer Backup Assistant custom Task Sequence steps to provision a data store on a local peer and setting the OSDStateStorePath variable to that store location
Running the Capture User State task, which copies the user state to the selected peer
Completing the capture to release the connection to the data store and retain the content for 7 days
Using High Availability and SSD to offload the USMT data to multiple machines across a defined site
Once the new operating system has been installed, the user state is restored from the same location and finally, the content is deleted from the peer data store to free up space for other peers.