Using Application Migration in a task sequence
The actual process of migrating applications is performed during an OS deployment task sequence in Configuration Manager.
Application Migration uses a custom task sequence action that calls an Application Migration API. The API gets a list of Configuration Manager Applications and Packages that need to be installed on a computer based on previously installed software titles (determined through inventory) and the migration rules applying to those titles.
Task Sequence Tools Upgrade
When upgrading task sequence tools, you must remove the old 1E Application Migration step and add the same step again in affected Task Sequences. Otherwise, the latest changes will not be accessible and may not work.
Testing the API and getting device details
You can test the API and observe the results for a specific computer from a browser with the following by replacing <WebServiceBaseURL >, <Domain>, and <MachineName> with the necessary details:
<WebServiceBaseURL>/platform/api/applicationmigration/getApplicationsToBeInstalled/?domainName=<Domain>&machineName=<MachineName>
where:
<WebServiceBaseURL> may be either of the host headers configured for Tachyon platform. See Web Service Base URL below for a more detailed description.
<domain> and <MachineName> specify the computer you are checking the results for.
Browsing to the URL returns a JSON file with a list of Applications and Packages that will be installed on the specified device when the task sequence executes.
This list is used to populate two series of task sequence variables (one for Applications and the other for Packages) that can be used by the standard Configuration Manager Install Application and Install Package steps to dynamically install each application and package returned by the API.
Modern Authentication support for TS Tools 2.6
Important
This feature is only available in 1E platform v9.1.
In 1E platform v9.1, the Authentication Proxy has been deprecated. In previous platform versions, the Authentication Proxy invoked the Application Migration TS API. From 1E 9.1, the Background Channel Proxy is employed to access the TS API by using the client computer certificate.
Upgrading earlier versions of the 1E Toolkit
Note
The 1E Toolkit v9.1 has been modified to remove its dependency on 1E Authentication Proxy and no longer supports it. As a result, if you are using a version of 1E Toolkit dependent on Authentication Proxy, you will not be able to upgrade to v9.1. You will need to uninstall your installed version of 1E Toolkit and install 1E Toolkit v9.1 where you can point to the 1E Platform URL instead of Authentication proxy URL.
Installed Version | Requires Authentication Proxy | Upgrade to 9.1 |
|---|---|---|
v8.1 | No | Yes |
v9.0 | Yes | Reinstall |
Configuring Background Channel Proxy
To call the TS API from 1E TS Tools, you must configure the Background Channel service web.config. You can do this by either, adding the entry manually or by using our PowerShell script.
Editing the web.config manually
In the manual web.config update, you should replace your-host in the targetURL with the value for your environment.
<ProxiedServers>
<Targets>

..
<add name="ApplicationMigrationTaskSequence" enabled="true" targetURL="https://your-host/platform/api/applicationmigration/getApplicationsToBeInstalled" timeoutSeconds="15" clientCertificateForTarget="" useWindowsAuthenticationForTarget="false" useServerTokenAuthenticationForTarget="true" deviceAuthentication="Certificate" forwardCertificateFromDevice="false" loggingLevel="off" />
..

</Targets>

</ProxiedServers>
Editing the web.config using PowerShell
Run the script using PowerShell, and provide the SLAPlatform base url: .\AddReclaimerBGProxy.ps1 https://{host}/Platform
Recreate your Application Migration Task Sequence step
To enable Modern Authentication, review your previous task sequences that used the Application Migration Task Sequence step; otherwise, they will not function correctly.
Note
You must have already applied the Application migration 9.1 hotfix, and configured the background channel proxy before following the guidance in this section.
Install Task Sequence Tool version 2.6.
Add a new Application Migration Task Sequence step immediately after your existing Application Migration Task Sequence step.
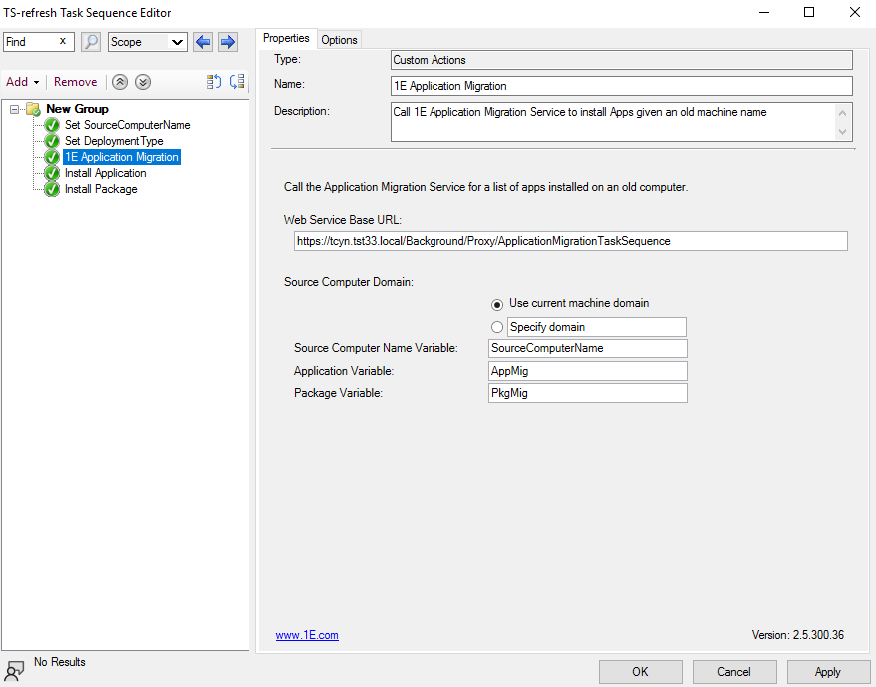
Transfer the values from the old step to populate your newly added Application Migration Task Sequence step. Ensure the Web Service Base URL value is
https://{host}/Background/Proxy/ApplicationMigrationTaskSequenceImportant
Please note that if the name attribute value ApplicationMigrationTaskSequence is included in the background channel web configuration for the task sequence, the URL should remain unchanged as shown above. Otherwise, you should adjust the name according to the value specified in the web configuration.
Remove the old Application Migration Task Sequence step.
Validate your updated Task Sequence by running it on a test computer.
Configuring the Application Migration Task Sequence step
The AppMigration action is used to create the 1E Application Migration Task Sequence step, and has the following properties.
Web Service Base URL | Note1E 9.1 users refer to Modern Authentication support for TS Tools 2.6 for changes to this section. You can connect either using HTTP or HTTPS. In either case, the URL will be based on the settings made on the Website Configuration screen of the Tachyon setup program. Refer to Website configuration. For example, if your platform server FQDN is ACME-TCN01.ACME.LOCAL and your platform DNS alias is TACHYON.ACME.LOCAL, and these have been configured as the host headers on the Website Configuration screen of the platform setup program, then you can use either of the following:
If you have specified a custom port on the Website Configuration screen of the platform setup program, then this should also be added to the URLs:
|
Credentials (for Web service call) | The username and password used to call the Application Migration API. This account must already exist as user on Tachyon platform. If the Domain\User Name and Password are left empty, the Configuration Manager Network Access Account is used to fetch data from Application Migration (to use this option the Network Access Account must be added as a platform user). |
Source Computer Domain | In most cases, the Source Computer Domain will be the same domain that the OS is being deployed in. If you are migrating computers from one domain to another through the OS deployment process, you must select the Specify Domain option and enter the Fully Qualified Domain Name of the originating domain, as this will be the domain that the computer belongs to in the platform from previous inventory. |
Source Computer Name Variable | The name of the task sequence variable that is used to store the source computer name (the computer from which applications are being migrated). NoteBy default, the Source Computer Name Variable property is set to SourceComputerName. If the specified variable does not exist, the Application Migration step uses the current computer name as the source computer name. If you are using Nomad (included in Windows Servicing Suite) and have included the Get migration settings step in the task sequence, that step will set the SourceComputerName variable as follows:
If you are adding the Application Migration step to an In-place Upgrade Task Sequence, set the Source Computer Name Variable to _SMSTSMachineName and do not use Get Migration Settings. |
Application Variable | The base variable name which this task sequence step uses to define the Configuration Manager Applications to be installed. This is used to define the base variable in a later Install Application step that is configured to install applications according to a dynamic variable list. For example, if Application Variable is set to |
Package Variable | The base variable name which this task sequence step uses to define the Configuration Manager Packages to be installed. This is used to define the base variable in a later Install Package step that is configured to install packages according to a dynamic variable list. For example, if Package Variable is set to |
Example
The following example illustrates how to add the Application Migration step to an existing OS Deployment task sequence. Your own task sequence may differ, but the general positioning of these steps is where Install Application steps would normally be placed (after Install Updates and before the Restore User Files).
From the Configuration Manager console, select the Software Library workspace.
Expand the Operating Systems folder and select Task Sequences.
Right-click the task sequence that Application Migration is to be added to and from the context menu, select Edit.
Application Migration step
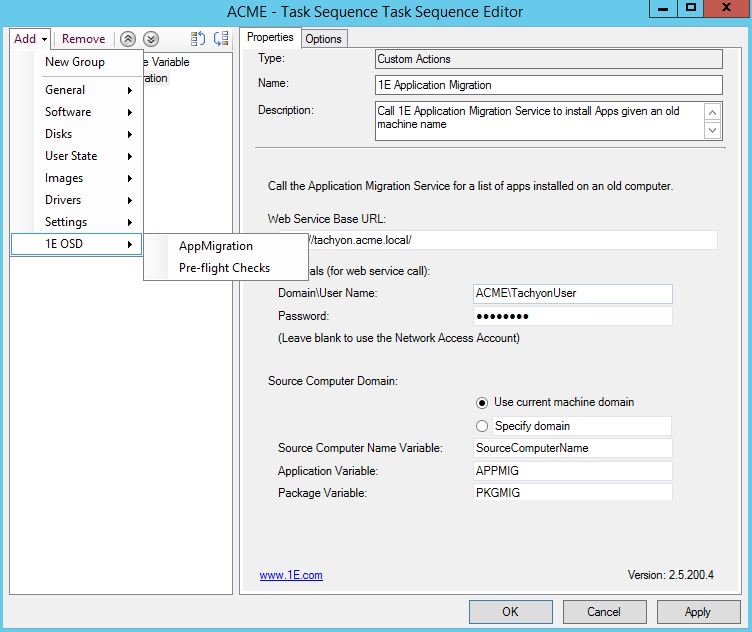
Choose Add > 1E OSD > AppMigration.

On the Properties tab, enter the following details.
Note
1E 9.1 users refer to Modern Authentication support for TS Tools 2.6 for changes to this section.
In Web Service Base URL, enter the location for the platform, for example http://tachyon.acme.local/
Under Credentials (for Web service call) enter the Domain\User Name and Password for the platform user you want to use.
Source Computer Domain in most cases the source computer domain will be the same domain that the OS is being deployed in. If you are migrating computers from one domain to another through the OS deployment process, you must select the Specify Domain option and enter the Fully Qualified Domain Name of the originating domain, as this will be the domain that the computer belongs to in the platform from previous inventory.
In Source Computer Name Variable leave the value at its default
SourceComputerName.In Application Variable choose the base variable that is used to define the dynamic applications. In our example, it is
AppMig.In Package Variable choose the base variable that is used to define the dynamic packages. In our example, it is
PkgMig.Click Apply.
Install Application step
Choose Add > Software > Install Application.
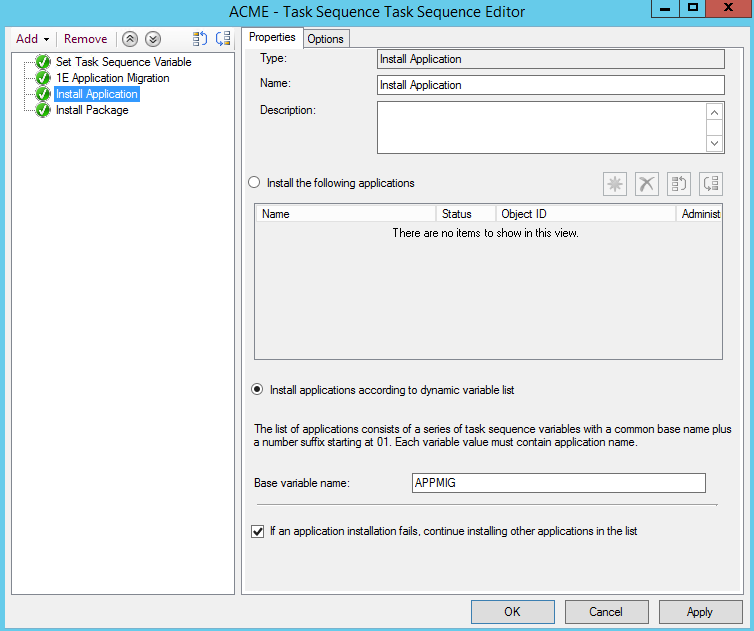
On the Properties tab:
Select the Install applications according the dynamic variable list option.
In Base variable name, enter the application variable. In our example, it is
AppMig(see step 5 above).If you want the task sequence to continue installing other applications in the event if an application install fails, select the If an application installation fails, continue installing other applications in the list option.
On the Options tab:
Click Add Condition and enter condition to check if Task Sequence Variable APPMIG01 exists (or the application variable you defined in the 1E Application Migration step with 01 appended).

Click Apply.
Install Package step
Choose Add→Software→Install Package.
On the Properties tab:
Select the Install software packages according to dynamic variable list option.
In Base variable name, enter the package variable name used in the 1E Application Migration step. In our example, it is
PkgMig(see step 6 above).If you want the task sequence to continue installing other applications in the event if an application install fails, select the If installation of a software package fails, continue installing other packages in the list option.
On the Options tab:
Click Add Condition and enter the condition to check if the task Sequence Variable PKGMIG001 exists (or the package variable you defined in the 1E Application Migration step and append 001 to it). Click OK to save the condition.
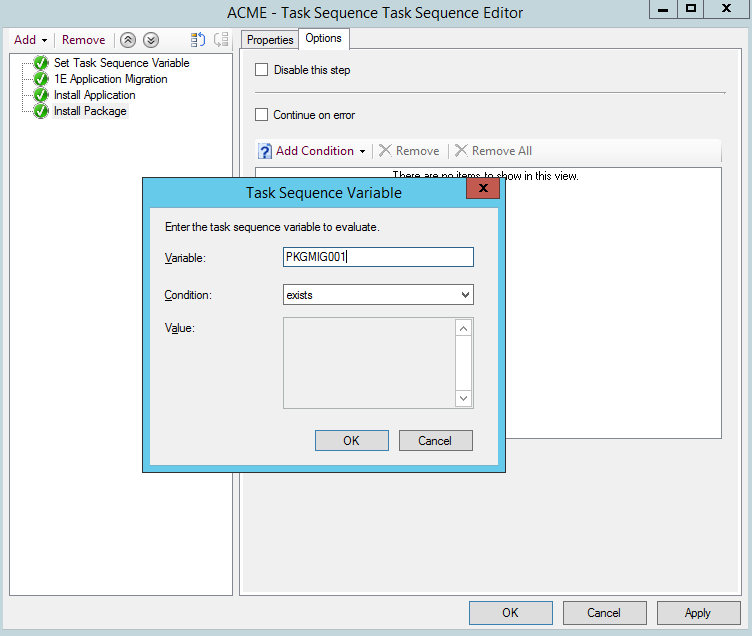
Click Apply to save the changes to the Task Sequence step.
Task sequence variables used by Application Migration
There are five task sequence variables used by Application Migration:
Source Computer Name Variable - the name of the task sequence variable that is used to store the source computer name (the computer from which applications are being migrated), as described above
Application Variable - the base variable name used for Applications, as described above
Package Variable - the base variable name used for Packages, as described above
Role Base Application Sets variable - optional, the variable named IncludeRoleBasedAppsForExistingPC must be set to true if you are using Role Based Application Sets, described below
Deployment Type variable - the variable named DeploymentType must be set to one of the following values, and must be set prior to the 1E Application Migration step
Value | Description of DeploymentType variable |
|---|---|
Refresh | Also known as Wipe-and-Load, the data on the computer is backed up, the disk is wiped, a new OS is installed and applications are installed subject to their respective migration rules. If no application migration rule exists for an application, it will not be installed. |
Replace | Data and applications are migrated from one computer to another. Applications that are migrated to the new computer are subject to the application migration rules for the source computer. If no application rule exists for an application, it will not be installed on the new computer. |
InPlace | Windows setup is executed on an existing computer to upgrade the OS. The disk is not wiped, so existing data and installed applications are preserved. In this instance, Application Migration will install only applications that are subject to a replace or upgrade migration rules. Retain rules are ignored. |
NewComputer | Also known as bare-metal, this is a new build computer where no applications or data are being migrated. However, you can use the Role Based Application Sets feature to install applications on new computers. |
Using migration rules and Role Based Application Sets
Role Based Application Sets can optionally be used in each of the deployment scenarios. A Role Based Application Set defines a set of applications that should be installed on a computer for a user performing a particular role, or perhaps working at a particular location.
For this to work, the task sequence must contain the variable IncludeRoleBasedAppsForExistingPC set to a value of true, as shown.
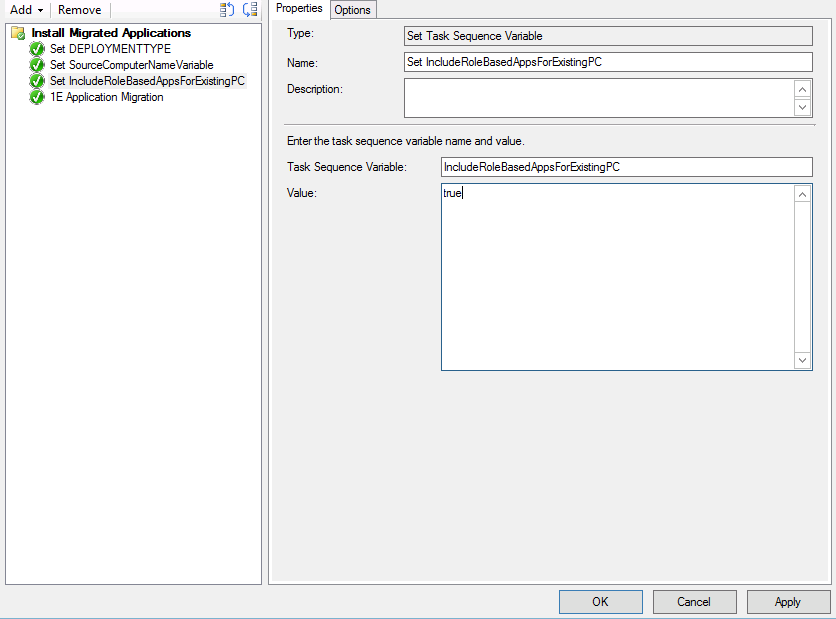
Note
When using IncludeRoleBasedAppsForExistingPC with a value of true for role-based application sets, the DeploymentType variable must be set appropriately in the task sequence before the 1E Application Migration step.
Auto Install for Configuration Manager Applications and Packages
Application Migration uses the Install Application and Install Package steps in a Task Sequence to install migrated applications and packages. These Task Sequence steps are dependent on the relevant checkbox (auto install flag) being enabled for each application and package:
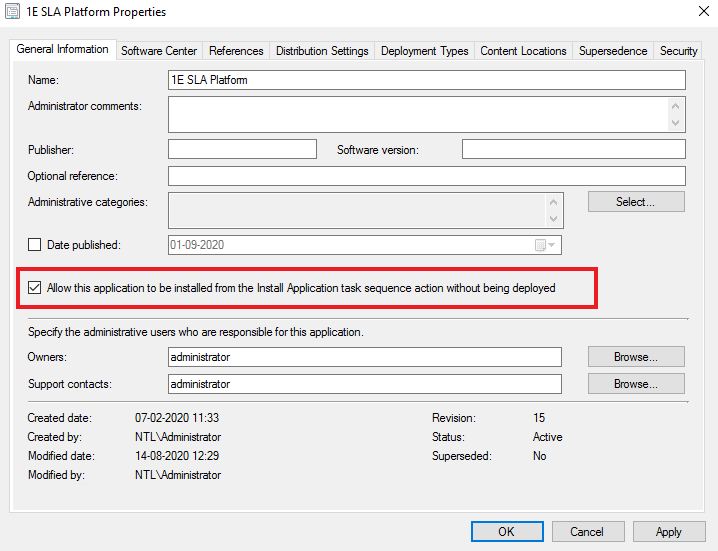
Allow this application to be installed from the Install Application task sequence action without being deployed.
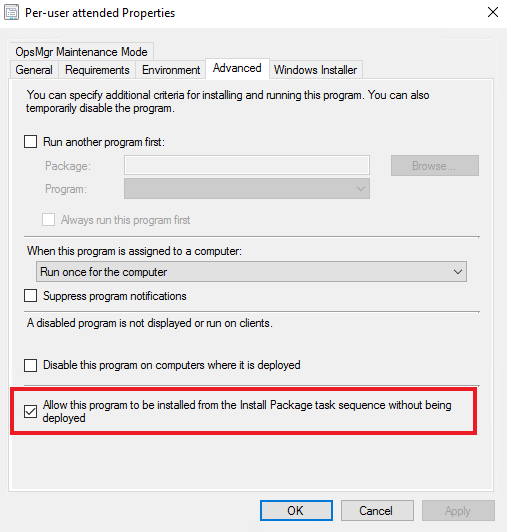
Allow this program to be installed from the Install Package task sequence action without being deployed.
If a checkbox is not enabled, the software installation will fail for that application or package. An administrator can enable this checkbox for each application and package by using either of the following methods:
in Configuration Manager during or after creating each application and package.
using the Auto Install feature in Application Migration when creating application associations, rules or Role Based Application sets.
Note
Application Migration's Auto Install feature is able to read the checkbox (auto install flag) for applications and programs, but in order for Application Migration to enable them for you, you'll need to configure related providers in the Settings module of Tachyon platform. These should already be configured as a post-installation step. For configuration details, please refer to Post-install configuration.
Refer to Managing migration rules: Auto Install for Migration Rules and Role Based Application Sets: Auto Install for Configuration Manager Applications and Packages.
Applications
The checkbox is located on the General Information tab of the Properties window for a Configuration Manager Application as shown.
Packages
The checkbox is also present on the Advanced tab of the Properties window of a Configuration Manager Package program as shown.
Support for Computer Replacement scenario
If you intend to use Application Migration to migrate applications from an old computer to a new computer (Replace scenario), you may need to include the Get migration settings step in your Task Sequences. The Get Migration Settings Task Sequence step retrieves information from a Computer Association in Configuration Manager so it can determine the source computer when installing applications on the new computer. It is currently distributed with Nomad and is added to the Task Sequence Editor by installing NomadBranchTools.msi. Please refer to Installing Nomad Branch Tools for more information.