Deploying software with Configuration Manager
Scenarios for deploying Applications and Packages where Nomad is integrated with Configuration Manager.
Nomad integrates with the Configuration Manager (CM) client content download process. When Nomad is installed, it registers with the Configuration Manager client as an Alternate Content Provider (ACP), which means the CM client will use Nomad as an alternative to BITS when it requires content if Nomad is enabled for the requested content object. Nomad can be enabled on individual packages (including Driver Packages, Operating System Images, Operating System Upgrade Packages and Boot Images) and Task Sequences.
For Applications and Software Updates, Nomad is enabled on each client for all Applications and Software Updates through Default Client Settings. When the CM client requires Nomad-enabled content, it passes a request to Nomad, which in turn downloads the content, places it in the CM client cache and passes back to the CM client for execution. The 1E Client (with Nomad client module enabled) must be installed on all CM client machines and on all Distribution Points (DP).
Refer to Distributing software with Nomad and Configuration Manager for more information about how Nomad works with Configuration Manager. For example, Nomad supported CM content sources and the types of content Nomad can act as a content provider for.
To enable the Configuration Manager client to interpret Nomad settings and ensure Content Transfer Manager hands-over to Nomad to download content, we need to extend the standard software deployment and client settings policies associated with packages, applications and software updates. The additional Nomad attributes are configured through the Configuration Manger console by way of custom console extensions, which add properties pages to the standard package, task sequence and client settings dialog boxes and wizards.
To find out more, refer to Installing Nomad Branch Tools.
Note
You can use the Nomad app, powered by the Tachyon Platform to get a visual snapshot of download activity in your environment. The Nomad app will be available after you install the Tachyon Platform and can be accessed using the Tachyon DNS Alias FQDN, for example https://tachyon.acme.local/Tachyon
The section Monitoring Nomad on this page provides an overview of how you can use the app to view download progress for large and small scale deployments.
Enabling Nomad for Application Management
Nomad is enabled or disabled for all Application deployments through the Client Settings. In our example we will enable Nomad for Application Management in the Default Client Settings and see how Nomad takes part in the download process and shares the content.
In our example in Configuration Manager:
We select the Administration workspace and choose the Client Settings node.
Then click Default Client Settings in the right-hand pane and select 1E Nomad→ Nomad Properties from the displayed Ribbon.
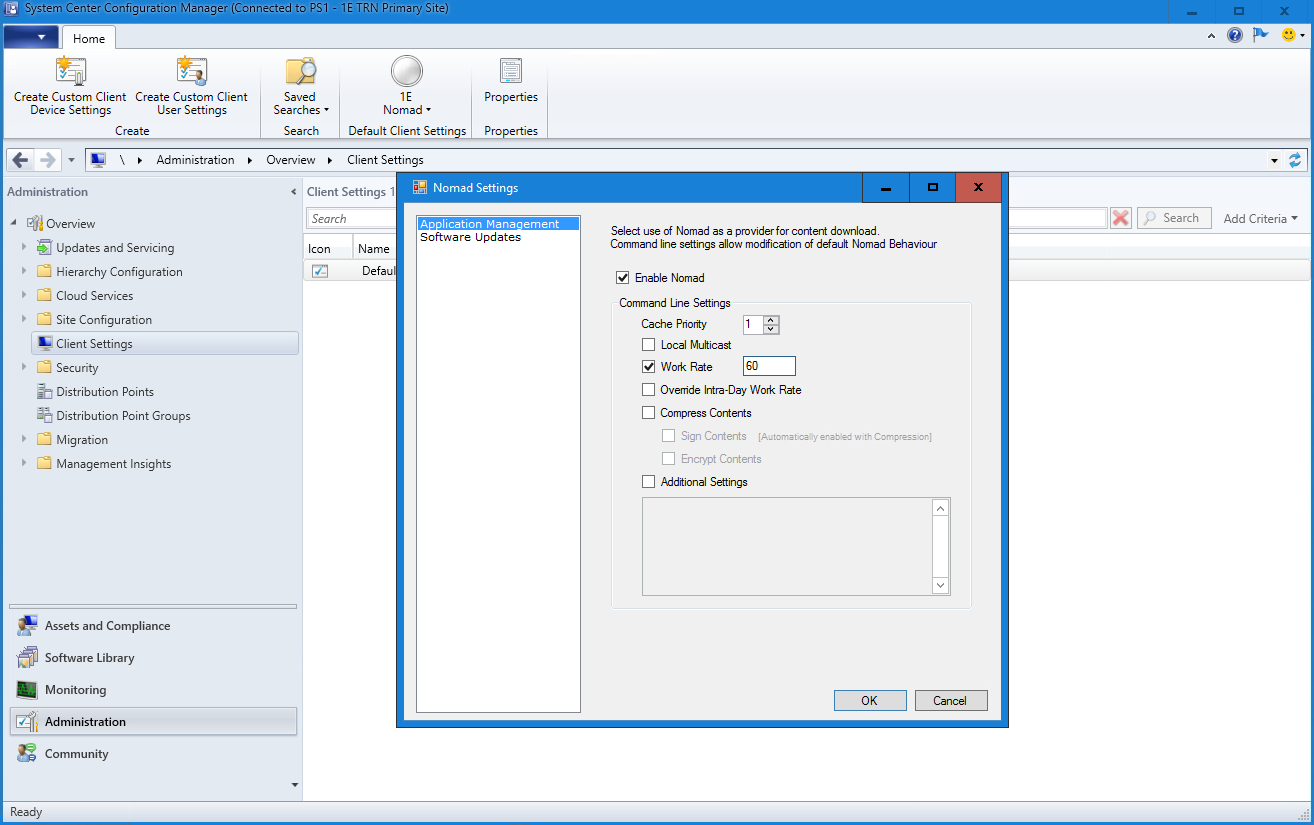
In the Nomad Properties dialog box, we select Application Management on the left and make the following changes.
Check Enable Nomad
Check Work Rate (%) and set the value to 6 0.
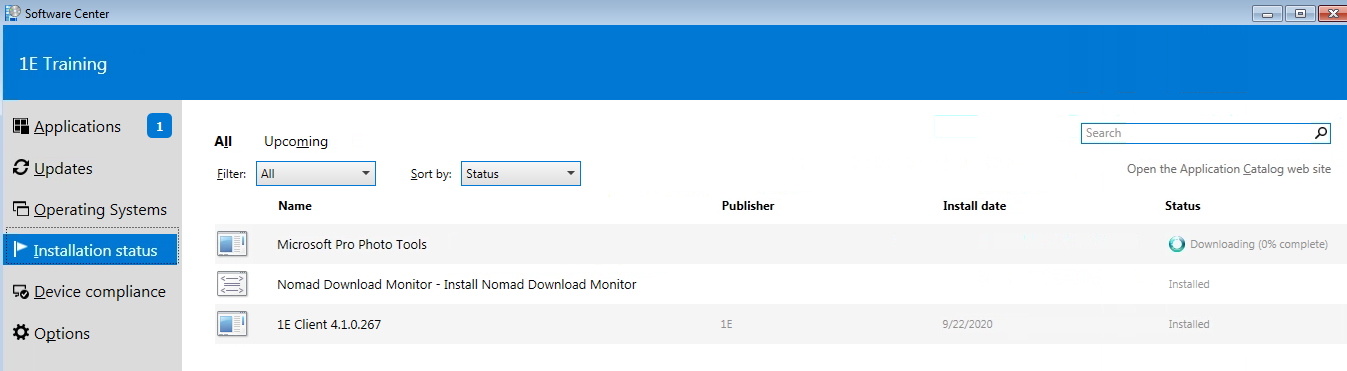
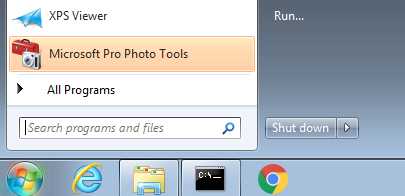
In this example, we will deploy Microsoft Pro Photo Tools to our collection containing our workstations called Workstations. Because we have enabled Nomad for Application Management, Nomad will be used to obtain the content for these clients when executing the deployment.
We then created a deployment for Microsoft Pro Photo Tools to our computers using the default deployment settings, but making sure on the Deployment Settings page we set the Purpose to Required.
Tracing the Application download progress
We then observe the computers as they receive the Software Updates policy and begin to download the content. Using Software Center we can see the content being downloaded.
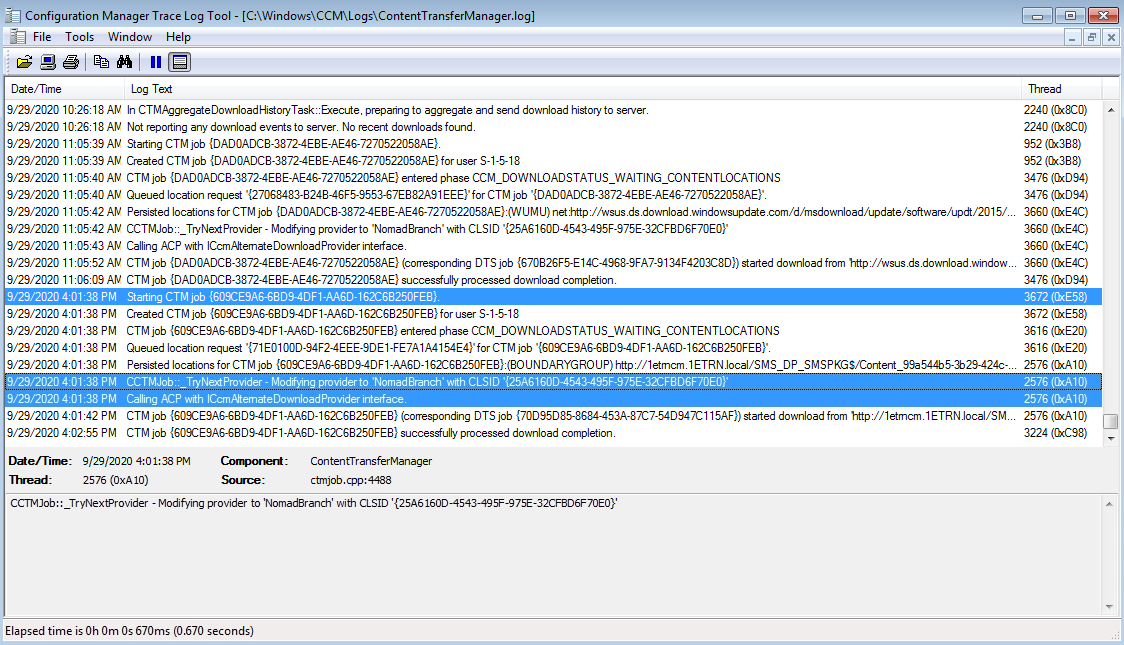
On 1ETRNW71 Using CMTrace.exe we open the CAS.log from C:\Program Files\SMS_CCM\Logs and can Identify the point when the content request is initiated.
We do this using the Application's Content ID: Content_99a544b5-3b29-424c-aef5-317699c1f330
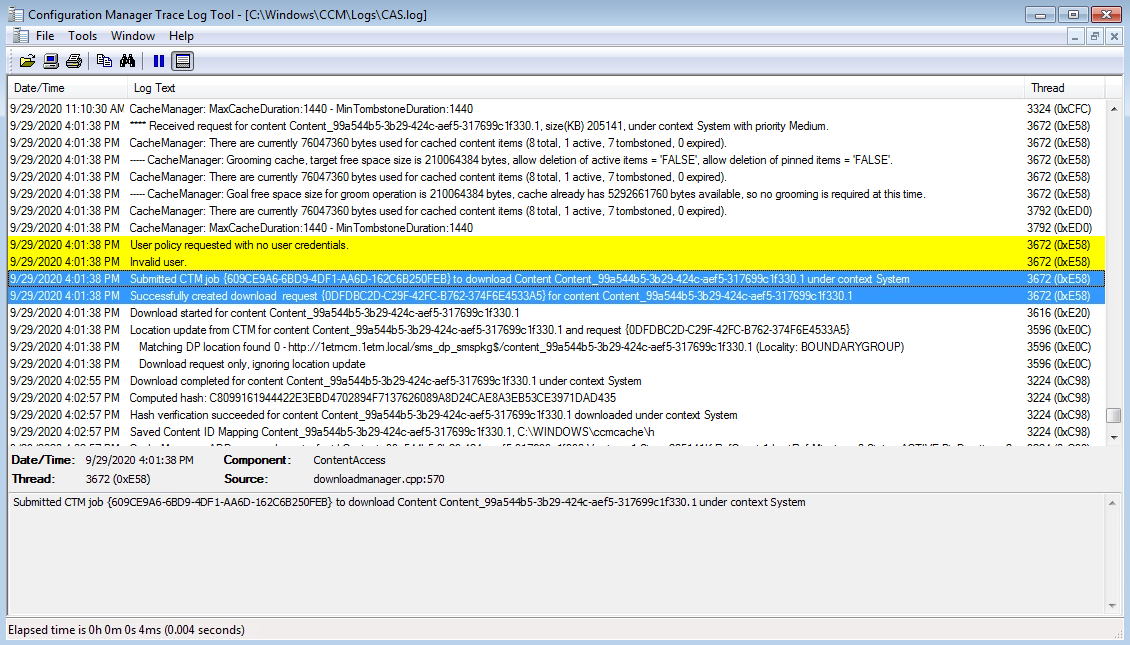
In the ContentTransferManager.log we can see where the CTM job started and that the Content Transfer Manager modifies the content provider to NomadBranch.
We look at the NomadBranch.log and identify the point where Nomad is called by the Content Transfer Manager as the Alternate Content Provider.
Note
The log extract shows the ICcmAlternateDownloadProvider.DownloadContent being called when the ContentTransferManager modified the provider to NomadBranch.
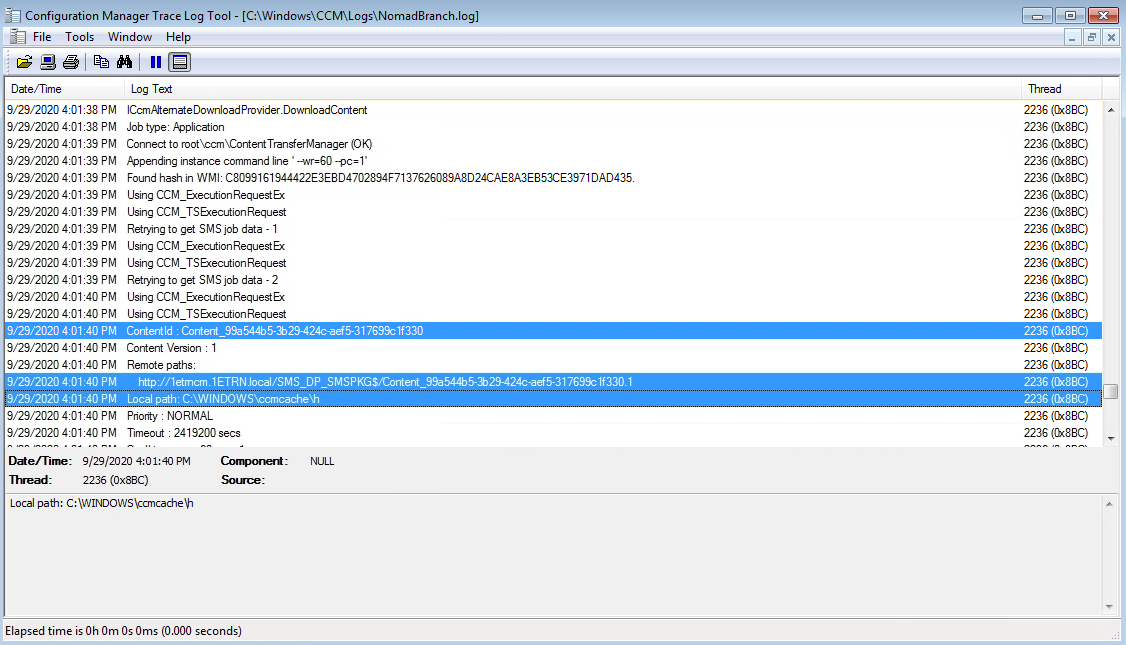
In the NomadBranch.log we can also see where the 1E Client names the Nomad options we defined in the Application Management section of Nomad settings.

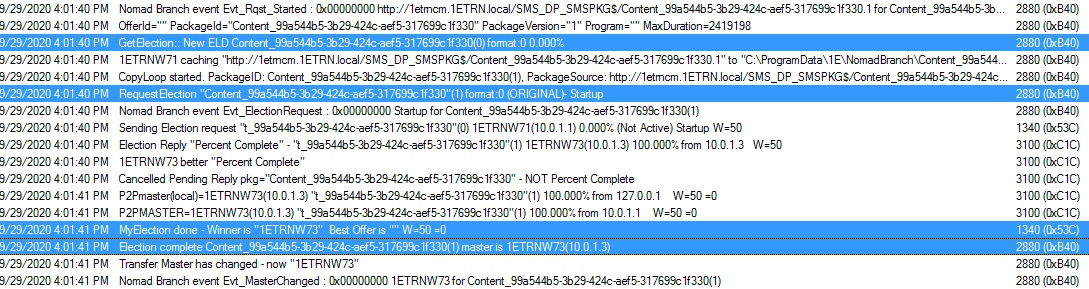
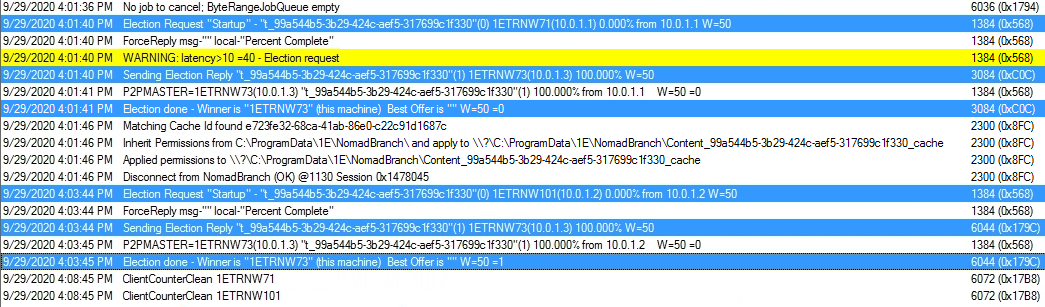
We can identify the point where the list of available content locations presented to Nomad appears.

There is also a point where the election starts, and we can identify that 1ETRNW73 wins the election.
Note
Nomad ensures that software packages are only ever copied once per branch over the WAN, utilizing local computers as temporary file caches to distribute the software locally. This reduces the bandwidth required for delivering software updates and means that small offices or sites connected by poor network links can receive software updates more reliably.
The Nomad clients with local copies of the package can themselves act as the master if the need arises. This significantly reduces the number of Configuration Manager servers required to manage a Configuration Manager hierarchy, thereby reducing initial and ongoing maintenance costs.
Refer to Download once to branch for full details about Nomad elections work including:
Nomad master elections
Nomad cache
Election rules and master elections.
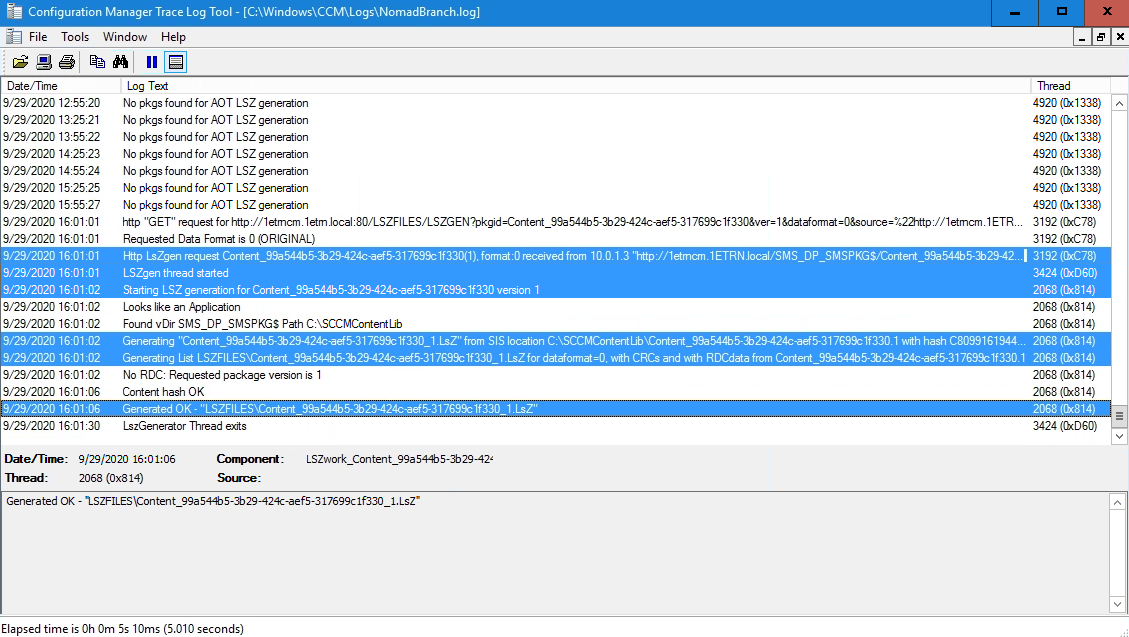
Because the elected master is 1ETRNW73 we switch to this computer and look at the NomadBranch.log, we then identify where the elected master requests the LsZ Manifest file to be generated on the DP.
Note
The manifest, a LSZ file, is stored in the root of the Nomad cache. This lists each file, its time stamp, a CRC checksum and the Configuration Manager hash value for the content. Nomad uses this manifest to ensure that the correct files have been downloaded for each package and to enable the rapid detection of changes between versions of packages.
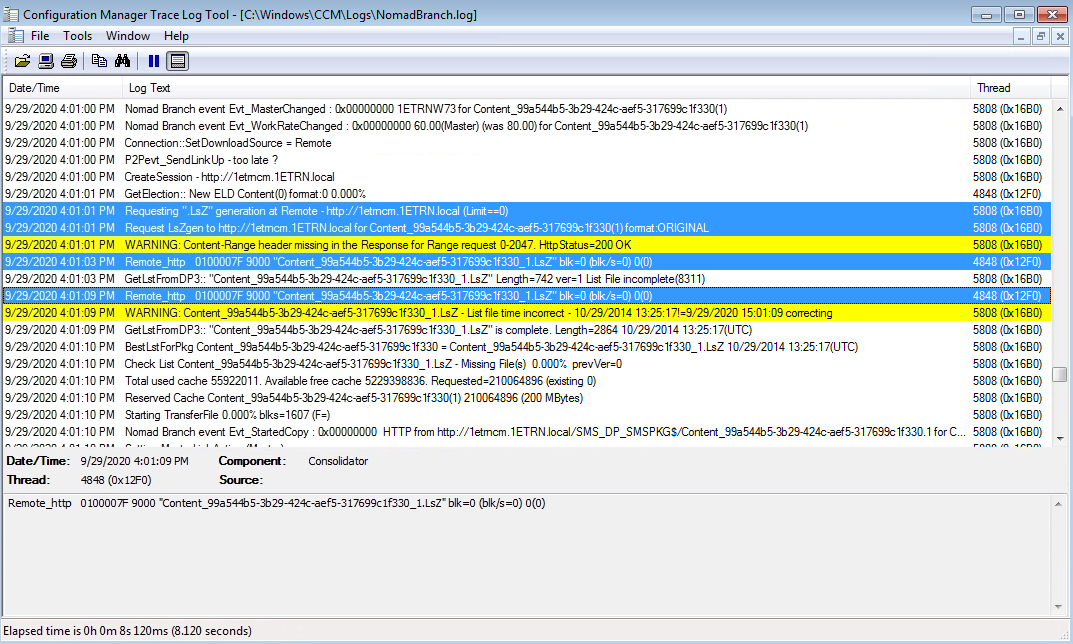
We switch to our Configuration Manager Server and open c:\Windows\CCM\Logs\NomadBranch.log where we can identify the point where the agent on the DP intercepts the request and generates the LsZ file.
By switching to the elected master 1ETRNW73 it's possible to track the download of content from the DP. This is highlighted by Remote_http.
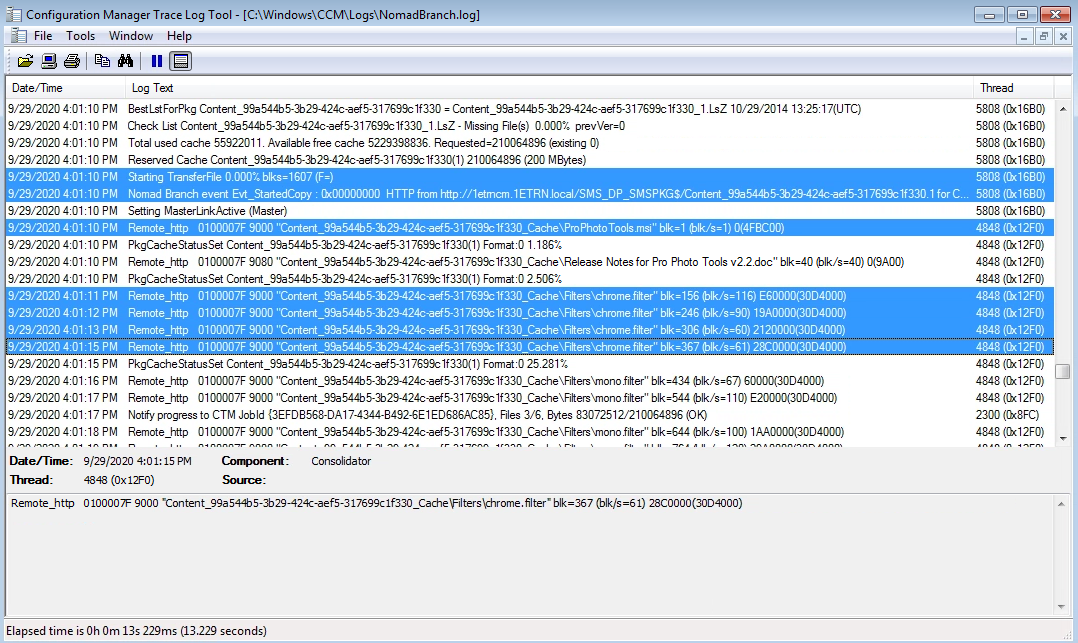
On the same computer 1ETRNW73 we can see other clients initiating an election as they process their content request.
Finally we can see the point where the master completes the download and performs the content hash check.
Note
The STATISTICS log entry indicates that this client (the master) got 100% of the content from the DP. The hardlinks are created shortly afterwards.
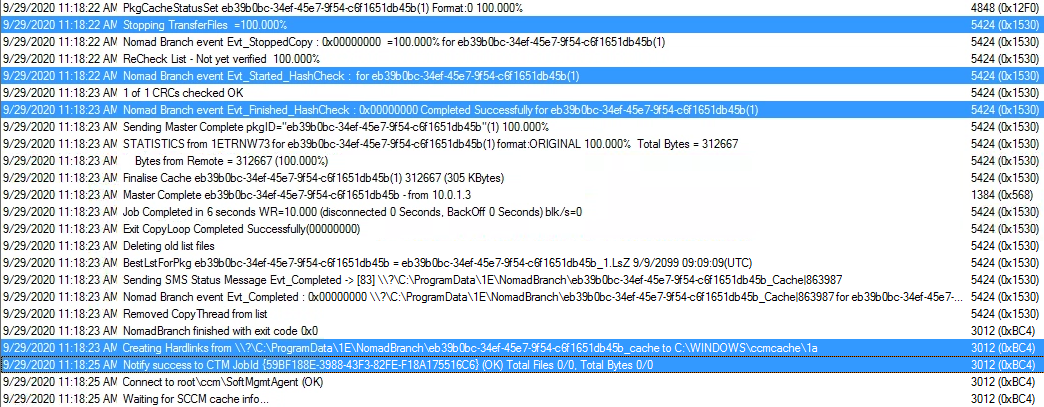
Once this process is complete Microsoft Pro Photo Tools is installed and available from the start menu.
Note
You can also use the Nomad app in the Nomad app to get a visual snapshot of download activity in your environment. The Nomad app will be available after you install the Tachyon Platform, it can be accessed using the Tachyon DNS Alias FQDN. For example:
https://tachyon.acme.local/Tachyon
See the section Using the Nomad app for an overview of how you can use the app to view download progress for large and small scale deployments for Content Titles and by device.
Enabling Nomad for Package Deployments
While you can use the same settings for all Applications, settings for Packages must be defined for each package you want to deploy.
Nomad can be set as a content provider for individual instances of the following types of Configuration Manager (CM) content. In the Configuration Manager Console, navigate to Software Library → Overview and then to one of the following:
CM Console node | Sub-node | Action |
|---|---|---|
Application Management | Packages | Select a package. |
Operating Systems | Driver Packages | Select a driver package. |
Operating System Images | Select an operating system image. | |
Operating System Upgrade Packages | Select an operating system upgrade package. | |
Boot Images | Select a boot image. | |
Task Sequences | Select a task sequence. |
Right-click and select Propertiesor click onCreate to start a New Wizard. Nomad properties is then accessible on the Nomad tab.
In our example we will deploy a Package called Phonebook to the computers in our collection.
In Configuration Manager:
We select the Software Library workspace and choose the Application Management→Packages node.
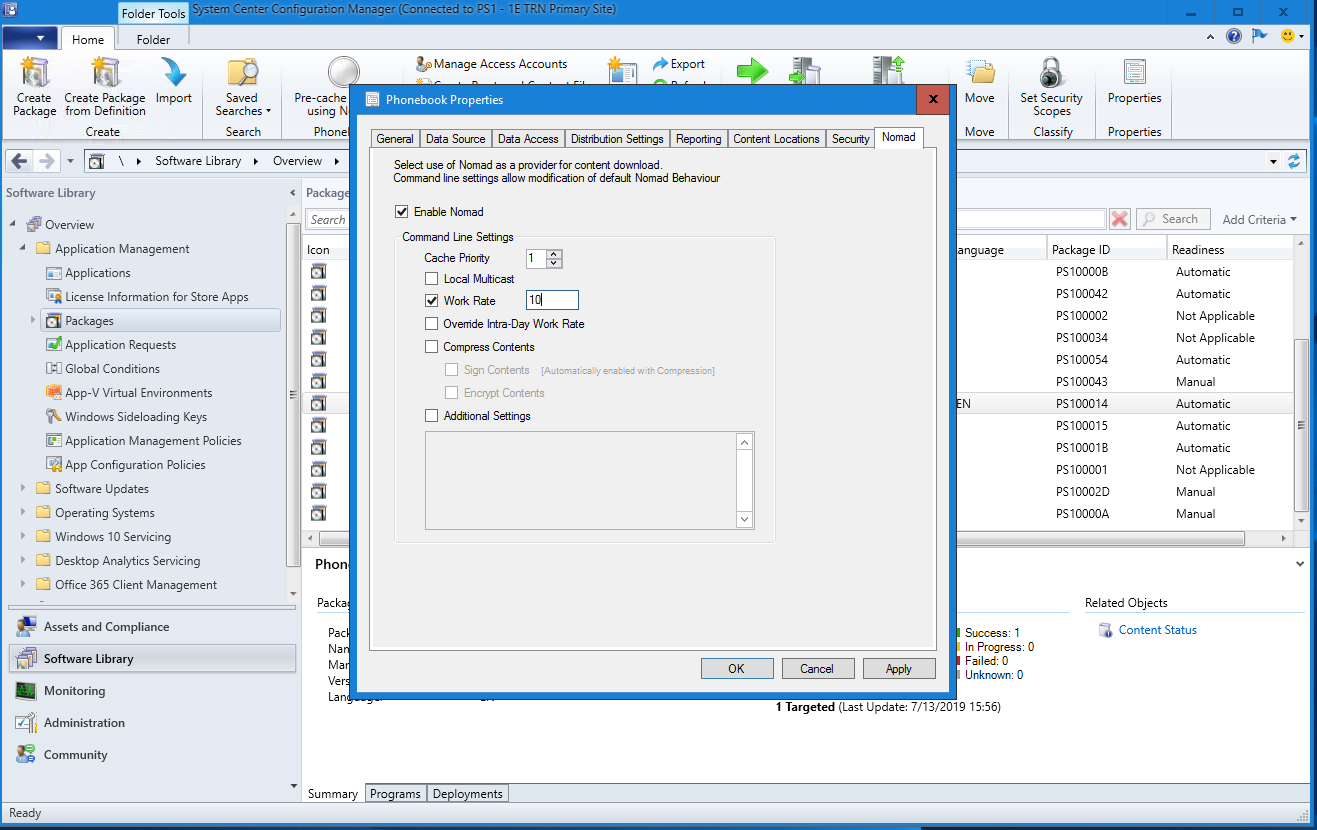
We right-click the Phonebook package in the right-hand pane and select theNomad tab from the displayed properties.
On the Nomad Properties tab, we select make the following changes:
Check Enable Nomad
Check Work Rate (%) and set the value to 10 we slow the rate to 10 to make the deployment easier to follow.
Note
Work Rate (%) – determines the percentage of available bandwidth to use for the download. The default value is 80%. If you have set intra-work rates, (the lower of these two values is used unless you enable the Override Intra-Day Work Rate option. Please refer to MaxWorkRates for details about intra-day work rates.
We then deploy the Phonebook Package to our workstations using the default deployment settings, but making sure we have set:
Deployment Settings - Type of deployment is Required
Scheduling - Create an assignment schedule of Assign immediately after this event with the deadline As soon as Possible
Distribution Points - we set both to Download content from distribution point and run locally.
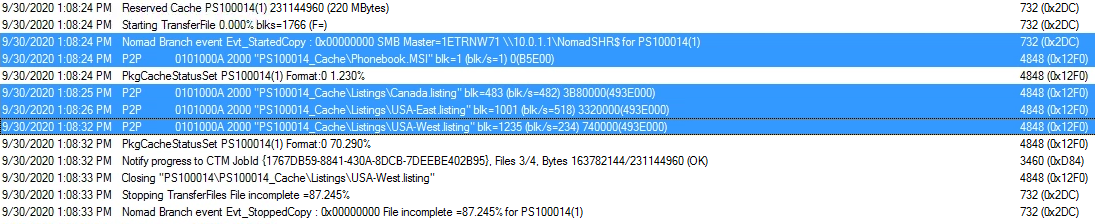
On 1ETRNW73 Using CMTrace.exe we open the NomadBranch.log from C:\Windows\CCM\Logs and Identify the election for the Phonebook Package which has a content ID of PS100014.
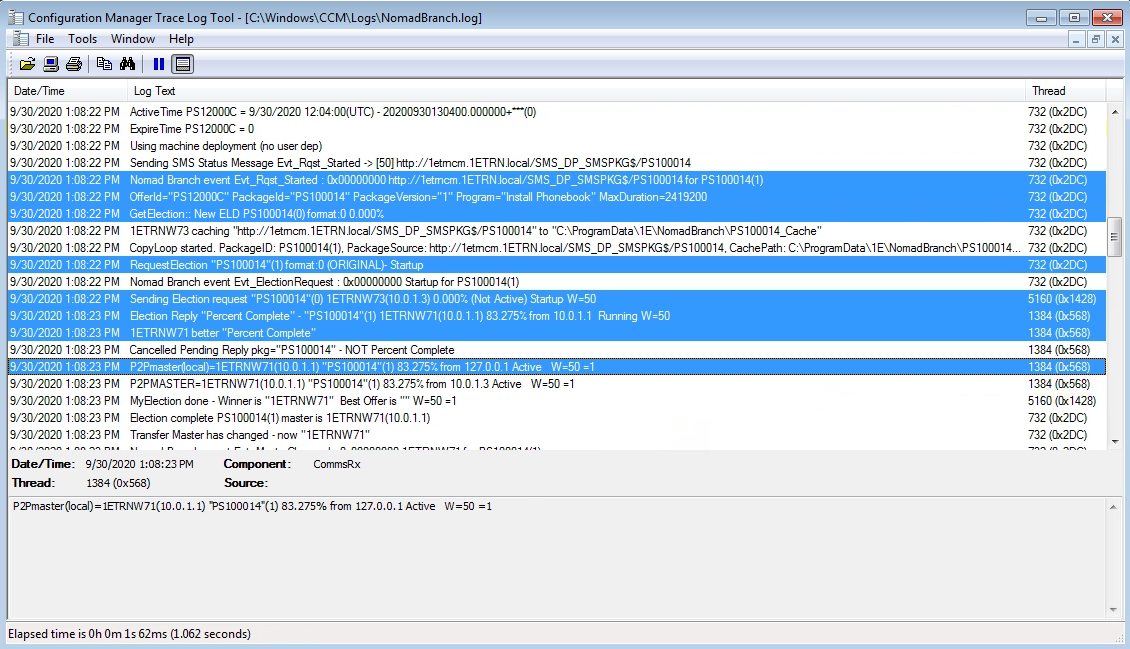
When the master is elected the computer starts copying from the master, refer to Download once to branch for details about Nomad elections.
The method for deploying Packages is the same as for Applications and software updates, as detailed in Tracing the Application download progress.