Configuring Patch Success
Configuring Patch Success after installation. The procedure below assumes that all users of Patch Success are permitted to see and use the buttons in the Patch Success application. Some guidance is provided for making buttons only available to specific users.
The steps for configuring Patch Success are:
Create an instruction set called 1E Patch Success, and upload its instructions
Create a custom role called 1E Patch Success Actioners, assign permissions, assign to All Devices
Configure the Tachyon connector, its instruction set 1E Inventory and custom role 1E Inventory Questioners
Configure the inventory connector for Configuration Manager (SCCM) or WSUS
Create schedules for the above connectors
Creating the 1E Patch Success instruction set and Actioners role
Creating the 1E Patch Success instruction set
The steps below create an instruction set called 1E Patch Success and a custom role called 1E Patch Success Actioners. Users who need to use Patch Success must be assigned to this custom role. The role allows the following:
Access to the Patch Success application and all its pages
Visibility and use of one or more of Deploy, Download only, Explore and Check Status buttons in the Patch Success pages, according to the permissions assigned to the role.
The 1E Patch Success instruction set will contain 3 instructions from the Patch Success Product Pack described in the table below.
Instruction text (ReadablePayload) | Type | Description | Instruction file name | Version |
|---|---|---|---|---|
Where:
| Action | Deploys a specific patch or patches to targeted devices. NoteUnlike the other instructions, the <patchSpec> parameter in this instruction does not support all. You must be specific which KBs you want to deploy. This instruction is used by the Deploy and Download only buttons, which allow users to deploy selected patches to devices. The 1E Patch Success Actioners role requires Actioner permissions to see the Deploy and the Download only buttons. See Patch.Deploy in the Tachyon SDK. | 5 | |
Where :
| Question | Returns patch status for given KB article numbers on targeted devices. The instruction is used by the Check Status button, which allow users to check the patch status of the selected patches and represent the results in Explorer for further investigations. The 1E Patch Success Actioners role requires Questioner permissions to see the Check Status button. See Patch.List in the Tachyon SDK. | 5 | |
Where:
| Question | Returns patch status for all known patches on targeted devices. Information is based on offline cache. When run, its response data is offloaded direct to the SLA-BI cube. The instruction is used by the Update Status button, which allows users to update the dashboard with the status of selected patches, to see for example Pending reboot and Installed states. The 1E Patch Success Actioners role requires Questioner permissions to see the Update status button. See Patch.List in the Tachyon SDK. | 5 |
Note
Patch Success also requires a further 5 instructions which are included in the 1E Inventory instruction set created when setting up a Tachyon Connector. You can add a Tachyon Connector later when you get to Configuring connectors and schedules below. If you already have a Tachyon Connector then you need to ensure the 1E-PatchSuccess-PatchStatus instruction has been added to the 1E Inventory instruction set.
Click here for more details about 1E Inventory instructions...
The following is an extract from Tachyon connector.
These steps are only required if:
you have not already loaded the 1E Inventory Product Pack using the Product Pack Deployment tool as part of the Tachyon Setup process
you will be using Tachyon Powered Inventory
The steps show how to create an instruction set called 1E Inventory.
The 1E Inventory instruction set will contain the 5 instructions listed in the following table:
Instruction text (ReadablePayload) | Type | Description | Data to Sync category | Instruction file name | Version | |||||||||||||||||||||||||||||||||||||||||||||||||||||||
|---|---|---|---|---|---|---|---|---|---|---|---|---|---|---|---|---|---|---|---|---|---|---|---|---|---|---|---|---|---|---|---|---|---|---|---|---|---|---|---|---|---|---|---|---|---|---|---|---|---|---|---|---|---|---|---|---|---|---|---|---|
Question | Processor details Uses Device.GetProcessors method. NoteClick here to expand details of data collected...
| Processor | 3 | |||||||||||||||||||||||||||||||||||||||||||||||||||||||||
Question | Process Usage data inventory for SLA Uses the $ProcessUsage_Daily inventory table, if Module.Inventory.ProcessUsage.Enabled setting is true (default) in the 1E Client configuration file. Please refer to Capture source settings. NoteClick here to expand details of data collected... Windows only. The following table shows fields available in the $ProcessUsage_Daily table.
The Tachyon client captures executable usage; this is from the moment the executable is turned into a process, hence the process usage. The Process Usage data presented is grouped by executable binary, and parallel runs are accumulated in the ExecutionCount, but not in the Duration, where coverage time period is desired instead. | Software Usage | 3 | |||||||||||||||||||||||||||||||||||||||||||||||||||||||||
Question | Software inventory for SLA Uses a combination of:
NoteClick here to expand details of data collected...
| Installed Software | 3 | |||||||||||||||||||||||||||||||||||||||||||||||||||||||||
Question | User data inventory for SLA Uses the $UserUsage_Daily inventory table, if Module.Inventory.UserUsage.Enabled setting is true (default) in the 1E Client configuration file. Top Console User is also calculated from this table. Please refer to Capture source settings. NoteClick here to expand details of data collected... Windows only. The following table shows fields available in the $UserUsage_Daily table.
The Tachyon client captures user sessions (usage); this is from the moment the user instigates a login/logout, hence User Usage. The usage data presented is grouped by SID and Username, and parallel login durations are really the coverage of the time period, not the total time for all the individual sessions. User and administrator accounts are included, either local or remote. System accounts, and accounts used to run services, are excluded. | User | 3 | |||||||||||||||||||||||||||||||||||||||||||||||||||||||||
TipThe 1E-PatchSuccess-PatchStatus instruction is not required if you do not intend to use the Patch Success application, and will not run if you do not have a license for Patch Success. For more information about configuring Patch Success please refer to Configuring Patch Success. WarningThis instruction is part of this 1E Inventory instruction set used by the Tachyon Connector. Do not move it to the 1E Patch Success instruction set used by the buttons visible in the Patch Success application. | Question | Returns patch status for 1E Inventory consumption | Patch | 5.0 |
Tip
You can use the Product Pack Deployment tool to simultaneously Upload the instructions and Create the Instruction set, or use the manual steps below.
These instructions are included in the 1E Inventory product pack, available in the TachyonPlatform.v5.x.x.x.zip file downloaded from the 1E Support Portal.
First upload the Patch Success instructions:
Download the TachyonPlatform.v5.x.x.x.zip file from the 1E Support Portal
Extract the 1E-PatchSuccess.zip from the Classic folder
Logon to the Tachyon Portal using a Tachyon user account with the Permissions Administrators and Instructions Administrators roles
Open the Settings application
Navigate to the Settings→Instructions→Instruction sets page
Click on the Upload button
In the Open dialog navigate to the location of the 1E-PatchSuccess.zip file
Select 1E-PatchSuccess.zip and click Open.
All the instructions contained in the zip file will initially be added to the default Unassigned instruction set. Instructions in the Unassigned instruction set cannot be used, so you will need to add the instructions to a new instruction set:
Select the 3 instructions you want to add to the new set, by clicking the checkbox at the start of each instruction row in the list
Click the Add new set button in the button panel to the right of the page
In the Add new instruction set popup subsequently displayed, type 1E Patch Success as the name
Optionally select a custom icon file
Ensure that the Include 3 selected instructions checkbox is checked
Click the Add button to add the new instruction set, with the selected instructions.
Creating the 1E Patch Success Actioners role
You must create the 1E Patch Success Actioners role so that its member users can use all features of Patch Success, including buttons which cause instructions to run in Explorer. Instructions are configured in Creating the 1E Patch Success instruction set above.
Tip
Some 1E Patch Success instructions are actions which require approval. Users cannot approve their own actions, but members of this role can approve each others actions. If you prefer other users or security groups to have Approver permissions, they would need an additional custom role, for example called 1E Patch Success Approvers. Or you may use an existing approvers role and assign the 1E Patch Success instruction set to it. Ensure the selected role has the All Devices management group assigned to it.
The built-in (system) role Patch Success Viewers can be used for users who only need to view the Patch Success screens and dashboard with no access to any buttons.
To create a new user:
Navigate to the Settings→Permissions→Users page.
Click the Add button to start the add user process.
In the Add user popup subsequently displayed in the Select user field, type the name of the AD security group representing Patch Administrators who will use the Tachyon Patch Success application.
Select a name from the search list, and click the Add button.
The new user will be added to the Users table.
Tip
You may have already created a Tachyon user for this custom role. You can change or add other users later.
To create the custom role:
Navigate to the Settings→Permissions→Roles page.
Click the Add button to start the add role process.
In the Add role popup subsequently displayed set the name as 1E Patch Success Actioners
Optionally enter a description
Click the Add button.
The new role will be added to the Roles table. Locate its entry and click on the link in the Name column for that row.
Select the Members tab and click the Add button.
In the Add role member popup subsequently displayed, search for the Tachyon user that you added in the earlier steps.
Click the Add button.
Select the Permissions tab and click the Add button.
In the Add permission popup subsequently displayed, scroll down the Type list and select Repository:patch
Select the Read checkbox.
Click the Add button.
In the Add permission popup subsequently displayed, scroll down the Type list and select Instruction set.
Scroll down the Name list and select the 1E Patch Success instruction set.
Select checkboxes for each of the following from the list of permissions, and then click the Add button:
Questioner permission - allows users to see and use the Explore and Check Status buttons
Actioner permission - allows users to see and use the Deploy button
Approver permission - allows users to approve each other's use of the Deploy button instruction (see the note at the start of this section about alternative Approver roles).
Select the Management groups tab and click the Add button.
In the Add management group popup subsequently displayed, scroll down the list and select All Devices.
Click the Add button.
Warning
Only select All Devices. This is the same as the All Devices management group as seen in Patch Success Title and filter bars.
To verify:
Logon to the Tachyon Portal using a Tachyon user account with the new 1E Patch Success Actioners role.
Navigate to the Patch Success→Overview page.
Configuring connectors and schedules
You must create the following connectors and schedules:
Tachyon connector and its Sync Data schedule - to import inventory and patch data into an inventory repository - this is normally the Default inventory repository
Configuration Manager or WSUS connector and its Sync Data schedule - to import meta-data for patches into the inventory repository
Generate Report - ETL schedule - for reprocessing of cube data in a BI repository - this is normally the Default BI repository
Patch data from all inventory repositories is reprocessed by an ETL (extract, transform, load) and stored in the BI cube to support dynamically updating interactive dashboards. The Patch Success application allows its users to view one inventory repository at any time.
Adding the Tachyon connector
You must add the Tachyon Connector in order to support Tachyon Powered Inventory which uses the 1E Inventory instructions.
Please refer to Tachyon connector for detailed configuration steps. In summary these steps do the following:
Creates a user. In our example this is ACME\SLATACHYON
Configures the Tachyon connector. A by-product of this step means Management Group synchronization is enabled to support the use of Management groups
Creates the 1E Inventory instruction set and 1E Inventory Questioners role.
Note
The 1E Inventory instruction set contains 4 instructions for inventory and 1 instruction for Patch Success. All of these instructions are necessary for Patch Success, but the inventory instructions are also used for other purposes. If you have already created the Tachyon Connector using only the inventory instructions, then you will need to add the instruction for Patch Success to the same instruction set. For more details about these instructions please refer to Tachyon connector: Creating the 1E Inventory Instruction Set.
Adding a connector for Patch meta-data
Patch Success needs to get meta-data for patches. Ensure you add a connector for whichever one of the following sources that you use to approve patches:
Configuration Manager (SCCM) if it is configured to manage WSUS
Windows Server Update Services (WSUS)
If you are using Configuration Manager then you must add a System Center Configuration Manager connector.
If you are using WSUS then you must add a Windows Server Update Services connector.
Creating schedules for Patch processing
The following Patch Success schedule process is designed to reduce the data that is retrieved when performing Tachyon, Configuration Manager and WSUS connector syncs and to provide a separate Device and Patch consolidation that can be run without running the Basic Inventory Consolidation. This saves time and processing when using Patch Success on its own. We suggest configuring the following daily schedules, set to run on the same inventory repository in the order presented - leave enough time between the steps to allow the previous step to complete. You can test how long that takes by running the steps manually.
Action | Frequency | Notes | |
|---|---|---|---|
1 | Sync Data - Configuration Manager or Sync Data - WSUS | Daily | Pick a suitable time when there is the least amount of activity. If using the Configuration Manager sync be aware it may take a long time to run because as well as patch meta-data, it is also importing a lot of inventory, and usage data for processes and users. To work around this, when using the Configuration Manager connector only with Patch Success, you can configure the sync to fetch just the Device and Patch data. |
2 | Sync Data - Tachyon | Daily | When configuring the Tachyon connector sync for use with Patch Success only, configure the sync to fetch just the Device, Patch and User data. You can schedule the Sync Data action to run at any time of day. Pick a suitable time when there is the least amount of processing activity. You must select the frequency that prevents the Sync Data actions for the Tachyon connector overlapping.
|
3 | Generate Report - Device and Patch consolidation | Daily | This action can be run when using Patch Success on its own. If you are using AppClarity as well these reports are also included as part of the Basic Inventory Consolidation. |
4 | Generate Report - ETL | Daily | This report reprocesses the cube data. |
Steps for adding a schedule can be found on the Settings→Configuration→Schedules page.
For the Sync Data actions, the actual name of the action depends on the connector name. Also ensure you select the correct inventory repository, the default is Default Inventory.
Configuring the source for Patch downloads
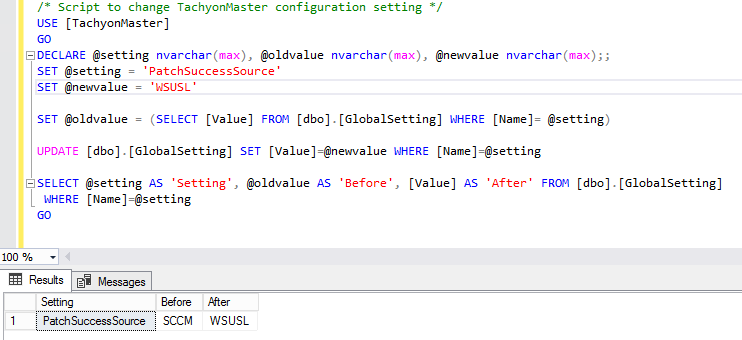
Patch Success needs to be configured with the download source from which client devices will download and install patches. By default the download source is configured as SCCM (Configuration Manager) but you will need to change this to WSUSL (local WSUS) if you are using WSUS instead of Configuration Manager.
To change the download source, you must manually update the value of PatchSuccessSource in the GlobalSettings table of the TachyonMaster database:
If your client devices are using Configuration Manager to download and install patches then leave PatchSuccessSource as SCCM - this is the default
If your client devices are using WSUS to download and install your patches then change PatchSuccessSource as WSUSL using the following SQL script:
SQL script to configure PatchSuccessSource setting
/* Script to change TachyonMaster configuration setting */
USE [TachyonMaster]
GO
DECLARE @setting nvarchar(max), @oldvalue nvarchar(max), @newvalue nvarchar(max);;
SET @setting = 'PatchSuccessSource'
SET @newvalue = 'WSUSL'

SET @oldvalue = (SELECT [Value] FROM [dbo].[GlobalSetting] WHERE [Name]= @setting)

UPDATE [dbo].[GlobalSetting] SET [Value]=@newvalue WHERE [Name]=@setting

SELECT @setting AS 'Setting', @oldvalue AS 'Before', [Value] AS 'After' FROM [dbo].[GlobalSetting]
 WHERE [Name]=@setting
GO
Note
Configuration of the PatchSuccessSource global setting (SCCM or WSUSL) is important to ensure that client devices use the correct source when instructed to download patches by the Tachyon Patch Success application. Patch Success administrators can expedite the patching process by using either Download only or Deploy (download and install) buttons. These buttons cause Tachyon to send the 1E-PatchSuccess-Deploy instruction to multiple clients with details of which patches to download only or to also install. In addition, if the PatchSuccessSource global setting is configured as WSUSL then the buttons provide the option to download from Microsoft Update via the Internet instead of from WSUS. The buttons do this by overriding the gobal Setting WSUSL with WSUSR (in the database Patch Success refers to Microsoft Update as WSUS remote). If you want to know more about the methods used by the 1E-PatchSuccess-Deploy instruction please refer to the Tachyon SDK - Patch.Deploy method documentation.
Note
If you set either WSUSR or SCCM (and intend allowing Windows Update to download the patches if they're not available on the Distribution Point) then the Windows Updates service must be allowed to download content from the internet and deploy the updates.
Additional configuration options
Following additional configuration options are available and can be changed if required.
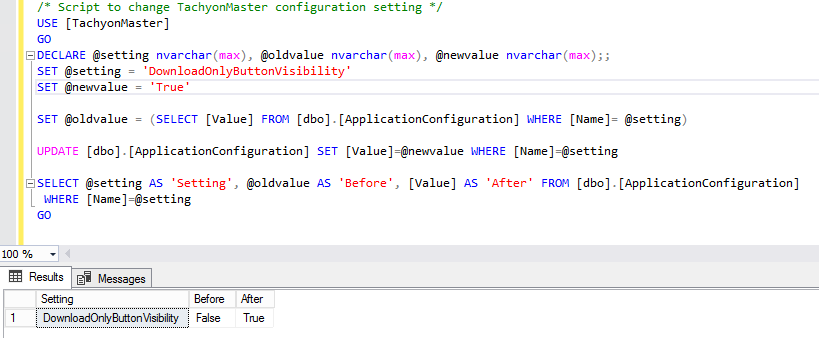
Enabling Download only feature
Download only is a button to download only without deploying the patch. This is only available for WSUSL and WSUSR patch source.
To enable Download only feature for the patch source WSUSL and WSUSR, run the following SQL script.
SQL script to configure DownloadOnlyButtonVisibility setting
/* Script to change TachyonMaster configuration setting */
USE [TachyonMaster]
GO
DECLARE @setting nvarchar(max), @oldvalue nvarchar(max), @newvalue nvarchar(max);;
SET @setting = 'DownloadOnlyButtonVisibility'
SET @newvalue = 'True'

SET @oldvalue = (SELECT [Value] FROM [dbo].[ApplicationConfiguration] WHERE [Name]= @setting)

UPDATE [dbo].[ApplicationConfiguration] SET [Value]=@newvalue WHERE [Name]=@setting

SELECT @setting AS 'Setting', @oldvalue AS 'Before', [Value] AS 'After' FROM [dbo].[ApplicationConfiguration]
 WHERE [Name]=@setting
GO
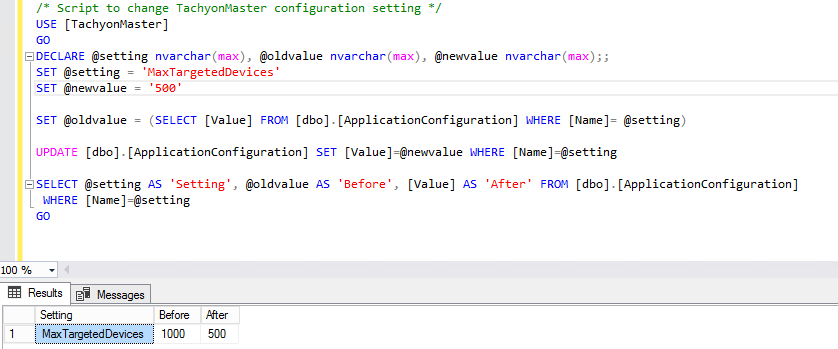
Changing the maximum number of targeted devices
For the patch source WSUSL and WSUSR the UI will limit the number of devices that can be targeted for Downloads and Deployments to the maximum number. This limit is put in place to warn of the possible impact of deploying and downloading patches at scale, to the network infrastructure.
To change the maximum number of targeted devices run the following SQL script.
SQL script to configure MaxTargetedDevices setting
/* Script to change TachyonMaster configuration setting */
USE [TachyonMaster]
GO
DECLARE @setting nvarchar(max), @oldvalue nvarchar(max), @newvalue nvarchar(max);;
SET @setting = 'MaxTargetedDevices'
SET @newvalue = '500'

SET @oldvalue = (SELECT [Value] FROM [dbo].[ApplicationConfiguration] WHERE [Name]= @setting)

UPDATE [dbo].[ApplicationConfiguration] SET [Value]=@newvalue WHERE [Name]=@setting

SELECT @setting AS 'Setting', @oldvalue AS 'Before', [Value] AS 'After' FROM [dbo].[ApplicationConfiguration]
 WHERE [Name]=@setting
GO
Tachyon Platform zip
The Tachyon Platform zip file can be downloaded from the 1E Support Portal https://support.1e.com/.
Refer to Tachyon platform zip file for details.