Creating a license entitlement
Entitlements are key components for determining your compliance position, also known as the license position. The license entitlements you create are taken into account against the installations on your enterprise, you can then create various reports to show exactly what your effective license position is.
There are three types of entitlement you can create in AppClarity:
Licenses
Maintenance
Agreement.
You may see when you create an entitlement that there is a fourth type called Contract. Contracts are really just placeholders for documentary evidence of ownership and may be associated with any of the three types of entitlement. In our example, we show how a contract can be associated with a license.
By combining these types, you can model a wide range of complex entitlements that you may have in your enterprise, allowing these to convert easily into AppClarity.
In this example
In this example, we introduce entitlements by creating a simple license for Microsoft Visio, and show how that is processed by AppClarity and taken into account against the software installed on our example network.
At the end of this example, you will have created one license entitlement in AppClarity. You will also have created a contract, which is a placeholder for any document, link or written evidence as proof of ownership for the license, the contract will then be linked to the license.
To carry out the actions described below, your user will require either the Entitlement Administrator, Compliance Administrator or Full Administrator role.
It is generally a good idea if the license, maintenance, and agreement entitlements you create have at least one associated contract. It's not mandatory, but it makes sense if the entitlements you create have proof that you own the particular license, maintenance, or agreement. For example, the contract may contain an enterprise agreement, a scan of a proof of purchase, a .PDF of an order or a paid purchase order. You create the contract and link to or load the associated proof into it. After saving, it may then be linked to the license, maintenance, or agreement you want it associated with. Subsequently, when auditing your licenses, AppClarity holds the proof of ownership linked to the entitlements that cover your installations.
Creating a simple entitlement
This example shows how a license deficit for a Microsoft Visio installation can be turned into a surfeit by creating a license entitlement. It assumes that you already have inventory data and that you've run the Compliance report.
Navigate to the AppClarity→Compliance→License Position page.
Click on the
 in the Title Column and enter contains in the dropdown and Visio in the next field, click Apply.
Note
You can choose which columns are displayed in Inventory and AppClarity detail tables to increase readability. On pages where you can pick the displayed columns you'll see a new control like the one highlighted below:

To find out more about this feature refer to Running your first Compliance License Summary: Choosing the columns to display in reports.
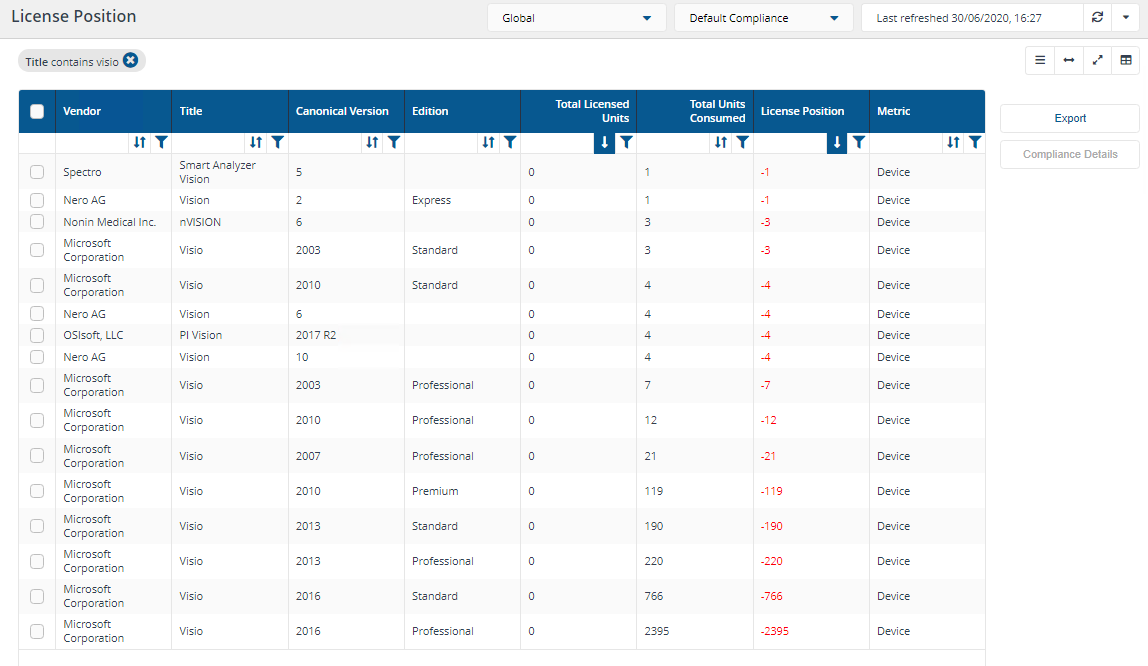
In our example you can see that there are multiple entries with the Title contains Visio including those with the Canonical Version of 2013 and on 2016, both are the Professional Edition.
By selecting either of those listed the Compliance Details button becomes enabled, click Compliance Details.

This opens the License Summary page, filtered on Microsoft Corporation and Visio.
Displayed is the consolidated Summary for all versions of Visio.
It's also possible to achieve the same result directly from the License Summary page and adding filters there.

Creating a simple license
To create our example license, we know the following information about the license:
Vendor: Microsoft Corporation
The units per license (1 unit per device in case of Device Metric)
Title: Visio
Edition: Professional
Version: 2016
The cost per unit for the license, in this case $150
Note
You can change the default displayed currency from USD to a currency of your choice, refer to Changing the default currency in AppClarity for details.
To create and publish a license entitlement:
Select the displayed product and click Add License, located just to the right.
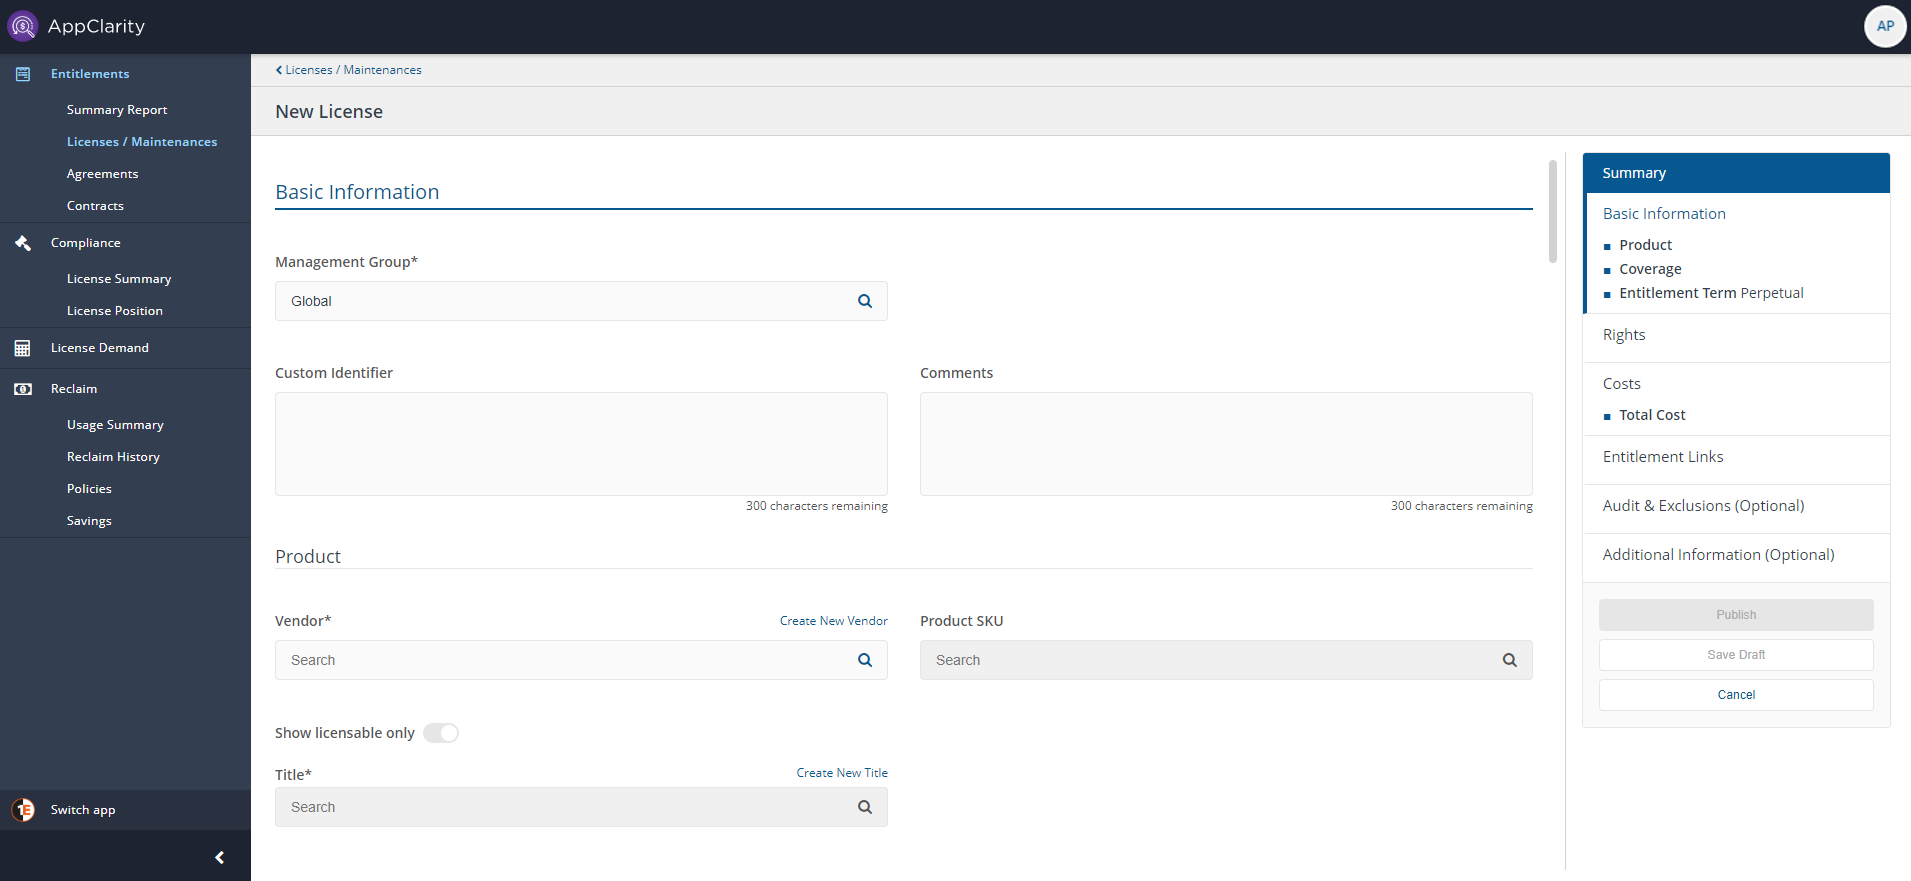
In the New License page we will choose a specific set of options to show how this page works. For more details on all the fields in this page please refer to New License page.
There are lots of fields on the page, but only a few are mandatory. The mandatory fields have an * next to their name.
The page is split into a number of sections, we will start in the Basic Information section.
The Management Group is the first mandatory field, it's set by default to Global, but it can be changed to any of your existing Management Groups, in this example we will leave it at Global.
The next mandatory item is the Vendor field. As we have opened this page after selecting a product, any known fields are prepopulated. Where they are not then as you start to type information suggestions are shown which are bought in from 1E Catalog.
Now we set:
Title: Visio
Version Type: Colloquial (need to set this, so we can specify the Version as 2016)
Version: 2016
Edition:Professional
Metric Type: Device (this is the default)
Quantity: 65 (For other more complex metric types you will need to adjust the Quantity accordingly.
Entitlement Type: Perpetual
Start date: to the date the license started, or is due to start on. In our example, it's set to the default of the current date
Duration set the duration of the license, this will be required if the license is not Perpetual
Version Downgrade: We now ensure that the both Available and Persistent checkboxes under the Rights section are checked, as it should be by default. This will confirm that this license can be applied to versions of Visio earlier than 2016.
Costs: 150
Currency: is already set to USD by default. AppClarity then calculates the total cost of the 65 licenses as $9750.00.
Now everything is set how we want it lets make this license entitlement take effect. To do this we click the Publish button at the bottom of the page. We could have clicked Save draft, if we were in the middle of making changes and didn't want to make the license active and the license would have been saved as draft in the Licenses / Maintenances page.
Note
These steps can also be carried out directly on the Entitlements - Licenses/Maintenances page and clicking on New License, but the prefilled information will not be there, and you will need to enter that yourself.
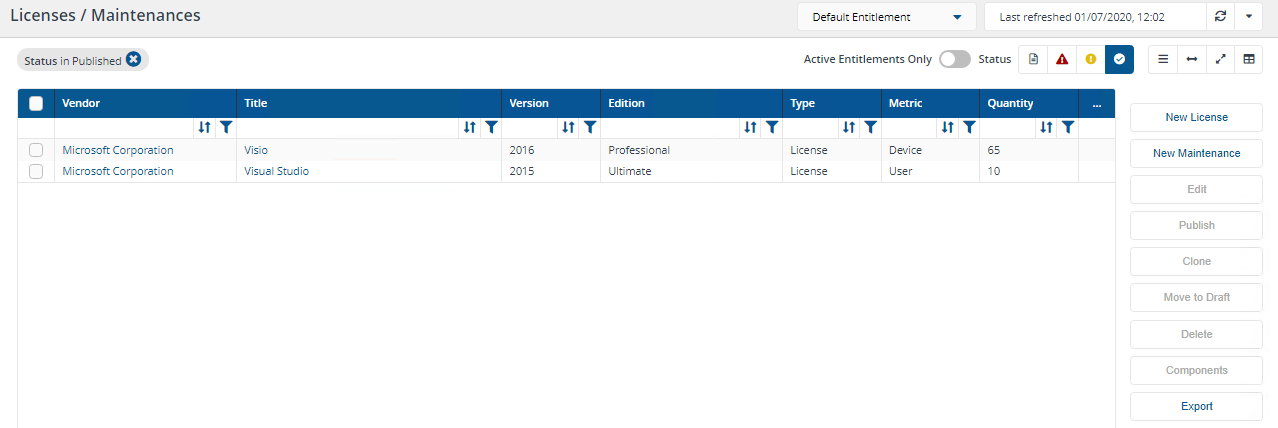
Having published the license entitlement an entry now appears in the Licenses / Maintenances page.
Click the green tick published icon to show the License we just published.
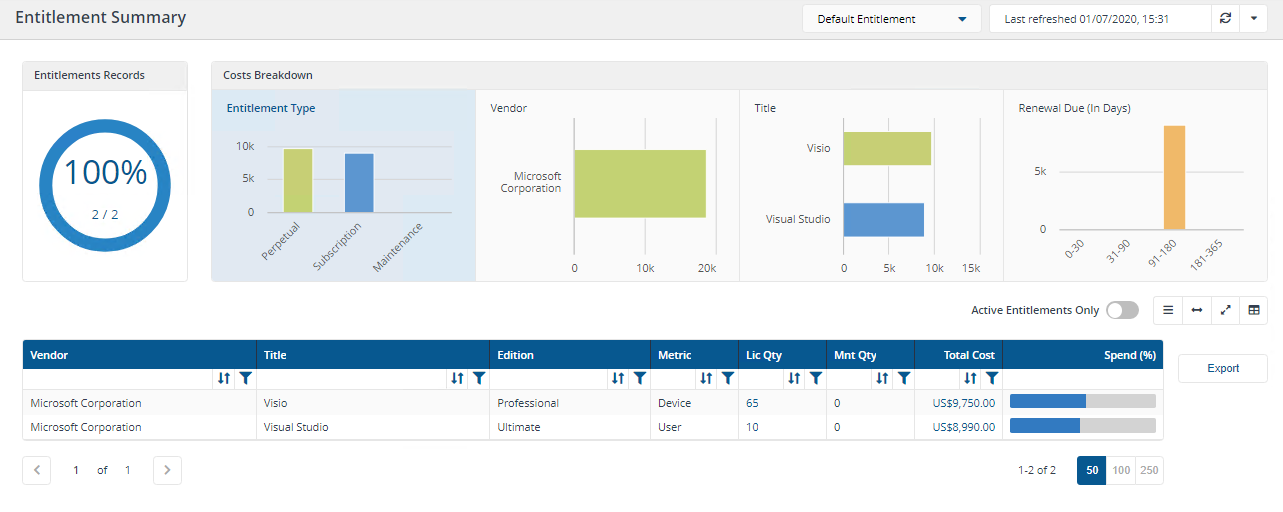
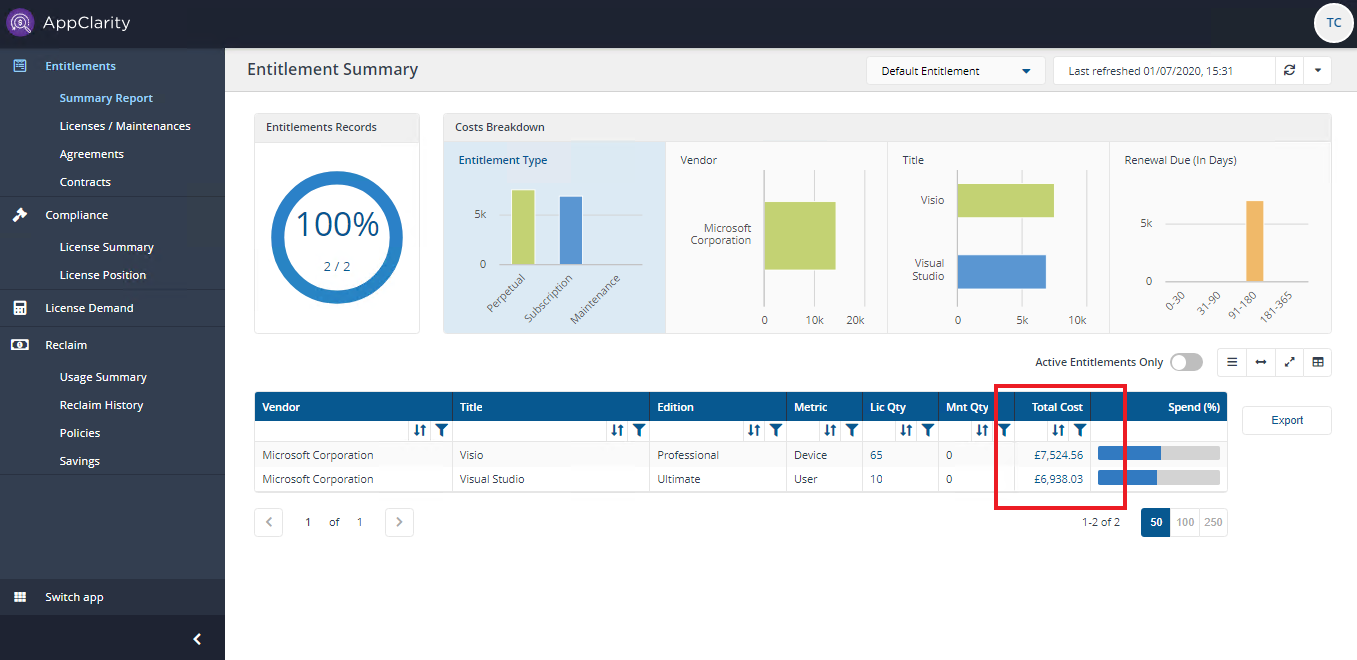
On publishing an entitlement, the Entitlement Consolidation report is refreshed. Once this is done, data can be seen on the Entitlement Summary page.
Note
You can download a .tsv report of the Entitlement Summary for your organization.
Click Export to download a file in the format EntitlementSummary_currentdate.tsv
Note
The Active Entitlements Only control has been added to the Entitlement Summary page. The control adds a filter when it's turned on that filters the table to only display the entitlements that have been published and not the ones that are in draft.
To make a published license entitlement take effect you have to run the Compliance report:
Navigate to the Settings→Connector page and click on the Execute button.
The Execute action popup is displayed, enter the following:
Navigate to Settings→Monitoring→Process Log and wait for the action to complete, this will be Compliance and will have a green tick in the Status column when complete.
Navigate to the AppClarity→Compliance→License Position page.
In our example you can see that Visio with Edition of Professional now has a License Position of 5. This indicates that the installations of the software title are now licensed and there are 5 spare licenses for Visio.
Note
You can refresh reports from individual AppClarity screens as well as using the Settings App. You can do this by using the refresh icon next to theLast Refreshedbox, for example:

For a complete list of the specific reports you can run from particular pages refer to Running your first Compliance License Summary: Refresh Reports.
Creating a contract
In our example we will create a new contract and load a scan of the proof of purchase for Visio.
To create a new contract:
Navigate to the AppClarity→Entitlements→Contracts page.
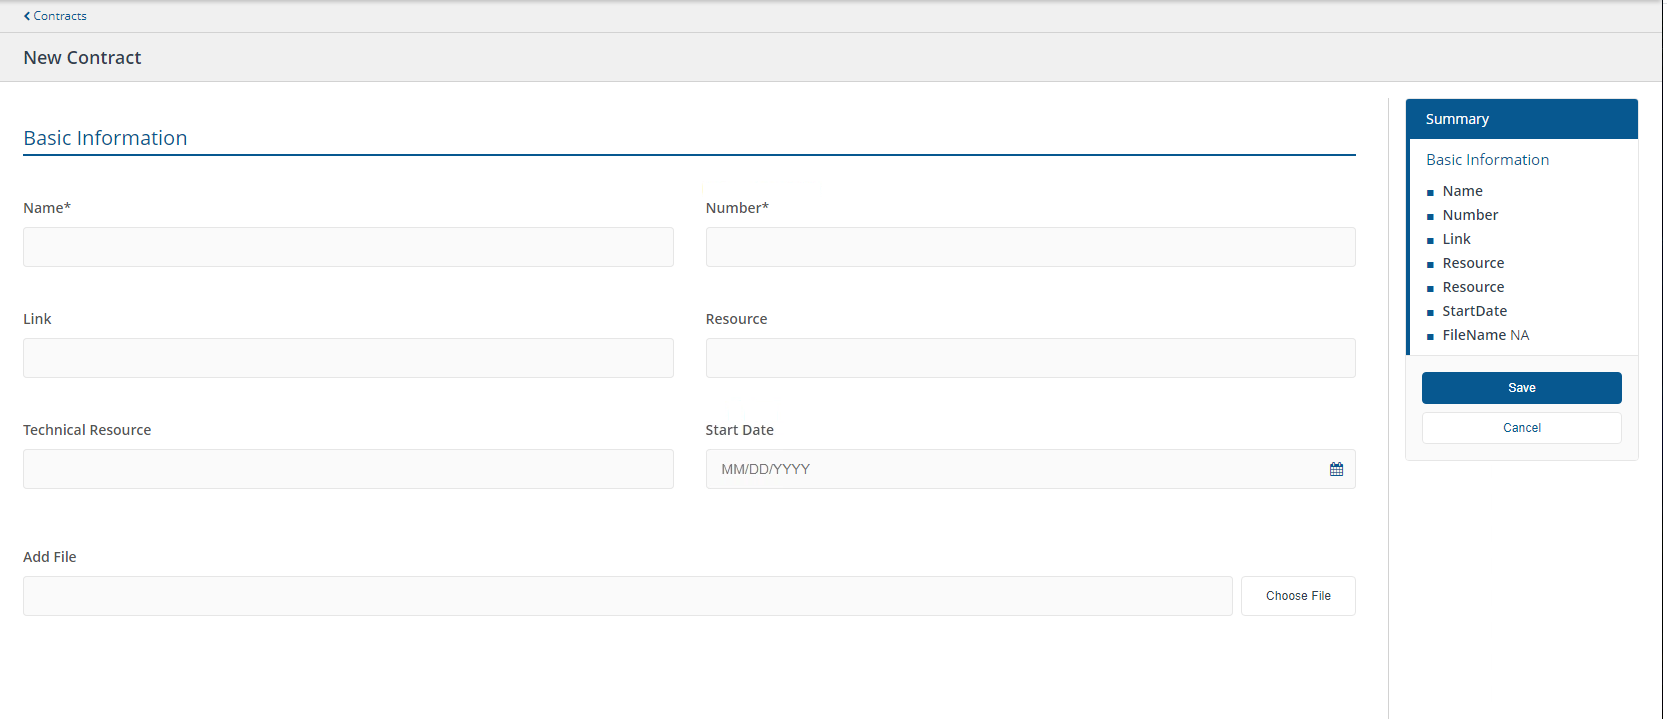
Click the New Contract button, located just to the right of the page.
In the New Contract page set the details for the contract. In our example we make the following settings:
On this page you could set a link to the contract (if the contract is online), specify the name of the person or role who manages the agreement, specify the name of the person or role who knows the technical detail of the license. In our example we will just add an attachment of a scan of the proof of purchase for Visio.
Clicking Choose File displays a system Open dialog, here you can browse to and select the file you want to attach. In our example the file is in C:\AppClarity\Contract Scans and is called Visio20180607.png. When the file is selected click Open to attach the file.
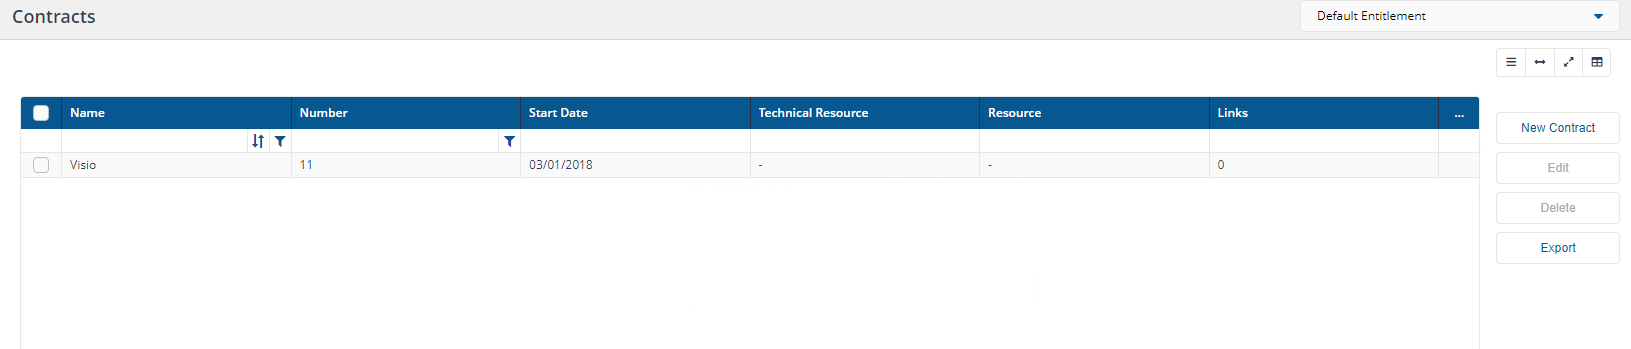
Once all the settings have been made on the screen click Save contract.
The newly created contract is now added to the Contracts page.
Linking the license to the contract
Once the new contract has been saved you can now link it to a license, maintenance or agreement entitlement.
To link a contract:
On the AppClarity→Entitlements→License / Maintenances screen locate the entitlement you want to link the contract to. At the right-hand end of the entitlement's entry click on the Edit link. In our example we click on the Edit link for the Visio license entitlement we created earlier.
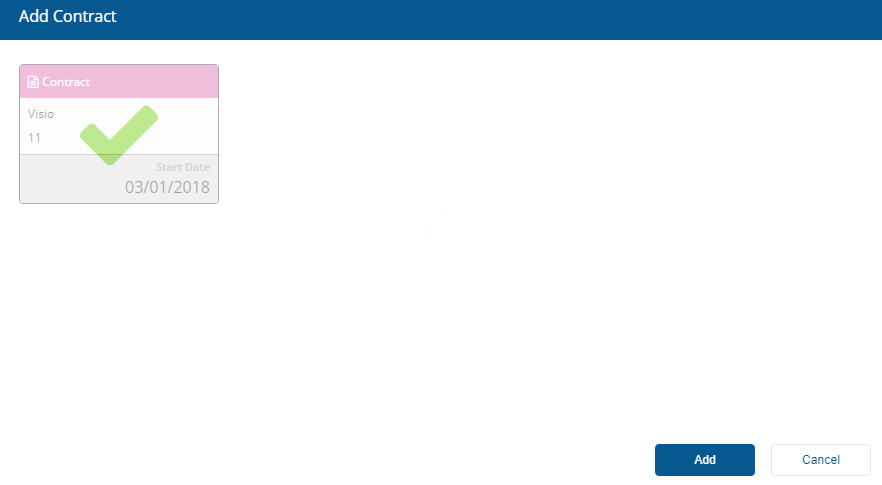
On the Edit License page scroll to the Entitlement Links section and click the + Add Link in the Associations area.
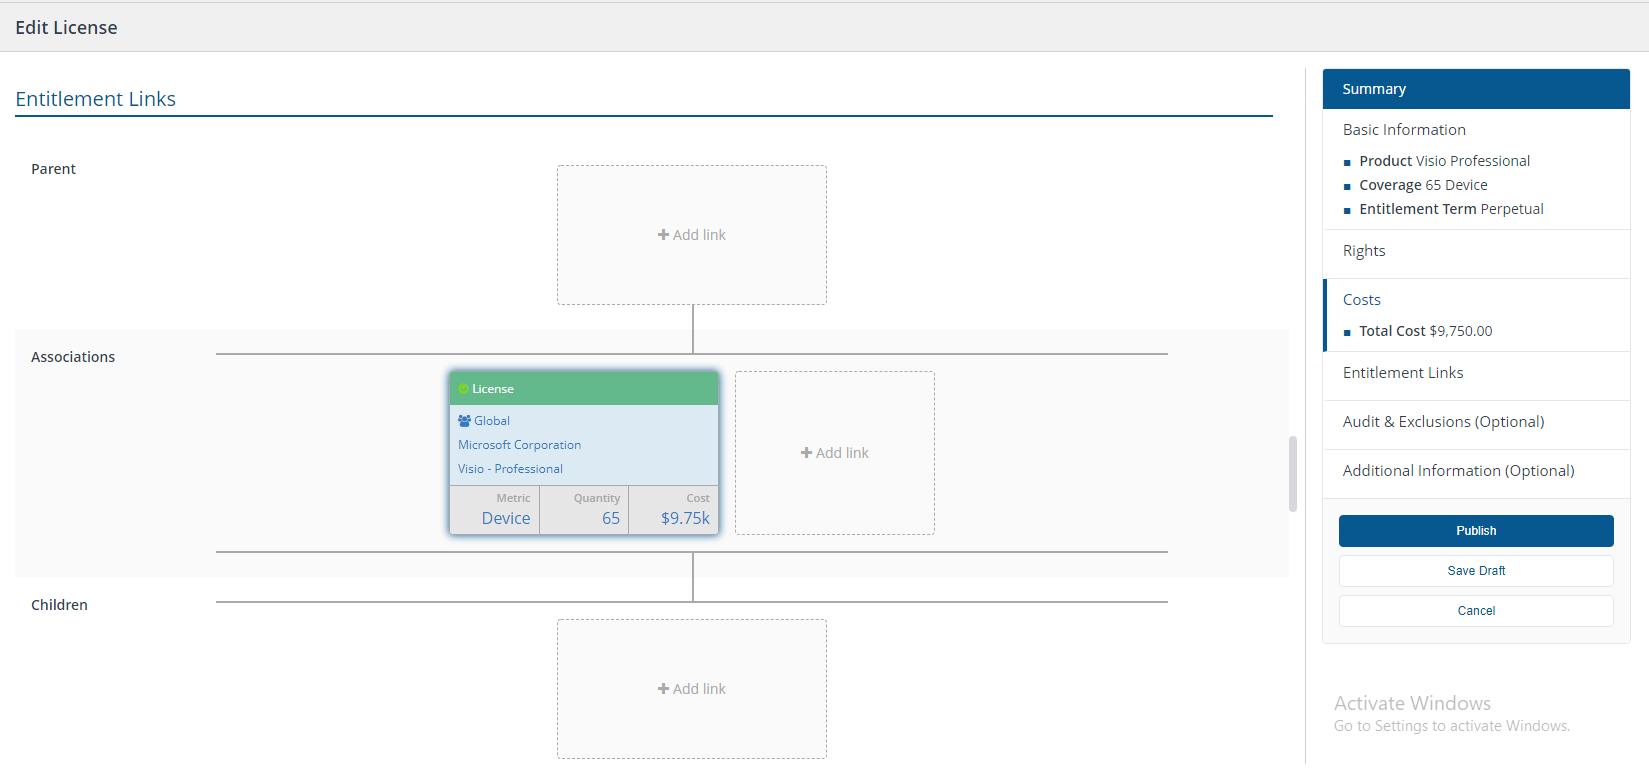
On the Add Contract popup subsequently displayed, locate the contract created earlier. In our example this was called Visio, and click the contract, a green tick will appear and click Add.
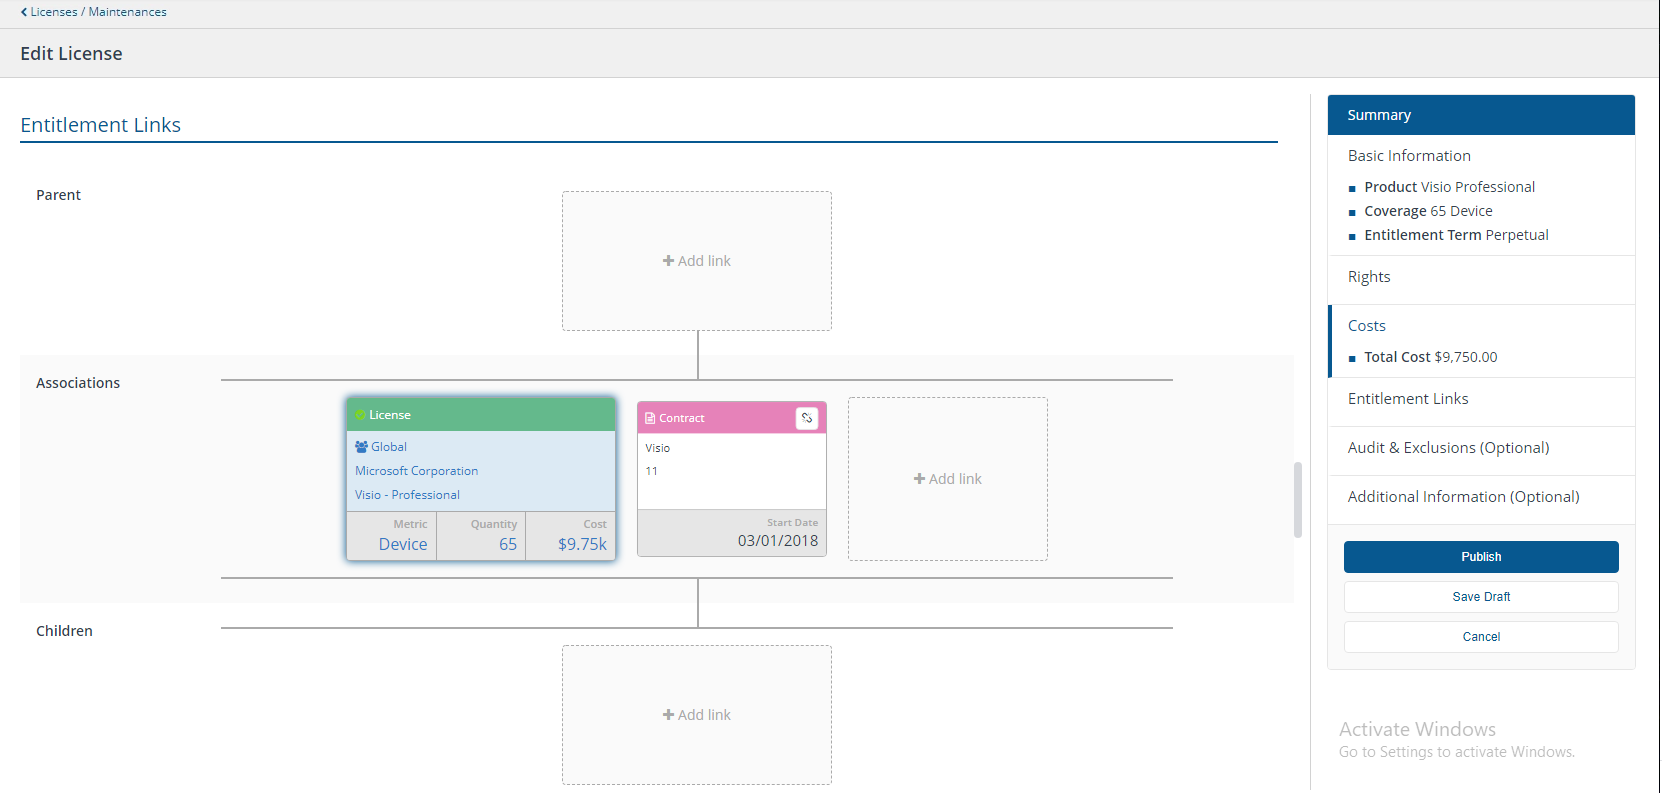
The Edit License Entitlement Links will be updated.
Click on Publish, this returns to the Licenses / Maintenances screen, and a 1 will now appear in the Links column for this entitlement.
If you click on the 1 in the Links column this will open the Entitlement Links page in view mode showing the Associations.
Congratulations! You have now created your first license entitlement and your first contract and linked one to the other.
Changing the default currency in AppClarity
You can change the default currency (USD) along with the appropriate currency symbol and name from USD to a currency of your choice. For example, if you set the default currency to GBP then all cost values should be displayed in GBP after currency conversion (if required) along with the correct currency symbol (in case of graphs).
You can change the cost values displayed on the following pages, costs will show the default currency name and graphs will reflect cost values with default currency name and symbol.
Title page | Sub-page | Sub-page |
|---|---|---|
Entitlements | Summary Report | n\a |
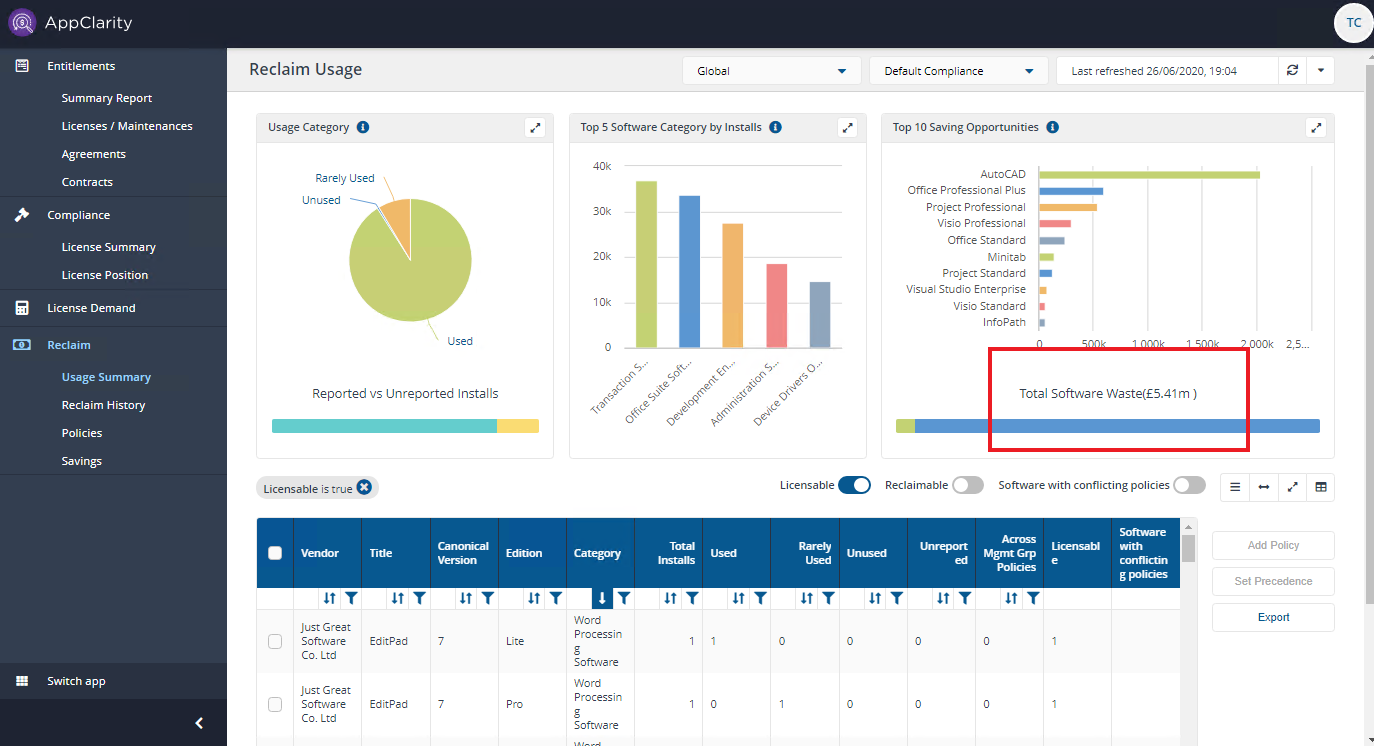
Reclaim | Usage Summary | n\a |
Policies | New Policy | |
Edit Policy | ||
Savings | n\a |
Setting the default currency
The default currency is set to USD by default, you can change this using an SQL script run against your SLA-Shared database. For example to change the default currency to GBP, you would run the following query:
Changing the default currency
USE [SLA-Shared]

UPDATE Setting

SET [Value] = 'GBP'

WHERE [Key] = 'DefaultCurrency'
You can view all the currencies available in AppClarity by running the query against SLA-Shared database:
Display available currencies
SELECT * FROM Currency
Running SELECT * FROM Currency returns these results:
CurrencyID | Name | DisplayName | Symbol |
|---|---|---|---|
1 | USD | NULL | $ |
2 | EUR | NULL | € |
3 | GDP | NULL | £ |
4 | JPY | NULL | ¥ |
5 | CAD | NULL | C$ |
6 | AUD | NULL | A$ |
7 | CNY | NULL | ¥ |
8 | CHF | NULL | Fr. |
9 | SGD | NULL | S$ |
10 | HKD | NULL | HK$ |
11 | ZAR | NULL | R$ |
Note
You can only set the default currency to a value which exists in the Currency table. If the default currency value does not exist in Currency table, then USD will be used as the default currency and all cost values will be displayed in USD.
However the currency symbol and currency may not be in USD and will be same as entered by you when setting default currency, when you set the default currency value, it should be in upper case.
Updating Currency Conversion Rates
To convert cost values from one currency to another currency, you should maintain a conversion table based on the latest conversion rate. Because all cost values are stored in USD, you will need to update the conversion rate from USD to DefaultCurrency and DefaultCurrency to USD. You can use the following SQL queries to do this.
For example, if you have set the default currency to GBP, you will need to set the conversion rate for converting USD -> GBP and GBP -> USD.
Converting USD to GBP
UPDATE cc

SET cc.Rate =  0.77175 -- Take the latest conversion rate

FROM CurrencyConversion cc

JOIN Currency fromCurrency ON cc.FromCurrencyID = fromCurrency.CurrencyID

JOIN Currency toCurrency ON cc.ToCurrencyID = toCurrency.CurrencyID

WHERE fromCurrency.Name = 'USD' and toCurrency.Name = 'GBP'
Converting GDP to USD
UPDATE cc

SET cc.Rate =  1.295756 -- Take the latest conversion rate

FROM CurrencyConversion cc

JOIN Currency fromCurrency ON cc.FromCurrencyID = fromCurrency.CurrencyID

JOIN Currency toCurrency ON cc.ToCurrencyID = toCurrency.CurrencyID

WHERE fromCurrency.Name = 'GBP' and toCurrency.Name = 'USD'
After updating then to view the changes reports on the following screens will require refreshing: Entitlements - Summary, Reclaim - Usage Summary, Reclaim - Policies and Reclaim - Savings