Managing migration rules
Introduction to migration rules
Migration rules are used to define what happens to previously installed applications during an OS deployment. These rules can include usage criteria, allowing you to choose to only install previously installed applications if they were being used, or perhaps replace a rarely used application with a less costly alternative.
A migration rule comprises the following elements.
Migration rule element | Description |
|---|---|
Rule type | Defines whether the rule will retain, upgrade or replace an application. An application will be removed during an OS wipe-and-load or device replacement if there is no rule defined. |
Source Application | Defines the application, identified by Vendor, Title, Version and Edition, that is to be migrated. |
Target Application | Defines the application, identified by Vendor, Title, Version and Edition, that will be installed in place of the source application. For retain rules, the Target Application is the same as the Source Application. For upgrade rules, the Target Application is a different version of the Source Application. |
Usage | Defines whether the source application will be migrated if it is used, rarely used, unused or any combination of these states. You can create multiple rules for the same Source Application with different usage settings. For example, you may want to retain an application if it is being used, but replace it with a cheaper alternative if it is not being used. |
Association | Defines the Configuration Manager Application or Package and Program that will install the Target Application. The association of a Configuration Manager Application or Package and Program with a Vendor, Title, Version and Edition can be made ahead of creating migration rules through Manage associations in Inventory, or while defining the rule. |
About Vendor, Title, Version and Edition
Application Migration identifies each application by Vendor, Title, Version and Edition as defined in the 1E Catalog. Some publishers use a 'colloquial version', such as 'Office 2019' or 'Acrobat Reader DC', to identify a broad major release, in addition to the full version that changes with each update. Where the 1E Catalog has a colloquial version defined for a given application, the Source Application and Target Application definitions in a migration rule will use the colloquial version. In some cases an application may have a mix of full versions and colloquial versions (typically when the adoption of colloquial versions came later in the product life cycle). Application Migration also includes the concept of a 'readable version', which is simply the full version truncated to the first two parts of the full version number (e.g. 16.0) to make managing rules easier.
When defining an Upgrade or Replace rules, the Source Application can be defined using a colloquial version (if available), readable version or full version. These rule types can also use a wild card (e.g. * or 16.*), which is useful for creating a single rule that will upgrade any version of an application to another version, or replace any version of an application with a different application.
If the selected Vendor, Title and Edition has already been associated with an Application or Package and Program in Configuration Manager, those associated versions will appear in bold at the top of the Version drop-down list when defining the target of any Migration rule or application in a Role-based Application set.
Understanding behavior of migration rules in different OS deployment scenarios
Migration rules will behave differently depending on the type of OS deployment being performed, If the existing OS is being reinstalled ('wipe-and-load'), or a new OS is being installed on a replacement device and you are using Application Migration to migrate applications from an old device, all migration rules will be applied. Any previously installed applications for which no migration rule has been defined will not be migrated (effectively these applications will be 'removed', although technically they are simply not reinstalled in the new OS. Replace rules will install the replacement (target) application in the new OS and the original (source) application will not be installed, so the application is effectively replaced in the new OS.
An In-place upgrade behaves differently, as the disk is not wiped during an in-place upgrade, so the previously installed applications remain installed after the upgrade. For this reason, any rules defined to retain an existing application are ignored by Application Migration during an in-place upgrade as the application will be retained anyway. Upgrade rules will be applied, and in most cases the installation of the later version will simply upgrade the previously installed application. However, in some cases, installing a later version of an application on a device that has an older version installed may result in both versions being installed 'side-by-side' - this all depends on how the vendor has implemented their installer.
Rules defined to replace an application will result in both the original (source) application and the replacement (target) application being installed during an in-place upgrade. This is because Application Migration does not actually remove the source applications when replacing an application. However, you can use Application Supersedence in Configuration Manager (refer to https://docs.microsoft.com/en-us/mem/configmgr/apps/deploy-use/revise-and-supersede-applications for details on how to configure Application Supersedence to have Configuration Manager uninstall the replaced (source) application when the replacement (target) application is installed.
Migration Rules and Management Groups
By default, migration rules are Global - they apply to all devices in your organization. In some cases you may want to define different migration rules for an application on different devices. For example, you may want to upgrade AutoCAD 2018 to AutoCAD 2019 everywhere except in the Seattle office, where they need to retain AutoCAD 2018 as they are working with a client on the older version. If you have Management Groups defined in the platform, you can create rules that apply globally or to a specific Management Group. Management Group migration rules take precedence over Global migration rules, so in our example, you would create a Global rule to upgrade AutoCAD to 2019 and a Management Group rule for the Seattle Management Group to retain the 2018 version. Devices in the Seattle Management Group will apply the Management Group rule, not the Global rule,
It is possible for a device to exist in multiple Management Groups, so it is also possible for conflicts to arise, where a device is in multiple Management Groups, each with different rules defined. If this occurs, the rule will be shown as a Conflict on the Installations page that must e resolved in order for any rule to apply during OS deployment. Refer to Viewing and resolving migration rule conflicts.
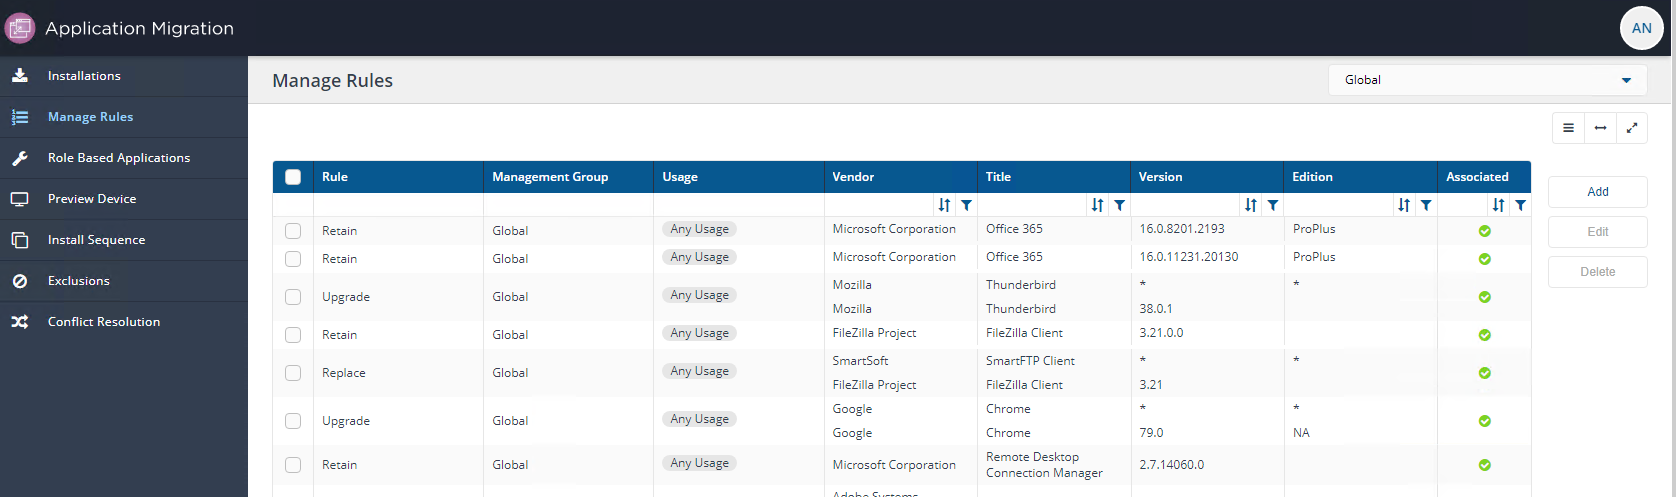
Adding Migration Rules
Migration rules can be added from the Installations page or the Manage Rules page.
Adding rules for installed applications
Typically, you will work from the Installations page to identify an installed application that you want to migrate, selecting it and clicking the Add Rule button. This will take you to the Add Rule page, but will pre-populate the Source Application Vendor, Title and Edition according to the application you selected in the Installations page. If you want to create a rule for a specific version of an application, from the Installations page click on the application title to view the installed versions and click the Add rule link in the Action column for the version you want to migrate. Again, this will take you to the Add Rule page, but with the Source Application Version pre-populated along with the Vendor, Title and Edition.
Note
You will not be able to add a rule for a specific version if that version and usage combination is already covered by another rule, for example a wild-card upgrade rule.
The following pages provide step-by-step instructions for adding different types of rules from the Installations page.
Upgrade - Adding a rule to upgrade an application
Replace - Adding a rule to replace an application.
Auto Install for Migration Rules
Application Migration uses the Install Application and Install Package steps in a Task Sequence to install migrated applications and packages. These Task Sequence steps are dependent on the relevant checkbox (auto install flag) being enabled for each application and package:
Allow this application to be installed from the Install Application task sequence action without being deployed.
Allow this program to be installed from the Install Package task sequence action without being deployed.
If a checkbox is not enabled, the software installation will fail for that application or package. An administrator can enable this checkbox for each application and package by using either of the following methods:
in Configuration Manager during or after creating each application and package.
using the Auto Install feature in Application Migration when creating application associations, rules or Role Based Application sets.
For information about manually enabling these checkboxes for Configuration Manager applications and packages. Refer to Using Application Migration in a Task Sequence: Auto Install for Configuration Manager Applications and Packages.
Note
Application Migration's Auto Install feature is able to read the checkbox (auto install flag) for applications and programs, but in order for Application Migration to enable them for you, you'll need to configure related providers in the Settings application of the platform. These should already be configured as a post-installation step. Refer to Post-install configuration.
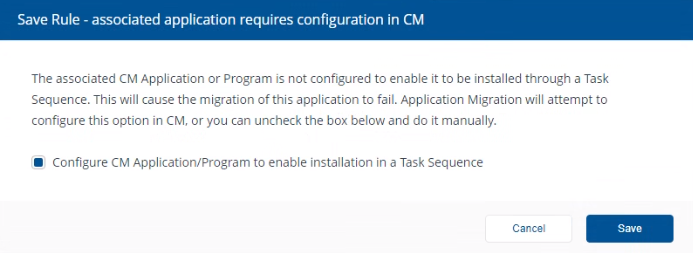
When you save the migration rule, and the Auto Install flag is not already enabled for the associated Application or Program, then you will see the popup shown opposite. You should enable Configure CM Application/Program to enable installation in a Task Sequence and click Save. The Auto Install status will then change from red to green. Status values are described in the table below.
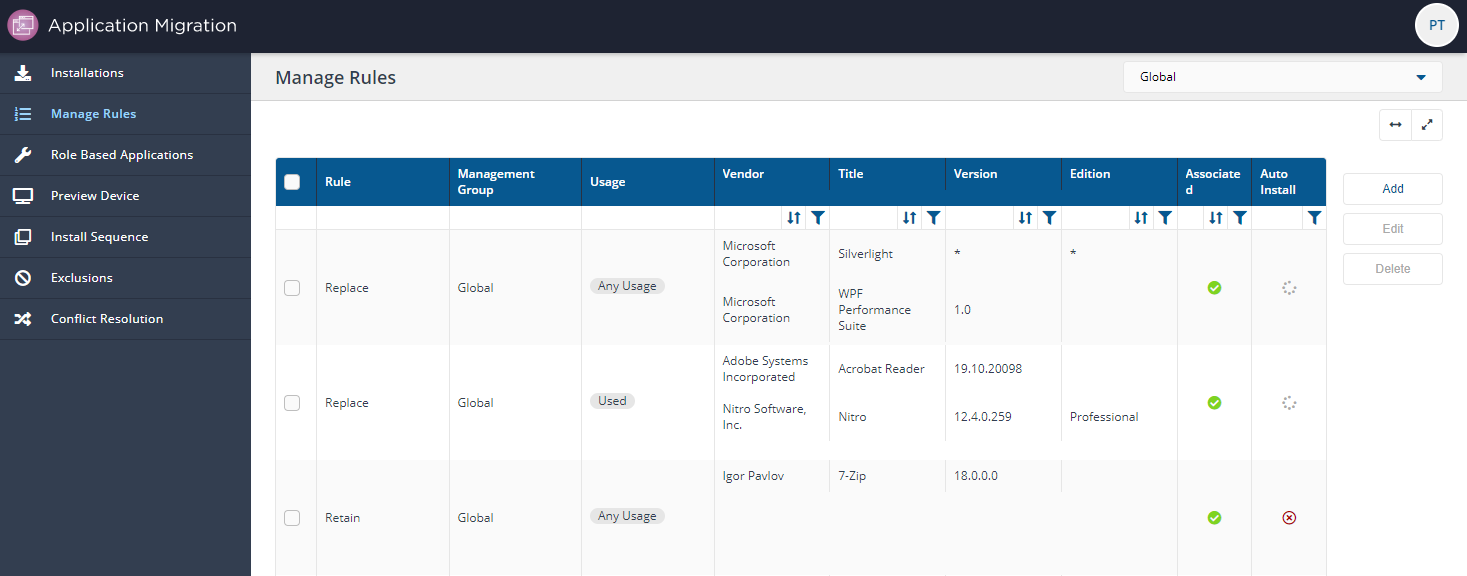
On the Manage Rules page, the Auto Install column displays a status for each migration rule. Our example shows two different types of status, In-Progress and Not Checked.
Auto Install status | Description |
|---|---|
Checked | Green tick. Auto install flag for Configuration Manager application or package program is set. |
Not Checked | Red cross. Auto install flag for Configuration Manager application or package program is not set. |
In-Progress | Spinning. Application Migration has triggered an operation which attempts to set the auto install flag of Configuration Manager application or package program. If the status permanently spins then it is likely that your administrator has not configured the providers in Settings. Once they have been configured, the setting will be applied and the icon will change from spinning to green. |
Failed | Red warning triangle. Application Migration triggered an operation which failed while trying to set the auto install flag of Configuration Manager application or package program. |
Not Applicable | A rule has broken association and the application migration report is not run. |
Note
If a rule has Auto Install unchecked, you will be prompted to edit that rule and set Auto Install to enabled. You can view this type of rule by filtering the Auto Install column by Not Checked.
You will also see a similar message on the following Application Migration pages and a prompt to take action if the Auto Install is unchecked:
Installation
Preview Device→Existing Device
Preview Device→New Device.
Adding rules for applications that are not reported as installed
The Installations page can be used to add migration rules for applications that are already installed in your estate. If you want to add a migration rule for an application that is not yet reported as installed on any devices in your estate, you will need to use the Manage Rules page.
From the Application Migration navigation menu on the left, select Manage Rules.
In the Manage Rules page, click Add (top right).
In the New Migration page screen, choose the rule type (Upgrade application, Replace application or Retain application as is) for the new rule.
If you choose to upgrade the application:
In Source Application , choose the Vendor, Title, Version and Edition.
Choose a Usage category (Any Usage, Used, Rarely Used, Unused or Unreported) the application must meet in order to be upgraded during the migration. If the application does not meet the criteria, it will not be installed.
In Target Application, choose the Version and Edition to upgrade to.
If you choose to replace the application:
In Source Application , choose the Vendor, Title, Version and Edition.
Choose a Usage category (Any Usage, Used, Rarely Used, Unused or Unreported) the application must meet in order to be upgraded during the migration. If the application does not meet the criteria, it will not be installed.
In Target Application, choose the Vendor, Title, Version and Edition in this order and choose the attributes for the replacement product.
If you choose to retain the application as is:
In Source Application , choose the Vendor, Title, Version and Edition.
Choose a Usage category (Any Usage, Used, Rarely Used, Unused or Unreported) the application must meet in order for it to be retained during the migration. If it does not meet the usage criteria, it will not be installed.
Associate the target with a Configuration Manager package or application.
Click Save and close.
Modifying an existing rule
Migration rules are modified from the Manage Rules page. For convenience, you can access the Manage Rules page from the Installations page by selecting an application then clicking the Manage Rules button. This will take you to the Manage Rules page, filtered to show the rule(s) for the selected application, Alternatively you can go to the Manage Rules page to view all migration rules and manually select the rule you want to modify, In either case, from the Manager Rules page select the rule and click the Edit button.
In this example, we are going to modify the existing retain Acrobat Reader migration rule by:
Changing its behavior from retain to replace.
Replacing all instances of Acrobat Reader with Nitro Reader.
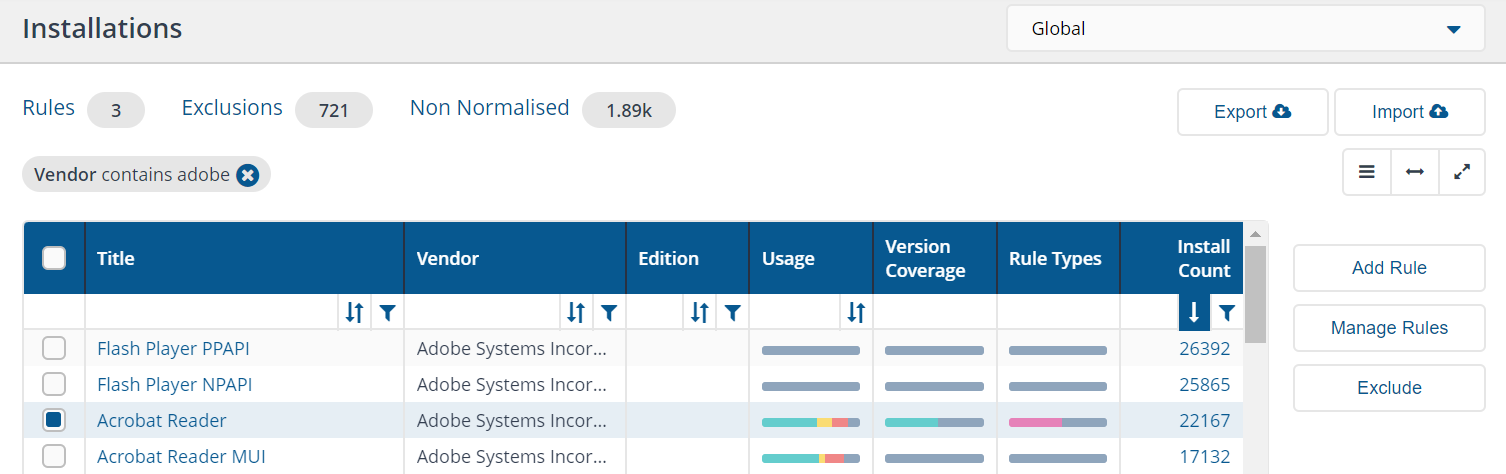
To modify the existing retain rule for Acrobat Reader:
On the Installations page, on the Vendor column click the filter icon

and narrow the results down with the criteria: Vendor contains Adobe.
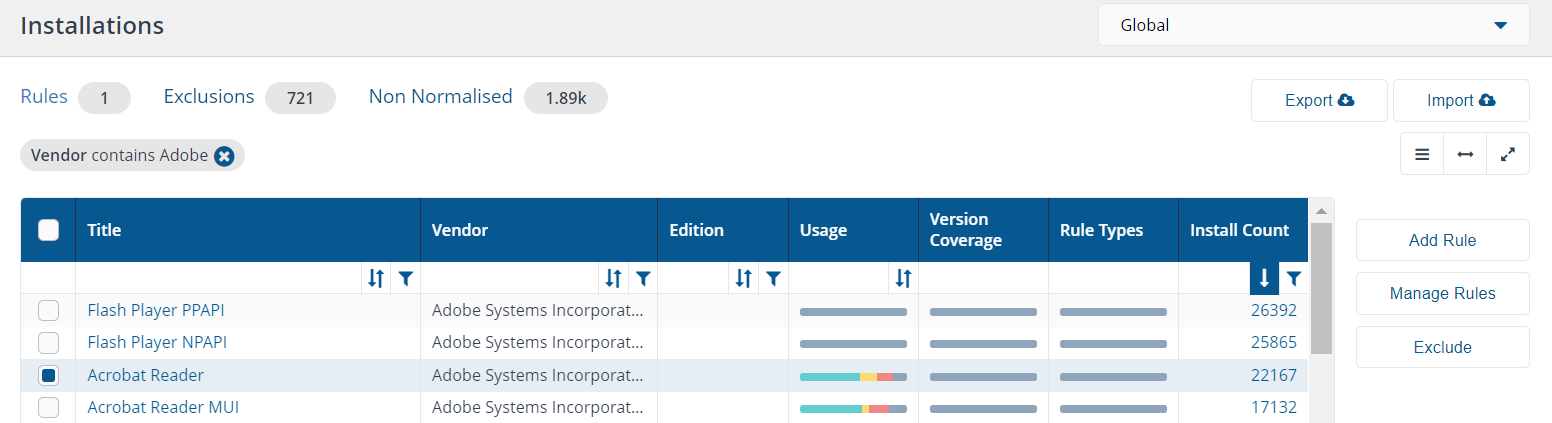
In the table, locate and select Acrobat Reader, then click the Manage rules button.
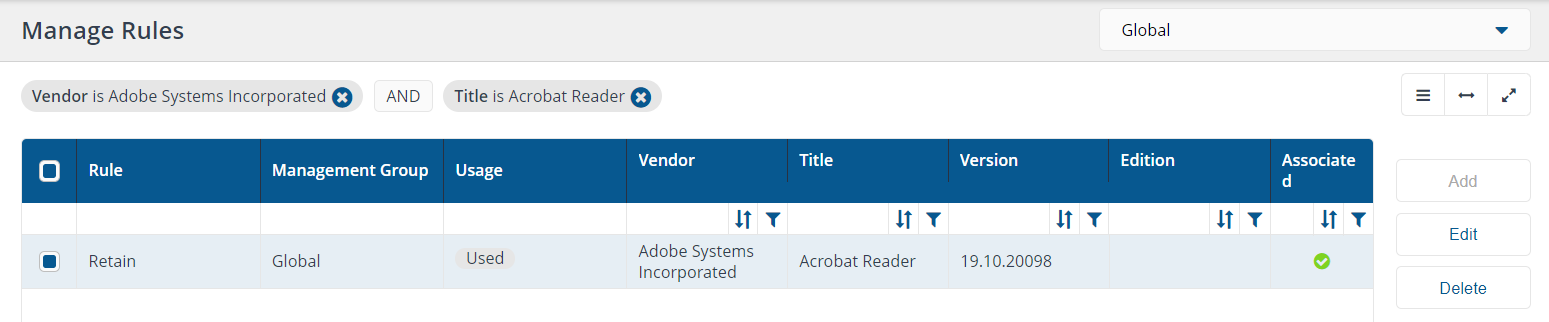
On the Manage Rules screen, select the rule and click Edit.
In the Edit Migration Rule screen, the original rule configuration is displayed.
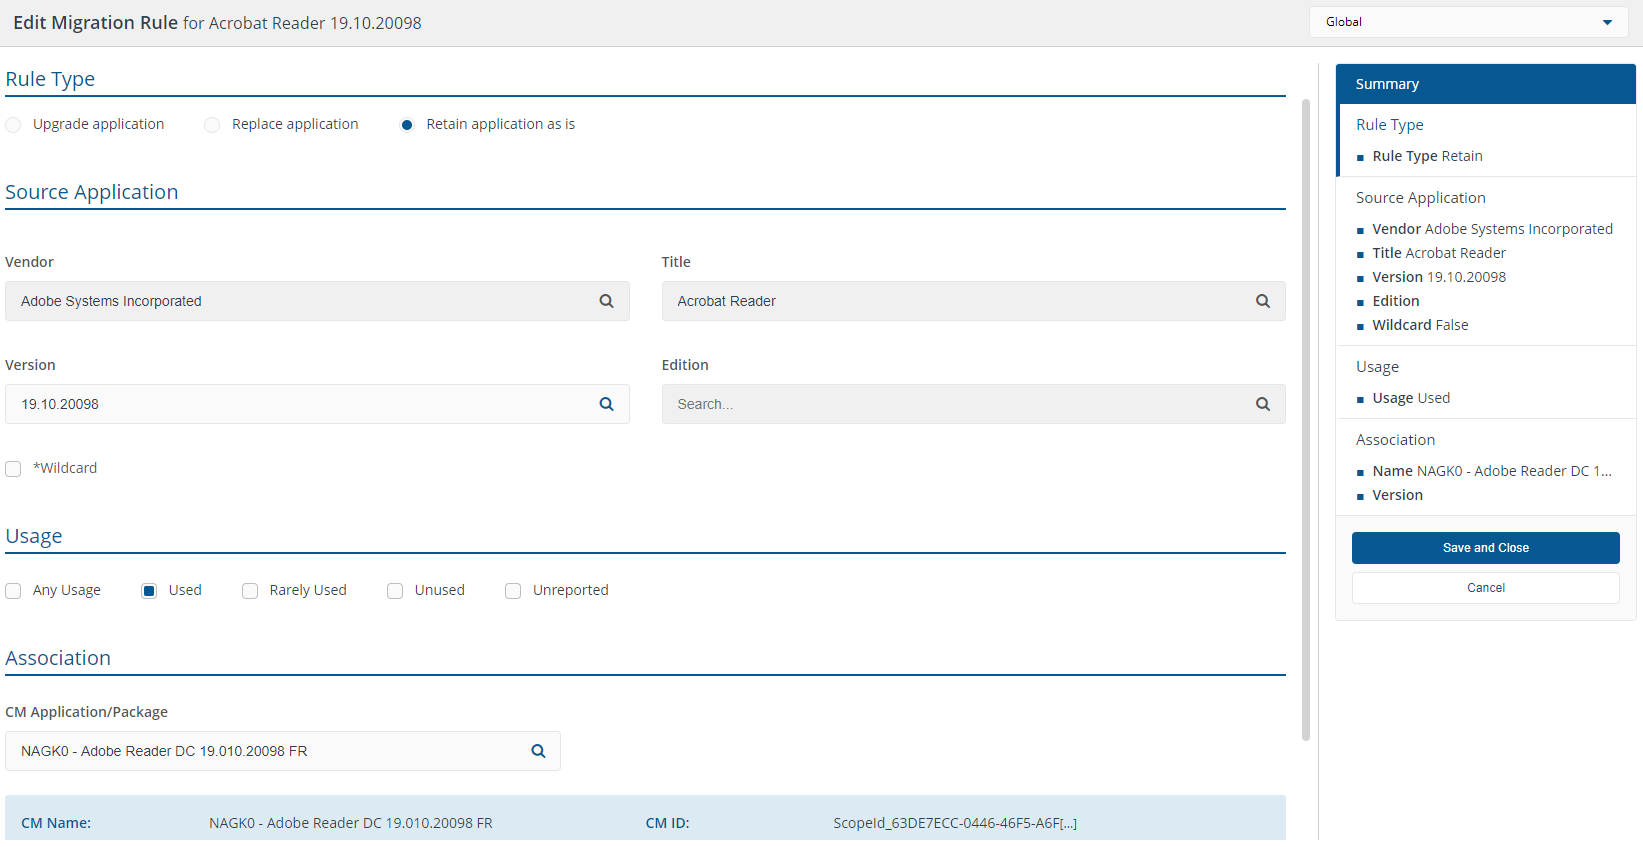
Click Replace application to change its behavior and under this, choose the attributes for the replacement application by clicking:
Vendor and from the list, select Nitro Software, Inc.
Title and from the list, choose Nitro.
Version and from the list choose 12.4.0.259.
Associate the target with an existing Configuration Manager Application/Package.
Click Save and close.
On the Application Migration page, the migration rule for Adobe Acrobat is updated from Retain to Replace.
Deleting an existing rule
Migration Rules are deleted from the Manage Rules page. For convenience, you can access the Manage Rules page from the Installations page by selecting an application then clicking the Manage Rules button. This will take you to the Manage Rules page, filtered to show the rule(s) for the selected application, Alternatively you can go to the Manage Rules page to view all migration rules and manually select the rule you want to delete, In either case, from the Manager Rules page select the rule and click the Delete button.
In our example, we are going to delete an existing rule for Acrobat Reader.
To delete an existing rule for Acrobat Reader:
On the Installations page, on the Vendor column click the filter icon
and narrow the results down with the criteria: Vendor contains Adobe.
In the table, locate and select Acrobat Reader then click the Manage rules button.
On the Manage Rules screen, select the rule to be deleted and click Delete.
You will be prompted to confirm your actions.
Click Delete to remove the rule.
Exporting and importing migration rules
You can export your installed applications to an Excel format file that can be worked on offline, with template columns that let you define new migration rules. Once you've finished defining the rules you can then import them back into Application Migration.
Refer to Working offline on migration rules for more information.
Adding a rule to retain an application
A retain migration rule reinstalls exactly the same version of the application during the migration.
In this tutorial, we'll create a rule that retains 7-Zip 18.
To do this:
On the Installations page in the Title column click the filter icon
and narrow the results down with the criteria: Title contains 7-Zip.

Click the title to expand the list of installed versions. Click the Add rule link in the Action column in the row of the version you want to retain.
Note
As Retain rules typically apply to a specific version, adding the rule from the specific version in the UI in this manner will pre-populate the version in the migration rule.
On the New Migration Rule page, choose Retain application as is for the behavior of the rule.
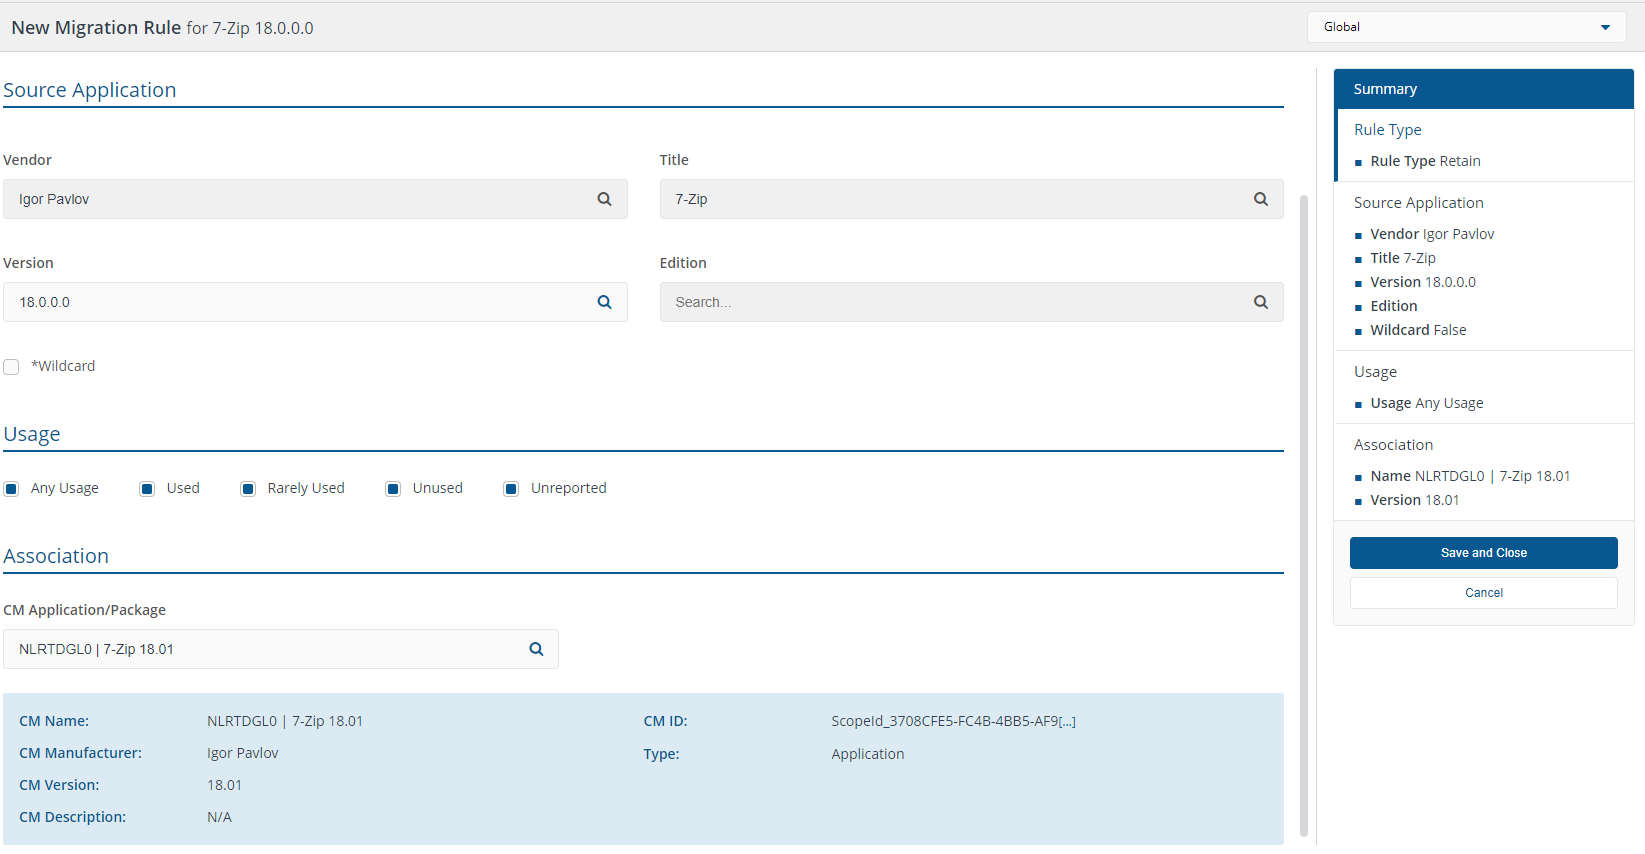
As we want to retain all instances of 7-Zip regardless of usage, in Usage check Any Usage.
Because this version of 7-Zip is not already associated with a Configuration Manager package or application, you must add the association. In the Association section, choose the 7-Zip 18.0.0.0 CM Application/Package from the search field.
Click Save and Close.
On the Manage Rules page In Title, search for 7-Zip to view a summary of the rule you just created.
Adding a rule to replace an application
A replace migration rule replaces an application with an alternative. This is useful for standardizing on common tools such as file compression applications.
In this tutorial, we are going to create a rule that replaces any version of WinZip with 7-Zip (specifically 16.14).
To do this:
On the Installations page, on the Vendor column click the filter icon
and narrow the results down with the criteria: Vendor contains WinZip.

Check the checkbox in the left-hand column for WinZip and click Add rule.
On the New Migration Rule page, choose Replace application for the behavior of the rule.
In Source Application, the attributes for WinZip are already populated and the wildcard box is automatically checked.
As we want to replace all instances of WinZip, in Usage check Any Usage.
In Target Application click field (in bold) and then choose the following values:
Vendor - Igor Pavlov.
Title - 7-Zip.
Version - 16.14.
As this 7-ZIP is not already associated with a Configuration Manager package or application, you must make the association for it to be installed.
In the Association section, choose the 7-Zip 16.14 CM Application/Package from the search field.
Click Save and Close.
On the Manage Rules page In Title, search for 7-Zip to view a summary of the rule you just created.
Adding a rule to upgrade an application
An upgrade migration rule upgrades an existing application to a newer version.
Adding upgrade rules
To do this:
On the Installations page, on the Vendor column click the filter icon
and narrow the results down with the criteria contains Adobe.
Click the checkbox in the left-hand column for Acrobat Reader and click Add rule.
On the New Migration Rule page, choose Upgrade application for the behavior of the rule.
In Source Application, the attributes for Acrobat Reader are already populated and the wildcard box is automatically checked.
As we want to upgrade all instances of Adobe Acrobat 9 to Adobe Acrobat DC, in Usage check Any Usage.
In Target Application click Version and choose the following value DC.
As this version of Adobe Acrobat DC Reader is not already associated with a Configuration Manager package or application, you must make the association for it to be installed.
In Association, CM Application/Packagefrom the list of applications, choose Adobe Acrobat Reader DC.
Click Save and Close.
On the Manage Rules page In Title, search for Adobe Acrobat Reader DC to view a summary of the rule you just created.
What happens in upgrade scenarios where the currently installed version of the application is later than the target application?
In upgrade rules where the source version is specified as a wild card, it is possible that versions of the source application in the upgrade rule, that are already installed on the client devices, actually have a later version than the target specified in the upgrade rule.
In versions prior to Application Migration 3.1, the upgrade rule would try to replace the source application already installed on the client device with an earlier target application version, which would result in one of the following possibilities:
the application would be downgraded
the application would remain at the later version and the Application Migration rule would fail
the application in the upgrade rule would be installed in parallel with the existing later version.
To remedy these unpredictable and unwanted results, in Application Migration 3.1, if an upgrade rule tries to downgrade an application then it will be ignored.
Viewing and resolving migration rule conflicts
Conflicts arising from having more than one migration rule for a computer belonging to more than one management group can be easily resolved before the migration takes place.
It's likely that you'll encounter conflicts where two or more migration rules exist for a computer that belongs to more than one Management group, refer to Management Groups page. Under these circumstances, the migration will fail to take place unless you resolve the conflict.
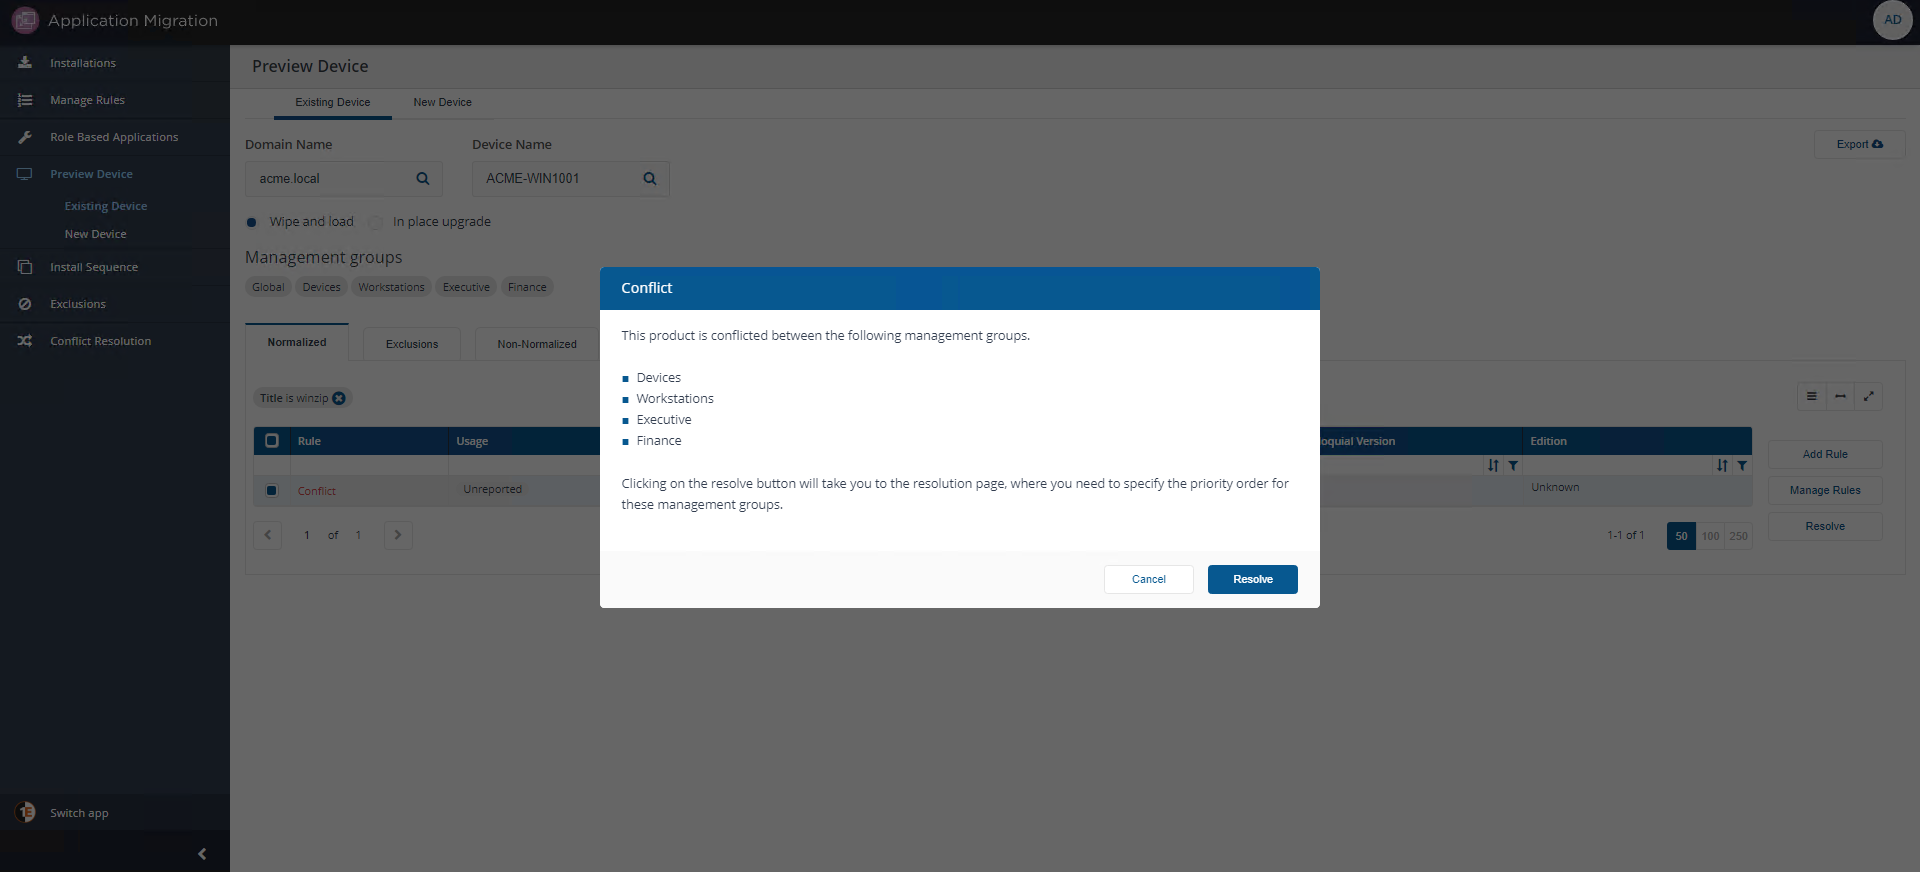
Conflicts are highlighted in red on the Installations screen. In our example, there's a conflict for WinZip.
Viewing a migration rule conflict
To view the migration rule conflict:
Click on the link in the Title column to show the drawer view for the software.
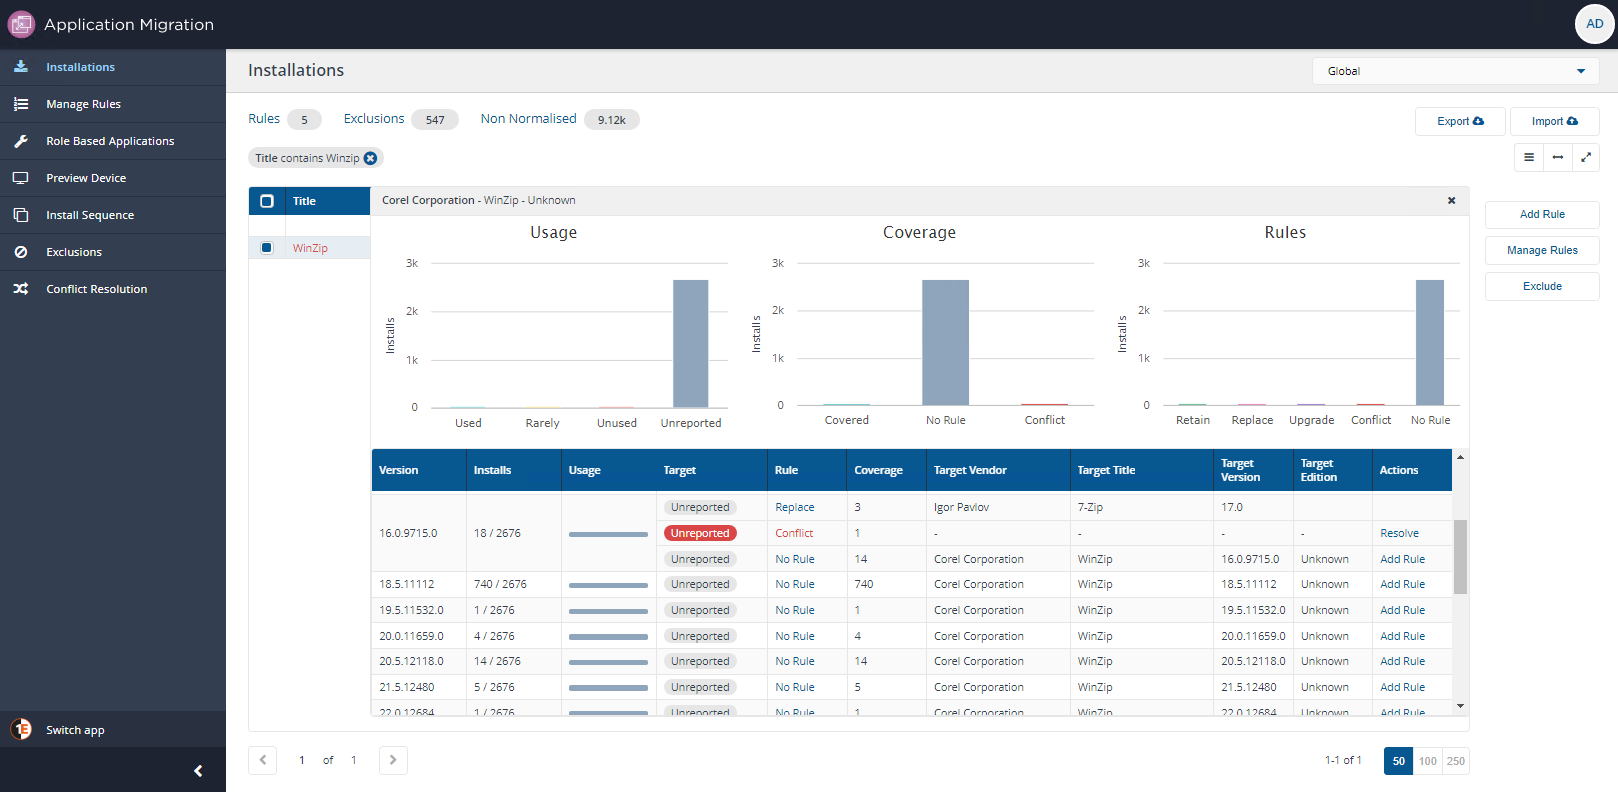
Click on Resolve in the Actions column to display a Conflict popup screen showing the Management Groups the computer is a member of that are causing the conflict. In our example these groups are:

Clicking on Resolve takes you to the Conflict Resolution page, where you can specify the priority order for these Management groups and resolve a migration rule conflict. The next section Resolving a migration rule conflict explains how you can do this.
Resolving a migration rule conflict
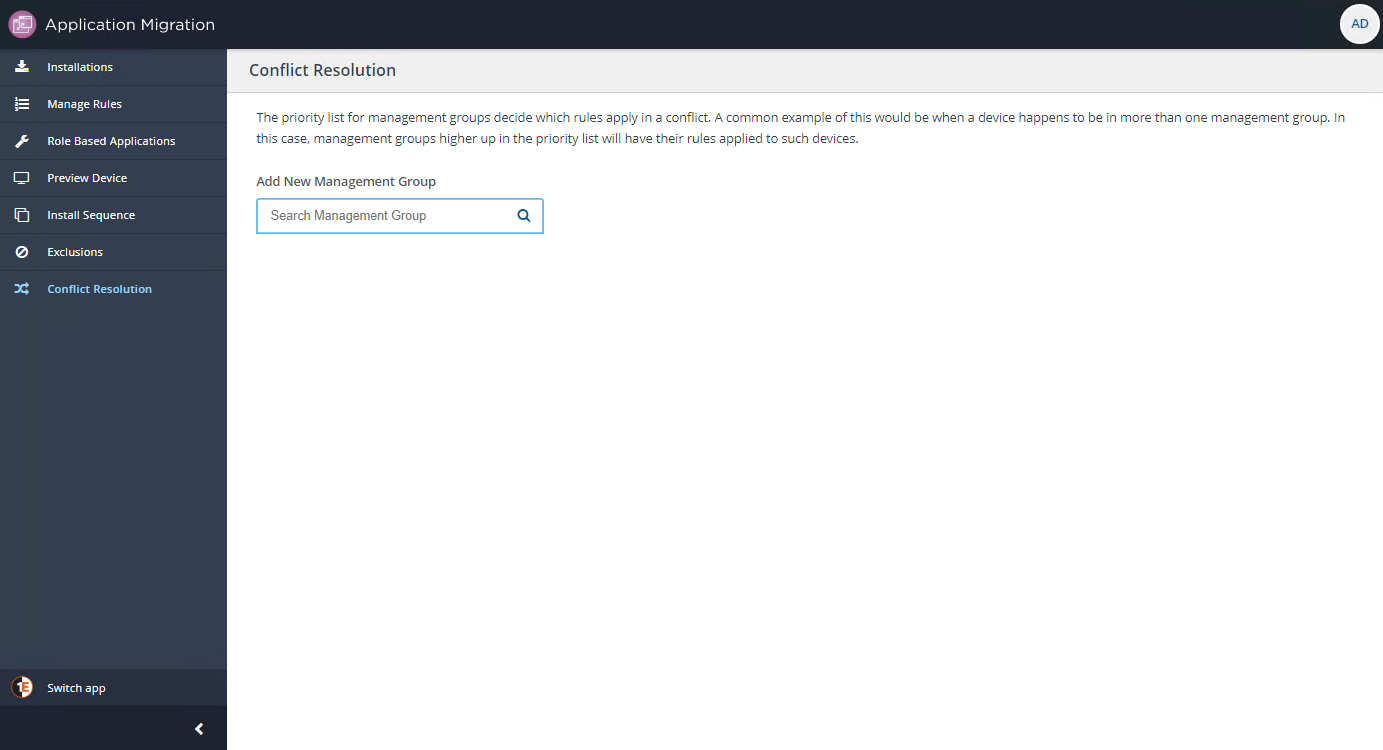
Clicking on Resolve in a Conflict popup takes you to the Conflict Resolution page where you can add and prioritize Management groups to avoid migration rule conflicts.
The priority list for management groups decide which rules apply in a conflict. A common example of this would be when a device happens to be in more than one management group. In this case, management groups higher up in the priority list will have their rules applied first to such devices. To do this:
Use the Add New Management Group to search for and add the Management groups you want to prioritize, in our example these groups are:
Devices
Workstations
Executive
Finance.
In the Priority List, arrange the Management groups using drag and drop based on your order of precedence.
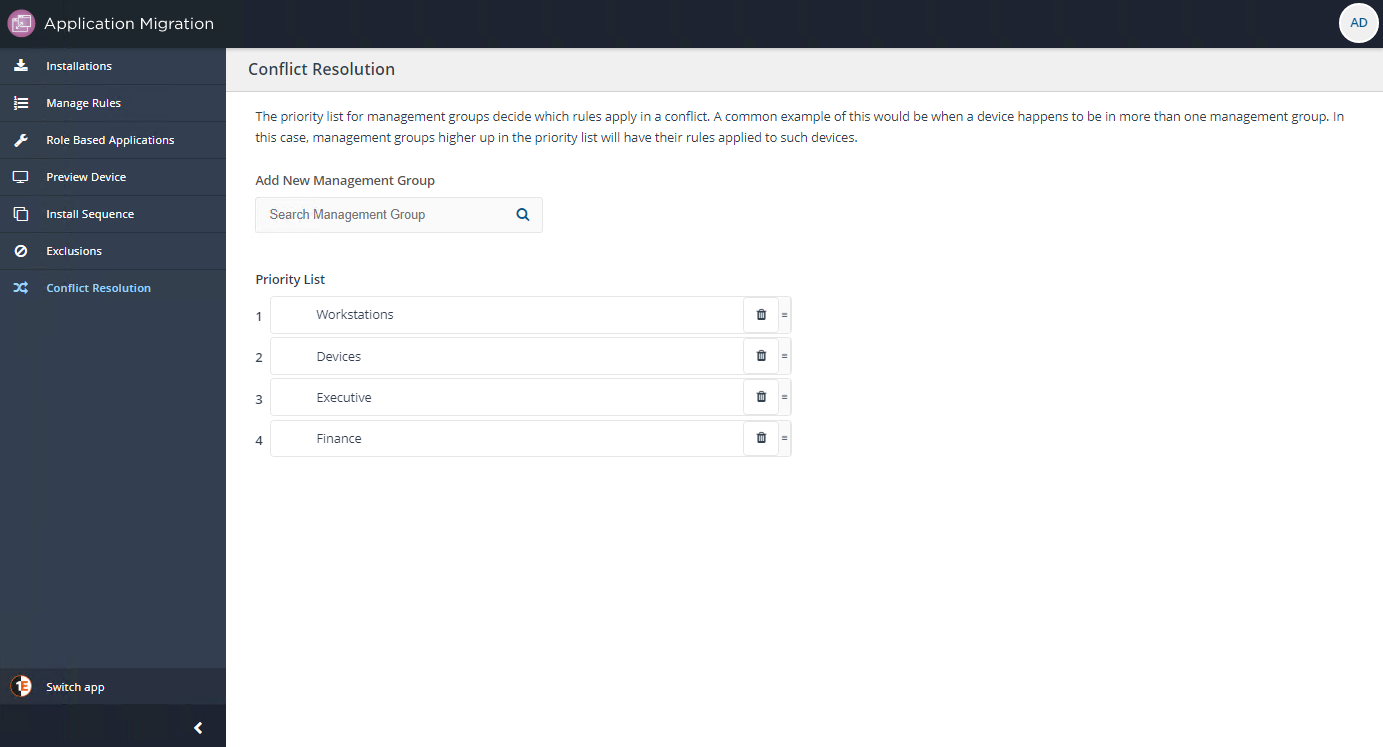
Check the Installations screen to confirm the conflict is now resolved. In our example, by setting an order of priority for our Management groups, WinZip now shows without the conflict warning.

By following this process Application Migration decides which of your Vendor, Title, Version, Edition (VTVE) rules should take priority if there's a migration rules conflict.
Using Preview Device to resolve conflicts
In addition to viewing and resolving Migration Rule conflicts from the Installation screen, you can also view and resolve conflicts from the Preview Device screen by searching for individual computers.
Click on Preview Device and then Existing Device screen.
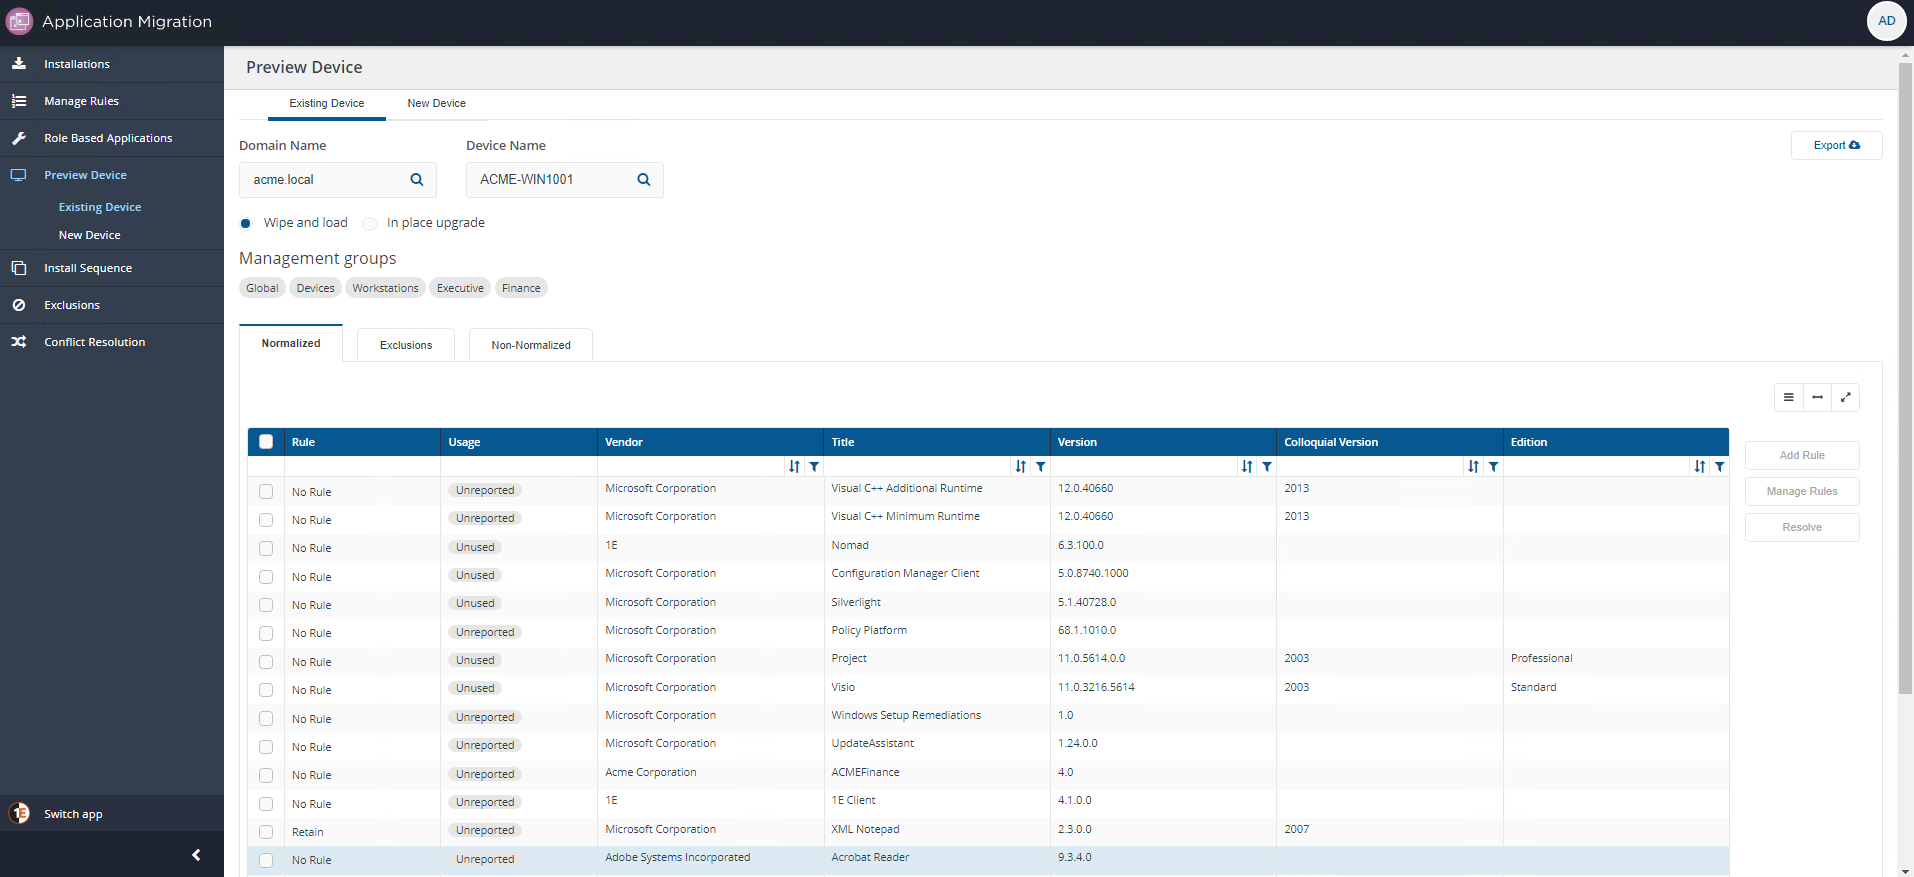
In the Domain Name field start typing the name of the Domain where the computer is located, in our example this is ACME.LOCAL.
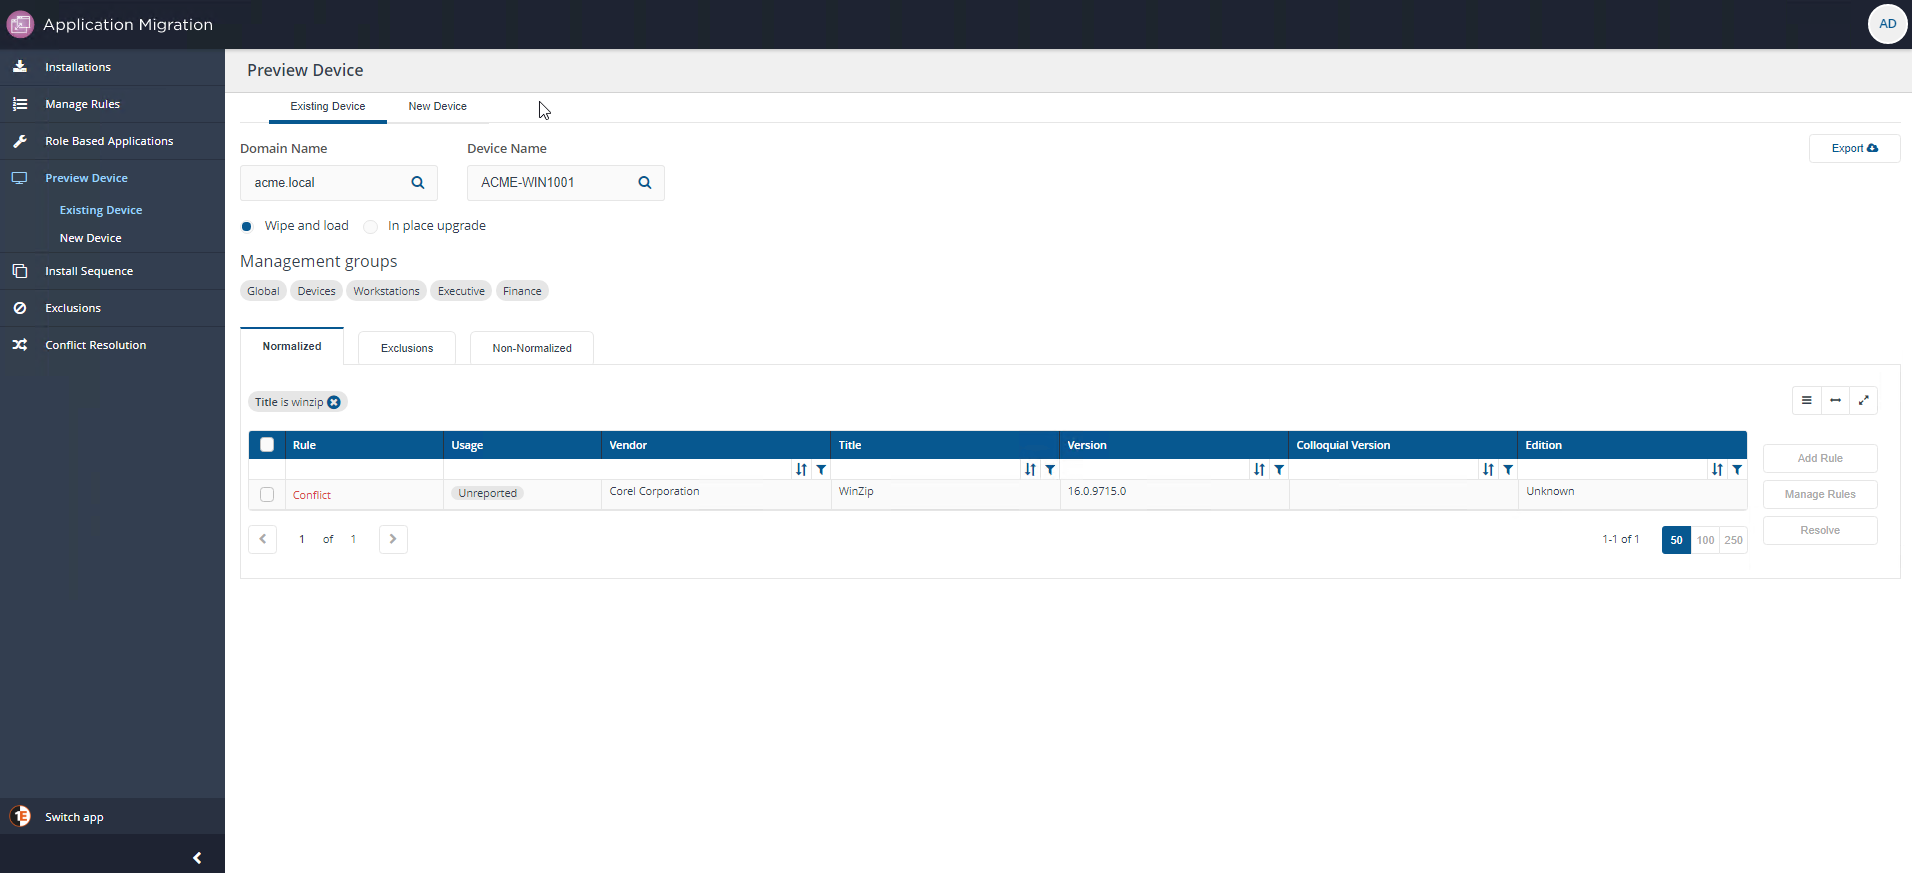
In the Device Name filed start typing the name of the computer you want to check, in our example we selected ACME-WIN1001.
All the Management groups this computer is a member of are displayed, as are the rules that apply to software installed on that computer. In this example we know there's a conflict related to WinZip, so we have filtered the view to just show this Title.
To resolve the conflict, select the title and click Resolve.
Clicking Resolve takes you to the Conflict Resolution page where you can add and prioritize Management groups to avoid migration rule conflicts as described in Resolving a Migration Rule Conflict.
Working offline on migration rules
You can export your installed applications to an Excel format file that can be worked on offline, with template columns that let you define new migration rules. Once you've finished defining the rules you can then import them back into Application Migration.
Exporting your installed applications
To simplify the process for creating new application migration rules, use the export feature – it creates a spreadsheet that has all your installed applications to enable you to create new rules to associate with them without having to be online. Existing rules cannot be modified with this process.
When you have added new rules to the spreadsheet, simply import it back to Application Migration and have your new migration rules implemented.
To get an export of your installed applications:
Under the Applications Migration menu, click Installations.

On the Installations page, click Export on the top right of the page.
A prompt is displayed while the export takes place. The default download location is the local computer downloads folder.

When the export is complete, you can retrieve the file (
Application Migration.xlsm) from the Downloads folder.
What you get with the export
Note
The export includes all inventoried applications from the current view, but will not include any existing rules. To use this feature effectively, filter the display page to include vendors or applications for which you have not already defined rules for, then export it so you can define rules for these installations.
The properties of the exported Application Migration spreadsheet are:
Column | Optionality | Default value | Notes |
|---|---|---|---|
RuleType | Mandatory | Pick-list to identify the type of migration rule. You must have a value for this column or it results in an error when we pre-flight the input during the import. Values are:
| |
CurrentVendor | Pre-populated | Vendor of the product to be migrated. Pick-list of vendors from the 1E Catalog. | |
CurrentTitle | Pre-populated | Title of the product to be migrated. Pick-list of titles available from that vendor. | |
CurrentVersion | Pre-polulated | Version of the product to be migrated. An asterisk (*) denotes all versions – dot (.) format or colloquial versions. | |
CurrentEdition | Pre-populated | Edition of the product to be migrated. | |
ManagementGroup | Mandatory | Global | The Management group the product is associated with. You must have a value for the column or it results in an error when we pre-flight the input during the import. |
Usage | Mandatory | Any Usage | Usage category for the product to be migrated. You must have a value for this column or it results in an error when we pre-flight the input during the import. Values are:
|
TargetVendor | Vendor of the product for the migration rule. Pick-list of vendors from the 1E Catalog. | ||
TargetTitle | Title of the product for the migration rule. Pick-list of titles available from the TargetVendor. | ||
TargetVersion | Version of the product for the migration rule. Can be in a dot format or colloquial versions. | ||
TargetEdition | Edition of the product for the migration rule. | ||
ApplicationType | Mandatory | Configuration Manager package/application associated with the target product. You must have a value for this column or it results in an error when we pre-flight the input during the import. Values are:
| |
Application/PackageName | Application name of the Configuration Manager package/application associated with the target application. | ||
Application/PackageId | Application ID of the Configuration Manager package/application associated with the target application. Displayed as:
| ||
ProgramName | Program name of the Configuration Manager package associated with the target application. Relevant only if ApplicationType = Package | ||
ImportResult | Post-import, for each row, it will display Added, Failed or Skipped. | ||
ImportLog | Post-import, for each row, it will display the reason why the record could not be processed if ImportResult was Failed or Skipped. |
Importing your application rules file
When you have created the new rules for your applications, import the file so that Application Migration can implement your new rules. Ensure you have met the mandatory requirements (refer to the What you get with the export table on this page) before you import your file to avoid non-critical errors being reported.
To import the file:
Under the Application Migration menu, click Installations.
On the Installations screen, click Import.
On the Upload migration rules screen, click Choose file.
Locate your updated import file and click Open.
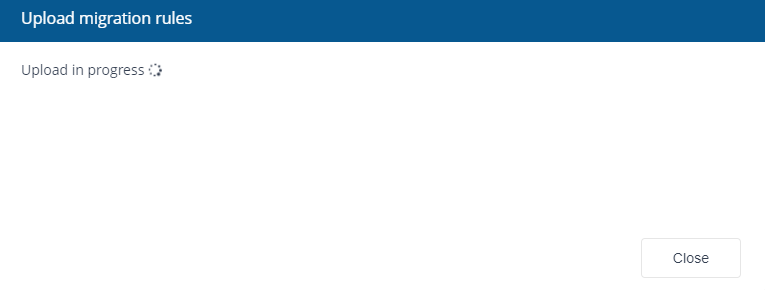
You'll see a prompt as the upload takes place.
When the upload completes, the results are displayed and an import file is automatically downloaded to the Downloads folder on your local computer. Refer to the table below for the In-flight validation used.
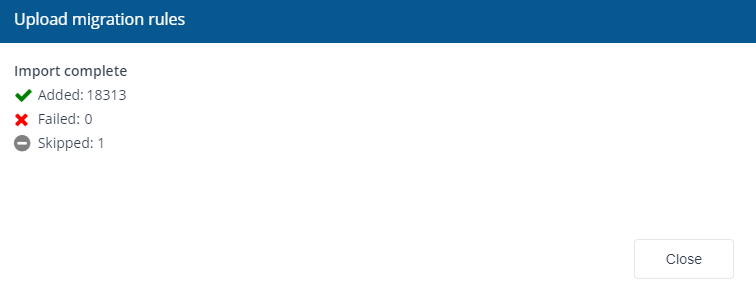
Click Close and locate the file to address any reported issues.
In-flight validation
When you import your migration rules, we run an in-flight validation on your spreadsheet and only create the migration rules when they pass our tests.
Validation on | Checks | Import result | Error message | Remedial action |
|---|---|---|---|---|
Rule types | RuleType is mandatory and must must be one of:
| Failed | Rule type must be valid. | Provide a valid rule type. |
If the rule type is Retain, SourceVersion and SourceEditions cannot contain wildcard characters. | Failed | Rules of Retain type cannot have wildcard rules. | Do not use wildcard characters in source version or source edition. | |
Two duplicate rules must not be present in import file. | Skipped | Another rule for this application, usage and management group already exists in the import file. | Delete one of the rules. | |
Rules must be unique for source product, usage and management group. Creating a duplicate rule will throw an error. | Skipped | Another rule for this application, usage and management group already exists in the database. | Delete the rule from the import file as it already exists. If you want to update the rule, please visit the website. | |
Rules cannot override an existing Configuration Manager association for a target product. | Failed | The target product in this row is already associated with another CM Application/Package. CM associations cannot be overridden through the import file feature. Please overwrite the CM association through the product user interface." | Assign the same association to the target product as it exists in the database. If you want to update the SCCM association, please visit the website. | |
Vendor | SourceVendor must not be empty. | Failed | Source Vendor must not be empty. | Provide a valid source vendor. |
Title | SourceTitle must not be empty. It is required for a replace rule. | Failed | Source Title must not be empty. | Provide a valid source title. |
Version | SourceVersion must not be empty. It must have the minimum value of a.b and must be in one of these formats: a.b, a.b., a.b.c.d, a.*, a.b.*,a.b.c.*, * You cannot use the wildcard character as part of a version, for example a.*.b, a.b.*.c, *.a | Failed | Source Version must not be empty. | Provide a valid source version. |
If the rule type is Retain, SourceVersion and cannotcontain wildcard characters. | Failed | Rules of Retain type cannot have wildcard rules. | Do not use wildcard characters in source version. | |
TargetVersion must not be empty. It must have the minimum value of a.b and must be in one of these formats:a.b, a.b., a.b.c.d. | Failed | Target Vendor, Title or Version is missing. | Provide a valid target version. | |
Edition | If the rule type is Retain, SourceEditions cannotcontain wildcard characters. | Rules of Retain type cannot have wildcard rules. | Do not use wildcard characters in source edition. | |
Combination of Vendor, Title, Version and Edition | The combination of SourceVendor, SourceTitle,SourceVersion and SourceTitle must have an equivalent item in the 1E Catalog. | Failed | Source Vendor, Title, Version and Edition has not matching entry in the 1E Catalog. | Select a valid source product. |
Combination of Vendor, Title, Version | The combination of TargetVendor, TargetTitle and TargetVersion must not be empty and must have an equivalent item in the 1E Catalog. | Failed | Target Vendor, Title, Version, Edition has no matching entry in the 1E Catalog. | Select a valid target product. |
TargetVendor, Target Title and Target Version must not be empty as these values are required for a Replace rule type. | Failed | Target Vendor, Title or Version is missing. | Provide valid target vendor, target title and target vendor for the Replace rule type. | |
TargetVersion must not be empty as it is required for an Upgrade rule type. | Failed | Target Vendor, Title or Version is missing. | Provide a valid target version for the Upgrade rule type. | |
Management group | Management group must not be empty. By default, the Global management group is always present. | Failed | Management group name is not valid. | Select a valid Management group. |
Usage | Usage is mandatory and must be one of:
| Failed | Selected usage is not valid. | Select a valid usage. |
Application types | ApplicationType must not be empty and must be one of:
| Failed | ApplicationType is not valid. | Enter a valid application type. |
The Package or Application must already exist in Configuration Manager. | Failed | Associated CM Package or Application is invalid. | Enter a valid Configuration Manager Package or Application. |
Managing Configuration Manager association alerts
Application Migration users will see alerts on specific pages that identify orphaned applications - when one or more rules or applications in an application set reference Configuration Manager objects that no longer exist, or where the Configuration Manager association has been deleted.
What are associations?
Applications and Packages in Configuration Manager are identified by a name and optionally publisher and version arbitrarily determined by the Configuration Manager administrator that created them. The platform uses a standard format of Vendor, Title, Version and Edition to identify applications.
The Manage Associations section of Inventory enables an administrator to effectively normalize the Applications and Packages imported from Configuration Manager by associating them with a Vendor, Title, Version and Edition defined in the 1E Catalog. These associations are then used to define migration rules in Application Migration, refer to Managing migration rules and reclaim rules in AppClarity.
What happens if an association is broken?
You will be notified when some rules are associated with Configuration Manager packages or applications that no longer exist on the following pages:
Manage Rules.
Installations.
Role Based Applications.
To manage associations, the Inventory repository used by your application must be populated by a System Center Configuration Manager connector that collects details of Applications and Packages defined in Configuration Manager.
There are two reasons why an association could be broken:
Someone has explicitly changed or deleted the association on the Manage associations page.
Someone has explicitly changed or deleted the source package or application the association depended on from Configuration Manager. In this case, the impact will only be seen after the System Center Configuration Manager connector sync has run.
Notifications will appear after the Application Migration Consolidation action has run.
For how associations and connectors work, refer to Manage associations and System Center Configuration Manager connector.
For managing rules in Application Migration, refer to Managing migration rules.
Managing association alerts
Manage Rules page
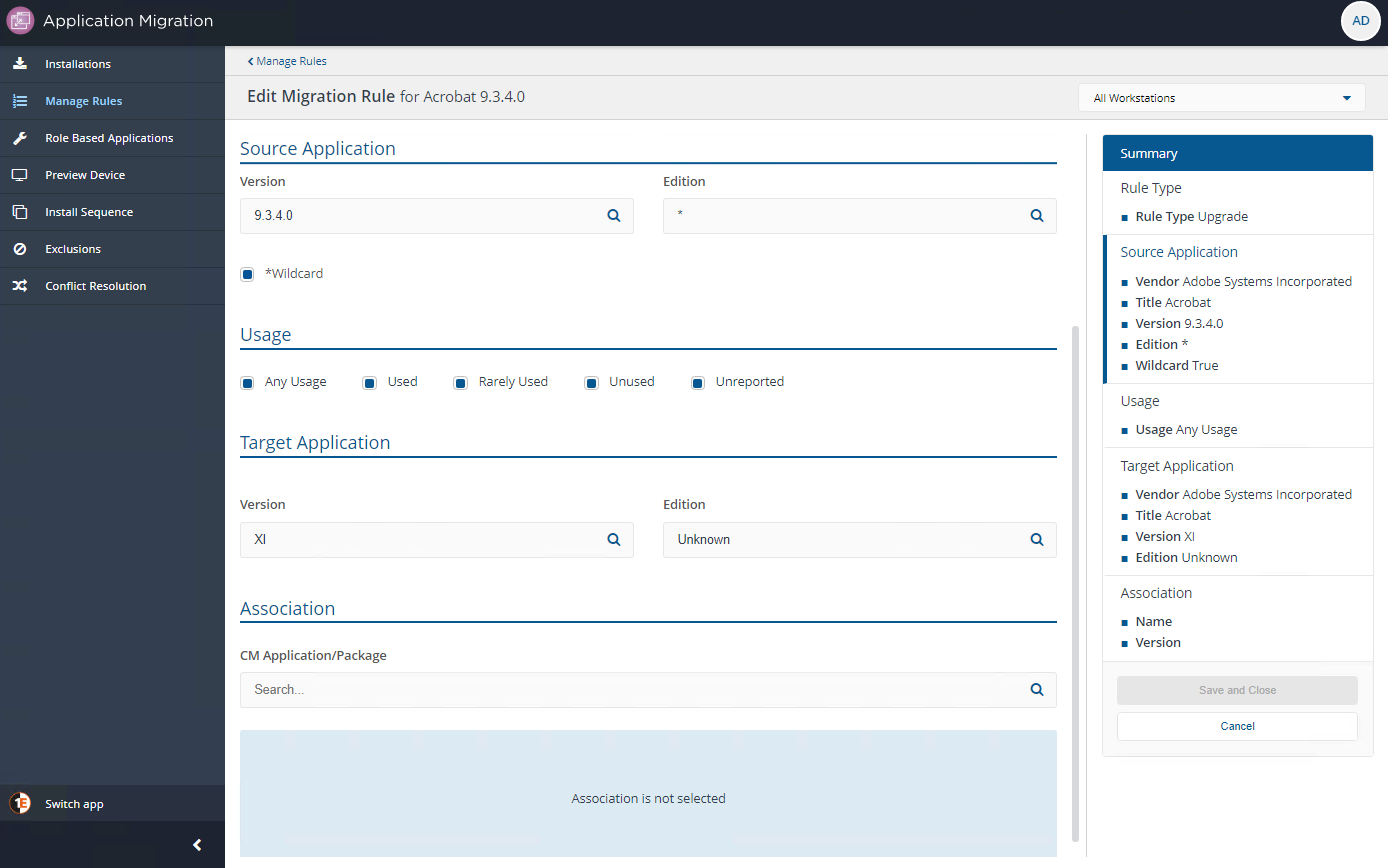
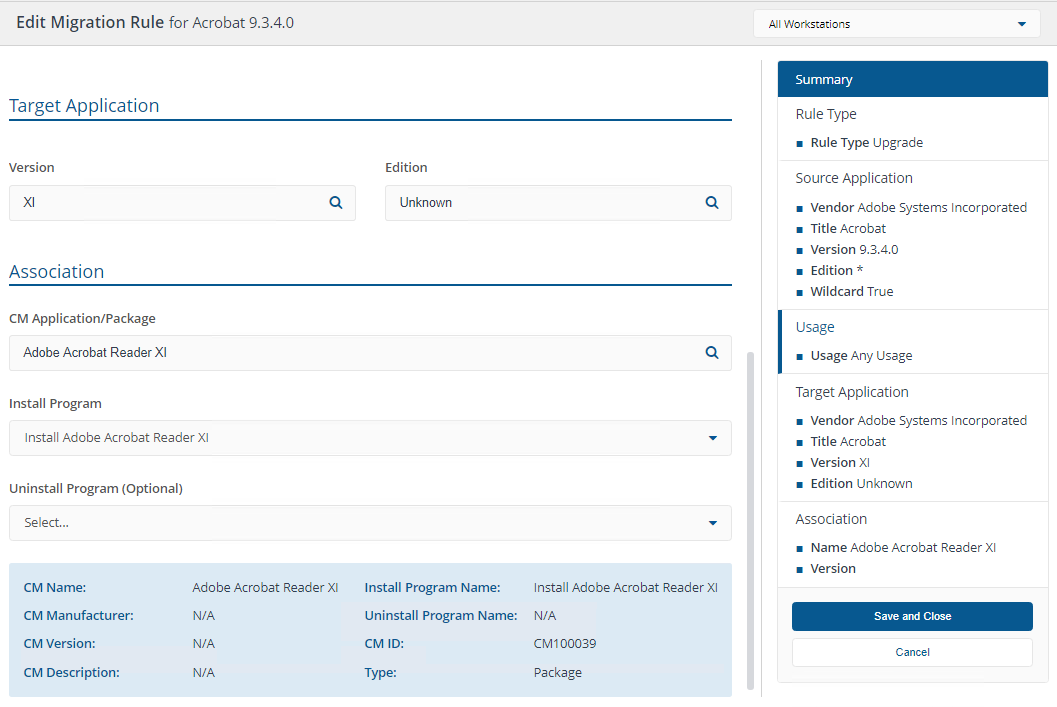
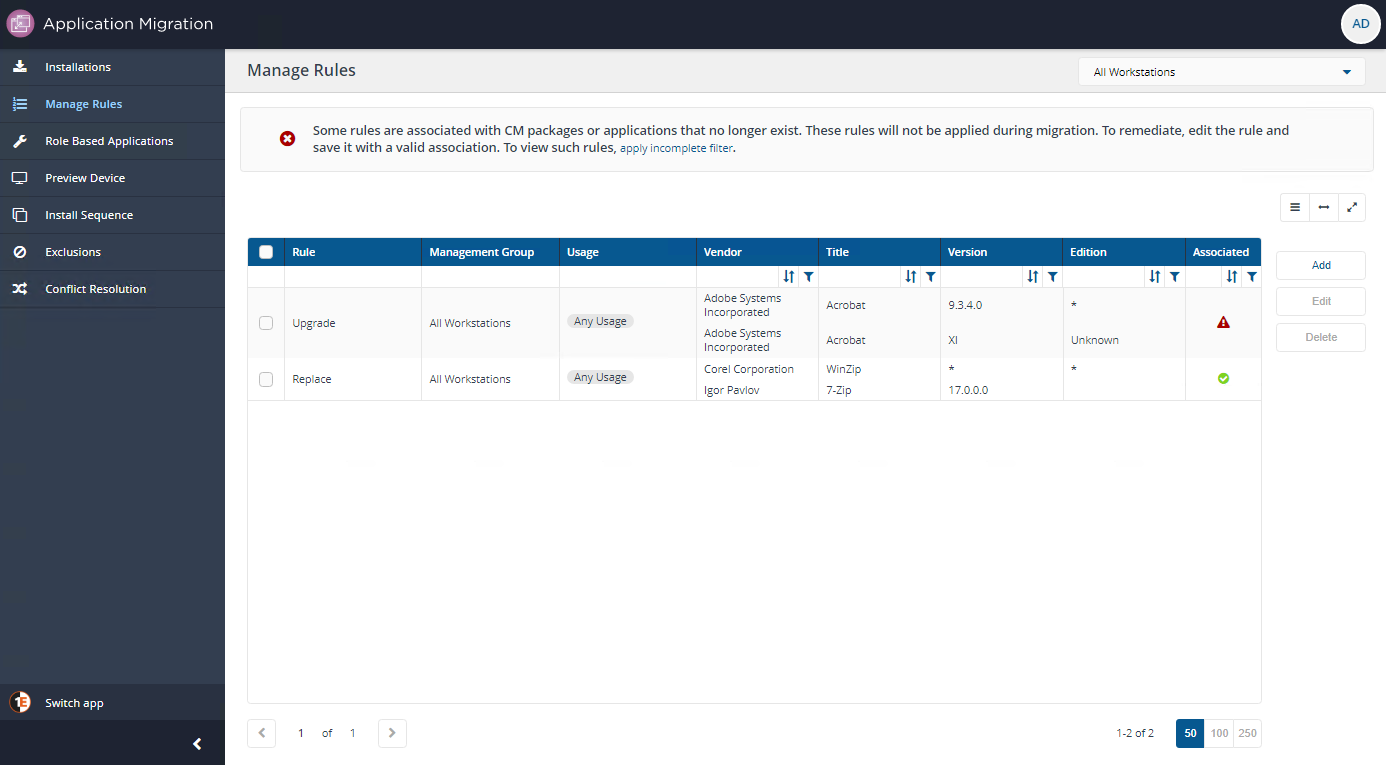
In this example we have a Rule to upgrade computers in the All Workstations Management Group from Adobe Acrobat version 9.3.4.0 to Adobe Acrobat XI.
To upgrade Adobe Acrobat version 9.3.4.0, the migration rule has an association with a Configuration Manager package for Adobe Acrobat Reader XI which has a Configuration Manager package ID of CM ID - CM100039.
Manage Rules page:
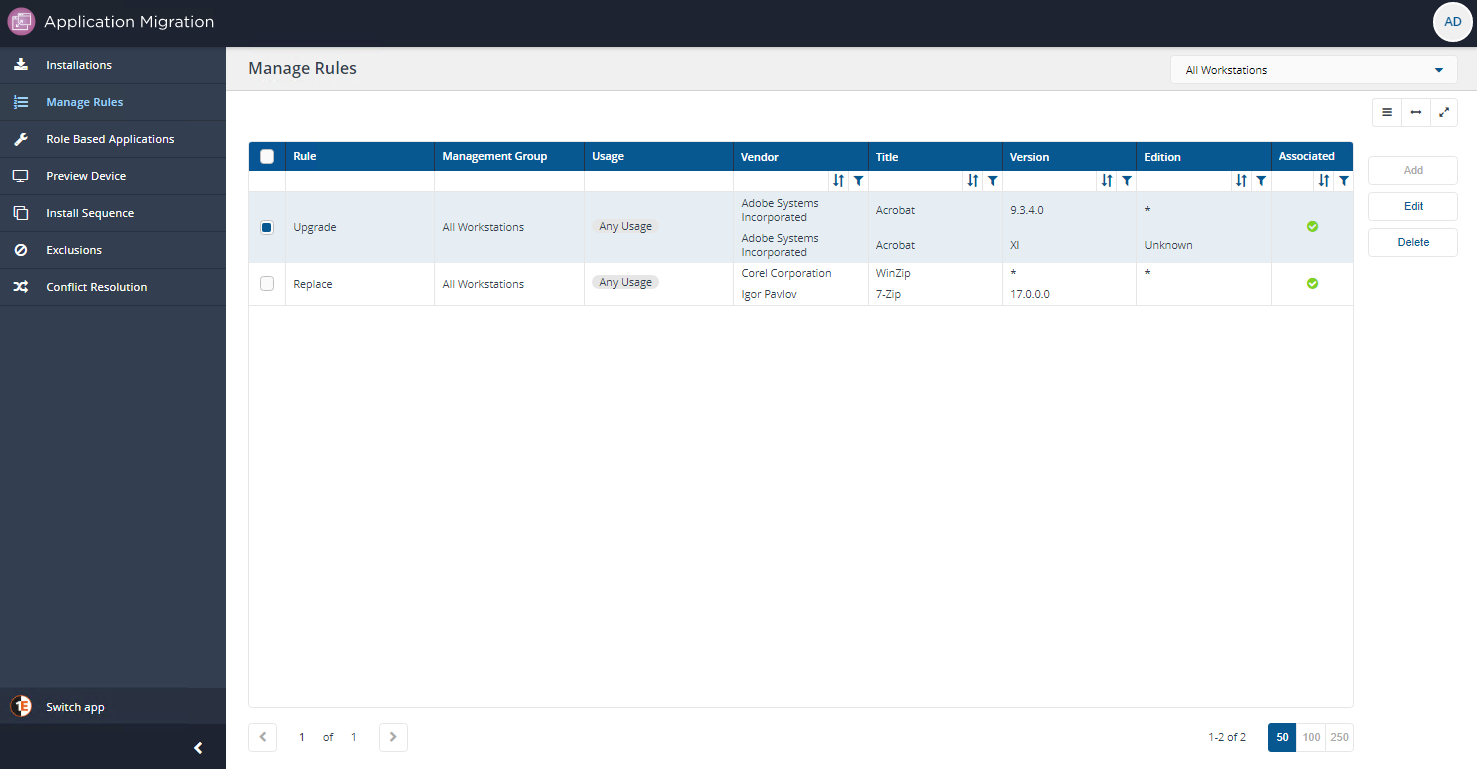
Configuration Manager Association:
Viewing associations between Configuration Manager and products
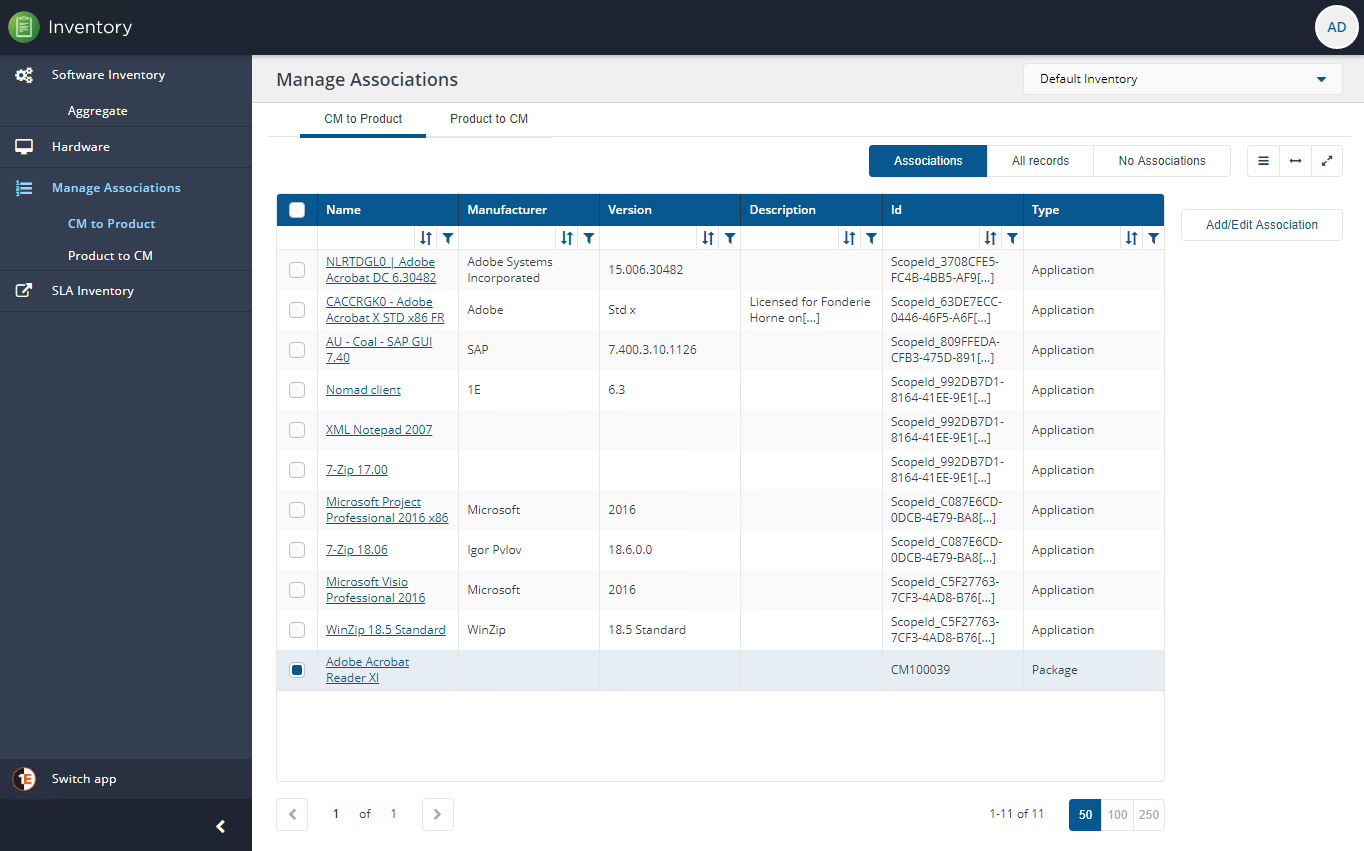
Associations between products and Configuration Manager packages and applications are managed in the Inventory Application.
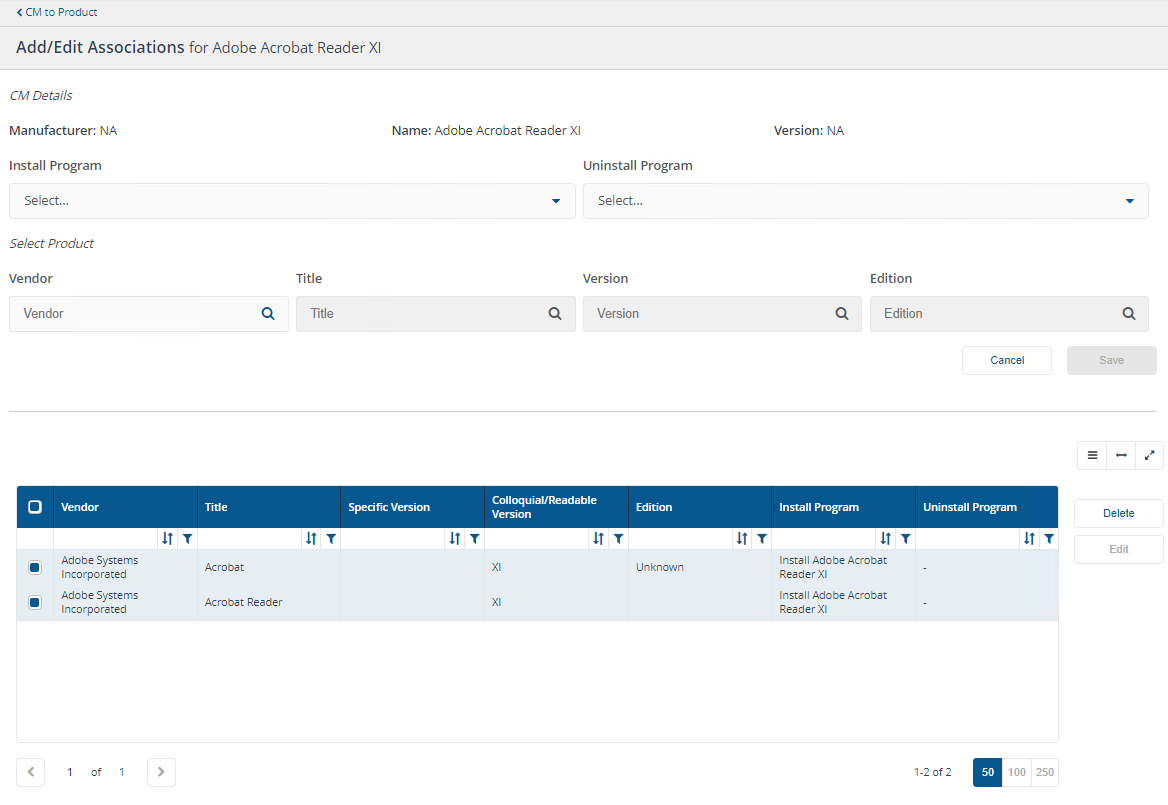
In our example, we can view the Adobe Acrobat Reader XI associations by switching to the Inventory app and then on the Manage Associations page, viewing CM to Product, selecting Adobe Acrobat Reader XI and clicking Add/Edit Association.
On the Add/Edit Associations for Adobe Acrobat Reader XI we can see that Adobe Acrobat Reader XI is associated with the correct application in Configuration Manager.
To find out more about how the Inventory Application works, please refer to Introducing Inventory.
Manage Associations page:
Add/Edit Associations for Adobe Acrobat XI:
When an alert is generated
If the Configuration Manager association is no longer present because, for example either the associated Configuration Manager application or package has been deleted from Configuration Manager. Or the Configuration Manager association has been deleted in Application Migration. You will see an alert.
In our example, the Adobe Acrobat XI package gets deleted from Configuration Manager. At the point of deletion Application Migration does not know the package is gone.
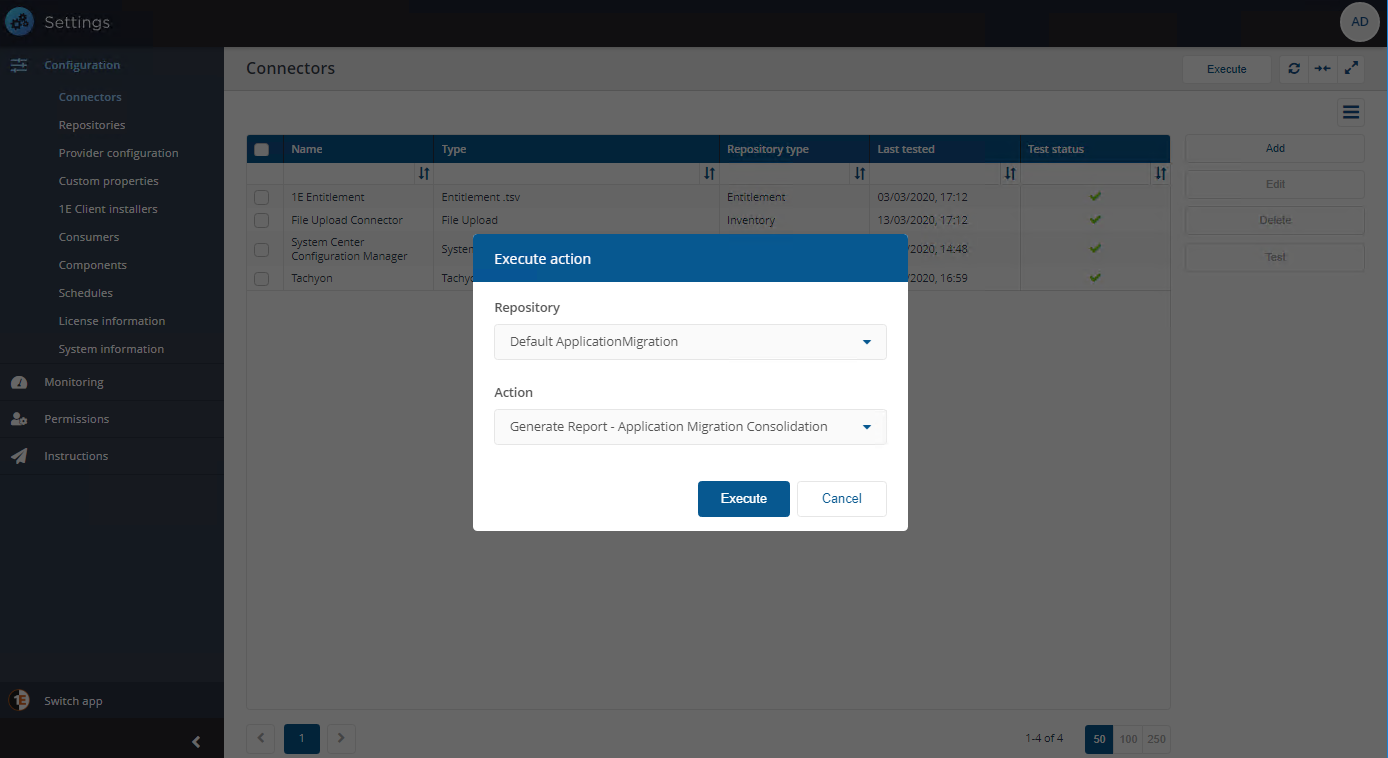
It is after the next Generate Report - Application Migration Consolidation runs and the Manage Rules page gets refreshed, that you will see an alert.
Tip
It's good practice to schedule the regular synchronization of data from Configuration Manager into Application Migration using the System Center Configuration Manager inventory connector.
You should schedule the connector to execute regularly to keep the data in Application Migration up to date, ensuring new devices, new software installations, and software removals are correctly reported.
To perform this task you will need to be logged into the Tachyon portal as a user with the Schedule Administrator role. The Application Migration Administrator role does not have the required permissions to schedule connectors.
Refer to the Schedules page for details on how to schedule a connector.
Note
To fully understand how to:
Get data into Application Migration from Configuration Manager.
Keep data synchronized between Application Migration and Configuration Manager.
Execute consolidation actions independently.
Please refer to Post-install configuration.
Generate Report - Application Migration Consolidation:
What the alerts look like
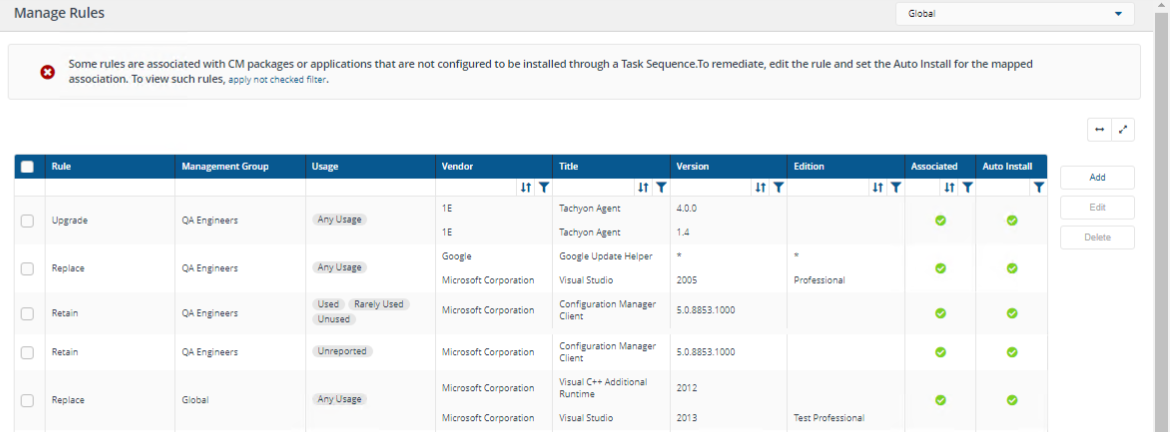
You will see an alert displayed in a banner at the head of the page indicating there are one or more rules associated with Configuration Manager packages or applications that no longer exist. In the Associated column there will be a warning symbol indicating which specific rule has a missing association.
Using the apply incomplete filter link in the warning banner you can apply a filter to display incomplete rules and then remediate them by investigating and fixing the missing associations.
For example, if a package has been removed from Configuration Manager, you would need to either recreate or re-import this package in Configuration Manager. You could also adopt your migration rule to include a package that is still present in Configuration Manager.
Or, if the package is present in Configuration Manager and only the association was removed, then you will need to recreate the appropriate associations for your rule to work correctly.
For more details about adding, modifying and deleting migration rules in Application Migration please refer to Managing migration rules.
Refreshed Manage Rules page:
Configuration Manager associations are no longer present: