Server installation issues
Troubleshooting common issues that you may be having with implementation.
If your problem is not identified on this page, then please review Installing Tachyon Server.
Please ensure you have run through the steps in the Verifying page before making any configuration changes. Several verification steps refer back to this page.
If you need further help, please refer to the Troubleshooting page for how to contact 1E Support and the technical support process.
Unable to install
If for any reason you are unable to install it, then please review the Preparation page. You should also re-run Tachyon Server post-installation tasks.
When installing interactively, please confirm you are logged on using an account that has local Administrator rights.
For Tachyon Servers, you can troubleshoot installation issues by reviewing the installation log file that is created in the same directory as Tachyon.Setup.exe after Tachyon Setup has run the installer.
For clients, you can troubleshoot installation issues by reviewing the installation log file. If you are having issues with 1E Client, please refer to Troubleshooting.
Verify the Tachyon Server certificate bindings
The server installer detects which Web Server certificate to use by matching the certificate's Subject Alternative Name (DNS) with the HTTPS Host header supplied during installation. As discussed in Certificate requirements, the Subject Alternative Name must include the DNS Alias FQDN of the server of type DNS Name, for example, DNS=TACHYON.ACME.LOCAL
To check the HTTPS binding of the website use the following steps. These steps can also be used to change the certificate if it has expired, or a new certificate needs to be used.
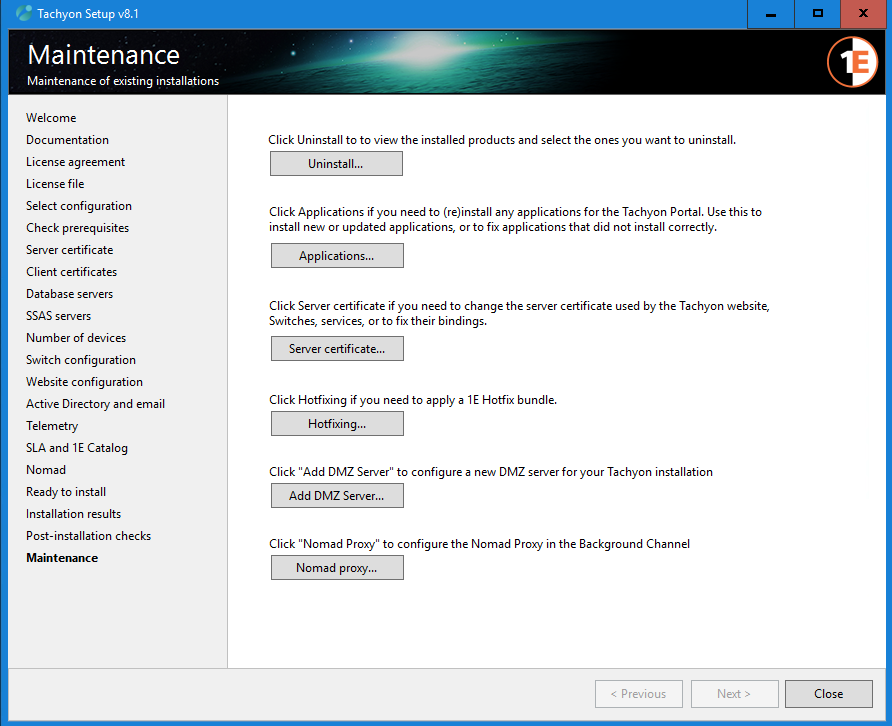
Logon to the Tachyon Server using the Tachyon installation account or user with local administrator rights.
Start Tachyon Setup and navigate directly to the Maintenance screen.
Click on Server certificate...
Review the Certificate Bindings screen.
It shows the thumbprint of the certificate used by each of the bindings required by Tachyon, or the Friendly name if one has been used, as shown in the picture.
If the bindings are using different certificates, then this may be deliberate, and you should find out why.
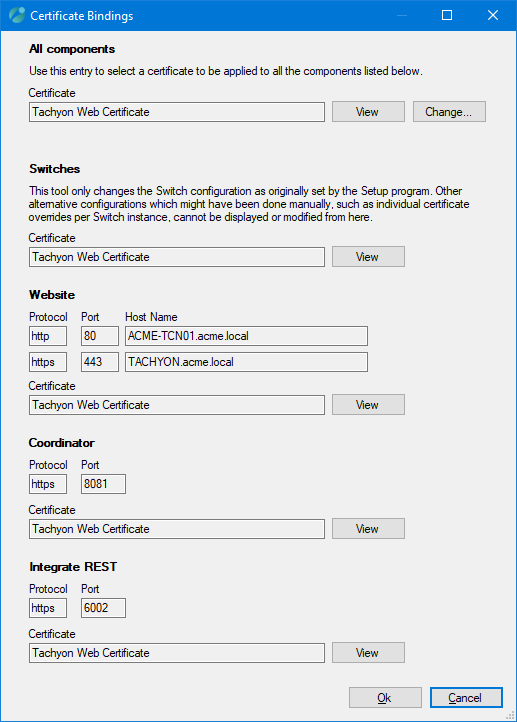
To view the details of a certificate, click View
To change the certificate, click Change...
This will start the Certificate Selector similar to the Server certificate screen.
This will let you select a certificate and apply it to all the bindings.
Note
If for any reason you need to apply a different certificate to each binding, then please contact 1E for details of how to configure them.
Note
The Coordinator may be using port 8080 if you have upgraded from Tachyon 3.3.
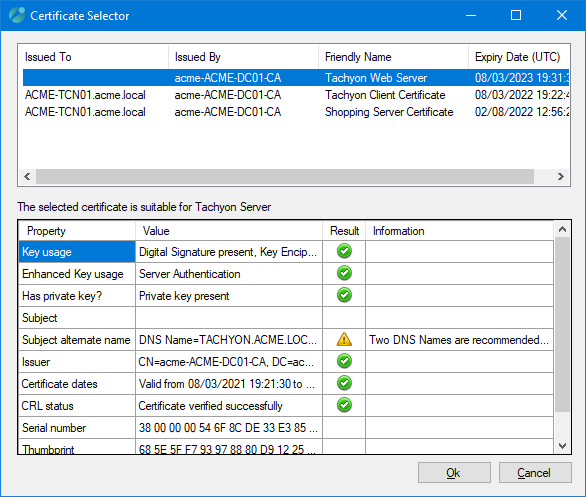
In the Certificate Selector screen, select a certificate, and the Selector will evaluate its suitability.
Click OK when you have selected a suitable certificate.
This will return you to the Certificate Bindings screen.
In the Certificate Bindings screen, click OK to save the new bindings configuration.
You do not require an IIS reset.
Tachyon Switch certificate issues
The Switch will start and then stop if there is an issue with its certificate.
Check the following log files for errors. The default location for Tachyon Server logs is the %AllUsersProfile%\1E\Tachyon folder on the server where Tachyon Server is installed.
Tachyon.Switch.Host.log
Tachyon.Switch.log
Verify IIS Configuration
For minimum requirements for IIS see Windows Server roles and features.
To review the configuration:
Start PowerShell with Admin privileges.
Type Get-WindowsFeature and wait for the listing to complete. It can be useful to pipe this output to a file.
Check the results and confirm that each of the minimum requirements is listed with an [X].
Alternatively, run Tachyon Setup and run the Post-installation check.
The table below shows the IIS web applications used by Tachyon, and the IIS features that affect how users and clients connect. For more detail about these IIS web applications, please refer to Tachyon Single-Server system.
IIS web application | Server | Authentication Enabled | SSL Settings | IP Address and Domain Restrictions |
|---|---|---|---|---|
Website | Master, Response & DMZ | Anonymous and Windows | Not configured | Not configured |
Admin | Master | Windows | Not configured | Not configured |
Background | Response & DMZ | Anonymous and Windows Anonymous is used by clients, Windows is used by Consumer API | Require SSL (accept) | Not configured |
CatalogWeb | Master | Anonymous and Windows | Not configured | Not configured |
Consumer | Master | Windows Basic Authentication must also be enabled if using 1E Core (for ServiceNow integration) | Require SSL (ignore) | Not configured |
ContentDistribution | Master | Anonymous and Windows | Not configured | Not configured |
Core | Response & DMZ | Anonymous | Require SSL (ignore) | Local IP addresses, plus the following added manually if used:
|
CoreExternal | Master | Anonymous | Not configured | Not configured |
Experience | Master | Windows Basic Authentication must also be enabled if using 1E Core (for ServiceNow integration) | Require SSL (ignore) | Not configured |
Platform | Master | Windows | Not configured | Not configured |
Tachyon | Master | Windows | Require SSL (ignore) | Not configured |
Note
The IP Address and Domain Restrictions feature is described in more detail below. Steps for verifying its configuration are provided in Verify IIS security of the Tachyon website.
IP Address and Domain Restrictions
The Tachyon Core web application (Response Stack) uses the IIS feature IP Address and Domain Restrictions to restrict access so that connections are only allowed from specific IP addresses. Other web applications, including Tachyon, Background, and CoreExternal, are not configured, and therefore they allow all local and remote connections.
The list of IPv4 and IPv6 addresses is updated by Tachyon Setup during installation (and upgrade) of the following configurations.
Configuration choice in Tachyon Setup | What Tachyon Setup (or TachyonServer installer) does during installation/upgrade |
|---|---|
All components on a single server | Adds all the IP Addresses of the local server during installation of the server. This allows the Core to receive connections from local Switches and components of the local Master Server. |
Response Stack | Adds all the IP Addresses of the local Response Server and the remote Master Server that are resolvable from the local server during installation of the Response Stack. This allows the Core to receive connections from local Switches and components on the remote Master Server. |
DMZ Server | Adds the IP Addresses of the DMZ Server that are resolvable from the local Response Server (Core) during the first phase of DMZ Server setup. This allows the Core to receive connections from Switches on the remote DMZ Server. |
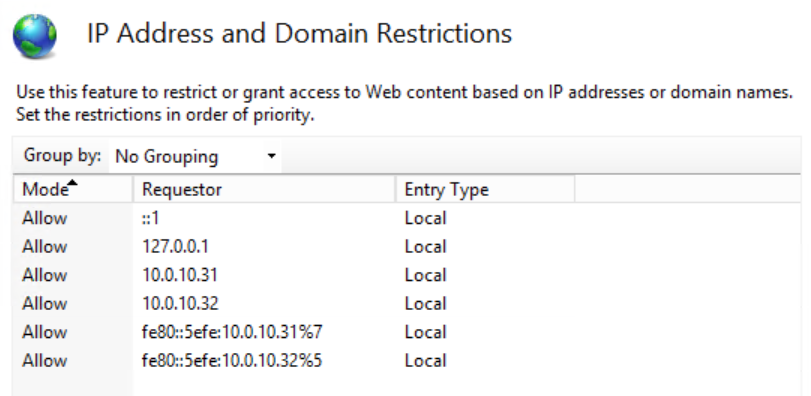
Below is an example of what the configuration looks like for a Tachyon Server which has a two network adapters, one for a Switch, the other for SQL traffic, with IPv4 enabled and IPv6 disabled on each interface. The IPv6 addresses shown are isatap addresses, which is enabled by default on the server.
::1 is the IPv6 loopback address
127.0.0.1 is the IPv4 loopback address
10.0.10.31 is the IPv4 address for network interface #7
10.0.10.32 is the IPv4 address for network interface #5
fe80::5efe:10.0.10.31%7 is the isatap address for network interface #7
fe80::5efe:10.0.10.32%5 is the isatap address for network interface #5
When to modify IP Address and Domain Restrictions
The Tachyon installer uses the PowerShell cmdlet Get-NetIPAddress to list all the IPv4 and IPv6 Addresses and adds them all to the restricted web applications during installation or upgrade. You must modify the configuration of IP Address and Domain Restrictions if the network interface configuration has changed on a Tachyon Server, for example if an IP Address is changed, or a new network interface is installed.
You will also need to modify the configuration of the Response Stack's Core web application to manually add the internal-facing IP Address of a DMZ Server.
Changing the configuration of Network Adapters
If the configuration of any network adapters is changed, then the Tachyon website configuration for IP Address and Domain Restrictions may need to be updated with the server's new IPv4 and IPv6 addresses. Failure to update the configuration after a network change will cause issues between the Switch and the Core and prevent the Tachyon Server from functioning.
Use the PowerShell cmdlet Get-NetIPAddress to determine the current IP Addresses, and if necessary update the configuration of the Core web application.
The following AddIpSec.ps1 script can be used to refresh local IP Addresses. It does not remove old, unwanted, or remote IP Addresses. Nor does it add addresses for remote Switches, which would need to be added manually.
Remote Access to the Core
A post-installation test is to confirm web browsers do not have remote access to the Core. A remote web browser is not expected to be able to access the Core web application, which should return a 'Server Error 403 - Forbidden: Access is denied'. If you are able to access these web applications from a remote computer then it is probable that the IP Address and Domain Restrictions feature is not installed.
Use the following steps to check if the IP Address and Domain Restrictions feature is installed and to install it.
Logon to the Tachyon Server using an account that has administrator privileges.
Start Powershell with Admin privileges.
Type Get-WindowsFeature and wait for the listing to complete.
Check to see if Web Server Security feature IP Address and Domain Restrictions is installed or not.
If installed, then Verify IIS Configuration to determine if there may be another reason for the issue.
If not installed, then:
type Install-WindowsFeature Web-IP-Security and wait for the feature installation to complete (a reboot or IIS restart is not required).
after the feature installation, the Core web application will have its configuration settings restored to the settings configured at the time that Tachyon was installed.
Use the PowerShell cmdlet Get-NetIPAddress to determine the current IP Addresses, and if necessary update the configuration for the Core web application.
Repeat the Verifying steps.
401 Not Authorized
There are a number of reasons why you may see this error when you browse to the Tachyon portal for the first time. You may also see errors saying Not Authorized or Unauthorized in server log files.
The usual reason for this is your server is configured to use Kerberos authentication and the HTTP class SPN is not registered in AD for the DNS Name used to access the server.
Service Principal Names (SPN) are attributes of AD accounts. A domain administrator will need to create an HTTP class SPN for the web server service account, by using one of the following methods:
By editing the ServicePrincipalName attribute of the web server's computer account
Using the following SETSPN commands, substituting your DNS Name, server, and service account:
setspn -l ACME\ACME-TCN01$
setspn -s http/acme-tcn01.acme.local ACME\ACME-TCN01$
setspn -s http/tachyon.acme.local ACME\ACME-TCN01$
Use each command as follows:
List existing SPNs for the service account. Run this to record details before you request for any new SPN(s) to be created. Re-run this after creation, ensuring you wait sufficient time for AD replication to occur.
Use this if tachyon.acme.local is a CNAME record and its (A) Host record is acme-tcn01.acme.local
Use this if tachyon.acme.local is a (A) Host record.
The above example assumes the:
Service account for all Tachyon web application pools is Network Service
Tachyon server name is ACME-TCN01 with a computer account in the ACME domain, which means the service account is ACME\ACME-TCN01$
DNS Name for the server is tachyon.acme.local.
Tip
If in doubt, it does no harm to create an SPN for each DNS Name used to access the Tachyon Server, including its CNAMEs and (A) Host records using: setspn -s http/<DNS Name> ACME\ACME-TCN01$
To determine which type of record a DNS Name is, run the following command:
nslookup tachyon.acme.local
If the command returns Name: acme-tcn01.acme.local and alias tachyon.acme.local then tachyon.acme.local is a CNAME record.
If the command returns Name: tachyon.acme.local and no aliases then tachyon.acme.local is a (A) Host record.
More complex scenarios can be configured which requires in-depth knowledge of IIS, SPN, and DNS configuration and are beyond the scope of this documentation.
403 Access Denied
You may see this error when doing post-installation tests (refer to Verifying). When you use a browser to open an application in the Tachyon portal, you will see Server Error 403 - Forbidden: 'Access denied' if the internal account used by the Application Pool does not have read access to the Tachyon web application folders. This can happen if Tachyon is installed in a non-default location and the NTFS permissions on the installation folder are not correct. To remedy the issue, you should review and correct NTFS permissions as described in Services and NTFS Security.
Warning
Do not enable Anonymous authentication to fix this type of issue.
404 File not found
You may see this error when doing post-installation verification tests, (refer to Verifying).
When you use a browser to open an application in the Tachyon portal, and you see Server Error 404 - 'File not found' the reason is probably that you have not installed the IIS features Web-ASP and/or Web-Asp-Net45.
Use the following steps to check if the Web-ASP and/or Web-Asp-Net45 features are installed and to install them.
Logon to the Tachyon Server using an account that has server administrator privileges.
Start Powershell with Admin privileges.
Type Get-WindowsFeature and wait for the listing to complete.
Check to see if the Web Server Application Development feature Web-ASP and/or Web-Asp-Net45 is installed or not.
If not installed:
Type Install-WindowsFeature Web-ASP, Web-Asp-Net45 and wait for the feature installation to complete (a reboot or IIS restart is not required).
Perform an IIS Reset.
If installed, then Verify IIS Configuration to determine if there may be another reason for the issue.
Repeat the Verifying steps.