Deploying 1E Client on macOS
Guidance for deploying 1E Client onto macOS devices, including installation and uninstallation. Only the Tachyon features of 1E Client are available on macOS.
Requirements
Please review Planning for 1E Client pages. After installation, please review the Verifying page.
For details of supported OS platforms, please refer to Common client requirements page.
Guidance provided below is for installation on macOS.
Note
1E Client does not have a license key. Even so, you must adhere to the terms of your license agreement.
Deployment choices
You must decide how you will configure the 1E Client and deploy to devices. Deploying the 1E Client is normally achieved using your existing software deployment tool.
Note
For more information about configuring the 1E Client properties during and after installation, please refer to 1E Client configuration settings and installer properties.
Non-Windows installation account
To install the 1E Client on a non-Windows client the installation account must have privileges to run the sudo command.
Certificate files
Each Tachyon client device requires a .pfx certificate file. Please refer to Client certificates for steps to create and use the .pfx file.
The 1E Client for macOS needs to have the storage of the client authentication certificate and the public certificates for the chain of trust for the Tachyon Switch.
If you have configured Tachyon Server to require client certificates then each device requires a certificate with the following properties, so the client can be authenticated by the Tachyon Switch.
Issued by a trusted Certificate Authority (CA)
The certificate for the Root CA in the Certification Path must exist in the Trusted Root CA store of the client
If the issuing CA is not the Root CA then the certificate for the issuing CA and any intermediate CA in the Certification Path must exist in the Intermediate CA store of the client
If either of these CA certificates is different from those used by the Tachyon Web Server, they will need to be exported and imported on the Tachyon Web Server
Most organizations have automated distribution of these CA certificates to clients and servers, using Group Policy for example.
Has at least the following Enhanced Key Usage:
Client Authentication.
Has at least the following Key Usage:
Digital Signature
Key encipherment.
Has a private key:
For workgroup and non-Windows devices, the private key must be exportable
Revocation information is included:
References at least one CRL Distribution point that uses HTTP
Has a Subject Name of type Common Name (CN=<computername>) or Subject Alternative Name (DNS Name=<computername>) where <computername> depends on the type of device:
On domain-joined Windows PCs this must be the computername FQDN of the computer, for example, W701.ACME.LOCAL
On workgroup Windows PCs and non-Windows devices, this must be the computername of the computer - as returned by the hostname command, for example on Windows PC this could be W701, and on a Mac this could be MAC01.local.
Note
Tachyon clients and Switches use OpenSSL and its validation process to verify certificates.
Client certificates
The 1E Client for macOS needs to have the client authentication certificate and the public certificates for the chain of trust for the Tachyon Switch in the System key chain.
First, you need to issue a certificate and create the .pfx file.
Key Store method
The client certificate, and Certificate Authority (CA) certificate(s) for the Switch certificate, are stored within the macOS Key Store.
Obtain and import Certificate Authority (CA) certificates
You can skip this step if the Certificate Authority (CA) certificates used by the client and the Switch are the same, and are included in the client certificate.
If the client certificate does not contain the CA certificates for itself, or the CA certificates used by the Switch, then the individual CA certificates will need to be obtained and imported into the macOS Key Store as follows:
Obtain Certificate Authority (CA) certificates as individual .cer files.
They must be exported individually because when presented with a bundle of certificates the Keychain Access UI only imports the last one it encounters.
Use Microsoft’s Manage Computer Certificates (MMC) to export as a .cer file using base-64 encoded X.509 format.
Copy the certificate .cer file(s) onto the macOS device.
Open Finder and double-click on each .cer file in turn to import each certificate into the macOS Keychain store. Or use File → Import Items... directly from Keychain Access.
Open Keychain Access; the certificates should appear under the system keychain.
If required, move (by dragging) each newly imported certificate to the System keychain, to ensure that it is trusted by all users and local system processes including the 1E Client which will run on this macOS machine.
Starting with the root CA certificate, if it is shown as not trusted, double-click to open. At the top left, above the Details section, expand the Trust section and ensure that When using this certificate Always Trust is selected and save the changes.
If you experience problems importing certificates using the Keychain Access app, for example if it reports error -25294 and CSSM_CODE_MEMORY_ERROR, an alternative way of importing public certificates and trusting them is to use the security command line tool. For example:
sudo security add-trusted-cert -d -r trustRoot -k /Library/Keychains/System.keychain <certificate.cer>
Create a client certificate for each macOS device
Each macOS device requires its own client certificate. Below is a guide for using a Microsoft Certificate Authority (CA) to issue a client certificate, then exporting it ready for installation on the device.
First, create a new Certificate template on your Certificate Authority by making a duplicate of either the Computer or Workstation template and configuring it with at least the following properties:
General - use a suitable name such as Tachyon Devices and validity period.
Request Handling - Allow private keys to be exported.
Subject Name - Allow information to be supplied in the certificate request, rather than being built from Active Directory information.
Extensions - Application Policies should contain only Client Authentication.
Security - ensure relevant users and computers will be able to request certificates.
Please refer to Client Certificates for more information on client certificate requirements.
Once the new template is created on the Certificate Authority (CA), issue it.
Using the issued template, request a certificate for a target device, and export it in .pfx form and remember the password. The certificate and associated private key should be exported, together with all extended properties, except include all certificates in the certification path if possible and Enable certificate privacy.
Warning
The Subject Name of the certificate must be the host name of the mac device. You will supply this value during enrollment. To find the host name of the mac open Finder and click the Apple icon in the upper left. Select System Preferences - Sharing - Screen Sharing. Below the computer name field you will see "Computers on your local network can access your computer at:" this value will be your host name. It must be typed exactly as displayed in the certificate request (case-sensitive and including any special characters).
Install a client certificate on each macOS device
To install a client certificate on each macOS device follow the instructions below.
Copy the client certificate onto the macOS device.
Open Keychain Access and from its File menu select Import Items, then navigate to the certificate. Double-click it and enter its password when prompted, then the client certificate and its associated private key should appear under the login keychain. Alternatively, double-click on the .pfx file in the Finder.
Copy the client certificate and its associated private key separately under the System keychain.
Allow access to the private key for the 1E Client by following these instructions:
Open the Keychain Access app, either by pressing command-space and searching for keychain or from the Finder app, top left select Go > Utilities and double click to invoke the Keychain Access app.
Locate the private key of the Tachyon Agent within the System keychain.
The private key will appear under its associated public certificate.
Ensure the private key is present in the System keychain.
Double-click the private key and select the Access Control tab.
Ensure Confirm before allowing access is selected and then add the Tachyon Agent binary to the Always allow access by these applications; adding the 1E Client by its path name, which is typically /Library/Application Support/1E/Client/1E.Client
Warning
The Keychain Access app cannot be guaranteed to always refresh its view following, for example, an update of access control permission. However, after exiting the app, killing the process /Applications/Utilities/Keychain Access.app/Contents/MacOS/Keychain Access and then restarting the app, will ensure the Keychain Access view will correctly display the contents of the Key Store.
An alternative approach to using the Keychain Access app is to import the .pfx file using the command-line security command:
sudo security import <download location>/<macOSpfx>.pfx -k /Library/Keychains/System.keychain -t agg -f pkcs12 -P <password> -T '/Library/Application Support/1E/Client/1E.Client'
This command imports a client certificate and the associated private key (termed an identity on macOS) from a .pfx file to a <keychain> as an aggregated type in PKCS #12 format using the specified password and giving access to the 1E Client.
Warning
When upgrading the 1E Client, by default the new version will not automatically be granted access to the private key in the Key Store. You can either repeat the import process during upgrade, or avoid the overhead by using the command-line security command with the import -A flag instead of -T . Please note that Apple do not recommend this approach as it is considered less secure. For more information on the security command please refer to the macOS page: https://ss64.com/osx/security-export.html.
If you do not grant correct access to the client certificate’s private key, and the 1E Client debug logging is configured the log will show that it cannot obtain the client certificate’s private key because the user name or passphrase entered is not correct.
Preparation
1E Client installation files are available for download from https://support.1e.com/.
Installation source files for non-Windows are available in a zip file called 1EClient-Non-Windows.v.x.x.zip
Within the zip, 1E Client for macOS is provided as an Apple Disk Image file, such as 1e.client-macOS_v.x.x.dmg.
Warning
1E Client for macOS is written for Intel and supported on Apple devices using Intel processors. It is also supported on Apple devices using the M1 chip, provided you have installed Rosetta 2, which is included with Big Sur. 1E Client is a daemon (not an app), therefore, during installation or running it will not prompt for Rosetta 2, which does not get installed on-demand.
You only need to install Rosetta 2 once, using one of the following commands, but repeating the command will safely reinstall it. The second version of the command requires root permission. Attempting to install on an Intel device will issue a harmless "unrecognized option" usage message.
/usr/sbin/softwareupdate --install-rosetta
/usr/sbin/softwareupdate --install-rosetta --agree-to-license
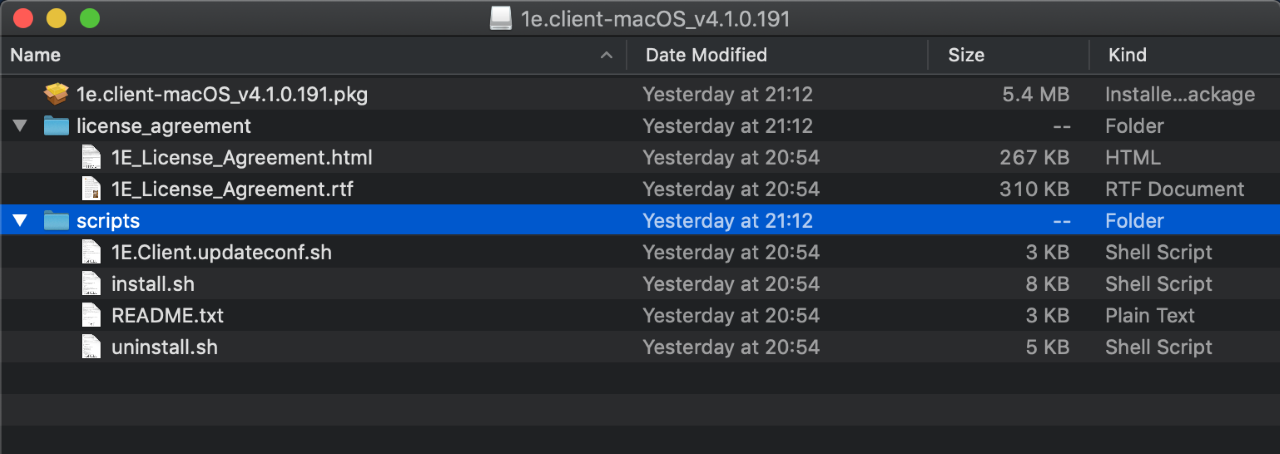
Once the dmg file is copied to macOS, double-click on the dmg file to automount it under /Volumes and display it in a Finder window, as shown.
If you wish, you can script this using all or parts of the following example:
mkdir ~/Downloads/1e.client
cd ~/Downloads/1e.client
wget https://<<serverURL>>/1e.client-macOS_v.x.x.dmg
hdiutil attach 1e.client-macOS_v.x.x.dmg
The last line of the output of the hdutil command will show the location of the mount point, which is likely to be /Volumes/image.1e.client-macOS_v.x.x
Installation
To install the macOS 1E Client perform only one of the following three options:
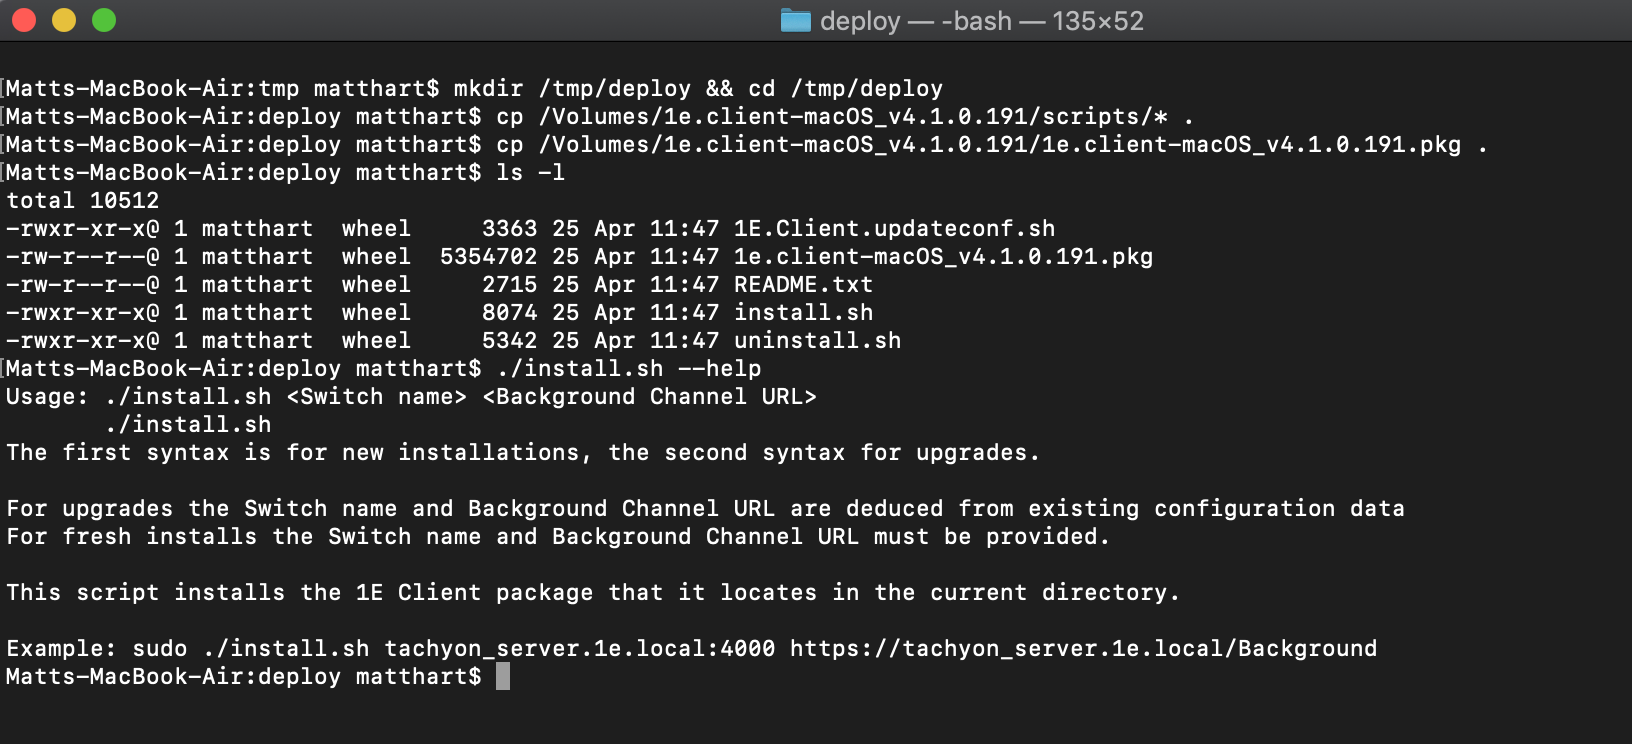
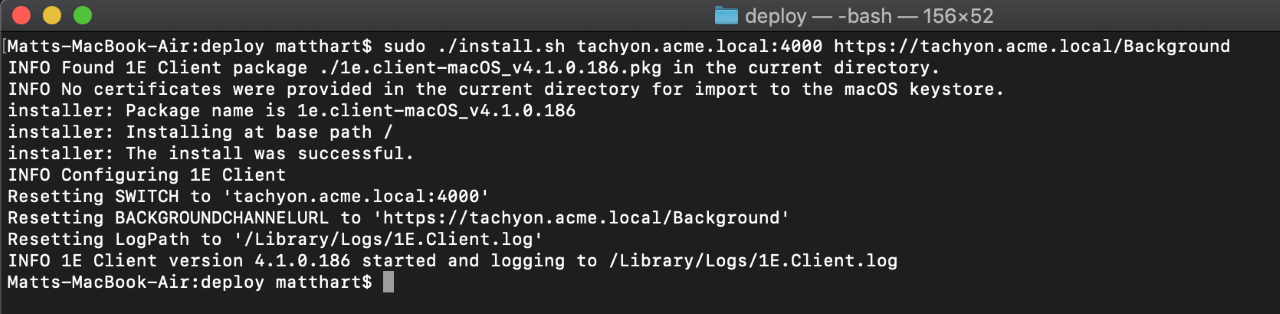
Use the install.sh script provided under the scripts directory, to install and configure the client, as shown in the pictures:
Copy the script to a separate directory together with the package you wish to use for installation or upgrade.
Invoke install.sh script to install, configure and start the 1E Client, giving the Switch host and port as the first parameter and the Background Channel URL as the second:
sudo ./install.sh tachyon.acme.local:4000 https://tachyon.acme.local/Background
Note
This method will start the client, but connection to the Tachyon Switch will fail unless the client has the necessary certificates, as described in Client certificates below.
Install the package file from a command window to install using defaults. The -target is the volume mount point, not the path in the file system at which it will be installed.
sudo installer -pkg /path/to/pkg/1e.client-macOS_v8.0.x.x.pkg -target /
Double-click on the package (.pkg) file within the Finder window to install using defaults.
Note
For options 2 and 3, you will need to reconfigure the 1E Client either using the 1E.Client.updateconf.sh script or by editing the /etc/1E/Client/1E.Client.conf file, as described in Reconfiguration.
You will also need to provide the necessary client certificates, as described in Client certificates, and then start the client.
After installation, you can unmount the dmg using the following command:
hdiutil eject /Volumes/image.1e.client-macOS_v8.0.x.x
Reconfiguration
You will need to use the 1E.Client.updateconf.sh script if you want to reconfigure the client, or you installed 1E Client using the previous installation options.
The pkg installation package for macOS includes a bash script called 1E.Client.updateconf.sh. The configuration properties for the Switch and Background Channel are mandatory, therefore assuming they are on the same Tachyon Server which has a DNS Name FQDN tachyon.acme.local then the post-installation command line would be similar to the following but all on one command line. The second Switch and Background Channel can be removed if a DMZ server is not used. Single quotes avoid escape characters and are necessary to allow the use of the ; character.
sudo sh '/Library/Application Support/1E/Client/1E.Client.updateconf.sh'
'/Library/Application Support/1E/Client/1E.Client.conf'
SWITCH='tachyon.acme.local:4000;tachyon.acme.com:4000'
BACKGROUNDCHANNELURL='https://tachyon.acme.local:443/Background/;https://tachyon.acme.com:443/Background/'
Please refer to 1E Client configuration settings and installer properties for a list of other configuration properties that can be appended to the above command-line.
Starting the 1E Client
To load and start the 1E Client use the command:
sudo launchctl load -w /Library/LaunchDaemons/com.1e.pkg.1E.Client.plist
Note
The client starts automatically if the switch and background URL are passed in the installation command as parameters as well as after client upgrade.
If it is necessary to stop the 1E Client use the command:
sudo launchctl unload /Library/LaunchDaemons/com.1e.pkg.1E.Client.plist
If the 1E Client should fail to start correctly please check:
sudo launchctl list | grep -i 1e - to confirm the service is actually running. It should appear as com.1e.pkg.1E.Client
/Library/Logs/1E.Client.Daemon.log - shows any service start errors
tail -f /Library/Logs/1E.Client.log - shows the current operation of the 1E Client.
If necessary raise the /Library/Application Support/1E/Client/1E.Client.conf to LoggingLevel=debug using a suitable text editor such as vi and then restart the 1E Client.
Uninstallation
To uninstall the 1E Client from a macOS device invoke the uninstall.sh script from within a sudo bash script. uninstall.sh is available within the scripts directory of the Apple Disk Image (dmg) file of the macOS 1E Client.
Alternatively, enter the following commands inside a sudo bash shell:
bash$ cd /Library
bash$ pkgutil --only-files --files com.1e.pkg.1E.Client | tr '\n' '\0' | xargs -n 1 -0 rm
bash$ pkgutil --forget com.1e.pkg.1E.Client
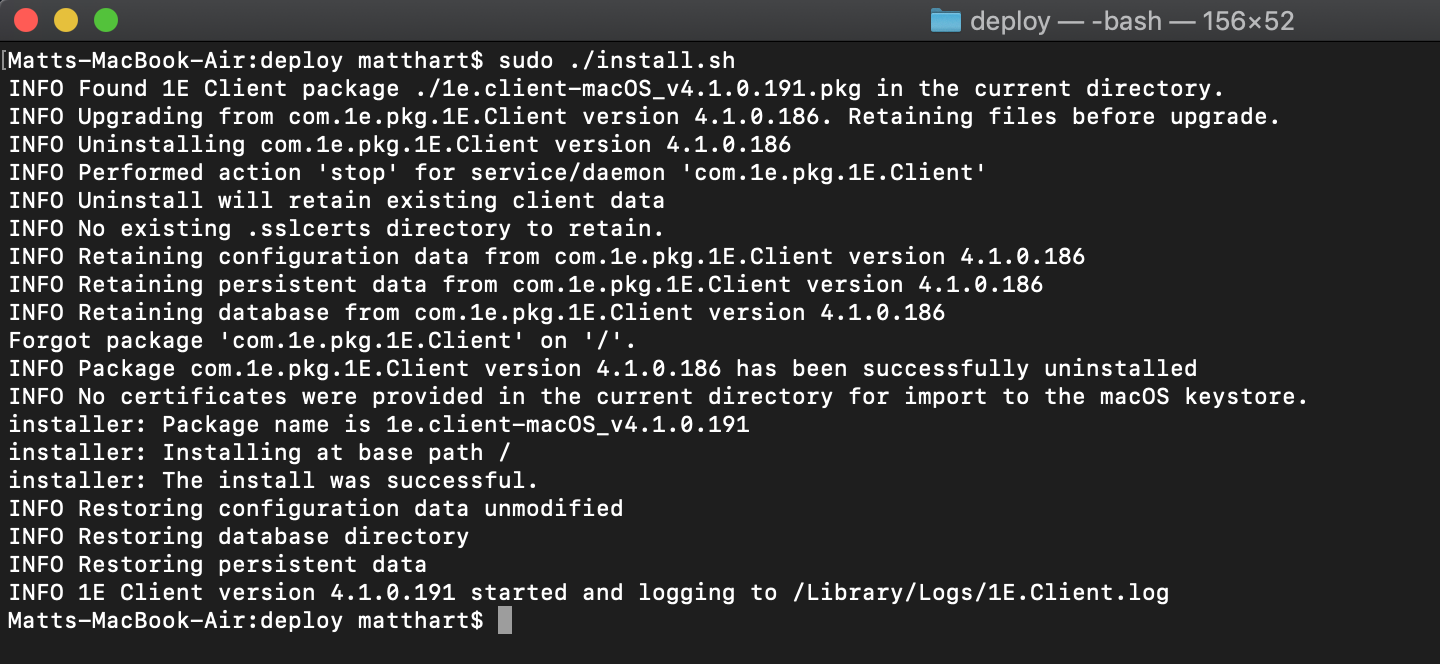
Upgrading
The install.sh script can be used for upgrading as well as installing. The bash script will deduce parameters from the existing configuration so no parameters are necessary, as shown in the picture.
If the installation of the macOS 1E Client is performed by double clicking on the latest .pkg file, then the new 1E Client will install successfully, but the contents of 1E.Client.conf will be reset to their default settings. To ensure that existing 1E.Client.conf settings are preserved across a 1E Client upgrade, please use the install.sh script.
When upgrading the 1E Client, by default the new version will not automatically be granted access to the private key in the Key Store. You can either repeat the import process during the upgrade or avoid the overhead by using the command-line security command with the import -A flag instead of -T . Please note that Apple does not recommend this approach as it is considered less secure. For more information on the security command please refer to the macOS page: https://ss64.com/osx/security-export.html.
If you do not grant correct access to the client certificate’s private key, and the 1E Client debug logging is configured the log will show that it cannot obtain the client certificate’s private key because the user name or passphrase entered is not correct.