Managing compliance for user-based licenses
You can view your compliance position by focusing on how licenses are consumed by user as well as by device. From here, you can also add entitlements for a specific product.
Viewing product compliance by user
This example assumes that you have associated your chosen compliance repository with your chosen entitlement repository, this example usesDefault Compliance andDefault Entitlement, and you have run the Compliance report on your chosen compliance repository.
Please refer to Running your first Compliance License Summary for steps that show how to do this.
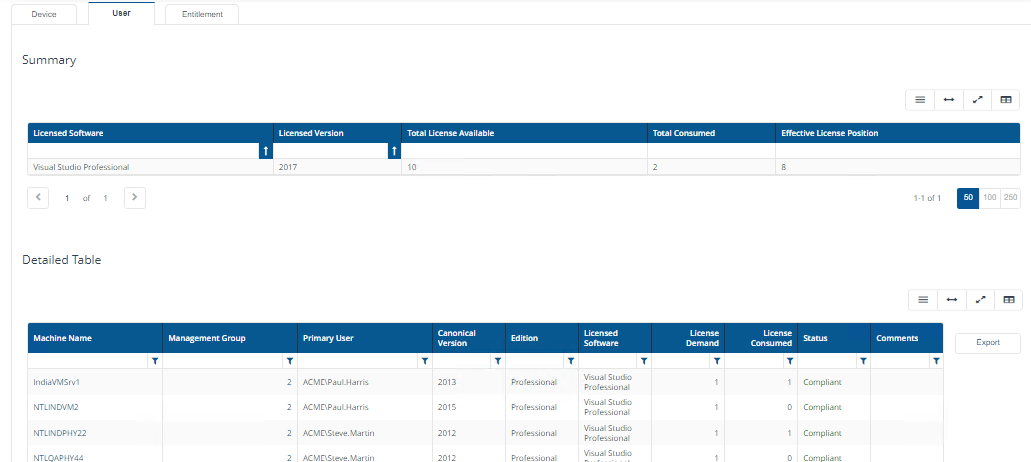
Our example, shows a simple workflow of how one user who is a primary user on multiple devices and uses the same software on those devices may need only one license for the installs to be compliant. In this example the user ACME\Paul.Harris uses 2 Installations on 2 devices running Visual Studio Professional, but would only need 1 license because user based compliance works across devices, where device based compliance works per individual device.
To view product compliance and interact with the products to create new licenses and improve your compliance:
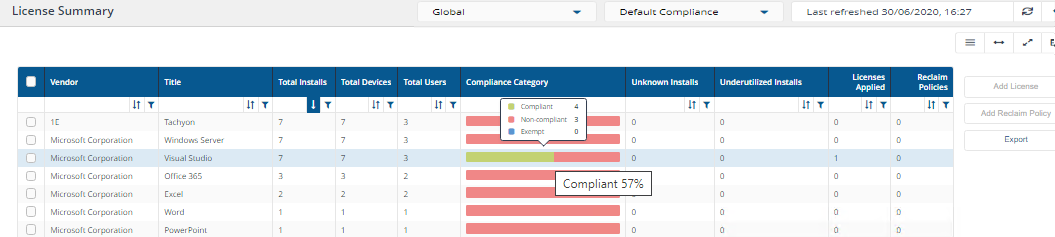
Navigate to AppClarity→Compliance→License Summary. Here you'll see a summary of your compliance position. The displayed table shows compliance information about all your products.
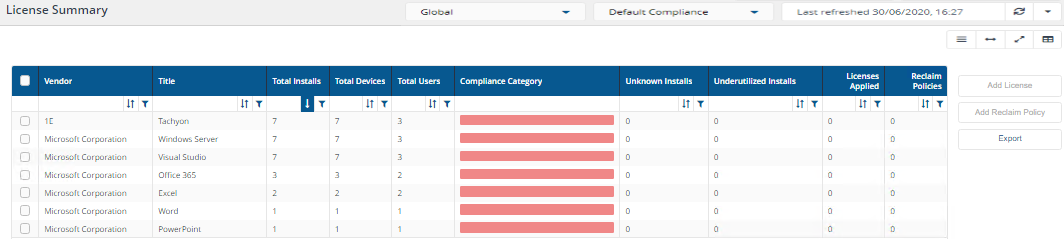
This displays the License Summary page, for more details on the fields on this page please refer to License Summary page. The compliance position for Visual Studio shows that Visual Studio has 7 installations on 7 devices, which are primarily used by 3 Users. To make Visual Studio compliant we could use either of these options:
7 Device metric based licenses
3 User metric based licenses.
This example focuses on setting up a User metric based license for Visual Studio to make this product compliant.
Select the product by clicking on the color bar in the Compliance Category column you want to add a license entitlement for, in our example this isMicrosoft Corporation,Visual Studio.

To create and publish a license entitlement:
This displays theNew Licensepage, for this example, we set the following fields to create the license entitlement:
Note
These steps can also be carried out directly on theEntitlements - Licenses /Maintenancespage and clicking onNew License, but the prefilled information will not be there and you will need to enter that yourself.
Select the displayed product and click Add License, located just to the right.
In the New License page we will choose a specific set of options to show how this page works. For more details on all the fields in this page please refer to New License page.
There are lots of fields on the page but a few are mandatory. The mandatory fields have an * next to their name.
The page is split into a number of sections, we will start in the Basic Information section.
The Management Group is the first mandatory field, it's set by default to Global, but it can be changed to any of your existing Management Groups, in this example we will leave it at Global.
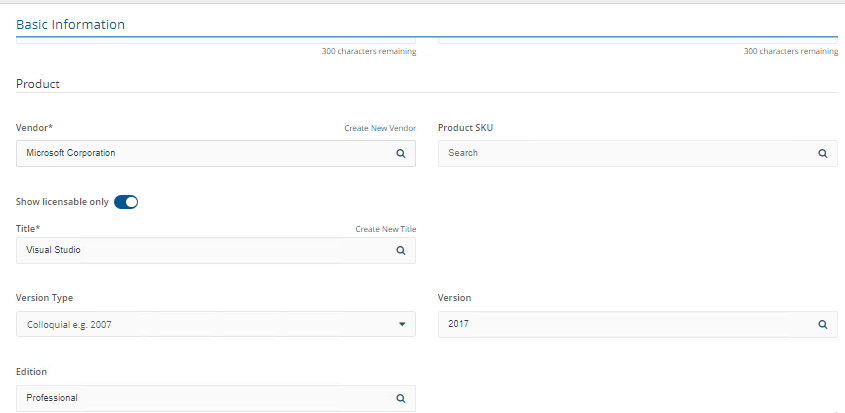
The next mandatory item is the Vendor field. As we have opened this page after selecting a product, any known fields are prepopulated. Where they are not, then as you start to type information suggestions are shown which are brought in from 1E Catalog.
Now everything is set how we want it lets make this license entitlement take effect. To do this we click the Publish button at the bottom of the page. We could have clicked Save draft, if we were in the middle of making changes and didn't want to make the license active and the license would have been saved as draft in the Licenses / Maintenances page.
Having published the license entitlement an entry now appears in the Licenses / Maintenances page.
The License we just published is shown with a green tick next to it, those in draft have a paper icon next to them.

For this simple example we populated the following fields:
Title: Visual Studio
Edition: Professional
Version Type: Colloquial
Version: 2017
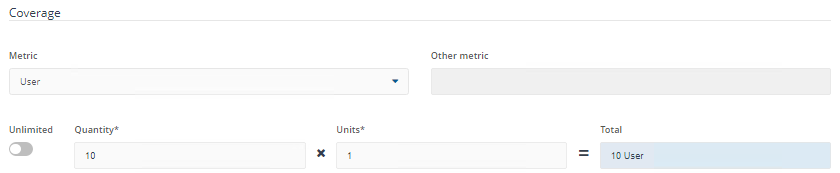
Metric Type: User (Device is default selection)
Quantity: 10 (For other more complex metric types, you will need to adjust the Quantity accordingly. For example, Microsoft Office 365 may be purchased in blocks of 5 devices, so if you bought 10 licenses at 5 devices each you would need to enter 50 in the Quantity field)
Entitlement Type: Perpetual
Start date: to the date the license started, or is due to start on. In our example, it's set to the default of the current date
Duration set the duration of the license, this will be required if the license is not Perpetual
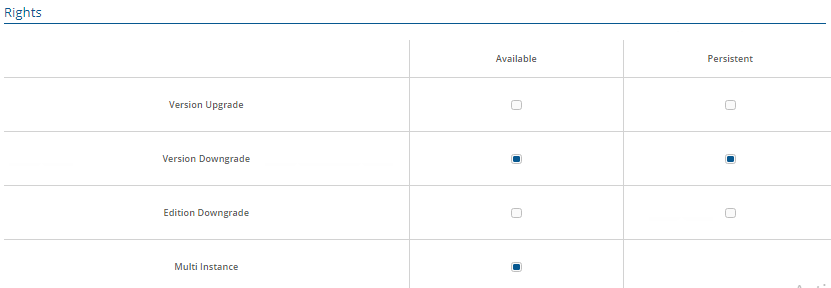
Version Downgrade: We now ensure that the both Available and Persistent check boxes under the Rights section are checked, as it should be by default. This will confirm that this license can be applied to earlier versions of Windows Server.
Costs: 150
Multi Instance: you must ensure this is checked to set the license as one that applies across multiple devices (In case of User metric based licenses, Multi Instance right is compulsory)
Currency: is already set to USD by default. AppClarity then calculates the total cost of the 10 licenses.
Note
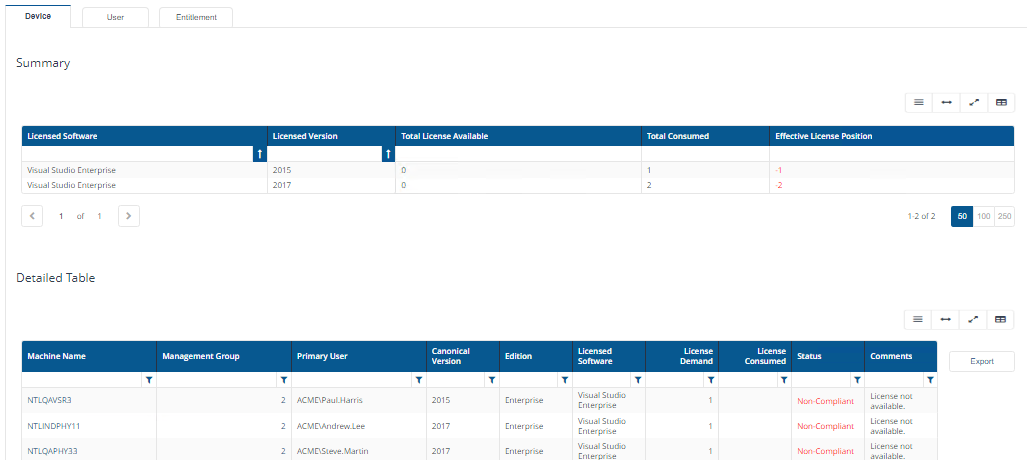
Edition Downgrade has been improved. For example Visual Studio can have multiple editions like Ultimate, Professional and Enterprise editions. In previous versions of AppClarity if you used Visual Studio Enterprise and in other addition downgraded versions like Visual Studio Professional, the lower version also consumed the same license as Visual Studio Enterprise.
If you only have an entitlement for Visual Studio Enterprise in your Inventory, the Enterprise license will cover Visual Studio Enterprise but also downgraded versions like Visual Studio Professional and Visual Studio Ultimate.
Note
You must ensure you check the Multi Instance checkbox to set the license as one that applies across multiple devices, otherwise setting the license by user will not work.
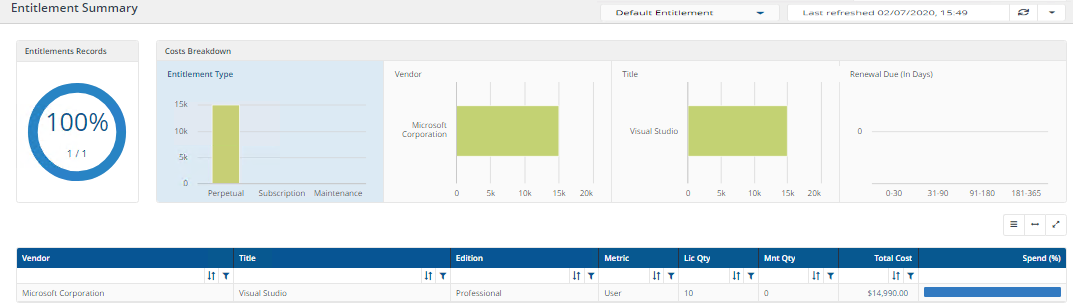
On publishing an entitlement, the Entitlement Consolidation report is refreshed. Once this is done, the data can be seen on the Entitlement Summary page.
To make a published license entitlement take effect you have to run the Compliance report:
Note
You can refresh reports from individual AppClarity screens as well as using the Settings App. You can do this by using the refresh icon next to theLast Refreshedbox, for example:

For a complete list of the specific reports you can run from particular pages refer to Running your first Compliance License Summary: Refresh Reports.
Note
You can choose which columns are displayed in Inventory and AppClarity detail tables to increase readability. On pages where you can pick the displayed columns you'll see a new control like the one highlighted below:

To find out more about this feature refer to Running your first Compliance License Summary: Choosing the columns to display in reports.
Navigate to the Settings→Connectors page and click on the Execute button.
The Execute action popup is displayed, enter the following:
Navigate to Settings→Monitoring→Process Log and wait for the action to complete, this will be Compliance and will have a green tick in the Status column when complete.
Navigate to the AppClarity→Compliance→License Position page.
In this example, you can see that Visual Studio Professional is now Compliant for 4 devices but with only 2 users.
Visual Studio Professional has 4 installations on 4 devices. But, only 2 user metric based licenses were consumed as only 2 users were accessing these 4 devices.
Repository: Default Compliance
Action: Generate Report - Compliance