Tachyon Server post-installation tasks
Post-installation tasks, which include verification checks and mandatory and optional configuration tasks.
Required tasks
The following tasks must be performed post-installation. You may have already performed some of these tasks as part of following the instructions on the Quick Start.
The Tachyon portal website will be available after installation using the Tachyon DNS Alias FQDN. For example:
Note
https://1e.acme.local/Tachyon/app
Verify installation
Note
You must perform the verification tests provided on the Verifying page.
Confirming the Tachyon website HTTPS binding
If you have implemented Tachyon Server on an IIS server that has previously been or is currently used by other applications then there may be other Web Server certificates in the Local Computer's Personal Certificates store in addition to the Tachyon Web Server certificate. In earlier versions of Tachyon, it was possible under these circumstances for the Tachyon Server installer to bind to the wrong certificate. The current version contains improved logic for avoiding this problem, but it is still good practice to verify that the configuration is indeed as expected.
To select the correct certificate for the HTTPS binding see the troubleshooting steps for Server installation issues.
If you want to optionally remove the HTTP binding, please refer below to the optional task Removing the HTTP binding from the Tachyon website.
Apply a 1E Hotfix bundle
Note
A 1E Hotfix bundle contains the latest hotfixes for a specific version of Tachyon. It consists of a manifest XML file containing commands, and files which can include scripts as well as MSP files, to patch one or more components on the local server.
If you need to apply a 1E Hotfix bundle, then you must run Tachyon Setup on all of your Tachyon servers, according to the instructions provided with the bundle.
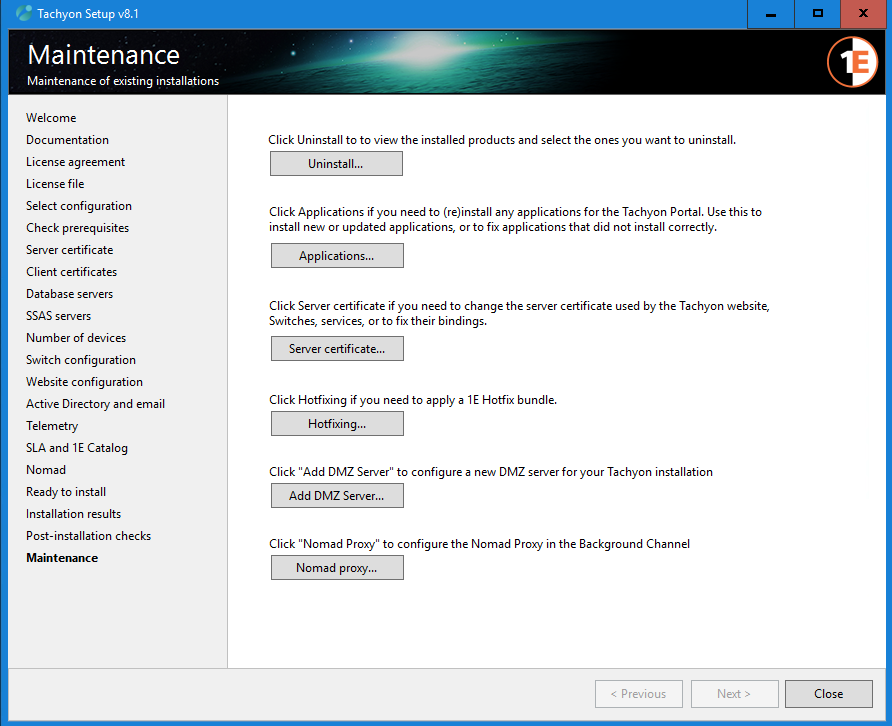
Start Tachyon.Setup
Click directly on the Maintenance link in the left-hand menu
In the Maintenance screen, click the Hotfixing... button
In the Apply a 1E Hotfix bundle dialog, click the ... button to browse for the File to upload
After locating the file you click on the Go! button
The Process Log shows the result of attempting to upload and apply the 1E Hotfix bundle
Click Close

Configure permissions
Immediately after installation, you can only access the Tachyon portal and the Settings application using the server installation account, until additional users have been added and assigned to their roles.
The installation account is assigned the Installer role and cannot be modified because it is a System Principal.
This means that one of your first steps after the installation is to connect to the Portal using the installation account and add other Tachyon users with necessary roles as described in the Users and Groups page and the Roles page.
Tip
After the initial configuration of Tachyon users and groups have been performed, we recommend that the Installer role is assigned to one or more other Tachyon users, and that your server installation account is disabled. It can be enabled later for the installation of updates and upgrades.
This approach of having a dedicated installation account ensures the same account is used for all installation activities and has relevant rights on the Tachyon server and in SQL Server. Disabling it makes it more secure than a normal user account. If an ordinary user account is used for installation tasks, there is a risk the account may be deleted, causing difficulties for future upgrades or re-installation.
Add Product Packs and configure Instruction Sets
Tachyon functionality is based on Instructions, until these are added to the system you will not be able to ask questions or perform actions. 1E provides instructions in zip files called Product Packs. A collection of Product Packs necessary for zip files is available in the Tachyon Setup zip (available on the https://support.1e.com/ and from the 1E Exchange. Each Product Pack contains a related collection of Instruction Definitions. Product Packs and Instruction Definitions can be added by a Full Administrator.
When added, Instructions are immediately allocated to the built-in Unassigned Instruction set. Instruction sets provide a way of determining the permissions for the Instructions they contain, but the Unsassigned Instruction set is only intended as a staging area for newly loaded Instructions - and Instructions in this set cannot be used directly. An Instruction can only belong to a single Instruction set, so after loading it, and before it can be used, it must be moved to another Instruction set - one created by a Full Administrator.
Instruction sets created by a Full Administrator can be used as the basis for custom roles created by a Full Administrator or Group Administrator. These custom roles determine the permissions for the Instruction sets and all the Instructions they contain. This enables the administrator to complete the assignment of specific Instruction set roles to users and determine which Instructions they can action, approve, question, or view.
You can either load instructions and create Instruction Sets for them automatically from Tachyon Setup by using the Tachyon Product Pack Deployment Tool, as described in Uploading with the Tachyon Product Pack Deployment Tool. Or, you can load the Product Packs and create their associated instruction sets by hand.
The tool is included in the Tachyon Platform zip file under the ProductPacks folder.
Tachyon.ProductPackDeploymentTool.exe (and its supporting files) is used to upload Product Packs
The tool creates a log file called Tachyon.ProductPackDeploymentTool.log in the same folder.
The ProductPacks folder contains two directories, Classic and Integrated.
The Classic directory holds a number of Classic Product Packs that contain Instructions.
The Integrated directory holds a number of Integrated Product Packs that contain definitions for some Guaranteed State Policies, associated Fragments, and Instructions. In addition, a core utility pack has been provided with common Fragments that you can use to build your own Policies.
Tachyon Product Packs reference provides full details of all the product packs included in the Tachyon Platform zip.
The account used to run the Tachyon.ProductPackDeploymentTool.exe must:
Have local administrator rights on the computer it is running on
Exist as a Tachyon user assigned to either Installer or Full Administrator role.
Deploy Tachyon clients
You will need to deploy the 1E Client (with Tachyon enabled) to at least one device in order to use any instructions. You will need to do this in order to fully verify the installation of your Tachyon Platform.
Please refer to Deploying Tachyon clients for guidance on deploying clients to Windows and non-Windows devices.
Configure Tachyon to support the Export all responses feature
The Export all feature is displayed on the responses page for a question once it has finished retrieving all its responses. To enable this to work you need to configure the following:
Configure BCP:
The Export all feature is described in Exporting data from Explorer. To enable Tachyon users with the appropriate permissions to use the Export all feature you must ensure that Microsoft Bulk Copy Program (BCP) is installed on each Response Stack, specifically the Response server where the Core component is hosted.
If Microsoft SQL Server is installed on the same server as the Response Stack, then BCP will normally be present.
If the TachyonResponses database is remote to the Response Stack and there is no local copy of Microsoft SQL Server, then you will need to install BCP.
You can confirm BCP is installed by starting a command prompt and typing bcp and usage information is displayed. The command bcp -v displays the version.
Note
The information here applies regardless of which version of SQL Server is being used. This does not imply that Tachyon itself is supported under every possible version of SQL Server that falls within those ranges. See Windows Server requirements for the supported versions and required Service Packs.
Install the following components to get BCP working:
Installer file name
Product Name
Where to get it from
vc_redist.x64.exe
Visual C++ 2017 Redistributable
https://support.microsoft.com/en-gb/help/2977003/the-latest-supported-visual-c-downloads
msodbcsql.msi
Microsoft® ODBC Driver 13.1 for SQL Server®
https://www.microsoft.com/en-us/download/details.aspx?id=53339
This needs to be installed because of a known issue in the Microsoft Command Line Utilities 15 for SQL Server.
msodbcsql.msi
Microsoft® ODBC Driver 17 for SQL Server®
https://docs.microsoft.com/en-us/sql/connect/odbc/download-odbc-driver-for-sql-server
Use version 17 (x64).
MsSqlCmdLnUtils.msi
Microsoft Command Line Utilities 15 for SQL Server
https://docs.microsoft.com/en-us/sql/tools/bcp-utility
The msi includes BCP and SQLCMD.
To verify the components have been installed, you can use AppWiz.cpl and check for the Product Name.
Configure the share:
The Export all feature enables the bulk copying of the entire completed responses for a Tachyon question to a specified network share.
Note
As this may potentially be a very large data set the location must have sufficient disk-space to store the exported data.
To use this feature you must create one or more network shares on the Tachyon Server or other location, and configure NTFS and share permissions as follows. If desired, it can be hidden using a $ at the end of the share name.
Share permissions Configure the share with Everyone modify access, or the same as the NTFS security.
NTFS Security The share folder needs modify access configured for the service account(s) used by the Tachyon Core application pool on each Response Stack server and the service account used by the Tachyon Consumer application pool on the Master Stack server. By default, this account is NT AUTHORITY\NETWORK SERVICE (if the share folder is located on a Tachyon' all-in-one' server where both the Tachyon Consumer and Core components are installed e.g. Master Stack and Response stack). However, there is another scenario where the share folder is neither located on the same server as the Tachyon Consumer or Tachyon Core components, but on a remote fileserver (like a NAS device, DFS share, etc). In this case, the Tachyon Consumer AND Tachyon Core components will attempt to connect to the share folder as their respective computer accounts, for example <domain>\<computer$>.
Therefore, depending on where the share folder is located, you will need to configure NTFS permissions for the following:
If the share is on the same server as the Tachyon Core application pool, the share must have NTFS Modify permissions added for the built-in NT AUTHORITY\NETWORK SERVICE account local to the server.
If the share is remote from the server used by a Tachyon Core application pool, the share must have NTFS Modify permissions added for the server$ account. For example, if the Tachyon Core application pool is running on a server called ACME-TCN01 the server account ACME-TCN01$ would need to be added to the remote share with NTFS Modify permissions.
If you have installed multiple Response Stacks, then repeat the preceding step, adding permissions on the share for each of the computers that are running a Tachyon Core. For instance, if you have deployed Response Stacks on two computers called ACME-TCN01 and ACME-TCN02, then the server accounts ACME-TCN01$ and ACME-TCN02$ would need to be added to the share with NTFS Modify permissions.
Tip
Alternatively, you can use an AD security group that contains the computer$ account of all your Tachyon Servers.
Note
Include any user accounts or AD groups that would require access to the share.
The preceding are the minimum permissions required. Of course, if your share has more permissions, it will also work for Export All. For example, if your share inherits the Modify permission for Authenticated Users from its parent, then this will automatically include permission for local and remote computer$ accounts, so you will not need to explicitly grant the permissions mentioned above.
Error: Header-row missing in .tsv file export | Tachyon Consumer has no access to share folder |  |
Error: Contents missing in .tsv file export | Tachyon Core(s) has no access to share folder |  |
Successful: Both header-row and contents correctly included in .tsv file export | Tachyon Consumer and Tachyon Core(s) have access to share folder |  |
Optional tasks
The following tasks are not essential, but may enhance the performance and use of Tachyon in your environment. If you are carrying out a fresh installation, then you should consider implementing them. If you have upgraded from a supported version to version, then review each one and confirm that the previous configuration is still in place, and then consider whether your update requires you to implement any of these optional tasks.
Add an inventory connector
You can add an inventory connector to Tachyon that will sync data from a data source to an inventory repository. Typically, this connector would be to another system such as Configuration Manager or to Tachyon itself. For more details please refer to the Connectors page. At least one configured inventory connector is required to support management groups.
Create management groups
You can create Management groups to partition your estate into groups of devices that can be managed separately. This is done by creating a management group in the Settings application, please refer to Management Groups page and Management Groups - tutorial for more details. To synchronize the management groups with Explorer you'll need to add a Tachyon connector, please refer to Tachyon connector for more details.
Change Tachyon database owner to 'sa'
After the databases have been created, the best practice is to change the owner of each database to sa, to avoid issues if the owner's Windows account is deleted in the future.
The following script can be used to change the owner of each database to sa. This will work even if the sa login has been disabled, which is also best practice.
Change owner to 'sa' Expand source
ALTER AUTHORIZATION ON DATABASE::TachyonMaster To "sa"
GO
ALTER AUTHORIZATION ON DATABASE::TachyonResponses To "sa"
GO
Note
Ensure the Server Installation Account retains the db_owner role on the database to support re-configuration and upgrades. If the account is removed from being owner, then it will also be removed from the db_owner role and will need to be re-assigned, for example by using the Grant db_owner SQL script.
The owner user and db_owner role are both mapped to the database dbo user. It is preferable for the account to be a member of the db_owner role, instead of being the owner user.
Grant db_owner Expand source
USE [TachyonMaster]
GO
CREATE USER [ACME\TCNinstaller01] FOR LOGIN [ACME\TCNinstaller01];
ALTER ROLE [db_owner] ADD member [ACME\TCNinstaller01];
GO
USE [TachyonResponses]
GO
CREATE USER [ACME\TCNinstaller01] FOR LOGIN [ACME\TCNinstaller01];
ALTER ROLE [db_owner] ADD member [ACME\TCNinstaller01];
GO
Changing the SMTP Host configuration
The server installer does not support configuration of SMTP credentials, but these can be configured post-installation. By default, Tachyon assumes port 25 and anonymous authentication.
Tachyon stores its SMTP configuration in
<INSTALLDIR>\Tachyon\Coordinator\Tachyon.Server.Coordinator.exe.config (workflow emails)
After any changes reboot the server or restart the 1E Tachyon Coordinator service.
<configuration>
  ...
  <appSettings>
    ...
    <add key="smtpHost" value="ACME-EXC01.acme.local"/>
    <add key="TachyonEmail" value="Tachyon@acme.local"/>
    ...
    <add key="2FAEnabled" value="true" />
    ...
  </appSettings>
  ...
  </entityFramework>
  <!-- The settings in the following section can be modified to provide custom port and authentication options for SMTP -->
  <system.net>
    <mailSettings>
      <smtp deliveryMethod="Network">
        <network
          port="25"
          defaultCredentials="true"
          userName=""
          password=""
        />
      </smtp>
    </mailSettings>
  </system.net>
</configuration>
Note
Microsoft's documentation for the SMTP network section can be found here: https://msdn.microsoft.com/en-us/library/ms164242(v=vs.110).aspx.
When defaultCredentials is set to true, the mail subsystem uses the Windows credentials from the process under which the coordinator service is running to connect to the mail server. In general, this will only work with Microsoft servers, or servers that allow anonymous connections. To use different credentials, set defaultCredentials="false" and add values for username and password (and, optionally, clientDomain ).
To use an encrypted connection, if the server supports it, add enableSsl="true". Change the port as needed, for example, port="465" or port="587".
Microsoft supports parameters named host and From, but these are ignored by Tachyon because the smtpHost and TachyonEmail keys in the <appSettings> section take precedence.
Note
If smtpHost is set to empty (blank) in a config file then email is disabled for the corresponding feature.
The Email and 2FA requirements feature requires email. Therefore, if smtpHost is set to empty, then the 2FA feature must be disabled by setting <add key="2FAEnabled" value="false" /> in the <INSTALLDIR>\Tachyon\Coordinator\Tachyon.Server.Coordinator.exe.config file.
Finally, reboot the server or restart the 1E Tachyon Coordinator service.
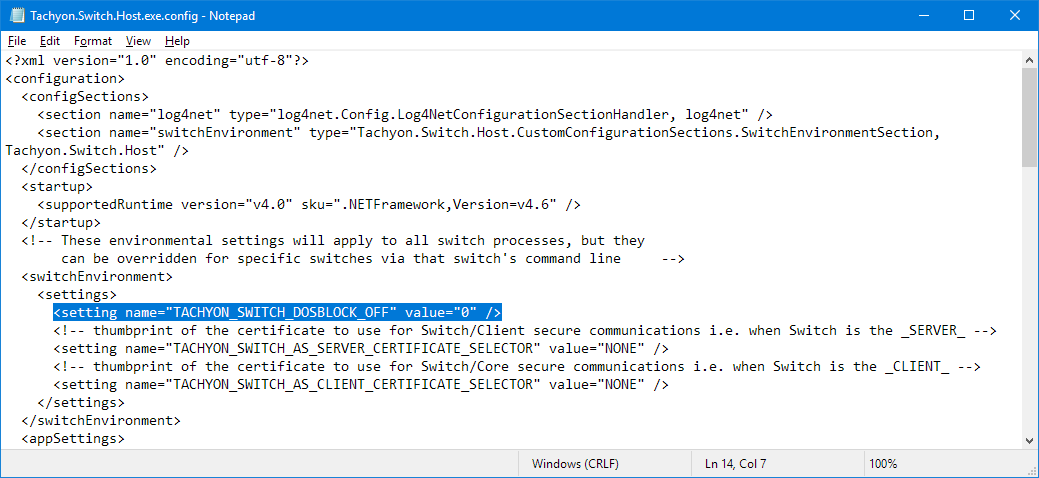
Enabling or disabling Denial-of-Service Blocking
By default, a Switch will temporarily blacklist the IP addresses of devices that "misbehave" - that is, if an external device, browser or other endpoint, sends a message other than Online when it first connects. This is to handle denial-of-service attacks or other malicious attempts to connect to the Switch.
However, you may wish to disable this feature in some circumstances. For example, if you are using a load balancer that sends a probe which triggers the block on its IP address, potentially blocking all clients using the load balancer.
You can configure this feature by editing the TACHYON_SWITCH_DOSBLOCK_OFF setting in the <INSTALLDIR>\Tachyon\Switch\Tachyon.Switch.Host.exe.config file.
By default, the setting is not present in the config file. If not present, empty, 1, or any value other than 0, then DoS blocking is disabled (off).
Set to 0 to enable (turn on) DoS blocking.
For a change of setting to take effect, restart the Switch Host service.
  <switchEnvironment>
    <settings>
      <setting name="TACHYON_SWITCH_DOSBLOCK_OFF" value="0" />
      ...
    </settings>
  </switchEnvironment>
You can test this by using a browser to go to:
http://tachyon.acme.local:4000
if the blocking is enabled this will be blocked for a few seconds, and if you refresh the browser you will see the connection is immediately rejected, but if the blocking is disabled you will see these are not rejected.
Blocking: On
When the blocking is on you will see Agent blocked warning messages in the Switch log when a device misbehaves:

Blocking: Off (default)
When the blocking is off, the first time it would have triggered you will see an INFO message saying it is disabled.

Enabling or disabling Device Deduplication
Please refer to the Device Deduplication page for further information about how the process works, and how to configure the settings.
Warning
The Device Deduplication feature is not enabled until you have modified the Coordinator configuration settings.
The configuration steps describe updating the Coordinator configuration file, specify False (default) for each of the configuration arguments. You are strongly advised that all configuration arguments - except for DeviceIdentifier - are set to False (default) for the first run or for whenever a new DeviceIdentifier value is being set. Results should then be analysed to ensure that the DeviceIdentifier specified is correct for your environment.
Tachyon stores its Device Deduplication configuration in the <INSTALLDIR>\Tachyon\Coordinator\Tachyon.Server.Coordinator.exe.config file.
After any changes reboot the server or restart the 1E Tachyon Coordinator service.
The time and frequency of when the Device Deduplication process runs is changed by adding and editing the DeviceDeduplication setting.
<module assemblyName="Tachyon.Server.Coordinator" providerName="Tachyon.Server.Coordinator.Scheduling.SchedulingModule">
  <settings>
    <add key="Crontab1" value="50 23 * * * LogDevicesSeenInTheLast7Days" />
    <add key="Crontab2" value="15 * * * * MaintainPolicyRulePartitioning" />
    <add key="Telemetry" value="40 23 * * 5 SendTelemetryStats" />
    <add key="DeviceDeduplication" value="0 1 * * 0 DeviceDeduplication {DeleteDevices:'false',UpdateDeviceData:'false',DeleteOrphanedDeviceData:'false',DeviceIdentifier:['FQDN']}" />
  </settings>
</module>
The numbers that you see after value is a crontab schedule expression. The schedule 0 1 * * 0 means "at 01:00 hours, any day of the month, any month of the year, on weekday 0 (Sunday)". In other words, this configuration runs the Device Deduplication process at 1AM UTC every Sunday night.
You can use an online tool such as https://crontab.guru/ to verify your crontab schedule expression.
Warning
Please ensure there are no spaces in the arguments text {within the brackets}.
Do not change the other crontab keys unless advised by 1E.
Enabling or disabling Telemetry features
Telemetry helps 1E to continually improve your experience. Only summarized statistical information is collected, which enables 1E to see how customers use features of the application. No personally identifiable data is collected. 1E use this information to:
Understand how the product is being used to influence future development decisions
Plan supported platforms (OS, SQL etc. versions) over time
Deliver a smooth upgrade experience as we can focus testing on implemented scenarios
Improve system performance
Identify early warning signs of potential issues such as excessive growth of database tables, instruction failures etc. so we can pro-actively address them.
Server telemetry reports how the platform is used and data is compressed, encrypted and sent to 1E through email on a configurable schedule. Full details of the Server telemetry data sent to 1E is provided in Server telemetry data.
User Interface telemetry reports how the user interface is used, and data is sent directly from administrator browsers to the 1E Cloud.
Server telemetry
Note
By default, Tachyon collects data continuously and sends a compressed and encrypted summary by email to 1E every Friday at 23:40 UTC.
If you have disabled the email feature then Server telemetry will not be sent to 1E.
In this version of Tachyon Platform, you must edit the Server telemetry configuration in the <INSTALLDIR>\Tachyon\Coordinator\Tachyon.Server.Coordinator.exe.config file.
After any changes reboot the server or restart the 1E Tachyon Coordinator service.
Note
Changes to the Telemetry configuration do not affect the data exported into an unencrypted CSV file by the Export Telemetry button on the Settings → System information page.
The time and frequency of when Telemetry is sent to 1E is changed by editing the Telemetry line.
<module assemblyName="Tachyon.Server.Coordinator" providerName="Tachyon.Server.Coordinator.Scheduling.SchedulingModule">
  <settings>
    <add key="Crontab1" value="50 23 * * * LogDevicesSeenInTheLast7Days" />
    <add key="Crontab2" value="15 * * * * MaintainPolicyRulePartitioning" />
    <add key="Telemetry" value="40 23 * * 5 SendTelemetryStats" />
  </settings>
</module>
Telemetry emails can be disabled by changing the key name from "Telemetry" to "DISABLED". To enable them, change it back to "Telemetry".
The numbers that you see after value is a crontab schedule expression. The schedule 40 23 * * 5 means "at 23:40 hours, any day of the month, any month of the year, on the 5th day of the week (Friday)". In other words, this configuration sends the telemetry data every Friday night.
You can use an online tool such as https://crontab.guru/ to verify your crontab schedule expression.
Warning
Do not change the other crontab keys unless advised by 1E.
User interface telemetry
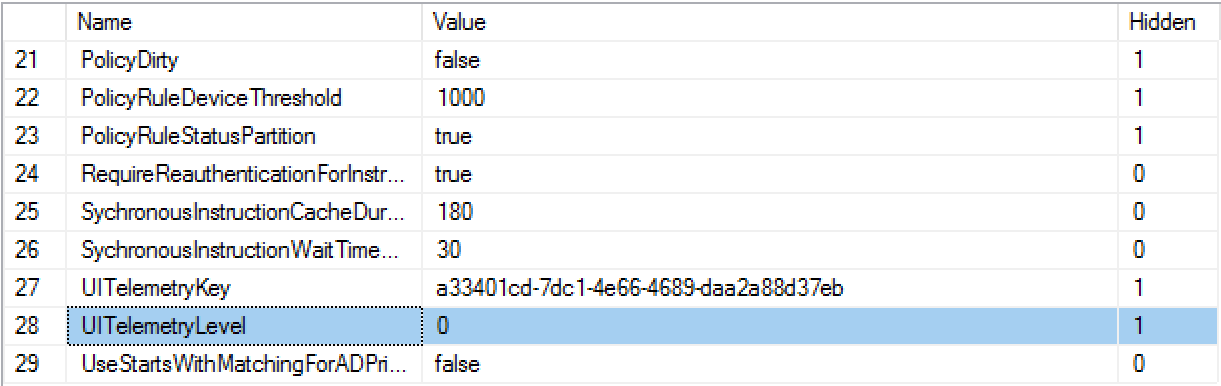
In this version of the platform, you must edit the User interface telemetry configuration in the Master database.
Connect to the TachyonMaster database and edit the GlobalSetting table. Locate the entry whose Name is UITelemetryLevel and change the Value to 0, 1, 2 or 3, to reflect the type of data that is reported to 1E.
0 - Off
1 - Anonymous
2 - License Name
3 - License Name and Unique user ID
The change takes effect for each user when they close and reopen their browser to connect to the portal.
Note
License Name is Customer name as it appears in the license file and License information page.
Unique user ID is a random ID number representing an individual user.
 |
Enabling or disabling Two-factor Authentication
2FA is optionally disabled (enabled by default) in the Active Directory and email screen. If you need to change this after installation, then you need to edit the setting <add key="2FAEnabled" value="true" /> in the <INSTALLDIR>\Tachyon\Coordinator\Tachyon.Server.Coordinator.exe.config file.
If enabling 2FA, please refer to Email and 2FA requirements.
Removing the HTTP binding from the Tachyon website
You can optionally remove the HTTP binding from the Tachyon website on any Tachyon server (Master, Response, DMZ or other server). You can do this by simply deleting the HTTP binding in IIS Manager.
The table below lists 1E products and apps that may depend on the website HTTP binding, which you should consider before removing it from the Master Stack.
Note
In this version of platform, upgrading will re-instate the HTTP binding. Therefore, you will need to repeat the removal process described below.
App | Tachyon Master Stack | Tachyon Response server |
|---|---|---|
AppClarity (Software Reclaimer) | No dependency on HTTP, although the Reclaimer uses HTTP by default. To use HTTPS, Software Reclaimer requires its Reclaimer XML to be reconfigured to use HTTPS. Please refer to Configuring Software Reclaimer to use HTTP or HTTPS. | No dependency on HTTP. Software Reclaimer does not use Response Servers. |
Application Migration (Task Sequences) | No dependency on HTTP. | No dependency on HTTP. Application Migration does not use Response Servers. |
Content Distribution | You will need to keep the HTTP binding only if you are still in the process of upgrading from Nomad 7.0.200 or earlier, which uses HTTP to connect to the Master Stack server. Nomad clients (in 1E Client 5.2, 8.0, 8.1, and later) do not connect to the Master Stack. | No dependency on HTTP. Nomad clients (in 1E Client) use HTTPS by default, and connect to the Background Channel. |
PXE Everywhere Central | Although PXE Everywhere Central is not an app, it can be installed on a Tachyon server. It requires HTTP, but this will be normally under the Default Web Site, which means you can safely remove the HTTP binding from the Tachyon website. However, there are circumstances where PXE Everywhere Central may have installed under the Tachyon website, in which case you will need to keep the HTTP binding, or remove the HTTP binding and re-install PXE Everywhere Central. PXE Everywhere Central will automatically install under the Tachyon website, or create its own website, if the Default Web Site does not exist or does not have an HTTP 80 binding. PXE Everywhere does not support HTTPS and uses/creates a HTTP 80 binding by default. You can optionally change the HTTP port after installation, but you must ensure PXE Everywhere Agents are also configured to use the same port. | See Master Stack. |
ServiceNow apps | No dependency on HTTP. | No dependency on HTTP. |
The following apps have no dependency on HTTP.
Experience
Explorer
Guaranteed State