Connectors page
Tachyon platform uses connectors to connect to other 1E and third-party systems. In addition to the inventory connectors provided, the following entitlement connectors are provided by AppClarity.
Please refer to the Connectors page for details.
AppClarity v5.2 connector
Exports entitlements from an AppClarity 5.2 database into a TSV file, which can then be reviewed and imported into AppClarity. You only require access to the AppClarity 5.2 database, you do not require a full installation of AppClarity 5.2. The TSV export file contains all the exported entitlements, this is a summary of the process:
After export, you should review the TSV file you will need to use the Entitlement .tsv connector to import them into AppClarity. See Entitlement import files reference page regarding structure and content of TSV files.
Note
If you are migrating from AppClarity 5.2 please contact 1E for help, with using this process and reviewing the contents of your TSV file before importing into AppClarity.
The AppClarity 5.2 connector is a preview for a forthcoming feature that will enable the migration of entitlements from AppClarity 5.2 so that they can be imported into AppClarity. We recommend that this feature is not used in a production environment and evaluated only in a lab environment.
The following limitations apply:
Only license and maintenance entitlement types are exported from AppClarity 5.2
Linked entitlements only support a single license with associated maintenance entitlements. For example, License1 is associated with Maintenance1, Maintenance2, Maintenance3 etc.
Files attached to contracts in AppClarity 5.2 are not exported or imported.
Management groups must exist in Tachyon if they are referenced in any entitlements in AppClarity 5.2. Please refer to Management Groups page.
Bundled entitlements are not supported for extended cases and may result in incorrect linking or export results. For example, when a single license is associated with multiple contracts or when a single maintenance is associated with multiple licenses and many more such cases.
There are some input value restrictions in AppClarity that are not in AppClarity 5.2. For example, contract number is allowed as alphanumeric in AppClarity 5.2, but must be a number only in AppClarity. Issues should be highlighted as caveats during import, most of which you can resolve by editing any problematic entitlement.
Metric Type and Metric Name in AppClarity 5.2 do not map directly to Metric Type and Metric Other in AppClarity. Therefore, you will see Invalid Metric Other caveat for every entitlement you import, unless the original Metric Type is Other. For Metric Type of Device, which is most common, you can publish directly without any concern. For remaining metric types, you can review before import, or correct after import.
Set permissions on the AppClarity 5.2 database
The connector requires an SQL login to exist in the AppClarity 5.2 database, with explicit Execute permissions to the stored procedure dbo.APSP_ExportEntitlement
This can be granted in any of the following ways:
If the connector is using Trusted Connection, the SQL login is the SLA Integrate Services Agent account which is normally Network Service
If the connector is not using Trusted Connection, then you can use any SQL login on the AppClarity database and grant it the above rights, and use this login as User ID and password in the AppClarity 5.2 connector.
Set permissions on the export folder
The connector requires a folder location that must be file share, or a folder on the Tachyon server, to which the SLA Integrate Services Agent account has write access to.
The folder location can be a folder on the Tachyon server, or a remote share, provided write access is given to the SLA Integrate Services Agent account which is normally Network Service.
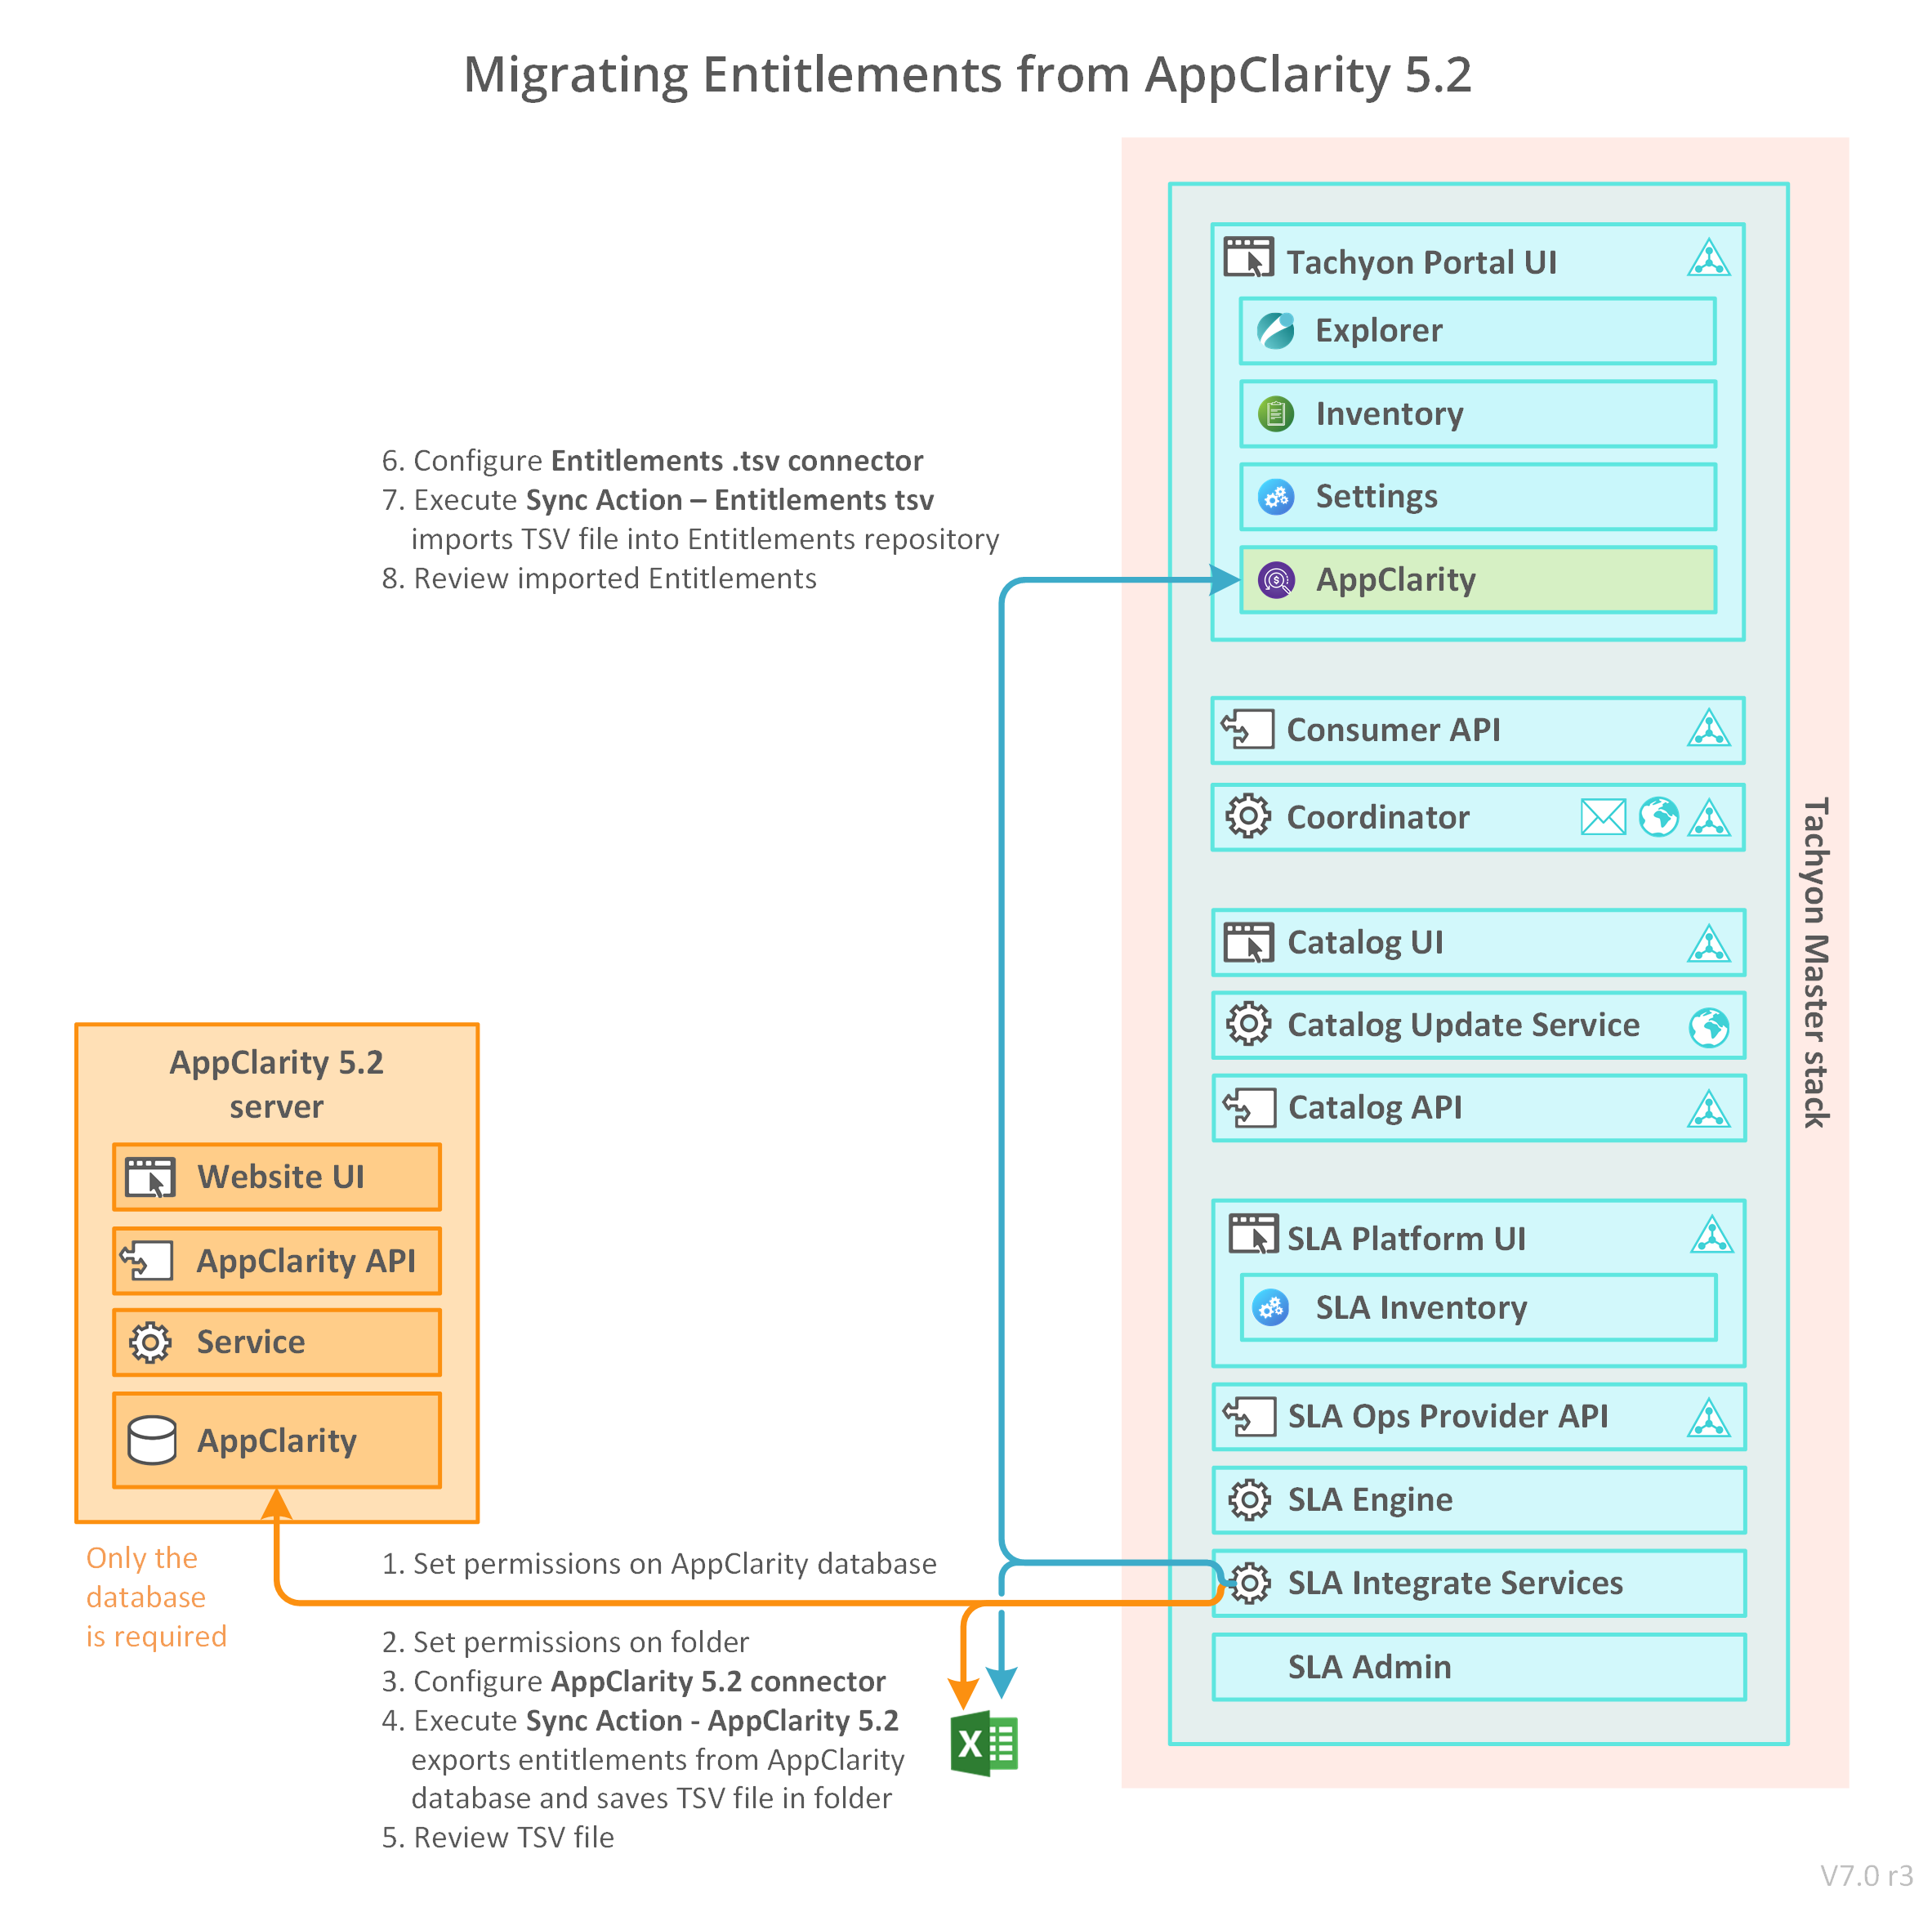
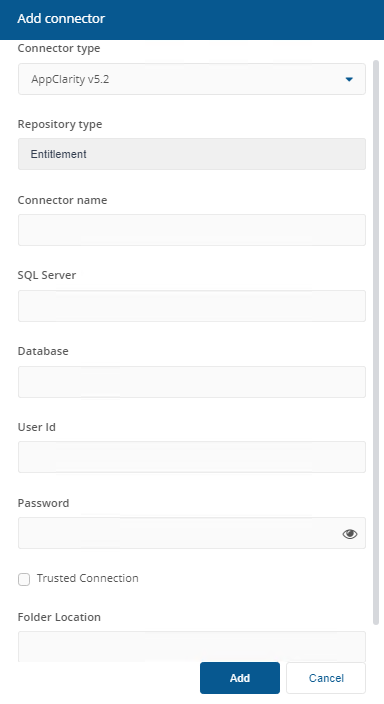
Configure the AppClarity v5.2 connector
Navigate to Settings→Configuration→Connectors.
Click the Add button.
In the Add Connector popup select the required Connector type from the list of connector types.
Once you've made a selection the Add connector popup will show fields appropriate to the selected Connector type.
Enter Connector name.
In Name, enter a logical name for this connector, for example AppClarity 5.2 production
Tip
You should use a naming convention for connector names:
<connector type> <scope> <RCR>
Scope describes where data is coming from or what it's being used for. For example Demo, Test, Lab, Q2 Audit.
In SQL Server, enter the name of the SQL Server instance where the AppClarity 5.2 database is hosted. If it is a named instance, append it to the server name, for example
Server_Name\Instance.In Database, enter the name of the AppClarity 5.2 database, this is usually AppClarity.
If you are using Windows Authentication to authenticate with the SQL Server instance:
Check Trusted Connection
You do not need to populate the User Id and Password fields.
If you are using a SQL Login to authenticate with the SQL Server instance:
Uncheck Trusted Connection
In User Id, enter the name for the SQL login you want to use to connect to the database.
In Password, enter the password for this login.
In Folder Location, enter the location for where your exported TSV file will be written.
Click Save.
Note
Test will confirm whether the SLA Integrate Services Agent account, or specified SQL Login, can connect to the specified database instance.
It does not test the following:
If permissions on the AppClarity 5.2 database have been set correctly (refer toSet permissions on the AppClarity 5.2 database)
If permissions on the AppClarity 5.2 database have been set correctly (refer to Set permissions on the export folder).
It is only when you attempt to use the connector (create new action Sync Data) that you will experience an issue if these points are not addressed. Then you will find the export TSV file is not created, and not see any error or warning.
Additionally, Test does not test if the stored procedure has been hotfixed.
Execute Sync Action - AppClarity 5.2
When a new connector is saved a new action is defined in Tachyon. This new action will have a name of the form: Sync Data - Connector name, for example Sync Action - AppClarity 5.2 production.
Click the Execute button.
In the Execute action popup subsequently displayed, use the Repository menu to select the inventory repository you want to populate.
Once the repository has been selected you can then select the action to run. In the case of inventory repositories the actions will be restricted to inventory related actions. For a connector you will be looking for an action with the form Sync Data - <connector name>.
For inventory syncs you have the option to check the Clean Sync checkbox.
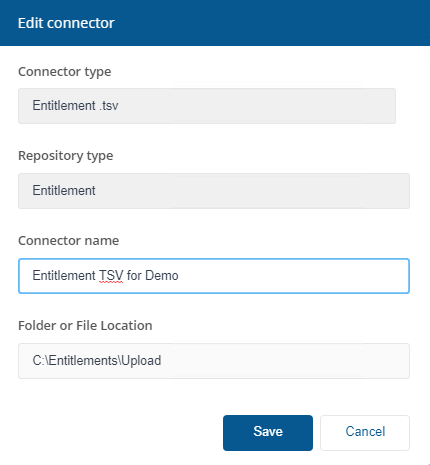
Entitlement .tsv connector
Uploads entitlements from a folder containing one or more tab or comma separated value file(s).
Entitlement files can be created using the AppClarity v5.2 connector (if you are migrating from AppClarity 5.2), or created manually.
Requirements
Before adding a new Entitlement .tsv connector, you will need the following:
Entitlement files must be either tab or comma separated with corresponding .tsv or .csv extension
Entitlement files must have the correct column structure and content, as described in the reference page: Entitlement import files
The location of entitlement TSV files, which can be a folder location, or share, with at least read access for the SLA Integrate Services Agent account.
Entitlement .tsv connector configuration
In Name, enter a logical name for this connector
Tip
You should use a naming convention for connector names:
<connector type> <scope> <RCR>
Scope describes where data is coming from or what it's being used for. For example Demo, Test, Lab, Q2 Audit.
In Folder or File Location, enter the location for your entitlement TSV file(s)
Tip
The folder location can be a folder on the server, or a remote share, which the SLA Integrate Services Agent account has read access to.
All files in the folder location will be uploaded, including sub-directories. Files can have any name, provided they have a .tsv or .csv extension.
Click Save
Tip
Test will error if the service account does not have read access to the folder location, or if there are no files in the folder.
Note
Once uploaded, ensure you remove uploaded files from the location. Duplicates will be created if you upload the same file(s) to the same Entitlements repository, which you will then need to manually delete.
Execute or schedule an action as described on the Connectors page.
 |