Reclaiming a product based on its usage
Inventory fetches information from its data sources to return details of how products are being used, wherever available. Reclaim Administrators who are interested in reclaiming unused software in order to recycle licenses can use this information to set their reclaim policies.
We'll start with a simple example based on reclaiming unused versions of a software. In this case the policy we set up will be soft (optional) in that it will only trigger a reclaim that allows the user to opt out and keep the software, as long as they provide suitable justification. In this example we use the global management group, more on that later.
This example assumes that you have already run a sync on your selected inventory repository to retrieve inventory data from one or more connector sources. As a result of doing this a number of reports are automatically run. The essential one, particularly for reclaim, is:
Reclaim Product Usage is run on the compliance repository associated with your chosen inventory repository. In our example we use the Default Compliance repository (which is automatically associated with the Default Inventory).
Note
You can choose which columns are displayed in Inventory and AppClarity detail tables to increase readability. On pages where you can pick the displayed columns you'll see a new control like the one highlighted below:

To find out more about this feature refer to Running your first Compliance License Summary: Choosing the columns to display in reports.
To view the current product usage and create a reclaim policy for a particular product:
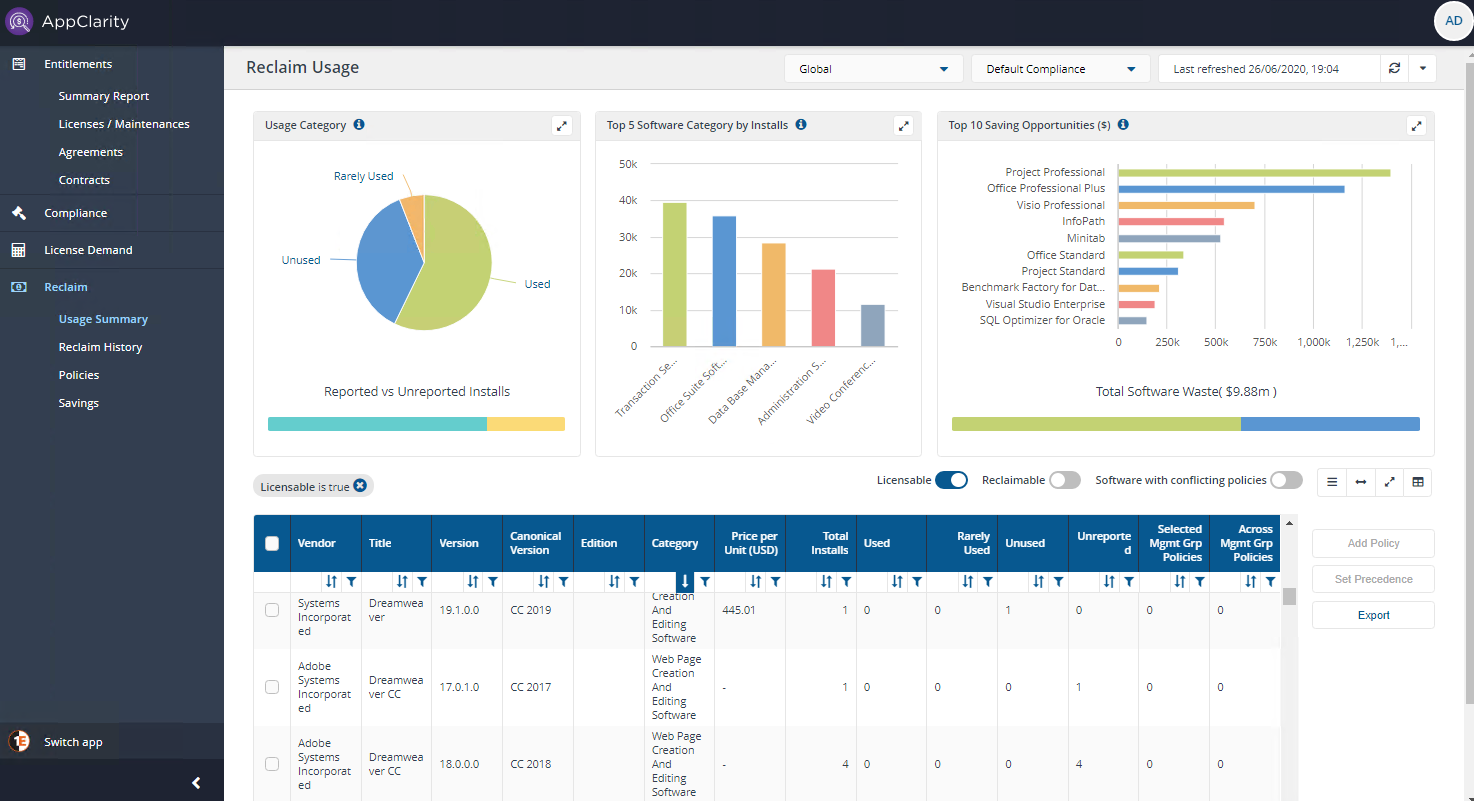
Navigate to the AppClarity→Reclaim→Usage Summary→Reclaim Usage page.
Note
The first thing to notice is how this page displays a chart of software organized according to the four usage categories for software in the inventory. Three categories are for reported usage:, Used, Rarely Used, Unused, and the 4th category is Unreported. The pie chart shows the proportions of the reported categories. The bar underneath shows the proportions of unreported and reported.
The next thing to notice is that there is a filter set by default that limits the display to the selected management group, in our example the Global management group, and another filter that limits the display to licensable products only. You can remove these filters if you don't see the software you want to reclaim. Your charts will only show the categories which your software fall into, and how you apply filters.
Unused software is usually the best candidate for reclaim.
Please refer to Usage categories for a detailed understanding of how usage categories are calculated.
In our example let's investigate Project Professional for example, you could do this by filtering the table view by Title containing Project and by Edition containing Professional or if you know the version, by filtering on Version.
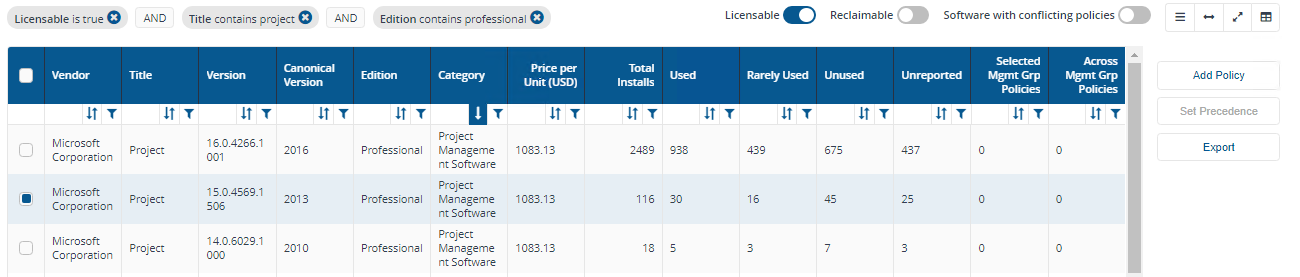
For our example we'll focus on Project Professional 2013, notice there are 116 Total Installs, 30 Used, 16 Rarely Used, 45 Unused and 25 Unreported products. Please refer to Usage Summary page for more details on how this page works and the columns displayed in the table. In our example you can see the usage details for the Project Professional 2013 product indicating that it has 45 unused installations and there are no reclaim policies currently set for it.
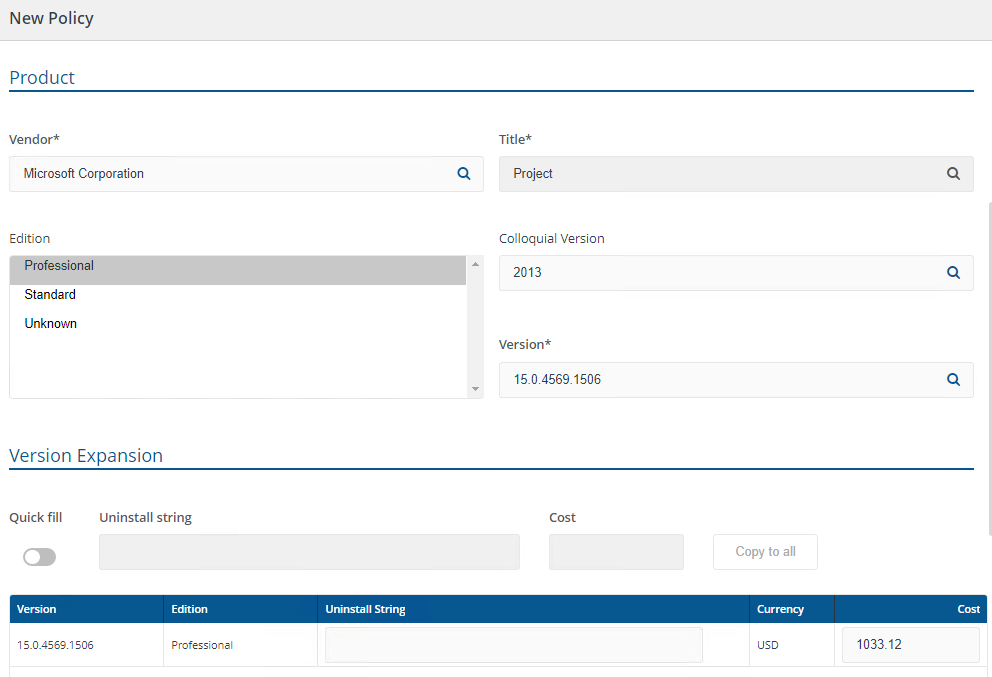
You can click on the Add Policy button on the left side of the Reclaim Usage page after selecting the product. Doing this displays the New Policy page with the details pre-filled with the information related to the selected product, please refer to the New Policy page for more details on how this page works. Here you can see the following information has been set automatically:
Note
Vendor is set to Microsoft Corporation
Title is set to Project
Edition is selected as Professional
Colloquial Version is set to 2013
Version is set to 15.0.4569.1506
Version Expansion is already expanded to that same version.
Note
There are constraints on the fields when you enter the information manually that you won't necessarily encounter in a pre-filled New Policy page like this one. Please refer to the New Policy page for more details on those constraints.
We can now decide which devices where the reclaim policy will run by applying the policy to a management group. You can select the global management group (also known as All Devices) by checking the Global checkbox.
We also want to publish the reclaim policy straight away and have it active, so we ensure that the Enabled checkbox is checked.
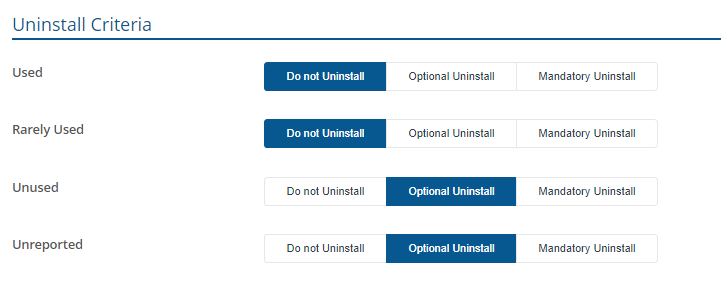
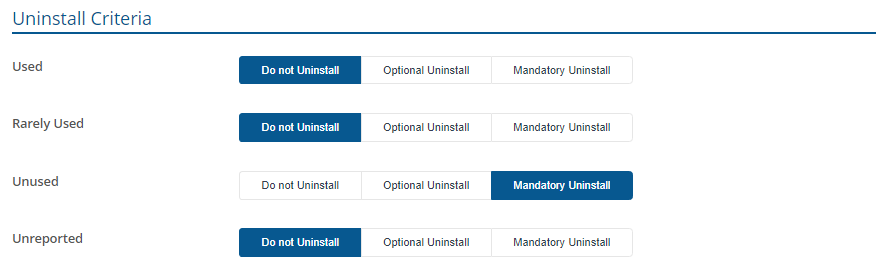
Now we set the reclaim aspects of the policy. There are four Uninstall Criteria controls corresponding to each of the software usage categories, where you can select the action to take if the target software is in that category.
In our example we want to leave the Used and Rarely Used controls at their default of Do not Uninstall.
For Unused and Unreported we want to set both of these to Optional Uninstall. This will mean that users on the devices where the targeted software in those states are installed will receive a notification requesting to uninstall the software.
Having set the policy we can now click Publish to start the process of making the policy active.
The new reclaim policy now appears on the Policies page, it's reported as Is Enabled = TRUE and Status = Published AppClarity will now make the policy live by automatically running the Reclaim Consolidation report.
Tip
When setting up a reclaim policy, for example for Notepad++, if you know uninstall command line, then you may enter it inside Uninstall string box for the version. Please follow these rules.
Each uninstall command line must be enclosed in double quotes - for example:
"C:\Program Files (x86)\Notepad++\Uninstall.exe"
You can use multiple command lines for same product version which are tried in succession. Ensure each command line is enclosed in double quotes, and separated by double pipe character ("||") . For example:
"C:\Program Files (x86)\Notepad++\Uninstall.exe"||"C:\All Softwares\Notepad++\Uninstall.exe"||"C:\Tools\Notepad++\Uninstall.exe"||"D:\Softwares\Notepad++\Uninstall.exe"
What the end-user sees
Let's suppose there is a device where the target software is installed and it is in the unused usage category. The reclaimer should have been configured to run on each device where reclaim is supported, this is done in two modes:
Is in mandatory mode, usually scheduled to run overnight on the device.
Is in opt-out mode, usually scheduled to run during the day when the end-user is logged on to the device.
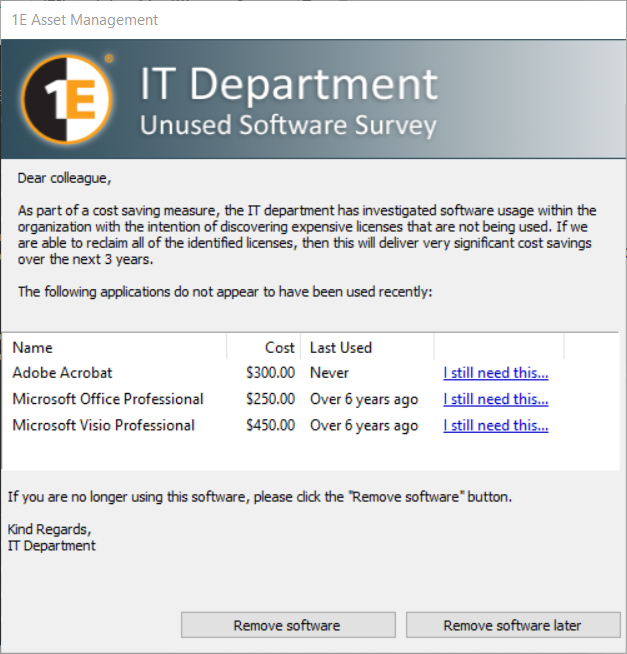
When the reclaimer on that device runs in opt-out mode to fetch policies, it will be informed that it needs to start the process of uninstalling the software in opt-out mode. This will mean that an reclaimer opt out notification dialog will be displayed to the next end-user that logs on, informing them that a particular software title on their device is reported as not having been used and is therefore due for a reclaim. In more detail:
The dialog shows them:
the name of the software.
the cost that would be recovered by reclaiming the software.
the last time the software was used.
The end-user then has the choice of:
Clicking on the I still need this link, and entering a suitable reason why the software should not be reclaimed.
Clicking the Remove software button, in which case the software is marked for immediate uninstallation.
Clicking the Remove software later button, in which case the software will be scheduled for uninstallation at some point in the future and not for immediate uninstallation.
In our example the end-user chooses to keep the software by clicking on the I still need this link and providing a suitable reason. Doing this displays the Confirm software use dialog.
The user enters their reasons for retaining the software and then clicks the OK button.
The Confirm software use and the reclaimer opot out dialogs both close.
The user has provided their reasons, it's now up to the AppClarity administrator to accept or reject their request to retain the software.
Tip
Please refer to Deploying Software Reclaimer for more details about customizing, deploying and testing the Software Reclaimer.
Responding to an end-user request to retain reclaimable software
After you've created some opt-out reclaim policies you will need to keep track of the ones that are currently in operation and requires attention from reclaim administrator.
To administer software reclaim policies:
Navigate to the AppClarity→Reclaim→Policies page, you may need to refresh the page if you are already there.
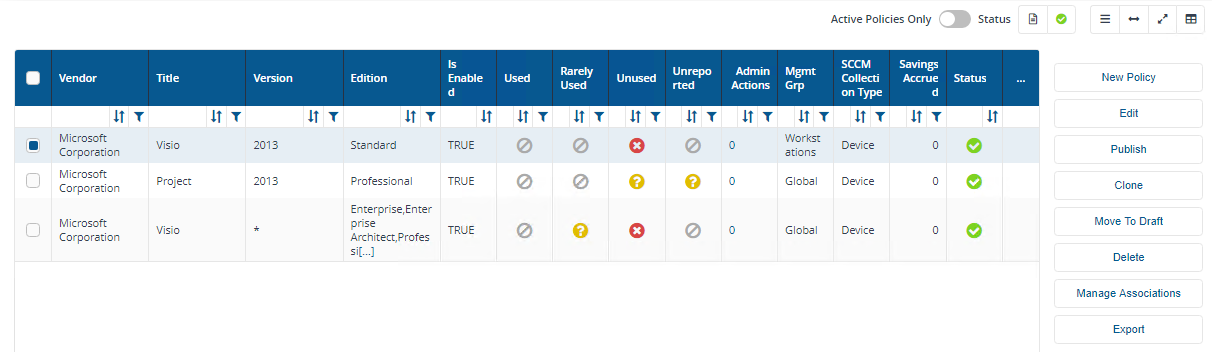
Locate the required reclaim policy, you should see that the Admin Actions column shows 1, indicating that there is one pending request to be processed.
Clicking on the number in the Admin Actions column displays the Administration page for that reclaim policy, please refer to Administration page for more details.
Here you can see the reclaims that have been completed for this policy and the reclaims still in progress. At the bottom of the page is the Reclaim Override Management table that lets you respond to requests for retaining software. To respond to a particular request you do the following:
Check the checkbox at the start of the request entry in the table
You then have the option of:
Clicking the Accept button to accept the end-user request to retain the software
Clicking the Reject button, in which case the optional software reclaim will be converted to a mandatory reclaim and the software will be removed without any further interaction with the end-user in very next cycle.
In our example we click the Accept button to allow the end-user to start using the software again, as they indicated in their reason.
A notification popup appears saying that the user's opt out request has been accepted and that the software will not be reclaimed at this time. Click on OK to close the notification.
Clicking on the AppClarity→Reclaim→Polices page shows that there are now 0 Admin Actions for this software reclaim policy.
Resolving overlapping reclaim policies
As a result of defining reclaim policies you may find that they overlap in terms of the devices and products they apply to. Only one policy can be applied for a given device and product and to resolve the conflict you can set the precedence to decide which of your policies are preferred. This becomes significant when management groups are involved.
Note
Click here to see how to create the management groups for this example...
Tip
Here we present an overview for the management groups used by this reclaim example. For detailed instructions on creating management groups please refer to Management Groups page.
Management Groups - tutorial
In this tutorial
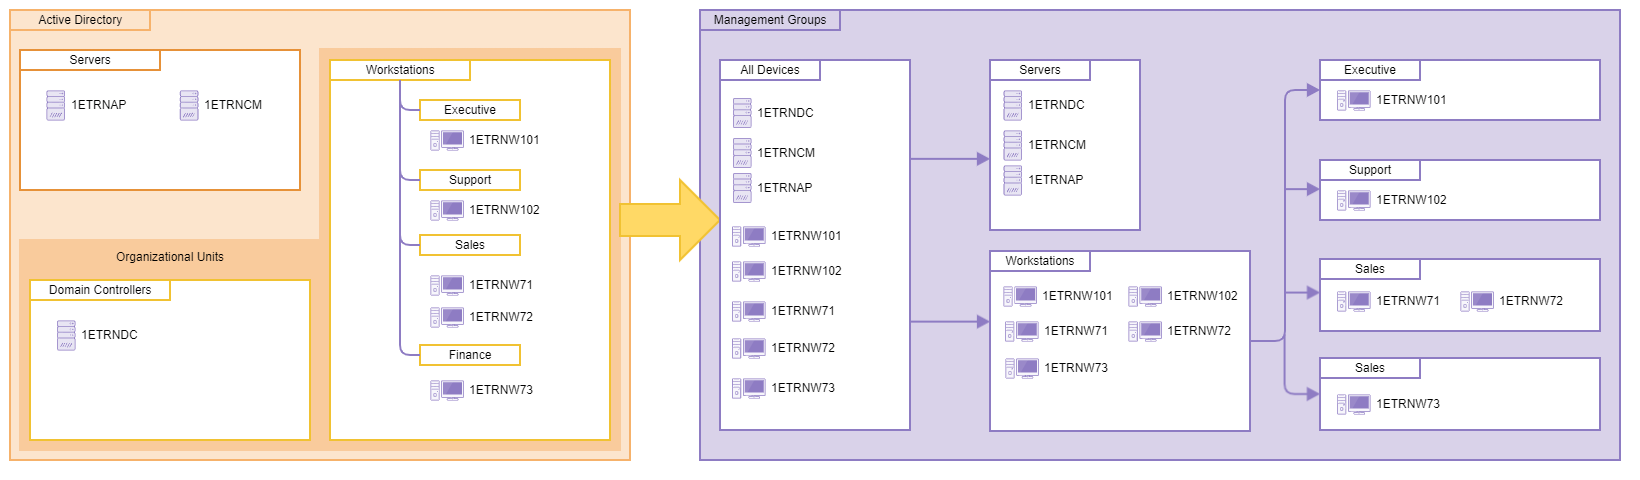
In this tutorial, we add a number of Management Groups for the ACME organization: one that uses the name of the devices and several that use the Organizational Unit (OU) the devices belong to. The following picture shows what we have in our example Active Directory and how this will appear as Management Groups in Tachyon. Here you can see there are two servers in the AD Computers group, an additional Domain Controller server and five workstations in the OU.
By the end of this example, you will have added six Management Groups in addition to the default All Devices Management Group:
All Devices - this Management Group brings all devices into a single Management Group
Servers, Workstations, Executive, Support, Sales and Finance - these Management Groups will use an OU rule to separate the devices according to the OU they belong to.
Note
If you want to take advantage of your Configuration Manager database, and pull in its inventory and usage data, so that you can mirror your Active Directory OU structure in your Management Groups, then you'll need to configure a System Center Configuration Manager connector in your Tachyon system.
In this example
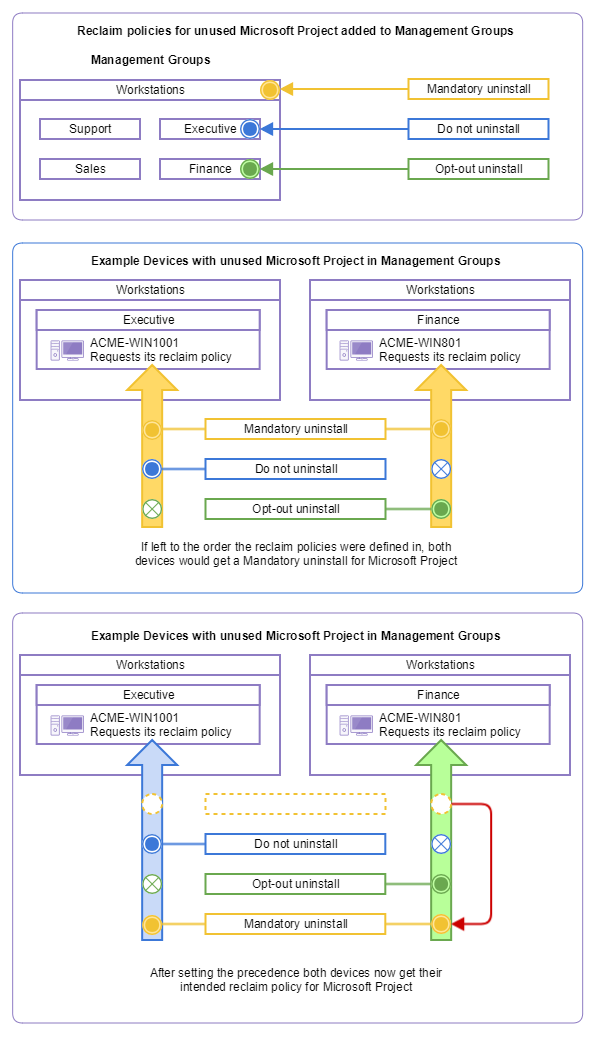
In this example we create three reclaim policies that target unused installations of Microsoft Project Professional. These overlapping policies will have different reclaim actions for unused software depending on the management groups, that come from the management group example above.
We will use three management groups which correspond to OU configured on our example ACME AD site. The first one, Workstations contains all the devices that are present in the other two, Executive and Finance, but those two sub OU are mutually exclusive. This means that devices in the Executive management group are also in the Workstations management and likewise devices in the Finance management group are also in the Workstations management group.
The purpose of this example is to create three reclaim policies for unused installations of Microsoft Project Professional for each of the Workstations, Executive and Finance management groups. Each reclaim policy will have a different reclaim action according to the management group they are associated with. However, in practice this means that the devices in the Executive and Finance management groups with their own reclaim policies will also be eligible for the reclaim policy associated with the Workstations management group.
For this reason a mechanism exists to set the precedence for the reclaim policies associated with a particular program so that you can ensure that the devices in each management group get the right reclaim policy.
By the end of this example you will have defined 3 new reclaim policies:
In the Workstations management group we will create a general policy that performs a mandatory uninstallation.
In the Finance management group we will create an opt-out uninstallation where the end-user can choose to keep the software.
For the Executive management group we will create a do not uninstall action for Microsoft Project Professional.
You will then have set the precedence for the policies so that they are selected in the correct order when a device runs its scheduled reclaimer policy retrieval.
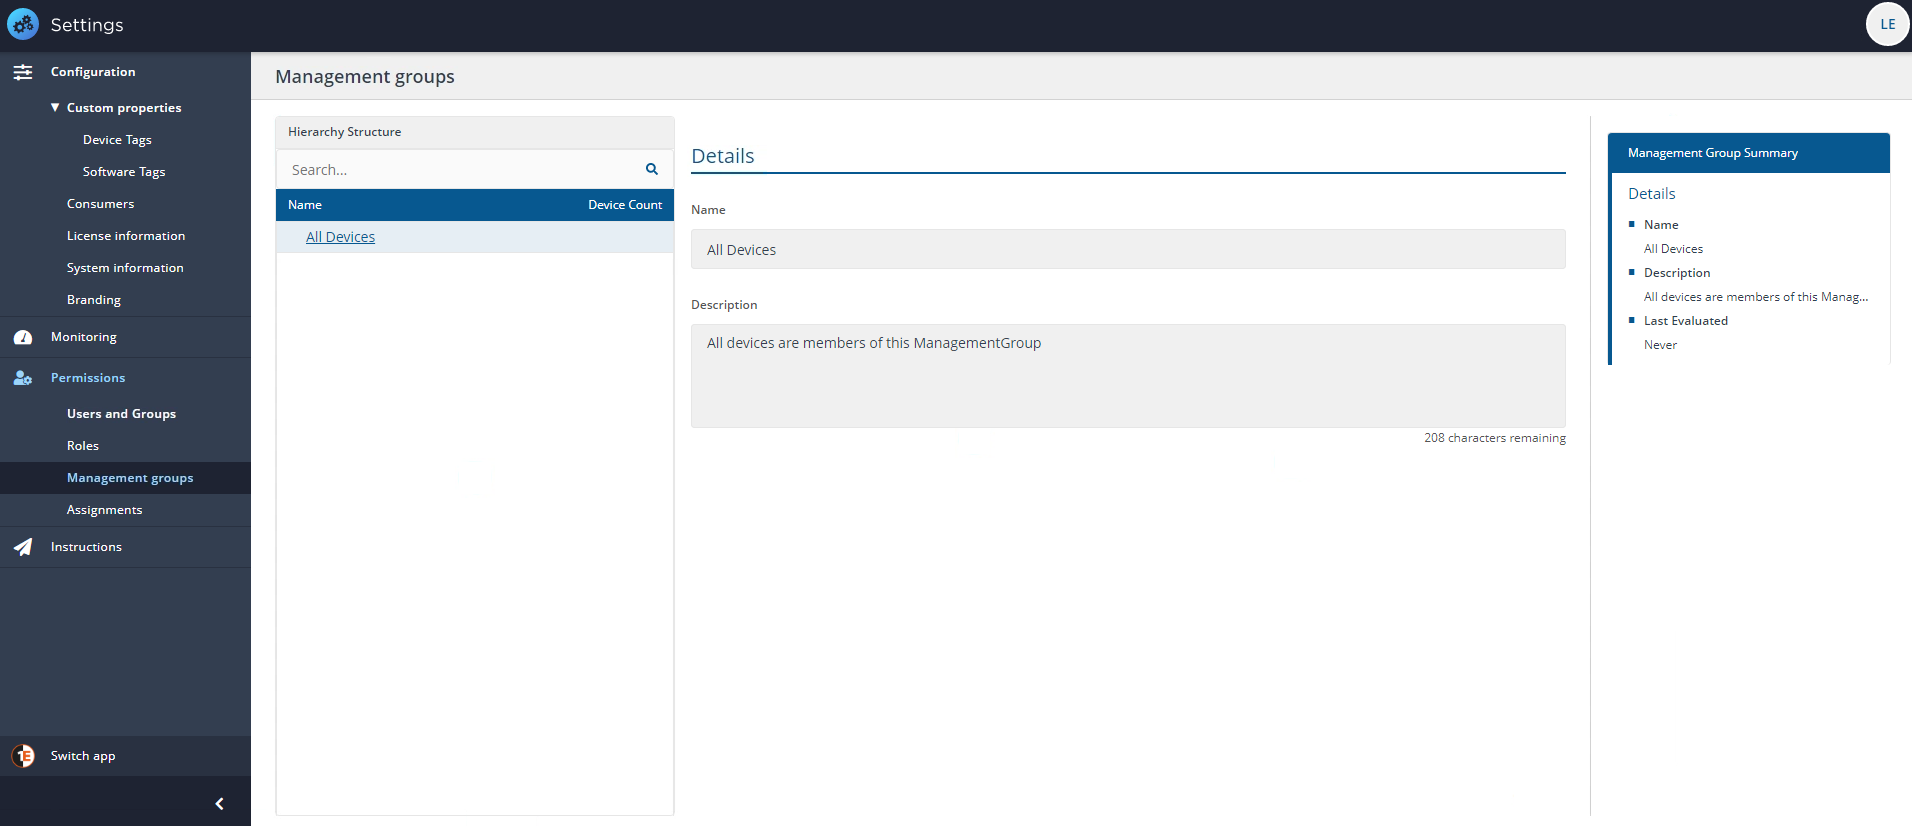
In our example we have three Management Groups we are interested in: Workstations, Executive and Finance. You can set Management Groups up in Settings->Permissions->Management groups. The creation and population of Management groups is documented in the Management Groups page.
To set reclaim policies in each of these management groups:
Navigate to AppClarity→Reclaim→Usage Summary. In our example, we'll create our first reclaim policy directly from some known installations of the Microsoft Project product showing in the Usage Summary pages.
Initially we filter on the unused products, which will help to focus on the unused products we want to reclaim.
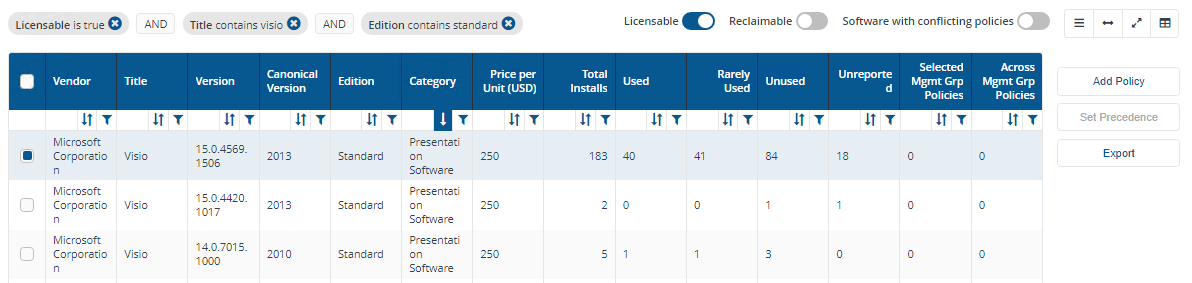
In our example we filter on Visio Standard 2013 in the Reclaim Usage table, on Title containing Visio and by Edition containing Standard. If you have a large number of unused products in your environment you may need to set a specific filter to find the specific one you want to reclaim.
Selecting the product and at the end of the product's entry in the table click on the Add Policy button.
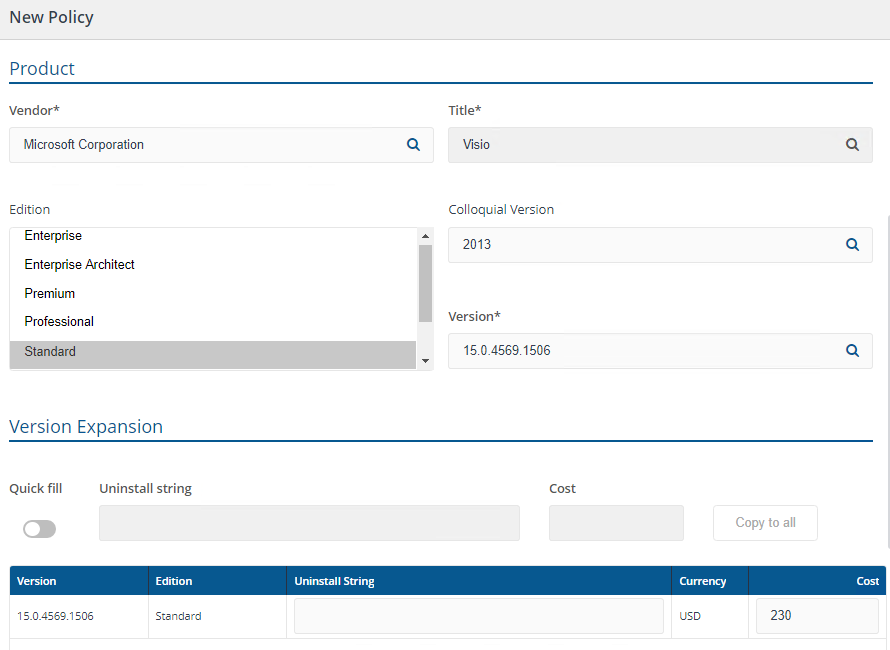
This displays the Reclaim Policy page prefilled with the product's details. In our example this shows:
Vendor is set to Microsoft Corporation
Title is set to Visio
Edition is selected as Standard
Colloquial Version is set to 2013
Version is set to 15.0.4569.1506
Version Expansion is already expanded to that same version.
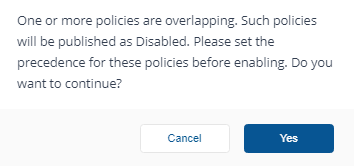
In our scenario we know that we want to create three reclaim policies for the same product which could lead to conflicts. So it makes sense to initially publish them so that they are not enabled, then resolve any conflicts and finally enable all the policies once the resolution is in place.
In our scenario we can plan ahead, but you may encounter scenarios where you are not aware that there is another existing reclaim policy that overlaps with a new one that you want to publish. AppClarity deals with this by notifying you that there is an existing policy and automatically setting the new one so that it is not enabled, thereby giving you the opportunity to resolve the conflicts in the same way.
Having ensured that the policy is not enabled, you then select the management group the reclaim policy will be associated with. In our example this first reclaim policy for Visio will be associated with the Workstations management group.
Next, set the reclaim actions for Used, Rarely Used, Unused, and Unreported. In our example we are only concerned with the Unused category and leave the others at their default of Do not Uninstall. We then set the Unused action to Mandatory Uninstall.
After the settings have been made click Publish to save the reclaim policy. This will display the Published Reclaim Policies page showing the saved policy.
Cloning a reclaim policy
In our example we want to create three reclaim policies for the same product, just in different Management Groups. We could go through the process outlined in the steps above for each of these, but a quicker method of doing this is to clone the reclaim policy we've just created:
We select the policy entry for Visio Standard in the Policies table and then click Clone at the right-hand end of the reclaim policy's entry.
A new Reclaim Policy page will be displayed prefilled with the contents of the cloned reclaim policy.
The only things you need to change here would be the selected management group and the Unused category action. In our example we select the Finance management group and set the Unused category action to Optional Uninstall.
When you click Publish to save the new policy. You will then be prompted to set the precedence as you will now have overlapping policies which are published as Disabled by default.
Setting precedence reclaim policies
Conflicts between overlapping policies for a product are resolved from the Reclaim Usage page.
Navigate to Usage Summary.
Locate the product with overlapping policies in the Across Mgmt Grp Policies column. In our example we have filtered this column by greater or equal is set to 1.
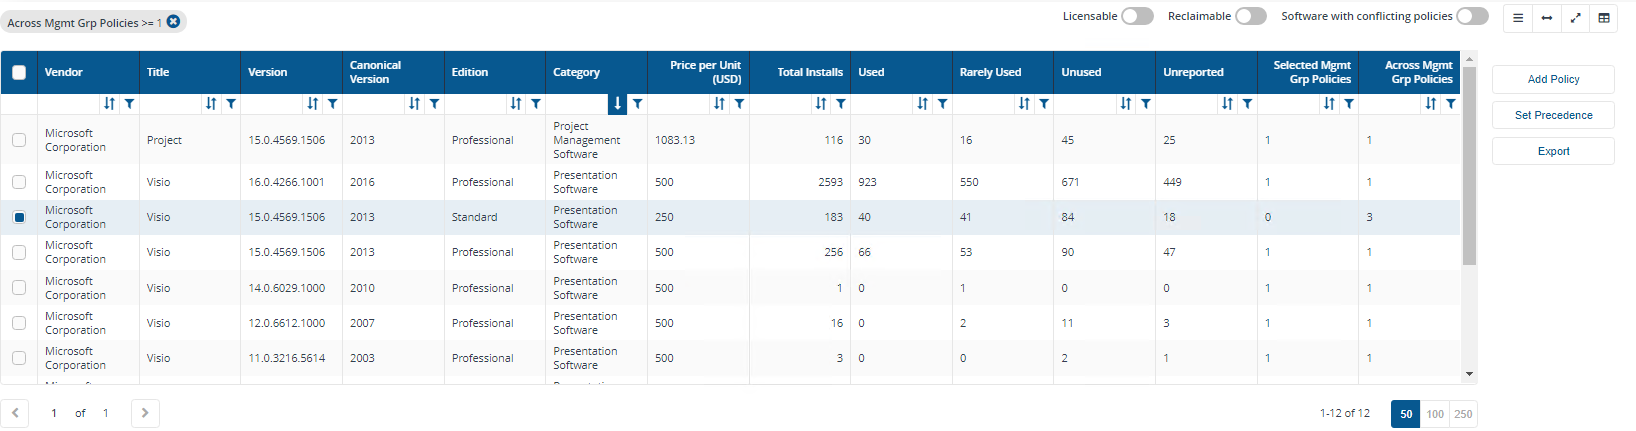
There is a 3 in the Across Mgmt Grp Policies column for Visio Standard v15.0.4569.1506 indicating that there are 3 reclaim policies applied to this product across all management groups.
On the far side of the table we click Set precedence, doing this displays the Precedence page.
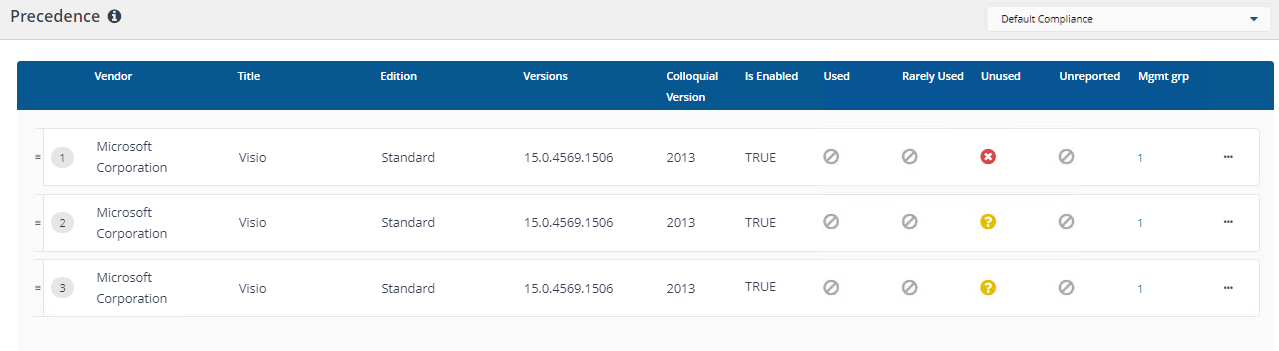
Reclaim policies are considered from top-to-bottom in this list. When the reclaimer runs on the target device, (usually according to a schedule set by the administrator who distributed the reclaimer on the network), it retrieves a single reclaim policy per targeted product from Inventory. The single reclaim policy provided to a device is dependent on the product, the management group and the order of the reclaim policy in the precedence list.
Note the following about reclaim policies and the way they apply to devices in more than one management group:
A device can only get one policy per product
The policy for the product is dependent on the management groups the device belongs to
A device may be in more than one management group, so there may be more than one candidate policy
Reclaim may only provide one policy from the candidates, by default this is done in the order they were defined, which you can't easily control
You have to set the precedence for the policies to ensure the right one gets applied to the devices you are managing.
To set the precedence between overlapping policies you will usually need to check the Management Group that the policy belongs to. The Management Group Names column contains a number Mgmt grp link at the end of each row that displays the Management Group(s) that the policy applies to. In our example by clicking on each row we would see the reclaim policy in the:
Top row applies to the Workstations Management Group.
Second row applies to the Finance Management Group.
Third row applies to the Executive Management Group.
To change the precedence you can click, drag and drop (up or down) a row in the table to another position in the table. In our example we change the order of the reclaim policies in the following way:
Click and drag the reclaim policy with the Unused Mandatory Uninstall reclaim action, associated with the Workstations management group, to the bottom.
Click and drag the reclaim policy with the Unused Optional Uninstall reclaim action, associated with the Finance management group, to the second place.
The more general Unused Mandatory Uninstall reclaim policy associated with the Workstations management group is now at the bottom, this means that any device with an unused installation of Visio Standard in the:
Executive management group will get the Do not Uninstall reclaim action
Finance management group will get the Optional Uninstall reclaim action
Workstations management group will get the Mandatory Uninstall reclaim action.
At this point the reclaim consolidation report runs automatically, making the set precedence live.

We now need to enable each of the published policies to make them live:
Navigate to Policies.
Click on the Edit link at the end of one of the reclaim policy rows where the Is Enabled column shows FALSE.
Check the Enabled checkbox and then click Publish.
Repeat steps b. and c. for the other disabled policies until all the policies display TRUE in the Is Enabled column.
Our three reclaim policies for unused Visio Standard installations are now defined and associated with the Workstations, Executive and Finance Management Groups.
The reclaim policies have been made live and their precedence set and processed. This means that devices will subsequently receive appropriate reclaim policies for their unused Visio Standard installations depending on the management group they belong to.
Evaluating a reclaim policy without affecting your environment
If you're planning on setting up a reclaim policy want to be sure what the impact will be, (i.e. on impacted devices, where software is no longer installed and reclaimed), can evaluate your policy before setting it up. By using Reclaim Evaluate you can identify devices where software would be:
Marked for Mandatory Uninstall (i.e. will be removed in upcoming mandatory reclaim cycle)
Marked for Optional Uninstall.
If, after you evaluate the policy and you're comfortable with the impacted devices, you can setup the policy the same reclaim actions.
Evaluating a Reclaim Policy
To evaluate a reclaim policy:
Navigate to AppClarity→Reclaim→Policies and click New Policy.
On New Policy screen, enter all the mandatory fields and all sections.
Click Evaluate.
Refer to New Policy page for more details on how this page works.
The evaluate button generates a downloadable TSV file containing information about the devices and actions the policy contains.

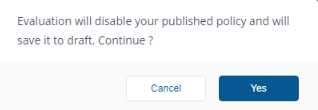
If you click evaluate on a published policy, you will get this warning message. Click on Yes and evaluate report is downloaded.
But, now this reclaim policy is converted into draft policy (i.e. not a reclaimable policy anymore). You will then have to go back click Publish again to move that policy back to published status and make it reclaimable. If you do not re-publish, none of the devices in your evaluate report will act on the policy.
Reclaiming a product using SCCM Uninstall
You can reclaim any software from your environment using either of these methods:
Traditional reclaim - the reclaimer included with earlier versions of AppClarity
SCCM custom Reclaim - which uses existing SCCM packages/applications added to any install collections
Using 1E SCCM Reclaim creates an uninstall collection you can use to reclaim software using your SCCM installation.
Note
To use SCCM custom Reclaim, your administrator must have enabled the SCCM Uninstall Provider.
Setting up a reclaim policy
Once the SCCM Uninstall is switched on you can create a reclaim policy and associate it with the appropriate ConfigMgr package or application.
Switch app to AppClarity→Reclaim→Policies.
Click on New Policy.
Configure your policy as required, completing the Basic Information, Product, Version Expansion sections
Set the Uninstall Criteria as Mandatory Uninstall - SCCM Workflow is driven on reclaim policies for mandatory uninstall. Any optional reclaim policy will not work with SCCM Uninstall, until it becomes a candidate for mandatory uninstall.
Select a value in the SCCM uninstall Collection Type section. This selection is important, as it allows SCCM to create suitable uninstall collections and drive the reclaim workflow accordingly.
Click Publish.
Adding the Association
Switch app to AppClarity→ Reclaim→Policies
Select the reclaim policy in the Policies listing page and click Manage Associations.
This opens the Inventory→Manage Associations→Product to CM page, and opens with your policy selected.
Select the product you want to associate to the SCCM Uninstall workflow with this reclaim policy then click Add Association.
On the Add Associations page, type in the name or part of the name of your SCCM Package or application.
Enter CM application/package name inside the Search for a CM Application or Package text box, the selected package/application details will show in grid below).
Select product and choose your desired action for:
Install Programs and Uninstall Programs for packages (for example Per System Unattended for Install Program OR Per System Uninstall for Uninstall program).
Applications do not require any selection for Install/Uninstall programs.
Click Save.
Note
You will see either an A or P icon next to the name, that will show either Package or Application Model. For a package, you will need to select the correct programs.
Verifying Reports
When the setup is completed the following reports are automatically triggered, and can be see in Settings→Monitoring→Process logs:
Reclaim Consolidation - to convert this reclaim policy from a traditional reclaim based setup to an SCCM reclaim based setup
SCCM uninstall report, to perform the following actions:
Verifies if the root folder (under Device Collection/User Collection) already exists to host device/useruninstall collections. If not, then create root folder with name as 1E
Create an Uninstall collection under 1E folder
Add those device/user into the Uninstall collection, from which software needs to be removed (i.e. based on the reclaim policy set)
Remove these device/user from Install collection
If the device, user or both are members of collections that have deployments for an install of the software that needs reclaiming, AppClarity removes them from the installation collection.
SCCM Uninstall actions also act as status poller, to fetch the statuses of uninstall or if any new device needs to be added into the Uninstall collection.
Verifying Reclaim History
To view the status history for these reclaims:
Run the Reclaim Reporting action for associated Compliance repository from Settings→Monitoring→Process logs and click Execute.
Select Compliance Repository, and action as Reclaim Reporting and click Execute.
Wait till the Reclaim Reporting action successfully completes, then:
Switch app to AppClarity→Reclaim→Reclaim History.
All devices which were added to Uninstall Collection in SCCM, and are still waiting to be uninstalled display a CollectionUpdated status.
After a successful uninstall, these devices will display a status of Uninstalled.