Design Considerations
Information that will help you design and plan the implementation of Nomad in your organization.
This page is part of the design phase of implementation.
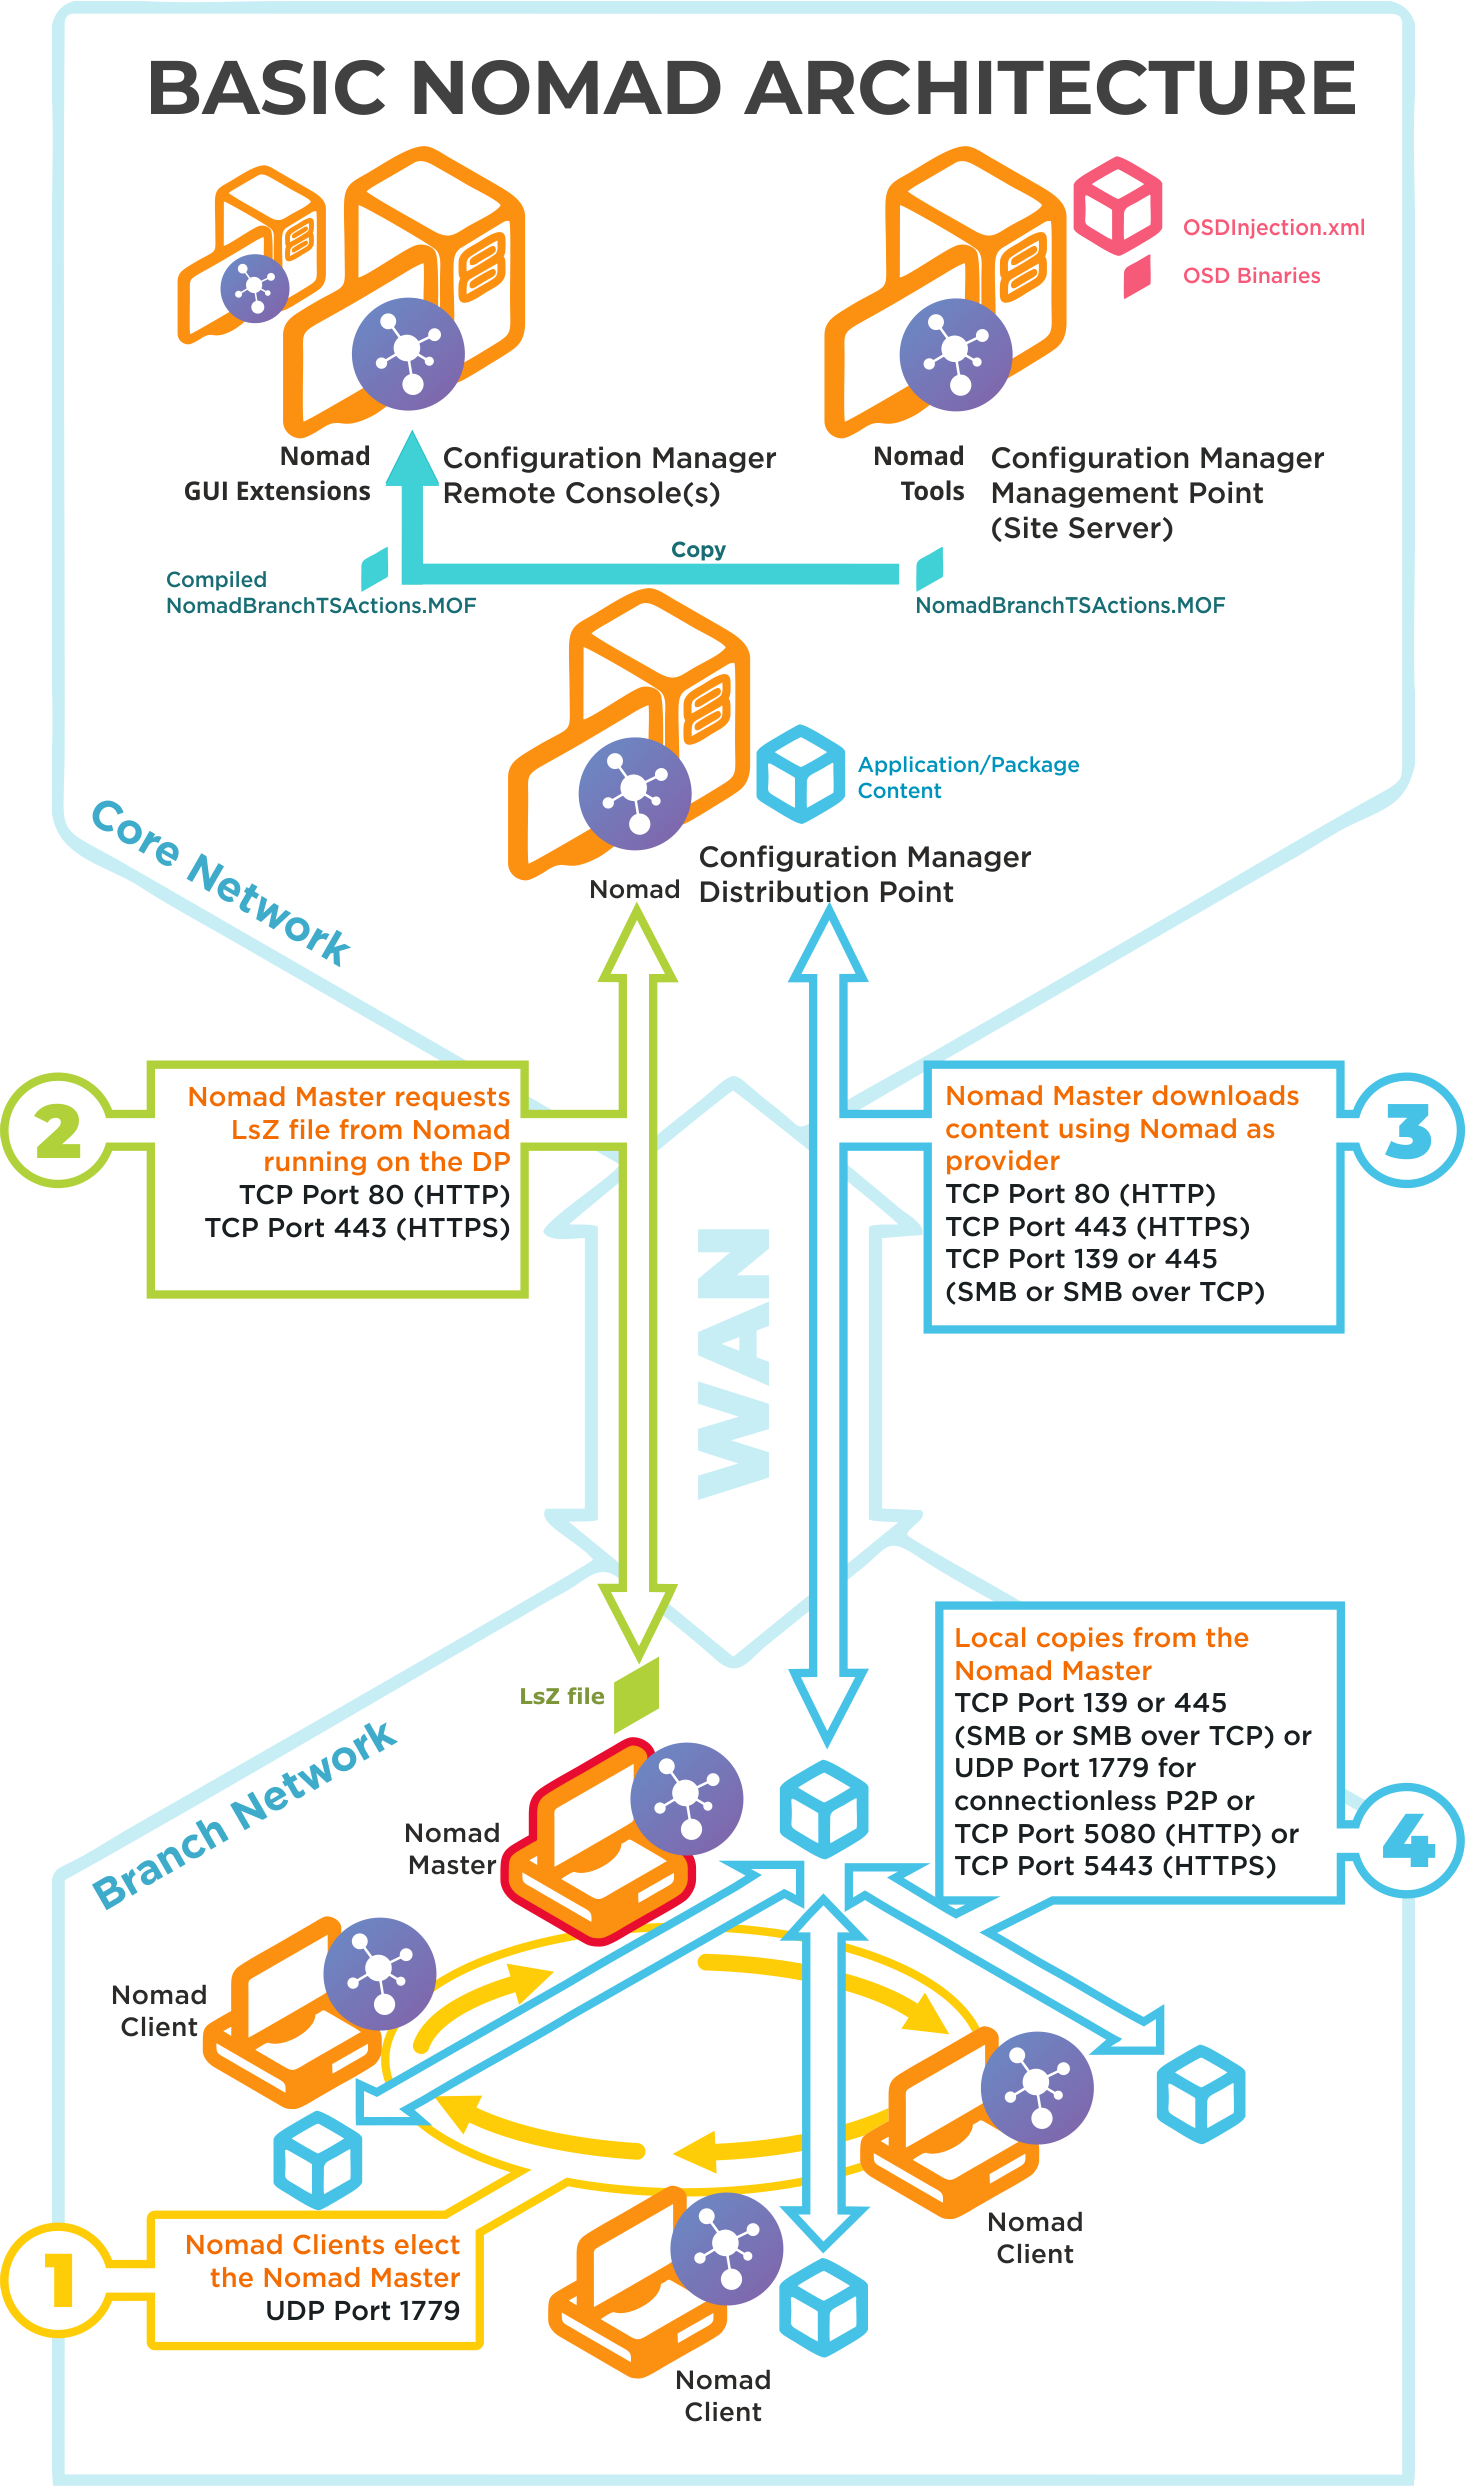
Nomad architecture
The architecture for Nomad. This describes the customer-facing components and how they connect to provide the functionality in Nomad.
Note
For a full description of Tachyon Platform Stacks, their components, the clients and how they connect to provide Tachyon Platform features, refer to Tachyon Architecture.
Ports | Notes |
|---|---|
UDP 1779 | Step 1By default, Nomad uses UDP Port 1779 to communicate during the election process for determining the master on a subnet. The Nomad installer will automatically add The default value for the port may be changed at install time using the P2PPORT installer property or post-installation by changing the P2P_Port registry value. If you change the default port, you must ensure all Nomad clients communicate using the same port. The Nomad port (by default UPD Port 1779) must be open on all wireless access points to facilitate Nomad peer-to-peer communications. Not all vendors enable this port by default, please refer to the specific device vendor's documentation for details on how to enable ports on each WAP device. |
TCP 80 (HTTP) TCP 443 (HTTPS) | Step 2Nomad Master requests LSZ file from Nomad running on the DP. |
TCP 80 (HTTP) TCP 443 (HTTPS) TCP 139 (SMB) TCP 445 (SMB over TCP) | Step 3Nomad Master downloads content using Nomad as provider. This communication depends on how the DP is configured. It may be one of the following:
For Configuration Manager the default setting is HTTP or HTTPS. |
TCP 139 (SMB) TCP 445 (SMB over TCP) UDP 1779 (used for connectionless P2P) TCP 5080 (HTTP) TCP 5443 (HTTPS) | Step 4Local copies from the Nomad master. The recommended way to facilitate Nomad cache access is to enable Windows File and Print Sharing. If this is not feasible on your network environment you can configure Nomad to use different means to access network shares, see Nomad cache for more details on configuring this option. Connections may use one of the following:
|
Installation scenarios
New installation
Nomad is included with the Tachyon Platform, so you'll need to use the Tachyon setup wizard to install it. To activate Nomad, you'll need a valid license file.
1E will provide you with a Tachyon.lic license file that defines the products and features your Tachyon System is able to use, for how long, and how many devices it supports, this may be an evaluation or subscription license.
The license must be activated. Once activated, it may be used only by the Tachyon System that activated it.
Licenses can be renewed or updated, but if allowed to expire, then the affected products or features will not be usable.
For a new installation, the Tachyon Setup program will let you select the license file from any folder on disk.
For an existing installation, the license file is copied into the folder: %PROGRAMDATA%\1E\Licensing on your Tachyon Server.
For details of what the license file needs to contain, please refer to License requirements for consumer applications.
Before installing the Tachyon Platform, please refer to Installing Tachyon, this includes details of server sizing. The addition of Nomad does not affect sizing, as it is included with the Tachyon Platform.
Existing Nomad installation
If you already have Nomad configured in your environment, you can install Nomad as a local consumer application on your existing Tachyon web server, if it is Tachyon Platform 8.1
Please refer to Upgrading Nomad for guidance on:
Upgrading to the latest version of Nomad within a Configuration Manager operating environment
Additional guidance on upgrading ActiveEfficiency to Content Distribution
Upgrading Configuration Manager when Nomad is in use.
Infrastructure dependencies
Tachyon platform
These features require the full deployment of the platform infrastructure, including Master and Response Stacks, with an optional DMZ Server for Internet-based clients.
Tachyon platform is installed using Tachyon setup, which should also be used to install the following components, included in the Tachyon platform download zip.
Nomad app - this consumer application replaces the legacy Nomad Dashboard.
Content Distribution - this web service is required by the Nomad app, and replaces the legacy ActiveEfficiency Server.
Please refer to:
Requirements for prerequisites.
Introducing Tachyon for details about the Tachyon platform and other optional applications and features.
Implementing a Tachyon Platform DMZ server
If you have internet-based clients you will need a Tachyon Platform DMZ Server to support your Internet-facing Tachyon clients. The DMZ Server is a type of Response Stack used to provide Tachyon Real-time and Inventory services to Internet-based clients. For details about installing a Tachyon DMZ Server to support Internet-facing Tachyon clients refer to Implementing a Tachyon DMZ Server.
Tachyon client integration with Nomad
When Tachyon and Nomad clients are both enabled in the 1E Client, then the clients and Tachyon instructions will - by default - automatically use Nomad to download content. Tachyon client uses Nomad to download content from the Tachyon Background Channel, or from any website, without any dependency on Configuration Manager.
For more information, from a Tachyon perspective, please refer to Downloading client content and Nomad integration.
Nomad components
To understand what Nomad can do for you, please refer to Nomad overview and Nomad fundamentals. Once you have decided what features you will use, then you will need to deploy relevant components to clients and servers.
In addition to the Nomad app and Content Distribution components described above, the following sections provide a brief overview of Nomad components:
1E Client
The Nomad client is the core component of Nomad and can be used on its own without any other components.
Nomad client is part of the 1E Client and is only supported on Windows devices. You must deploy the 1E Client (with Nomad enabled) to:
In-scope client devices - use 1E Client Deployment Assistant 8.1 (CDA) to help deploy 1E Client via Configuration Manager
Configuration Manager Distribution Points - use the installer transform file created by CDA edited as required to suit the type of DP, ensuring LSZ Generation is enabled (enabled by default in SpecialNetShare).
The 1E Client also includes the following clients that must be enabled to support optional Nomad features:
Tachyon client - provides real-time features required by the Download Pause feature
Shopping/WSA client - provides Windows Servicing Assistant (WSA) features
PXE Everywhere Agent - allows computers to automatically boot up into Windows PE, which then allows a Windows Operating System to be installed.
Please refer to:
Deployment and configuration options for an overview of Nomad configuration and deployment options
Requirements for prerequisites
Deploying the Nomad client using Configuration Manager for detailed steps
Introducing 1E Client for details about 1E Client and other optional client modules (Tachyon, Shopping/WSA, PXE Everywhere, WakeUp).
Configuration Manager Console extensions
The extensions must be installed on all computers where Configuration Manager administrators use their CM Admin Console to :
edit OSD Task Sequences
configure Nomad content download settings for applications, packages, software updates
use the Nomad Download Pause feature
use the Nomad Baseline wizard feature.
Please refer to:
Requirements for prerequisites.
Configuration Manager OSD Tools
The Configuration Manager OSD Tools (also known a NomadBranch Tools) must be installed on all Site Servers (except Secondary) and all SMS Provider servers. Specifically servers which Configuration Manager Consoles may connect to.
The installer copies the Nomad binaries to the ConfigMgr site installation folder .\OSD\bin\<Architecture> on the SMS Provider server. This enables the files to be injected into the OSD boot image allowing Nomad to be used during the WinPE deployment phase. The installer will also extend the Configuration Manager Site WMI namespace to include definitions of the 1E Nomad built-in task sequence steps.
Please refer to:
Requirements for prerequisites
Download Monitor tool
Also known as NomadBranch GUI, the Nomad Download Monitor tool is optionally installed on client devices alongside the Nomad client, and is used for troubleshooting and testing only. It should not be installed generally in your network.
Client deployment and common configuration settings
1E Client Deployment Assistant (CDA)
The 1E Client Deployment Assistant (CDA) is the recommended method of deploying 1E Client to Windows computers if you have Microsoft System Center Configuration Manager, and also for deploying 1E NightWatchman Agent. 1E Client may be deployed independently using alternative software distribution methods.
The CDA creates Packages, Applications, empty Collections and Deployments with custom Windows Installer transforms to simplify the installation and initial configuration of the 1E Client and its modules. You can then simply add devices into the Collections to upgrade Nomad on those devices.
Note
The wizard allows you to configure commonly used settings. The template .mst contains many additional installer properties, but not all of them. You should review your requirements and decide which installer properties to modify or add. The full list is available in Nomad installer properties.
Some less common settings are described in more detail further below.
Connection to a Configuration Manager site is required even if you only want to use the CDA wizard to create the MST transform files. The site must have software distribution features enabled.
Tip
CDA helps create everything you need to deploy clients and agents in your Configuration Manager environment. If you prefer, you can use CDA in a lab or other environment to create the Configuration Manager application and/or package content (including MST transform files). Then you can copy the content to your production environment and manually create your deployments.
If you don't want CDA to create objects in Configuration Manager then you can use Microsoft's Orca to edit the base MST transform files supplied with CDA, and manually create your deployments.
Orca is a Microsoft tool for creating and editing Windows Installer packages (MSI) and merging modules (MST transforms). It is available from the Windows Installer Development Tools - https://docs.microsoft.com/en-us/windows/desktop/msi/orca-exe.
Nomad OSD tools and Nomad Configuration Manager Console extensions are both available in the NomadBranchTools.msi installer. The installer will automatically choose which components to install based on the server where the installer is running. For Configuration Manager sites and SMS Providers the Nomad OSD tools will be installed and if the Configuration Manager Console is present the Nomad Configuration Manager Console extensions will be installed.
So, in addition to deploying 1E Client (with Nomad client module enabled) on all computers and on Configuration Manager Distribution Points, the following locations require the NomadBranchTools.msi to be run:
Configuration Manager sites and SMS Providers.
Configuration Manager site servers, any other computer that has the Configuration Manager Console installed.
Note
For full documentation on the 1E Client Deployment Assistant, refer to Introducing 1E Client Deployment Assistant including:
Preparation.
Running the wizard - where you configure commonly used settings.
Configuration Manager objects.
Supported platforms.
Installer properties.
Nomad client settings
Nomad client installer properties are associated with each area of functionality in Nomad, and are mostly configured in the registry, it's only the enabling of Nomad and Tachyon that's completed in the 1E Client configuration file.
They can be specified during installation of the 1E Client as Windows installer properties, and must be specified in upper-case. Settings that exist in the 1E Client configuration file can be mixed-case, and can be reconfigured after installation using 1E Client command-line parameters.
Note
For a full list of the 1E Client installer properties available for the Nomad client module refer to Nomad client alphabetic installer properties.
Common configuration settings
These are settings that most frequently vary between organizations, and are therefore presented as options in CDA.
Nomad client settings in CDA
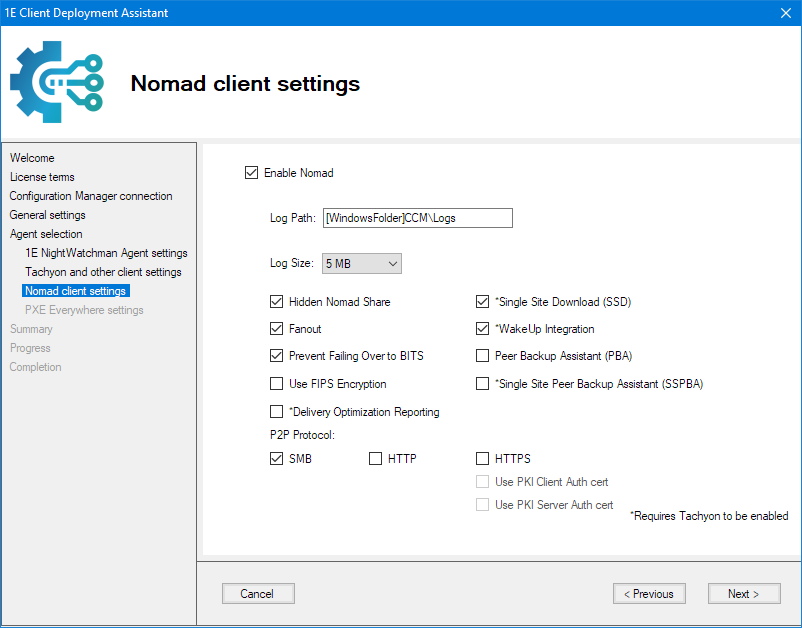
Nomad client settings in 1E Client installer
Each of the following features is optional. Although not a requirement for generally using Nomad, Introducing Tachyon must be installed and available before you can use certain Nomad features.
Nomad feature | Description | Installer properties | Infrastructure requirement |
|---|---|---|---|
The Nomad cache is configured as a share that enables peer-to-peer distribution of downloaded content. Nomad provides control over the accounts that have access to the share and also provides an advanced Nomad FanOut mechanism that can overcome the connection limit to shares on workstations to ensure that content is distributed efficiently and securely. |
| ||
Nomad's Single Site Download (SSD) feature ensures a download across the WAN only happens once per site. It does this by maintaining information about which subnets are neighbors of each other (accessible on LAN rather than WAN), so that when an elected master considers a download from a DP rather than a peer in its subnet, it can discover which other local subnets already has the package. These subnets are typically at a single customer site, specifically a single geographical location. Nomad SSD uses Content Distribution. When a Nomad client downloads a package, it registers this information with Content Distribution, enabling a profile to be created on which Nomad clients hold particular packages. NoteWhen SSD is enabled in the CDA wizard, then Content registration is also enabled. |
| ||
Windows imposes a limit on the number of concurrent connections on the Nomad share. The FanOut featurecompensates for this limitation by enabling any peer that has more content than the requester to respond to the FanOut request. It is not limited to peers that have an active connection to the master. |
| ||
The Peer Backup Assistant (PBA) feature enables files and settings data to be backed-up to a peer computer so that they can be maintained when the computer is being migrated to a new Operating System. Using PBA, you can avoid the cost of State Migration Point servers to hold the backup data, as peer computers can be used to provide this storage. The risk of losing user data through the migration process is also greatly reduced in the process. |
| ||
If Nomad generates a return code that is not in the list, it passes a fail to the CTM component which causes the Configuration Manager client to try downloading the content itself using BITS, or use another Alternate Content Provider (ACP). This process may itself succeed or fail depending on the conditions that resulted in the original Nomad return code, and may have an undesirable impact on the network. NoteThe special code 0x9999 can be added to the list, or used on its own, to cause Nomad to always return a success to CTM. As a consequence this code is also known as "prevent failover to BITS". |
| ||
SSPBA can be enabled at install time using the MODULE.NOMAD.SSPBAENABLED installer property. Post-installation SSPBA can be enabled by setting the following registry values:
When SSPBA is enabled, PBA will initially attempt to find suitable PBA data stores on the local subnet. If it does not find one, it will send the request to neighboring subnets using the information held in Content Distribution. |
| ||
FIPS encrypts the following types of Nomad data: Data sent over a network in peer-to-peer communications, including:
|
| ||
Delivery Optimization Reporting | Monitor and report on Delivery Optimization (DO) downloads. This feature is only supported in full versions (OS with UI) of Windows Server 2016 and Windows 10 Version 1909 onwards. | ||
| If you are installing Nomad for the first time, consider how your peers are going to communicate for content transfer. You will need to make sure your clients are configured to use the same protocol. Depending on whether you use either SMB, HTTP or HTTP/S the configuration steps will be slightly different, for example if you decide to use a PKI certificate for server or client authentication HTTP/S. Nomad peer-to-peer content transfer uses SMB by default, which requires File and Print services to be enabled in order for it to share the content. For better security Nomad can be configured to use HTTP or HTTPS for peer-to-peer content transfer, removing the requirement for file shares. When Nomad is configured to use HTTP/S, if Peer Backup Assistant is enabled it will also use HTTP/S. Refer to Peer copy over HTTP or HTTPS for more information, including:
|
|
Other configuration settings
In general, the default values using in the CDA template .mst file will suit most organizations, however you should consider the following to ensure you have the optimum configuration for your organization.
Maximizing download speed for high-bandwidth links using Dynamic Block Sizes
The Dynamic Block Size (DBS) feature increases block size on high-bandwidth links to get maximum efficiency, and reduces it on low-bandwidth links to reduce the impact. Using DBS, Nomad is able to automatically decide the appropriate block size for a given link bandwidth and also adjust it as needed during the download if the link conditions change. As a result, Nomad is far more efficient and faster on all types of connection bandwidths while retaining its minimal impact on other link traffic.
Note
DBS is enabled or disabled by configuring Bit 25 in the CompatibilityFlags registry. Setting Bit 25 disables DBS and clearing Bit 25 enables DBS.
In Nomad 7.0 onwards, the DBS feature is turned off by default for new installations, and not changed for upgrades.
Prior to v6.3 the default value of BlockSize registry setting was 32KB (0x8000). From v6.3 onwards the default is 128KB (0x20000).
The installer automatically sets this to 128KB for both fresh installs and upgrades from previous versions. The only exceptions to this are:
It will use the specified value if the BLOCKSIZE property is used in the installation command line or in a MST transform, when doing a fresh install or upgrade
It will retain the previous value of BLOCKSIZE if it was set to anything other than 32KB (the older default), when doing an upgrade.
Note
For more information click here to expand...
The following is a duplicate of the BlockSize page.
Value (in bytes) for the minimum size of each block of data Nomad copies from the package source folder.
Note
Any change to this value requires a manual service restart before it can take effect.
Registry value | Default value | Notes | Installer property |
|---|---|---|---|
BlockSize | 131072(128KB) | Must be between 4096(4KB) to 4194304(4MB) inclusive.
|
The Dynamic Block Size (DBS) feature increases block size on high-bandwidth links to get maximum efficiency, and reduces it on low-bandwidth links to reduce the impact. Using DBS, Nomad is able to automatically decide the appropriate block size for a given link bandwidth and also adjust it as needed during the download if the link conditions change. As a result, Nomad is far more efficient and faster on all types of connection bandwidths while retaining its minimal impact on other link traffic.
Note
DBS is enabled or disabled by configuring Bit 25 in the CompatibilityFlags registry. Setting Bit 25 disables DBS and clearing Bit 25 enables DBS.
In Nomad 7.0 onwards, the DBS feature is turned off by default for new installations, and not changed for upgrades.
Prior to v6.3 the default value of BlockSize registry setting was 32KB (0x8000). From v6.3 onwards the default is 128KB (0x20000).
The installer automatically sets this to 128KB for both fresh installs and upgrades from previous versions. The only exceptions to this are:
It will use the specified value if the BLOCKSIZE property is used in the installation command line or in a MST transform, when doing a fresh install or upgrade
It will retain the previous value of BLOCKSIZE if it was set to anything other than 32KB (the older default), when doing an upgrade.
Managing stable LAN connections
Nomad provides extra stability by managing a machine's network connections as they move between a wireless and a wired LAN. Depending on the OS version or other factors, once an SMB or HTTP session is running on a wireless connection, it will remain on wireless even when a wired LAN becomes available. Nomad uses WLanBlipSecs to temporarily drop a wireless connection when it detects a wired LAN connection, to give time for the OS and Nomad to automatically switch to the LAN connection.
For example, if a Nomad master was initiated when a machine was on a wireless connection and a wired connection subsequently became available, Nomad disables the wireless adapter for a long enough period to enable a switchover to the wired connection. As a result of this, the IP address and the share path will change and peers will log error messages until each peer re-establishes its connection to the master and the new share location.
This feature is turned off by default.
Note
Other applications may be affected when switching from wireless to wired connection.
Irrespective of the WLanBlipSecs setting, you can also control which service set identifier (SSID) Nomad connects to by managing a list. To do this, update the NomadBranch WLanProfileList registry value with a comma-delimited list of SSIDs or use the wildcard (*) character for any SSID.
Note
For more information click here to expand...
The following is a duplicate of the WLanBlipSecs page.
The duration for temporarily disabling a wireless connection when a wired LAN connection becomes available, to provide time for the OS and Nomad to switch to the LAN connection. This is useful for OS versions and drivers that do not automatically switch to a preferred wired connection.
Registry value | Default value | Notes | Installer property |
|---|---|---|---|
WLanBlipSecs | 0 | The value must be 20 seconds or more. |
Nomad provides extra stability by managing a machine's network connections as they move between a wireless and a wired LAN. Depending on the OS version or other factors, once an SMB or HTTP session is running on a wireless connection, it will remain on wireless even when a wired LAN becomes available. Nomad uses WLanBlipSecs to temporarily drop a wireless connection when it detects a wired LAN connection, to give time for the OS and Nomad to automatically switch to the LAN connection.
For example, if a Nomad master was initiated when a machine was on a wireless connection and a wired connection subsequently became available, Nomad disables the wireless adapter for a long enough period to enable a switchover to the wired connection. As a result of this, the IP address and the share path will change and peers will log error messages until each peer re-establishes its connection to the master and the new share location.
This feature is turned off by default.
Note
Other applications may be affected when switching from wireless to wired connection.
Irrespective of the WLanBlipSecs setting, you can also control which service set identifier (SSID) Nomad connects to by managing a list. To do this, update the NomadBranch WLanProfileList registry value with a comma-delimited list of SSIDs or use the wildcard (*) character for any SSID.
Examples:
WLanProfileList REG_SZ WIFIGAP,GUEST
WLanProfileList REG_SZ *
Setting intra-day work rates
Nomad allows hourly variable work rates to be set throughout the day enabling organizations to use different maximum percentage of available bandwidth during the working day and in the evenings. Intra-day work rates are set on the client using the MaxWorkRates registry value. If the intra-day work rate is less than that defined on the command-line, it will override the command-line value. If the intra-day work rate is higher than that defined on command-line, the command-line value is used in preference.
Note
Work rates only apply to transfers from a DP not to P2P transfers within a LAN.
Note
For more information click here to expand...
The following is a duplicate of the MaxWorkRates page.
MaxWorkRates is a registry key, that must be created, to hold registry values for each day of the week (Day0 to Day6) where the hourly maximums for the variable work rates are set.
Registry values | Default value | Notes | Installer property |
|---|---|---|---|
MaxWorkRates\Day# | Hourly variable workmates can be set throughout the day. The days of the week are labelled: Day0 to Day6 where Day0 = Sunday, Day1 = Monday etc. Each day value is REG_SZ string set as a comma separated list of 24 hourly work rates for that day. Each value can be set from 1-100. The following is an example for setting for the Day# values where on Sunday, a maximum work rate of 20% will be used. On Monday, the max work rate between 0:00-05:59 is 80%, between 06:00-17:59 is 20% and between 18:00-23:59 is it 80% again. For the rest of the week, the work rate specified on the command-line is used. If neither work rate is specified, the default is 80%. Windows Registry Editor Version 5.00 [HKEY_LOCAL_MACHINE\SOFTWARE\1E\NomadBranch\MaxWorkRates] "Day0"="20,20,20,20,20,20,20,20,20,20,20,20,20,20,20,20,20,20,20,20,20,20,20,20" "Day1"="80,80,80,80,80,80,20,20,20,20,20,20,20,20,20,20,20,20,80,80,80,80,80,80" "Day2"="" "Day3"="" "Day4"="" "Day5"="" "Day6"="" | None. |
Nomad allows hourly variable work rates to be set throughout the day enabling organizations to use different maximum percentage of available bandwidth during the working day and in the evenings. Intra-day work rates are set on the client using the MaxWorkRatesregistry value. If the intra-day work rate is less than that defined on the command-line, it will override the command-line value. If the intra-day work rate is higher than that defined on command-line, the command-line value is used in preference.
Note
Work rates only apply to transfers from a DP not to P2P transfers within a LAN.
Work rate override arguments
The intra-day work rates can be overridden using the --wro and --wr Nomad command-line arguments.
If these two arguments are combined, the value for the --wr switch is used in preference to the intra-day work rate set in the registry
If only the --wro argument is used, any intra-day value is overridden with a default maximum of 80%
If using intra-day work rates and the --wr argument only, the lower of the two values is used.
Inhibiting subnets and sites
You can define subnets and AD sites where machines will download from the DP (these machines will not relay download status messages) and not participate in Nomad elections. This feature only supports IPv4 subnets and is useful for sites that have a:
Local DP
VPN without isolation. Typically, VPN solutions isolate each client using single-node subnets (i.e. each client is in its own subnet with a 32-bit subnet mask) to prevent broadcast traffic between VPN clients that are typically geographically dispersed and not on the same local network. If the VPN solution is not configured in this manner and clients get an IP address with a subnet mask less than 32 bits, broadcasts can be exchanged between the VPN clients enabling Nomad to elect a master that is not on the same local network.
The Nomad additional setting ++pr will not override the download priority.
The Nomad NomadInhibitedSubnets or NomadInhibitedADSites registry values can be set with a comma separated list of sites or subnets in which Nomad functionality should be inhibited. If the client machine exists in either an inhibited subnet or an inhibited site, peer functionality is disabled, the agent will not participate in elections and will download from the DP.
Inhibit files and formats
You can append the inhibited subnet and AD site lists with content from text files to make it easier to manage if there are many sites and subnets to be defined. Inhibited sites or subnets are defined in text files with a .inh extension and must reside in the %INSTALLDIR%\Inhibits directory.
Each file should contain a list of the inhibited subnets in a classless inter-domain routing (CIDR) format, or a list of inhibited AD sites. Each site or subnet must be on a separate line or be separated by commas. For example, the following defines two subnets and one AD site to be inhibited:
192.168.0.0/24, 192.168.1.0/24
ACMEDOM1
When the Nomad service starts or is reset, any .inh files in the Nomad %INSTALLDIR%\Inhibits directory are read in. Both the registry values and the contents of these files are used together to determine the list of inhibited subnets and sites.
A service reset occurs when the Nomad registry is updated or there is a change of subnet. So, if a laptop moves to another subnet half way through a download, the Nomad service will reset and check the current subnet against its list of inhibited subnets. If the check determines that the new subnet is an inhibited subnet, Nomad’s peer-to-peer functionality is disabled – the service stops downloading from the peer and will instead download from the local DP.
Support for IPv4 and IPv6
Nomad supports IPv4 by default, and optionally supports IPv6, which is commonly required when clients connect to the corporate network using the DirectAccess.To configure support for IPv4 and/or IPv6, update the Nomad SpecialNetShare registry value:
Bit 1 - 0x0002 - Enable IPv6
Bit 2 - 0x0004 - Disable IPv4