Upgrading Nomad
This page provides guidance on:
Upgrading to the latest version of Nomad within a Configuration Manager operating environment.
Additional guidance on upgrading ActiveEfficiency to Content Distribution.
Upgrading Configuration Manager when Nomad is in use.
Nomad - 1E Client - Tachyon Platform
In response to customer demand to reduce the number of agents required, 1E has merged the client functionality of Nomad, PXE Everywhere, WakeUp, Shopping and Tachyon into a single 1E Client, and are merging server functionality into a single Platform.
The Nomad client is installed and enabled as a module of the 1E Client. When the 1E Client is installed with the Nomad module enabled on a device that has Nomad 6.3 or earlier installed, the previous version will be removed, and the new Nomad module will be implemented. Any custom configuration defined in the registry (for example through Configuration Baselines) will be retained. Existing Configuration Baselines will continue to work with the 1E Client. Nomad versions of Nomad Branch Tools and Nomad Branch Admin Console Extensions are distributed and deployed in a combined installer called NomadBranchTools.
From Nomad 7.1 onward, ActiveEfficiency Server and the Nomad Dashboard are replaced by Content Distribution and the Nomad app on the Tachyon Platform.
Nomad licensing
Nomad client does not require a license key (Nomad 6.3 and earlier versions did). However, you must continue to adhere to the terms of your license agreement.
The Nomad app and Content Distribution component on the Tachyon Platform requires a Nomad license
Supported upgrade scenarios
Below is an overview of three basic upgrade and migration scenarios for customers who already have ActiveEfficiency Server.
In-place upgrade of ActiveEfficiency Server to Tachyon Platform
In-place upgrade of Tachyon Platform
Installation or upgrade of Tachyon Platform side-by-side an existing ActiveEfficiency Server
The overall objectives are:
Continued support of the following Nomad features that were supported by ActiveEfficiency Server:
Single Site Download (SSD)
Pre-caching
Single Site Peer Backup Assistant
Nomad Download Pause
ConfigMgr Computer Association.
Continued support of downlevel (old) clients during the phased upgrade of clients as CD upgrades from an existing AE.
Upgrading Nomad only
In this scenario, Nomad is upgraded separate from any Configuration Manager Current Branch upgrade. This is the simplest and most common scenario that typically occurs when you want to keep your software current, take advantage of new features and improvements in the latest versions, or your current version is nearing end of support. In some cases, new features in Nomad may require your ActiveEfficiency server to be upgraded or additional solutions such as Tachyon to be implemented.
Product Support Lifecycle
For details of the support lifecycle of each of the 1E Products, refer to https://support.1e.com/.
Upgrading Nomad involves upgrading the server, tools and console components first before upgrading Distribution Points and finally clients. Nomad is generally backward compatible and unless otherwise stated in the product documentation, existing features will be supported by the new version. 1E realizes the importance of compatibility to maintain client operations during the upgrade process.
Nomad 7.1 onward uses the Tachyon Platform to provide Content Distribution and Dashboard features. Content Distribution replaces ActiveEfficiency Server. Content Distribution continues to provide legacy features for legacy (before 7.1) Nomad clients, which function independently alongside new Nomad clients. To install or upgrade to Tachyon Platform, either from ActiveEfficiency or from Tachyon, please refer to Upgrading to Tachyon Platform. If you are currently using Active Efficiency Server it will either be upgraded to Tachyon Platform, or be decommissioned in the side-by-side scenario.
To upgrade clients, 1E recommends using the 1E Client Deployment Assistant. The CDA creates Packages, Applications, empty Collections and Deployments with custom Windows Installer transforms to simplify the installation and initial configuration of the 1E Client and its modules. You can then simply add devices into the Collections to upgrade Nomad on those devices. CDA is required if you are installing or upgrading PXE Everywhere.
If previous versions of Nomad have been deployed as an Application in Configuration Manager, you should define supersedence on the Application that installs the new version so that it supersedes the previous versions. This is very important, as it prevents attempts at downgrading Nomad through Application Deployment Enforcement if there are still active deployments for the previous versions.
Upgrading Nomad may also require updates to existing Task Sequences. Existing Nomad Task Sequence steps will continue to work after upgrade, but it may be necessary to remove and replace them after upgrade to implement any fixes or improvements included in the new version.
Important
It is advised that before starting any Nomad upgrades, you should stop services to your CM database before you start the upgrade.
Upgrading Configuration Manager
Configuration Manager (CM) Current Branch (CB) is updated three times a year. In most cases, updates to Configuration Manager do not affect core Nomad functionality. 1E endeavor to test all supported versions of all products and release a support statement within 30 days of General Availability ('slow ring') of a CM CB release. If any issues are identified, 1E will endeavor to fix the issue within the 30-day period, provide a workaround or communicate when the issue is expected to be resolved. Any such fixes will usually be implemented as a hotfix (that will be rolled into future versions) rather than an upgrade.
1E Support for CM CB releases
Before upgrading Configuration Manager, refer to https://1eportal.force.com/s/support-for-msft-rapid-release-cycle to confirm your currently installed versions of Nomad and ActiveEfficiency are supported on the new CM CB version.
If your currently installed versions of Nomad and ActiveEfficiency support the version of CM that you are upgrading to, you can go ahead and upgrade CM. Even though your currently installed versions are supported, you may like to take this opportunity to upgrade to the latest versions, or at least apply the latest hotfixes, to keep your software current. In that case, upgrade CM first, then update / upgrade Nomad and ActiveEfficiency accordingly, following the process for upgrading Nomad only.
If your currently installed versions of Nomad or ActiveEfficiency do not support the version of CM that you are upgrading to, you will need to update (hotfix) or upgrade them before upgrading CM.
NomadBranchTools and OSDInjection.xml
CM upgrades are likely to overwrite the OSDInjection.xml file that defines the files that are injected into Windows PE boot images. Nomad Branch Tools updates OSDInjection.xml to include the Nomad binaries that need to be added to the boot image. After upgrading CM you should uninstall and reinstall Nomad Branch Tools on the CM site server and any remote SMS Providers to ensure the Nomad binaries are included next time the boot image is redistributed.
Side-by-Side Migration of Configuration Manager and Nomad
If you are implementing a new Configuration Manager hierarchy with the intention of migrating devices from a separate hierarchy to the new hierarchy. Nomad Branch Tools and Nomad Admin Console Extensions would need to be installed in the new hierarchy. If those devices to be migrated already have a version of Nomad installed that is supported on the CM version of the new hierarchy, they can be migrated to the new hierarchy with no further changes needed to Nomad. If the currently installed version of Nomad is not supported on the new hierarchy's CM version, you will need to upgrade Nomad before migrating clients to the new CM hierarchy.
If ActiveEfficiency is being used in the old hierarchy you have two options.
Reconfigure the existing ActiveEfficiency server to synchronize with the new CM hierarchy. This option has the benefit of retaining SSD site definitions and historical data for content distribution and pre-caching. If package objects have been migrated from the old hierarchy, thereby retaining their content ID, this option will also enable clients that have not been migrated to share content with those that have across subnets (using SSD). However once ActiveEfficiency is synchronizing with the new CM hiearchy, you will no longer be able to manage pre-cache jobs from the old hierarchy and the dashboard will only be updated with activity from clients reporting into the new CM hierarchy.
Implement a new ActiveEfficiency server configured to sync with the new hierarchy. As clients are migrated to the new hierarchy, they should be reconfigured to report to the new ActiveEfficiency server. Pre-caching, SSD and dashboard reporting can be managed independently from each hierarchy until all clients are migrated to the new hierarchy.
Preparing for Upgrade
You should include the following steps in your preparation for upgrading:
Step | Action | Details |
|---|---|---|
1 | Review how you are currently using Nomad |
|
2 | Familiarize yourself with the features that have been introduced and other differences between your currently installed version and the new version. |
|
3 | Check if any hardware upgrades or new hardware are required for any new features you intend to implement (for example, Tachyon is required for the Nomad Download Pause feature) and plan for these sufficiently in advance. | n\a |
4 | Obtain the latest software versions and hotfixes from the 1E Support Portal | n\a |
5 | Review CM health. You will be using CM to deploy the upgrade to clients, so any effort in ensuring CM is functioning well will ease the upgrade. | n\a |
6 | Plan your upgrade |
|
7 | Follow your upgrade plan in the production environment | n\a |
Upgrade Sequence
The upgrade process presented within this document implements three simple maxims
If you are upgrading Configuration Manager and your currently installed versions of Nomad or ActiveEfficiency are not supported on the new CM version, you must upgrade these before upgrading CM
If you are upgrading Configuration Manager and Nomad at the same time and your currently installed versions of Nomad and ActiveEfficiency are supported on the new version of CM, upgrade CM first then upgrade Nomad and ActiveEfficiency
Upgrade server components before clients.
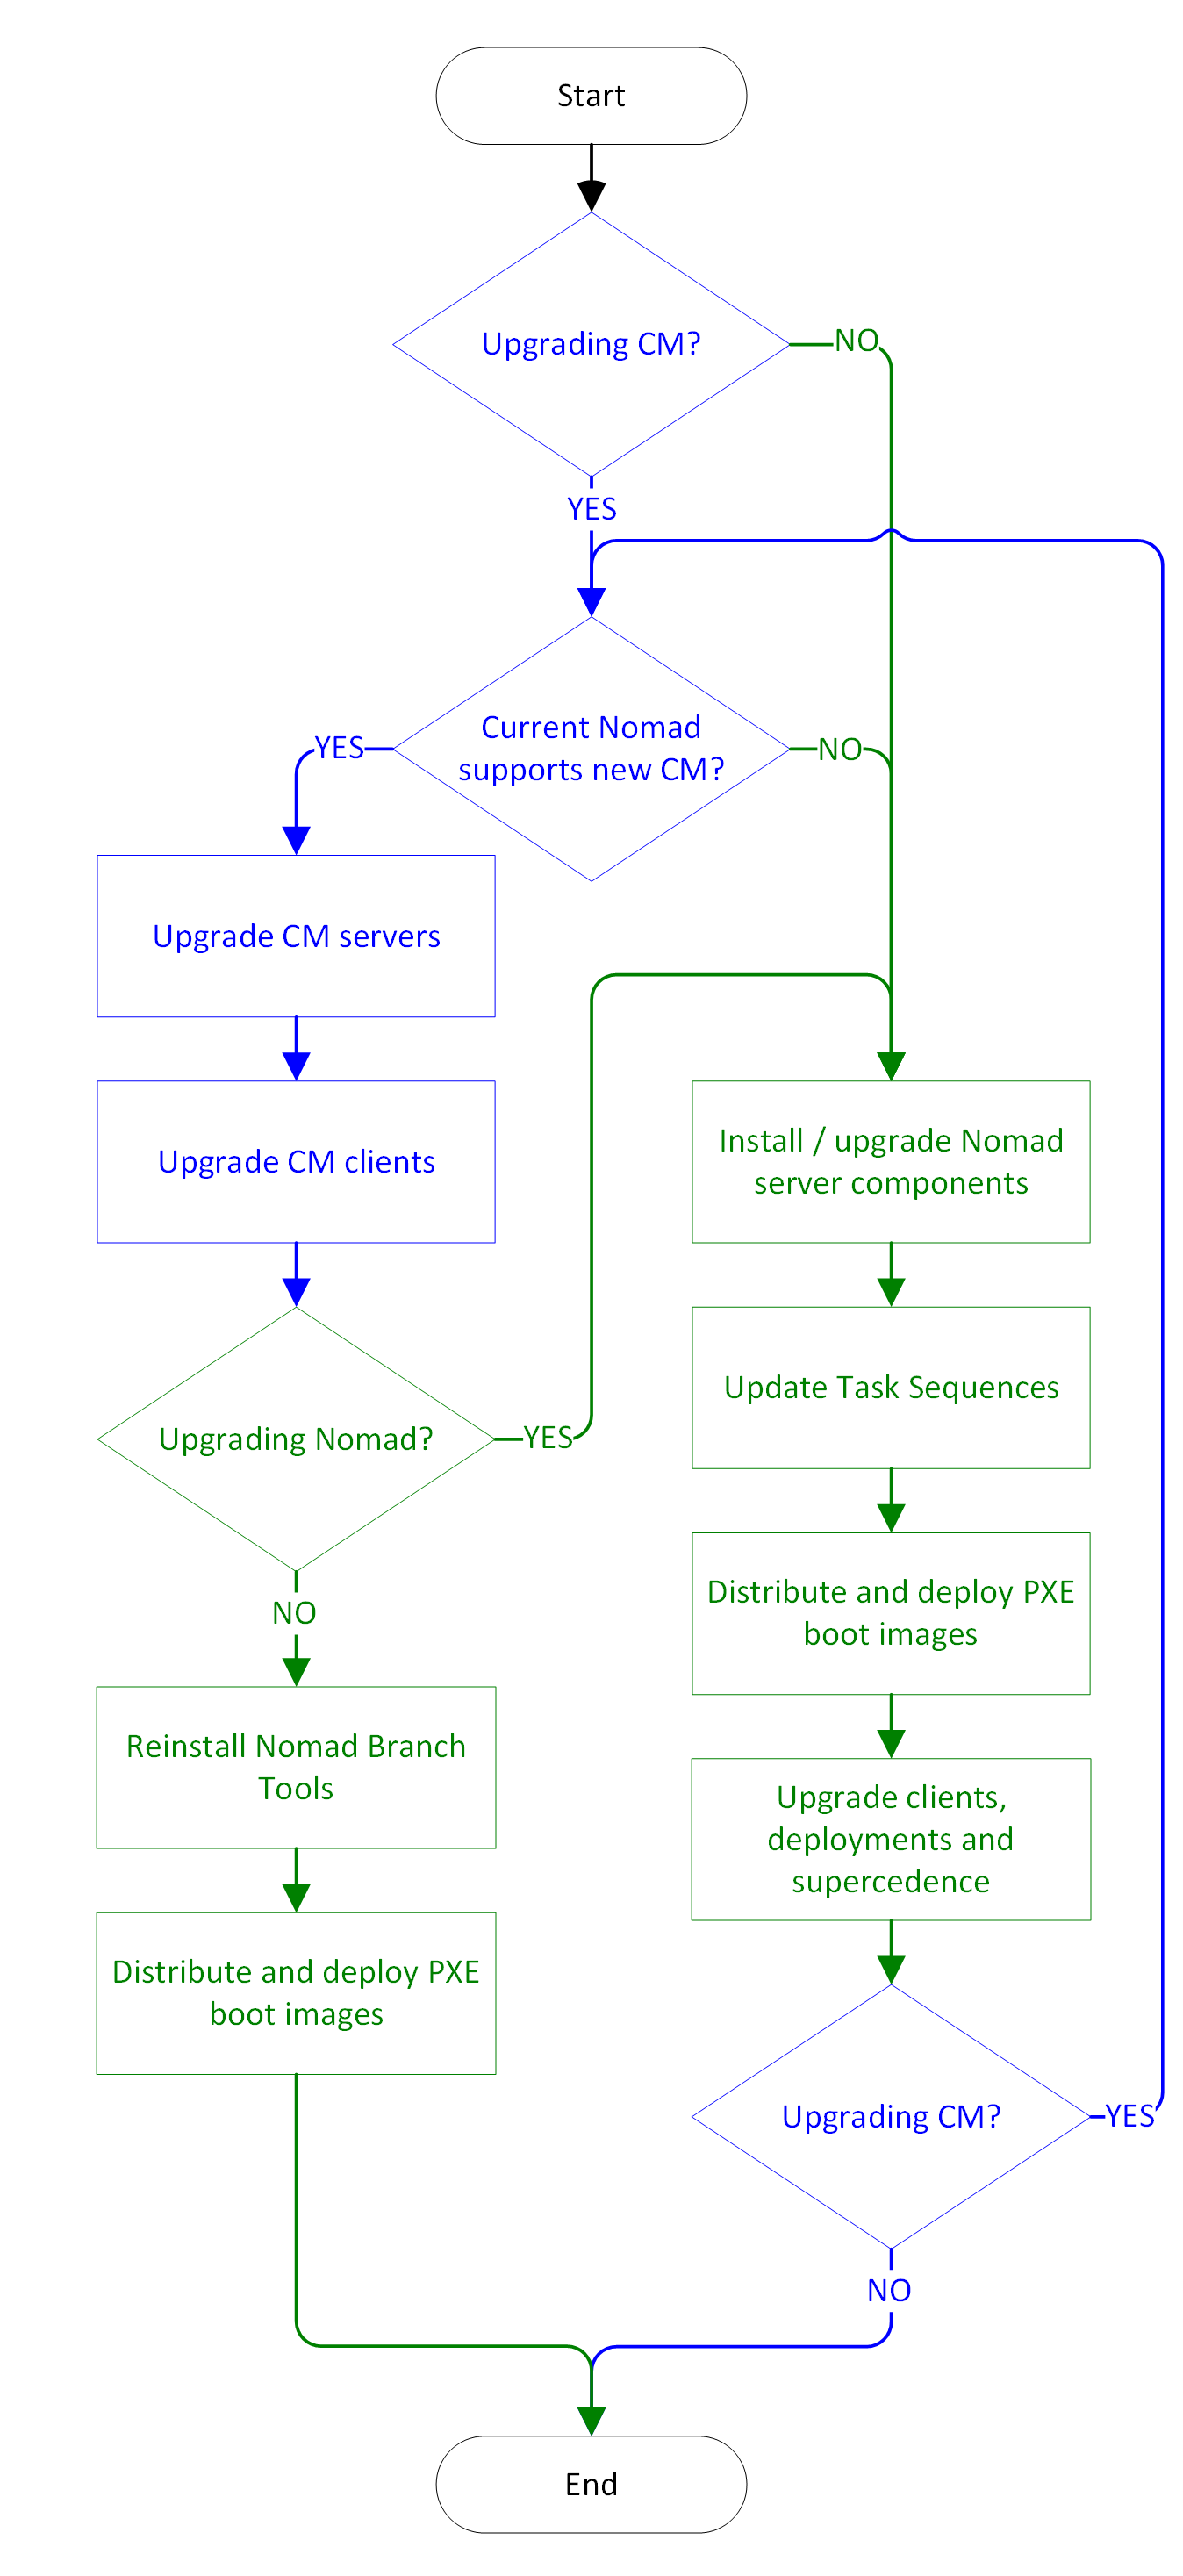
The figures below describe the principal processes and the sequence of steps involved when performing an upgrade. Described, is the logical progression of an upgrade process based upon the following possible scenarios:
Nomad only upgrade
Configuration Manager only upgrade
Configuration Manager and Nomad upgrade
Side-by-side migration of Configuration Manager and Nomad.
Upgrading Nomad and / or Configuration Manager
If you are only upgrading CM and your currently installed versions of Nomad and ActiveEfficiency support the new version of CM, follow Microsoft documentation to upgrade CM then reinstall the Nomad Branch Tools and redistribute the boot images.
If you are upgrading CM and your currently installed versions of Nomad or ActiveEfficiency are not supported on the new version of CM, follow the process below for upgrading Nomad first, then follow Microsoft documentation to upgrade CM.
Use the following process to upgrade Nomad.
Install or upgrade Nomad server components
If you are going to introduce features that require additional infrastructure (e.g. SSD, Dashboard and Pre-caching require ActiveEfficiency, Download Pause feature requires Tachyon), install these first as you will need to specify the server names when upgrading the Nomad Admin UI extensions and 1E Client
Upgrade the existing Nomad server components as follows:
ActiveEfficiency (optional component for SSD, Dashboard and Pre-caching)
Tachyon (optional component for real-time client management)
Nomad Admin UI extensions (on Site Servers and remote CM consoles)
Nomad Branch Tools (on Site Servers and SMS Providers)
Nomad on Distribution Points. Use the 1E Client installer to upgrade to Nomad 8.1 on DPs.
Hotfix required
If you are using ActiveEfficiency, Nomad 8.1 requires ActiveEfficiency 1.10 (or later) with the latest accumulated hotfix.
Update Task Sequences
Existing Task Sequence steps will continue to work after upgrading Nomad. However, the following steps should be updated in due course after upgrading the Nomad Admin UI extensions and Nomad Branch Tools.
Current step | Changes | ||||||||
|---|---|---|---|---|---|---|---|---|---|
| |||||||||
Stage Nomad Package Only if you are upgrading from a version of Nomad earlier than Nomad | Remove the step and replace it with Stage 1E Client Package , and reference the 1E Client package created earlier. | ||||||||
Install Nomad Only if you are upgrading from a version of Nomad earlier than Nomad | Remove the step and replace it with Install 1E Client . Before you remove the old step, make a note of any Additional installation commands in the existing step properties, and decide if you need to add them to the new step. Installer PropertiesNote that the installer property names in the 1E Client installer that relate to Nomad are different from the property names in previous versions of the Nomad installer. Generally, the original property name is prefixed with MODULE.NOMAD, but some have changed and there are new properties available since Nomad 7.0. Refer to Nomad installer properties for full details. If you are using Client Deployment Assistant to deploy the 1E Client, you should check to see if that has already configured your settings for you. |
Distribute and deploy PXE boot images
Nomad Branch Tools updates the Nomad files that are injected into Windows PE boot images. After upgrading Nomad Branch Tools, right-click existing boot images and select Update Distribution Points. CM will then generate an updated boot image, incorporating the updated Nomad files, and update it on DPs to which the boot image was previously distributed to. You will then need to deploy the updated boot image to any PXE Everywhere clients (see Preparing and deploying 1E PXE Everywhere boot images).
Upgrade clients
The 1E Client installer is used to upgrade from Nomad 6.3 to Nomad 8.1. 1E recommends using the Client Deployment Assistant (CDA) to create deployment objects (Applications, Packages, Collections and Deployments) in CM that can be used to roll out the client upgrade. The Applications and Packages created by CDA include Windows Installer transforms (.MST files) that configure the 1E Client according to options selected in the CDA.
Supported Upgrade path
The 1E Client supports upgrading from Nomad 6.3.100 and 6.3.201. Nomad 6.2 is now out of support. If you are still running Nomad 6.2, you will need to upgrade to Nomad 6.3.201 before upgrading to Nomad 8.1 with the 1E Client.
Application Supersedence
If you use Configuration Manager Applications (rather than Package) to deploy Nomad and still have active Application deployments for previous versions of the Nomad client, be sure to either:
delete those deployments
or define supersedence on the 1E Client Application such that it supersedes all Applications that install older versions of Nomad.
This will prevent Configuration Manager attempting to downgrade Nomad, which can leave the client in an unstable state.
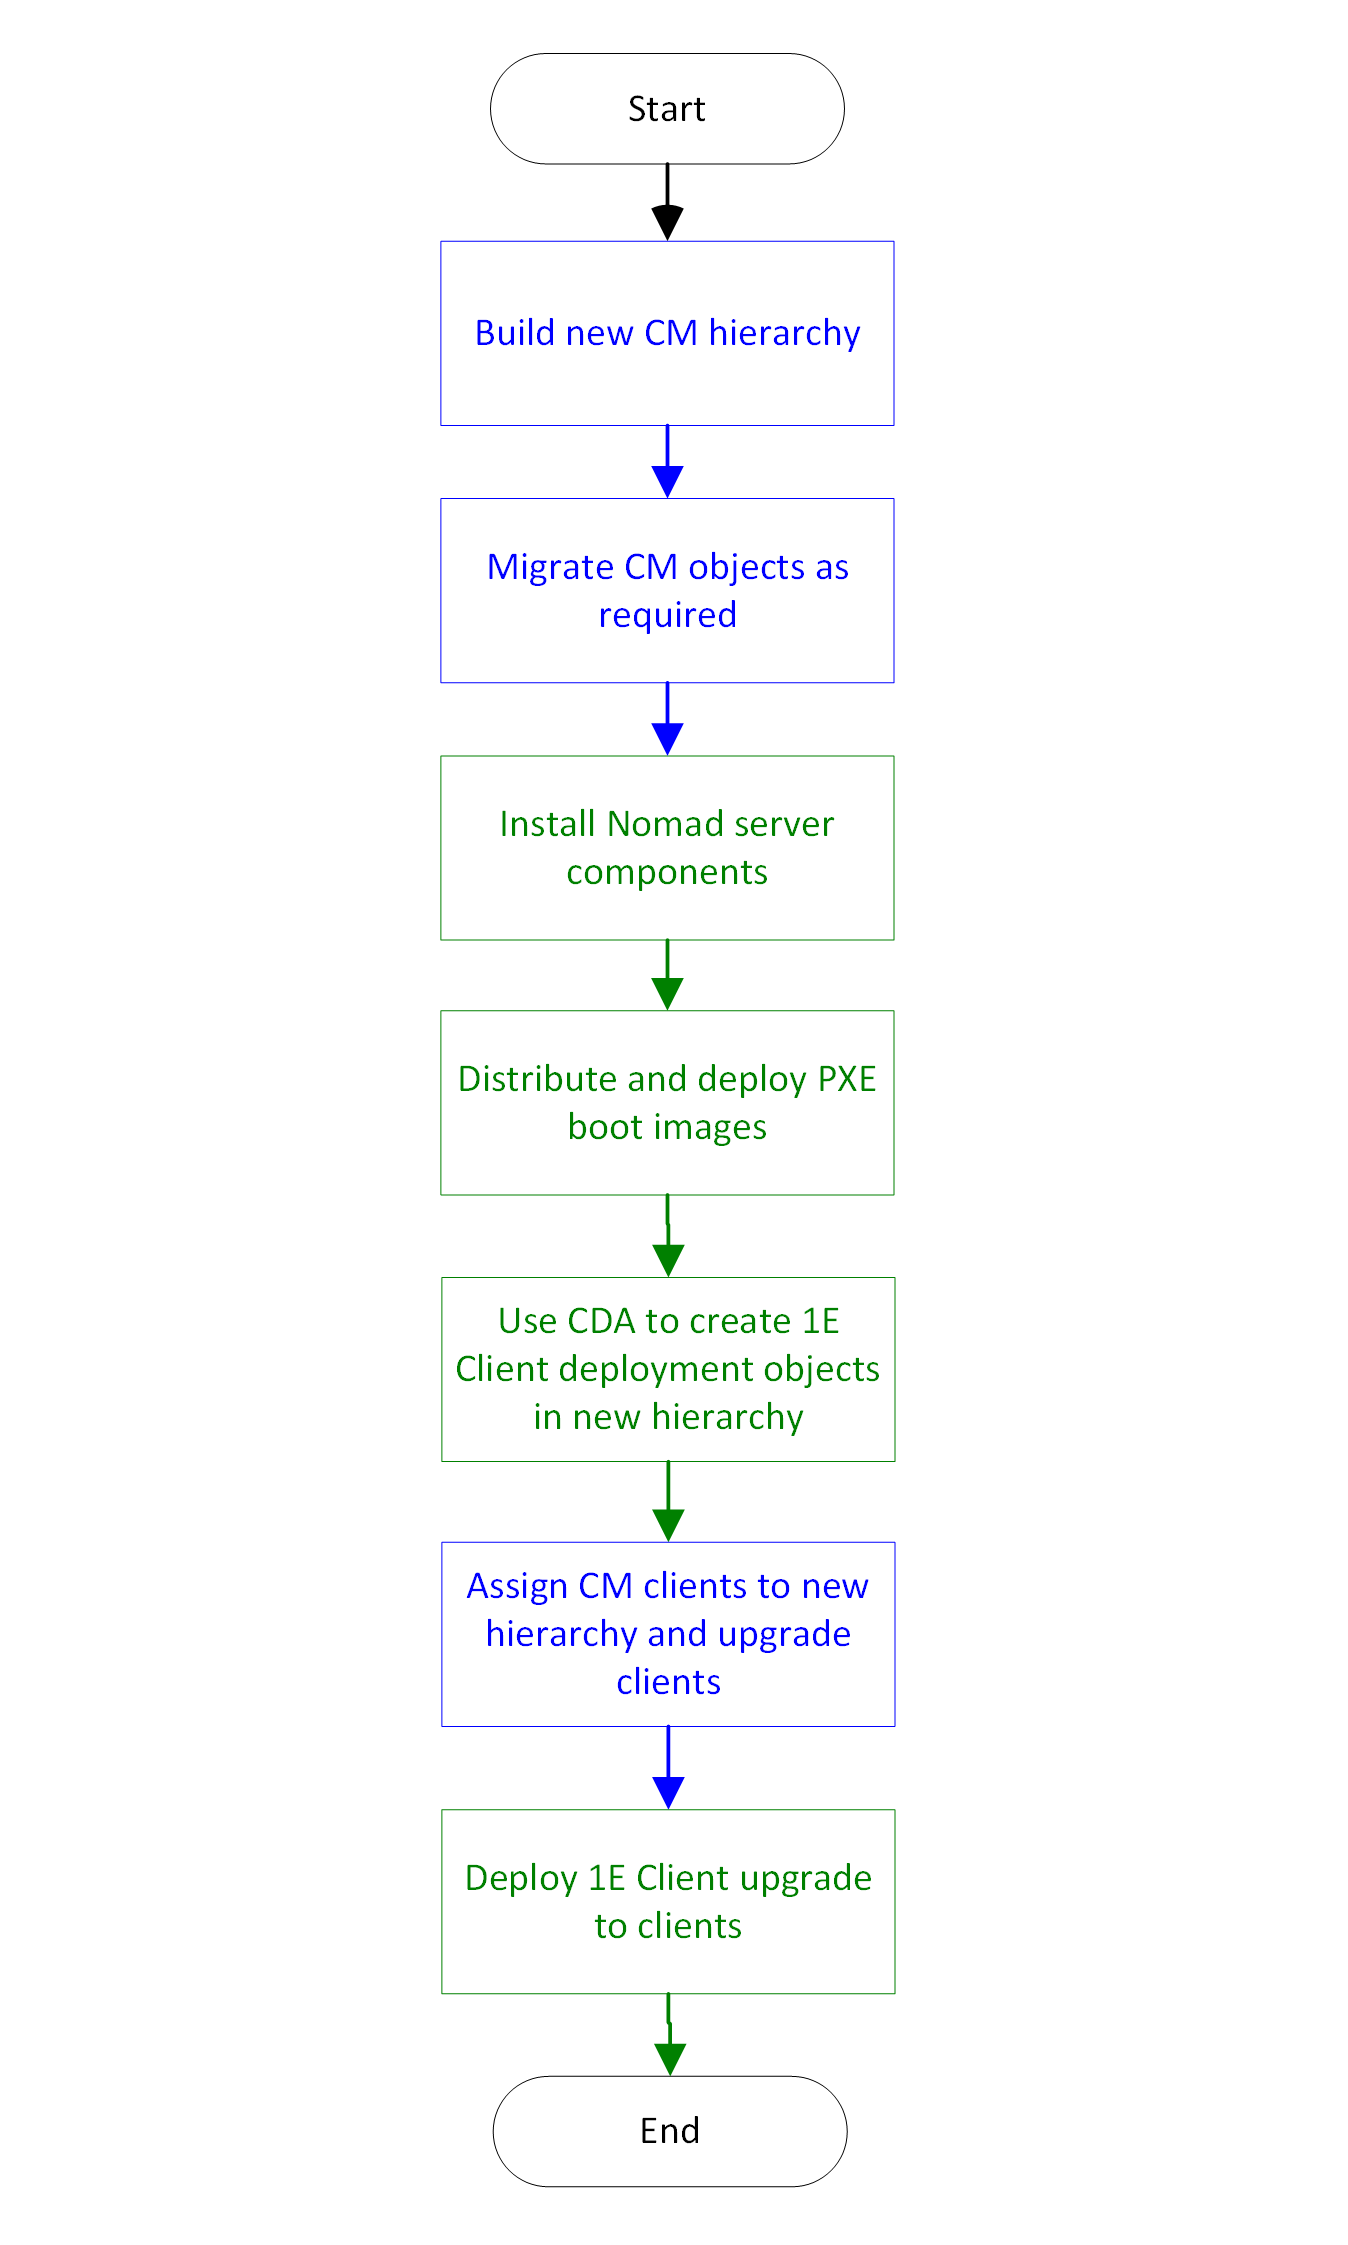
Side-by-side Configuration Manager migration
When performing a sire-by-side Configuration Manager migration, you will need to perform a number of tasks in the new hierarchy to get Nomad up and running. The steps below summarize the process.
Build new CM hierarchy
Follow Microsoft documentation to build the new CM hierarchy.
Migrate CM objects as required
This is an optional step. You may choose to migrate some or all of your packages and other objects from your old hierarchy rather than recreating them manually in the new hierarchy. This has the added benefit of retaining content IDs, which means that Nomad clients assigned to the new hierarchy will be able to source content for those migrated packages from peers still assigned to the old hierarchy.
Install Nomad server components
You will need to install the Nomad server components in the new hierarchy as if installing Nomad for the first time.
ActiveEfficiency (optional component for SSD, Dashboard and Pre-caching). See Side-by-Side Migration of Configuration Manager and Nomad for options with ActiveEfficiency
Tachyon (optional component for real-time client management)
Nomad Admin UI extensions (on Site Servers and remote CM consoles)
Nomad Branch Tools (on Site Servers and SMS Providers)
Nomad (1E Client) on Distribution Points.
Distribute and deploy PXE boot images
Nomad Branch Tools updates the Nomad files that are injected into Windows PE boot images. After upgrading Nomad Branch Tools, right-click existing boot images and select Update Distribution Points. CM will then generate an updated boot image, incorporating the updated Nomad files and update it on DPs to which the boot image was previously distributed to. You will then need to deploy the updated boot image to any PXE Everywhere clients (see Preparing and deploying 1E PXE Everywhere boot images).
Use CDA to create 1E Client deployment objects in new hierarchy
1E recommend using the Client Deployment Assistant (CDA) to create deployment objects (Applications, Packages, Collections and Deployments) in CM that can be used to roll out the 1E client to new clients in the new hierarchy and also to upgrade existing clients if they are on Nomad 6.3, and you wish to upgrade them to Nomad 8.1. The Applications and Packages created by CDA include Windows Installer transforms (.MST files) that configure the 1E Client according to options selected in the CDA. If you chose to implement a new ActiveEfficiency server in the new hierarchy, remember to specify the new server when running the CDA in this environment.
Assign CM clients to new hierarchy and upgrade clients
Follow the Microsoft documentation to assign CM clients to the new hierarchy and upgrade the CM client if appropriate.
Deploy the 1E Client upgrade to clients
If you are upgrading Nomad as you migrate clients to the new hierarchy, deploy the 1E Client application to upgrade them. If you used the CDA to create the deployment objects, simply add devices to the Collection created by CDA to upgrade them.
Upgrade FAQ
Client Upgrade FAQ
This section will attempt to answer some common questions related to upgrading the Nomad client.
Application Supersedence
If you use Configuration Manager Applications (rather than Package) to deploy Nomad and still have active Application deployments for previous versions of the Nomad client, be sure to either:
delete those deployments
or define supersedence on the 1E Client Application such that it supersedes all Applications that install older versions of Nomad.
This will prevent Configuration Manager attempting to downgrade Nomad, which can leave the client in an unstable state.
Question | Answer |
|---|---|
Refer to Supported Platforms. Product Support LifecycleFor details of the support lifecycle of each of the 1E Products, please refer to the 1E Support Portal (https://1eportal.force.com/apex/ProductLifeCycleSupportMaintenance). | |
Follow the process described above. | |
No. Old versions of Nomad required a license key, but a license key is not required to install 1E Client with Nomad enabled. However, your organization must still buy a license to use Nomad. | |
The Client Deployment Assistant (CDA) was developed to allow easy installation and configuration of all 1E Client modules and the PXE Everywhere client. CDA includes all the client installation packages and is updated and released alongside new client releases. CDA is an installation wizard that guides you through the configuration creation and deployment of Applications and Packages that install the 1E Client modules (Nomad, WakeUp, Shopping and Tachyon) and the PXE Everywhere and NightWatchman clients. The CDA is designed to speed up client deployment and ensure consistency of their configuration with the CDA providing a set of recommended configuration settings that can be changed either through the wizard or by editing the AppImport.xml file and running CDA in unattended mode. For more information on how to use the CDA, refer to Introducing 1E Client Deployment Assistant. | |
Yes. All upgrades will preserve the Nomad registry settings, as well as any content that exists in the Nomad Cache. However, it is recommended that users always deploy the upgrade using their desired transform (MST) in order to ensure that any existing clients that may be misconfigured are brought into line. Users should consult new release documentation in order to understand the settings related to implementing new features present in the release. | |
Yes. Nomad is backward compatible with Nomad 6.3. Older versions of Nomad are no longer supported. | |
It is recommended that you endeavor to upgrade clients by subnet where practical. Mobile clients moving from on-premises to Cloud DP locations should be upgraded as soon as possible. For customers not using Cloud DPs and mobile clients, it is generally not necessary to upgrade a set of particular clients at once. 1E always makes sure Nomad clients are backward compatible in terms of being able to download and share new and existing content between clients of different versions. | |
The best practice is to upgrade the Configuration Manager client prior to the Nomad client. The exception is when the currently installed Nomad agent does not support the new version of CM. Under normal operation, Nomad is designed to instantly recognize and remediate if it is not configured as the Alternate Content Provider (ACP) for the Configuration Manager client. When upgrading the Configuration Manager client or Nomad client, no additional steps are required to make sure Nomad remains configured as the ACP. The one exception is when the Nomad client installation is run on a host that does not have the Configuration Manager client installed. In this case, if installing the Configuration Manager client after installing Nomad, then you will need to perform a restart of the NomadBranch service for successful ACP registration. As a precaution, if reinstalling both agents clients, it is recommended that the Configuration Manager client is always installed/upgraded before Nomad. |
Content FAQ
This section will attempt to answer some common questions related to Nomad content during a 1E Nomad upgrade.
Question | Answer |
|---|---|
An upgrade of the Nomad client does not delete content from the Nomad cache. Similarly, an upgrade to the Configuration Manager client will not result in content being deleted from its cache. The new Cache Optimization (CO) feature introduced in Nomad 6.3 is turned off by default. CO allows content to be automatically purged from the cache based upon the last time it was copied by a peer or downloaded – whichever came last. | |
Yes, for a shared environment, provided the content version is consistent between the old and new site/hierarchy, the content locations will be supplied to the Nomad client by the Configuration Manager client and accessed by Nomad in the usual way. This is true for native Configuration Manager deployments as well as Nomad Pre-caching when the Nomad client performs its own content request. The Nomad client installed on the shared DP will continue to function as normal. | |
Yes. Migrating objects in Configuration Manager is performed using migration jobs and content identifiers are maintained after migration. This means all content metadata gathered by the Nomad client in the old hierarchy will be valid in the new. | |
Yes, the software update identifiers and metadata generated by Nomad in the source site remains valid in the new hierarchy. | |
For packages, no. Users must manually configure the Nomad settings on their migrated content in the new site. This can be automated by running a post migration script in order to set the required Nomad properties. Because of this, it is recommended that deployments are set to disabled in the package migration jobs. For applications and software updates, this is not a concern since the setting to use Nomad is made in the Configuration Manager Client Settings policy, rather than against individual pieces of content. |
Content Distribution FAQ
This section will attempt to answer some common questions related to ActiveEfficiency and Content Distribution when upgrading Nomad.
Question | Answer |
|---|---|
No. Prior to upgrading, it is recommended to take note of any customizations. If you have customized settings such as IIS bindings or changed the service.exe.config file, then these will need to be reapplied after the upgrade. | |
Operating System Deployments FAQ
This section will attempt to answer some common questions related to OSD when upgrading Nomad.
Question | Answer |
|---|---|
No. PXE Everywhere 4.0 is the latest version, released earlier in 2019. | |
Unless you are upgrading the Windows ADK, you do not need to recreate your Nomad enabled PXE boot images. Admins do however need to update and deploy their boot images to include updated Nomad 8.1 program files when upgrading the Configuration Manager site server, SMS provider components, or the Nomad Branch Tools. Updating is achieved by simply redistributing the boot image package using the Configuration Manager console. The PXE boot image must then be re-deployed to your PXE Everywhere endpoint agents. | |
1E are always looking for ways to simplify and enhance our customer's OSD experience and will often release new built-in task sequence steps as part of a Nomad release. 1E recommends that whenever possible, users take advantage of any new task sequence steps and update their task sequences accordingly. If users wish to retain the configuration of their existing task sequences, then the older steps will typically remain supported, unless otherwise stated in the release documentation. Where existing steps are supported into the latest release, no action is required on existing task sequences once the Nomad Branch Tools and Configuration Manager Admin Console UI extensions have been upgraded. Configuration Manager admins are then able to open and edit their existing task sequences, and they will continue to function in the same way. |