Nomad Pre-caching
Pre-caching lets you preload the Nomad caches of particular machines directly from the Configuration Manager console. This enables downloads to be available on the branch prior to a deployment taking place, which can be very useful in large-scale deployment scenarios.
Before you start, ensure the following prerequisites are met:
Tachyon Platform 5.2 or later is accessible, with Nomad features enabled
Nomad Configuration Manager console extensions must be installed.
Refer to Using Nomad with Operating System Deployment OSD for example scenarios about how to use Nomad to maximize the efficiency of distributing large OS content across the network and how you can monitor those deployments using the Nomad app.
Architecture and ports
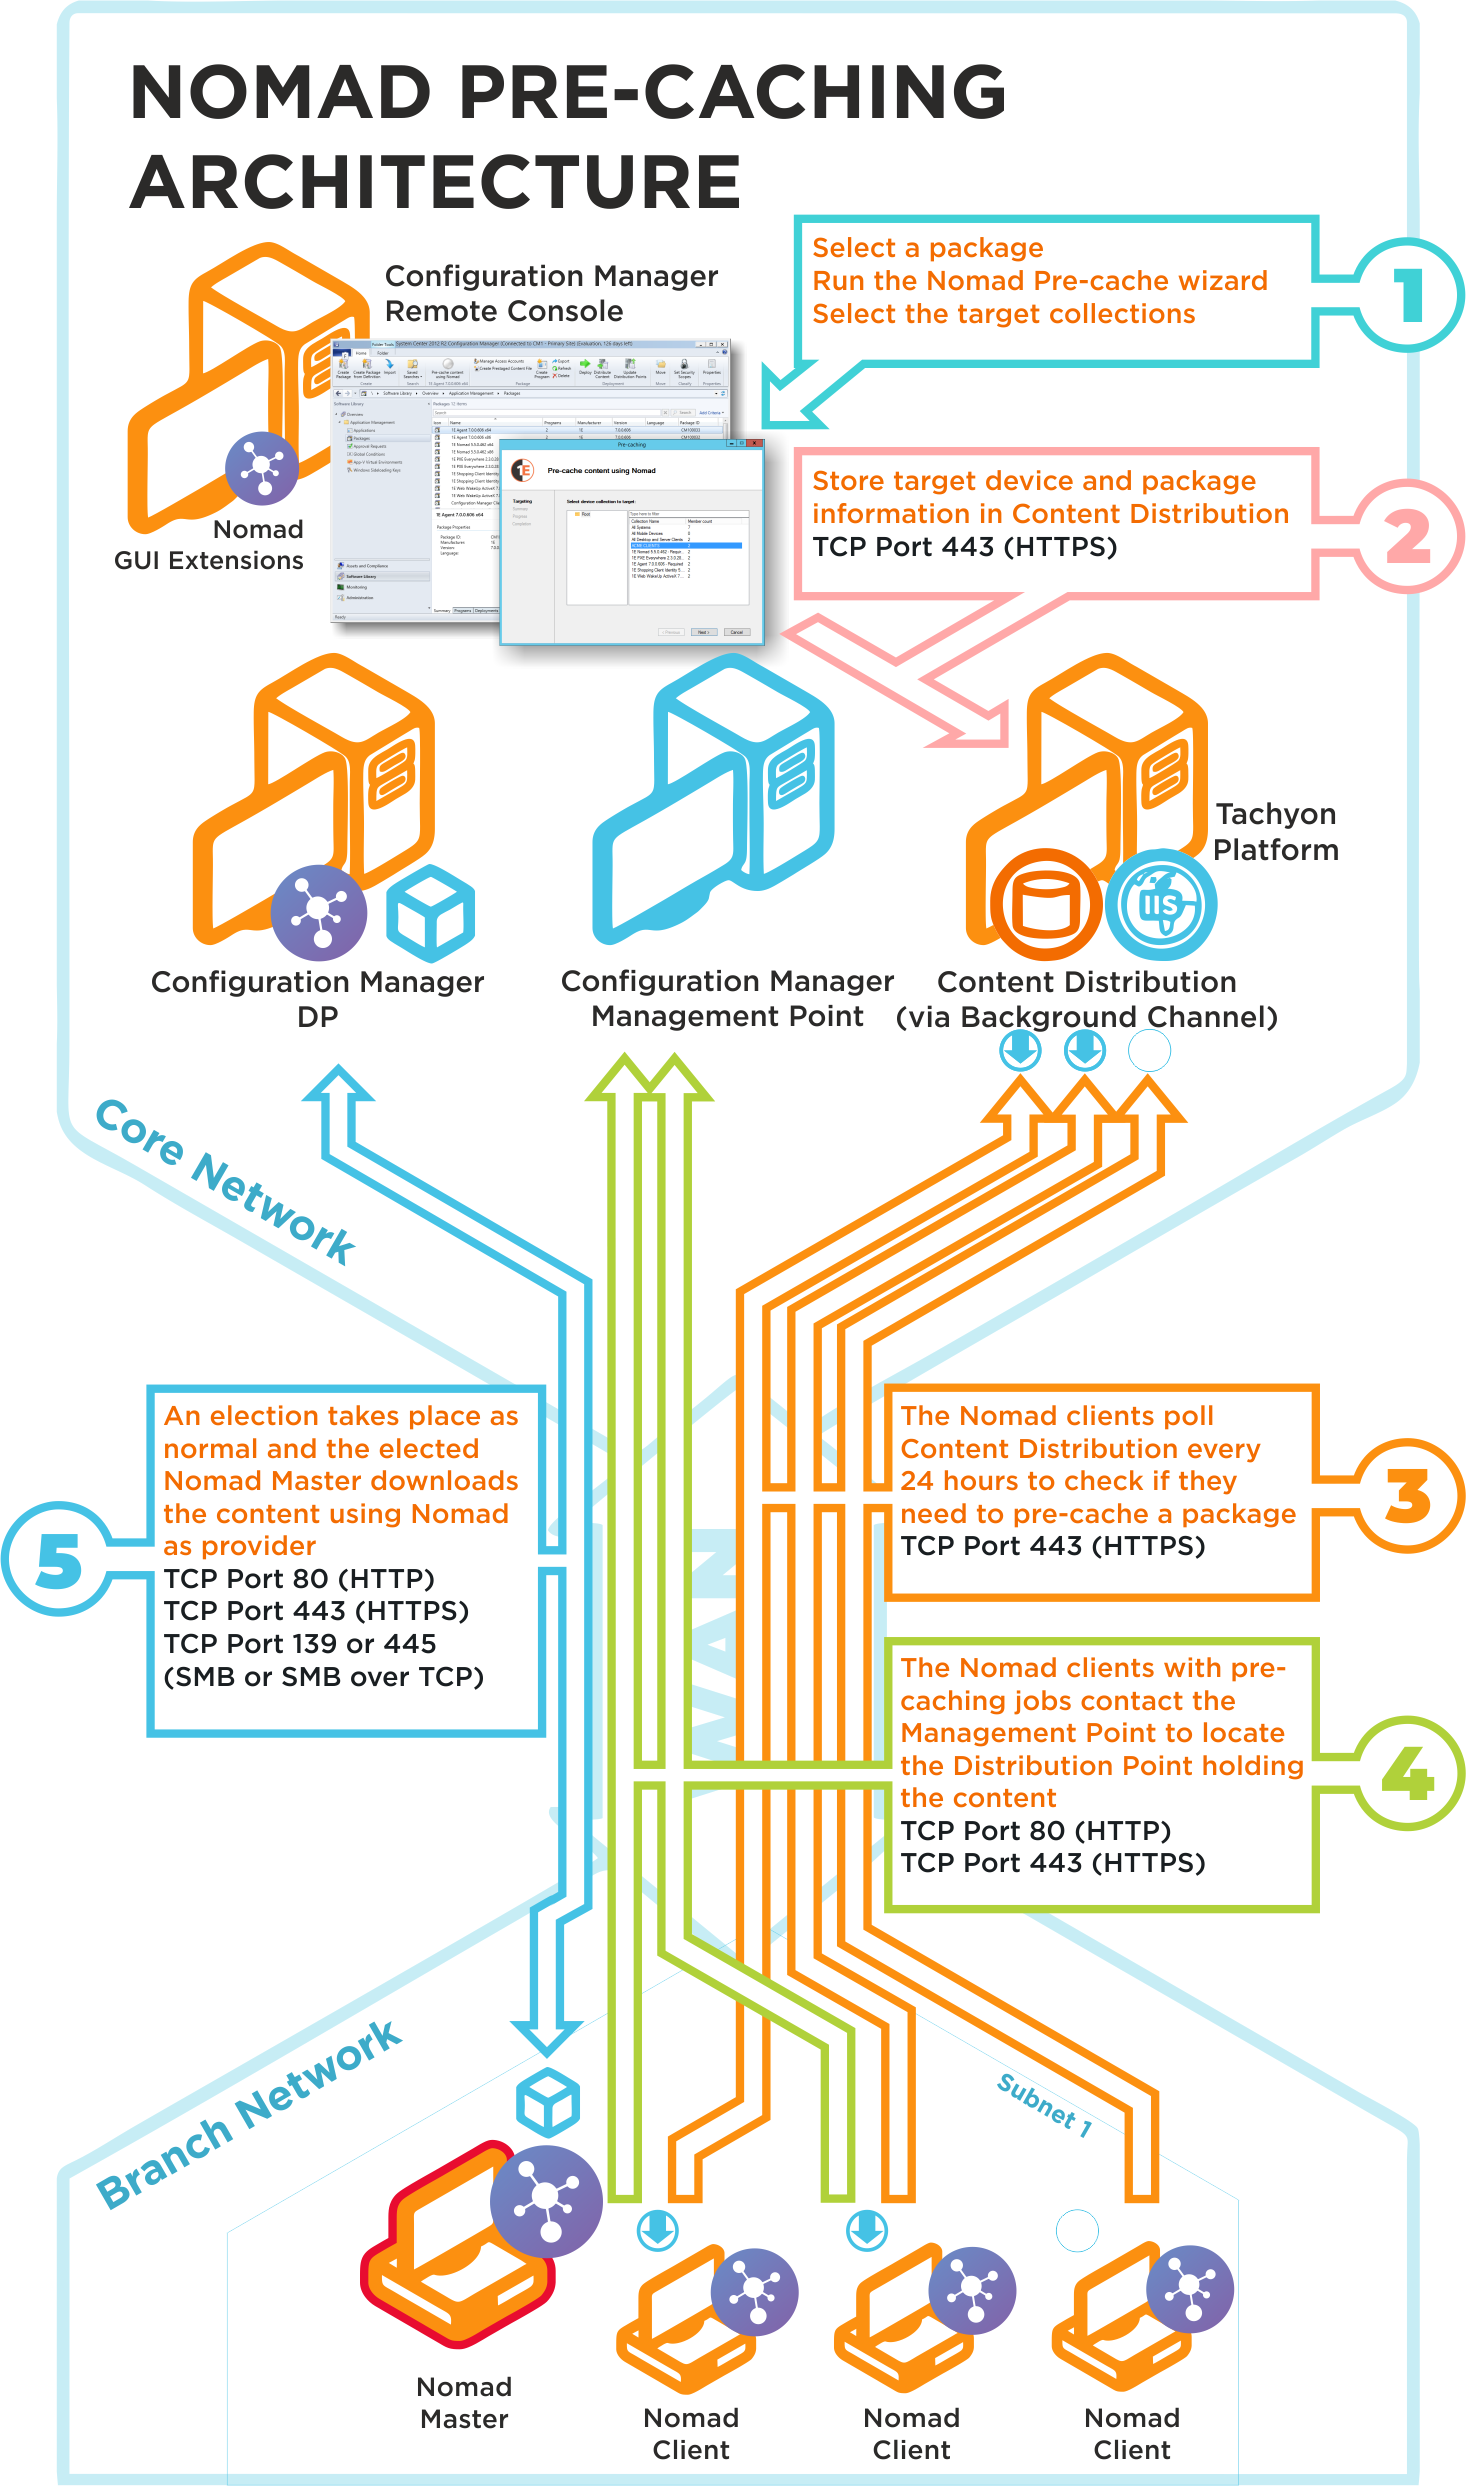
The Nomad pre-caching uses the following ports in its communications. If a site server is configured to use custom ports, pre-caching will use those ports to communicate with a management or distribution points. To ensure high-availability, pre-caching falls back to next available site server if it fails to communicate with a management or distribution point.
Ports | Description |
|---|---|
N/A | Choose a package and run the Nomad pre-caching wizard, selecting the target device collection. This step does not require any port configuration but the Nomad Configuration Manager console extensions must be installed in the Configuration Manager Console. |
TCP 80 (HTTP) TCP 443 (HTTPS) | The Nomad pre-caching wizard stores the target device and package information in Tachyon. |
TCP 80 (HTTP) TCP 443 (HTTPS) | The Nomad clients, where the pre-cache feature has been enabled, poll Tachyon every 24 hours to see if they need to pre-cache some content. This takes the form of pre-caching notifications that tell the Nomad clients they need to process a download job to fetch the specified content. |
TCP 80 (HTTP) TCP 443 (HTTPS) | The Nomad clients, with pre-caching notifications, contact the Management Point to locate the Distribution Point that holds the content. This may use HTTP or HTTPS depending on how the Management Point is configured. |
TCP 80 (HTTP) TCP 443 (HTTPS) TCP 139 (SMB) TCP 445 (SMB over TCP) | A Nomad Master election takes place and the elected master processes the job by downloading the pre-cache content using Nomad as provider. This is then distributed locally to the Nomad peers that also require the pre-cached content. This communication depends on how the DP is configured. It may be one of the following:
For Configuration Manager the default setting is either HTTP or HTTPS. |
Enabling Nomad pre-caching
When you consider how to install the Nomad Branch Tools (refer to Installing Nomad Branch Tools), you can also install them in unattended mode by using the MODULE.NOMAD.PLATFORMURL installer property or by setting the PlatformURL registry value on the machine where the extensions are installed post-installation.
Note
If you have an existing Nomad 7.0.200 installation, and you upgrade to Tachyon Platform 8.1 you should also upgrade your Nomad Configuration Manager console extensions to the current version, doing this ensures you can view your pre-existing Nomad pre-cache jobs. When you upgrade from earlier versions of Nomad to Tachyon Platform, ActiveEfficiency is upgraded to Content Distribution. As a result, if you have an earlier version of the Nomad Configuration Manager console extensions, you may not be able to view your existing Nomad pre-cache jobs until you upgrade.
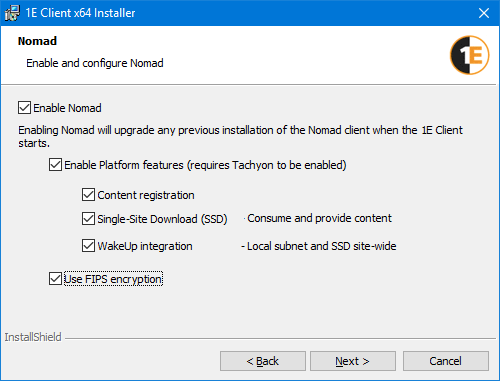
Nomad clients must also be configured to support pre-caching. This is done during installation in the Nomad screen of the 1E Client installer, for more details refer to Installing the 1E Client for Nomad.
Setting | Description | ||||||||||||||
|---|---|---|---|---|---|---|---|---|---|---|---|---|---|---|---|
Enable Nomad | Check this box to enable Nomad. Nomad is used to support efficient content download for Configuration Manager and Tachyon. For Tachyon, its Nomad content download feature is enabled by default but only used if Nomad is enabled. NoteIf Nomad is enabled, when the 1E Client starts it will upgrade any previous installation of the NomadBranch client. | ||||||||||||||
Enable 1E Platform features | Check this box to let you configure the Single-Site Download (SSD) options and WakeUp integration.
If you need to enable reporting but prevent the Nomad client acting as an SSD provider, then use installer properties or mst transform files to configure MODULE.NOMAD.SSDENABLED and MODULE.NOMAD.CONTENTREGISTRATION. For more information about SSD, please refer to Single Site Download.
NoteThe Platform settings are only available if you have enabled Tachyon. NoteThese settings do not affect other Platform features such as Pre-caching. | ||||||||||||||
Use FIPS encryption | Checking Use FIPS Encryption configures the Nomad module to use FIPS encrypted communications. You must ensure that Nomad is configured with the same FIPS encryption setting on all your 1E Clients. |
Note
Although the Single-Site Download option must be enabled in the installer, you can use the Nomad pre-caching feature without using SSD by not configuring the Single Site Download feature. If you are already using the SSD feature in your environment, no further Nomad client configuration will be required to enable Nomad pre-caching.
Using Nomad pre-caching
Nomad pre-caching is directly integrated with the Configuration Manager Console, is fully compliant and works with Role Based Access in Configuration Manager, refer to Nomad pre-caching RBAC support for details.
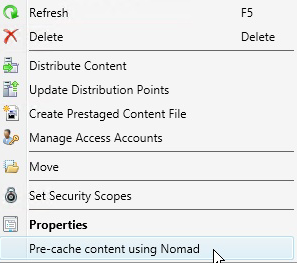
To start the pre-cache wizard, right-click any of the following types of content in the Configuration Manger console and from the context menu, choose Pre-cache content using Nomad.
Applications
Packages
Driver packages
Operating system images
Operating system upgrade packages
Boot images
Task sequences.
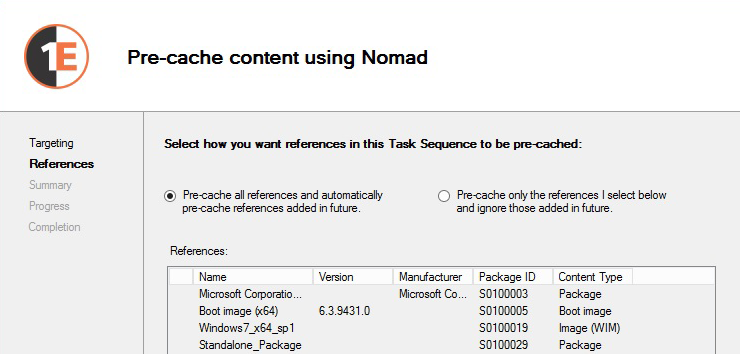
For task sequences, please refer to the note in the table under Dynamic pre-caching below:
On the Targeting screen, choose the device collection you want to pre-cache.
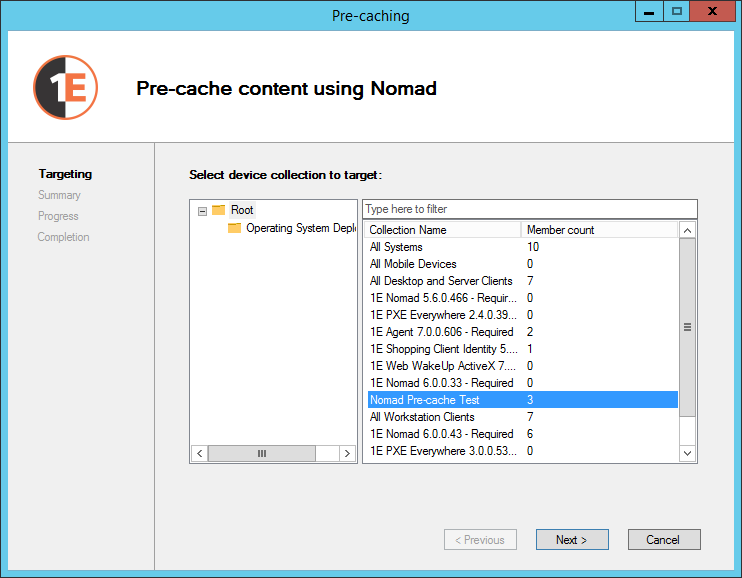
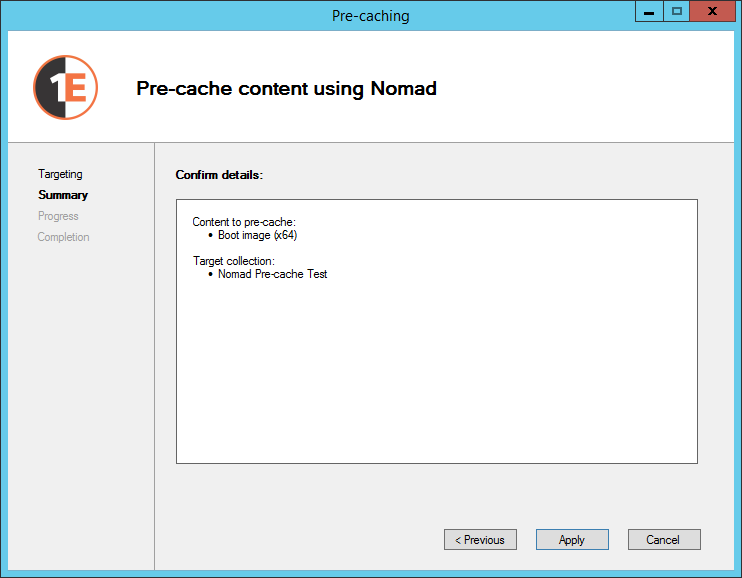
On the Summary screen, verify your selection.
Click Apply if it is correct
If it is incorrect, click Previous to start again.
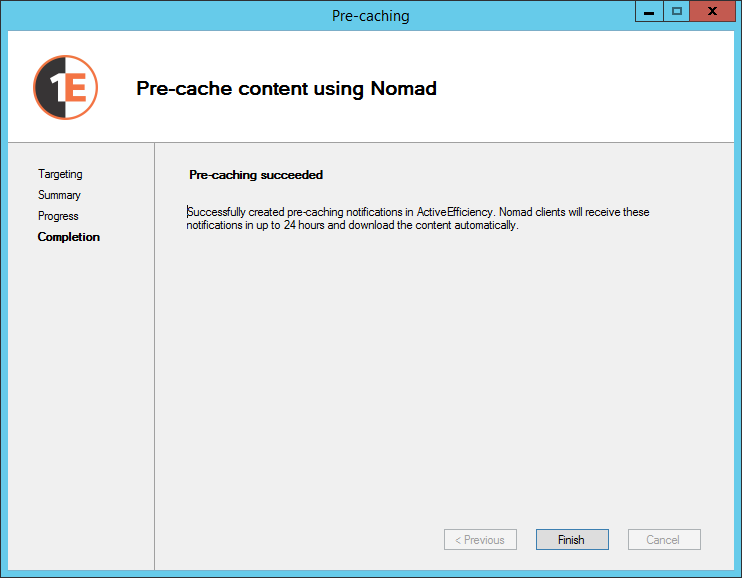
The Progress screen displays the status while the wizard sets up the pre-cache notification in ContentDistribution.
Note
From Nomad 8.1 there is support for providing alternate credentials to authenticate with the Tachyon Platform. If your Tachyon Platform instance resides in another domain or the cloud, you will be prompted to enter alternate credentials for that location, which get stored in the credential store for any future requests.
On the Completion screen, click Finish to close the wizard.
Viewing pre-cached jobs
If you are not a full administrator, you can only view pre-cached jobs provided you have Read permissions on the collection as well as the content.
To view pre-cached jobs:
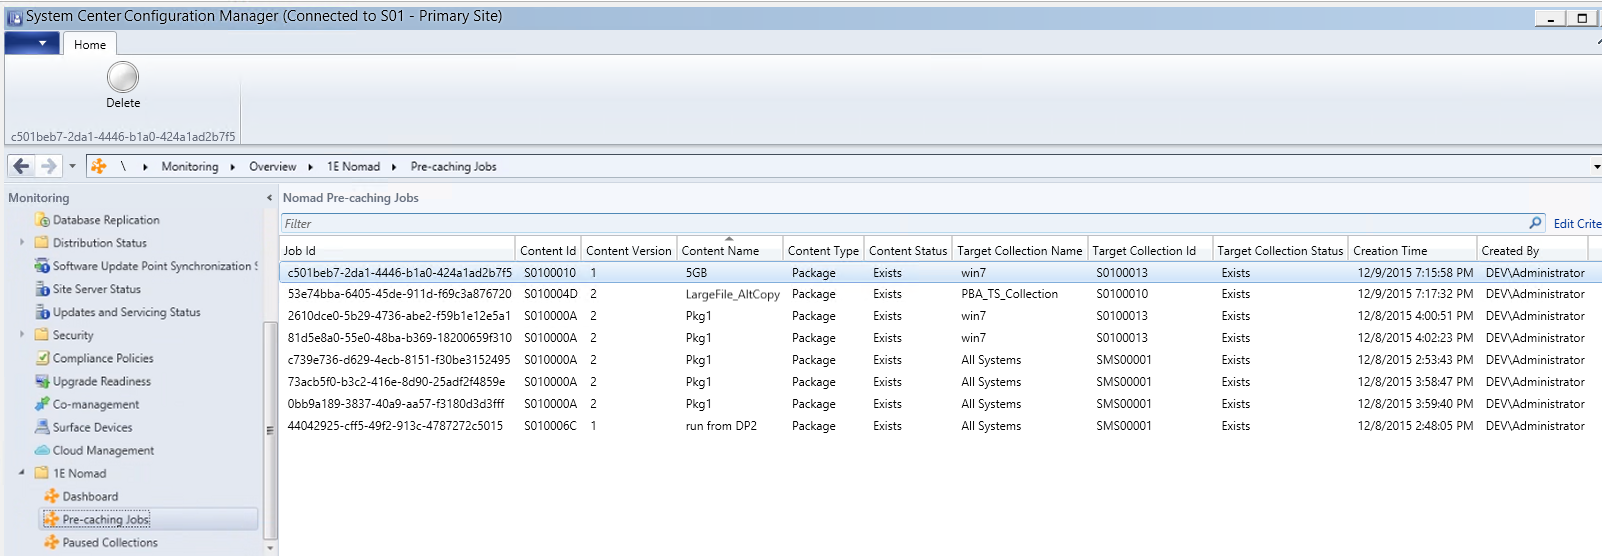
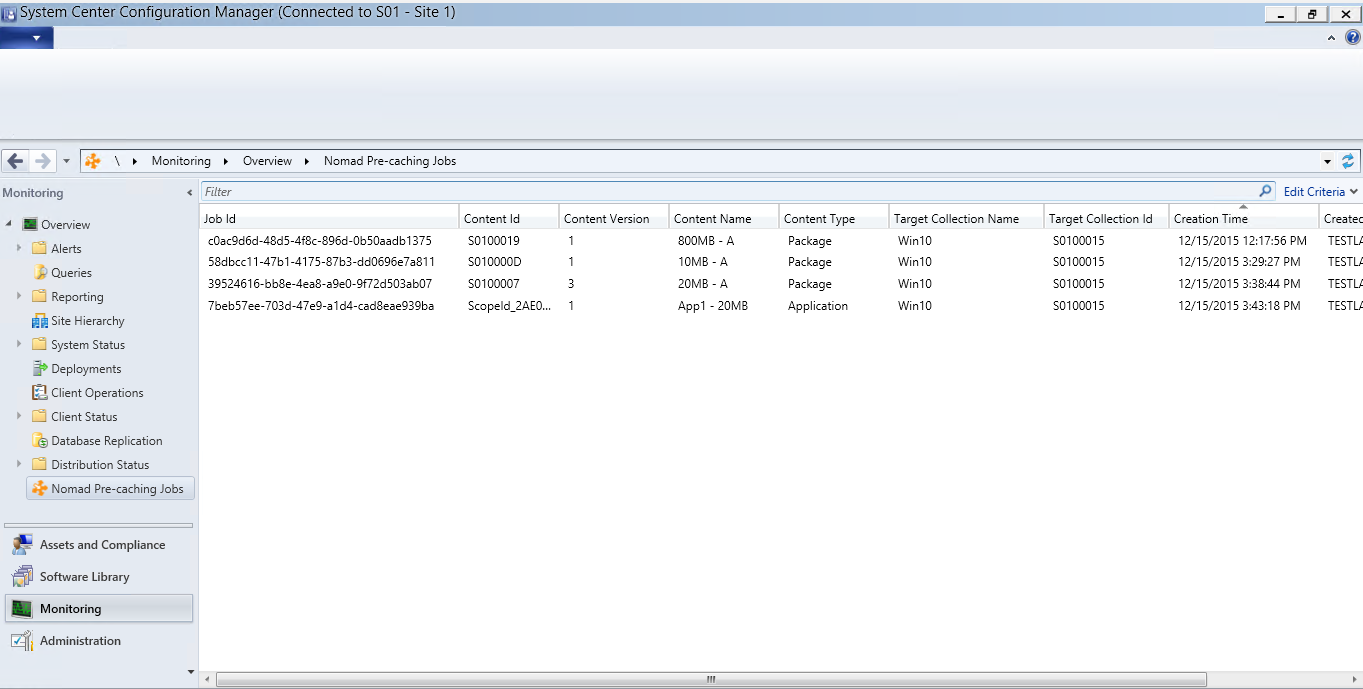
In Configuration Manager, choose Monitoring.
Expand the 1E Nomad node and select Pre-caching Jobs.
The attributes for the job are displayed in the right-hand pane as follows:
Column title | Attribute definition |
|---|---|
Job Id | The ContentDistribution identifier of the job. |
Content Id | Configuration Manager identifier for the content referenced by the job. |
Content Name | Name of the content referenced by the job. |
Content Version | Version of the content referenced by the job. |
Content Type | Type of the content referenced by the job (i.e. application, task sequence). |
Target Collection Id | Device collection identifier targeted by the job. |
Target Collection Name | Device collection name targeted by the jobs. |
Creation Time | The time the job was created. |
Created By | The person who created the job. |
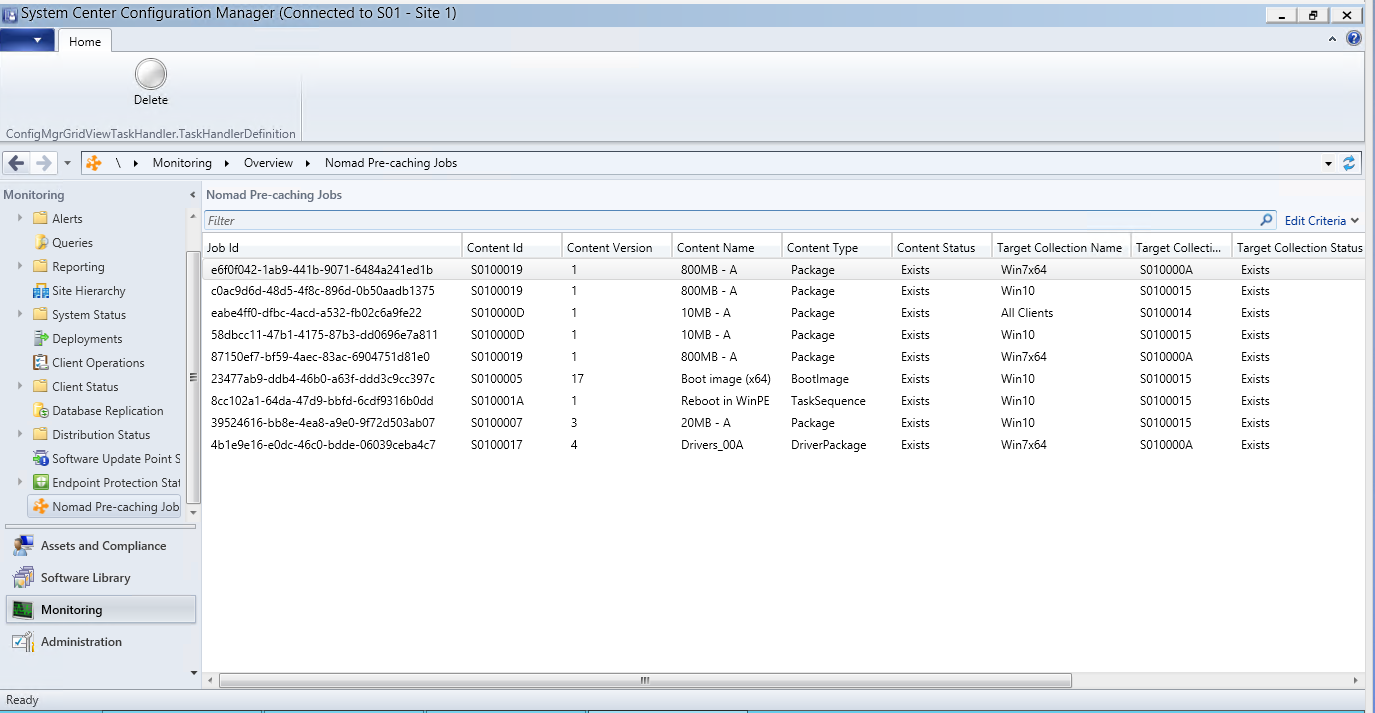
Content Status | (Visible only to those with full administrator rights) – displays the status of the content, i.e whether it exists or is deleted. |
Target Collection Status | (Visible only to those with full administrator rights) – status of the device collection, i.e. whether it exists or is deleted. |
Deleting pre-cached jobs
You can only delete pre-cached jobs if you have permissions for a particular content type. If you are not a full administrator, you will need:
Read permissions on collections (through a security role)
Access to the pre-cached job (i.e. content and the device collection)
To delete a pre-cached job:
In Configuration Manager, choose Monitoring.
Expand the Overview tree and choose Nomad Pre-cache jobs.
In the Nomad Pre-caching jobs list, right-click the pre-cached you want and from the context menu, choose Delete.
Managing pre-cached jobs with Powershell cmdlets
You can also manage pre-cached jobs by using PowerShell cmdlets.
To get all pre-cached jobs from ContentDistribution, run:
Get-PreCachingJobs [-PlatformURL <String>] [<CommonParameters>]
To remove pre-cached jobs from ContentDistribution run:
Remove-PreCachingJobs [-Id] <String> [-PlatformURL <String>] [-Confirm [<SwitchParameter>]] [<CommonParameters>]Remove-PreCachingJobs -Before <String> [-PlatformURL <String>] [-Confirm [<SwitchParameter>]] [<CommonParameters>]Remove-PreCachingJobs -AgeInDays <UInt32> [-PlatformURL <String>] [-Confirm [<SwitchParameter>]] [<CommonParameters>]Remove-PreCachingJobs -All [<SwitchParameter>] [-PlatformURL <String>] [-Confirm [<SwitchParameter>]] [<CommonParameters>]
The parameters are:
Parameter | Optionality | Notes |
|---|---|---|
| Mandatory | ID for the job to delete. |
| Optional | Location of ContentDistribution. If not provided, it is retrieved from the |
| Optional | Suppresses the confirmation prompt for the deletion. |
| Mandatory | Delete jobs before a particular date and time where the notation is |
| Mandatory | Delete jobs older than a particular number of days. |
| Mandatory | Delete all jobs. Exercise caution if you use this. |
| Values are: Verbose, Debug, ErrorAction, ErrorVariable, WarningAction, WarningVariable, OutBuffer, PipelineVariable and OutVariable |
There is more information about CommonParameters at http://go.microsoft.com/fwlink/?LinkID=113216
Dynamic pre-caching
If the content or membership of a targeted collection changes after a pre-cached job is created, Nomad is updated to keep in sync with Configuration Manager. It does this by polling the Configuration Manager database at regular intervals to fetch updated content.
These intervals (you would have defined the intervals when you installed Tachyon Platform) have the following characteristics:
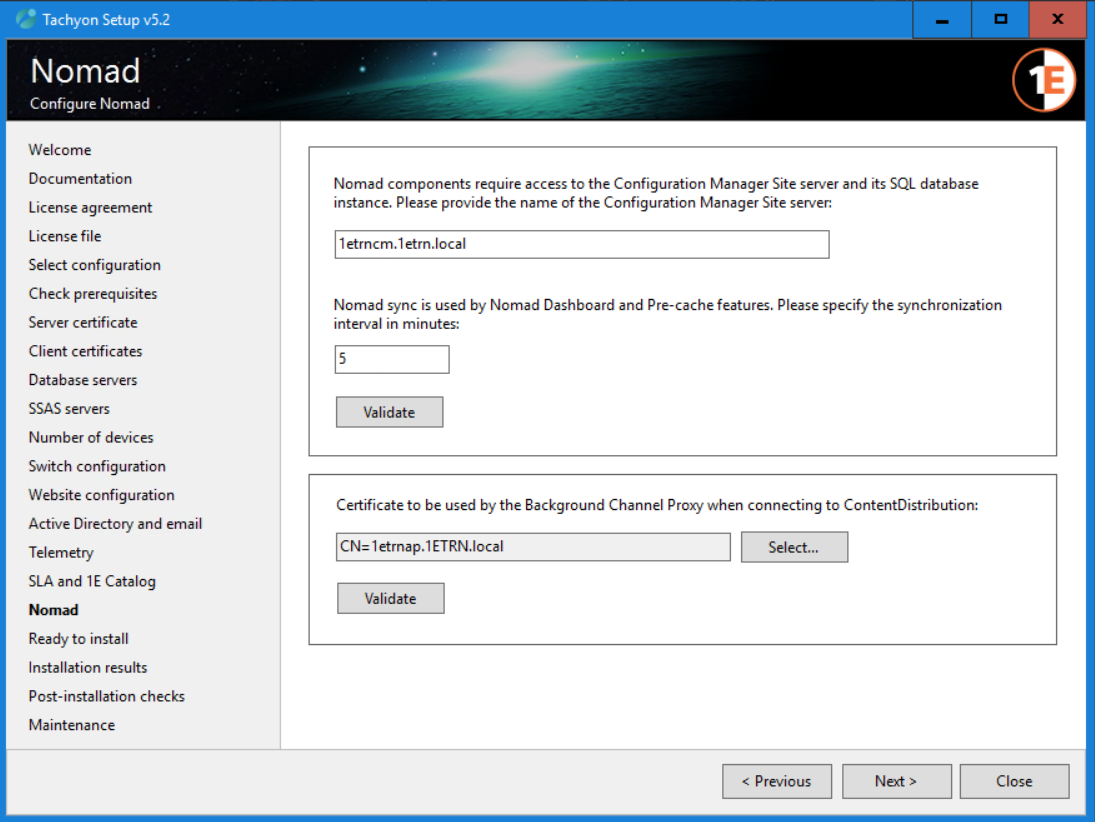 |
The range for the interval is between 5 minutes and 1440 minutes (1 day). By default, Nomad synchronizes with the Configuration Database every 30 minutes. If the values are outside the range, for example if the interval is less than 5, it will default to the minimum which is 5 minutes. Similarly, if the interval is greater than 1440, it defaults to the maximum which is 1440 minutes.
If a synchronization fails, it is rescheduled to run again in 15 minutes
Each synchronization task fetches the following:
Pre-caching data (device collections and contents)
Dashboard data (status messages).
Pre-cached jobs are affected when these events take place in Configuration Manager, and on the next synchronization with Nomad:
Configuration Manager events | Next Nomad synchronization cycle | ||
|---|---|---|---|
Device collections |
|
| |
Packages |
|
| |
Applications |
|
| |
Task sequences | If you chose to automatically pre-cache references (as well as those added later)
| Nomad is updated:
NoteApplications and packages that will be installed using a dynamic variable list will not be automatically pre-cached. Also be aware that any other dynamic content will not be pre-cached, for example drivers deployed using Modern Driver Management (http://www.scconfigmgr.com/modern-driver-management/). Dynamic content needs to be pre-cached independently as separate jobs. | |
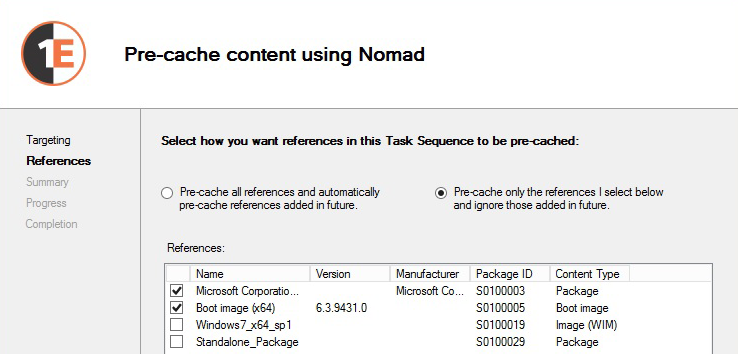
If you chose to selectively pre-cache references:
|
| ||
Manually forcing a synchronization between Content Distribution and Configuration Manager
You can force a synchronization to occur outside its normal cycle to assist in troubleshooting or just to speed up the sync process.
Navigate to https://<Platform_URL>/contentdistribution/v1.0/commands/cmsync
You should then see the response:
Initiated Cm SyncCheck C:\ProgramData\1E\ContentDistribution\ContentDistribution.log for details.
Note
By default, all synchronization activities are logged in the ContentDistribution service log C:\ProgramData\1E\ContentDistribution\ContentDistribution.log.
Disabling synchronization
There may be instances, such as carrying out maintenance on the Configuration Manager server or the SQL Server instance, where you have to disable synchronization. To do this:
Open appsettings.json located in the service installation folder, typically in C:\Program Files\1E\ContentDistribution\Web\WebService
Set
Enabledtofalseunder theCmSyncelement, for example:"CmSync": { "Enabled": false, "IntervalMinutes": "30", "TimeoutMinutes": 10, "CmServer": "1etrncm.1etrn.local" }
Hash validation
Hash validation is used when content is downloaded for pre-cached jobs and for LSZgen requests for these jobs. When a pre-cached job is created:
For task sequences, hashes for all referenced packages and applications are posted to Content Distribution
For applications, hashes for all its child deployment types are posted to Content Distribution.
On the client side:
Where a job is queued, the client queries the management point for content locations. The management point returns a hash for application content types only. If it does not return a hash, the client retrieves it from Content Distribution. Hashes from management points take priority over Content Distribution.
For the Tachyon server hosting Content Distribution, the client fetches the hash during the pre-cache cycle for that particular content.
Nomad clients polling the ContentDistribution database
After running the wizard, Nomad clients that are registered with the ContentDistribution database, and that were included in the selected device collection, will get a pre-cache notification within 24 hours. This notification tells Nomad that it has to process a download job on the content to be cached. The default number of notifications a client processes in one pre-cache poll cycle is 20, but you can modify this by updating the PrecachePollBatchSize registry value.
When is polling disabled?
Nomad clients normally start their polling cycle when the service starts, with a random delay to minimize the possibility of multiple simultaneous polls from different clients. However, polling will not start if any of the following is true:
The Tachyon Platform URL is not set in the Nomad registry.
Nomad is running on a machine using the Win PE operating system.
The Configuration Manager client is not installed on the machine – in order to download pre-cached content, the Nomad service needs to contact the management point and this is only possible if the client is installed locally.
To explicitly turn polling off for a Nomad client set the PrecachePollMinutes registry value to 0.
Nomad pre-caching RBAC support
Nomad pre-caching is tightly integrated into Configuration Manager and honors the permissions and restrictions enforced by role-based access control (RBAC). The following rules are used to determine whether a particular user is allowed to pre-cache a particular content on a particular collection or not:
A user is only allowed to pre-cache a content item if they have the RBAC permissions to deploy it via Configuration Manager.
A user is only allowed to pre-cache to a device collection if they have the RBAC permissions to access that collection.
Note
Configuration Manager (CM) administrators will need to be a member of the Nomad Administrators group, so they can manage Configuration Manager collections, for example create, view and delete pre-cache and paused collections. Refer to Installing the Nomad app and 1E Content Distribution - Nomad roles and permissions for details.
If an administrator does not have the necessary RBAC permissions, they will not be able to see or access any of the Nomad pre-cache features in the Configuration Manager Admin console. Similarly, if they do not have the right permissions to a device collection, that collection will not be available to them in the Targeting screen of the pre-cache wizard.
 |
However, full administrators will see:
 |
The following table provides an overview of the availability of Nomad pre-caching for the built-in Configuration Manager security roles:
Nomad pre-caching support based on the Configuration Manager security role | ||||||
Built-in Configuration Manager Security Roles | SOFTWARE LIBRARY | |||||
APPLICATION MANAGEMENT | Operating System | |||||
Applications | Packages | Driver Packages | Operating System Images | Boot Images | Task Sequences | |
Nomad pre-caching Wizard | ||||||
Application Administrator | Pre-caching available (Access to Collection required) | Not available | ||||
Application Author | Pre-caching Not available (Access to Application Management only) | Not available | ||||
Application Deployment Manager | Pre-caching available (Access to Collection required) | Not available | ||||
Asset Manager | No access to Software Library | |||||
Company Resource Access Manager | ||||||
Compliance Settings Manager | Pre-caching Not Applicable for Software Updates (No Access to Application Management & Operating System, Only Software Updates under Software Library available) | |||||
Endpoint Protection Manager | No Access to Software Library | |||||
Full Administrator | Pre-caching available (Access to Collection required) | |||||
Infrastructure Administrator | Pre-caching not available (Access only to Windows Sideloading Keys in Application Management under Software Library) | |||||
Operating System Deployment Manager | Pre-caching not available | Pre-caching available (access to Collection required) NoteIf Package/Application is part of a task sequence, pre-caching does not happen | ||||
Operations Administrator | Pre-caching available (Access to Collection required) | |||||
Read-only Analyst | Pre-caching not available (Configuration Manager console is in Read-Only mode) | |||||
Remote Tools Operator | No access to Software Library | |||||
Security Administrator | ||||||
Software Update Manager | Pre-caching not applicable for Software Updates (No access to Application Management & Operating System, Only Software Updates under Software Library available) | |||||
Limitations
The following limitations are part of the current implementation of the Nomad pre-caching feature:
Software Updates are not supported by Nomad Pre-caching. Instead, make use of the available and mandatory advertisement dates.
Disabling Nomad Content Registration with the ContentDistribution database prevents Nomad clients from fetching further pre-caching notifications after the first batch of 20.
The Nomad Pre-caching Wizard allows packages that do not have content to be selected for pre-caching.
Delays may be seen when processing Pre-caching notifications for devices with many notifications. By default, Nomad clients will poll the ContentDistribution database once a day. Each time a client polls it will fetch a batch of 20 notifications to process, so for a client with 100 outstanding pre-caching notifications, it will take 5 days for all the notifications to be processed. The time between polls depends on the PrecachePollMinutes setting which can be reduced if there are many pre-caching jobs, though the 24-hour default is recommended.
Pre-caching jobs do not support Nomad additional settings (such as those configurable in the Nomad tab in the Package or Task Sequence properties).
Nomad won't re-download a pre-caching job with updated data format (that is compressed/encrypted), if the content has previously downloaded to the cache. The conversion will happen when ACP triggers the same content.
Nomad synchronization may cause issues if there is any replication issues between the central administration site and primary site.
Workgroup member clients may not be able to use the Nomad Pre-Caching feature, as it requires ContentDistribution registration using their FQDN.
Using network access accounts
Prior to this release, when a download is initiated, Nomad only used the credentials from the first Configuration Manager network access account it found to authenticate, and if that failed, the download stopped. From this release, Nomad cycles through all native Configuration Manager network access accounts to authenticate, thereby reducing the risk of failure.
Note
Nomad won't use network access accounts for SMB downloads from Distribution share. It uses the SYSTEM$account to connect to the package share location.