Tachyon Setup
Using the Tachyon Setup wizard to check prerequisites, configure, install and verify Tachyon Server, install Tachyon applications, and perform various maintenance tasks. To make the process easier for installing Tachyon Platform and its applications, the Tachyon Setup wizard aims to help you:
Prepare for a successful deployment of Tachyon Platform and applications
Find online resources for Tachyon Platform and applications
Check and configure prerequisites
Create the Tachyon Server certificate for use with the Tachyon Server website and the Tachyon Switch
Deploy selected components
Perform post-installation tasks, including configuring the components for interaction with each other
Running validation tests on the completed installation.
Required installation files
The TachyonPlatform zip file can be downloaded from 1E Support Portal (1eportal.force.com/s/article/Tachyon81). Extracting the zip will create a folder structure containing the following, where the files highlighted in bold are required by Tachyon Setup.
| Please refer to:
WarningTachyon Setup is the only supported method of installing, upgrading, and patching a Tachyon server. Installation using standalone msi or msp files is not supported unless advised by 1E, which may be necessary in complex installations, using non-interactive (quiet/silent) command-lines, and may require further post-install configuration steps. | ||||
| This folder contains msi installer files for Tachyon components and applications that will be installed by Tachyon Setup if their prerequisites are met. | ||||
| This folder contains apps folders for Tachyon consumer applications that will be installed by Tachyon Setup if their prerequisites are met. If you do not want to install a Tachyon consumer application, then delete the folder before running Tachyon Setup. Later, if you need to install the Tachyon consumer application, then you can reinstate the folder and install the app using Tachyon Setup as described in Tachyon Setup: Applications maintenance. NoteSome consumer applications are installed using their msi instead of an apps folder, for example AppClarity and Application Migration. | ||||
| These Product Packs are required to support various Tachyon features, for more detail please refer to Tachyon Product Packs reference. If your license permits, you can use additional Product Packs available from Tachyon Exchange (tachyonexchange.1e.com) to meet specific use-cases.
TipThe Tachyon Product Pack deployment tool can be started independently, or at the end of the Tachyon Setup process via the Quick Start: Post-installation checks screen, where the screen contains a link that launches the tool. The Tachyon Setup method of starting the tool is recommended because Tachyon Setup ensures you have the correct permissions to upload the Product Packs. |
Note
You should also have access to the location for the Tachyon.lic file provided with your Tachyon purchase or evaluation.
Warning
Tachyon Setup is the only supported method of installing, upgrading, and patching a Tachyon server.
Installation using standalone msi or msp files is not supported unless advised by 1E, which may be necessary in complex installations, using non-interactive (quiet/silent) command-lines, and may require further post-install configuration steps.
If you are already familiar with earlier versions of 1E Platform Setup
The Tachyon Platform release includes the platform installers and all supported applications bundled together in a single Tachyon Platform download zip. Some applications have other installers for clients, tools, and admin extensions, that are available as separate downloads.
ActiveEfficiency has been replaced by Content Distribution and the Nomad application, so the platform now combines services for both Tachyon and Nomad, as well as other 1E applications.
While these separate installers are still provided under an Installers folder inside the release .zip file, it is not recommended launching them individually. Instead, Tachyon.Setup.exe provides a wrapper around the separate .msi installers. Tachyon Setup presents a sequence of screens where it gathers configuration information, which in many cases is common to more than one installer, and then launches each individual installer with the appropriate parameters. It captures an installation log for each installer, as well as for the Tachyon.Setup executable itself, and then presents a final summary and performs some post-installation configuration tasks.
Running the Tachyon Setup provides some functionality that is not available from the individual .msi installers:
It performs a check for prerequisites and, in most cases, it can install any that are missing
While gathering configuration information, it can perform several validations on the information that you enter
After installation is finished, it can perform several validations on all the installed components
And, most importantly, after deploying the individual components, it can alter the configuration files and tables to fine-tune each component and connect the components to each other. If you were installing the individual .msi files these operations would have to be done manually after installation.
Running Setup
Logon to the server using the Server installation account.
To start the Tachyon Setup wizard, double-click on Tachyon.Setup.exe. It will then display the following screens, you may go directly to any screen by clicking on the list on the left side of the wizard, but for best results we recommend that you follow these in the order they are presented.
Note
Parts of each Setup screen will be greyed out if they are not applicable for the selected configuration type.
Warning
If you are installing a DMZ Server, please refer to Implementing a Tachyon DMZ Server before running Setup.
Tachyon Setup provides a two-stage process to install a new DMZ Server:
run Setup Maintenance on the Response Stack server (specifically the server that hosts the Core which the DMZ Server will connect to) to prepare the Response server and its database, and store details in an ini file
run Setup to install the DMZ Server using the prepared ini file
The two-stage process and its ini file are required, because Tachyon Setup is unable to communicate through the DMZ firewall. In previous versions of Tachyon, the first stage required complex manual configuration.
To upgrade a DMZ Server, you only need to run Tachyon Setup on the DMZ Server, you do not require the ini file.
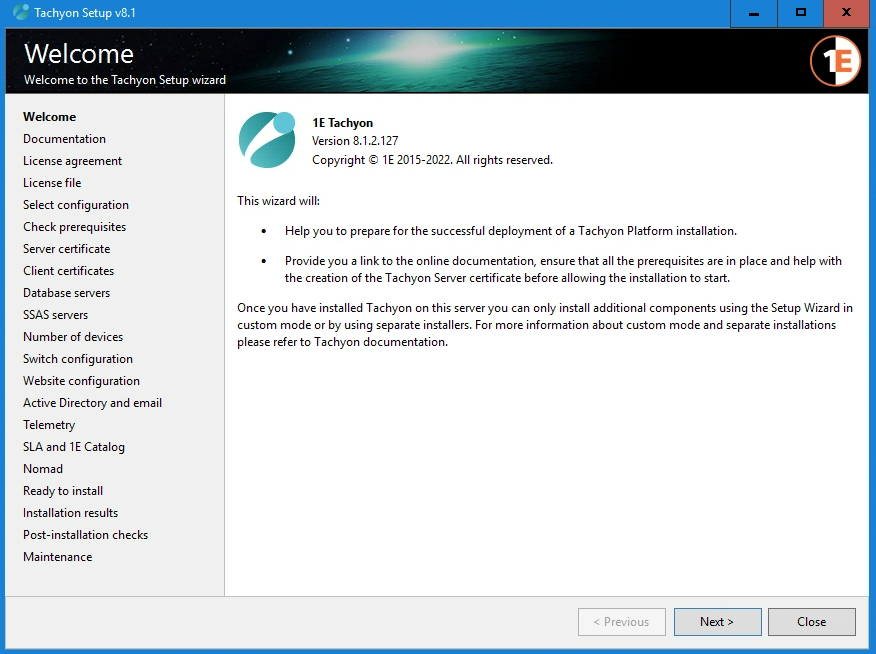
Welcome
This screen provides the version number for Tachyon and outlines what the wizard will do.
It also examines the system for installed versions of the components and displays warning messages in case any of them cannot be upgraded to the versions that you are currently installing.
Click Next to go to the next screen.
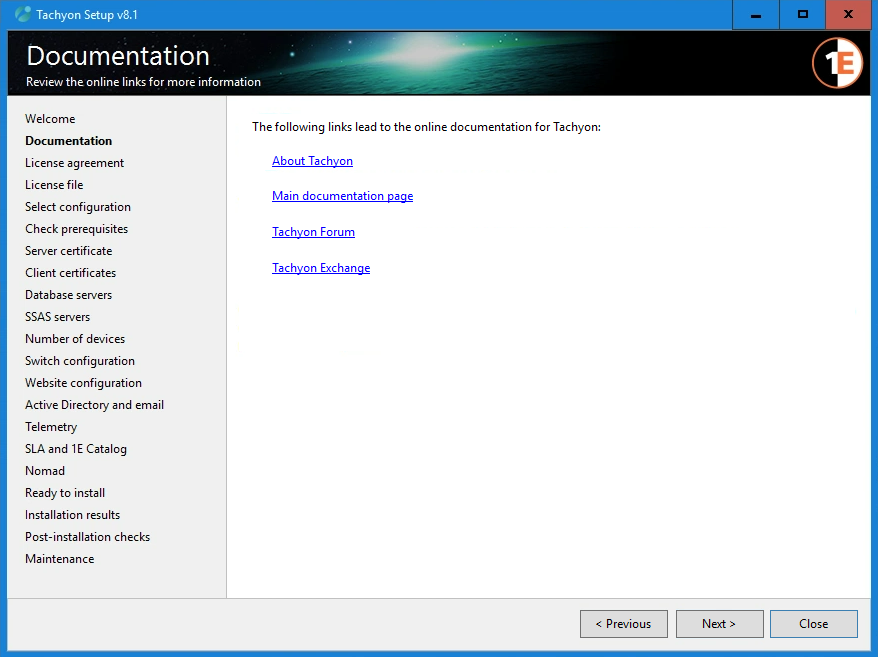
Documentation
This screen provides links to several online resources that provide additional information about how to use and configure Tachyon.
Link | Description |
|---|---|
Links to the Tachyon page on the 1E website. | |
Links to the Welcome page for this documentation on the help.1e.com website. | |
Links to the Tachyon Forum where you can find technical resources, such as: troubleshooting and FAQs. | |
Links to the Tachyon Exchange where you can find 1E and community-supported Tachyon product packs to supplement the Tachyon Product Packs included in Tachyon Platform download zip. |
Once you've finished investigating the online resources, click Next to go to the next screen.
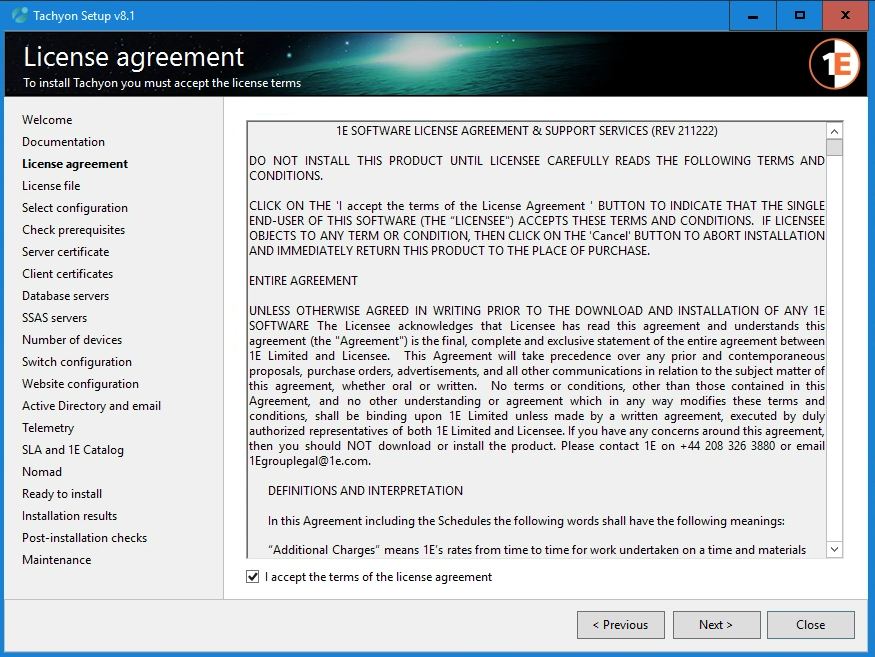
License agreement
You must read and then accept this license information by checking the I accept the terms in the license agreement checkbox. If you continue with the setup without checking the link to this screen will be highlighted in red and you won't be able to install until it is checked.
Click Next to go to the next screen.
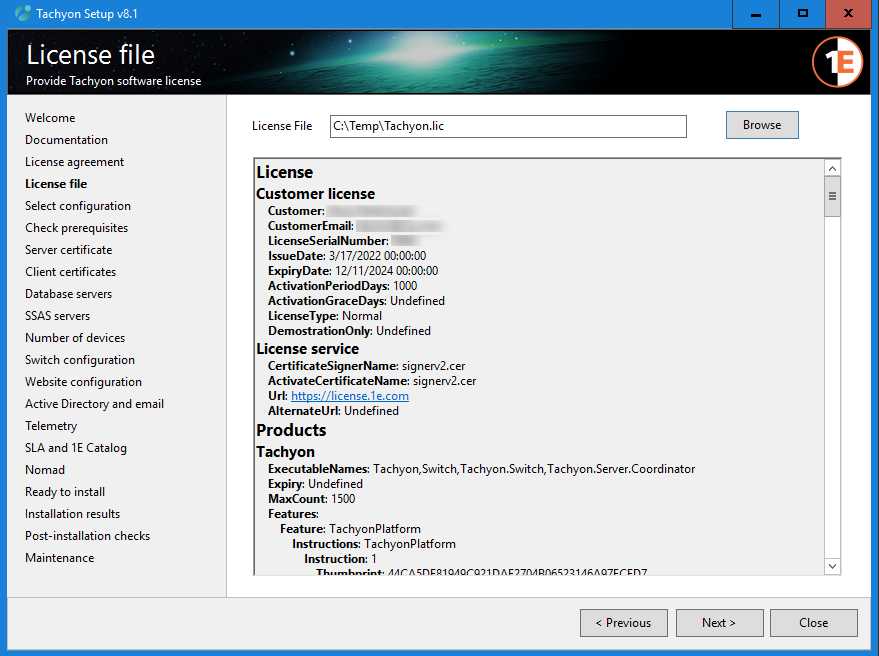
License File
On the License File field screen you must enter the path to a valid 1E license file for Tachyon, obtained from 1E. You can also click Browse to locate the file using a standard file browser.
1E will provide you with a Tachyon.lic license file that defines the applications, tools, and features your Tachyon System is able to use, for how long, and how many devices it supports, this may be an evaluation or subscription license.
The license must be activated. Once activated, it may be used only by the Tachyon System that activated it.
Licenses can be renewed or updated, but if allowed to expire, then the affected products or features will not be usable.
For a new installation, the Tachyon Setup program will let you select the license file from any folder on disk.
For an existing installation, the license file is copied into the folder: %PROGRAMDATA%\1E\Licensing on your Tachyon Server.
Tachyon Setup will attempt to connect to the 1E license service in the 1E cloud, and warn you if a connection cannot be established. The product will still install successfully and you will be able to connect to the Tachyon Portal but you won't be able to fully use the system until you enable communications with the 1E license service.
For more details please refer to the License requirements page.
Note
This screen displays the message "A DMZ Server installation does not require a license file" when installing a DMZ Server, and you have provided an ini file in the Setup folder that has the same name as the server hostname.
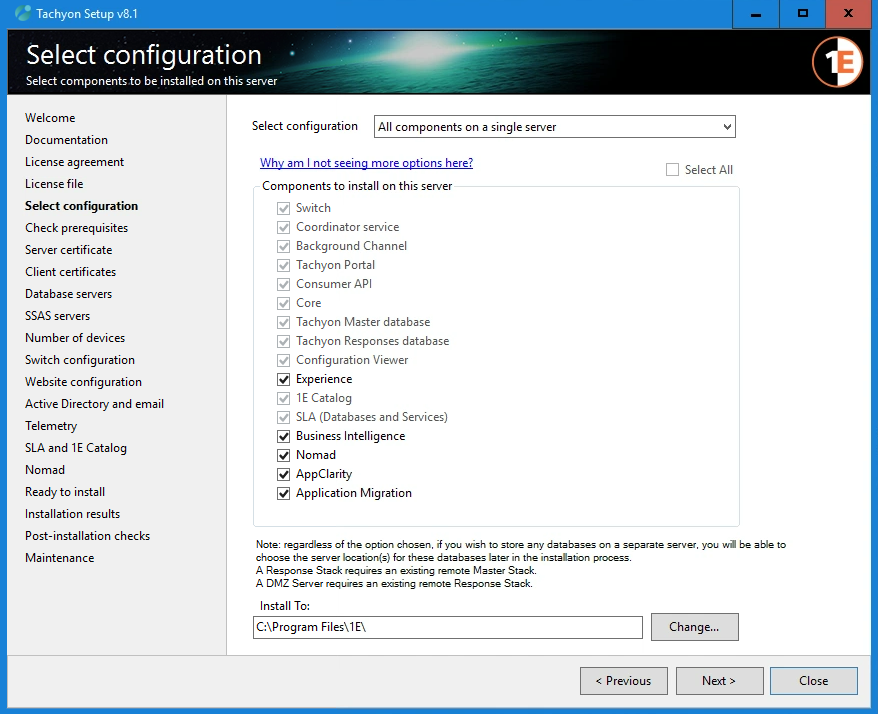
Select configuration
This screen lets you choose between installing all the Tachyon Server components onto a single server or selecting the components you want to install individually.
The options in the Select configuration list are:
All components on a single server (default) - all components required for Tachyon Master and Response Stacks
Tachyon Master Stack - all Tachyon systems require one Master Stack
Tachyon Response Stack - this is required for Real-time features of Tachyon
DMZ Server - this is required to provide Real-time features to Internet-facing clients
Business Intelligence - this is required for Patch Success
Note
This screen automatically selects "DMZ Server" when installing a DMZ Server, and you have provided an ini file in the Setup folder that has the same name as the server hostname. For more detail, please refer to Implementing a Tachyon DMZ Server.
Optional components
When you select All components on a single server, or Tachyon Master Stack, you can also select optional components:
Experience - if you want to use the Tachyon Experience application from 1E
Nomad - if you want to monitor Nomad in your environment, and install Content Distribution to support Nomad features such as Single-Site Download and Pre-cache
Business Intelligence - required for Patch Success
AppClarity
Application Migration
A component is included in this list because its installer .msi file has been detected by Setup in its Installers folder. A component is automatically enabled if its feature is enabled in the License File.
Setup will also automatically install additional applications it detects in its Installers\Apps folder, which includes apps that do not have their own installers, such as Explorer, Guaranteed State, Inventory, and Patch Success. After installation, these apps are visible in the Tachyon Portal if its consumer is enabled in the License File. The Settings app is always available.
Custom configuration
A custom configuration can be made available where you can select the Tachyon components you wish to install on the server. For guidance please contact 1E.
The Tachyon Setup wizard supports the fully configured installation of Tachyon components onto a single server, with optional remote databases.
While you can select to install individual components in isolation, in practice additional configuration will be needed to get those components working together. So, before selecting the custom configuration option, you should contact 1E in order to get an overall picture of the complete custom installation and configuration process.
One particular custom configuration is to install Tachyon to use an existing 1E Catalog server, for example if you have an existing deployment of 1E Windows Self-Service (WSS) solution. Although in this instance you should be aware that SLA Platform cannot be shared between Tachyon and WSS.
Please review Architectural requirements to determine your Tachyon system architecture and decide which configuration to select.
You can also change the folder you wish to install to.
After selecting the installation options you want, click Next.
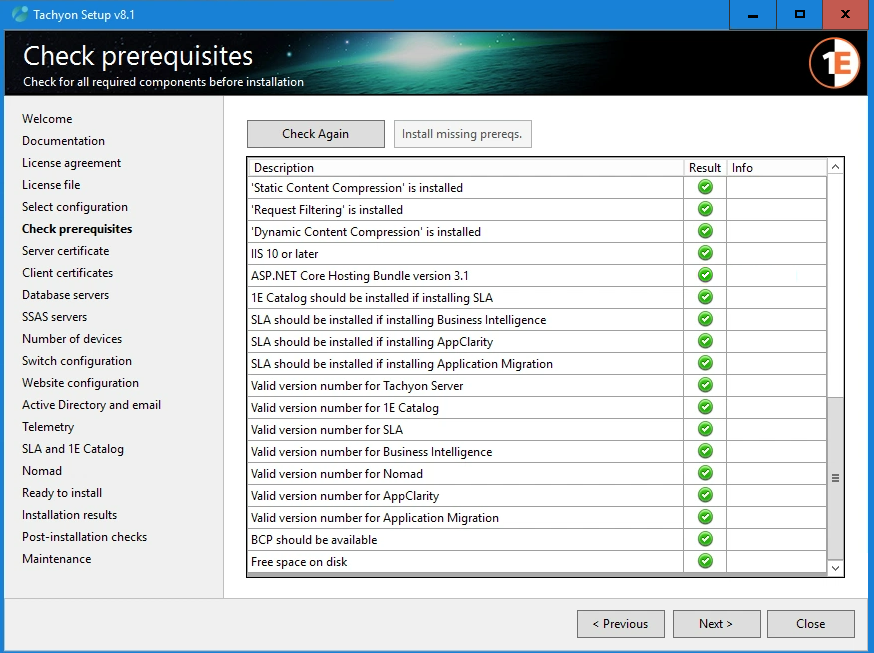
Check prerequisites
This screen performs prerequisite checks on the local server and user account. The list varies depending on which components you selected on the Select configuration screen.
Click Start Checking to start the checks.
If any of the checks fail, Tachyon Setup may be able to install the missing prerequisites. To install these, click the Install missing prereqs. button.
Note
If .NET Framework 4.8 is missing, the checker will stop at this point, for you to select Get & Install. You must reboot after you have installed .NET Framework, and then start Tachyon Setup again.
Note
If there are missing prerequisites which Tachyon Setup is able to install, then the Install missing prereqs. button is enabled. If you click this button, the missing prerequisites will start installation immediately.
Not all prerequisite checks have automated fixes. If your environment fails a check and the Install missing prereqs. button has not been enabled then you will need to install or configure the missing prerequisites by hand.
You can click Check Again to re-run the checks once any remediation steps have been made.

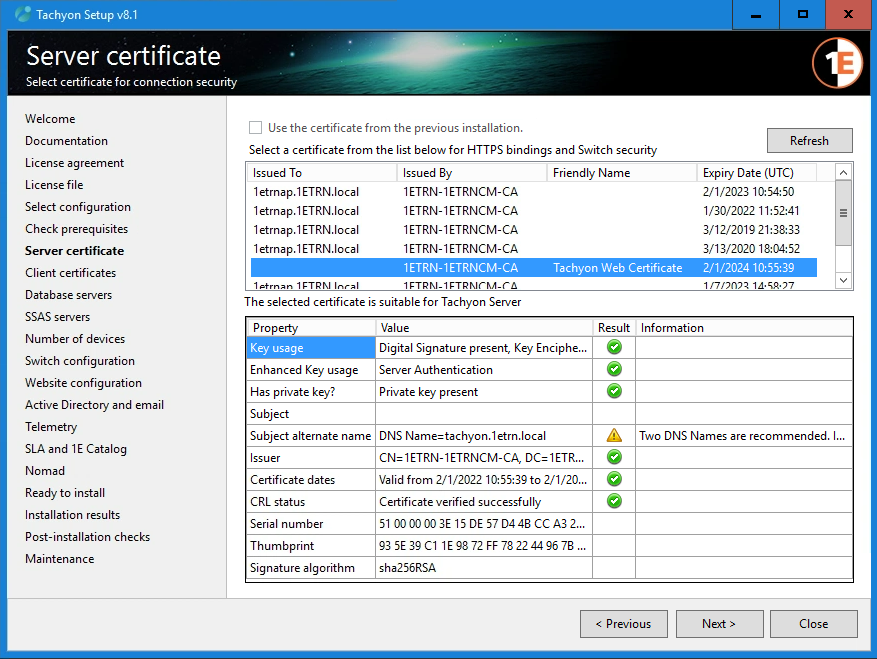
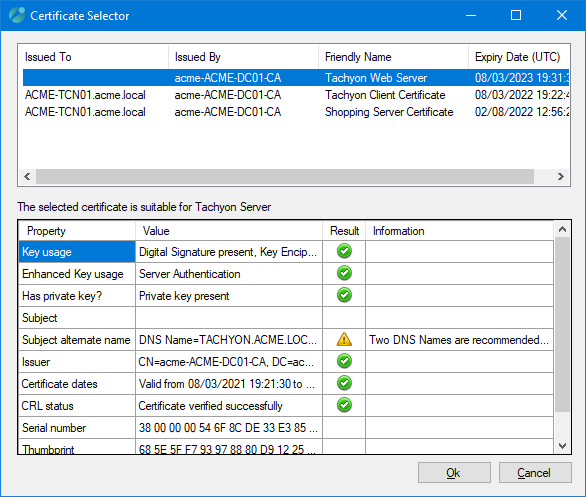
Server certificate
This screen displays a list of certificates from the Local Computer\Personal certificate store, letting you select a specific certificate you want to use for the Tachyon Server website and Tachyon Switches. Tachyon Setup will then evaluate the suitability of the selected certificate.
Note
You may notice a warning for the Subject alternate name indicating that Two DNS Names are recommended. This is a requirement when performing a Tachyon Setup in a DMZ scenario, in all other scenarios, although recommended this warning can be ignored and still result in a successful Tachyon setup.
The option to Use the Switch certificate from a previous installation can be used if you are upgrading Tachyon, or you can choose a different certificate.
If there are issues with the certificate after installation, they may be resolved using the steps in Server installation issues: Verify the Tachyon website HTTPS binding.
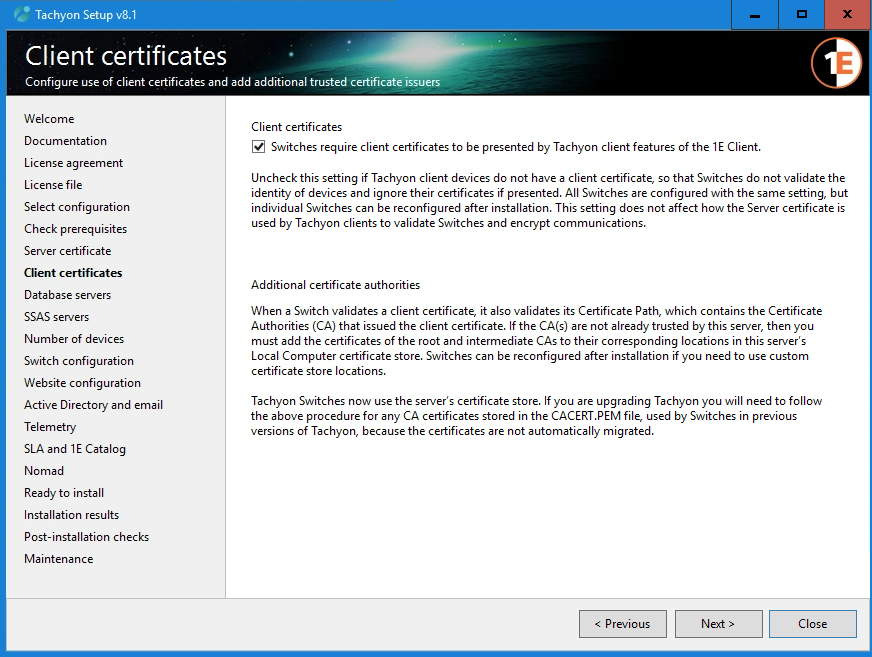
Client certificates
This screen lets you manage the trust(s) between the Tachyon Server and Tachyon clients.
If your Tachyon clients do not have certificates or you do not want to use them, then uncheck Switches require client certificates to be presented by Tachyon client features of the 1E Client. This configures Switch(es) to not require client certificates. Clients will effectively use anonymous authentication.
Note
For a new installation, this setting is checked by default.
For an upgrade, this setting is determined by the current configuration of the Switch(es). If any Switch is configured to require client certificates, then this setting will be checked and re-applied to all Switches.
Please refer to Switch Command Lines if you want to reconfigure switches post-installation.
If you want Tachyon clients to present certificates, that were issued by a different Certificate Authority than the certificate used by Switch(es), then the process described below must be used for each different Certificate Authority.
Create .cer or .pfx files containing the public key of the issuing CA, its root CA, and any intermediate CA in the trust path of the client certificate.
Import the CA files into the corresponding CA stores on the Tachyon server
For more detail about Tachyon client certificates, please refer to Preparation: Tachyon client certificate requirements.
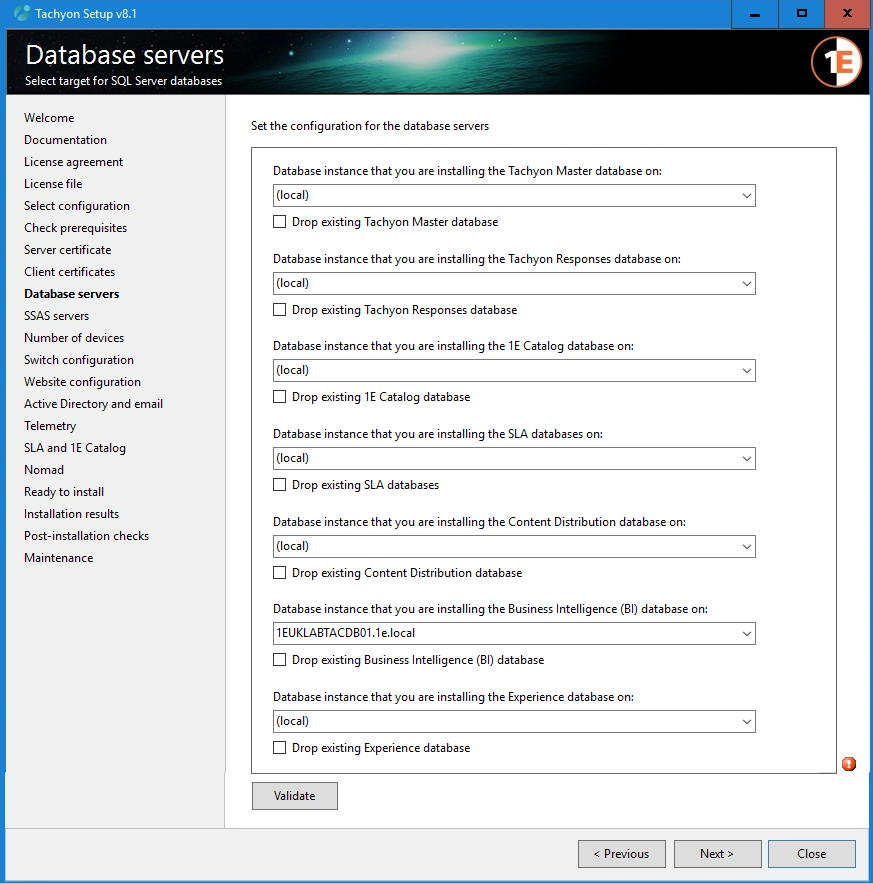
Database servers
On this screen you select the SQL Server instances where you want to install each of the databases that will be deployed:
Tachyon Master
Tachyon Responses
1E Catalog
SLA databases (SLA-Data, SLA-Shared, SLA-Integrate databases must be installed on the same instance)
Content Distribution (required for Nomad)
Business Intelligence (SLA-BI database is required for Patch Success)
Tachyon Experience (required for Experience)
For each database, a combo-box containing a list of available SQL Server instances is displayed. This list of instances is generated as a background task, so it may take a few seconds to populate. It may also return instances that are accessible but not necessarily on the local network. You may select one from the list or type in your own. 1E recommends all databases are installed on the same SQL Server instance.
For each database there is a Drop existing <title> database checkbox, which if you are upgrading you can check to remove any existing data from that database on the specified database server. Obviously you should be careful when checking these checkboxes and sure that you want to continue, as data will be deleted if they are checked and the installation is started.
A Validate button is provided that performs some basic tests to check that the selected SQL instances can be accessed using the current user account.
Once the SQL Server instances have been selected and validated, click Next to continue.
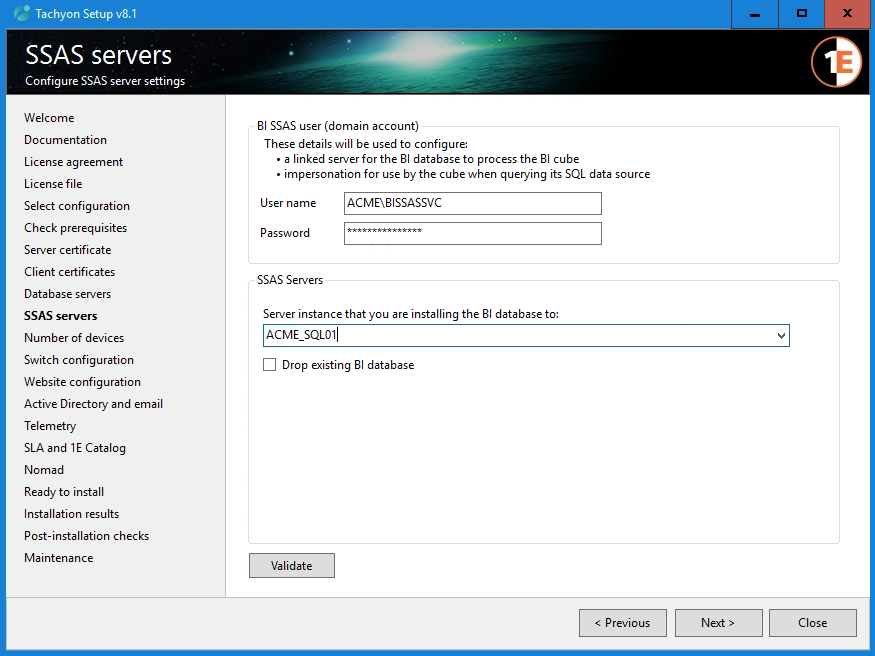
SSAS servers
This screen is only relevant if you selected the option to install Business Intelligence on the Select Configuration screen.
On this screen:
Enter the credentials for the BI SSAS User account, that will be used to connect to the SSAS server (Patch Success only)
Select the server instance for the SQL Server Analysis Service where you want to deploy the Business Intelligence cube (Patch Success only).
The Validate button lets you performs some basic tests (but not a full validation of permissions and functionality on the SSAS server).
Once you have entered and validated the settings, click Next to continue.
Note
For more information about the BI SSAS User account, please refer to Directory requirements: Service accounts.
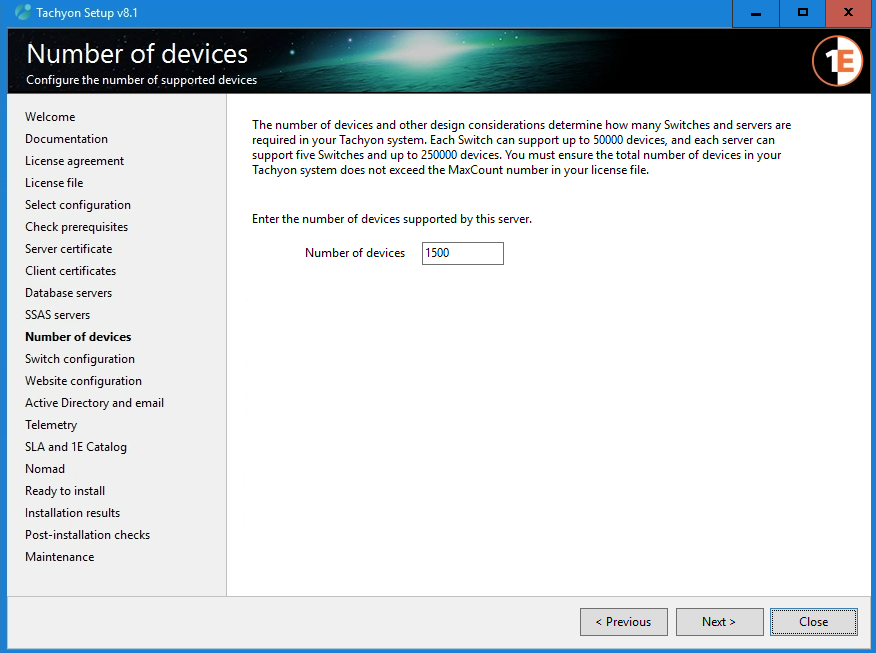
Number of devices
Enter the number of devices supported by this server.
The number of devices supported by a Tachyon Server determines the number of Switches configured on the server.
The range is 1 to 250,000; default is 1,000.
A single server with suitable resources can support up to five Switches and up to 250,000 devices, with each Switch supporting up to 50,000 devices. Additional servers or configuration may be required according to the design of the Tachyon system. The total number of devices supported across the Tachyon system must not exceed the license file allocation.
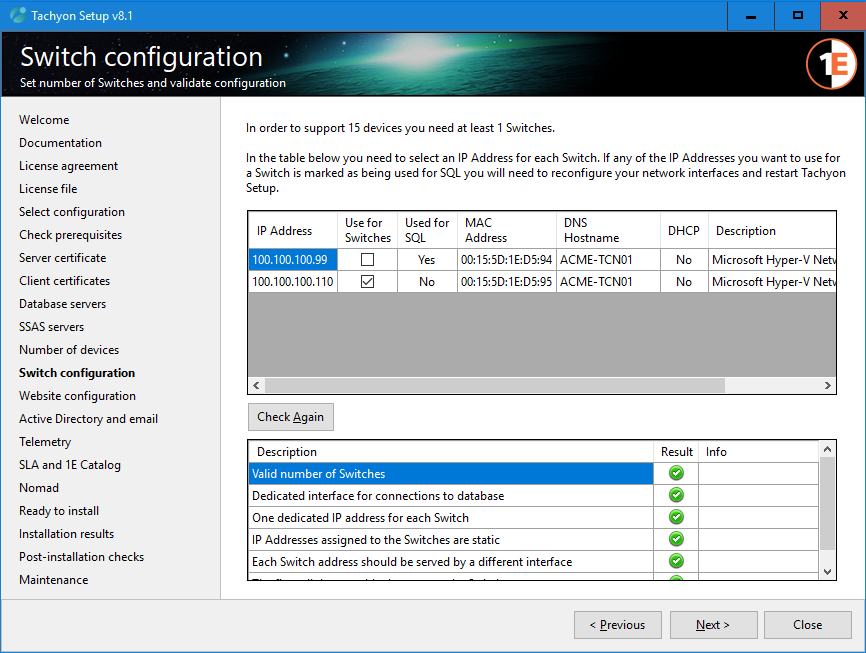
Switch configuration
This screen is only relevant if you selected one of the following configuration options:
All components on a single server
Tachyon Response Stack
DMZ Server
This screen displays a list of IP Addresses that can be assigned to each Switch in your configuration. Tachyon Setup will estimate how many Switches are required for the number of devices selected in the earlier setup screen and try to assign an IP Address for each. You will need to confirm or change which IP Address is used by each Switch.
IPv6
The screen only displays a list of IPv4 IP Addresses available on the server. If you need to use IPv6 and have a functioning IPv6 network infrastructure then please contact 1E for further advice on how to use this screen.
Ideally to maximize the performance of Tachyon you should have the following configuration:
You have enough Switches configured to support the selected number of devices - you can add additional Switches by clicking extra checkboxes, if you have enough IP Addresses configured
One interface per Switch - interfaces may have more than one associated IP Address, so you'll need to check the MAC Addresses to make sure that the IP Addresses are on different interfaces
An additional interface if you have a remote SQL Server, necessary to separate incoming and outgoing response traffic, using a persistent route as described in Preparation: Configuring a persistent route for SQL traffic.
However, in a lab or other environment which has less than 500 devices, you can have all components using a single IP Address.
If you have a local installation of SQL Server, then Used for SQL will show No for all IP Addresses, and you can select whichever IP Address you wish to for each Switch.
If you are using a remote SQL Server, then Used for SQL will show Yes for the IP Address, which the validation process used in the Database servers screen to validate the connection to the SQL Server you selected for the Responses database. If this is not the same interface you prepared a persistent route for, then you will need to configure the persistent route, and restart Tachyon Setup. The validation checks do not test if the route is persistent.
For an installation with multiple Switches, aside from each selected IP Address, all Switches will have an identical configuration.
Click Validate to check that your selection conforms to the best practice rules for configuring switches.
Once the selection has been validated, click Next to continue.
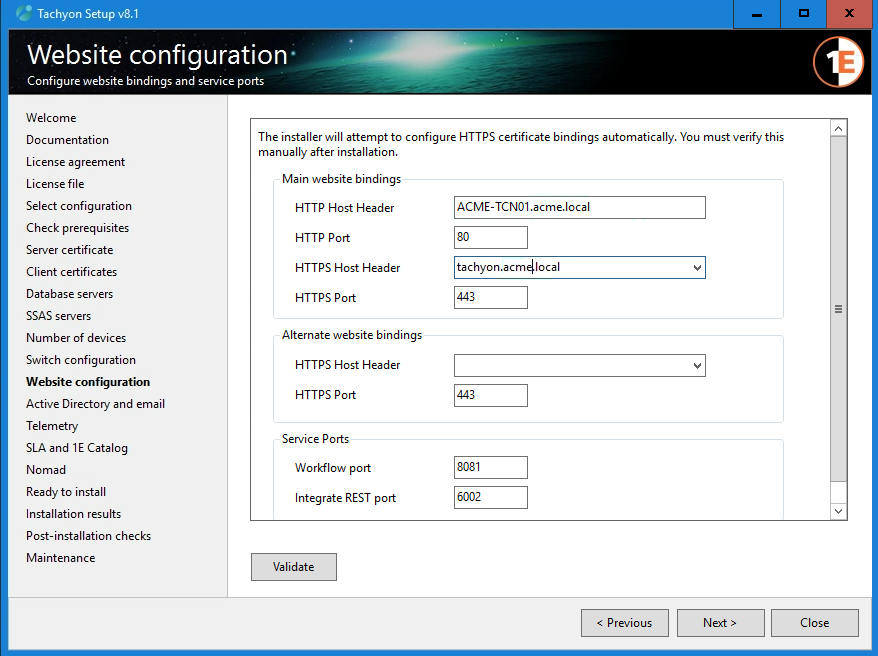
Website configuration
Confirm that the details are correct on this screen. If the defaults are changed, then ensure you use the Validate button.
Note
Many of the fields on his screen are pre-populated with defaults ports, and DNS Names found in certificate selected in the Server certificate screen.
When installing a DMZ Server, and you have provided an ini file in the Setup folder that has the same name as the server hostname, the fields are pre-populated using values from the ini file. You should not change these. For more detail, please refer to Implementing a Tachyon DMZ Server.
Parameter | Description |
|---|---|
HTTP Host Header (Main binding) | Sets the host header used by the main HTTP binding for the Tachyon website. Default value is set to the FQDN for the local computer, and should not need to be changed. NoteIf you are upgrading from SLA Platform 3.3 and SLA Platform had a custom host header defined for HTTP, you should change the host header to the host header used for the SLA Platform website. If the Tachyon website uses a different host header port than was previously used by SLA Platform and you are using Application Migration, the Application Migration Task sequence step and Shopping integration will stop working until these URLs are updated. |
HTTP Port (Main binding) | Sets the port used by the main HTTP binding for the Tachyon website. Together with the Host Header and IP Address, these bindings uniquely identify the Tachyon Website which Tachyon Switches use to connect to the Tachyon Core. Default value 80. NoteIf you are upgrading from SLA Platform 3.3, you should change this port to the HTTP port previously used for the SLA Platform website (default 8080). If the Tachyon website uses a different port than was previously used by SLA Platform and you are using Application Migration, the Application Migration Task sequence step and Shopping integration will stop working until these URLs are updated. |
HTTPS Host Header (Main binding) | Sets the host header used by the main HTTPS binding used by the Tachyon website. This is used by:
NoteThe FQDN used for the host header must be included as a Subject Alternate Name (SAN) in the Web certificate. Default value TACHYON.<domainFQDN> |
HTTPS Port (Main binding) | Sets the port used by the main HTTPS binding used by the Tachyon website. Default value 443. |
HTTPS Host Header (Alternate binding) | Sets the host header used by the alternate HTTPS binding used by the Tachyon website. This is mandatory when installing on a DMZ Server, and used for the internal-facing network. Optionally used by the following if you do not want the main HTTPS binding, for example if you want to use a different HTTPS port:
NoteIf used, the FQDN used for the host header must be included as a Subject Alternate Name (SAN) in the Web certificate. NoteIf you are upgrading from SLA Platform 3.3 and SLA Platform had a custom host header defined, you should change the host header to the host header used for the SLA Platform website. If the Tachyon website uses a different host header port than was previously used by SLA Platform and you are using Application Migration, the Application Migration Task sequence step and Shopping integration will stop working until these URLs are updated. |
HTTPS Port (Alternate binding) | Sets the port used by the alternate HTTPS binding used by the Tachyon website. This is used by Tachyon clients to communicate with the Tachyon server using the background channel. Default value 443. NoteIf you are upgrading from SLA Platform 3.3, you should change this port to the HTTPS port previously used for the SLA Platform website (default 8443). If the Tachyon website uses a different port than was previously used by SLA Platform and you are using Application Migration, the Application Migration Task sequence step and Shopping integration will stop working until these URLs are updated. |
Workflow port | Sets the port used by HTTPS binding of the Coordinator Workflow module. This is separate from the Tachyon Website. Tachyon Setup suggests 8081 by default, and should not need to be changed. |
Integrate REST port | This is used internally by the SLA Integrate services. You will normally not need to change it, unless it conflicts with any other service that is already using the same port. |
After installation, you will need to manually verify the certificate bindings, as described in Tachyon Server post-installation tasks.
A Validate button is provided that performs some basic tests to check that the selected HTTP/HTTPS Host Header and ports as well as the service ports do not conflict with each other and that the addresses are resolvable from DNS.
When all the settings have been made and validated, click Next to continue.
Note
Versions of Tachyon Setup before 5.2 had an option to change the IP Address used by the Main website bindings for HTTPS and HTTP. By default, this is * for both bindings. You can manually edit the bindings later using IIS Manager if you need to change the IP Address for any binding.
Active Directory and email
On this screen you enter the details for the Active Directory search method. You can choose to enable email and enter the SMTP server details. When email is enabled you can also select if you want two-factor authentication to be enabled.
Parameter | Description | ||||
|---|---|---|---|---|---|
Active Directory | A list of Active Directory URLs. Tachyon services locate users and computers and membership of security groups by querying a semi-colon delimited list of Active Directory GC and/or LDAP URLs.
Any domain which contains Tachyon servers, users or groups must:
The default GC:// is sufficient for a Tachyon Server in a simple Active Directory environment of one forest which has a Global Catalog. You can include, but it is not required, the name of the server's local domain or root domain, for example: GC://acme.local To add support for a remote forest which has its own GC, you would for example have GC://acme.local;GC://nadir.local and so forth adding the root domain of any other forests to the list of GC URLs. If you prefer to use LDAP, or there are difficulties with trusts between forest domains, then you would create a list of LDAP URLs including all domains that have Tachyon users and groups, as well as domains in which a Tachyon server resides. For example: LDAP://acme.local;LDAP://pop.acme.local;LDAP://rock.acme.local;LDAP://country.acme.local;LDAP://nadir.local;LDAP://disco.nadir.local You can mix GC and LDAP URLs, but you should avoid mixing LDAP URLs that are also resolved by a GC URL. For example: GC://;LDAP://nadir.local;LDAP://disco.nadir.local The Coordinator Workflow module queries AD for email details of Tachyon users, and the Consumer API queries AD for security details of Tachyon users to support Role-Based Access Control. | ||||
Enable Email | Determines whether Tachyon email features are available. Tachyon uses email for
For guidance about using non-default SMTP settings, see Email and 2FA requirements. If email notifications need to be disabled after installation, then see Tachyon Server post-installation tasks: Changing the SMTP Host configuration. To configure Telemetry after installation, please refer to Tachyon Server post-installation tasks: Enabling or disabling Telemetry. | ||||
SMTP Server | Sets the FQDN of the SMTP relay/gateway. If the FQDN needs to be changed after installation, then see Tachyon Server post-installation tasks: Changing the SMTP Host configuration. | ||||
SMTP Port | Sets the port used to connect to the SMTP relay/gateway. Default is 25. If the port needs to be changed after installation, then see Tachyon Server post-installation tasks: Changing the SMTP Host configuration. | ||||
Mail from | Sets the mail-from email address used by the Tachyon Server when it sends emails. For guidance about the Mail-From address see Email and 2FA requirements: Mail-From address. | ||||
Enable two-factor authentication | Determines whether Tachyon uses two-factor authentication. If email is disabled then so is two-factor authentication which relies on email. |
A Validate button is provided that performs some basic tests to check that the selected SMTP server and port can be contacted.
Click Next to continue.

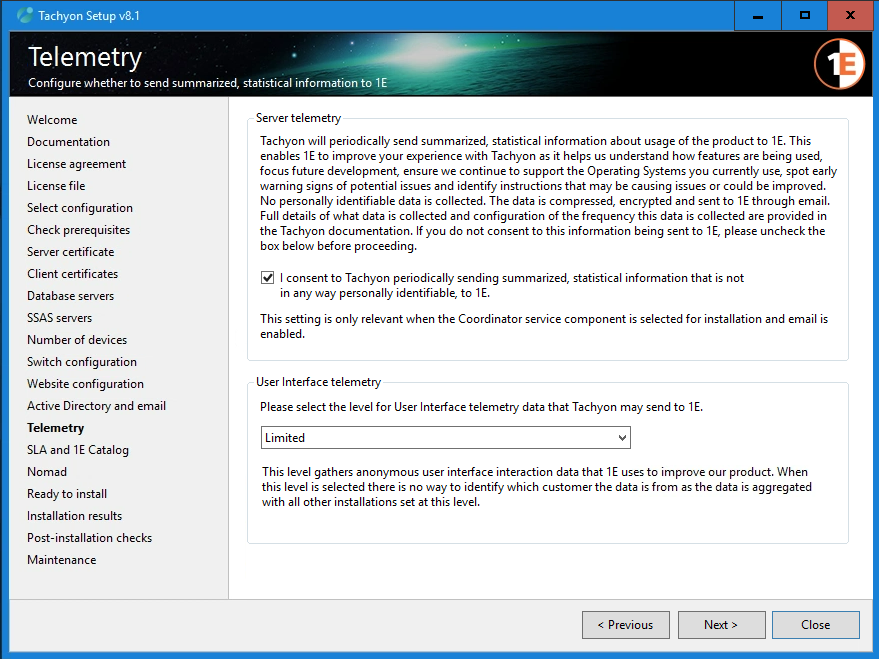
Telemetry
On this screen you choose whether to enable or disable the Tachyon telemetry features.
To enable the Server telemetry feature check the I consent... checkbox.
To enable the User Interface telemetry feature select one of the following from the drop-down:
Limited
Basic
Full
Click Next to continue.
Note
Server telemetry
Tachyon will periodically send summarized, statistical information about usage of the product to 1E. This enables 1E to improve your experience with Tachyon as it helps us understand how features are being used, focus future development, ensure we continue to support the Operating Systems you currently use, spot early warning signs of potential issues and identify instructions that may be causing issues or could be improved. No personally identifiable data is collected. The data is compressed, encrypted and sent to 1E through email.
Full details of what data is collected is provided here: Server telemetry data.
How to configure the frequency this data is sent to 1E is described here: Tachyon Server post-installation tasks: Enabling or disabling Telemetry features.
The Server Telemetry feature is only available if the following dependencies are enabled:
Coordinator service - this component is enabled when installing a Tachyon Master Stack, visible in the Select configuration screen
Email - this is an optional feature in Active Directory and email screen.
1E Cloud connection from the server must also be whitelisted, as described in Network requirements: Whitelisting connections to 1E Cloud.
You can change the configuration after installation, as described in Tachyon Server post-installation tasks: Enabling or disabling Telemetry features.
Note
User Interface telemetry
User Interface telemetry reports how the user interface is used, and data is sent directly from administrator browsers to the 1E Cloud.
1E Cloud connection from administrator browsers must also be whitelisted, as described in Network requirements: Whitelisting connections to 1E Cloud.
You can change the configuration after installation, as described in Tachyon Server post-installation tasks: Enabling or disabling Telemetry features.
There are three options available, they all gather user interaction data that 1E uses to improve Tachyon and its associated applications. They are described in the following table:
Option | Description |
|---|---|
Limited | When this option is selected the data is aggregated and anonymized so there is no way to identify the customer the data is being collected from. |
Basic | The data collected for this option is the same as the Limited option, except that it is associated with the name used in the Tachyon License file. The 1E customer success team can use this information to help improve the experience for our customers. |
Full | The data collected for this option is the same as the Basic option, except that it also records a unique identifier for each user. The user's name is not captured. The 1E product team can use this information to see how users are interacting with our products and understand their user journeys. |
Note
User Interface Telemetry
License Name is Customer name as it appears in the Tachyon license file and License information page.
Unique user ID is a random ID number representing an individual user.
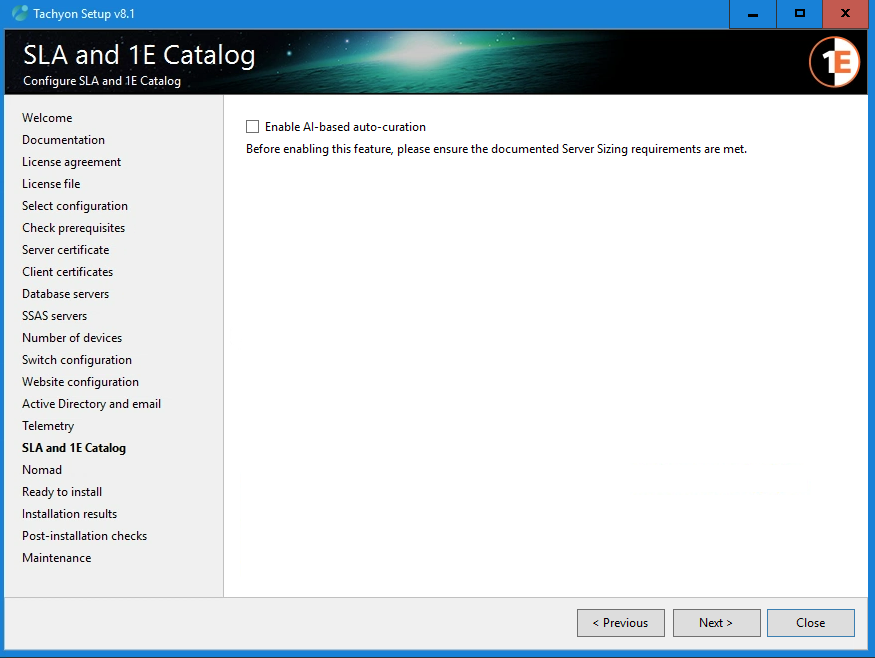
SLA and 1E Catalog
Tachyon 5.0 introduced a new AI Powered Auto-curation feature that automatically recognizes software without the need to first create mapping rules in the 1E Catalog. This means you can have greater visibility of software installed across your organization. Please refer to AI Powered Auto-curation for more details, this also includes information on how to enable the feature post setup.
On this screen, you can configure whether the AI Powered Auto-curation feature is enabled or not. If you are installing or upgrading 1E Catalog using Tachyon Setup, enabling this will also configure 1E Catalog to download the files needed by SLA to support this feature.
To enable the feature, check the Enable AI-based auto-curation checkbox.
Click Next to continue.
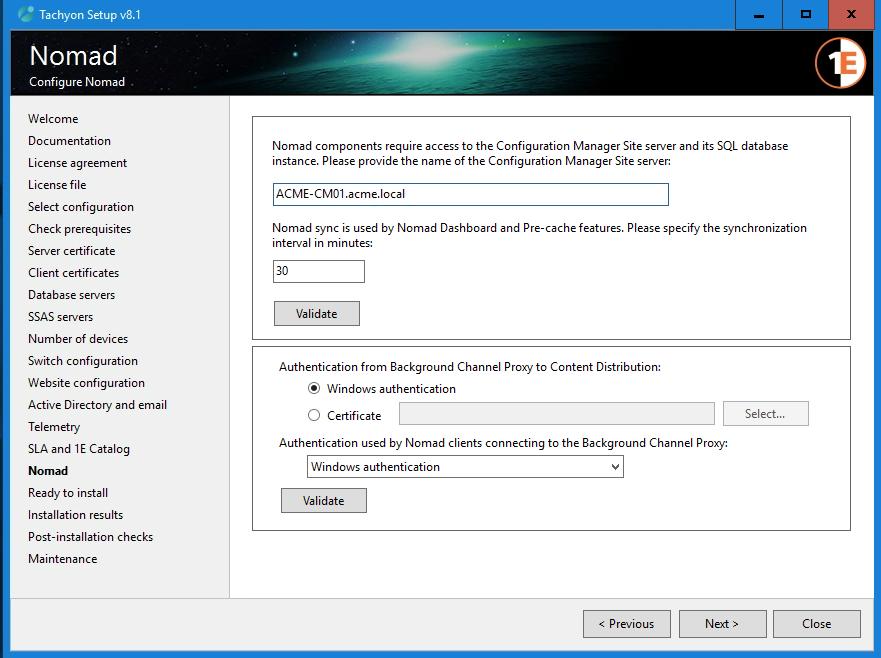
Nomad
If you have selected the option to install Nomad on the Select Configuration screen, then you need to set the following options.
Name for the Configuration Manager Site server | Provide the name for the Configuration Manager Site server. Doing this allows the Configuration Manager database to be located using a WMI query - for this to work the installation account must have Read-only Analyst permissions in Configuration Manager. Use the Validate button to verify the specified Configuration Manager Site server can be located, and that the installation account has the required permissions in Configuration Manager. NoteIf your installation account does not have sysadmin rights on the SQL instance that hosts the Configuration Manager database, then you will see a popup warning you that Setup could not validate the membership of the Tachyon server's computer$ account in the ConfigMgr_DViewAccess localgroup. This is not a fatal error as long as you are sure the account is a member of the localgroup. If you proceed without this, then you will need to add it later to ensure Nomad functions correctly. For more information about the ConfigMgr_DViewAccess localgroup, please refer to Preparation: Microsoft Endpoint Configuration Manager preparation. |
Synchronization interval | Select a synchronization interval in minutes that governs how often the Nomad app and Pre-cache feature synchronizations will happen. This is set to 30 minutes by default. |
You must also configure the following authentication options. If you do not configure these settings now, then you will have to manually configure them later if you decide to use Nomad.
Authentication from Background Channel Proxy to Content Distribution | Determines how the Background Channel Proxy communications with the Content Distribution application. You have the following options:
| ||||||
Authentication used by Nomad clients connecting to the Background Channel Proxy | Determine how the Nomad clients will authenticate with the Background Channel Proxy. This is separate from the Nomad client configuration for Peer-to-Peer communication features. You have the following choices:
|
Note
The Background Channel provides a reverse proxy feature which forwards communications from Nomad clients to the Content Distribution API. This is how Content Distribution provides a more distributed solution and support for DMZ, than the ActiveEfficiency features provided by previous versions of Tachyon Platform and used by legacy Nomad clients.
Click Next to continue.
Ready to Install
To start the Tachyon Server installation with the information you have provided, click the Install! button at the bottom of the Ready to Install screen.
Note
Because you can click on this screen at any point, the Install! button is only enabled when enough information and responses have been provided on the other screens to enable installation to start. For example, one of the conditions is that until you respond by checking the I accept the terms in the license agreement checkbox on the License Agreement screen the Install! button will not be enabled. Other items such as selecting a valid Tachyon Server website certificate are also requirements.
Once you have reached this stage and no errors are displayed, a file named Tachyon.Setup.ini is written to disk in the same folder that contains Tachyon.setup.exe. This .ini file contains the selections that you made up to this point, and can be used to re-launch the installer without having to re-enter all the settings.
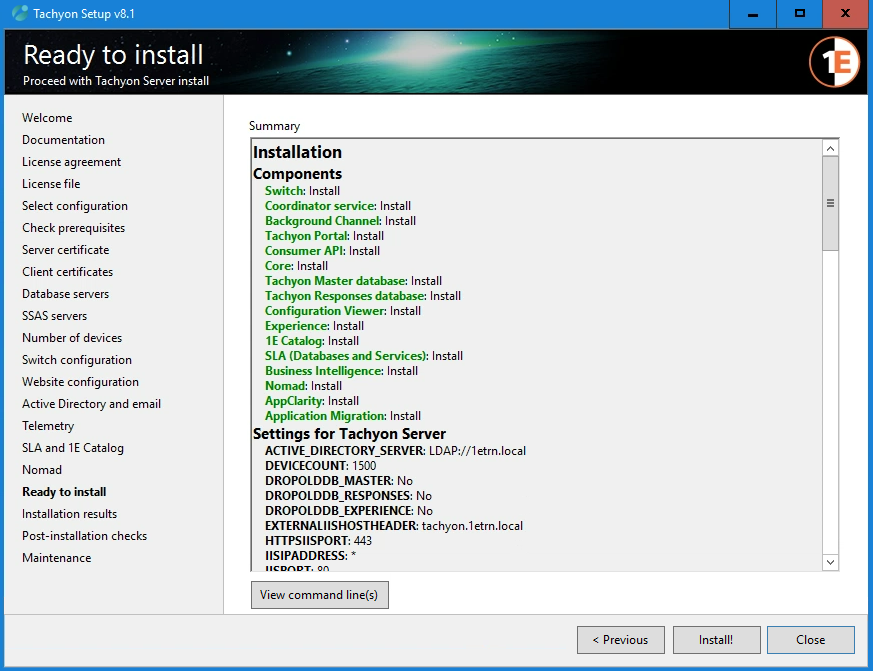
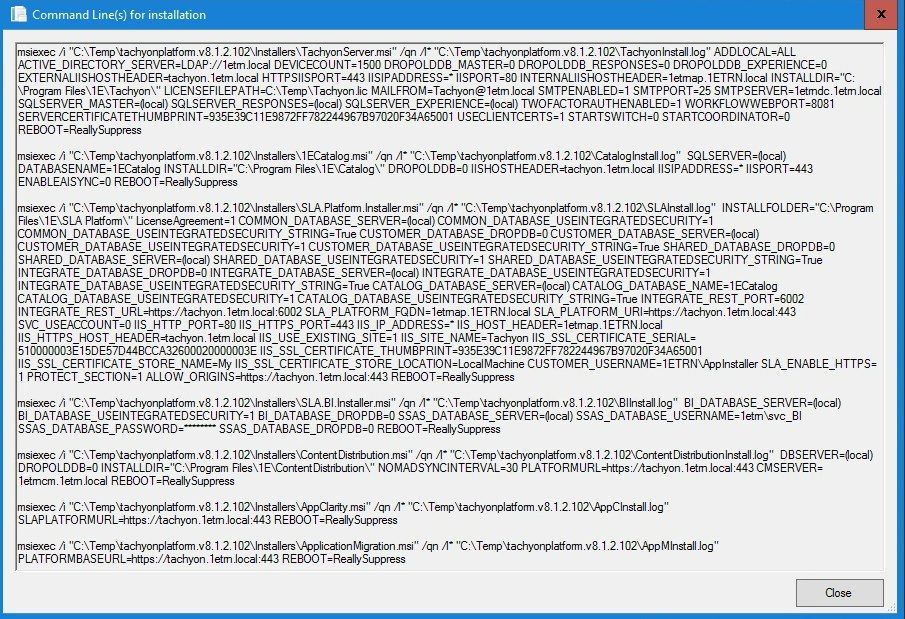
When you've configured the installation properties you can click the View command line button to view the command lines used to run the various .msi installers to install Tachyon Server along with the bundled components with the settings you have entered.
Warning
Tachyon Setup is the only supported method of installing, upgrading, and patching a Tachyon server.
Installation using standalone msi or msp files is not supported unless advised by 1E, which may be necessary in complex installations, using non-interactive (quiet/silent) command-lines, and may require further post-install configuration steps.
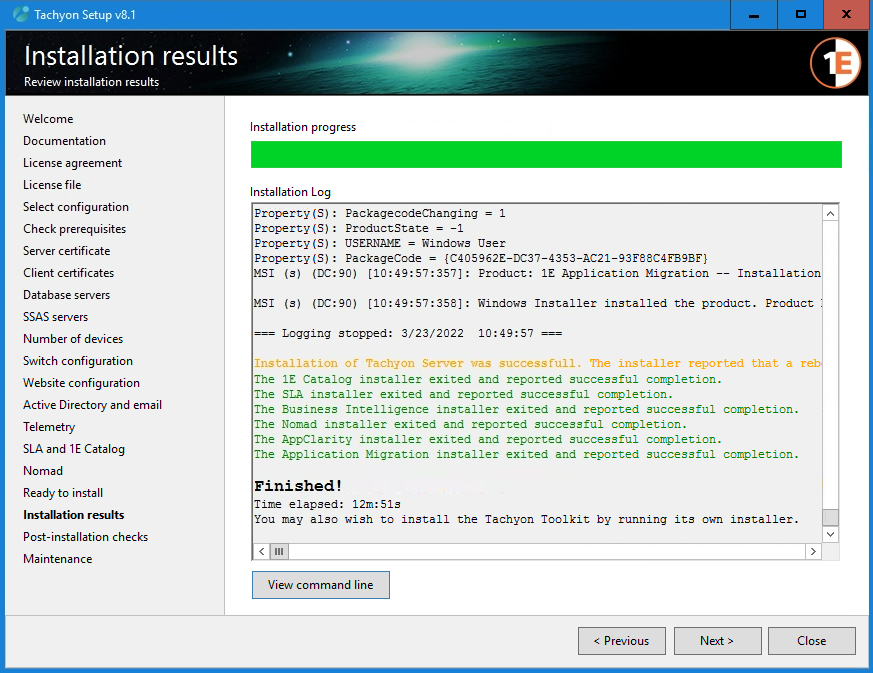
Installation results
This screen displays the current progress of the Tachyon installer. The installer log information is displayed as it occurs in the Installation Log window.
Once installation has finished successfully the message: The installer exited and reported successful completion, will be displayed in the Installation Log window.
You can find the installation logs on disk (*.log) in the same folder from where Tachyon.Setup.exe was launched.
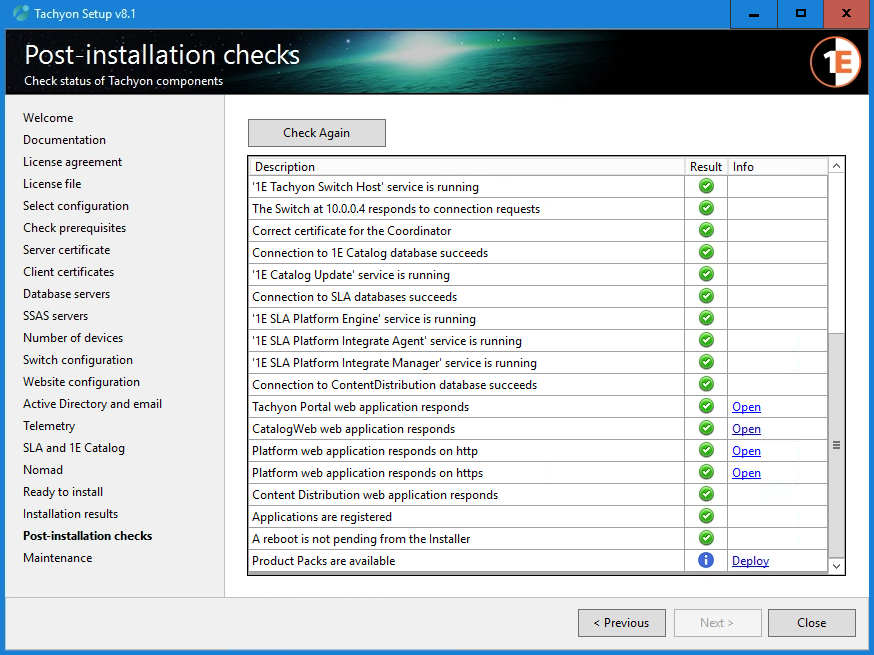
Post-installation checks
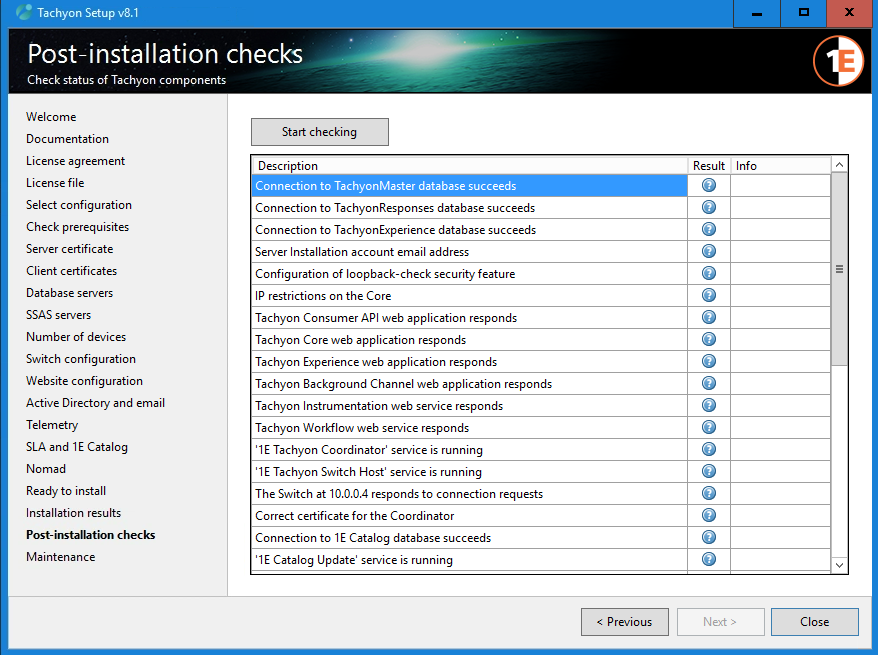
After an installation, you can opt to run the Post-installation checks by clicking on the Start checking button.
The aim is to achieve 100% check success results in the Result column. If any of the checks fail, look for additional information in the Info column. You can use this information to help troubleshoot the issue in combination with the Troubleshooting section and/or share with 1E Support.
One of the post-installation checks is: Tachyon Portal web application responds. When this check passes, it will display a link Open which can be used to start the default browser and connect to the Tachyon Portal.
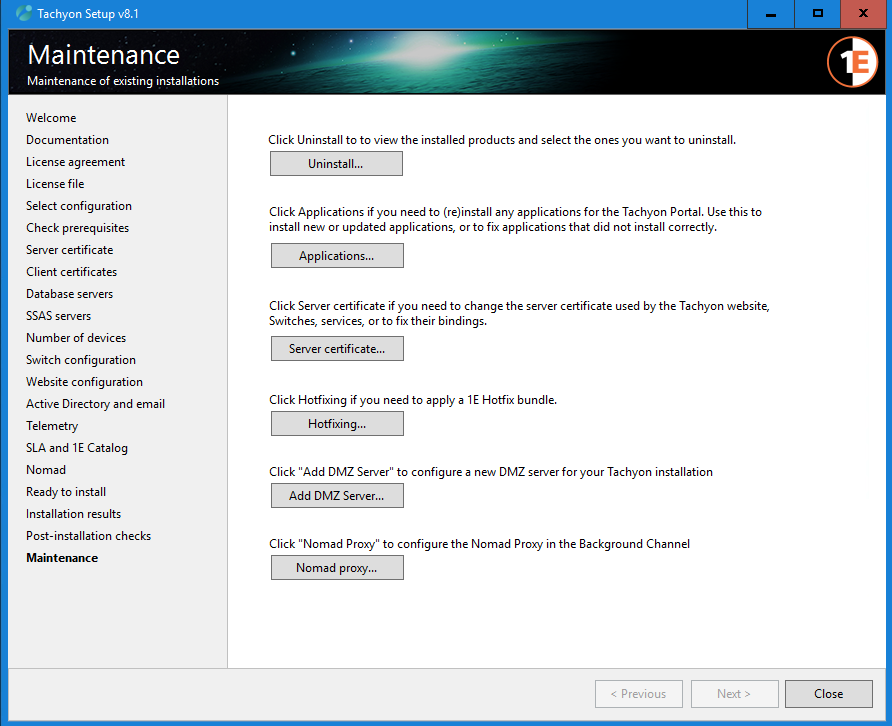
Maintenance
You can start Tachyon.Setup and click directly on the Maintenance link in the left-hand menu.
Maintenance
From this screen, you can:
Uninstall... all or part of the components deployed from Tachyon Setup
Install, re-install or update any Applications...
Change the Server certificate... used by the Tachyon website, switches and services - or fix their bindings
Upload and apply a 1E Hotfix bundle by clicking on Hotfixing...
Note
A 1E Hotfix bundle contains the latest hotfixes for a specific version of Tachyon. It consists of a manifest XML file containing commands, and files which can include scripts as well as MSP files, to patch one or more components on the local server.
If you need to apply a 1E Hotfix bundle, then you must run Tachyon Setup on all of your Tachyon servers, according to the instructions provided with the bundle.
See screens below:
Uninstall
From this screen you can uninstall all or some of the components deployed from Tachyon Setup.
Note
Tachyon Setup is the recommended method of uninstalling all or individual components instead of using the Windows Control Panel.
This is because Tachyon Setup can undo any changes that were done after deploying the components, which would not be undone by the standard application uninstaller. For an example of why this is important, see the information box below.

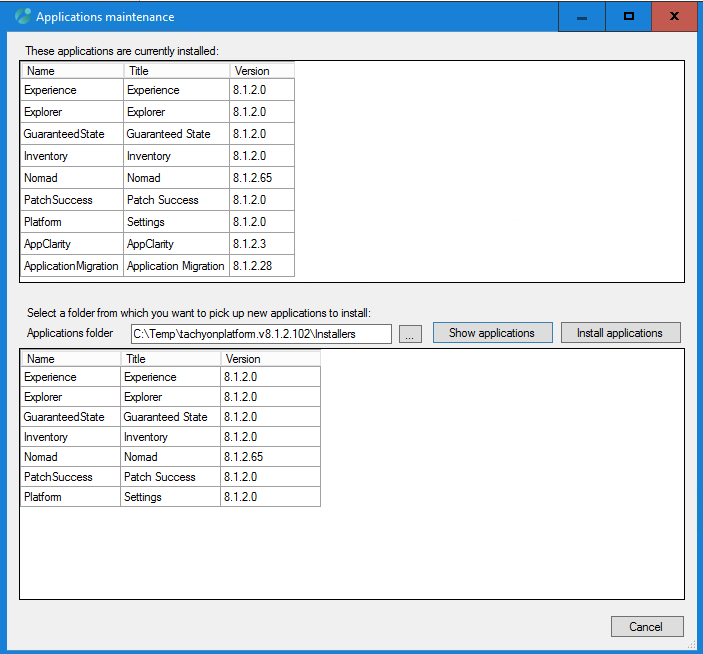
Applications maintenance
In this dialog, you can select to install or re-install any Applications used by the Portal.
The top grid displays the Applications that are already installed and their versions.
To install or re-install applications:
Type or select a folder in the Applications folder field.
Click on Show Applications. Doing this displays all the Tachyon Applications that are found under the selected folder. The Applications are displayed using the Name, Title and Version.
Click on Install Applications. This will upload the Applications into the server:
Any new uploaded Applications are added to the server
Any uploaded Applications with a newer version number will replace the older versions
If any uploaded Application has a version number prior to an existing Application, an error message will be generated and the version will not be downgraded.
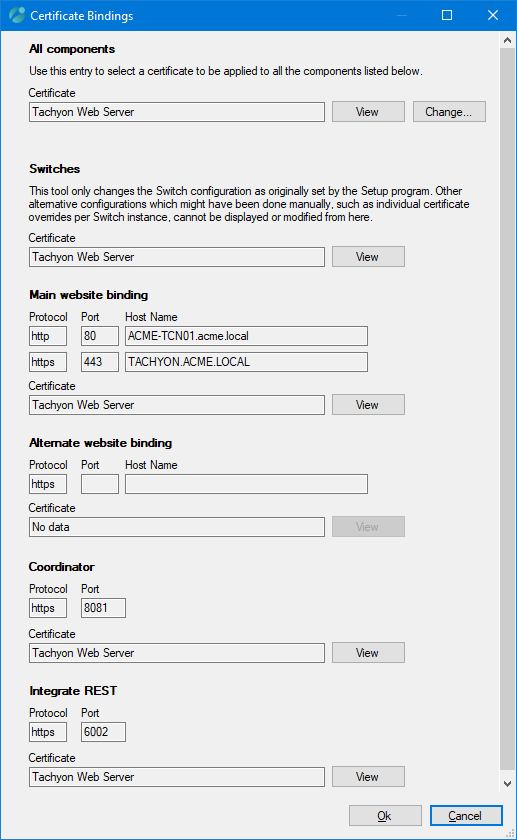
Certificate Bindings
In this dialog, you can change the certificate bindings used by the Switches, Website, Coordinator and Integrate REST components. Currently, you can apply one certificate across all the components.
To view the certificate that is being used, click on any of the View buttons.
To change the certificate, click the Change... button and select the new certificate from the Certificate Selector dialog subsequently displayed. This dialog behaves in a similar way to the Server certificate screen displayed earlier in Tachyon Setup. When you've finished making the selection in the Certificate Selector, click Ok.
The certificate displayed for the Switches, Website, Coordinator and Integrate REST components will then change to the selected certificate. Click Ok in the Certificate Bindings dialog to apply the changes.
Upload and apply a 1E Hotfix bundle
In this dialog, you can locate and upload a 1E Hotfix file, using the ... button at the end of the File to upload: field.
After locating the file, you click on the Go! button.
The Process Log will show the result of attempting to upload the Hotfix.
Note
A 1E Hotfix bundle contains the latest hotfixes for a specific version of Tachyon. It consists of a manifest XML file containing commands, and files which can include scripts as well as MSP files, to patch one or more components on the local server.
If you need to apply a 1E Hotfix bundle, then you must run Tachyon Setup on all of your Tachyon servers, according to the instructions provided with the bundle.

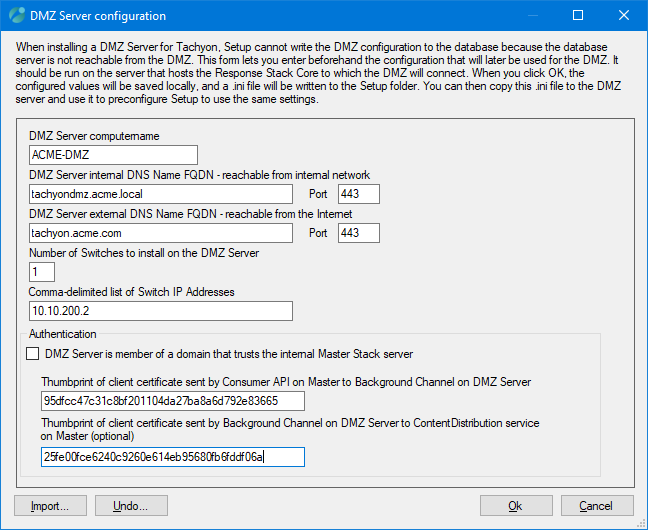
Add DMZ Server
This screen is stage 1 of a two-stage process for installing DMZ Server. Please refer to Implementing a Tachyon DMZ Server for how to use this screen and install a DMZ Server.
Note
Tachyon Setup provides a two-stage process to install a new DMZ Server:
run Setup Maintenance on the Response Stack server (specifically the server that hosts the Core which the DMZ Server will connect to) to prepare the Response server and its database, and store details in an ini file
run Setup to install the DMZ Server using the prepared ini file
The two-stage process and its ini file are required, because Tachyon Setup is unable to communicate through the DMZ firewall. In previous versions of Tachyon, the first stage required complex manual configuration.
To upgrade a DMZ Server, you only need to run Tachyon Setup on the DMZ Server, you do not require the ini file.
The Import... button allows you read an existing or prepared ini file.
The Undo... button allows you to undo the changes written to the database, so that your server will not think anymore that you have a DMZ Switch and Background Channel. This can be useful if you find an error in your configuration or if you need to revert the changes to avoid the errors mentioned above, or if you wish to uninstall your DMZ server. If you need to do this after you have already closed the form, you can re-open it and reload the information by means of the Import... button.
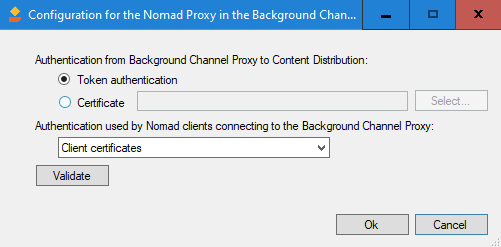
Nomad Proxy
Selecting the Nomad Proxy option lets you configure the communications and certification options for the Background Channel Proxy.
Authentication from Background Channel Proxy to Content Distribution | Determines how the Background Channel Proxy communications with the Content Distribution application. You have the following options:
| ||||||
Authentication used by Nomad clients connecting to the Background Channel Proxy | Determine how the Nomad clients will authenticate with the Background Channel Proxy. This is separate from the Nomad client configuration for Peer-to-Peer communication features. You have the following choices:
|
Note
The Background Channel provides a reverse proxy feature which forwards communications from Nomad clients to the Content Distribution API. This is how Content Distribution provides a more distributed solution and support for DMZ, than the ActiveEfficiency features provided by previous versions of Tachyon Platform and used by legacy Nomad clients.
Next Steps
After installation, you should do the following: